
Chapter 7. Creating and managing persistent storage
This chapter covers
- Using the system:admin user to administer your cluster
- Attaching persistent storage to applications
- Making remote storage available in containers
- Removing persistent storage from applications
- Cleaning up persistent storage volumes
We haven’t discussed what your first application deployed in OpenShift does. We noted that the application you deployed using the image-uploader source code was written in PHP. Here are a few additional application features:
- Uploads images from your workstation
- Shows you those images as thumbnails on the application page
- Verifies that what you’re uploading is a standard image format
- Shows you the full-size image when you click it
It’s not the next Instagram, but it’s simple enough to live in a couple of files of source code and be easy to edit and manipulate in OpenShift. You’ll use that simplicity to your advantage in this chapter.
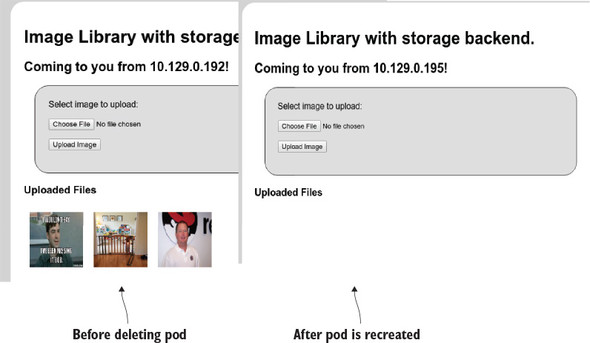
If you haven’t already, go ahead and test out the Image Uploader app, and upload an image or two (or three or four or more!) into the app-cli deployment. After you do, your application should look similar to figure 7.1. For the examples, I uploaded a meme, a picture of my super-cute daughter, and a photo of Dan Walsh.
Figure 7.1. Image Uploader after a few pictures have been uploaded. I (Jamie) uploaded a meme, a picture of my daughter, and a photo of Dan Walsh.

Dan is a consulting engineer at Red Hat who joined the company in 2001. Since 2013, Dan has been the lead engineer for Red Hat’s container engineering teams. He’s also the lead engineer for most of the development around SELinux.
In addition to being a pretty smart guy and a key voice in how containers are changing IT, he’s funny, massively sarcastic, and a bit of a hero to both authors. You can find Dan on Twitter at @rhatdan.
When you deploy an application in OpenShift, you can specify the minimum number of replicas (instances of the application) to keep running at all times. If you don’t specify a number (you didn’t for app-gui or app-cli), OpenShift will always keep one instance of your application running at all times. We initially discussed this in chapter three, and used the feature in chapters four, five, and six. None of these application replicas had persistent storage. If one of the application pods was deleted or scaled down, any data it had written would be gone as well. Let’s test this out.
7.1. Container storage is ephemeral
After logging in to your OpenShift cluster from the command line with the oc command-line tool, you can use the oc get pods command to get a list of all of your running pods:
$ oc login -u dev -p dev https://ocp-1.192.168.122.100.nip.io:8443     1
Login successful.

You have one project on this server: "image-uploader"

Using project "image-uploader".
$ oc get pods
NAME              READY     STATUS      RESTARTS   AGE
app-cli-1-2162x   1/1       Running     1          23h                 2
app-cli-1-build   0/1       Completed   0          23h
app-gui-1-build   0/1       Completed   0          23h
app-gui-1-gk5j4   1/1       Running     1          23h                 3
- 1 Logging in to OpenShift successfully from the command line
- 2 The app-cli application container
- 3 The app-gui application container
The output shows the app-cli and app-gui application containers. It also lists the completed pods created by the build config and used to create the custom image for each deployment. The pod for the app-cli application is app-cli-1-2162x.
Let’s put this idea to the test. You can use the oc delete pod command to delete the app-cli pod. To do so, use the command followed by the name of the pod you want to delete:
$ oc delete pod app-cli-1-2162x
pod "app-cli-1-2162x" deleted
After deleting the pod, check back using the oc get pods command. Here you can see that OpenShift created a new pod with a new name for app-cli almost immediately:
$ oc get pods
NAME              READY     STATUS      RESTARTS   AGE
app-cli-1-build   0/1       Completed   0          1d
app-cli-1-d2mcd   1/1       Running     0          11s           1
app-gui-1-build   0/1       Completed   0          1d
app-gui-1-gk5j4   1/1       Running     1          1d
- 1 Newly created app-cli pod, which has been up for 11 seconds according to the AGE data column
As we mentioned earlier in this chapter, OpenShift always makes sure the desired number of copies of your application are running. When you delete a pod, OpenShift detects that the desired state (one pod running at all times) isn’t being met, so it creates a pod using the application image created when you deployed app-cli. In this case, the AGE field indicates that the pod had already been up and running for 11 seconds by the time the oc get pods command was run again.
This would seem to be the answer to just about everything, wouldn’t it? Applications automatically restart themselves when they go down. But before we close up shop, take another look at your app-cli application’s web page.
In figure 7.2, you can see that the images uploaded earlier are nowhere to be found. When a pod is deployed in OpenShift, the storage that’s used for the filesystem is ephemeral: it doesn’t carry over from one instance of the application to the next. When applications need to be more permanent, you need to set up persistent storage for use in OpenShift.
Figure 7.2. After app-cli was automatically redeployed by OpenShift, the isolated storage for the new container didn’t include the uploaded images from the previous deployment, because containers don’t have persistent storage by default.
7.2. Handling permanent data requirements
In OpenShift, persistent storage is available for data that needs to be shared with other pods or needs to persist past the lifetime of any particular pod. Creating such permanent storage in pods is handled by persistent volumes (PVs). PVs in OpenShift use industry standard network-based storage solutions to manage persistent data. OpenShift can use a long list of storage solutions to create PVs, including the following:
- Network File System (NFS)
- HostPath (local directories on the OpenShift nodes)
- Gluster
- Ceph RBD
- OpenStack Cinder
- AWS Elastic Block Storage (EBS)
- Google Cloud Platform (GCP) Persistent Disk
- iSCSI
- Fibre Channel
- Azure Disk
- Azure File
In the next section, you’ll configure a PV in OpenShift using NFS.
7.3. Creating a persistent volume
PVs in OpenShift rely on one of the listed types of network storage to make the storage available across all nodes in a cluster. For the examples in the next few chapters, you’ll use a PV built with NFS storage. Appendix B takes you through setting up and exporting an NFS volume on your OpenShift master. It also offers up pointers if you prefer to use a different NFS server. If you haven’t already, go ahead and walk through that now.
As we discussed early in chapter 2, your OpenShift cluster is currently configured to allow any user to log in to the system, as long as their password isn’t empty. Each new username is added to a local database at first login. You created a user named dev and used that user to create a project and deploy the app-cli and app-gui versions of the Image Uploader application. The dev user can create projects and deploy applications, but it doesn’t have the proper permissions to make cluster-wide changes like attaching a PV. We’ll take a much deeper look at how users are managed in OpenShift in chapter 9, but to create a PV, you need administrator-level access to your OpenShift cluster.
7.3.1. Logging in as the admin user
When an OpenShift cluster is installed, it creates a configuration file for a special user named system:admin on the master server. The system:admin user is authenticated using a specific SSL certificate, regardless of the authentication provider that’s configured. System:admin has full administrative privileges on an OpenShift cluster. The key and certificate for system:admin are placed in a Kubernetes configuration file when the OpenShift cluster is installed; this makes it easier to run commands as system:admin. To run commands as system:admin, you need to copy this configuration file to the local system where you’ve been running oc commands.
Copying the admin user configuration
The configuration file for system:admin is created on the master server at /etc/origin/ master/admin.kubeconfig. You can copy this file into your home directory on your workstation; this process will vary slightly depending on your workstation’s operating system. Your admin.kubeconfig file should look similar to the example in the following listing.
Listing 7.1. Example admin.kubeconfig file (certificate and key fields trimmed)
apiVersion: v1
clusters:
- cluster:
    certificate-authority-data:
    LS0tLS1CRUdJTiBDRVJUSUZJQ0FURS0tL...
    server: https://ocp-1.192.168.122.100.nip.io:8443
  name: ocp-1-192-168-122-100-nip-io:8443
contexts:
- context:
    cluster: ocp-1-192-168-122-100-nip-io:8443
    namespace: default
    user: system:admin/ocp-1-192-168-122-100-nip-io:8443
  name: default/ocp-1-192-168-122-100-nip-io:8443/system:admin
current-context: default/ocp-1-192-168-122-100-nip-io:8443/system:admin
kind: Config
preferences: {}
users:
- name: system:admin/ocp-1-192-168-122-100-nip-io:8443
  user:
    client-certificate-data:
    LS0tLS1CRUdJTiBDRVJUSUZJQ0FURS0tL...
    client-key-data: LS0tLS1CRUdJTiBSU0EgUFJJVkFURSBLR...
The system:admin user is a special user account in OpenShift. Instead of relying on the configured identity provider, it uses a TLS certificate for authentication. This certificate was generated when you deployed your cluster. The certificate and user information are stored in /etc/origin/master/admin.kubeconfig—that’s why copying this file to your workstation allows you to run administrator-level commands on your OpenShift cluster. The root user on your master server also has this configuration file as its default OpenShift setup, which means any user who has root access to your master server can administer your entire OpenShift cluster.
After you’ve copied admin.kubeconfig to your workstation, you can use it with the oc command to create a PV, as we’ll discuss in the next section.
7.3.2. Creating new resources from the command line
OpenShift makes extensive use of configuration files written in YAML format. YAML is a human-readable language that’s often used for configuration files and to serialize data in a way that’s easy for both humans and computers to consume. YAML is the default way to push data into and get data out of OpenShift.
Note
If you’d like to dig a little deeper into what YAML is and how it works, a great place to start is www.yaml.org/start.html.
In chapter 2, we talked about the OpenShift resources that are created when an application is built and deployed. These resources have documented, YAML-formatted templates so you can create and manage the resources easily. In later chapters, you’ll use several of these templates to create or change resources in OpenShift. For the application deployments you created in chapter 2, these templates were automatically generated and stored in the OpenShift database when you ran the oc new-app command.
In this chapter, you’ll use a template to create a PV. To make this a little easier, we’ve created an organization on GitHub with repositories for each chapter: https://github.com/OpenShiftInAction. You can download the chapter 7 repository from https://github.com/OpenShiftInAction/chapter7; other chapters have similar names. If you haven’t already, clone this repository on to your workstation. It contains ready-made templates that you can use for the rest of the examples in this chapter.
Note
The source code that you used to create the Image Uploader application is also in this GitHub organization, at https://github.com/OpenShiftInAction/image-uploader. In addition, it’s posted on the book’s website at www.manning.com/books/openshift-in-action.
The template to create your first PV is detailed in listing 7.2. It contains several key pieces of information about the PV you’ll create with it, including the following:
- The type of resource the template will create. Different resources have different template configurations. In this case, you’re creating a PV.
- A name for the resource to be created. This example is pv01. In the next section, you’ll create pv01 through pv05.
- Storage capacity for the PV that will be created, measured in GB in this example. Each of the PVs you create in this chapter will be 2 GB.
- Access mode for the PV that will be created.
- NFS path for this PV.
- NFS server for this PV. If you used another IP address for your master, or used another server, you’ll need to edit this value.
- Recycle policy for the PV that will be created. These policies dictate how data will be disposed of once it’s no longer being used by an application. We’ll discuss this in the next section.
Listing 7.2. Template to create a PV using the NFS volume created in appendix B
apiVersion: v1
kind: PersistentVolume                             1
metadata:
  name: pv01                                       2
spec:
  capacity:
    storage: 2Gi                                   3
  accessModes:
  - ReadWriteMany                                  4
  nfs:
    path: /var/nfs-data/pv01                       5
    server: 192.168.122.100                        6
  persistentVolumeReclaimPolicy: Recycle           7
- 1 Type of resource template
- 2 Name of the PV
- 3 Capacity for this PV
- 4 Access mode for the PV
- 5 Mount path for the NFS volume on the NFS server
- 6 NFS server address
- 7 Volume reclaim policy
In the next section, you’ll create several PVs using the NFS volumes that you created in appendix B.
7.3.3. Creating a physical volume
To create a resource from a YAML template, use the oc create command along with the -f parameter, which specifies the template file you want to process. To create the PV for this example, you’ll use the template named pv01.yaml, which is in the chapter7 repository you cloned onto your workstation earlier in this chapter.
Note
Creating PVs is one of the few tasks that isn’t available in the current OpenShift web interface. To create and manage PVs, the command line is the place to start.
Because PVs are cluster-wide resources, you can also use the --config parameter to specify the admin.kubeconfig file that you copied from your master server earlier. You can put all of this together by running the following command:
$ oc --config ~/admin.kubeconfig create -f pv01.yaml
persistentvolume "pv01" created
In appendix B, you created five NFS exports. Each of these will be mapped to a PV; there are templates for these additional PVs in the chapter7 repository.
To create the other PVs, you can repeat the previous step for each pvX.yaml file in the repository. Or you can run them all as a quick Linux one-liner like the following:
for i in $(seq 2 5);do oc --config ~/admin.kubeconfig create -f pv0$i.yaml;done
You can confirm that the parameters from your template were correctly interpreted by running the oc get pv command using the admin.kubeconfig configuration to get information about all active PVs:
$ oc --config ~/admin.kubeconfig get pv
NAME   CAPACITY ACCESSMODES  RECLAIMPOLICY   STATUS     CLAIM  REASON  AGE
pv01   2Gi      RWX          Recycle         Available                 15s
pv02   2Gi      RWX          Recycle         Available                  9s
pv03   2Gi      RWX          Recycle         Available                  8s
pv04   2Gi      RWX          Recycle         Available                  8s
pv05   2Gi      RWX          Recycle         Available                  8s
Next, let’s look at some of those parameters, to help better understand their options and benefits.
Deciding on a storage access mode
Each PV’s template specifies an access mode. An access mode for a PV describes how it can be used by other OpenShift resources. There are three options for the access mode:
- Read/Write once (RWO)— This volume can be mounted as read/write by a single node in the OpenShift cluster. This is useful when you have workloads where a single application pod will be writing data. An example is a relational database, when you know that all the writes to the persistent data will come from a single pod.
- Read-only many (ROX)— Volumes with this access mode can be mounted as read-only by multiple OpenShift nodes. An example of where this type of access mode is useful is when a horizontally scalable web application needs access to the same static content, such as images.
- Read/Write many (RWX)— The RWX access mode is the option you’ll use for the PV in this chapter. It allows multiple nodes to mount this volume, read from it, and write to it. The Image Uploader application is a good example. When you scale up the Image Uploader application in the next chapter, multiple nodes will need to be able to read and write to the persistent storage you’re about to create.
Currently, only GlusterFS and NFS support the RWX access mode.
Selecting a reclaim policy
A reclaim policy dictates how a PV handles reclaiming space after a storage claim on the PV is no longer required. Two options are available:
- Retain— With this reclaim policy, all data is retained in the PV. Reclaiming space is a manual process.
- Recycle— This reclaim policy automatically removes data when the claim is deleted. You’ll use this option for the PV created in this chapter. This policy is available only for NFS and HostPath PVs.
Tip
In OpenShift 3.7 and above, the recycler for NFS has been deprecated in favor of dynamic provisioners. More information about using dynamic provisioners to create storage on demand is available at https://docs.openshift.org/latest/install_config/persistent_storage/dynamically_provisioning_pvs.html.
You’ve now created persistent storage that can be used with your applications in OpenShift. In the next section, you’ll configure your applications to take advantage of this storage.
7.4. Using persistent storage
Now that you have PVs configured, it’s time to take advantage of them. In OpenShift, applications consume persistent storage using persistent volume claims (PVCs). A PVC can be added into an application as a volume using the command line or through the web interface. Let’s create a PVC on the command line and add it to an application.
First, you need to know how PVs and PVCs match up to each other. In OpenShift, PVs represent the available storage. PVCs represent an application’s need for that storage.
When you create a PVC, OpenShift looks for the best fit among the available PVs and reserves it for use by the PVC. In the example environment, matches are based on two criteria:
- PV size vs. PVC need— OpenShift tries to take best advantage of available resources. When a PVC is created, it reserves the smallest PV available that satisfies its need.
- Access mode— When a PVC is created, OpenShift looks for an available PV with at least the level of access required. If an exact match isn’t available, it reserves a PV with more privileges that still satisfies the requirements. For example, if a PVC is looking for a PV with an RWO access mode (read/write once), it will use a PV with an RWX (read/write many) access mode if one is available.
Because all the PVs in your environment are the same size, matching them to PVCs will be straightforward. Next, you’ll create a PVC for your application to use.
7.4.1. Creating a persistent volume claim using the command line
Listing 7.3 shows an example PVC template, which you can find in the chapter7 repository on GitHub. The file is named pvc-app-cli.yaml. Some of the important template parameters include the following:
- The name of the PVC to be created.
- The access mode for the PVC. In this example, the PVCs will request the RWX access mode. This aligns with the PVs you created earlier in this chapter.
- The size of the storage request. This example creates a 2 GB storage request, which matches the size of the PVs that you created in the previous section.
Listing 7.3. Example PVC template from the chapter7 repository on GitHub
apiVersion: v1
kind: PersistentVolumeClaim
metadata:
  name: app-cli               1
spec:
  accessModes:
    - ReadWriteMany           2
  resources:
    requests:
      storage: 2Gi            3
- 1 Name of the PVC
- 2 Access mode for the PVC
- 3 Requested storage size
To create a PVC on the command line, you use the same oc create command syntax that you used to create a PV:
$ oc create -f pvc-app-cli.yaml
persistentvolumeclaim "app-cli" created
Note that this example doesn’t use the system:admin user to create the PVC. By default, any user can create a PVC in their project. The one rule to remember is that a PVC needs to be created in the same project as the project for which it will provide storage.
When the PVC is created, it queries OpenShift to get all the available PVs. It uses the criteria described to find the best match and then reserves that PV. Once that’s done, it can take a minute or so, depending on the size of your cluster, for the PVC to become available to be used in an application as persistent storage.
The following command shows how you can use oc to provide information about all the active PVCs in an OpenShift project:
$ oc get pvc
NAME      STATUS    VOLUME    CAPACITY   ACCESSMODES   AGE
app-cli   Bound     pv05      2Gi        RWX           1h
A PVC represents reserved storage available to the applications in your project. But it isn’t yet mounted into an active application. To accomplish that, you need to mount your newly created PVC into an application as a volume.
7.4.2. Adding a volume to an application on the command line
In OpenShift, a volume is any filesystem, file, or data mounted into an application’s pods to provide persistent data. In this chapter, we’re concerned with persistent storage volumes. Volumes also are used to provide encrypted data, application configurations, and other types of data, as you saw in chapter 6.
To add a volume, you use the oc volume command. The following example takes the newly created PVC and adds it into the app-cli application (the command is broken into multiple lines to make it a little easier to understand, and to fit on the page):
$ oc volume dc/app-cli --add
--type=persistentVolumeClaim
--claim-name=app-cli
--mount-path=/opt/app-root/src/uploads
info: Generated volume name: volume-l4dz0          1
deploymentconfig "app-cli" updated
- 1 The volume name was automatically created.
By applying the volume to the deployment config for app-cli, you can trigger a redeployment of the application automatically to incorporate the new PV. The following parameters are required:
- dc—The deployment config, in this case app-cli
- --add—Tells oc that you want to add a new component
- --type—The type of component you want to add, in this case a persistentVolumeClaim
- --claim-name—The PVC to use as the mounted volume
- --mount-path—The mount point in the pod
Optionally, you can also specify a name for the volume with the --name parameter. If this isn’t set, OpenShift creates one dynamically.
Using the oc describe dc/app-cli command, you can confirm that this volume is mounted into your application:
$ oc describe dc/app-cli
Name:        app-cli
Namespace:    image-uploader
Created:    2 hours ago
Labels:        app=app-cli
Annotations:    openshift.io/generated-by=OpenShiftNewApp
Latest Version:    2                                            1
Selector:    app=app-cli,deploymentconfig=app-cli
Replicas:    1
Triggers:    Config, Image(app-cli@latest, auto=true)
Strategy:    Rolling
Template:
  Labels:    app=app-cli
        deploymentconfig=app-cli
  Annotations:    openshift.io/generated-by=OpenShiftNewApp
  Containers:
   app-cli:
    Image:    172.30.52.103:5000/image-uploader/
     app-cli@sha256:f5ffe8c1...
    Port:    8080/TCP
    Volume Mounts:                                              2
      /opt/app-root/src/uploads from volume-l4dz0 (rw)
    Environment Variables:    <none>
  Volumes:
   volume-l4dz0:
    Type:    PersistentVolumeClaim (a reference to a PersistentVolumeClaim in
     the same namespace)
    ClaimName:    app-cli
    ReadOnly:    false
...
app-cli@sha256:f5ffe8c1...
Port: 8080/TCP
Volume Mounts: 2
/opt/app-root/src/uploads from volume-l4dz0 (rw)
Environment Variables: <none>
Volumes:
volume-l4dz0:
Type: PersistentVolumeClaim (a reference to a PersistentVolumeClaim in
the same namespace)
ClaimName: app-cli
ReadOnly: false
...
- 1 Version of the currently active deployment. Attaching the volume caused a new deployment to be created for the application.
- 2 Volumes mounted into the application, including the newly mounted PVC
Because you created the PV and PVC to allow for multiple reads and writes by using the RWX access mode, when this application scales horizontally, each new pod will mount the same PVC and be able to read data from and write data to it. To sum up, you just modified your containerized application to provide horizontally scalable persistent storage.
In the next section, you’ll create the same result using the OpenShift web interface. In the web interface, you’ll focus on creating a PVC and associating it with an active application, because to create a PV you must use the command line.
7.4.3. Adding persistent storage to an application using the web interface
Creating PVCs and associating them as persistent volumes in applications is easy to do using the web interface.
Creating a persistent volume claim with the web interface
You don’t need administrator-level privileges to create a PVC, so log in as your dev user, if you haven’t already done so. Select the Image Uploader project when you log in, and you should see the Storage link in the left menu bar of the project overview page (see figure 7.3).
Figure 7.3. The Storage link to create PVCs in the web interface

Click the link to go to the Storage page. You should see the PVC that you created on the command line, which is currently mounted as a PV in app-cli. On the right side of the page, click the Create Storage button to open the dialog shown in figure 7.4, where you can create a PVC.
Figure 7.4. Creating a PVC using the web interface

The required parameters for the web interface are as follows:
- Name— The name for your PVC. For this example, use the name of your application, app-gui.
- Access Mode— Use the same RWX mode that you used to create the PVC for app-cli.
- Size— Use 2 GB, which is the same as all the PVs you created earlier in this chapter.
After you fill in the fields, click the Create button to return to the Storage page. Your new PVC is listed beside the one you created earlier (see figure 7.5).
Figure 7.5. The storage-overview page after you create the PVC for app-gui using the web interface

This page also confirms the capacity, access mode, and PV that your PVC has reserved. In this example, our newly created app-gui PVC has bound itself to PV01. The next step is to attach this PVC to an application as a PV.
Attaching storage to an application with the web interface
To attach a PVC to an application, you start on the project overview page. Just as you did at the command line, you need to add the PVC you created to your application as a PV. On the command line, you made a change to the deployment config for app-cli: this caused your application to be redeployed with your PVC attached in the pod. In the web interface, you need to do the same thing.
Figure 7.6 points out an easy way to access an application’s current deployment config. Click the app-gui link to open the Deployments page for app-gui.
Figure 7.6. In the web interface, use the link to the deployment overview to edit your applications.

The Deployments page, a portion of which is shown in figure 7.7, lists all the deployments for the app-gui application. There’s currently only the initial deployment from when you built the application. Adding the PVC as a volume to the application will trigger a new deployment for app-gui.
Figure 7.7. The app-gui Deployments page. There’s currently only the initial deployment for the application. Adding the PVC as a PV will trigger a new deployment.

To add the volume, choose Actions > Add Storage to open the Add Storage wizard for app-gui. Using the wizard, you need to select the PVC that you want to use: in this case, the app-gui PVC. The only other field that’s required for your mount to work is Mount Path. This will be the same as the mount path for the command-line example earlier in this chapter: you want to mount the PVC at /opt/app-root/src/uploads in your application (see figure 7.8).
Figure 7.8. Adding a persistent volume to app-gui

Once you’ve selected your storage and filled out the mount path, click the Create button to return to the Deployments page for app-gui. Figure 7.9 shows that OpenShift redeployed the application.
Figure 7.9. After adding a new PV, OpenShift redeploys the app-gui application to incorporate the persistent storage in the pod.

After a few seconds, the new version of app-gui should be functional and active, including the newly mounted persistent storage. With PVs up and active in both app-cli and app-gui, now is the time to test them and see what’s happening.
7.5. Testing applications after adding persistent storage
First, the fun stuff. Because app-gui and app-cli are individual instances of the same Image Uploader application, they both have web pages that you can access through your browser. Each application has an active URL address that leads you to the application (see figure 7.10). For both app-gui and app-cli, browse to the web interfaces and upload a few pictures. These pictures are stored in the uploads directory in each application’s pod. That means the pictures are stored on the two PVs you just configured. In my case, I uploaded pictures of container ship accidents into app-cli, and I uploaded pictures of my daughter into app-gui.
Figure 7.10. On the project overview page, each application’s URL is an active link to the application.

Note
To upload pictures with the Image Uploader program, use the Choose File button on the main page to select pictures from your workstation.
7.5.1. Data doesn’t get mixed up
Notice that you don’t see pictures in the wrong places after you upload them. That’s because each application deployment is using its own NFS volume to store data. Each NFS volume is mounted into its application’s mount namespace, as we talked about in chapter 3, so the application’s data is always separated. It isn’t possible for one application to inadvertently put data, or funny pictures, in the wrong place. The true test will come when you force OpenShift to create a new copy of your application’s pod.
7.5.2. Forcing a pod restart
At the beginning of the chapter, you deleted a pod and noticed that the uploaded pictures were lost when OpenShift automatically replaced the deleted pod. Go ahead and repeat the experiment, this time for both applications. Here’s the process in action:
$ oc get pods
NAME               READY     STATUS      RESTARTS   AGE
app-cli-1-build    0/1       Completed   0          1d
app-cli-2-1bwrd    1/1       Running     0          1d
app-gui-1-build    0/1       Completed   0          3h
app-gui-2-lkpn0    1/1       Running     0          1h

$ oc delete pod app-cli-2-1bwrd app-gui-2-lkpn0
pod "app-cli-2-1bwrd" deleted
pod "app-gui-2-lkpn0" deleted

$ oc get pods
NAME               READY     STATUS      RESTARTS   AGE
app-cli-1-build    0/1       Completed   0          1d
app-cli-2-m2k7v    1/1       Running     0          34s
app-gui-1-build    0/1       Completed   0          3h
app-gui-2-27h64    1/1       Running     0          34s
After this, look at the app-gui and app-cli websites again. Are your pictures still there? Did they survive a pod deletion? Yes, they did! You’ve deployed persistent storage in multiple applications in OpenShift. What does that look like on the host running the containers? Let’s take a look.
7.5.3. Investigating persistent volume mounts
Because you’re using NFS server exports as the source for your PVs, it stands to reason that somewhere on the OpenShift node, those NFS volumes are mounted. You can see that this is the case by looking at the following example. SSH into the OpenShift node where the containers are running, run the mount command, and search for mounted volumes from the IP address of the NFS server. In my environment, the IP address of my OpenShift master server is 192.168.122.100:
$ mount | grep 192.168.122.100 192.168.122.100:/var/nfs-data/pv05 on /var/lib/origin/openshift.local.
You get two results, one for each pod for each application. Earlier in this chapter, you used the oc get pv command and confirmed that pv05 was being used by app-cli. But that doesn’t explain how the NFS volume is made available in the app-cli container’s mount namespace.
Chapter 3 looked at how the filesystem in a container is isolated from the rest of the application node using a mount namespace. The pv05 NFS mount isn’t added to the app-cli mount namespace, though. Instead, the NFS mount is made available in the container using a technology called a bind mount.
A bind mount in Linux is a special type of mounted volume where part of a filesystem is mounted in a new, additional location. For app-cli, the NFS mount for pv05 is mounted using a bind mount at /opt/app-root/src/uploads in the container’s mount namespace. Using a bind mount makes the content available simultaneously in two locations. A change in one location is automatically reflected in the other location (see figure 7.11).
Figure 7.11. Volumes are bind mounted into the container from the host

Note
You can find more information about bind mounts in the mount manual pages at http://man7.org/linux/man-pages/man8/mount.8.html.
Bind mounts are used for volumes for two primary reasons. First, creating a bind mount on a Linux system is a lightweight operation in terms of CPU requirements. That means redeploying a new container to replace an old one doesn’t involve remounting a remote volume. This keeps container-creation time low.
Second, this approach separates concerns for persistent storage. Using bind mounts, the container definition doesn’t have to include specific information about the remote volume. The container only needs to define the name of the volume to mount. OpenShift abstracts how to access the remote volume and make it available in containers. This separation of concerns between administration and usage of a cluster is a consistent OpenShift design feature.
The goal of this chapter was to walk you through configuring the components that make persistent storage work in OpenShift. In the following chapters, you’ll use persistent storage to create more scalable and resilient applications.
7.6. Summary
- When an application pod is removed or dies, OpenShift automatically replaces it with a new instance of the application.
- OpenShift can use multiple network storage services, including NFS, to provide persistent storage for applications.
- When using persistent storage, applications in OpenShift can share data and provide data across upgrades, upgrades, and container replacement.
- OpenShift uses persistent volumes to represent available network storage volumes.
- Persistent volume claims are associated with a project and match criteria such as capacity needed and access mode to bind to and reserve a persistent volume.
- Persistent volume claims can be mounted into OpenShift applications as volumes, mounting the network storage into the container’s filesystem in the desired location.
- OpenShift manages the persistent volume using the proper network storage protocol and uses bind mounts to present the remote volumes in application containers.