
Chapter 10. Networking
- Designing cluster networks
- Understanding network traffic flow in OpenShift
- Configuring Open vSwitch
- Configuring OpenShift network plugins
- Using DNS in OpenShift
The importance of the networking configuration in an OpenShift cluster can’t be overstated; it’s the fabric that binds your cluster together. With that perspective, OpenShift does a lot of work to make sure its networking configuration is stable, performs well, and is highly configurable. Those principles are what we’ll cover in this chapter. Let’s start with an overview of how the network in OpenShift is designed.
10.1. OpenShift network design
Up to this point, all your OpenShift applications have run on a single application node. It’s time to fix that. Section A.8 in appendix A walks through the steps to provision a third server and add it to your OpenShift cluster as an application node. Go ahead and use that walkthrough to scale your cluster with an additional application node. When you’re finished, your cluster will consist of a single master server and two application nodes.
When you initially deployed OpenShift, a private network called the pod network was created. Each pod in your OpenShift cluster is assigned an IP address on the pod network when it’s deployed. This IP address is used to communicate with each pod across the cluster. The pod network spans all nodes in your cluster and was extended to your second application node when that was added to the cluster (see figure 10.1).
Figure 10.1. Expanded three-node cluster

The pod network uses the 10.128.0.0/14 classless inter-domain routing (CIDR, (defined at http://mng.bz/28or) IP address block by default. Each node in the cluster is assigned a /23 CIDR IP address range from the pod network block. That means, by default, that each application node in OpenShift can accommodate a maximum of 512 pods. The IP ranges for each node are controlled by OpenFlow, a component in OpenShift’s networking solution. OpenFlow (https://www.sdxcentral.com/sdn/definitions/what-is-openflow/) is a software-defined networking control-plane manager that OpenShift uses to route network traffic in the cluster without having to change the configuration of the host’s networking stack. Open control lets OpenShift maintain the IP address ranges for each host without having to alter the application node’s network routing tables. To see information about the pod network, including the IP ranges allocated to each node, run the oc get hostsubnet command:
oc get hostsubnet NAME HOST HOST IPSUBNET ocp1.192.168.122.100.nip.io ocp1.192.168.122.100.nip.io 192.168.122.100
- 1 All pods deployed on ocp2 have an IP address in the 10.128.0.0/23 range.
Your pod network IP addresses can’t be used on your network by any network that OpenShift might need to communicate with. OpenShift’s internal network routing follows all the rules of any network, and multiple destinations for the same IP address lead to confusion.
If you’re using all or part of the 10.128.0.0/14 network range, you can change the pod network IP address range. When you configure the installation inventory file before deploying OpenShift, set the osm_cluster_network_cidr variable to the IP address range you want to use for the pod network. This variable and many others are documented at http://mng.bz/efu3. Be careful when you select the IP range for the pod network—once you deploy OpenShift, it’s all but impossible to change it.
We already mentioned OpenFlow and that it’s used to manage how IP addresses are allocated to each application node. The interfaces on the nodes that make up the pod network, and also the encrypted connections between nodes, are created and managed by Open vSwitch (OVS; www.openvswitch.org). Combined with the iptables firewall on each host, open control and OVS are referred to collectively as the OpenShift SDN network plugin. The term software-defined networking (SDN) can be used for any networking solution that uses interfaces and components that are created using software instead of physical interfaces. Next, we’ll look at how OVS is used in OpenShift SDN.
Tip
If you’d like more in-depth documentation for these open source projects, you can use these links for the OpenShift SDN components: OVS, http://docs.openvswitch.org/en/stable; open control, http://docs.openvswitch.org/en/latest/topics/openflow; and iptables, https://netfilter.org/documentation.
10.2. Managing the OpenShift SDN
OVS is an enterprise-grade, scalable, high-performance SDN. In OpenShift, it’s the default SDN used to create the pod network in your cluster. It’s installed and configured when you deploy OpenShift or add a node to an existing cluster. OVS runs as a service on each node in the cluster. You can check the status of the service by running the following systemctl command on any node:
systemctl status ovs-vswitchd
The ovs-vswitchd service is automatically enabled on all cluster nodes as part of OpenShift’s deployment.
The configuration file for OVS is located at /etc/sysconfig/openvswitch, and each node’s local OVS database is located in the /etc/openswitch directory. For day-to-day operations, OVS should be transparent. Its configuration and updates are controlled by OpenShift. Using OVS provides several advantages to OpenShift.
This transparent operation is possible because OpenShift uses the Kubernetes Container Network Interface (CNI; http://mng.bz/vRJa). The Kubernetes CNI provides a plugin architecture to integrate different SDN solutions to create and manage the pod network. OpenShift uses OVS as its default, but it can function with other network providers as well; these are documented at http://mng.bz/y145.
OVS is used in your OpenShift cluster as the communications backbone for all of your deployed pods. Traffic in and out of every pod is affected by OVS in the OpenShift cluster. For that reason, you need to know how it works and how to effectively use it for your needs. Let’s start with the network configuration for your OpenShift application nodes.
10.2.1. Configuring application node networks
When a node is added to an OpenShift cluster, several network interfaces are created in addition to the standard lo loopback interface and eth0 physical interface. For our purposes, we’ll call eth0 the physical interface even though you’re using VMs for your cluster’s infrastructure. That’s because OpenShift creates the following additional virtual interfaces to route traffic:
- br0—An OVS bridge all OpenShift SDN interfaces are associated with. OVS creates this interface when the node is added to the OpenShift cluster.
- tun0—Attached to br0. Acts as the default gateway for each node. Traffic in and out of your OpenShift cluster is routed through this interface.
- vxlan_sys_4789—Also attached to br0. This virtual extensible local area network (VXLAN) is encrypted and used to route traffic to containers on other nodes in your cluster. It connects the nodes in your OpenShift cluster to create your pod network.
Additionally, each pod has a corresponding virtual Ethernet (veth) interface that’s linked to the eth0 interface in the pod by the Linux kernel. Any network traffic that’s sent to either interface in this relationship is automatically presented to the other. (We’ll get into more detail in the next section.) All of these relationships are illustrated in figure 10.2.
Figure 10.2. Application node networking configuration

A Linux bridge is a virtual interface that’s used to connect other interfaces together. If two interfaces on a host are attached to a bridge, they can communicate with each other without routes needing to be created. This helps with communication speed as well as keeping networking configurations simple on the host and in the container. For more details, see https://wiki.archlinux.org/index.php/Network_bridge.
A VXLAN is a protocol that acts as an overlay network between the nodes in your OpenShift cluster. An overlay network is a software-defined network that’s deployed on top of another network. The VXLANs used in OpenShift are deployed on top of the networking configuration of the hosts.
To communicate securely between pods, the VXLAN encapsulates pod network traffic in an additional layer of network information so it can be delivered to the proper pod on the proper server by IP address. The overlay network is the pod network in your OpenShift cluster. The VXLAN interfaces on each node provide access to and from that network. You can find the full definition and specifications for a VXLAN in the RFC documentation at https://tools.ietf.org/html/rfc7348.
A TUN interface (short for network TUNnel) is a virtual network device that mimics the functionality of a physical interface. In the case of OpenShift, the tun0 interface acts as the default gateway on each node for the pod network. Because it’s a virtual device and not a physical one, it can be used to route traffic on and off the non-routable pod network. In-depth information about TUN interfaces is available at www.kernel.org/doc/Documentation/networking/tuntap.txt.
All of these devices are controlled by OVS and form the network topology for OpenShift SDN.
You can see these interfaces on your application nodes by running the ip a command. The following sample output has been trimmed with a little command-line magic for brevity and clarity:
# ip a | egrep '^[0-9].*:' | awk '{ print $1 $2}'
1:lo:
2:eth0:
3:ovs-system:
6:br0:
7:docker0:
8:vxlan_sys_4789:
9:tun0:
10:veth68d047ad@if3:
11:veth875e3121@if3:
12:vethb7bbb4d5@if3:
13:vethd7768410@if3:
14:veth8f8e1db6@if3:
15:veth334d0271@if3:
The networking configuration for the master node is essentially the same as an application node. The master node uses the pod network to communicate with pods on the application nodes as they’re deployed, deliver their applications, and are eventually deleted. In the next section, we’ll look more deeply at how the interface in the container is linked to a corresponding veth interface on the application node.
10.2.2. Linking containers to host interfaces
In chapter 3, we talked about the network namespace and how each container contains a unique loopback and eth0 interface for network communications. From the perspective of applications in a container, these two interfaces are the only networks on the host. To get network traffic in and out of the container, the eth0 interface in the container is linked in the Linux kernel to a corresponding veth interface in the host’s default network namespace.
The ability to link two interfaces is a feature of the Linux kernel. To determine which veth interface a container is linked to, you need to log in to the application node where the container is running. You can figure this out in just a few steps. Let’s use the app-cli application as an example.
Run the oc get pods -o wide command to confirm where the app-cli pod is deployed:
$ oc get pods -o wide -n image-uploader --show-all=false NAME READY STATUS RESTARTS AGE IP
- 1 The app-cli pod is deployed on ocp3.
Any virtual interface on a Linux system can be linked by the kernel to another virtual or physical interface. When an interface is linked to another, the kernel makes them essentially the same interface. If something happens to one interface, it automatically happens to its linked interface. In an interface’s iflink file—a file created and maintained by the running Linux kernel at /sys/class/net/<interface name>/iflink—is the index number for its linked interface. To find the linked interface number for the app-cli container, run the following oc exec command, making sure to use the pod ID for your app-cli deployment. This command uses the cat command-line tool to echo the contents of the app-cli container’s iflink file:
$ oc exec app-cli-4-vt840 cat /sys/class/net/eth0/iflink
11
The eth0 interface in the app-cli pod is linked to interface 11 on application node ocp3. But which veth interface is number 11? That information is available in the output from the ip a command. The link ID, also called the ifindex for each interface, is the number at the beginning of each interface listed. For each eth0 interface in a container, its iflink value is the ifindex value of its corresponding veth interface (see figure 10.3).
Figure 10.3. How container interfaces are linked in Linux

You previously confirmed that app-cli is deployed on ocp3. To confirm that the index for the veth interface app-cli is linked to, SSH to ocp3 (this may be different on your cluster). To view only the interface with ifindex 11 on ocp3, run the following ip a command (we’ve trimmed the command-line output):
# ip a | egrep -A 3 '^11.*:' 11: veth875e3121@if3: <BROADCAST,MULTICAST,UP,LOWER_UP> mtu 1450 qdisc
You’ve now confirmed that the app-cli pod is linked by the Linux kernel to veth875e3121 on the ocp3 application node. This is how network traffic enters and exits containers in general. Next, let’s confirm that veth875e3121 on ocp3 is connected to the cluster’s pod network so network traffic can get in and out of the OpenShift cluster.
10.2.3. Working with OVS
The command-line tool to work with OVS directly is ovs-vsctl. To use this tool, you need to be logged in to the host you’re looking for information about. In these examples, we’re logged in to ocp3, where app-cli is deployed and where we’ve already identified the linked interface for app-cli.
We mentioned earlier in this chapter that all OpenShift SDN interfaces are attached to an OVS bridge named br0. We make the distinction of calling it an OVS bridge because it’s a bridge interface that’s created and controlled by OVS. You can also create a bridge interface with the Linux kernel. A Linux bridge is created and managed using the brctl command. You can confirm that the br0 interface is being controlled by OVS by running the following ovs-vsctl command to list all active OVS bridges:
# ovs-vsctl list-br
br0
If you’ve used Linux bridges before, it can seem confusing when you know a bridge should be present but none appears when you run brctl, because they’re being managed by OVS. Ocp3 has a single OVS bridge named br0, which aligns with what we discussed earlier. To list the interfaces connected to br0, run the following ovs-vsctl command:
# ovs-vsctl list-ifaces br0
The output of this command lists all interfaces connected to br0:
- tun0 interface that’s the default gateway for the pod network on ocp3.
- vxlan0 interface, which is how the vxlan_sys_4789 interface is referenced in the OVS database
Also included is a veth interface for each pod running on the node, including veth875e3121, which is the interface linked to eth0 in the app-cli pod:
# ovs-vsctl list-ifaces br0
tun0                          1
veth334d0271
veth68d047ad
veth875e3121                  2
veth8f8e1db6
vethb7bbb4d5
vethd7768410
vxlan0                        3
- 1 TUN interface
- 2 Veth interface linked to app-cli pod
- 3 VXLAN interface
This is how OpenShift SDN functions. When a new pod is deployed, a new veth interface is created and attached to bro. At that point, the pod can send and receive network traffic on the pod network. It can communicate outside the cluster through br0 and communicate to pods on other application nodes using the vxlan_sys_4789 interface (see figure 10.4).
Figure 10.4. Application node networking configuration

In the next section, you’ll put OpenShift’s SDN to work by digging deeper into how application traffic is routed and how applications communicate in your cluster. Let’s start at the beginning, with a request for the app-cli deployment.
10.3. Routing application requests
When you browse to http://app-cli-image-uploader.apps.192.168.122.101.nip.io/, your request goes to ocp2 (192.168.122.101) on port 80, the default HTTP port. Log in to ocp2, and run the following netstat command to determine which service is listening on port 80:
# netstat -tpl --numeric-ports | grep 80 tcp 0 0 0.0.0.0:80 0.0.0.0:* LISTEN
There’s an haproxy service running on ocp2 as PID 42625. Let’s look at this in more detail.
10.3.1. Using HAProxy to route requests
HAProxy (www.haproxy.org) is the front door to your applications in OpenShift. HAProxy is an open source, software-defined load balancer and proxy application. In OpenShift, it takes the URL route associated with an application and proxies those requests into the proper pod to get the requested data back to the requesting user. We won’t dig too deeply into all that HAProxy can do—we’re focusing on how OpenShift uses HAProxy. If you’d like more information about HAProxy, you can find documentation for its different versions at www.haproxy.org/#docs.
Tip
Like the networking configuration, the router in OpenShift is built using a plugin architecture. The default plugin is the HAProxy plugin we’re discussing in this chapter. But OpenShift also ships with a routing plugin that uses the BigIP F5 load-balancer platform (https://f5.com/products/big-ip/local-traffic-manager-ltm). You can find more information about configuring router plugins at https://docs.openshift.org/latest/install_config/router/index.html.
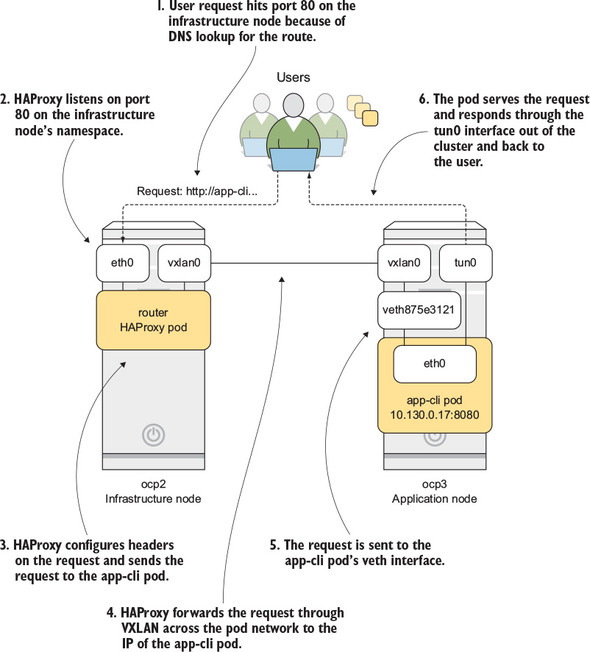
The router pod runs in the project named “default” in OpenShift. The router pod handles incoming user requests for your OpenShift cluster’s applications and proxies them to the proper pod to be served to the user. The router pod listens directly on the host interface for the node it’s deployed on and uses the pod network to proxy requests for different applications to the proper pod. The session then returns to the user from the pod’s host through its TUN interface (see figure 10.5).
Figure 10.5. How requests are routed through HAProxy in OpenShift

Because the router listens directly on the host’s interface, it’s configured differently than a typical pod in OpenShift. In the next section, we’ll investigate the HAProxy pod in more detail.
When you deployed your OpenShift cluster, you added a label to the ocp2 node that added it to a region named infra:
- connect_to: 192.168.122.101 ... node_labels: '{''region'': ''infra''}'
Labels are arbitrary key-value pairs you can use in OpenShift workflows to manage applications and a host of interactions. You can add labels to the nodes in your cluster and use those labels to specify where specific pods are deployed.
To specify a specific node or group of nodes by label, specify a nodeSelector value in your application’s deployment config component. The default OpenShift router has a node selector that specifies the node with the matching region=infra label. You can see this node selector in the router’s deployment config:
$ oc export dc/router -n default | grep -A1 nodeSelector
      nodeSelector:
        region: infra
Node selectors are powerful tools when you need to separate different types of applications in your OpenShift cluster. You can see a great demo at http://mng.bz/2HDH. For the HAProxy router, a node selector makes the public IP address for accessing your applications predictable. Your application’s DNS routes won’t have to be updated, because the router will always be deployed on the node that has the region=infra label associated with it. As long as that node’s IP address is consistent, your routes will work reliably.
10.3.2. Investigating the HAProxy pod
The lsns tool you used in chapter 3 displays the namespaces associated with the haproxy process listening on port 80. The following lsns command works in our example cluster. Our example has PID 42625; be sure to change the PID to match your own cluster:
lsns -p 42625
Instead of having unique network and UTS namespaces, the router pod uses the UTS and network namespaces from the host system:
NS TYPE NPROCS PID USER COMMAND 4026531837 user 299 1 root
- 1 Network namespace created by systemd when the host was booted
- 2 UTS namespace created by systemd when the host was booted
Using the host’s network namespace lets HAProxy listen directly on the host’s interfaces for incoming requests. Listening on the host’s interface means HAProxy receives application requests directly, acting as OpenShift’s front door for application traffic.
The router pod has its own mount namespace, which means the configuration files for HAProxy are isolated in the container. To enter the router pod, run the following oc rsh command, substituting the name of your router pod:
$ oc rsh router-1-qpfg3
sh-4.2$
Once you’re in the container’s namespace context, confirm that the router pod can see the host’s network by running the ip a command. You see all the interfaces on the host.
Tip
The router pod is an example of a privileged pod. A privileged pod is able to run with additional permissions and resource access in the OpenShift cluster. We’ll discuss these in more depth in chapter 11.
So far in this section, we’ve talked about how HAProxy uses the networking stack for the host it runs on, and how it’s always deployed to the same node by using a node selector that specifies nodes with the region=infra label. Those features provide two primary benefits:
- Using the host networking stack lets HAProxy receive requests directly from users. Because HAProxy is the front door to OpenShift, it has to be the first thing a request encounters.
- Deploying to the same host makes it easier to manage the DNS routes used to access individual applications.
In the next section, we’ll walk through how HAProxy takes the URL that’s been requested and proxies the traffic into a pod servicing the correct application. We’ll look at the HAProxy configuration in the pod, scale an application, and see how the HAProxy configuration changes.
10.3.3. How HAProxy gets requests to the correct pods
The configuration file for HAProxy is in the pod at /var/lib/haproxy/ conf/haproxy.config. This configuration file is maintained by OpenShift. Any time an application is deployed, updated, or deleted, OpenShift updates this configuration and has the HAProxy process reload it. Let’s see this in action.
With app-cli scaled to a single-pod replica, run the following command to search for the app-cli HAProxy configuration in the router pod:
$ grep app-cli /var/lib/haproxy/conf/haproxy.config backend be_http:image-uploader:app-cli server pod:app-cli-1-c7t85:app-cli:10.128.0.73:8080 10.128.0.73:8080
- 1 app-cli pod entry in the HAProxy configuration
We won’t go too deep into how the configuration works, but you can see the pod name, IP address, and port to access app-cli.
Next, scale app-cli to two pods, either in the web UI or with the following oc command from a workstation that can log in to OpenShift:
$ oc scale dc/app-cli --replicas=2 -n image-uploader
This command takes a few seconds to complete. After it’s done, rerun the search in the router pod for app-cli. Kubernetes has updated the HAProxy configuration to add an entry for the newly created app-cli pod:
$ grep app-cli /var/lib/haproxy/conf/haproxy.config backend be_http:image-uploader:app-cli server pod:app-cli-1-c7t85:app-cli:10.128.0.73:8080 10.128.0.73:8080 cookie
- 1 Original pod entry
- 2 The scaled-up pod IP address is added automatically to HAProxy configuration when the pod deploys.
HAProxy takes the request from the user, maps the requested URL to a defined route in the cluster, and proxies the request to the IP address for a pod in the service associated with that route. All this traverses the pod network created by OpenShift SDN (see figure 10.6)
Figure 10.6. OpenShift SDN network interfaces
This process works in concert with iptables on each host. OpenShift uses a complex, dynamic iptables configuration to make sure requests on the pod network are routed to the proper application pod. Iptables are a complex topic that we don’t have space to cover here, but we wanted to mention them so you know they should be running on your cluster nodes, and they’re crucial to your cluster’s effective operation. For more information, visit http://mng.bz/p58R.
The method for routing requests in OpenShift works well. But it poses a problem when you’re deploying applications that depend on each other to function. If a new pod is added to an application or a pod is replaced and it receives a new IP address, the change would require all applications that reference it to be updated and redeployed. This isn’t a serviceable solution. Luckily, OpenShift incorporates a DNS service on the pod network. Let’s examine it next.
10.4. Locating services with internal DNS
Applications depend on each other to deliver information to users. Middleware apps depend on databases. Web presentation apps depend on middleware. In an application spanning multiple independently scalable pods, these relationships are complex to manage. To make this easier, OpenShift deploys SkyDNS (https://github.com/skynetservices/skydns) when the cluster is deployed and makes it available on the pod network. SkyDNS is a DNS service that uses etcd, the primary Kubernetes database, to store DNS records. DNS records, also known as zone files, are configuration files where DNS records are recorded for a domain controlled by a DNS server. In OpenShift, SkyDNS controls the zone files for several domains that exist only on the pod network:
- cluster.local— Top-level domain for everything in your OpenShift cluster
- svc.cluster.local— Domain for all services running in your cluster
Domains for each project are also created. For example, image-uploader.svc.cluster .local is used to access all the services created in the image-uploader project.
A DNS A record (http://support.dnsimple.com/articles/a-record) is created in SkyDNS for each service in OpenShift when an application is deployed. A service represents all the deployed pods for an application. To view the services for the image-uploader project, run the following oc command:
$ oc get services -n image-uploader
NAME      CLUSTER-IP      EXTERNAL-IP   PORT(S)    AGE
app-cli   172.30.86.81    <none>        8080/TCP   3h
app-gui   172.30.90.249   <none>        8080/TCP   3h
Let’s examine how DNS resolution works in your OpenShift cluster.
10.4.1. DNS resolution in the pod network
When a pod is deployed, the /etc/resolv.conf file from the application node is mounted in the container in the same location. In Linux, /etc/resolv.conf configures the servers and configuration used for DNS resolution. By default, /etc/resolv.conf on the application node is configured with the IP address for the node itself. DNS requests on each application node are forwarded to SkyDNS running on the master server.
The search parameter in /etc/resolv.conf is also updated when it’s mounted in the container. It’s updated to include cluster.local, svc.cluster.local, and all other domains managed by SkyDNS.
Any domains defined in the search parameter in resolv.conf are used when a fully qualified domain name (FQDN) isn’t used for a hostname. FQDNs are defined at https://tools.ietf.org/html/rfc4703; but because not everyone loves to read RFC documents, a good rule of thumb is that an FQDN has to be a complete address on a network. The domain server.domain.com is fully qualified, where server isn’t a complete domain name. The search parameter provides one or more domains that are automatically appended to non-FQDNs to use for DNS queries.
When a request comes in from your cluster, those requests are automatically forwarded to the master server where SkyDNS handles requests. Let’s test it in action in your cluster.
From an OpenShift node, you can access the services using DNS if you use its FQDN. The format is service_name.project_name.svc.cluster.local:port. The following example is run from ocp3, connecting to the app-cli service:
# curl app-cli.image-uploader.svc.cluster.local:8080
<html>
<head>
<title>Image Library Demo Application by </title><style>
body {
...
</body>
</html>
You can run the same command from within a pod without specifying the FQDN, because /etc/resolv.conf has the SkyDNS search domains added. Using oc rsh, you can enter the namespaces for the app-cli pod and use curl to download the index page from app-gui service and the default page for the router service:
$ oc rsh app-cli-1-3lqbw                                1


$ curl app-gui.image-uploader:8080                      2
<html>
<head>
<title>Image Library Demo Application by </title><style>
body {
...
</body>
</html>

$ oc rsh app-gui-1-2zrqx                                3
sh-4.2$ curl wildfly-app.stateful-apps:8080
<!DOCTYPE html>
<!--
    JBoss, Home of Professional Open Source
    Copyright 2014, Red Hat, Inc. and/or its affiliates, and individual
- 1 Connects to the app-cli pod
- 2 Browses the app-gui service
- 3 Browses wildfly-app in the stateful-apps project
Using OpenShift’s implementation of SkyDNS, you can access any deployed application using the DNS record for its service. In OpenShift, application relationships remain stable, and no information about the application’s pods is required. This abstraction makes it easy to add references to other services in applications’ configurations when they’re deployed, without having to know the actual pod-level information about them.
In the previous example, you accessed an application from one project (wildfly-app in the stateful-apps project) from an application pod in another project (the app-cli pod in the image-uploader project). You do so because the default configuration of OpenShift’s pod network uses a flat network topology. Applications from one project are able to communicate with applications in all other projects.
This configuration works well when OpenShift is used by a single team. But when you need a multitenant environment to support multiple teams who don’t need to view each other’s applications, OpenShift handles that situation as well. In the next section, you’ll change OpenShift’s network configuration so it isolates the network traffic for each project.
10.5. Configuring OpenShift SDN
When you deploy OpenShift, the default configuration for the pod network’s topology is a single flat network. Every pod in every project is able to communicate without restrictions. OpenShift SDN uses a plugin architecture that provides different network topologies in OpenShift. There are currently three OpenShift SDN plugins that can be enabled in the OpenShift configuration without making large changes to your cluster:
- ovs-subnet— Enabled by default. Creates a flat pod network, allowing all pods in all projects to communicate with each other (see figure 10.7).
Figure 10.7. SDN plugins and overview

- ovs-multitenant— Separates the pods by project. The applications deployed in a project can only communicate with pods deployed in the same project. You’ll enable this plugin in this chapter.
- ovs-networkpolicy— Provides fine-grained ingress and egress rules for applications. This plugin provides a lot of configuration power, but the rules can be complex. This plugin is out of scope for this book.
The Kubernetes CNI accepts different networking plugins. OpenShift SDN is the default CNI plugin in OpenShift; it configures and manages the pod network for your cluster (see figure 10.7).
Let’s review the available OpenShift SDN plugins, starting with ovs-subnet.
10.5.1. Using the ovs-subnet plugin
Earlier, you were able to communicate directly with an application from the stateful-apps project from a pod in the image-uploader project; you could do so because of how the ovs-subnet plugin configured the pod network. A flat network topology for all pods in all projects lets communication happen between any deployed applications (see figure 10.8).
Figure 10.8. With the ovs-subnet plugin all pods can communicate with each other.

With the ovs-subnet plugin, an OpenShift cluster is deployed like a single tenant, with all resources available to one another. If you need to separate network traffic for multiple tenants, you can use the ovs-multitenant plugin.
10.5.2. Isolating traffice with the ovs-multitenant plugin
The ovs-multitenant network plugin isolates pod communications at the project level. Each pod for each application deployment can communicate only with pods and services in the same project on the pod network. For example, the app-gui and app-cli pods can communicate directly because they’re both in the image-uploader project. But they’re isolated from the wildfly-app application in the stateful-apps project in your cluster. This isolation relies on two primary tools in Open vSwitch:
- VXLAN network identifier (VNID)— A VNID acts in a fashion similar to a VLAN in a traditional network. It’s a unique identifier that can be associated with an interface and used to isolate communication to interfaces with the same VNID.
- OpenFlow— OpenFlow (www.sdxcentral.com/sdn/definitions/what-is-openflow) is a communications protocol that can be used to map network traffic across a network infrastructure. OpenFlow is used in OpenShift to help define which interfaces can communicate and when to route traffic through the vxlan0 and tun0 interfaces on each node.
When the ovs-multitenant plugin is enabled, each project is assigned a VNID. The VNID for each project is maintained in the etcd database on the OpenShift master node. When a pod is created, its linked veth interface is associated with its project’s VNID, and OpenFlow rules are created to make sure it can communicate only with pods in the same project.
Note
The router and registry pods in the default project are assigned VNID 0. This is a special VNID that can communicate with all other VNIDs on a system. If a pod needs to communicate with a pod on another host, the VNID is attached to each packet on the network as part of the VXLAN encapsulation process (see figure 10.9).
Figure 10.9. The multitenant plugin isolates network traffic by project.

With the multitenant plugin enabled, if a pod needs to communicate with a pod in another project, the request must be routed off the pod network and connect to the desired application through its external route like any other external request. This isn’t always the most efficient architecture. The OpenShift SDN’s ovs-networkpolicy plugin provides more fine-grained control over how applications communicate across projects.
10.5.3. Creating advanced network designs with the ovs-networkpolicy plugin
The ovs-networkpolicy plugin provides fine-grained access control for individual applications, regardless of the project they’re in. These rules can become complex very quickly. We don’t have space in this book to cover creating network policies, but if you want to learn about it, a good starting place is the documentation at http://mng.bz/LIUA.
Let’s enable the ovs-multitenant plugin and make sure it isolates traffic in your cluster as we’ve discussed.
10.5.4. Enabling the ovs-multitenant plugin
To enable the ovs-multitenant plugin, you need to SSH to your master and application nodes and edit a configuration file on each. Follow these steps to edit the master configuration:
1. Open the master configuration file located at /etc/origin/master/master-config.yaml.
2. Locate the networkPluginName parameter in the file. The default value that enables the ovs-subnet plugin is redhat/openshift-ovs-subnet. Edit this line as shown next.
Listing 10.1. Editing networkPluginName in the master config
...
networkPluginName: redhat/openshift-ovs-multitenant
...
3. Restart the origin-master service:
# systemctl restart origin-master
Next you need to edit the application node configurations. Here are the steps:
1. On each application node, the configureation file is located at /etc/origin/ node/node-config.yaml. In this file, you need to edit two lines. They’re the same as the line you changed in the master configuration.
Listing 10.2. Editing networkPluginName in the application node config
....
networkPluginName: redhat/openshift-ovs-multitenant 1((CO8-1))
# networkConfig struct introduced in origin 1.0.6 and OSE 3.0.2 which
# deprecates networkPluginName above. The two should match.
networkConfig:
mtu: 1450
networkPluginName: redhat/openshift-ovs-multitenant 1
...
- 1 Edit both lines to reference the multitenant plugin.
2. Restart the node service on each application node with the following command:
# systemctl restart origin-node
And that’s it. You’ve changed your OpenShift cluster to use the multitenant network plugin. To make sure, let’s test it.
10.5.5. Testing the multitenant plugin
Previously in the chapter, you logged in to the app-cli pod using oc rsh and downloaded web pages from other pods. Let’s test this now with the ovs-multitenant plugin in place. Follow these steps:
1. Connect to the app-cli pod:
$ oc rsh app-cli-1-3lqbw
sh-4.2$
2. From the app-cli pod, use the curl command to download the index page for the app-gui pod using its DNS record:
sh-4.2$ curl app-gui:8080
<html>
<head>
...Because these two applications are in the same project, you can communicate between these pods with no issues.
3. Try to access the router pod in the default project:
sh-4.2$ curl router.default
<html>
<head>
...Because the default project is assigned VNID 0, the app-cli pod can access it as needed.
4. Attempt to access the wildfly-app pod in the stateful-apps project:
sh-4.2$ curl wildfly-app.stateful-apps
This request eventually times out. The app-cli pod can’t connect to the wildfly-app pod because they’re in different projects. The multitenant plugin stops this communication from happening by design.
Note
You can learn more about how the ovs-multitenant plugin uses VNIDs at http://mng.bz/dkj0, including information about how VNID 0 is used for the default project.
This chapter has been quite a journey through the network in your OpenShift cluster. Managing a network effectively in an application platform is a huge challenge. OpenShift uses Open vSwitch and its components to do so effectively in a dynamic cluster. All you have to do is decide how you want your pod network configured and then edit your cluster configuration files.
10.6. Summary
- OpenShift uses a non-routable pod network to handle traffic in the cluster.
- OpenShift SDN is a software-defined networking implementation using Open vSwitch (OVS) to create a scalable and highly configurable network for OpenShift traffic.
- Network traffic is passed in and out of containers using multiple OVS interfaces configured together on each host.
- Each container has a corresponding veth interface on the host that’s linked to the container interface using the Linux kernel.
- OpenShift provides an internal DNS service to make interactions between pods easy to manage and scale.
- OpenShift SDN’s default plugin provides a flat network topology that allows all pods to communicate with each other in the cluster.
- You can change networking plugins to the multitenant plugin, which effectively isolates network communications at the project level for applications.