5. Google Now and Navigation

In this chapter, you find out how to use Google Maps, Navigation, and Google Now. Topics include the following:
→ Getting to know Google Now
→ Working with Google Maps
→ Using Google Maps with no data coverage
→ Getting around with Navigation
Your Galaxy Note II can be used as a GPS Navigation device while you are walking or driving around. The Galaxy Note II also includes a new app called Google Now that offers to provide you all the information you need when you need it.
Google Now
You can access Google Now from the Lock screen or from any screen and it enables you to search the Internet. The app also provides you information such as how long it will take to drive to work and game scores from your favorite teams.
Before you even unlock your Galaxy Note II, you can access Google Now by sliding the Google icon up. You can also access Google Now from any app by touching and holding the Menu button.
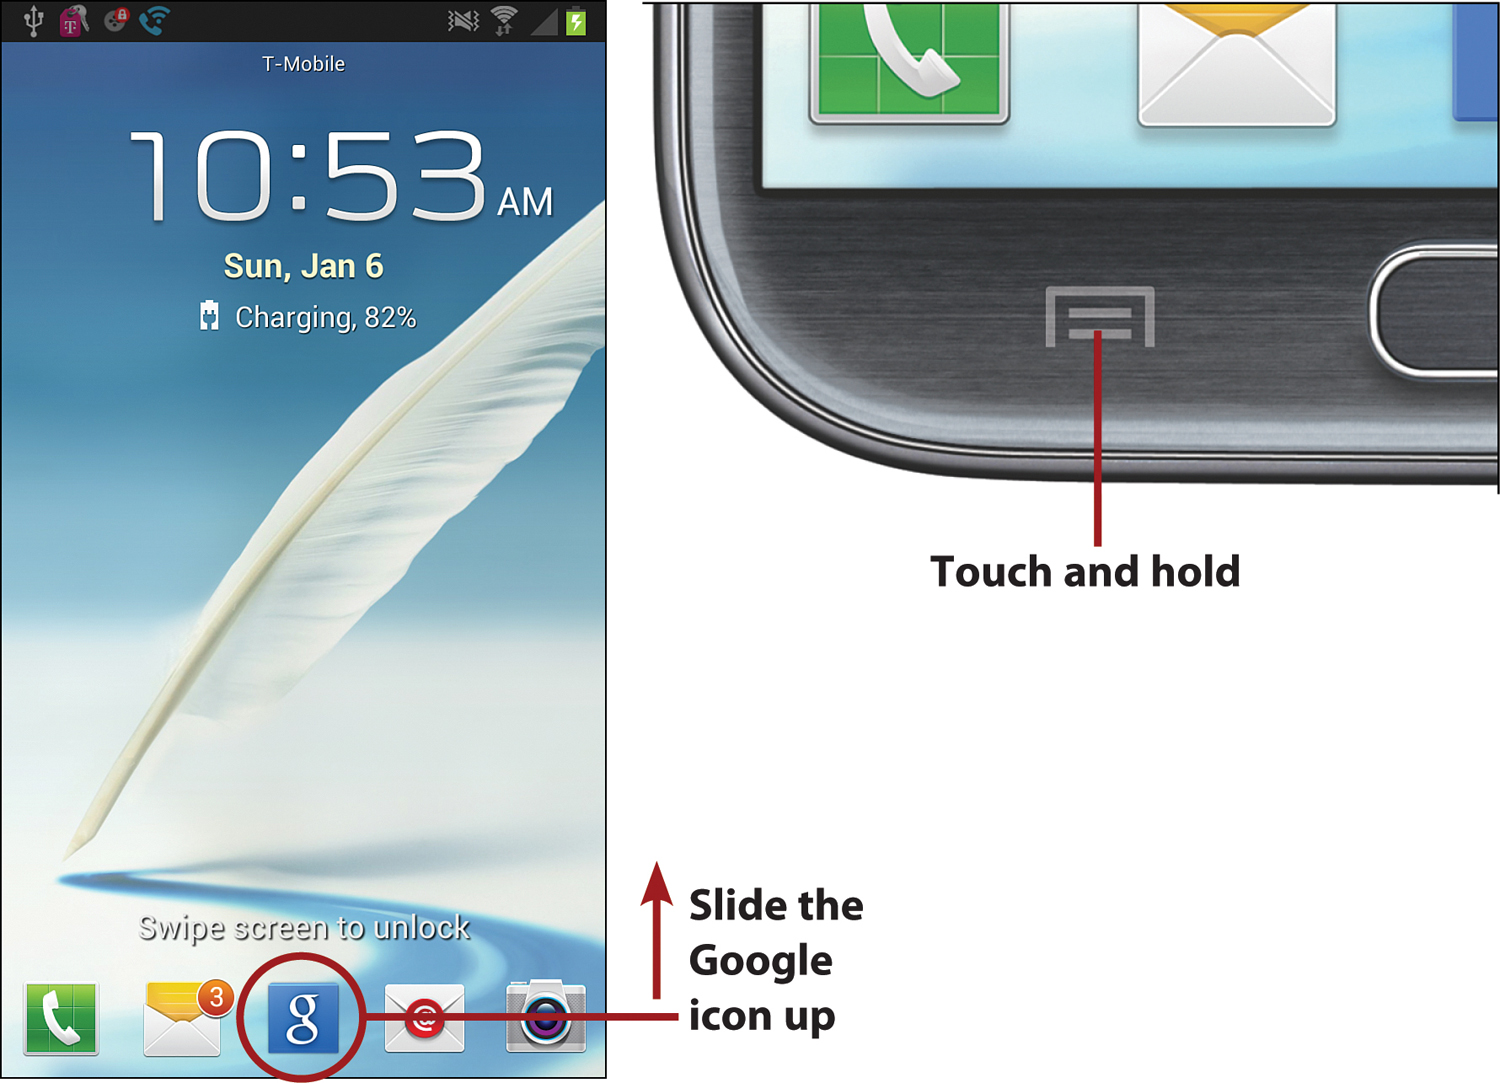
Understand the Google Now Screen
1. Cards automatically appear based on your settings. Possibilities include teams you follow, upcoming meetings, weather where you work, and traffic on the way to work.
2. Touch and speak a request or search. You can also just say “Google” and then speak your request. Cards relevant to your search or request appear.
Set Up Google Now
For Google Now to work for you, you should set it up correctly. This means setting up Google Now, but you also need to set up Google Maps, which is used heavily by Google Now.
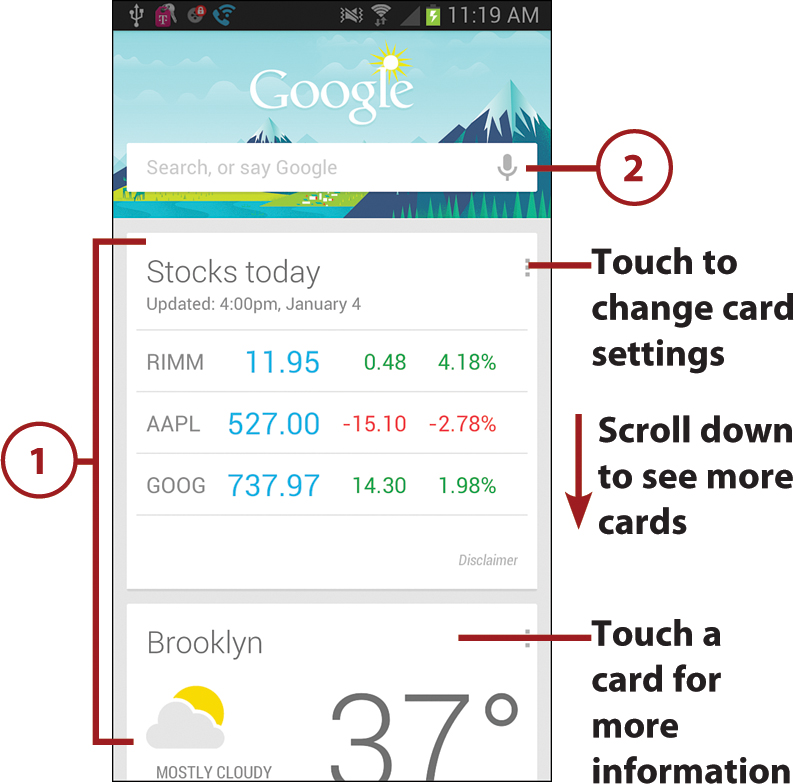
1. Touch the Menu button.
2. Touch Settings.

3. Touch Google Now.
4. Touch to change how Google Now shows different cards. You can control if the card shows, what information it shows, and when it shows it.
5. Touch to save your changes and return to the main Settings screen.

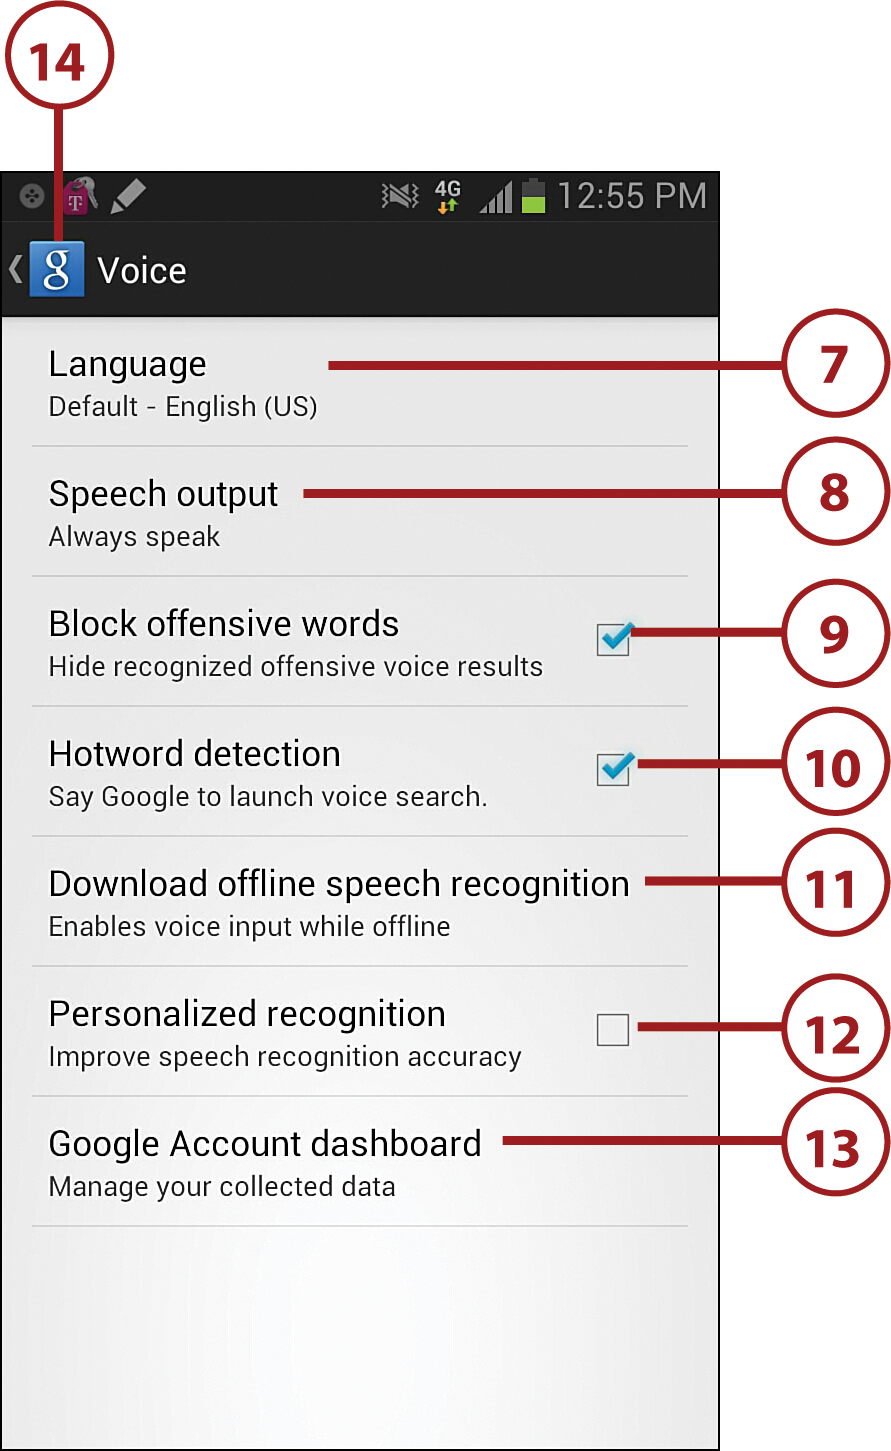
6. Touch Voice.

7. Touch to choose the language that Google Now uses.
8. Touch to set when you can speak to Google Now. The choices are Always or Only When You Are Using a Hands-free Device.
9. Touch to block or allow offensive words. Turning this on causes the Voice Search feature to hide any search results that contain offensive words.
10. Touch to enable or disable Hotword detection. When enabled, while Google Now is running, it is always listening for you to say “Google.” When you do, a voice search launches.
11. Touch to download speech recognition software so you can do voice searches even when you’re not connected to the Internet. You can download multiple languages.
12. Touch to enable or disable personalized voice recognition. When enabled, Google tries to better understand your accent to make for more accurate searches.
13. Touch to see your Google dashboard, which shows you all of your Google account information and enables you to manage settings for all of the Google services you use.
14. Touch to save your changes and return to the main Settings screen.
15. Touch to choose which apps installed on your Galaxy Note II are searched when you search using Google Now.
16. Touch to change which Google account you want to use for Google Now, and set whether you want to report your location information. (Disabling this severly limits the usefulness of Google Now.)
17. Touch to save your changes and return to Google Now.

Set Up Google Maps
Because Google Now relies heavily on Google Maps, you need to change a few things in Google Maps and tell Google Maps where you live and work.
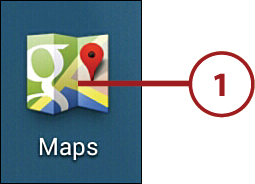
1. Touch to launch Google Maps.
2. Touch for Maps options.
3. Touch My Places.
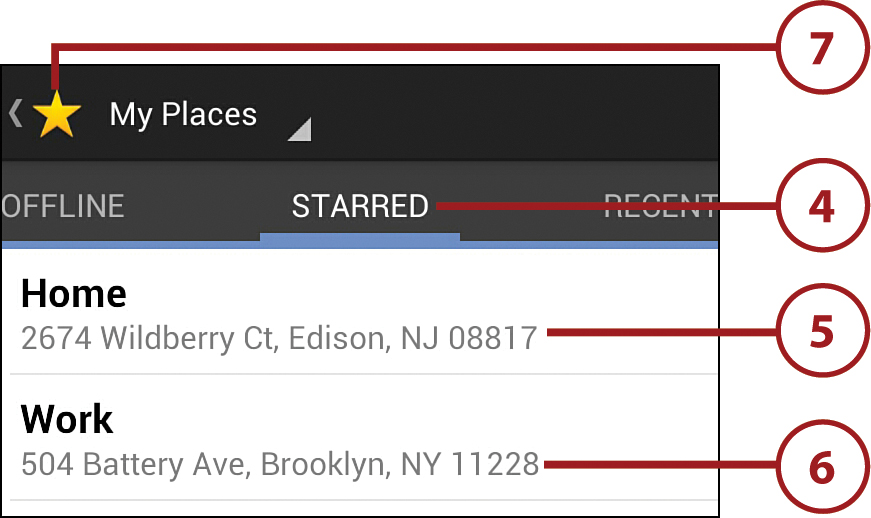
4. Touch Starred.
5. Touch and hold to enter your home address, or edit it.
6. Touch and hold to enter your work address, or edit it.
7. Touch to close the My Places screen.
8. Touch the Menu button.
9. Touch Settings.
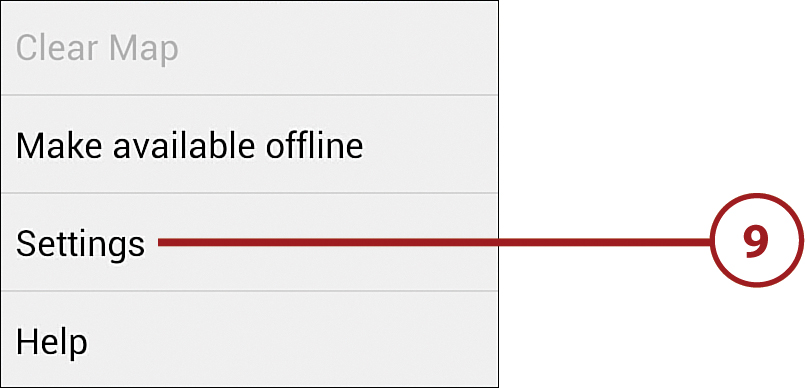
10. Touch Location Settings.
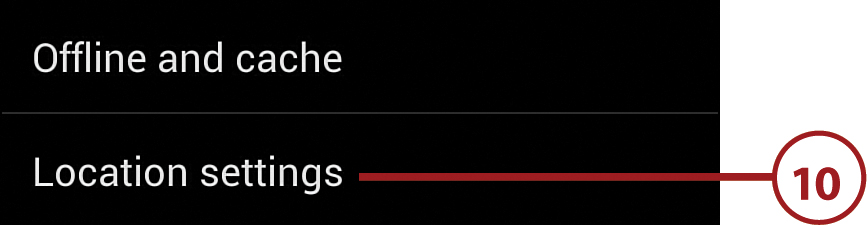
11. Make sure that Enable Location History is checked.

12. Touch the Back button to save your changes and return to the previous screen.
Google Maps
Google Maps enables you to see where you are on a map, find points of interest close to you, give you driving or walking directions, and provide extra layers of information, such as a Satellite view and traffic.
1. Touch to launch Google Maps.

2. Touch to type a search term.
3. Touch to get walking or driving directions from one location to another. You can also choose to use public transit or biking paths to get to your destination.
4. Touch to find local restaurants, coffee shops, bars, and attractions. This menu item also shows you special offers in the area.
5. Touch to add layers to the Map view. Layer options include restaurants, offers, traffic, a Satellite view, transit lines, biking paths, and Wikipedia entries for the area.

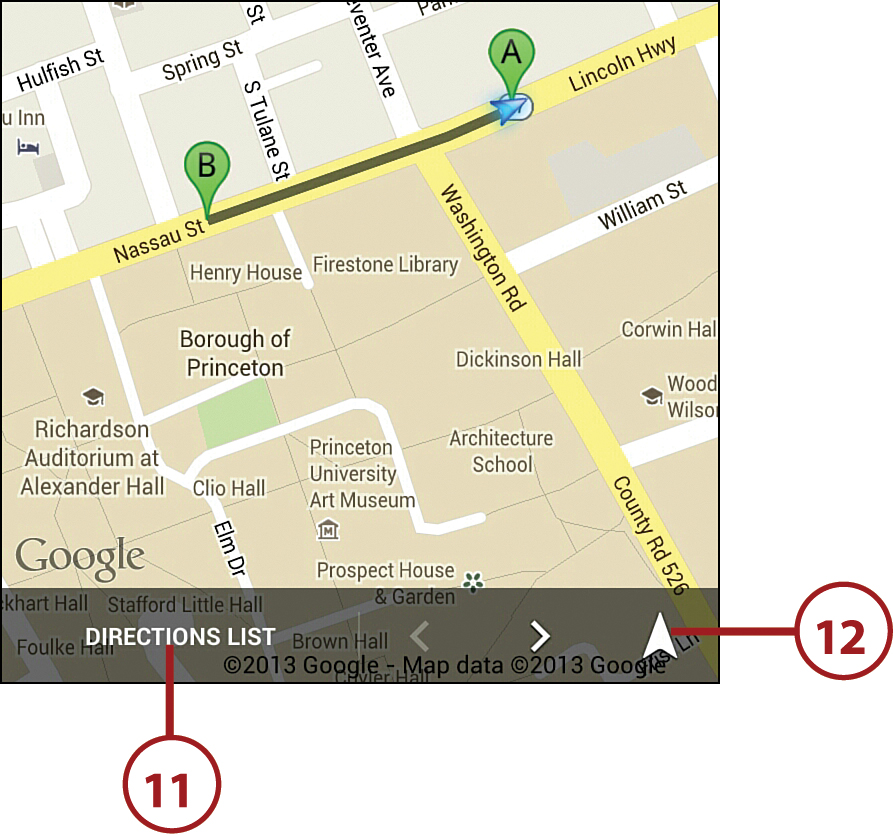
Get Directions
Most people use Google Maps to get directions to where they want to go. Here is how.
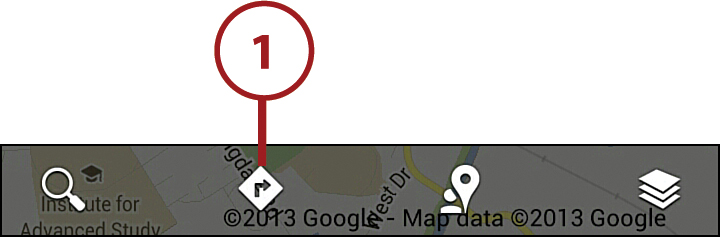
1. Touch the Directions icon.
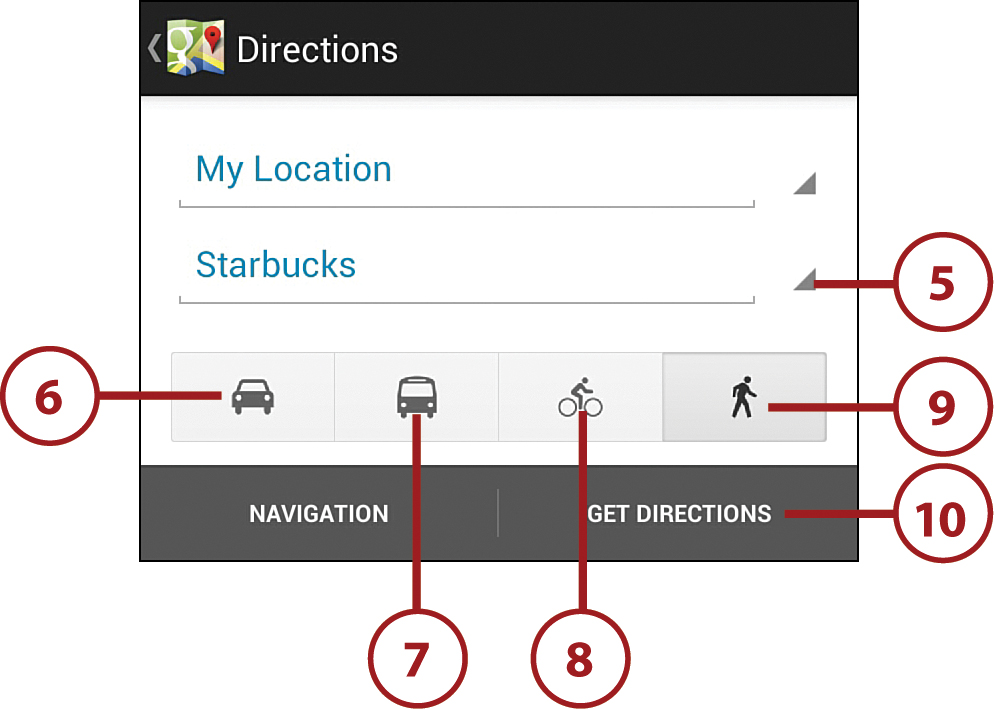
2. Touch to set the starting point or leave it as My Location (which is your current location).
3. Touch to choose a location from your Contacts, My Places, or a point on the map.
4. Type in the destination address.

5. Touch to choose a location from your Contacts, My Places, or a point on the map.
6. Touch to use driving directions.
7. Touch to use public transportation.
8. Touch to use bike paths (if available).
9. Touch to walk to your destination.
10. Touch to see the directions on the map.
Public Transportation
If you choose to use public transportation to get to your destination, you have two extra options to use. You can choose the type of public transportation, including bus, subway, train, or tram/light rail. You can also choose the best route, including fewer transfers and less walking.

11. Touch to see the directions as a list.
12. Touch to launch the Navigation app to provide spoken turn-by-turn directions to your destination.
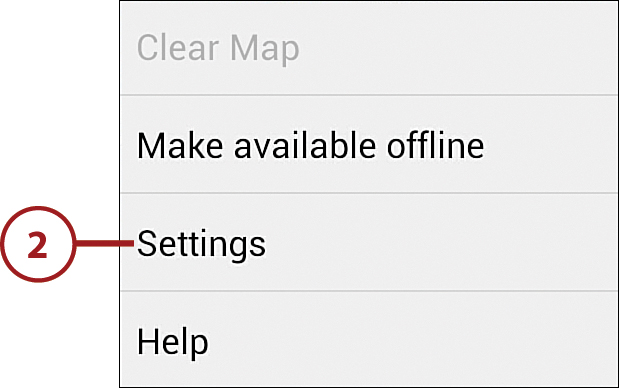
2. Touch Settings.
3. Touch Display to tweak what is shown on the map. For example, you can change the bubble that appears above a landmark to show Navigation, Call, or Street View instead of the standard Get Directions.
4. Touch to remove all cached maps. This forces Google Maps to redownload new map areas as needed.
5. Touch to switch to another Google account to use Google Maps.
6. Touch to change your Google Map location setting.
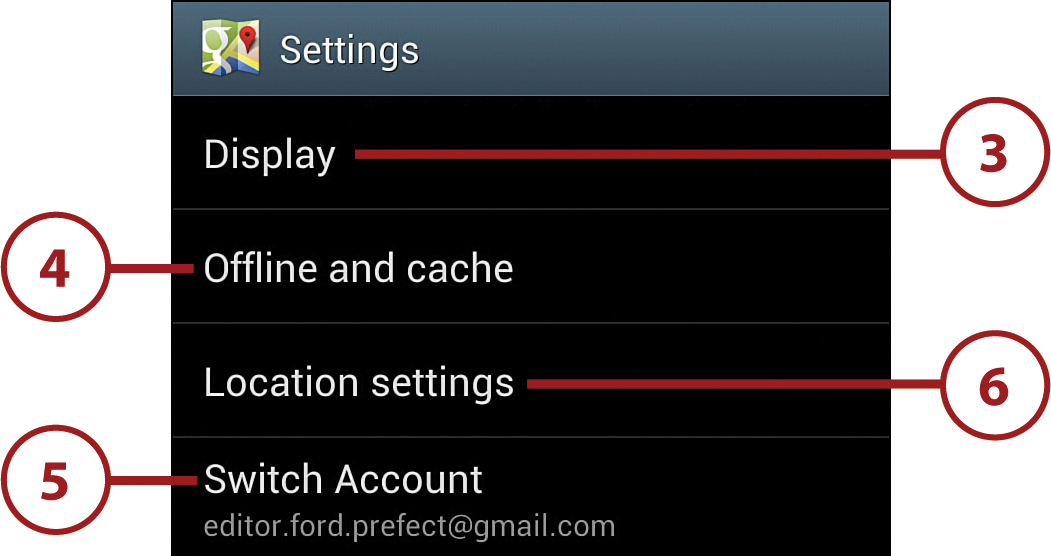
7. Touch to change how Google Maps knows where you are. You can leave it as Detect Your Location (meaning Google Maps uses your GPS location information) or change it to a specific address.
8. Touch to enable or disable reporting your location from your Galaxy Note II. Combined with the next setting, you can update your location automatically so your friends can see where you are.
9. Touch to enable sharing your location with your friends. Which friends see your location is set in the next step.
10. Touch to manage which of your friends see where you are.

11. Touch to enable location history where Google Maps keeps track of where you have been. Having this enabled makes Google Now much better.
12. Touch to have Google Maps automatically check you into places you visit and have designated as places you visit a lot.
13. Scroll down for more settings.
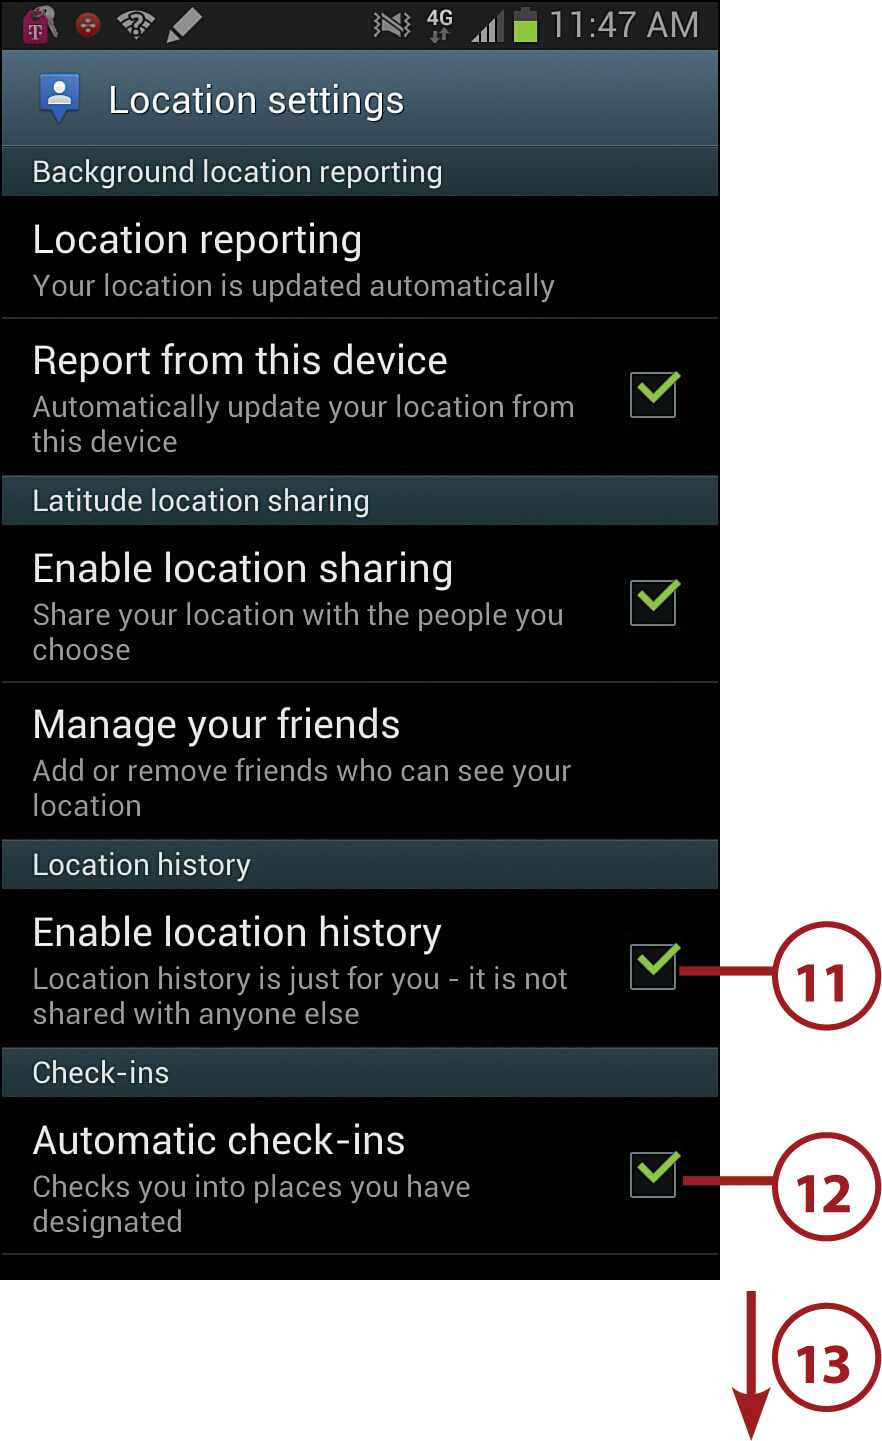
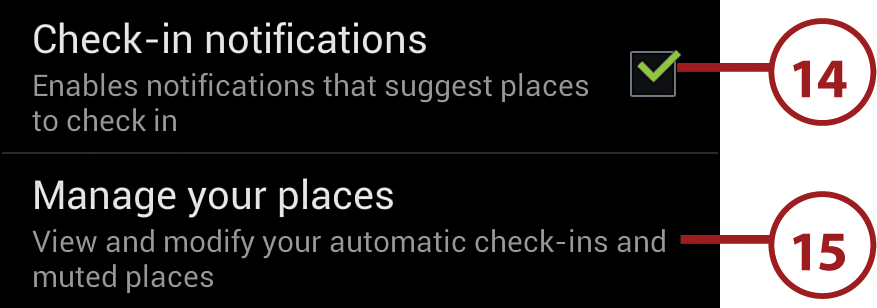
14. Touch to enable check-in notifications, which enables Google Maps to suggest places for you to visit based on where you are.
15. Touch to manage your places, which includes places you check into often and places you want to mute (or do not want to hear about).
16. Touch the Back button to save your changes and return to the previous screen.
Use Offline Google Maps
Google Maps enables you to download small parts of the global map to your Galaxy Note II. This is useful if you are traveling and need an electronic map but cannot connect to a network to download it in real time.
1. Touch the Menu button.
2. Touch Make Available Offline.

3. Pinch to zoom out.
4. Move the blue selection square over the area you want to take offline. This area can be anywhere on the globe.
5. Touch Done to start downloading the map data to your Galaxy Note II.


How Much Map Can I Take Offline?
When selecting the area of the map to take offline, you are limited to about 100Mb of map data. However, you don’t need to worry about the size of the data because if you have selected an area that is too large, Google Maps gives you a warning.
Access Google Maps Offers
Google Maps has a feature that enables you to see offers from local businesses, shops, and restaurants. If there are coupons to use, you can use them right from your Galaxy Note II.
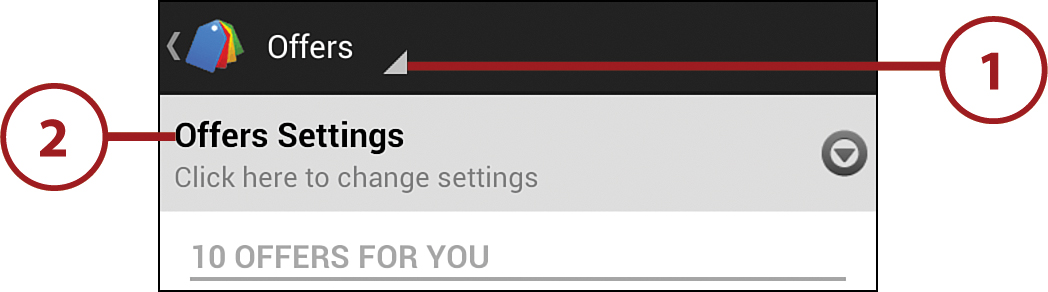
1. Touch and choose Offers.
2. Touch Offers Settings to make sure that you have this feature enabled. If you do already, skip to step 4.
3. Touch Notify Me of Nearby Offers.

4. Touch an offer to view it.

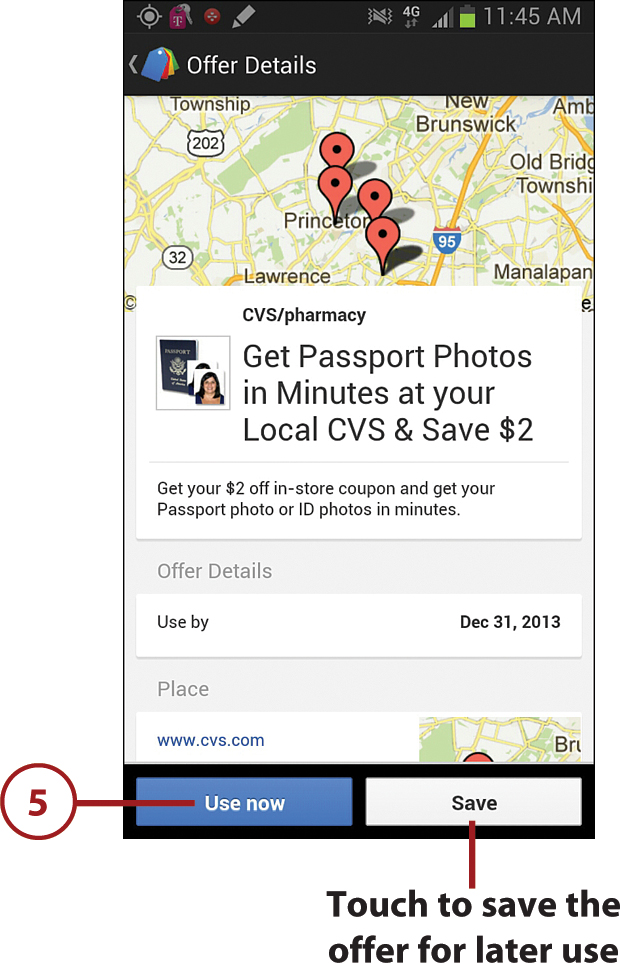
6. Touch Continue.

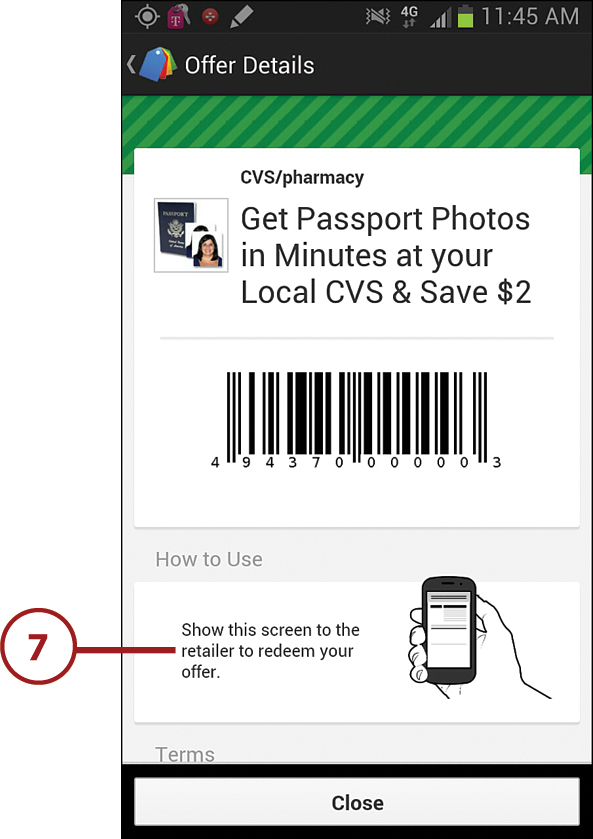
7. Follow the onscreen instructions. The offers can either be used via bar code, QR code, or Near Field Communications (NFC).
Locate Friends with Google Latitude
Google Maps includes Google Latitude that can show where your friends and family are on the map in real time.
1. Touch and choose Latitude.
2. Touch to correct any settings that are required for Latitude to work.
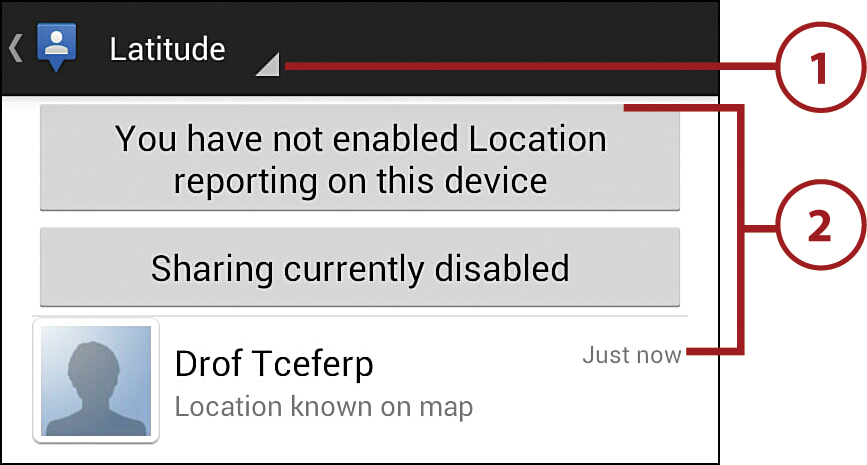
3. Touch to see where all of your friends are plotted on the map.
4. Touch to request permission from your friends and family to allow you to see their location in Latitude.
5. Touch to check in to a location.
6. Touch to manually refresh the list of your friends. After your friends have given their permission, they are displayed here.

Navigation
The Navigation app provides the same functionality as built-in car navigation systems or portable navigation units you can buy and stick to your windshield. Combined with a good window mount, the Navigation app provides the same functionality but free of charge.
1. Touch to launch Navigation.

2. Touch to type a destination.
3. Touch to speak a destination. This allows you to speak the destination or name of destination instead of typing it.
4. Touch to see the map.
5. Touch to choose to go home. If you have not previously used this selection, you need to type in your home address.

6. Drive, cycle, or walk and listen to the audible turn-by-turn navigation instructions until you reach your destination.
7. Touch to show a list of actions.
8. Touch to adjust the route preferences and find alternative routes.
9. Touch to see the entire route in a list.
10. Touch to change the Navigation app setting for screen dimming, set a new destination, or search for a destination.
11. Touch to add or remove layers from the Navigation view. These include Satellite view, traffic, parking, gas stations, ATMs and banks, and restaurants.
12. Touch to turn off the voice prompts.
13. Touch to exit navigation.
