1. Connecting to Bluetooth, Wi-Fi, and VPNs

In this chapter, you discover your Galaxy Note II’s connectivity capabilities, including Bluetooth, Wi-Fi, VPN, and NFC. Topics include the following:
→ Pairing with Bluetooth devices
→ Connecting to Wi-Fi networks
→ Working with virtual private networks (VPN)
→ Using your Galaxy Note II as a Wi-Fi hotspot
→ Using Near Field Communications (NFC) and beaming
Your Galaxy Note II can connect to Bluetooth devices, such as headsets, computers, and car in-dash systems, as well as to Wi-Fi networks, and 2G, 3G, and 4G cellular networks. It has all the connectivity you should expect on a great smartphone. Your Galaxy Note II can also connect to virtual private networks (VPNs) for access to secure networks. Your Galaxy Note II can even share its cellular data connection with other devices over Wi-Fi.
Connecting to Bluetooth Devices
Bluetooth is a great personal area network (PAN) technology that allows for short-distance wireless access to all sorts of devices, such as headsets, other phones, computers, and even car in-dash systems for hands-free calling. The following tasks walk you through pairing your Galaxy Note II to your device and configuring options.
Pair with a New Bluetooth Device
Before you can take advantage of Bluetooth, you need to connect your Galaxy Note II with that device, which is called pairing. After you pair your Galaxy Note II with a Bluetooth device, the two devices can connect to each other automatically in the future.
Putting the Bluetooth Device into Pairing Mode First
Before you pair a Bluetooth device to your Galaxy Note II, you must first put it into Pairing mode. If you are pairing with a Bluetooth headset, you normally have to hold the button on the headset for a certain period of time. Please consult your Bluetooth device’s manual on how to put that device into Pairing mode.
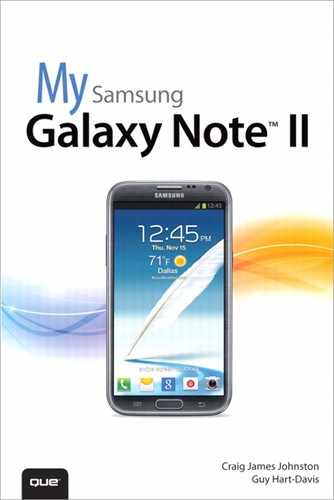
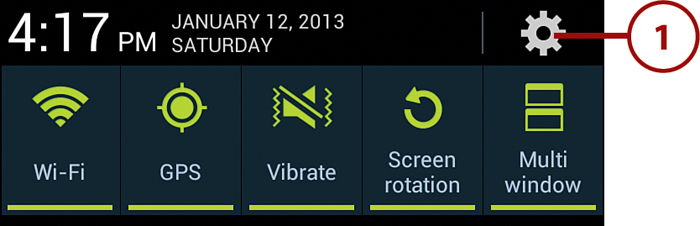
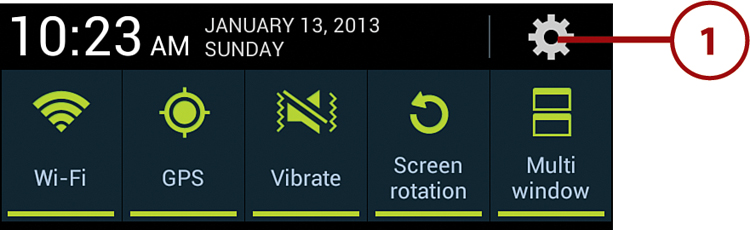
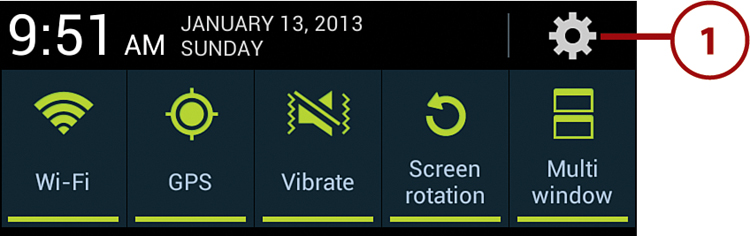
1. Pull down the Notification bar and touch the Settings icon.
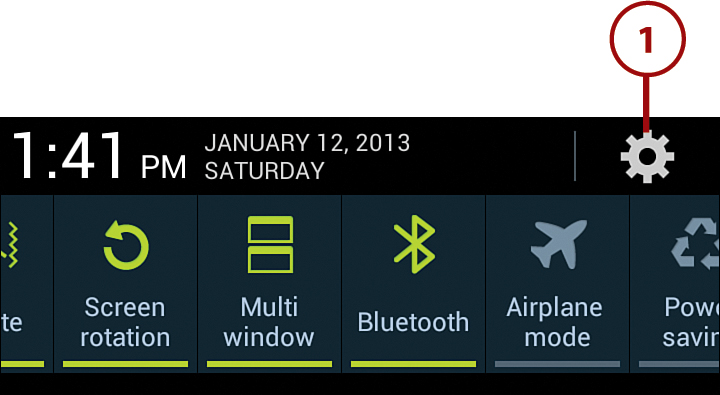
2. Touch Bluetooth under the Wireless and Network section.

3. Touch Scan if you don’t see the device you want to connect to in the list of discovered devices.
4. Touch the Bluetooth device you want to connect to. In this example, we are going to connect to the 520Plantronics headset.
5. Touch Device Name to change the name that your Galaxy Note II uses when it broadcasts on the Bluetooth network.
6. If all went well, your Galaxy Note II should now be paired with the new Bluetooth device.
Bluetooth Passkey
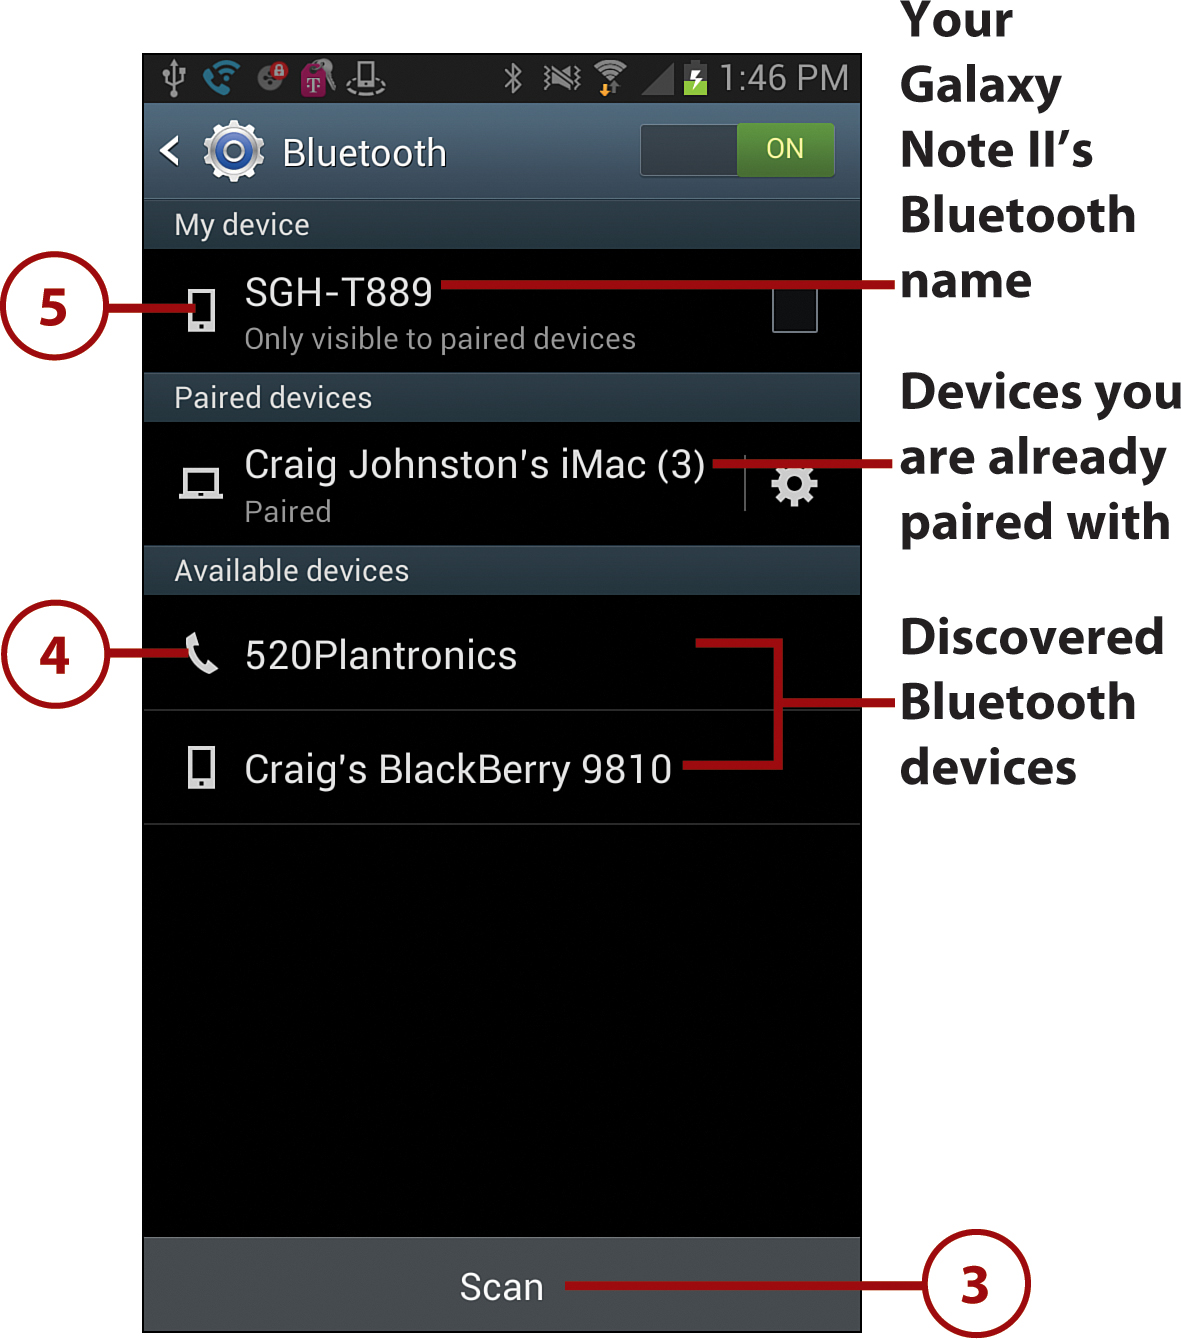
If you are pairing with a device that requires a passkey, such as a car in-dash system or a computer, the screen shows a passkey. Make sure the passkey is the same on your Galaxy Note II and on the device you are pairing with. Touch Pair on your Galaxy Note II and confirm the passkey on the device you are pairing with.

All Zeros
If you are pairing with an older Bluetooth headset, you might be prompted to enter the passkey. Try using four zeros; it normally works. If the zeros don’t work, refer to the headset’s manual.

Change Bluetooth Settings
You can change the name your Galaxy Note II uses when pairing over Bluetooth. You can also change the amount of time it remains visible when pairing.
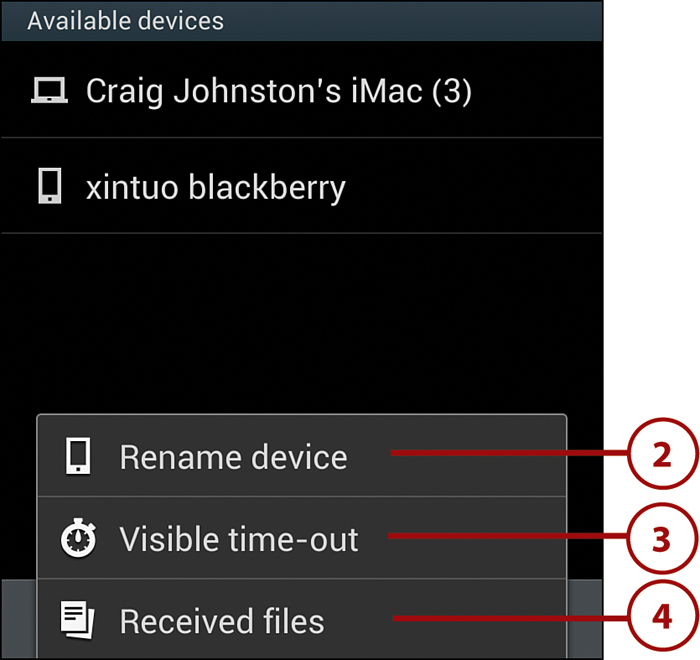
1. Touch the Menu button.
2. Touch to rename your Galaxy Note II phone. You can change it from the obscure Samsung model number to something more friendly like “Craig’s Galaxy Note II.”
3. Touch to change how long your Galaxy Note II stays visible when pairing.
4. Touch to see any files people have sent you over the Bluetooth network.
Change Bluetooth Device Options
After a Bluetooth device is paired, you can change a few options for some of them. The number of options depends on the Bluetooth device you are connecting to. Some have more features than others.
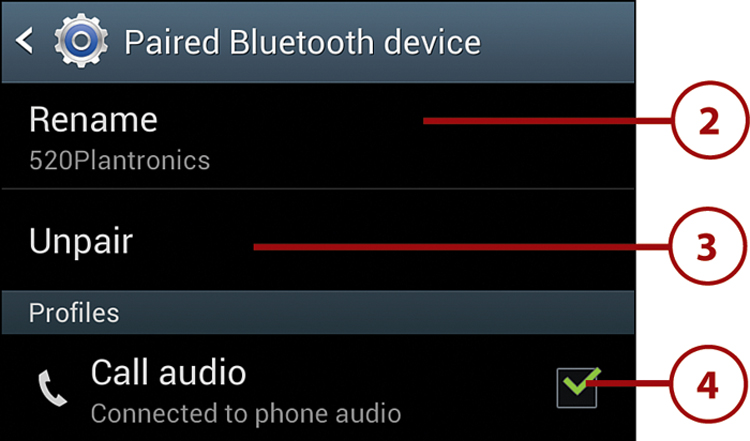
1. Touch the Settings icon to the right of the Bluetooth device.

2. Touch to rename the Bluetooth device to something more friendly.
3. Touch to disconnect and unpair the Galaxy Note II from the Bluetooth device. If you do this, you won’t be able to use the Bluetooth device again until you redo the pairing as described in the “Pair with a New Bluetooth Device” task.
4. Touch to enable and disable using this device for phone calls. Sometimes Bluetooth devices have more than one profile. You can use this screen to select which ones you want to use.
Bluetooth Profiles
Each Bluetooth device can have one or more Bluetooth profiles. Each Bluetooth profile describes certain features of the device. This tells your Galaxy Note II what it can do when connected to the device. A Bluetooth headset normally only has one profile, such as Phone Audio. This tells your Galaxy Note II that it can only use the device for phone call audio. Some devices might have this profile but also provide other features such as a Phone Book Access profile, which would allow it to synchronize your Galaxy Note II’s address book. The latter is typical for car in-dash Bluetooth.
Quick Disconnect
To quickly disconnect from a Bluetooth device, touch the device on the Bluetooth Settings screen and then touch OK.
Wi-Fi
Wi-Fi (Wireless Fidelity) networks are wireless networks that run within free radio bands around the world. Your local coffee shop probably has free Wi-Fi, and so do many other places, such as airports, train stations, malls, and other public areas. Your Galaxy Note II can connect to any Wi-Fi network and provide you higher Internet access speeds than the cellular network.
Connect to Wi-Fi
The following steps explain how to find and connect to Wi-Fi networks. After you have connected your Galaxy Note II to a Wi-Fi network, you automatically are connected to it the next time you are in range of that network.
1. Pull down the Notification bar and touch the Settings icon.

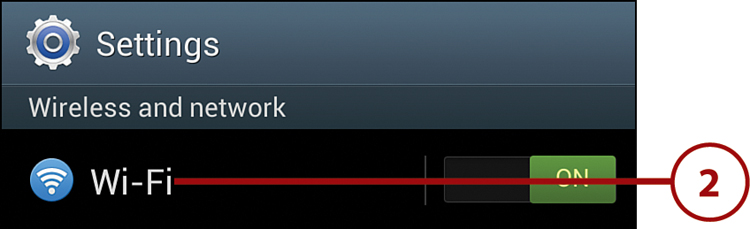
2. Touch Wi-Fi under the Wireless and Network section.

3. Touch to turn Wi-Fi on if the slider is in the off position.
4. Touch the name of the Wi-Fi network you want to connect to. If the network does not use any security, you can skip to step 7.

5. Enter the Wi-Fi network password.
6. Touch to connect to the Wi-Fi network.

Adding a Hidden Network
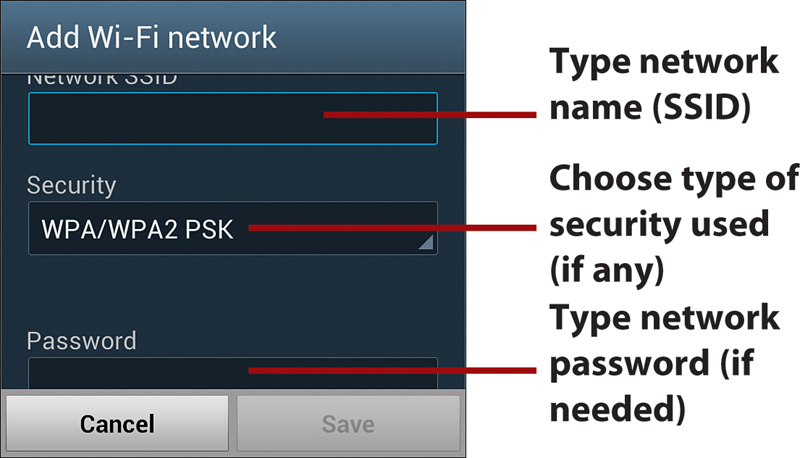
If the network you want to connect to is not listed on the screen, it might be purposely hidden. Hidden networks do not broadcast their names (which are known as their service set identifier [SSID]). You need to scroll down to the bottom of the listed Wi-Fi networks and touch Add Wi-Fi Network, type in the SSID, and choose the type of security that the network uses. You need to get this information from the network administrator before you try to connect.
7. If all goes well, you see the Wi-Fi network in the list with the word Connected under it.
Can’t Connect to Wi-Fi?
If all does not go well, you might be typing the password or encryption key incorrectly. Verify this with the person who owns the Wi-Fi network. Sometimes there is a lot of radio interference that causes problems. Ask the person who owns the Wi-Fi network to change the channel it operates on and try again.
Wi-Fi Network Options
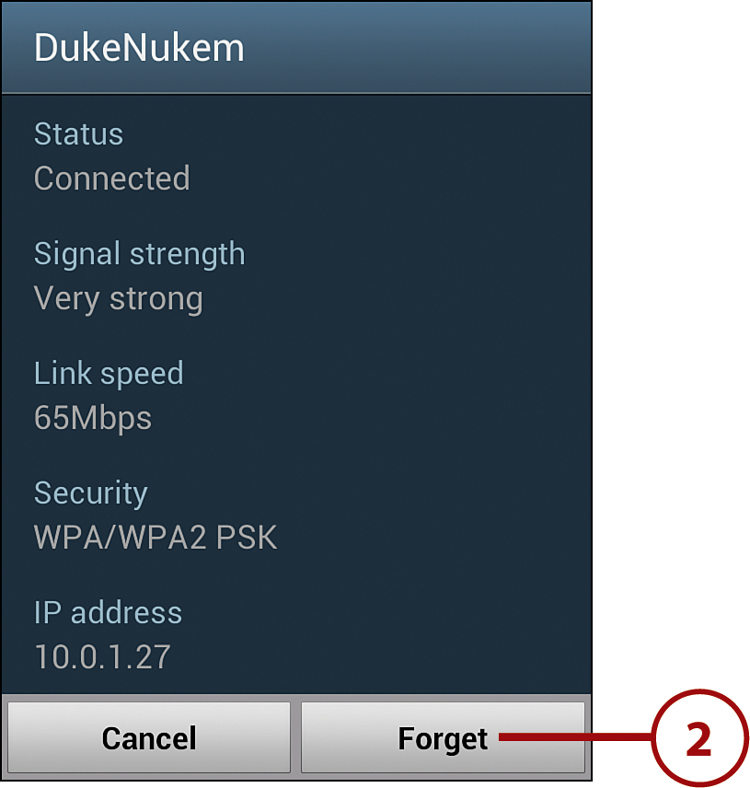
1. Touch a Wi-Fi network to reveal a pop-up that shows information about your connection to that network.

2. Touch Forget to tell your Galaxy Note II to not connect to this network in the future.
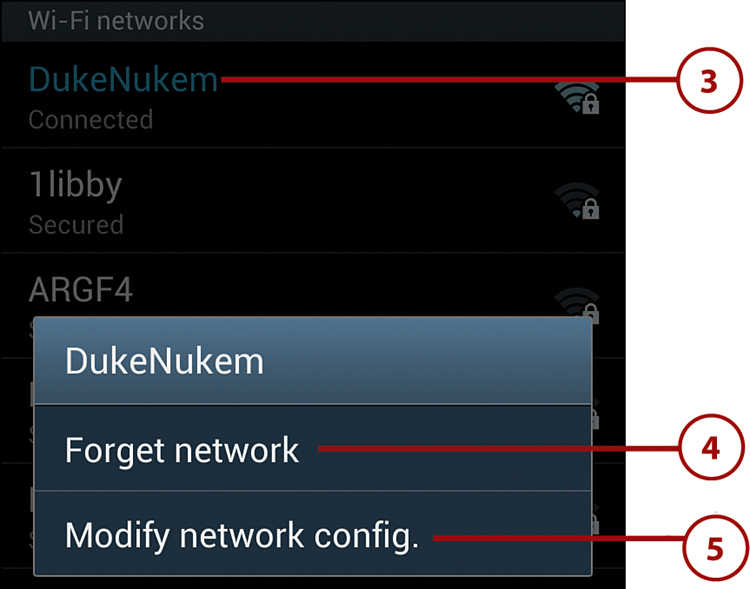
3. Touch and hold on a Wi-Fi network to reveal two actions.
4. Touch to forget the Wi-Fi network and no longer connect to it.
5. Touch to change the Wi-Fi network password or encryption key that your Galaxy Note II uses to connect to the network.
Advanced Wi-Fi Options
Your Galaxy Note II enables you to configure a few advanced Wi-Fi settings that can actually help preserve your battery life.
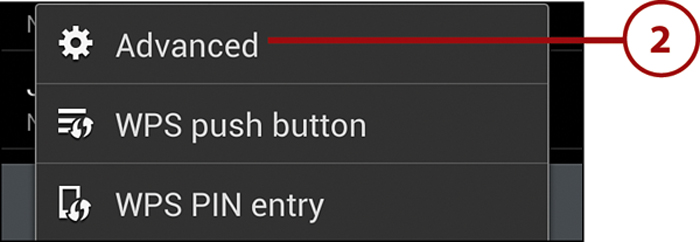
1. Touch the Menu button.
2. Touch Advanced.
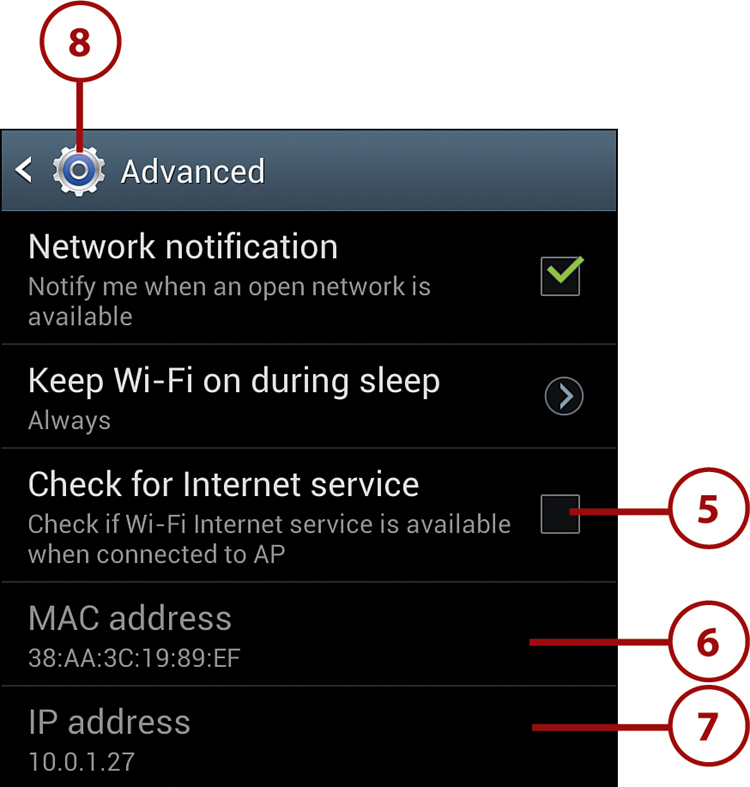
3. Touch to enable or disable the ability for your Galaxy Note II to automatically notify you when it detects a new Wi-Fi network.
4. Touch to change the Wi-Fi sleep policy. This enables you to choose if your Galaxy Note II should keep its connection to Wi-Fi when it goes to sleep.
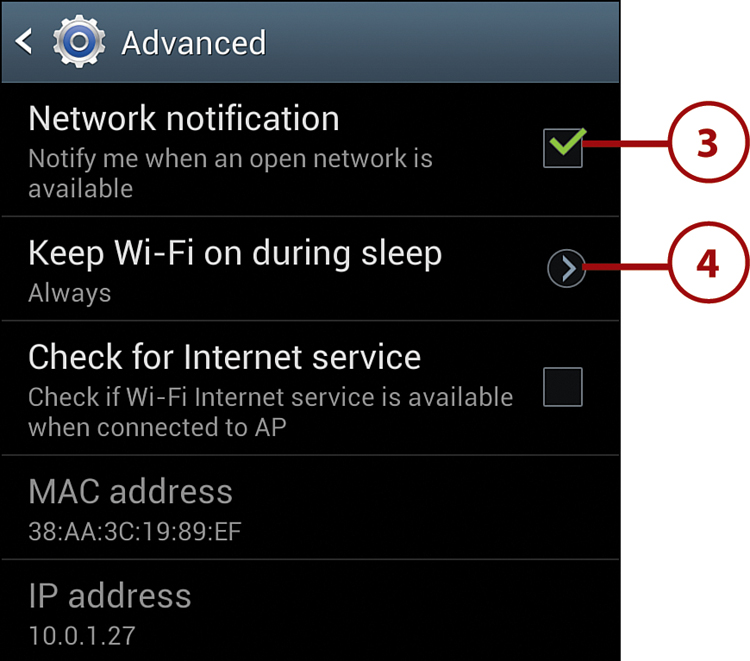
Should You Keep Wi-Fi on During Sleep?
In step 3 of the “Advanced Wi-Fi Options” task, you can choose how your Galaxy Note II handles its connection to Wi-Fi when it goes to sleep. Because Wi-Fi is much faster, more efficient than 3G or 4G, and is free, you should keep this set to Always. However, battery usage can be affected by always being connected to Wi-Fi, so you might want to set this to Only When Pluggd In, which means that if your Galaxy Note II is not charging, and it goes to sleep, it switches to the cellular network for data; when the Galaxy Note II is charging and it goes to sleep it stays connected to Wi-Fi. If you set this setting to Never, it means that when your Galaxy Note II goes to sleep, it switches to using the cellular network for all data. This can lead to more data being used out of your cellular data bundle, which might cost extra, so be careful.
5. Touch to make your Galaxy Note II check to make sure that the Wi-Fi network you connect to has access to the Internet.
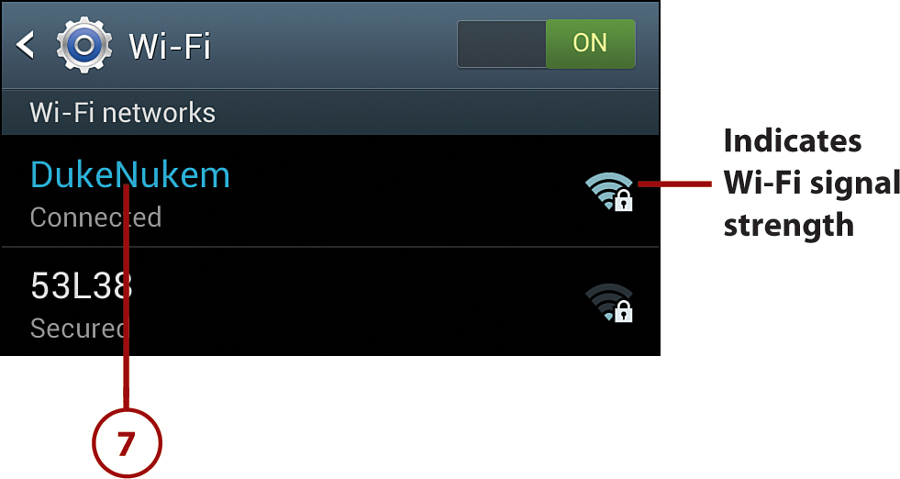
6. Use this Wi-Fi MAC address if you need to provide a network administrator with your MAC address in order to be able to use a Wi-Fi network.
7. This shows the IP address that has been assigned to your Galaxy Note II when it connected to the Wi-Fi network.
8. Touch to save your changes and return to the previous screen.
Wi-Fi Direct
Wi-Fi Direct is a feature that allows two Android devices running version 4.1 (Jelly Bean) or later to connect to each other using Wi-Fi so they can exchange files. Because Wi-Fi is much faster than Bluetooth, if you are sending large files, using Wi-Fi Direct makes sense. Although Wi-Fi Direct is built into Jelly Bean Android devices, such as your Galaxy Note II, and you can successfully connect to devices, the actual sending of files between them doesn’t work. It appears that Google added the functionality, but never extended it to the apps so they can make use of it.
Set Up Wi-Fi Direct
At the time of writing, Wi-Fi Direct doesn’t work. If it starts working in the future, use these steps to set it up.
1. Pull down the Notification bar and touch the Settings icon.
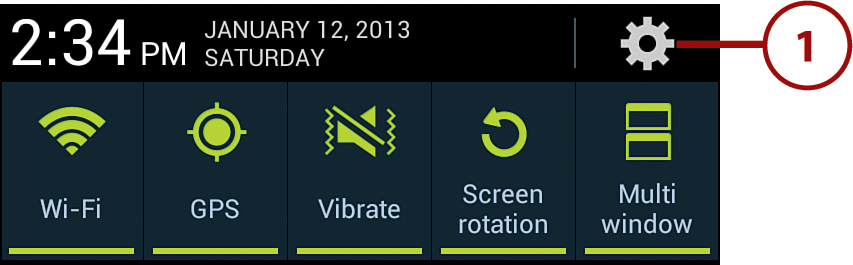
2. Touch Wi-Fi under the Wireless and Network section.
3. Touch Wi-Fi Direct.

4. Touch the Menu button.
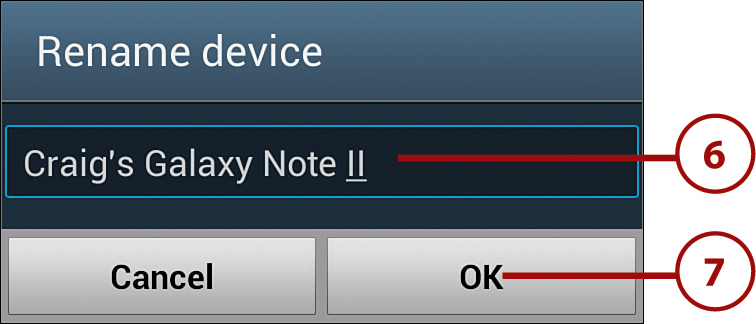
5. Touch Rename Device to rename your Galaxy Note II from its generic name to something more meaningful.

6. Type a new name for your Galaxy Note II as it will appear to others using Wi-Fi Direct.
7. Touch OK.
Use Wi-Fi Direct (the Official Way)
Follow these steps to connect two Android devices running version 4.1 (Jelly Bean) or later via Wi-Fi Direct. After they are connected, you should theoretically be able to send files between them, but as of the writing of this book, it does not work. Repeat steps 1 and 2 in the “Set Up Wi-Fi Direct” task if you are not already on the Wi-Fi Direct screen.
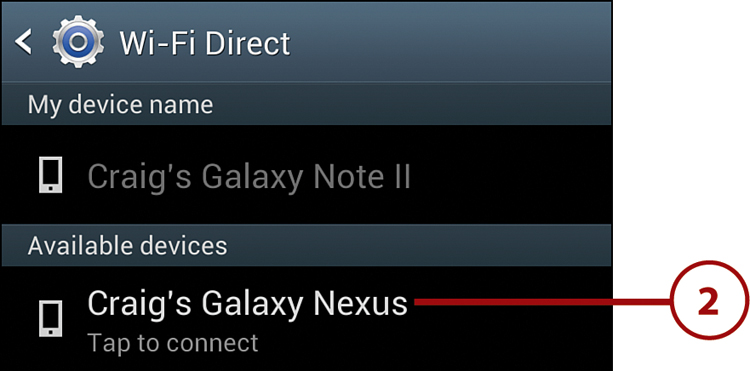
1. Ask the other person to enable Wi-Fi Direct on his Android device. After he does, the device should appear on your screen under Available Devices.
2. Touch the device to invite it to connect with your Galaxy Note II via Wi-Fi Direct.
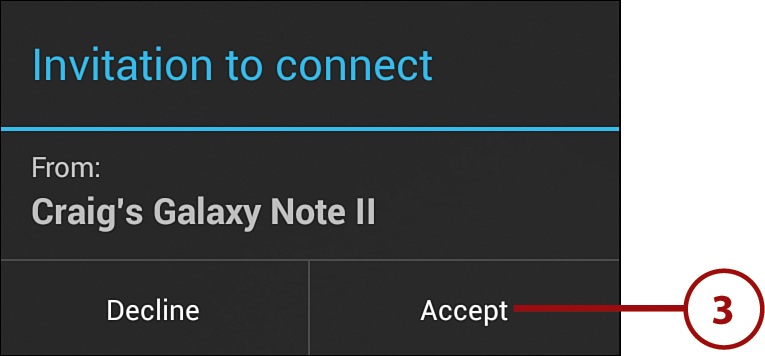
3. Ask the other person to touch Accept on the device you are inviting.
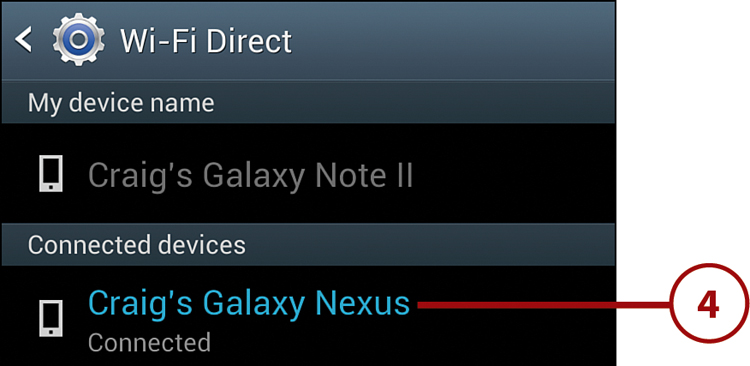
4. The device will show as Connected.
After You Are Connected, Then What?
After you are connected with another device via Wi-Fi Direct, theoretically you should be able to open a picture, video, or music file, touch the Share icon, and share the file via Wi-Fi Direct. When you touch to share it via Wi-Fi Direct, you see a list of devices connected via Wi-Fi Direct. Touch to choose the device you want to share it with. This functionality, however, does not work at all (or at least it didn’t during the writing of this book). To use Wi-Fi Direct successfully, you should just use Samsung’s S Beam, which uses Near Field Communications (NFC) to set up a Wi-Fi Direct connection between two Samsung phones running Android 4.1 or later. Read more about S Beam later in this chapter.


Use Wi-Fi Direct (Use WiFi Shoot)
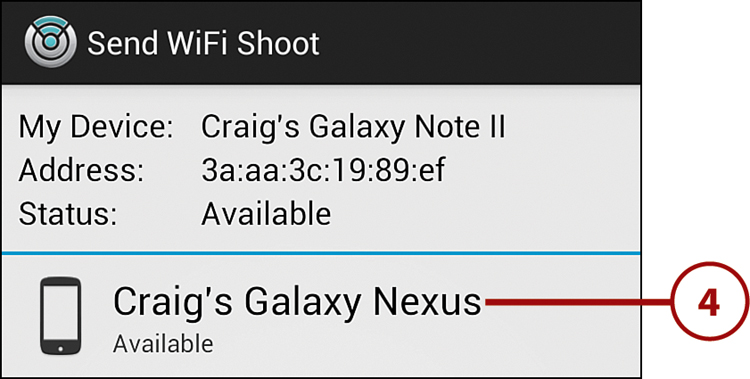
Because the official method of using Wi-Fi Direct doesn’t work, you can download an app called WiFi Shoot from Google Play (see Chapter 11, “Working with Android Apps,” for more on how to use Google Play). WiFi Shoot, although not perfect, should allow you to send files via Wi-Fi Direct. To use WiFi Shoot, you and the person you want to share files with must both install and open WiFi Shoot.
1. Ask the other person to run WiFi Shoot on her Android device before you start.
2. Find a picture, music file, or video file you want to share and touch the Share icon.
3. Touch WiFi Shoot.

4. Touch the device you want to send the file to.
5. The user of the other device must accept the connection.
6. Touch Shoot to send the file to the other device.

Near Field Communications (NFC)
Your Galaxy Note II has the ability to swap data via its NFC radio with other phones that use NFC or read data that is stored on NFC tags. You can also use NFC to pay for items you have purchased. Android Beam and Samsung S Beam also use NFC to send files between Android devices by setting up the sending process automatically via NFC, and continuing it via Bluetooth or Wi-Fi Direct.
Enable NFC, Android Beam, and S Beam
To get the full benefit from NFC, you need to enable the NFC radio. You should also enable Android Beam and S Beam.
1. Pull down the Notification bar and touch the Settings icon.
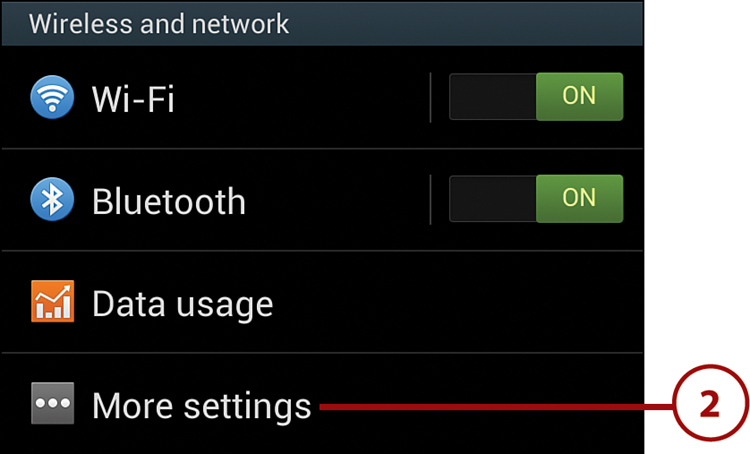
2. Touch More Settings in the Wireless and Network section.
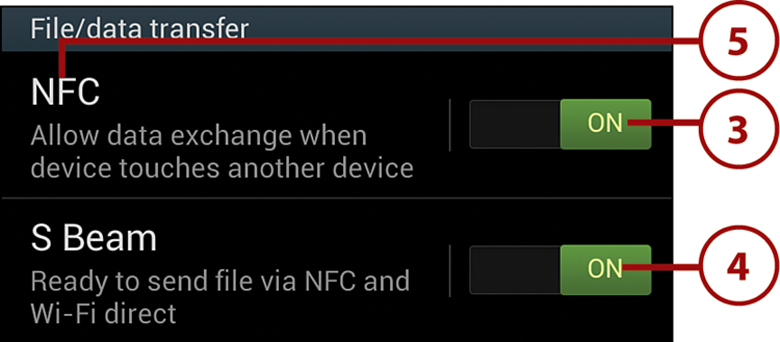
3. Touch to enable NFC.
4. Touch to enable S Beam.
5. Touch NFC to see more settings.
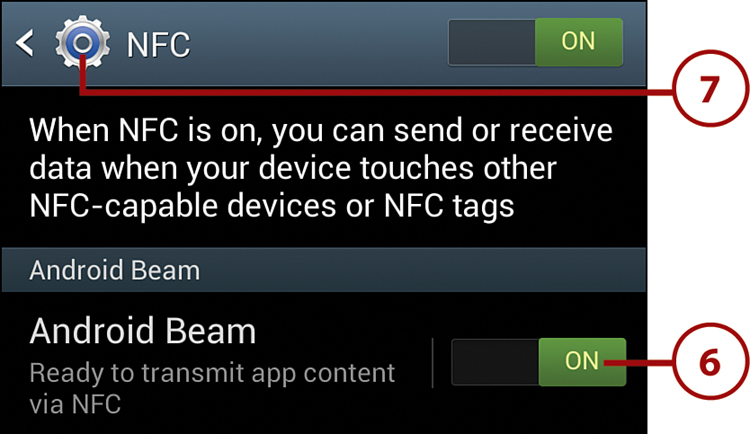
6. Touch to enable Android Beam. (See the next section for more about Android Beam.)
7. Touch to save your changes.
Use Android Beam to Send Links to Content
You can use Android Beam to send links to content—such as apps, music, and video in the Google Play store or website links—to another device. Android Beam only works between devices that are both running Android 4.0 (Ice Cream Sandwich) or later.
1. Open a website that you’d like to share the link to.

2. Put the back of your Galaxy Note II about 1″ from the back of another NFC-enabled phone. You know that the two devices have successfully connected when the web page zooms out.
3. Touch the web page after it zooms out.
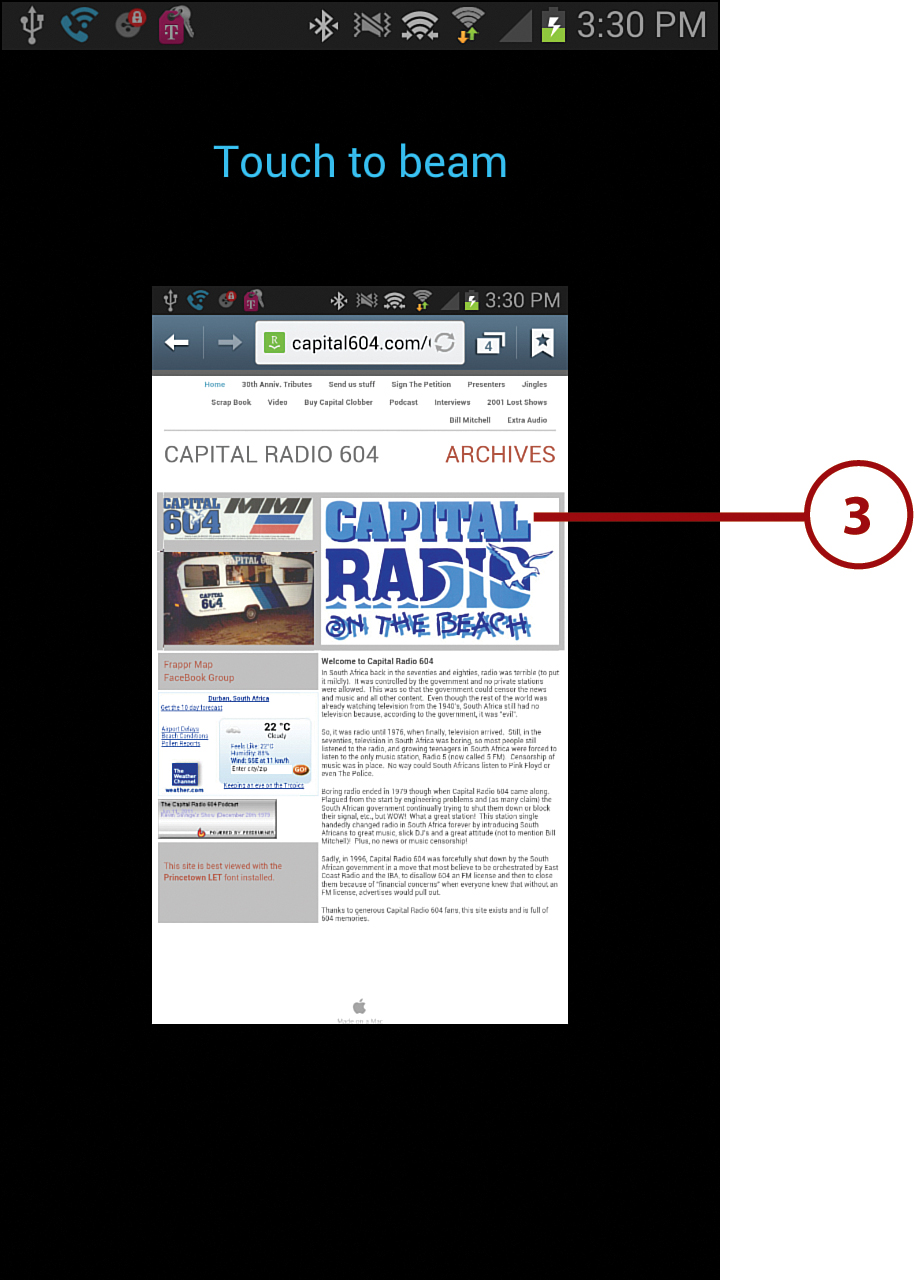
4. The browser on the other device opens and immediately loads the link you shared.
Beam Google Play Content and YouTube Videos
If you like a song, movie, book, or app that is in the Google Play store, you can beam it to someone. Simply open the song, movie, book, or app in Google Play, touch your devices together, and touch to beam. To beam a YouTube video, open the video in the YouTube app, touch the devices together, and touch to beam. The other device opens YouTube and jumps directly to the video.
Use Android Beam to Send Real Files
You can also use Android Beam to send real content such as pictures, music, and video that’s stored on your Galaxy Note II. Sending real files using Android Beam only works between devices that are running Android 4.1 (Jelly Bean) or later. This task describes how to beam a picture.
1. Open the picture you want to beam. Note that the picture must reside on your Galaxy Note II and not in the Google Cloud.
2. Put the back of your Galaxy Note II about 1″ from the back of another NFC-enabled phone. You know that the two devices have successfully connected when the picture zooms out.
3. Touch the picture after it zooms out.
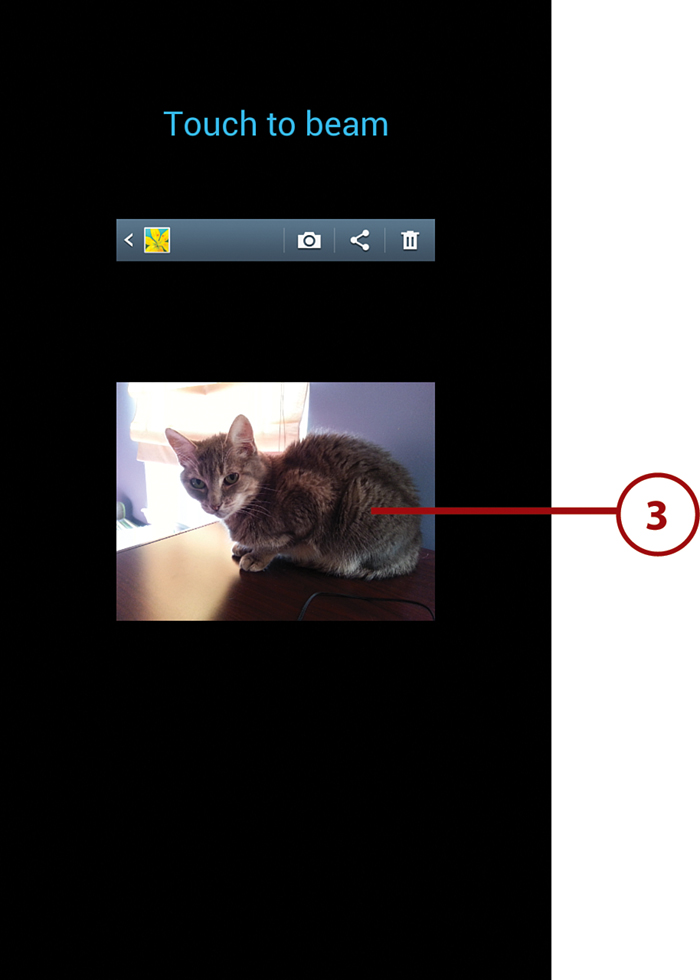
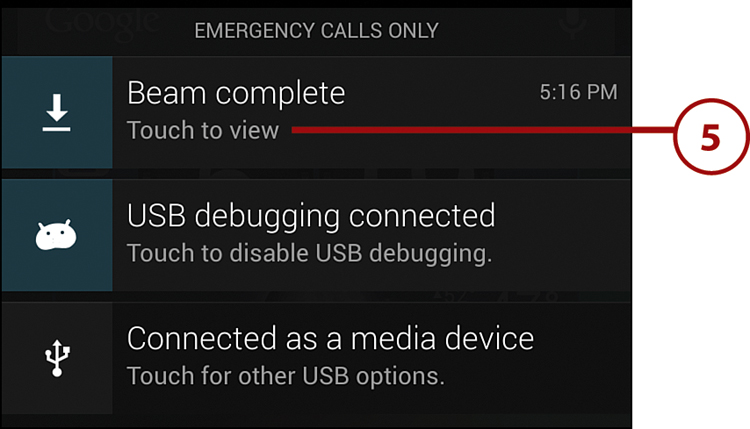
4. Your Galaxy Note II sends the picture to the other device. The file is sent using Bluetooth in the background.
5. Touch to open the beamed file on the other device after it has been completely received.
Use Samsung S Beam to Send Files
Samsung S Beam is Samsung’s version of Android Beam, and you can use it to send real content, such as pictures, music, and video, that’s stored on your Galaxy Note II. Samsung S Beam only works between Samsung Android devices that also support S Beam. This task describes how to beam a picture.
1. Open the picture you want to send via S Beam. Note that the picture must reside on your Galaxy Note II and not in the Google Cloud.
2. Put the back of your Galaxy Note II about 1″ from the back of another S Beam–enabled Samsung device. You know that the two devices have successfully connected when the picture zooms out.
3. Touch the picture after it zooms out.
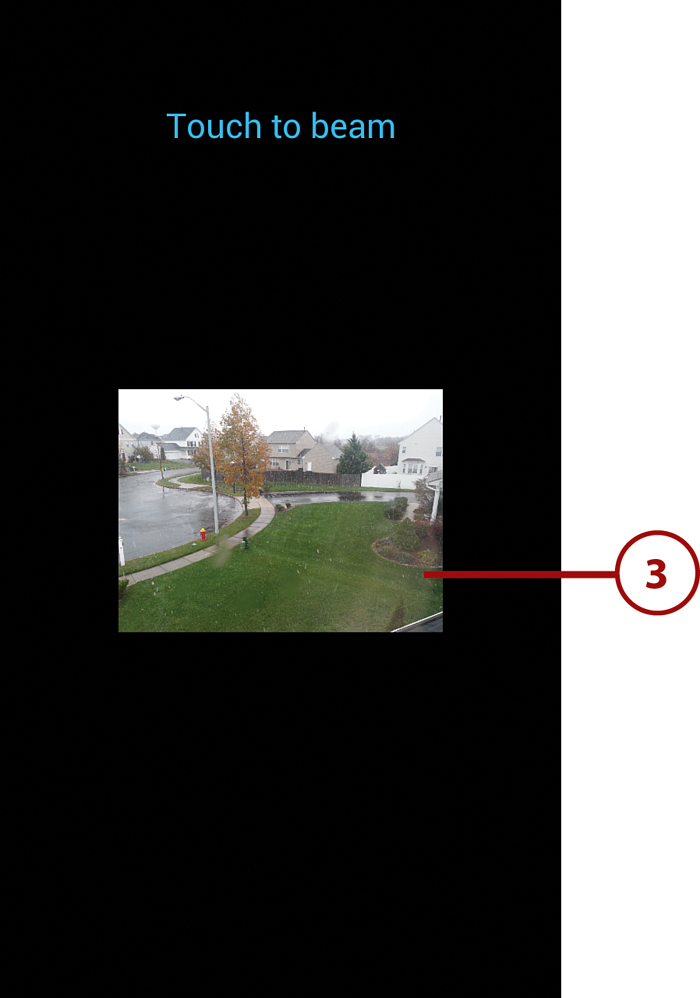
4. Separate the two devices as instructed on the screen.
5. Your Galaxy Note II sends the picture to the other device. The file is sent using Wi-Fi Direct in the background.

Cellular Networks
Your Galaxy Note II can connect to many different cellular networks around the world. The exact networks that it can connect to are determined by the variant of Galaxy Note II you have because not all carriers use the same technology. To complicate things even more, many devices use different frequencies from one another.
Change Mobile Settings
Your Galaxy Note II has a few options when it comes to connecting to cellular (or mobile) networks.
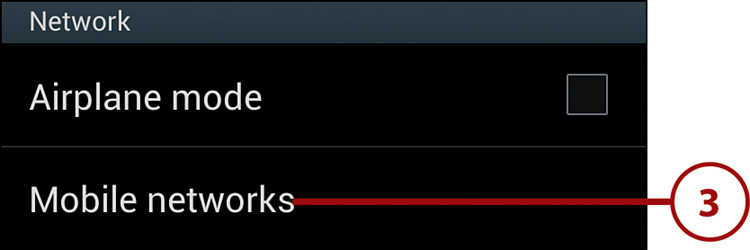
1. Pull down the Notification bar and touch the Settings icon.

2. Touch More Settings under the Wireless and Network section.

3. Touch Mobile Networks.
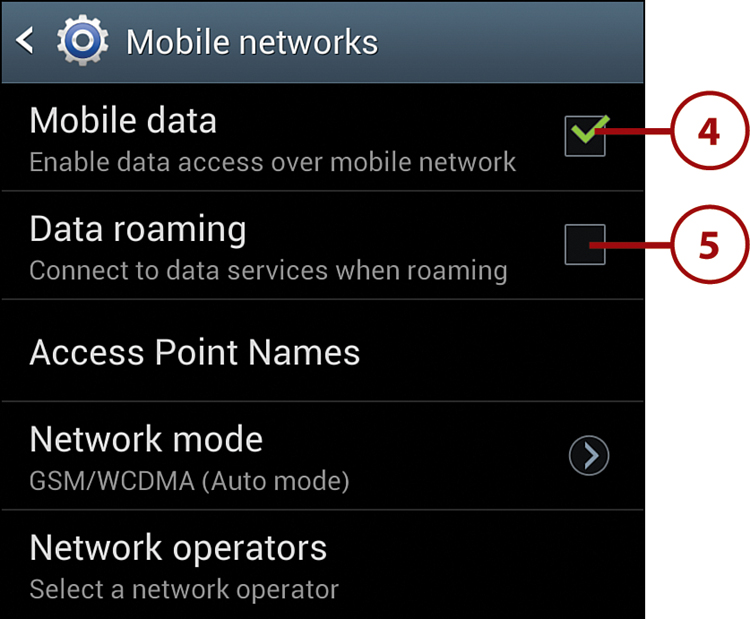
4. Touch to enable or disable cellular data. If this option is unchecked, your Galaxy Note II is able to use only Wi-Fi networks for data.
5. Touch to enable or disable cellular data roaming. If this is unchecked, your Galaxy Note II does not attempt to use data while you roam away from your home cellular network.
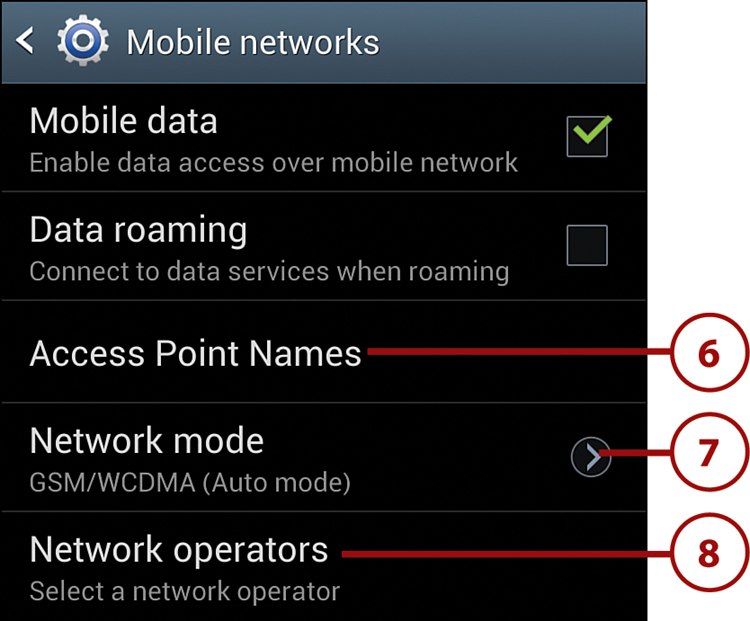
APN stands for Access Point Name. You normally don’t have to make changes to APNs, but sometimes you need to enter them manually to access certain features. For example, if you need to use tethering, which is where you connect your laptop to your Galaxy Note II and your Galaxy Note II provides Internet connectivity for your laptop, you might be asked by your carrier to use a specific APN. Think of an APN as a gateway to a service.
6. Touch to view, edit, and add APNs. It is unlikely that you need to make any APN changes.
7. Touch to change the network mode. This setting enables you to choose to force your phone to connect to a slower 2G network to save battery or always to a faster 3G or 4G network for the best speed, or to leave it set to Auto mode and let your phone choose for you.
Can I Disable Mobile Data?
If you disable mobile data, you can save on battery life; however, you effectively kill the functionality of any app that needs to be connected all the time, such as instant messaging apps (Yahoo! or Google Talk) or apps like Skype. You also stop receiving email in real time. When this feature is disabled, about 5 minutes after your Galaxy Note II goes to sleep, it disconnects from the mobile data network; however, it remains connected to the mobile voice network.
8. Touch to view and choose mobile operators to use manually.
Virtual Private Networks (VPN)
Your Galaxy Note II can connect to virtual private networks (VPNs), which are normally used by companies to provide a secure connection to their inside networks or intranets.
Add a VPN
Before you add a VPN, you must first have all the information needed to set it up on your Galaxy Note II. Speak to your network administrator to get this information ahead of time (and save yourself some frustration). The information you need includes the type of VPN protocol used, the type of encryption used, and the name of the host to which you are connecting.
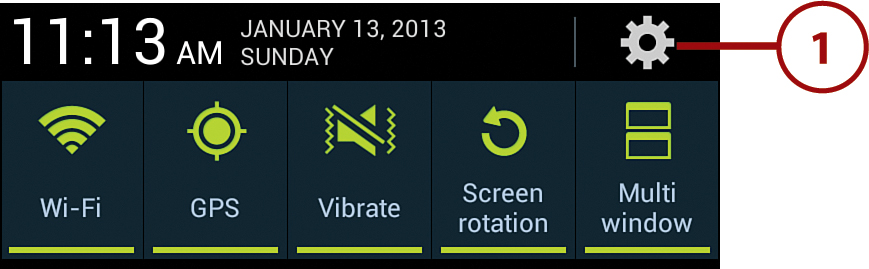
1. Pull down the Notification bar and touch the Settings icon.
2. Touch More Settings under the Wireless and Network section.

4. Touch OK to set up a screen lock PIN, pattern, or password. If you already have a screen lock PIN or password, you won’t be prompted at this point, and you can proceed to step 6.
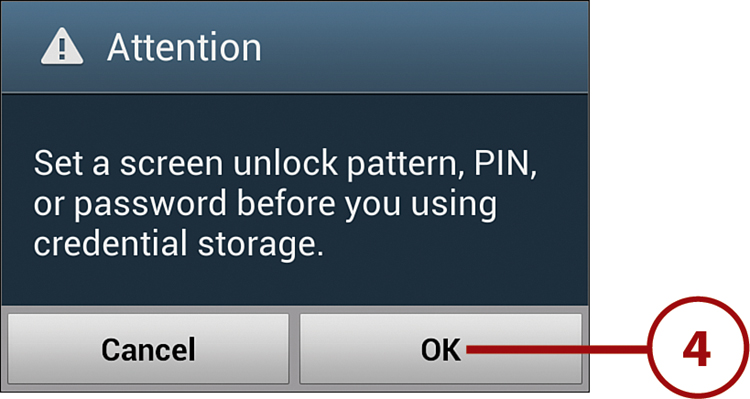
Why Do You Need to Set a PIN or Password?
If you don’t already have a screen lock PIN, password, or pattern set up before you create your first VPN network connection, you are prompted to create one. This is a security measure that ensures your Galaxy Note II must first be unlocked before anyone can access a stored VPN connection. Because VPN connections are usually used to access company data, this is a good idea.
5. Choose either a pattern, PIN, or password to unlock your Galaxy Note II and follow the steps to create it.

6. Touch Add VPN Network.

7. Enter a name for your VPN network. You can call it anything like Work VPN or the name of the provider like PublicVPN.
8. Touch to choose the type of encryption the VPN network uses.
9. Enter the remaining parameters that your network administrator has provided.
10. Touch Save.

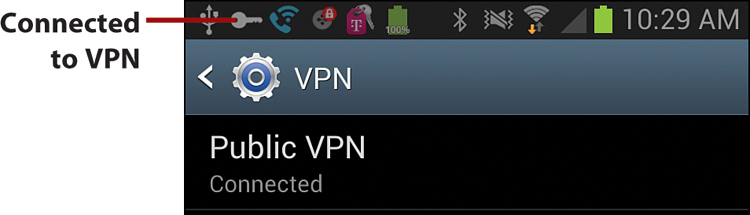
Connect to a VPN
After you have created one or more VPN connections, you can connect to them when the need arises.
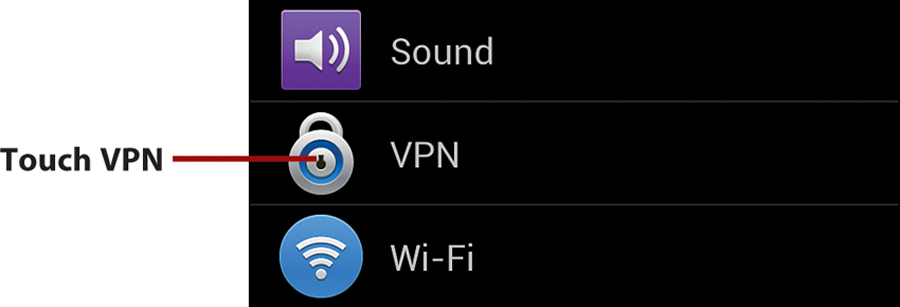
1. Pull down the Notification bar and touch the Settings icon.
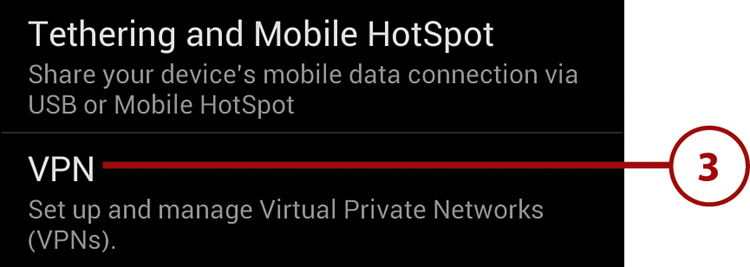
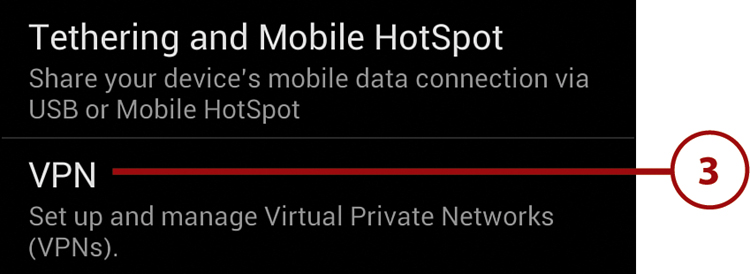
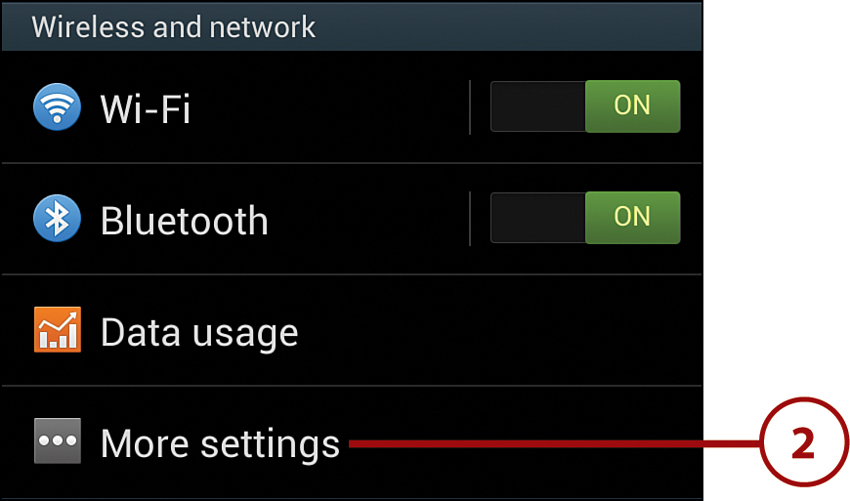
2. Touch More Settings under the Wireless and Network section.

3. Touch VPN.
4. Touch a preconfigured VPN connection.

5. Enter the VPN username.
6. Enter the VPN password.
7. Touch Connect. After you’re connected to the VPN, you can use your Galaxy Note II’s web browser and other applications normally, but you now have access to resources at the other end of the VPN tunnel, such as company web servers or even your company email.

Editing or Deleting a VPN
You can edit an existing VPN or delete it by touching and holding the name of the VPN. A window pops up with a list of options.


Mobile Wi-Fi Hotspot
Your Galaxy Note II has the ability to share its cellular data connection with up to eight devices over Wi-Fi. Before you use this feature, you need to normally sign up for a tethering or hotspot plan with your cellular provider, which is normally an extra monthly cost.
Start Your Mobile Wi-Fi Hotspot
1. Pull down the Notification bar and touch the Settings icon.
2. Touch More Settings in the Wireless and Network section.
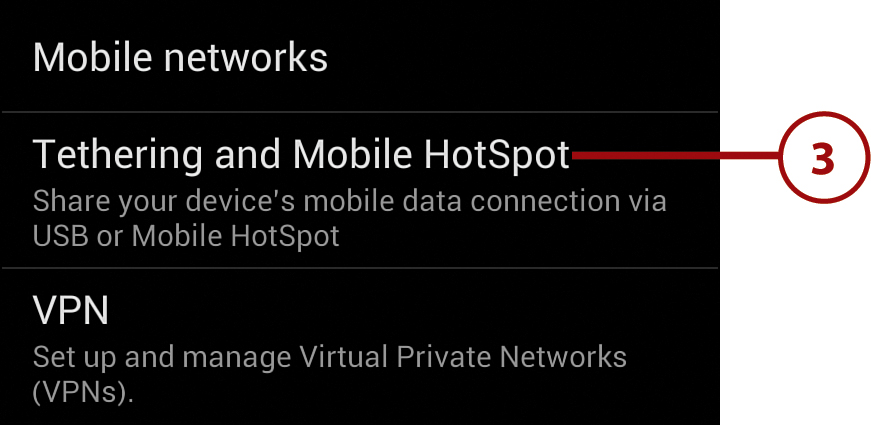
3. Touch Tethering and Mobile HotSpot.
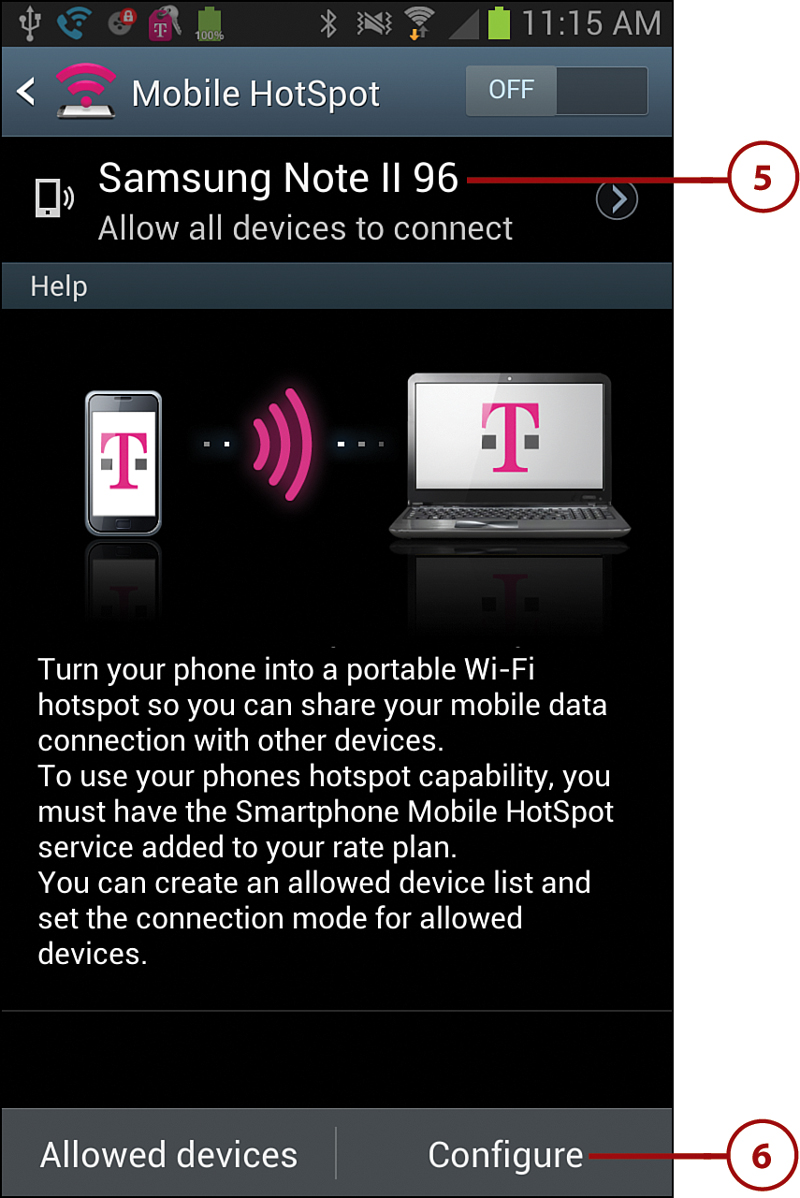
4. Touch Mobile HotSpot to configure the settings.

5. Touch to choose whether to allow any device to connect or only devices you allow.
6. Touch Configure.
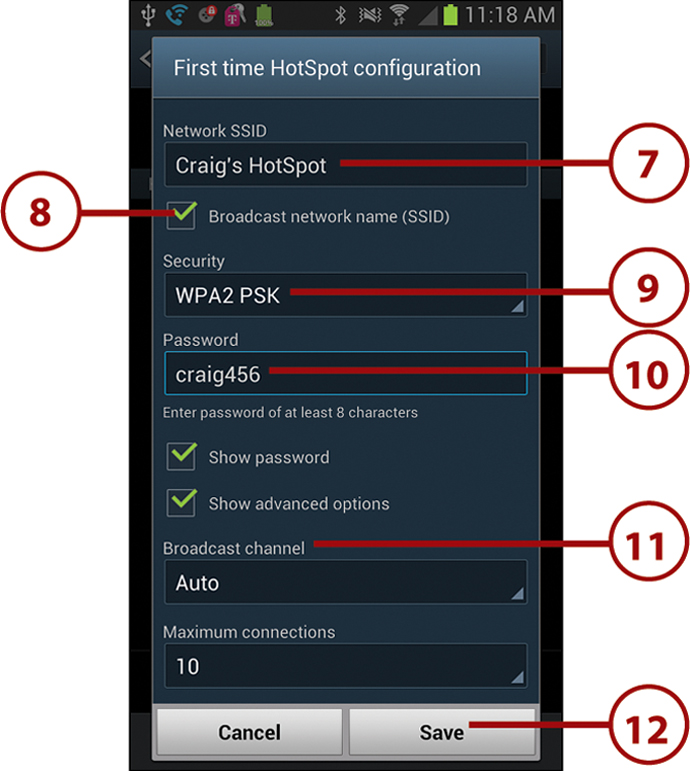
7. Choose a network name (also known as the SSID) for your mobile hotspot. You can leave it set to the auto-generated name or change it to something more friendly.
8. Touch to enable or disable broadcasting your Wi-Fi HotSpot’s network name (also called its SSID). If you choose not to broadcast it, your network will be hidden, but it requires more steps to connect to it.
9. Touch to choose the type of security to use for your mobile hotspot or choose Open to use no security.
10. Enter a password for your portable hotspot if you chose to use a security method in step 9.
11. Touch to change the broadcast channel and maximum connections advanced settings.
12. Touch to save your settings.
13. Touch to enable your portable hotspot.
14. Provide the network connection information to anyone you want to have connecting to your hotspot.

Limit Who Can Connect
People can only connect to your hotspot after you give them the connection information; however, you can further limit who can connect to your hotspot by allowing only certain devices.
1. Touch to add an already connected device to the allowed devices list.
2. Touch to add devices to the allowed list manually.

3. Touch to add a new allowed device using its MAC address. You need to ask the person who owns the device to give you his Wi-Fi MAC address ahead of time.
