Prologue: Getting to Know Your Galaxy Note II
In this chapter, you become familiar with the external features of the Galaxy Note II and the basics of getting started with the Android operating system. Topics include the following:
→ Getting to know your Galaxy Note II’s external features
→ Getting to know your Galaxy Note II’s S Pen (Stylus)
→ Learning the fundamentals of Android 4.1 (Jelly Bean) and TouchWiz
→ Setting up your Galaxy Note II for the first time
→ Installing desktop synchronization software
Let’s start by getting to know more about your Galaxy Note II by examing the external features, device features, and how the Android 4.1 operating system works.
In addition to Android 4.1 (Jelly Bean), this chapter covers the Samsung TouchWiz interface, which is overlaid on top of Android to adjust the way things look and function.
Your Galaxy Note II’s External Features
Becoming familiar with the external features of your Galaxy Note II is a good place to start because you will be using them often. This section covers some of the technical specifications of your Galaxy Note II, including the touchscreen, camera, and S Pen. There are many versions of the Samsung Galaxy Note II, but no matter which one you own or which wireless carrier you use to connect it, the exterior, functionality, and look and feel of the interface are exactly the same.
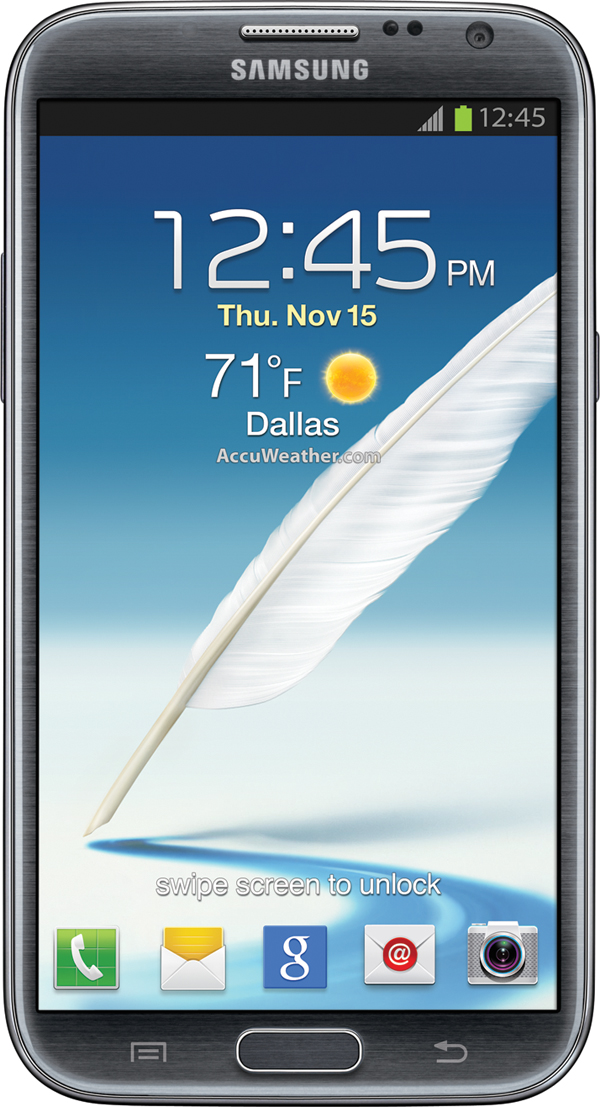
Front
• Proximity sensor—Detects when you place your Galaxy Note II against your head to talk, which causes it to turn off the screen so that your ear doesn’t inadvertently activate things on the screen.
• Light sensor—Adjusts the brightness of your Galaxy Note II’s screen based on the brightness of the ambient light.
• Earpiece—The part you hold against your ear while on a call.
• Indicator light—Indicates new events (such as missed calls, new Facebook messages, or new emails).
• Front camera—1.9-megapixel front-facing camera that can be used for video chat, taking self-portraits, and even unlocking your Galaxy Note II using your face.
• Touchscreen—The Galaxy Note II has a 5.5″ 720×1280 pixel Super AMOLED HD (Super Active-Matrix Organic Light-Emitting Diode) S-Stripe RGB screen that incorporates capacitive touch.
• Back button—Touch to go back one screen when using an application or menu. This is a touch-sensitive button.
• Menu button—Touch to see a context-aware menu of options based on the screen or app you are using.
• Home button—Press to go to the Home screen. The application that you are using continues to run in the background. Press and hold to see a list of recently used apps and switch between them. This is a physical button.
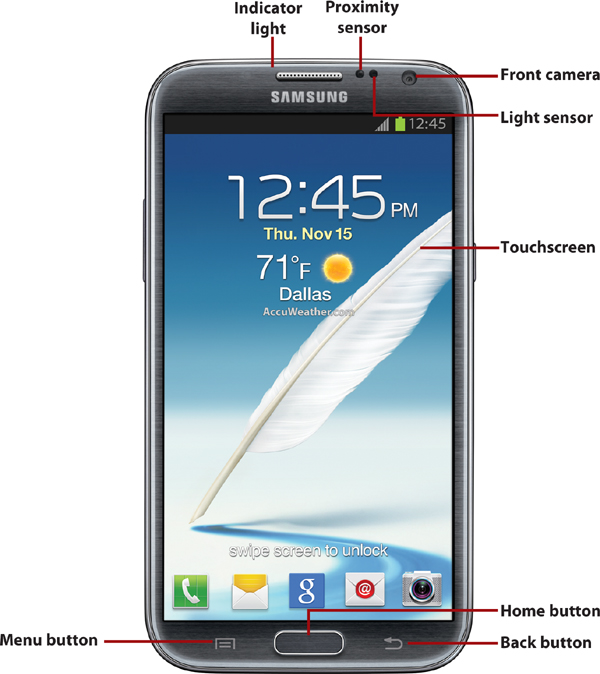
Back
• Volume up/down buttons—Enables you to control the audio volume on calls and while playing audio and video.
• Power button—Allows you to wake up your Galaxy Note II by pressing once. Press and hold for one second to reveal a menu of choices. The choices enable you to put your Galaxy Note II into Silent mode, Airplane mode, or power it off completely.
• Rear camera—8-megapixel camera with autofocus that takes clear pictures close-up or far away.
• LED (light-emitting diode) camera flash—Helps to illuminate the surroundings when taking pictures in low light.
• Speaker—Produces audio when speakerphone is in use. Place your Galaxy Note II on a hard surface for the best audio reflection.
• Back cover removal point—Allows you to remove the back cover. Insert your fingernail and pull to remove the back cover. After you have removed the back cover, you can install or swap SIM cards, and insert or swap the Micro-SD memory card.
Top


• Noise canceling microphone—Used in conjuction with the regular microphone on phone calls to reduce background noise. This microphone is also used when you record videos.
• MHL-compliant Micro-USB port—You can use the Micro-USB port to synchronize your Galaxy Note II to your desktop computer and charge it, but because it is Mobile High-definition Link (MHL) compliant, you can use it to play movies on your TV via high-definition multimedia interface (HDMI) using a special cable or dock.
• Microphone—You use the microphone when you are on a call and holding your Galaxy Note II to your ear.
• S Pen (Stylus)—Pull the S Pen out of its holder to draw on the screen and interact with apps. Read more about the S Pen in the next section.
S Pen
Your Samsung Galaxy Note II comes with a stylus, which Samsung calls the S Pen. The S Pen is stored in the Galaxy Note II on the right side and you pull it out from the lower right. This section covers some of the S Pen’s features and functions.
Getting to Know the S Pen
Let’s take a look at the S Pen itself and learn about its features.

• Stylus tip—The S Pen stylus tip is what makes contact with the screen as you write and draw. The stylus tip is pressure sensitive so it knows how hard or soft you are pressing. This is particularly useful for drawing as pressure translates into line thickness.
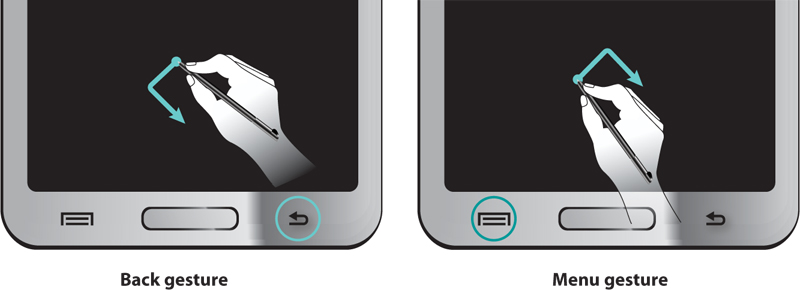
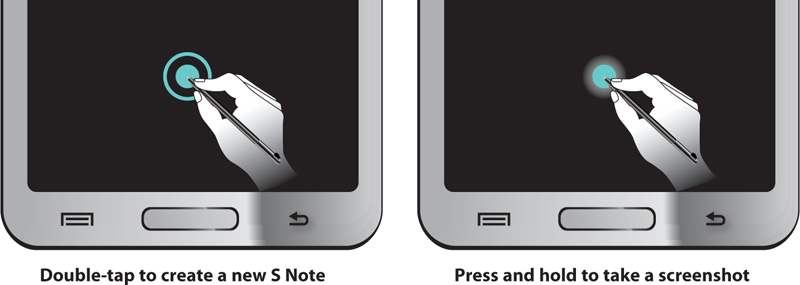
• S Pen button—The S Pen button adds extra functionality to the S Pen. When you press the button as you drag the pen on the screen, you can perform functions, such as moving between screens, taking screenshots, and even cutting out parts of any screen.
By default, when you remove the S Pen from your Galaxy Note II, a special S Pen screen displays. On that screen, you see the Create Note widget from the S Note app. If you want, you can remove this widget and place other widgets or app shortcuts that you want to appear when you remove your S Pen.

Air View
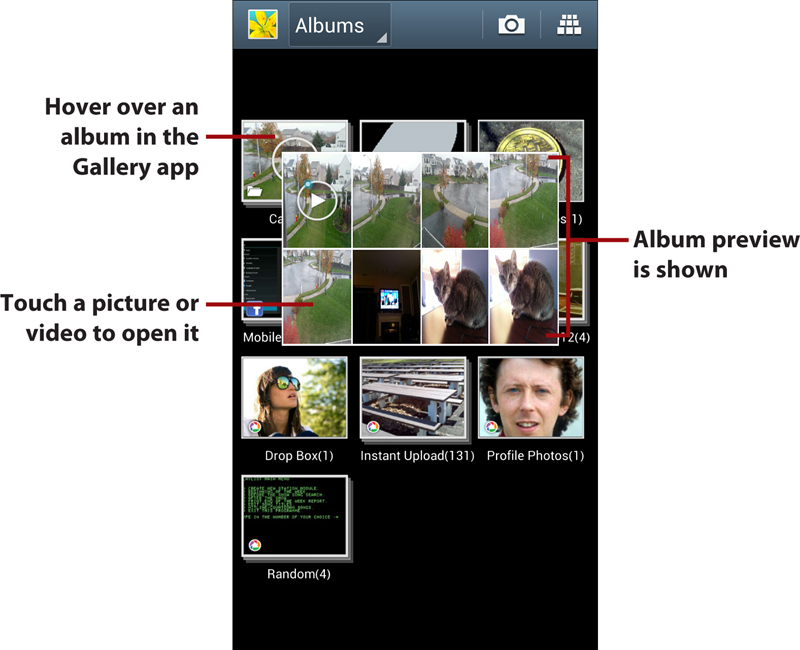
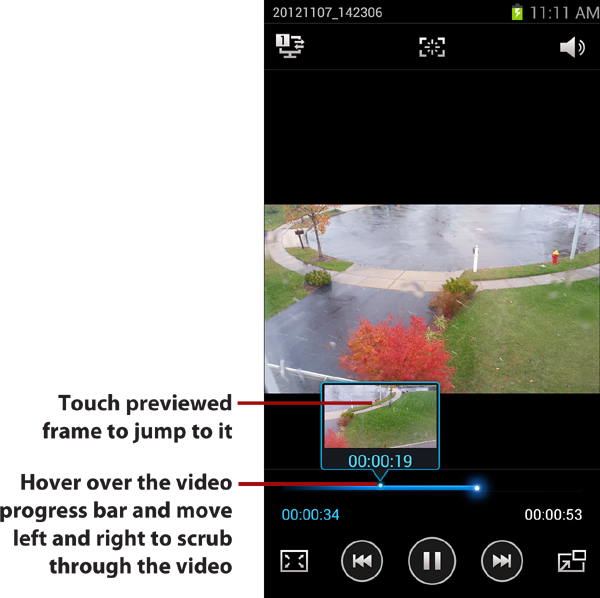
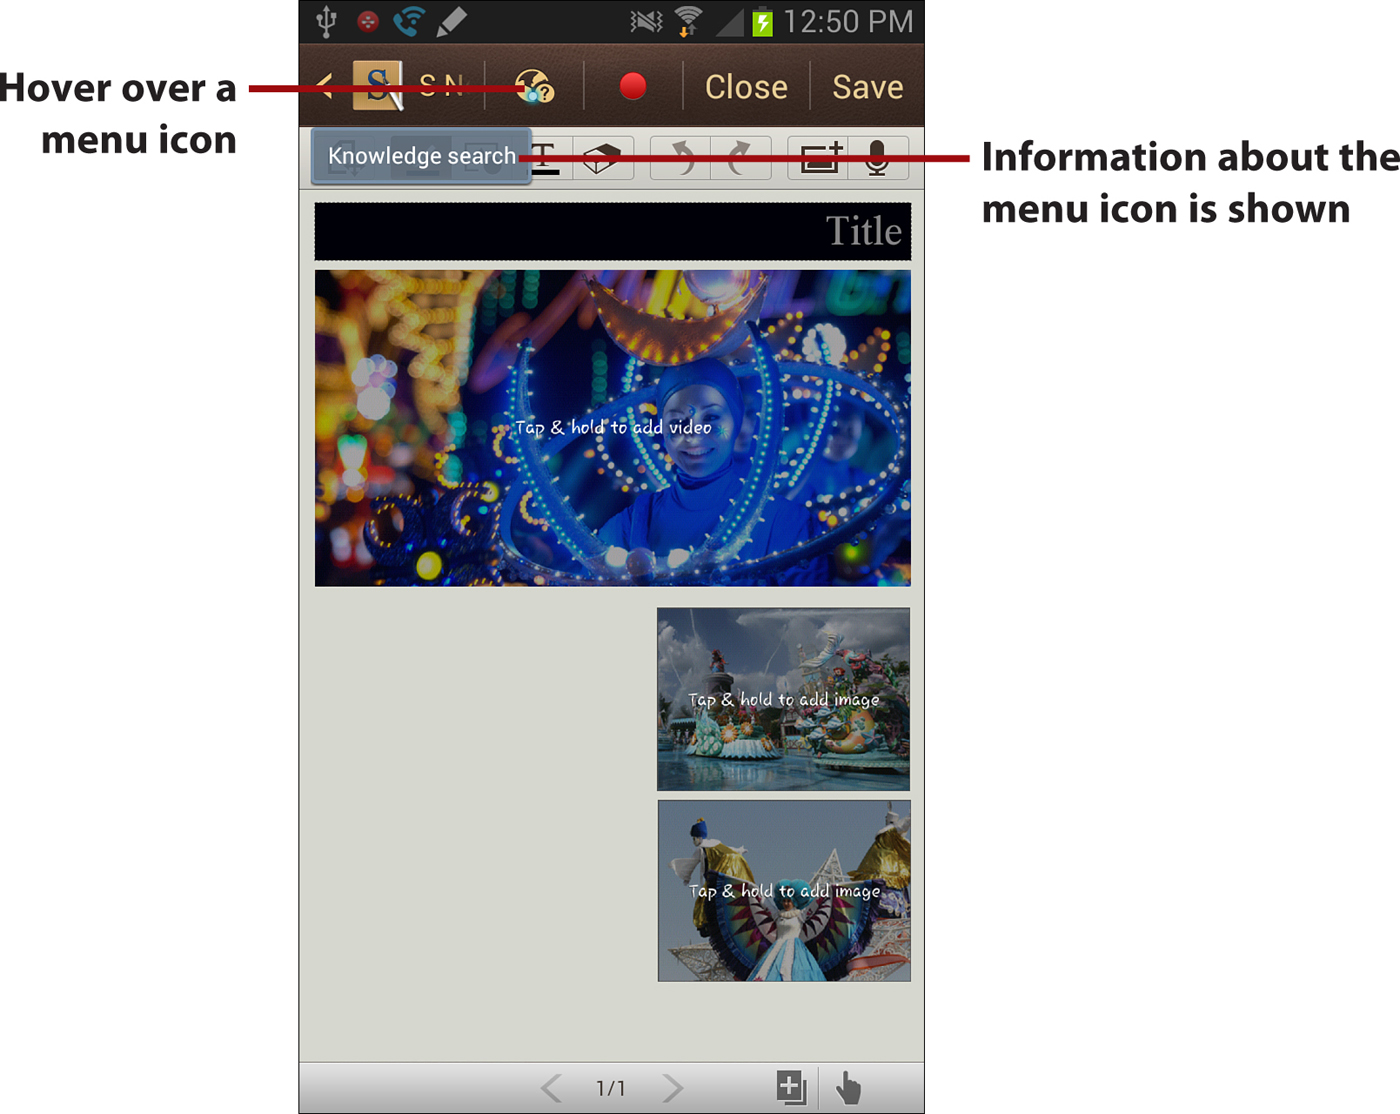
Air View is a feature that shows you a preview of information about an object and enables you to interact with it when you hover the S Pen near the screen over an object that is Air View enabled. Here are some examples of using Air View.

Gestures
While holding the S Pen button, you can draw symbols on the screen to take actions such as going back to the previous screen or bringing up the menu. Here are some examples.
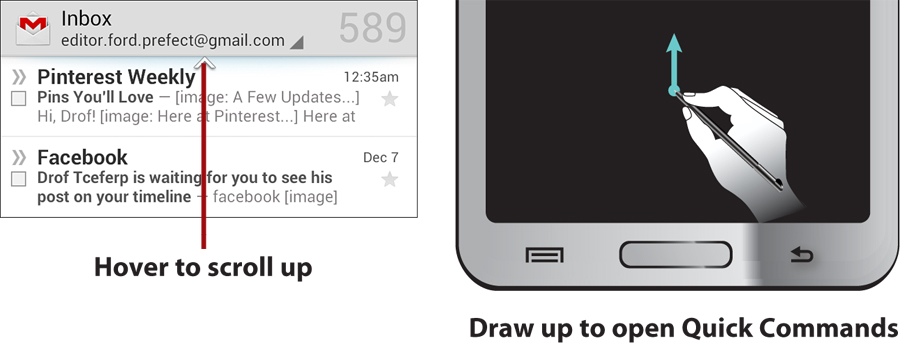
You can scroll up and down by hovering your S Pen at the top or bottom of an area of the screen that scrolls, such as a message list. For this gesture, you must not press the S Pen button—just hover at the top or bottom of the scroll area. You see an arrow indicating that the scrolling gesture has been recognized.
Quick Commands
Quick Commands is a feature that enables you to draw symbols on the screen that cause apps to load or activate certain device features. You can even create your own Quick Command symbols.
1. While pressing the S Pen button, draw up from the bottom of the screen to activate Quick Commands.
2. Release the S Pen button.
3. Draw a Quick Command symbol. This example uses the symbol for composing a text message.
4. Write a keyword, such as a name, search term, or place, after the Quick Command symbol. In this example, we want to compose a text message to Craig so we write Craig.

5. The command is executed and you should see the app load and your keyword acted upon. In the example, the Message app opens, and a new message is created for Craig.
Default Quick Commands
When you first use Quick Commands, there are a few preloaded that you can use right away. They include searching the Internet for a search term, composing an email to someone, looking up an address in Google Maps, placing a call to someone, and sending a text message to someone.

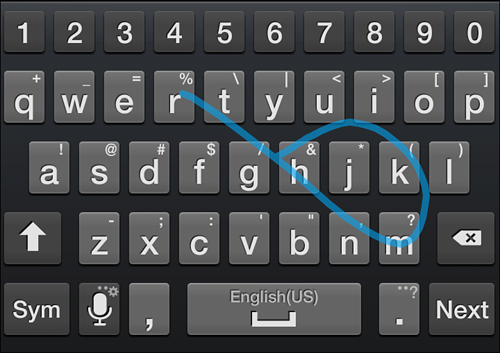
Grabbing Part of the Screen
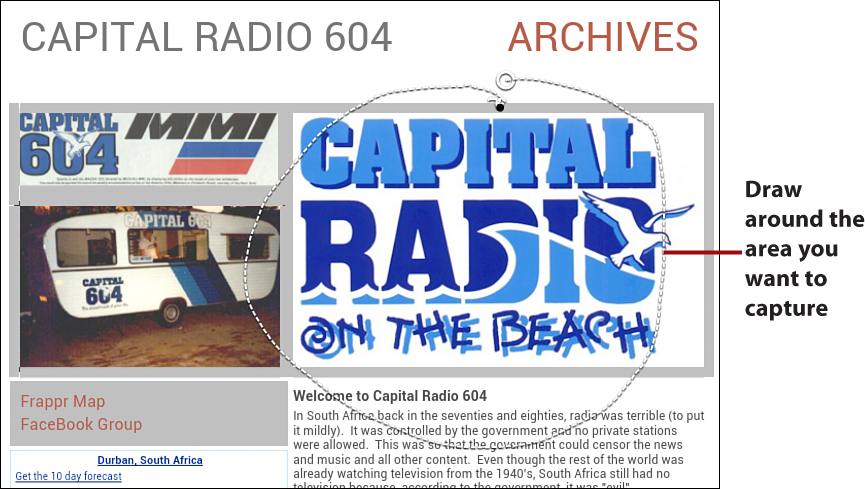
Using your S Pen, you can grab any part of the screen as an image. To do that, simply press and continue holding the S Pen button. Draw around the part of the screen you want to capture. Release the S Pen button and the part of the screen inside the shape you have drawn is copied and placed in the Gallery app in an album called Screenshots. Because it is a regular image at that point, you can edit it or share it with your friends.
First-Time Setup
Before setting up your new Samsung Galaxy Note II, you should have a Google account because your Galaxy Note II running Android is tightly integrated into Google. When you have a Google account, you can store your content in the Google cloud, including any books and music you buy or movies you rent. If you do not already have a Google account, go to https://accounts.google.com on your desktop computer and sign up for one.
1. Touch and hold the Power button until you see the animation start playing.
2. Touch to change your language if needed.
3. Touch Next.

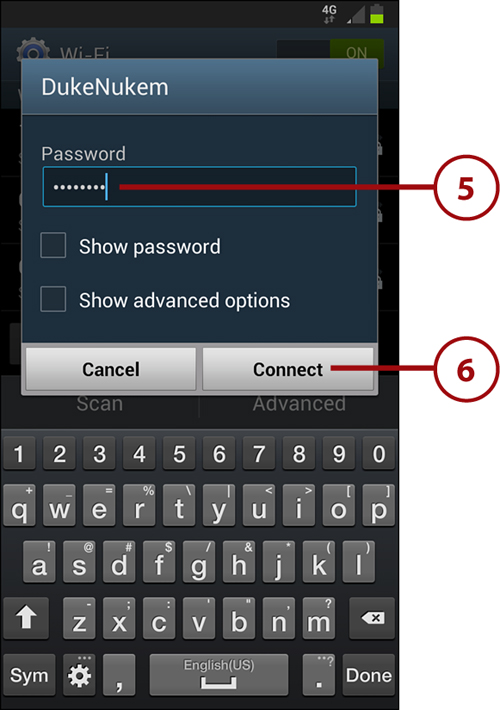
4. Touch a Wi-Fi network to connect. If you’d rather not connect to a Wi-Fi network, touch Skip and continue at step 8.

5. Enter the password for the Wi-Fi network using the onscreen keyboard.
6. Touch Connect. Your Galaxy Note II connects to the Wi-Fi network.
7. Touch Next.

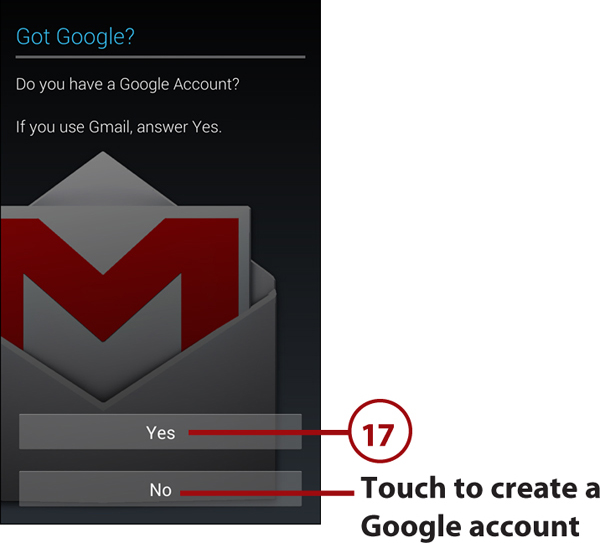
8. Touch to sign in to your Samsung account, if you have one, or touch Skip and jump to step 17.
9. Touch to create a new Samsung account, if you don’t have one, or touch Skip and jump to step 17.

10. Enter the email address you used for your Samsung account.
11. Enter your Samsung account password.
12. Touch Sign In.

13. Select the information you want to be backed up to the Samsung cloud.
14. Touch OK.

15. Touch to first restore data previously backed up in the Samsung cloud to your Galaxy Note II before continuing.
16. Touch Next.

17. Touch Yes to log in to your Google account.
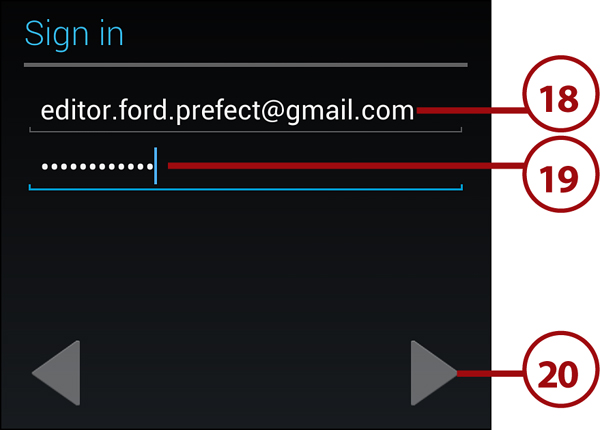
18. Enter your Google account email address (your Gmail address).
19. Enter your Google account password.
20. Touch to continue.
21. Check this box to restore settings previously saved in the Google cloud to your new Galaxy Note II before continuing.
22. Check this box to keep data on your Galaxy Note II backed up to the Google cloud.
23. Touch to continue.

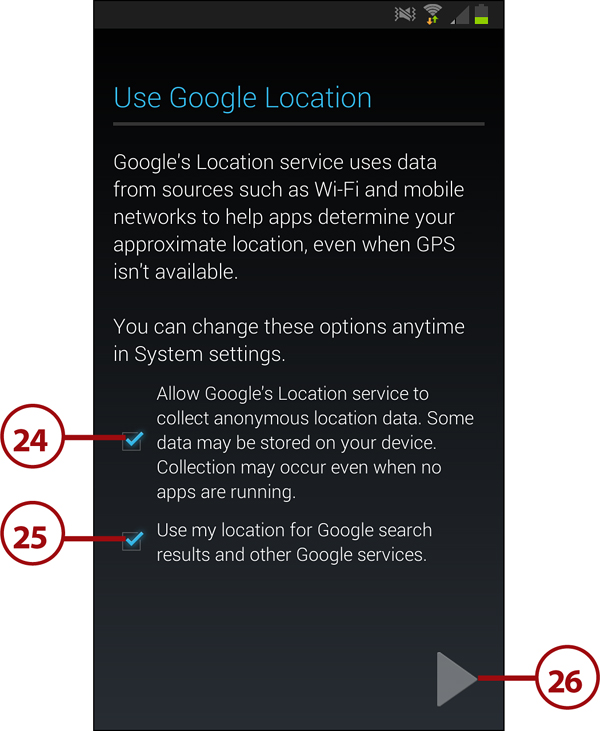
24. Check this box if you are okay with Google collecting information about your geographic location at any time. Although this information is kept safe, if you are concerned about privacy rights, uncheck this box.
25. Check this box if you are okay with Google using your geographic location for Google searches and other Google services.
26. Touch to continue.
27. Touch to create a Dropbox account.
28. Touch to sign in to your existing Dropbox account.
29. Touch to skip using Dropbox and continue.
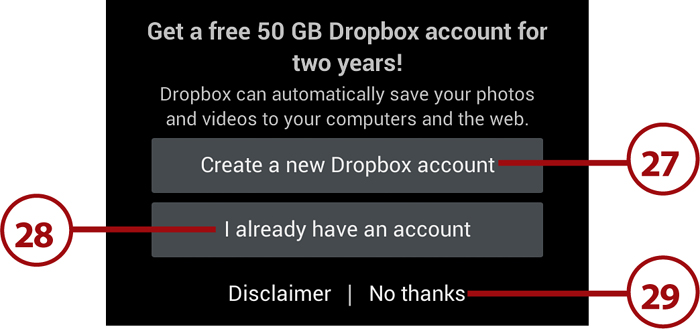
Do I Need Dropbox?
Dropbox is a company that provides cloud storage data. This means that you can use its storage to store your pictures, videos, and other files privately, and choose to share some of that content with your friends. You do not need to use Dropbox on your Galaxy Note II. You can choose other cloud storage companies like Box.net, and even Google’s cloud storage.
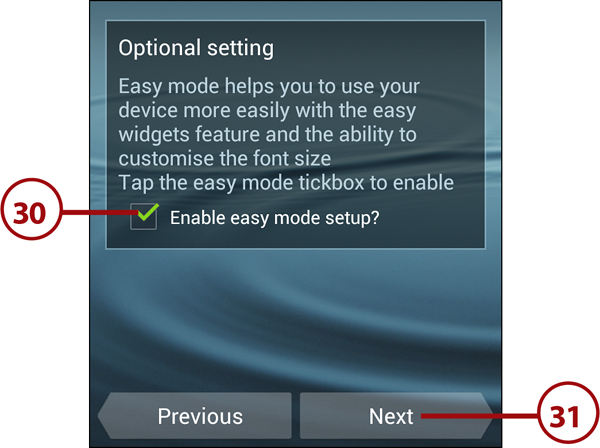
30. Check the box to enable Easy mode, or leave it unchecked to skip Easy mode.
What Is Easy Mode?
When you enable Easy mode, your Android Home screens are filled with widgets that are meant to help you use your Galaxy Note II. These widgets include Favorite Settings, Favorite Apps, and Favorite Contacts. Later, you can disable Easy mode if you feel it is too intrusive.
31. Touch Next to continue.
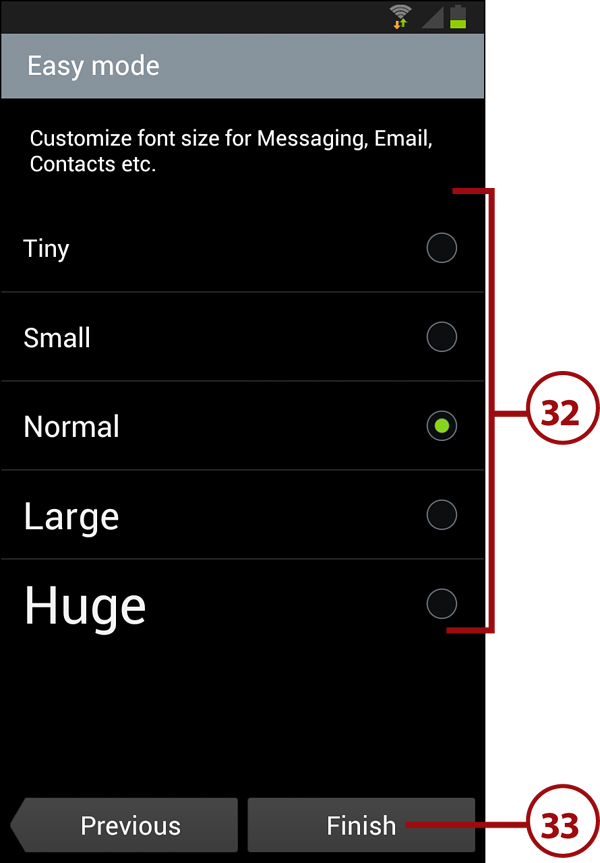
32. Touch to choose a different font size for displaying email, contacts, and text messages, or leave it set to Normal.
33. Touch Finish.
Fundamentals of Android 4.1 and TouchWiz
Your Galaxy Note II is run by an operating system called Android. Android was created by Google to run on any smartphone, and your Galaxy Note II uses a version called Android 4.1 (or Jelly Bean). Samsung has made many changes to this version of Android by adding extra components and modifying many standard Android features. They call this customization TouchWiz.
The Unlock Screen
If you haven’t used your Galaxy Note II for a while, the screen goes blank to conserve battery power. This task explains how to interact with the Lock screen.
1. Press the Power button or Home button to wake up your Galaxy Note II.
2. Slide your finger across the screen from left to right (or right to left) to unlock your Galaxy Note II.
3. Touch the Missed Calls icon and slide it in any direction to unlock your Galaxy Note II and jump straight to the missed calls list. This icon is visible only when you have missed calls.
4. Touch the Missed Text Messages icon and slide it in any direction to unlock your Galaxy Note II and jump straight to the missed text messages list. This icon is visible only when you have missed text messages.
5. Touch an app icon along the bottom of the screen and slide it up to unlock your Galaxy Note II and launch that app.
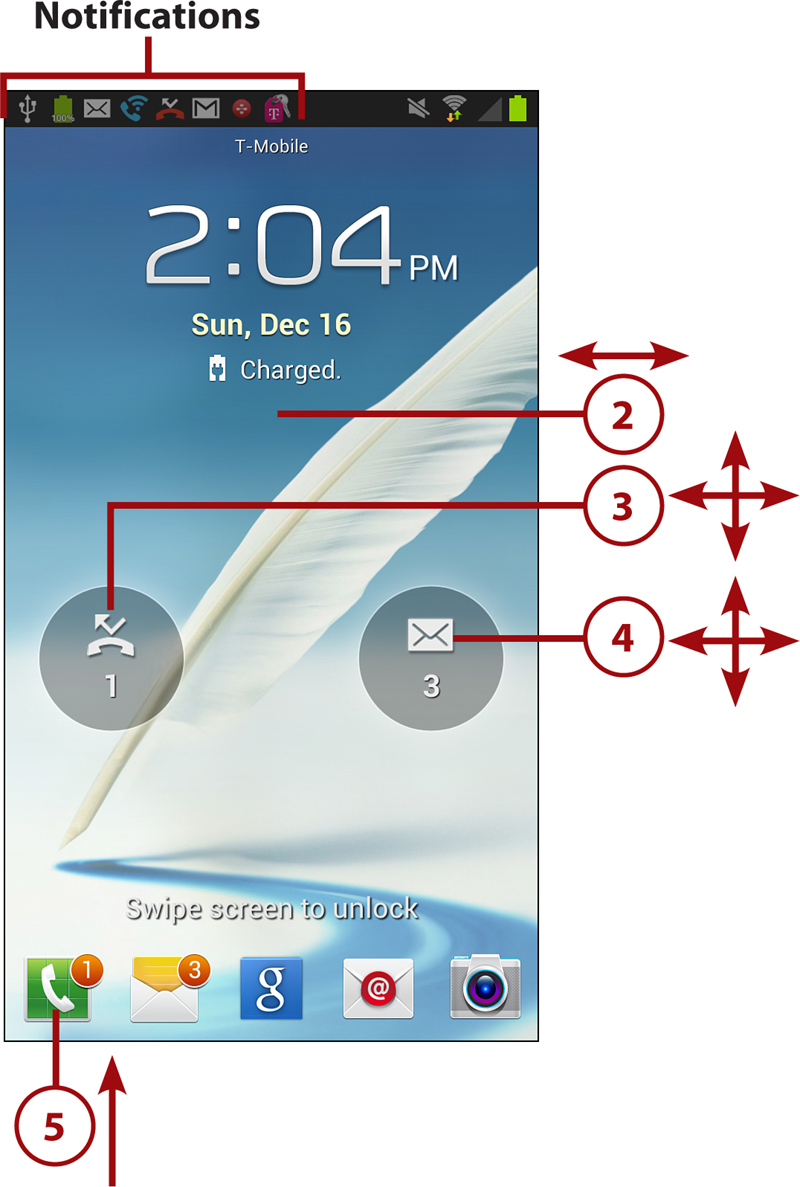
Working with Notifications and Settings on the Lock Screen
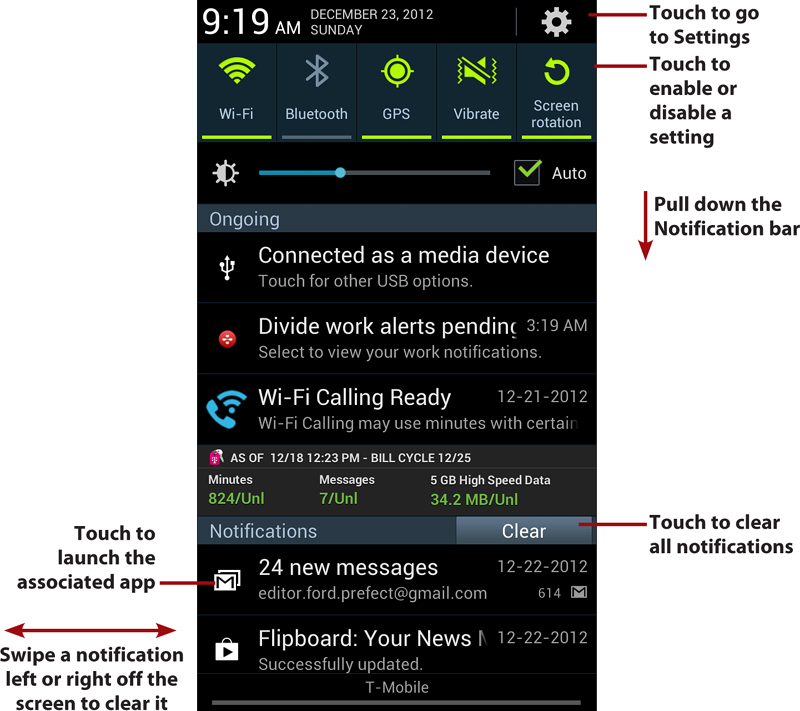
You can work with notifications and settings right on the Lock screen. If you see notifications in the Notification bar, pull down the Notification bar to view and clear them. Touching a notification takes you straight to the app that created them. Read more about the Notification bar later in this section.

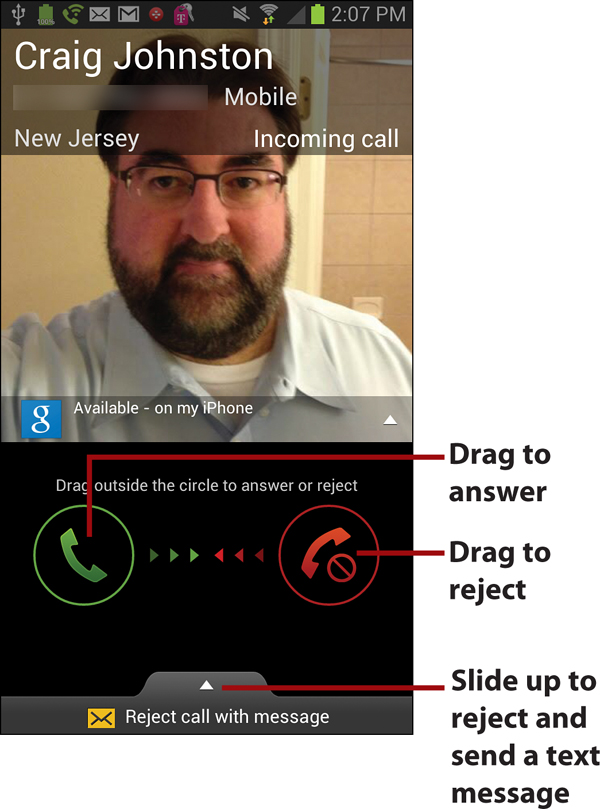
Answering a Call from the Lock Screen
If your Galaxy Note II is locked when a call comes in, you have three choices: Drag the green icon to answer the incoming call; drag the red icon to reject the incoming call and send it straight to voice mail; or drag up from the bottom of the screen to reject the call and send a preset text message (SMS) to the caller.
The Home Screen(s)
After you unlock your Galaxy Note II, you are presented with the middle Home screen. Your Galaxy Note II has five Home screens. The Home screens contain application shortcuts, a Launcher icon, Notification bar, Shortcuts, Favorites Tray, and widgets.

• Notification bar—The Notification bar shows information about Bluetooth, Wi-Fi, and cellular coverage, as well as the battery level and time. The Notification bar also serves as a place where apps can alert or notify you using notification icons.
• Notification icons—Notification icons appear in the Notification bar when an app needs to alert or notify you of something. For example, the Phone app can show the Missed Calls icon indicating that you missed a call.
To interact with notifications that appear in the Notification bar, place your finger above the top of the screen and drag to pull down the Notification bar and reveal the notifications. Swipe individual notifications off the screen to the left or right to clear them one by one, or touch Clear to clear all of them at once. The Notification bar also includes Quick Settings such as the ability to turn on or off Wi-Fi or Bluetooth.
• Widget—Widget are applications that run directly on the Home screens. They are specially designed to provide functionality and real-time information. An example of a widget is one that shows the current weather or provides a search capability. Widgets can be moved and sometimes resized.
• App shortcut—When you touch an app shortcut, the associated app launches.
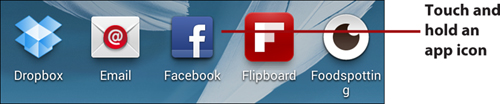
Touch the Launcher icon to see all of your apps. Touch and hold on the app you want to make a shortcut for. After the Home screens appear, drag the app shortcut to the location you want the shortcut to be on the Home screen, drag it to an App folder, or drag it left or right off the screen to move between Home screens. Release the icon to place it.

• App folders—You can group apps together in a folder as a way to organize your apps and declutter your screen.
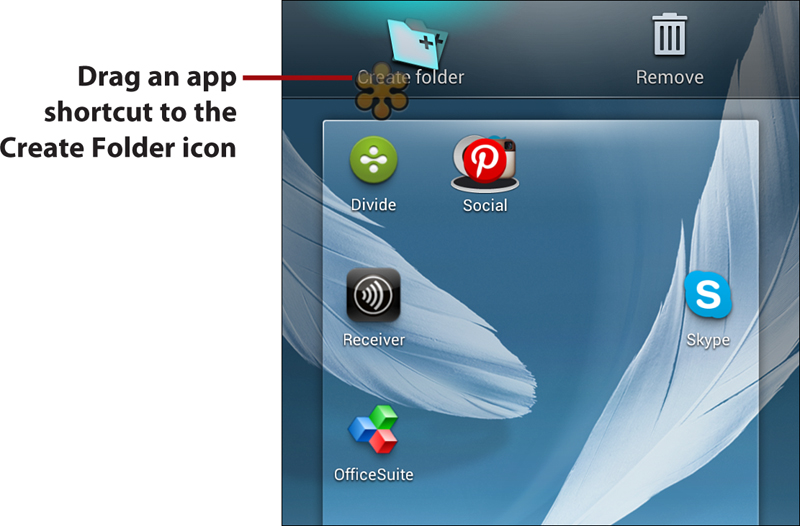
To create a new App folder, touch and hold the first app shortcut you want in your folder. When the Create Folder icon appears, drag the app shortcut to that icon and release it. After you give your App folder a name, the folder displays on your Home screen. Now you can drag other app shortcuts into that folder. To open the folder, touch it to reveal the shortcuts in that folder.


• Favorites Tray—The Favorites Tray is visible on all Home screens. You can drag apps to the Favorites Tray so that they are available no matter which Home screen you are looking at. Apps in the Favorites Tray can be rearranged and removed.
• Launcher icon—Touch to show application icons for all applications that you have installed on your Galaxy Note II.
Creating a New Home Screen and Removing an App Shortcut
If you want to create a new Home screen, touch and hold an App Shortcut icon. When the three action icons appear, drag your App Shortcut icon to the Create Page icon, and the shortcut is placed on a brand-new Home Screen page. To remove an App Shortcut icon, drag it to the Remove icon.

Use the Touchscreen
You interact with your Galaxy Note II mostly by touching the screen, which is known as making gestures on the screen. You can touch, swipe, pinch, double-tap, and type.
![]() Touch—To start an application, touch its icon. Touch a menu item to select it. Touch the letters of the onscreen keyboard to type.
Touch—To start an application, touch its icon. Touch a menu item to select it. Touch the letters of the onscreen keyboard to type.
![]() Touch and hold—Touch and hold to interact with an object. For example, if you touch and hold a blank area of the Home screen, a menu pops up. If you touch and hold an icon, you can reposition it with your finger.
Touch and hold—Touch and hold to interact with an object. For example, if you touch and hold a blank area of the Home screen, a menu pops up. If you touch and hold an icon, you can reposition it with your finger.
![]() Drag—Dragging always starts with a touch and hold. For example, if you touch the Notification bar, you can drag it down to read all of the notification messages.
Drag—Dragging always starts with a touch and hold. For example, if you touch the Notification bar, you can drag it down to read all of the notification messages.
![]() Swipe or slide—Swipe or slide the screen to scroll quickly. To swipe or slide, move your finger across the screen quickly. Be careful not to touch and hold before you swipe or you will reposition something. You can also swipe to clear notifications or close apps when viewing the recent apps.
Swipe or slide—Swipe or slide the screen to scroll quickly. To swipe or slide, move your finger across the screen quickly. Be careful not to touch and hold before you swipe or you will reposition something. You can also swipe to clear notifications or close apps when viewing the recent apps.
![]() Double-tap—Double-tapping is like double-clicking a mouse on a desktop computer. Tap the screen twice in quick succession. For example, you can double-tap a web page to zoom in to part of that page.
Double-tap—Double-tapping is like double-clicking a mouse on a desktop computer. Tap the screen twice in quick succession. For example, you can double-tap a web page to zoom in to part of that page.
![]() Pinch—To zoom in and out of images and pages, place your thumb and forefinger on the screen. Pinch them together to zoom out or spread them apart to zoom in (unpinching). Applications like Browser, Gallery, and Maps support pinching.
Pinch—To zoom in and out of images and pages, place your thumb and forefinger on the screen. Pinch them together to zoom out or spread them apart to zoom in (unpinching). Applications like Browser, Gallery, and Maps support pinching.
 Rotate the screen—If you rotate your Galaxy Note II from an upright position to being on its left or right side, the screen switches from Portrait view to Landscape view. Most applications honor the screen orientation. The Home screens and Launcher do not.
Use the Keyboard
Your Galaxy Note II has a virtual or onscreen keyboard for those times when you need to enter text. You might be a little wary of a keyboard that has no physical keys, but you will be pleasantly surprised at how well it works.
Some applications automatically show the keyboard when you need to enter text. If the keyboard does not appear, touch the area where you want to type and the keyboard slides up ready for use.
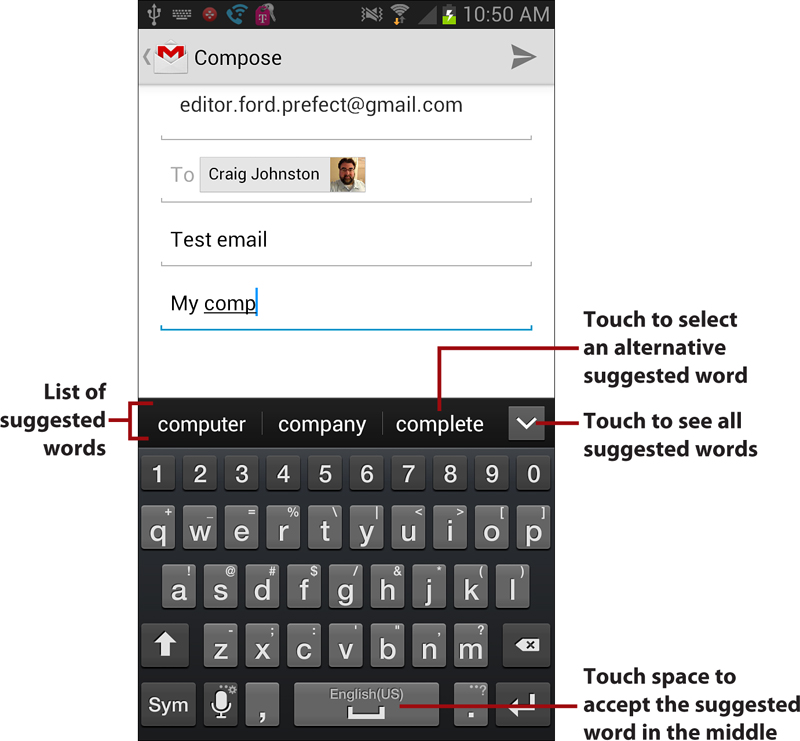
Using the virtual keyboard as you type, your Galaxy Note II makes word suggestions. Think of this as similar to the spell checker you would see in a word processor. Your Galaxy Note II uses a dictionary of words to guess what you are typing. If the word you were going to type is highlighted, touch space or period to select it. If you can see the word in the list but it is not highlighted, touch the word to select it.
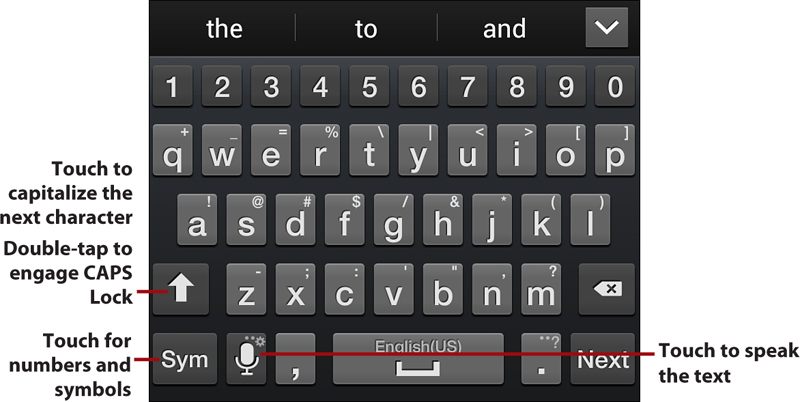
To make the next letter you type a capital letter, touch the Shift key. To make all letters capitals (or CAPS), double-tap the Shift key to engage CAPS Lock. Touch Shift again to disengage CAPS Lock.
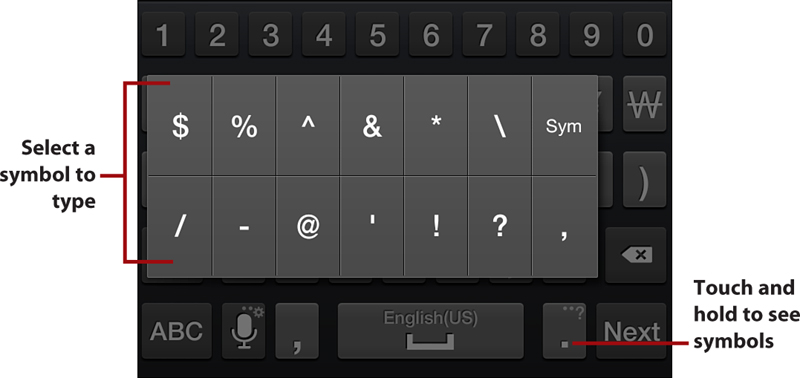
To type numbers or symbols, touch the Symbols key.
When on the Numbers and Symbols screen, touch the Symbols key to see extra symbols. There are three screens of symbols. Touch the ABC key to return to the regular keyboard.

Quick Access to Symbols
If you want to type commonly used symbols, touch and hold the period key. A small window opens with those common symbols. Slide your finger over the symbol you want to type, and lift it to type that symbol.
To enter an accented character, touch and hold any vowel or C, N, or S keys. A small window opens enabling you to select an accented or alternative character. Slide your finger over the accented character and lift your finger to type it.

To reveal other alternative characters, touch and hold any other letter, number, or symbol.
Want a Larger Keyboard?
Turn your Galaxy Note II sideways to switch to a landscape keyboard. The landscape keyboard has larger keys and is easier to type on.
Instead of typing on the keyboard in the traditional way by touching each letter individually, you can swipe over the letters in one continuous movement. This is called Continuous Input. It is enabled by default; to use it, just start swiping your finger over the letters of the word you want to type. Lift your finger after each word. No need to worry about spaces because your Galaxy Note II adds them for you. To type a double letter (as in the word pool), loop around that letter on the keyboard.
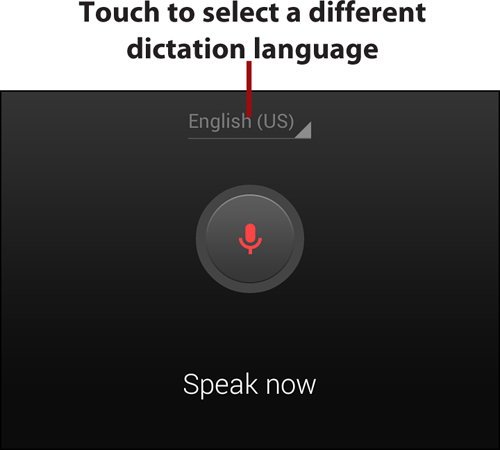
Dictation—Speak Instead of Type
Your Galaxy Note II can turn your voice into text. It uses Google’s speech recognition service, which means that you must have a connection to the cellular network or a Wi-Fi network to use it.
1. Touch the microphone key.

2. Wait until you see Speak Now and start speaking what you want to be typed. You can speak the punctuation by saying “comma,” “question mark,” “exclamation mark,” or “exclamation point.”
Edit Text
After you enter text, you can edit it by cutting, copying, or pasting the text. This task describes how to select and copy text so you can paste over a word with the copied text.
1. While you are typing, touch and hold a word you want to copy.

2. Slide the blue end markers until you have selected all of the text you want to copy.
3. Touch to copy the text.
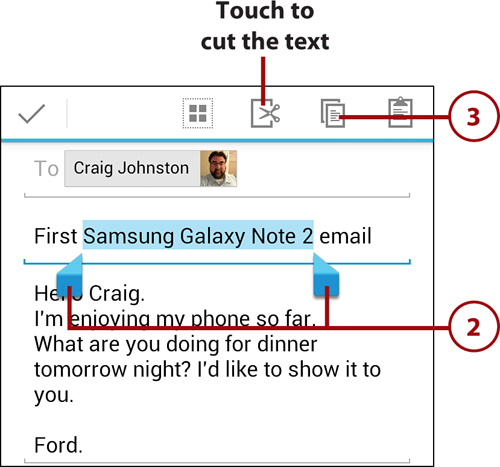
4. Touch and hold the word you want to paste over.
5. Touch to paste what you copied earlier.

You can also simply place a cursor on the screen and move it around to do manual text editing, such as backspace to delete letters or manually insert a new word. To do this, tap on the screen in the text area. A single blue marker displays; drag that marker to the point in the text you want to make changes to. Now start typing or tap backspace, and the action occurs at the cursor position.

Writing Instead of Typing
As discussed earlier in this chapter, your Galaxy Note II comes with the S Pen stylus. Instead of typing on the keyboard, you can use handwriting recognition to write. To enable Handwriting mode, pull out the S Pen from its holder and then touch and hold the Microphone button. Touch the Handwriting icon to enable Handwriting mode. Now write on the screen.


Menus
Your Galaxy Note II has two types of menus: app menus and context menus. All applications use an app menu. To see the an app menu, touch the physical Menu button, which is to the left of the Home button.
A context menu applies to an item on the screen. If you touch and hold something on the screen (in this example, a link on a web page), a context menu appears. The items on the context menu differ based on the type of object you touched.

Run Two Apps at the Same Time
Your Galaxy Note II has a feature called Multi Window that allows certain apps to run on the same screen at the same time.
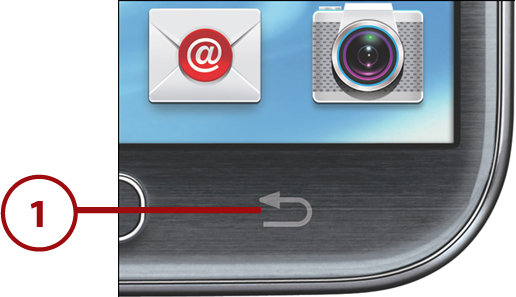
1. Press and hold the Back button.
2. Drag an app onto the screen but keep holding it.
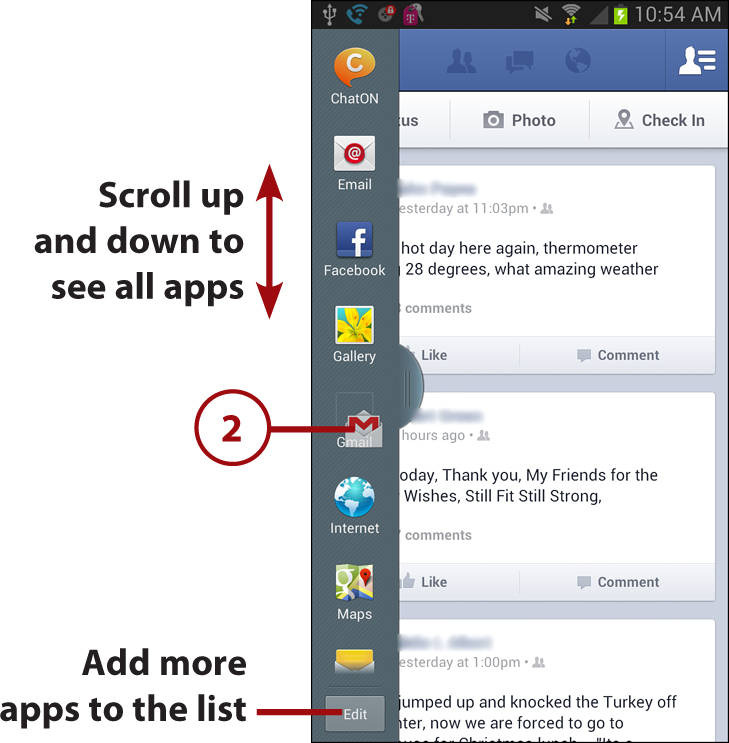
Not All Apps Support Multi Window
When you touch Edit to add more apps to the list of Multi Window apps, remember that apps must be specially written to take advantage of Multi Window mode. This means that you might not see the apps you are looking for until the developer updates the app to support Samsung’s Multi Window mode.
3. Drag the app to either the top or bottom half of the screen and release it.
4. Drag the bar up or down to give more or less room to each app.
5. Touch the bar to reveal the Swap and Full Screen icons.
6. Touch to swap the position of the apps on the screen.
7. Touch to make the selected app full screen.

Switch Between Apps
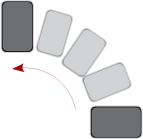
You can switch between running apps and close apps using the multitasking feature.
1. Press and hold the Home button.
2. Scroll up and down the list of running apps.
3. Touch an app to switch to it.

4. Swipe an app left or right off the screen to close it.
Installing Synchronization Software
Because your Galaxy Note II is tightly integrated with Google and its services, all media that you purchase on your phone is stored in the Google cloud and accessible anywhere, anytime. However, you might have a lot of music on your computer and need to copy that to your Google cloud. To do that, you need to install the Google Music Manager software or the Android File Transfer app for your Mac to copy any file back and forth.
Install Android File Transfer (Apple Mac OS X)
You only need the Android File Transfer app when using a Samsung Android phone (like your Galaxy Note II) on an Apple Mac running OS X.
1. From your Mac, browse to http://www.android.com/filetransfer/ and download the Android File Transfer app.
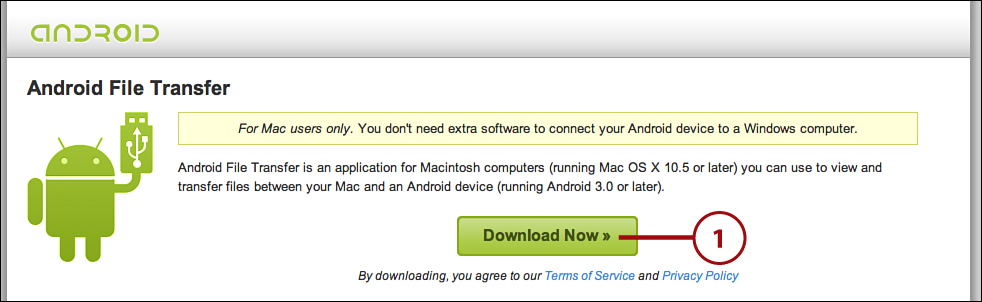
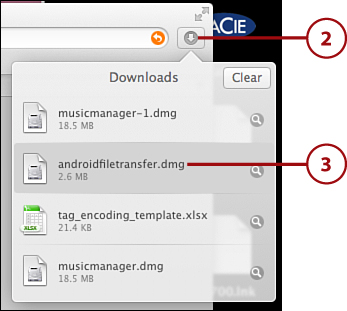
2. Click the Downloads icon.
3. Double-click the app in your Safari Downloads.
4. Drag the green Android to the Applications shortcut to install the app.

Install Google Music Manager (Apple Mac)
Don’t install Google Music Manager unless you plan to upload files from your computer to the Google Music cloud.
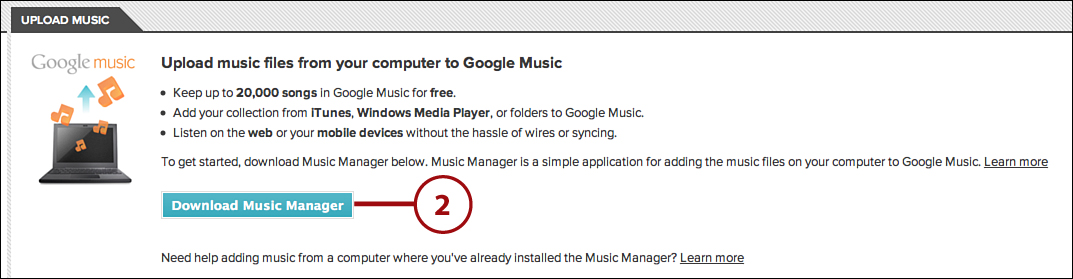
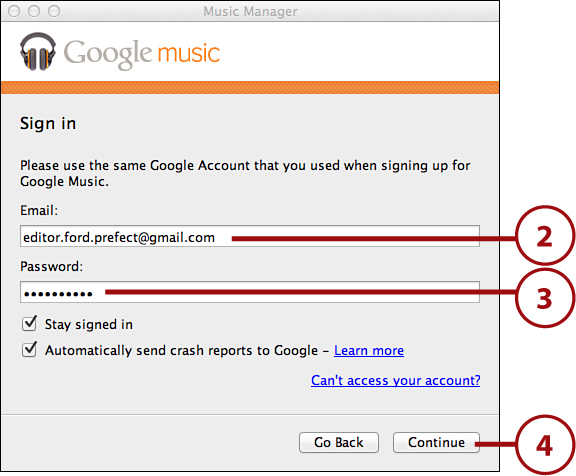
1. Visit https://music.google.com/music/listen#manager_pl from your desktop web browser and log in to your Google account if you’re prompted.
2. Click to download Music Manager.
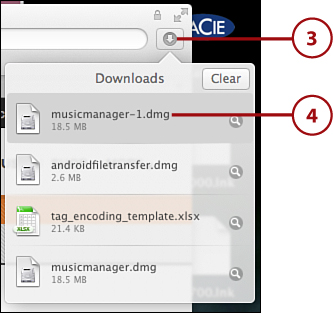
3. Click the Downloads icon.
4. Double-click the app in your Safari Downloads.
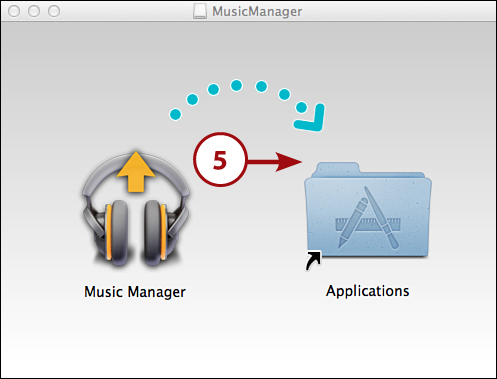
5. Drag the Music Manager icon to the Applications shortcut to install the app.
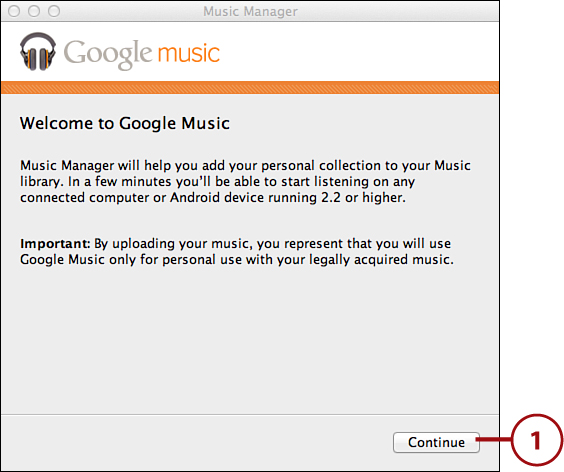
6. Double-click the Music Manager icon in the Applications folder.

7. Skip to the “Configure Music Manager” section to complete the installation.
Install Google Music Manager (Windows)
Don’t install Google Music Manager unless you plan to upload files from your computer to the Google Music cloud.
1. Visit https://music.google.com/music/listen#manager_pl from your desktop web browser and log in to your Google account if you’re prompted.
2. Click to download Music Manager.

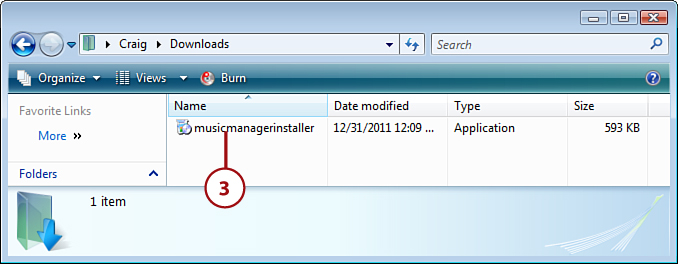
3. Double-click the app in your Downloads folder.
4. Skip to the “Configure Music Manager” section to complete the installation.
2. Enter your Google (Gmail) email address.
3. Enter your Google (Gmail) password.
4. Click Continue.
5. Choose where you keep your music.
6. Click Continue.

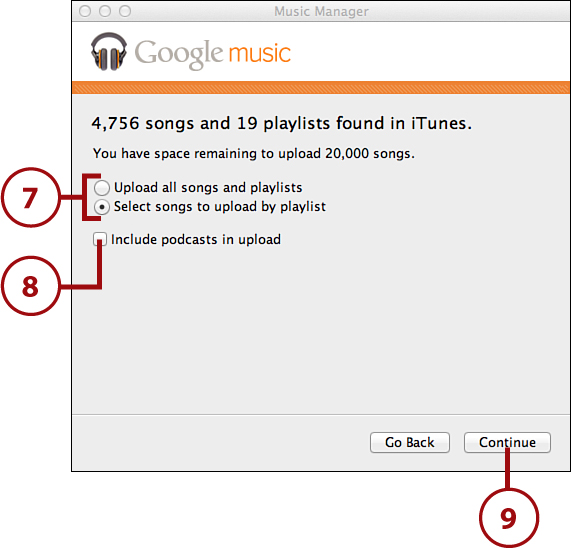
7. Choose whether to upload all of your music or just some of your playlists. Remember that you can only upload 20,000 songs for free. Skip to step 12 if you chose to upload all music.
8. Check if you want to also upload podcasts.
9. Click Continue.
10. Select one or more playlists of music.
11. Click Continue.

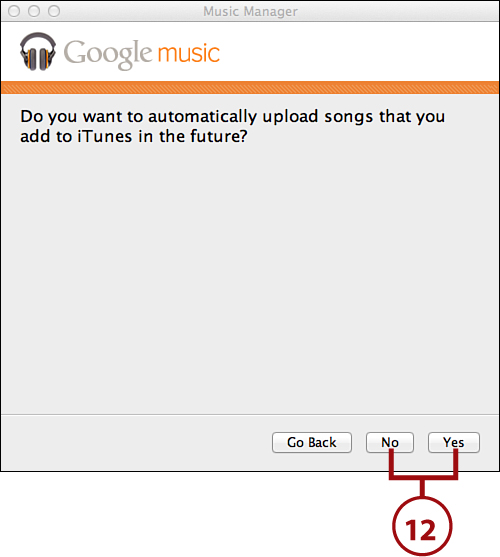
12. Choose whether you want to automatically upload any new music that is added to your computer.
14. Click Close.
