4. Email

In this chapter, you discover your Galaxy Note II’s email applications for Gmail and other accounts, such as POP3, IMAP, and even Microsoft Exchange. Topics include the following:
→ Sending and receiving email
→ Working with attachments
→ Working with Gmail labels
→ Changing settings
Your Galaxy Note II has two email programs: the Gmail app, which only works with Gmail, and the Email app that works with POP3, IMAP, and Microsoft Exchange accounts.
Gmail
When you first set up your Galaxy Note II, you set up a Gmail account. The Gmail application enables you to have multiple Gmail accounts, which is useful if you have a business account and a personal account.
Add a Google Account
When you first set up your Galaxy Note II, you added your first Google (Gmail) account. The following steps describe how to add a second account.
1. Touch to open the Gmail app.
2. Touch the Menu button.
3. Touch Settings.

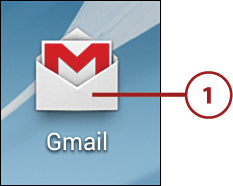
4. Touch Add Account.
5. Touch Existing.

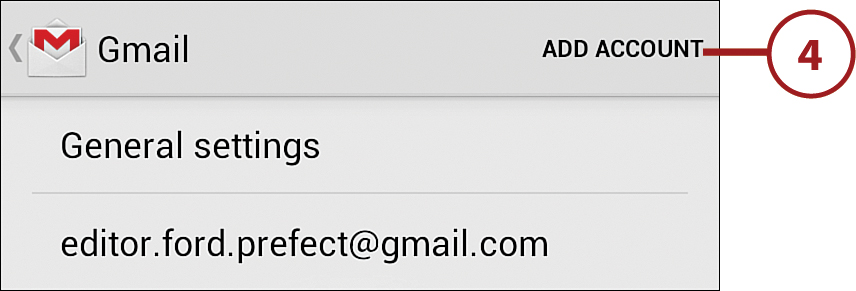
6. Enter your existing Google account name. This is your Gmail address.
What If I Don’t Have a Second Google Account?
If you don’t already have a second Google account but want to set one up, in step 5, touch Get a Google Account. Your Galaxy Note II walks you through the steps of choosing a new Google account.
7. Enter your existing Google password.
8. Touch to sign in.
9. Select what components of your Google account you want to synchronize with your Galaxy Note II.
10. Touch to finish the Google account setup.

Why Multiple Google Accounts?
You are probably wondering why you would want multiple Google accounts. Isn’t one good enough? Actually, it is not that uncommon to have multiple Google accounts. It can be a way to compartmentalize your life between work and play. You might run a small business using one account, but email only friends with another. Your Galaxy Note II supports multiple accounts, but still enables you to interact with them in one place.
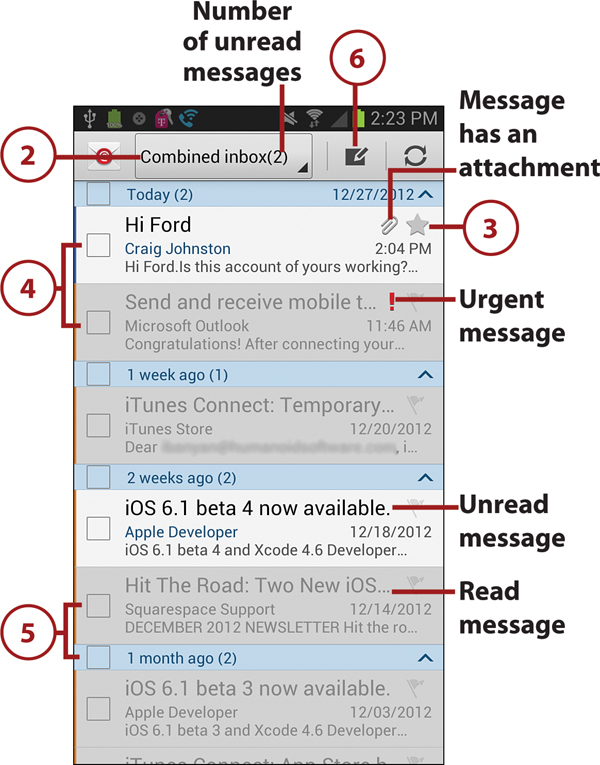
1. Touch the Gmail icon.
2. Touch to switch between Gmail accounts (if you use more than one) or switch from the Inbox label to one of your other labels.
3. Touch to compose a new email.
4. Touch to search the current label for an email.
5. Touch to manually refresh the current view.
6. Touch to manage your labels.
7. Touch the star to add the email to the Starred label.

Stars and Labels
Gmail allows you to use stars and labels to help organize your email. In most email clients, you can create folders in your mailbox to help you organize your emails. For example, you might create a folder called “emails from the boss” and move any emails you receive to that folder. Gmail doesn’t use the term folders; instead, it uses the term labels. You can create labels in Gmail and choose an email to label. When you do this, it actually moves it to a folder with that label, but to you, the email has a label distinguishing it from other emails. And email that you mark with a star is actually just getting a label called “starred.” But when viewing your Gmail, you see the yellow star next to an email. People normally add a star to an email as a reminder of something important.

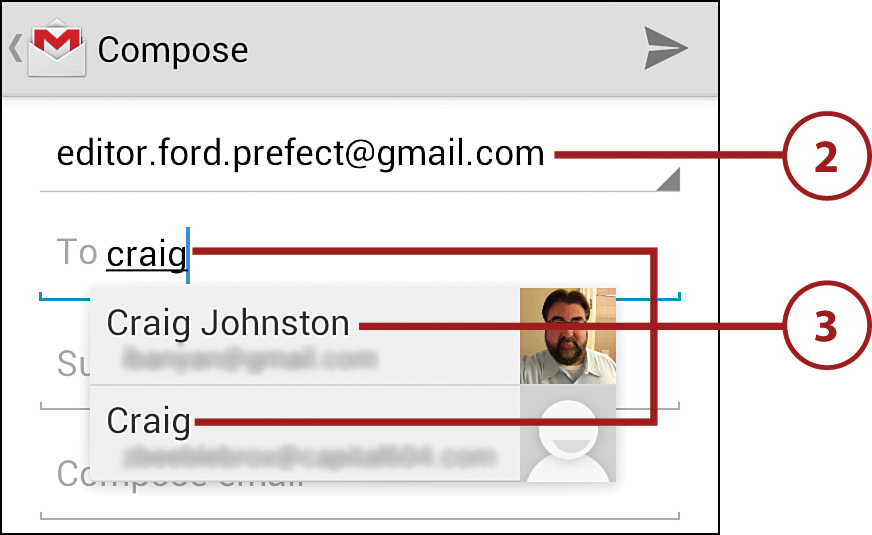
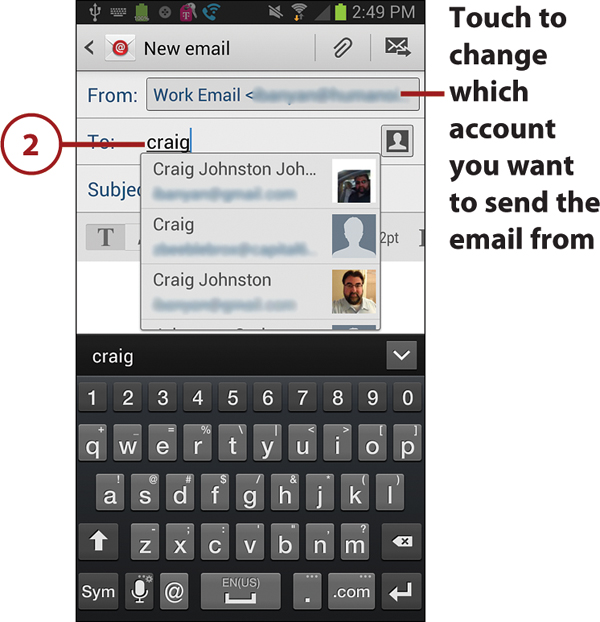
2. Touch to change the Gmail account from which the message is being sent (if you have multiple Gmail accounts).
3. Type names in the To field. If the name matches someone in your Contacts, the name is displayed and you can touch it to select it.
Can You Carbon Copy (Cc) and Blind Carbon Copy(Bcc)?
While you are composing your email, you can add recipients to the To field, as shown in the figure for step 3; however, there are no Carbon Copy (Cc) and Blind Carbon Copy (Bcc) fields shown. You can add these fields by touching the Menu button and touching Add Cc/Bcc. After you do that, the Cc and Bcc fields display.

4. Type a subject for your email.
5. Type the body of the email.
6. Touch to send the email.

Add Attachments to Messages
Before sending an email, you can add one or more attachments. You can attach pictures or videos, but if you use Dropbox you can attach any file that is in your Dropbox folders. If you use OfficeSuite for your Microsoft Office documents, you can attach files from there, too.
1. With an email message open, touch the Menu button.
2. Touch Attach Picture or Attach Video (they do the same thing).

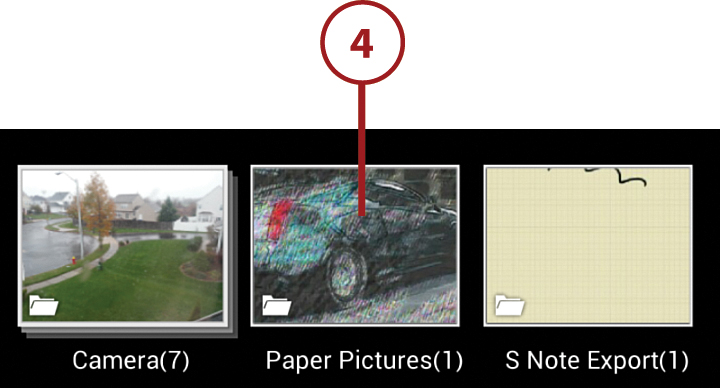
3. Touch Gallery.

4. Navigate the Gallery app to find the picture you want to attach.
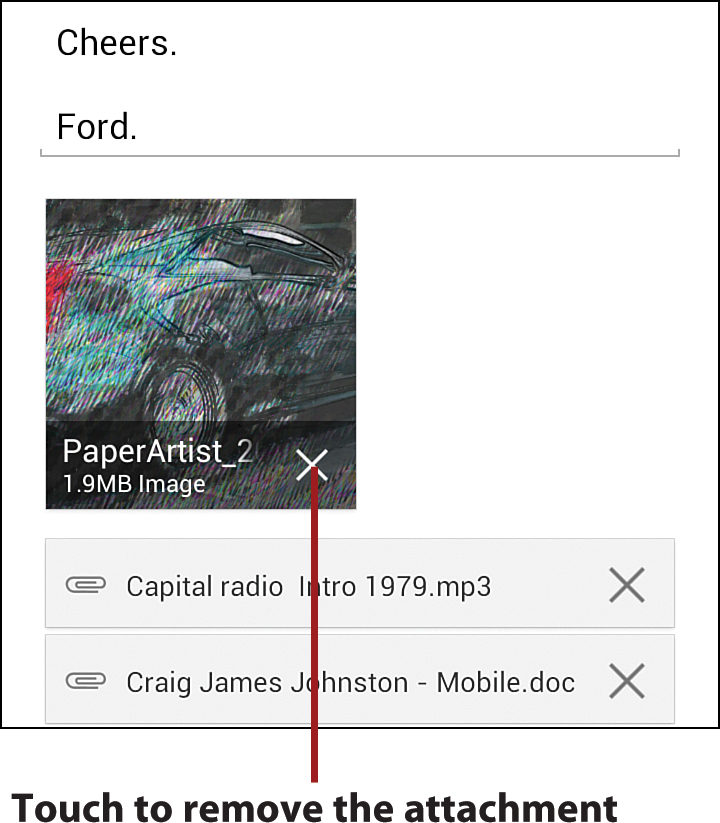
5. Attachments are listed below the body of the email.

2. Touch to expand the original email, if the email you are reading is a reply.
3. Touch to reply to the sender of the email. This does not reply to anyone in the Cc field.
4. Touch the menu bar to do a Reply All (reply to all recipients) or Forward the email.
5. Touch to expand the email header to see all recipients and all other email header information.
6. Touch to “star” the email, which adds it to the star label. Read more about labels earlier in this chapter.
7. Touch to move the email to the Gmail Archive folder.
8. Touch to permanently delete the email.
9. Touch to change the label of the email. Read more about labels earlier in this chapter.
10. Touch to mark the message as unread and return to the message list.

2. Touch to report the email as spam.
3. Touch to mute the email conversation. Once muted, you no longer see emails in the conversation.
4. Touch to report the email as a phishing scam.
5. Touch to mark the message as not important or important.

What Is Important?
Gmail tries to automatically figure out which of the emails you receive are important. As it learns, it might guess wrong. If an email is marked as important but it is not important, you can manually change the status to not important as described in step 5. Important emails have a yellow arrow, whereas emails that are not important have a clear arrow.
What Are Conversations?
Conversations are Gmail’s version of email threads. When you look at the main view of the Gmail app, you see a list of email conversations. The conversation might have only one email in it, but to Gmail that’s a conversation. As you and others reply to that original email, Gmail groups those emails in a thread, or conversation.
What Happens to Your Spam and Phishing Emails?
When you mark an email in Gmail as spam or a phishing scam, two things happen. The message gets a label called Spam. In addition, a copy of that email is sent to Gmail’s spam servers so they are now aware of a possible new spam or phishing scam email that is circulating around the Internet. Based on what the servers see for all Gmail users, they block that spam or phishing email from reaching other Gmail users. So the bottom line is that you should always mark spam and phishing emails because it helps all of us.
Modify Gmail Settings
You can customize the way Gmail accounts work on your Galaxy Note II, including changing the email signature and choosing which labels synchronize.
1. Touch the Menu button.
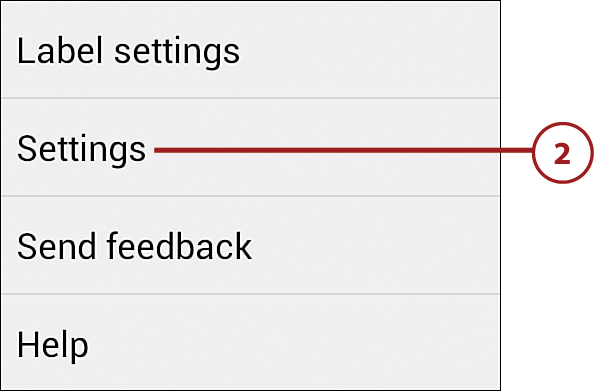
2. Touch Settings.
Email Signature
An email signature is a bit of text that is automatically added to the bottom of any emails you send from your Galaxy Note II. It is added when you compose a new email, reply to an email, or forward an email. A typical use for a signature is to automatically add your name and maybe some contact information at the end of your emails. Email signatures are sometimes referred to as email footers.
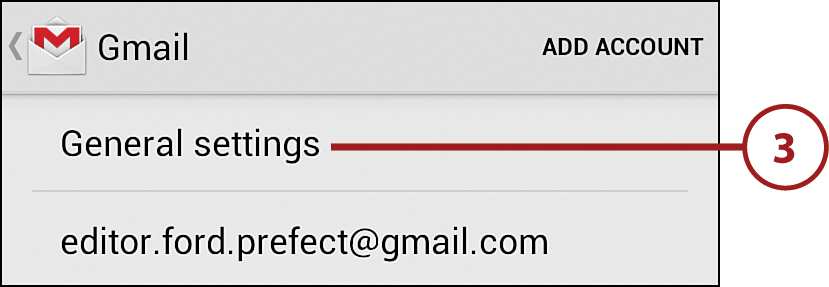
3. Touch General Settings.
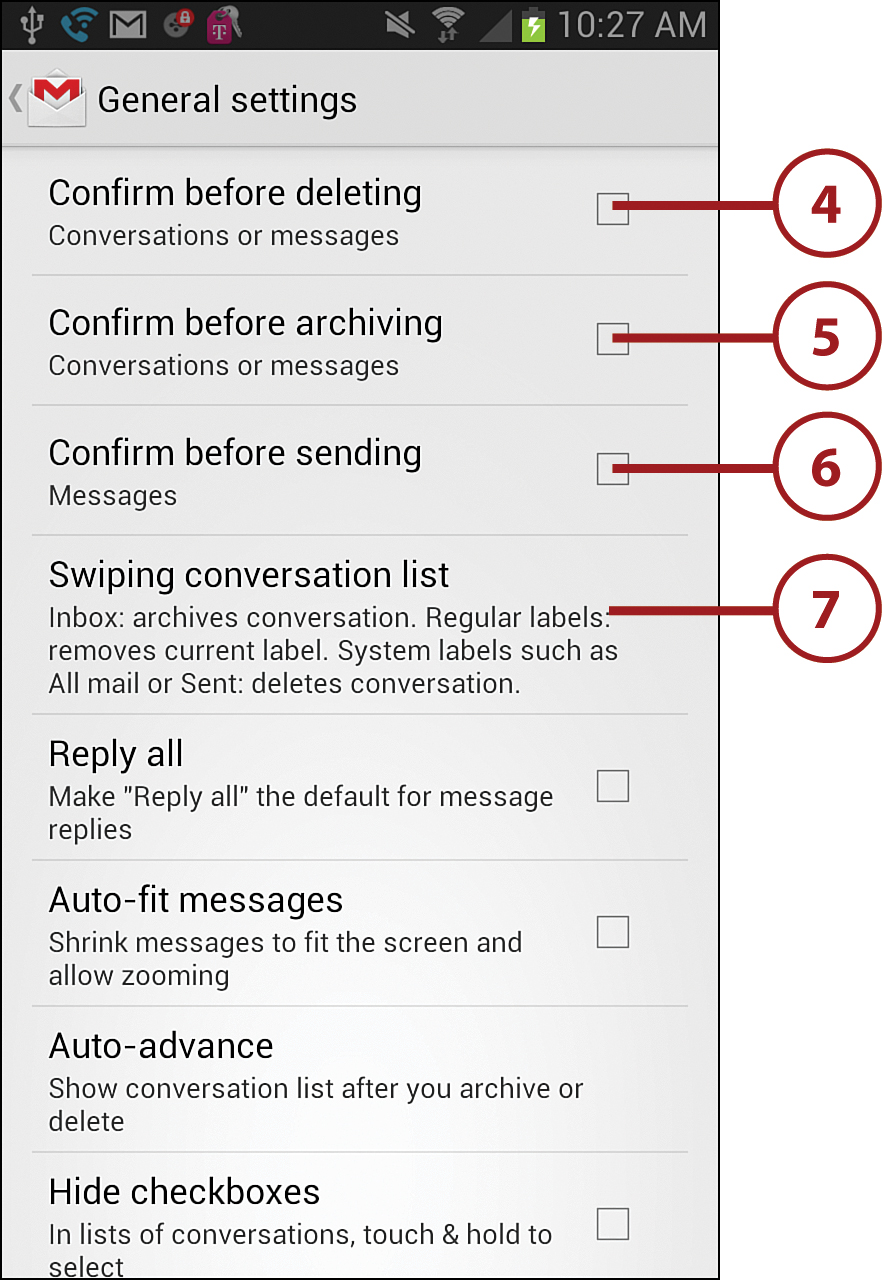
4. Touch to enable or disable confirmation before deleting a message or entire conversation.
5. Touch to enable or disable confirmation before archiving a message or entire conversation.
6. Touch to enable or disable confirmation before sending an email.
7. Touch to change what happens if you swipe your finger over a conversation list. You can set it so that nothing happens, the conversation is archived, or it is deleted.
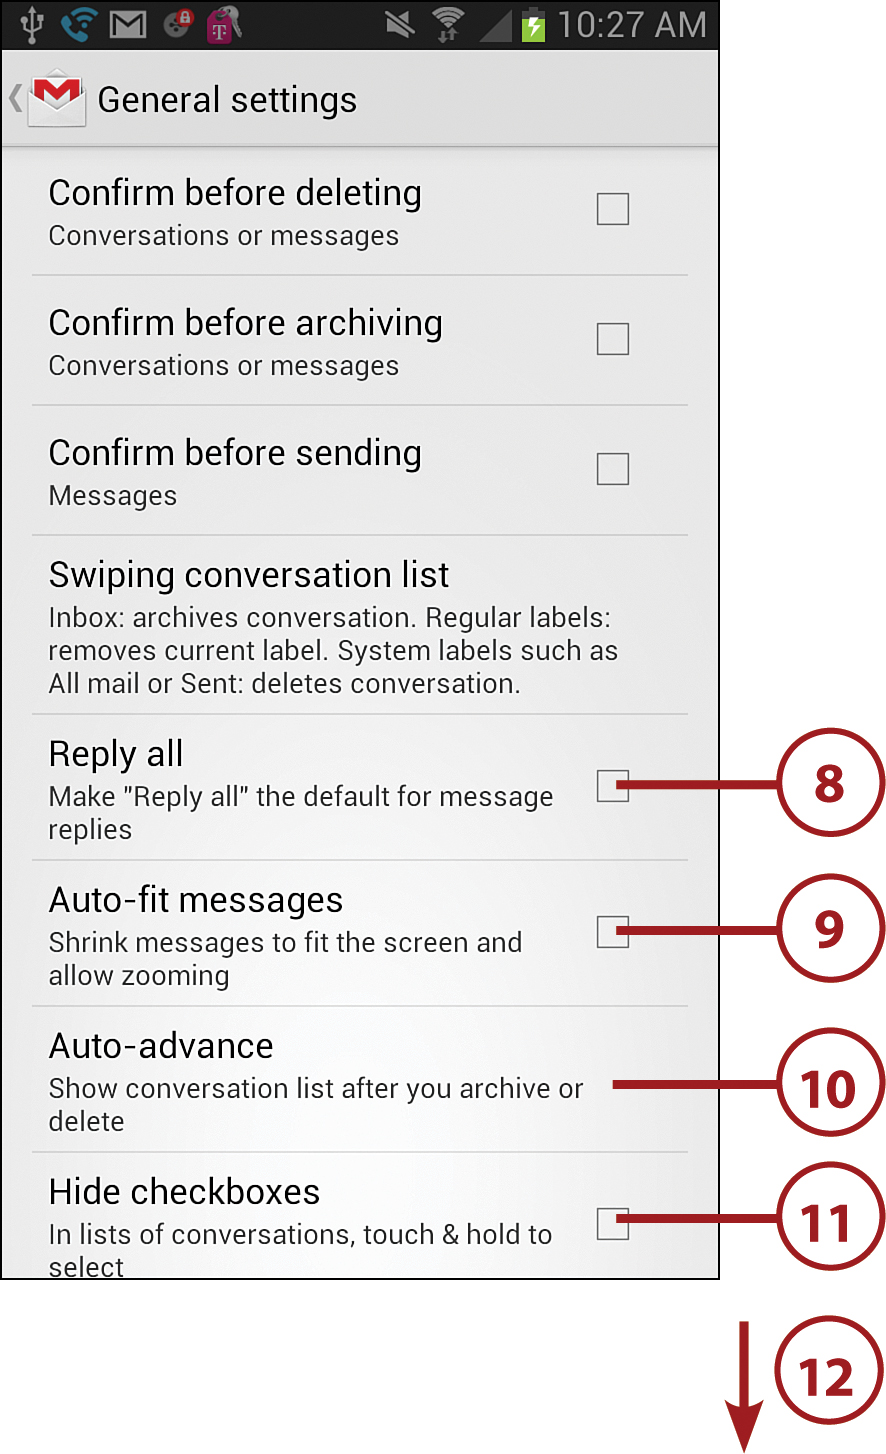
8. Touch to enable or disable making Reply All the default action when replying to emails. Normally only Reply is used. Reply All replies to the sender and all recipients.
9. Touch to enable or disable Auto-fit. When enabled, Auto-fit shrinks all emails so that they fit on the screen, but you can use the unpinch gesture to zoom in.
10. Touch Auto-advance to select which screen your Galaxy Note II must show after you delete or archive an email. Your choices are Newer Conversation, Older Conversation, and Conversation List.
11. Touch to enable or disable hiding the check boxes in the conversation List. When this is not enabled, there are always check boxes next to emails in the conversation list. This enables you to select more than one email and take action on it. If you enable this, the check boxes are hidden, forcing you to touch and hold to select multiple messages.
12. Scroll down for more options.
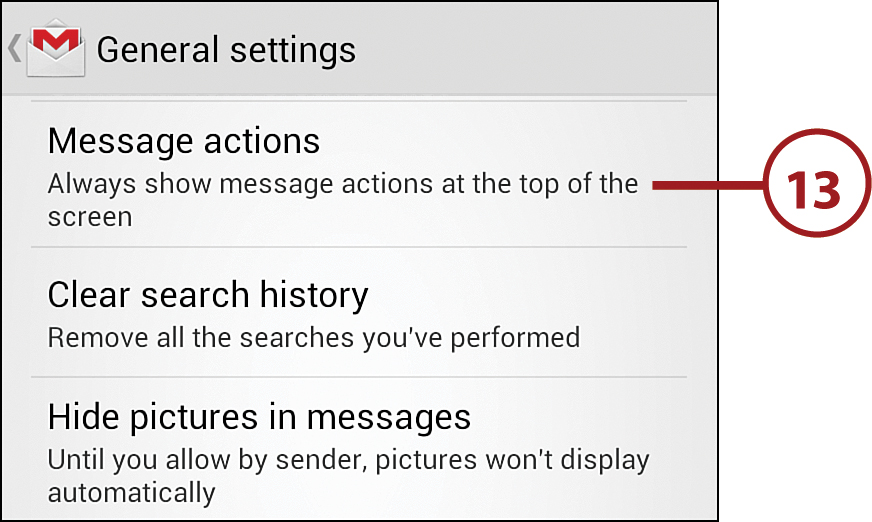
13. Touch to change the behavior of the blue message actions bar as you scroll through a message. Your choices are to keep it at the top of the screen as you scroll, only keep it at the top of the screen when in Portrait mode, or let it scroll up with the message as you scroll.
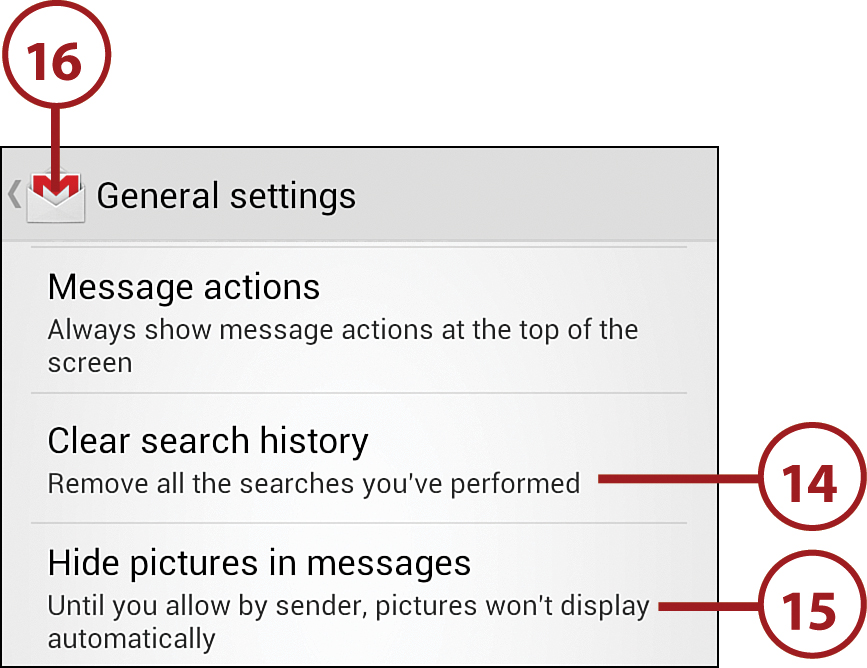
14. Touch to clear the Gmail search history.
15. Touch to restore the setting for whether to automatically load pictures when reading email. By default, this is set to Off.
16. Touch to return to the main Settings screen.
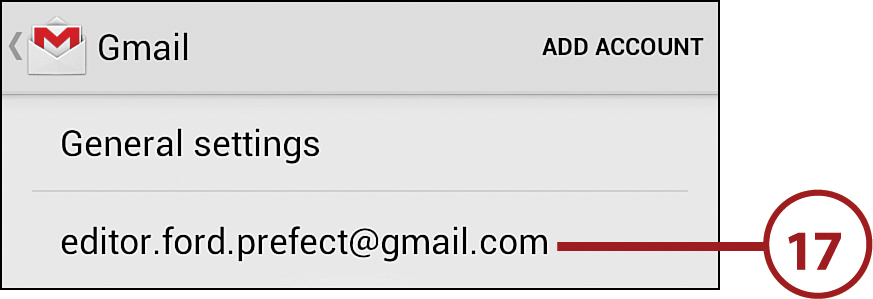
17. Touch one of your Gmail accounts to change settings specific to that account.
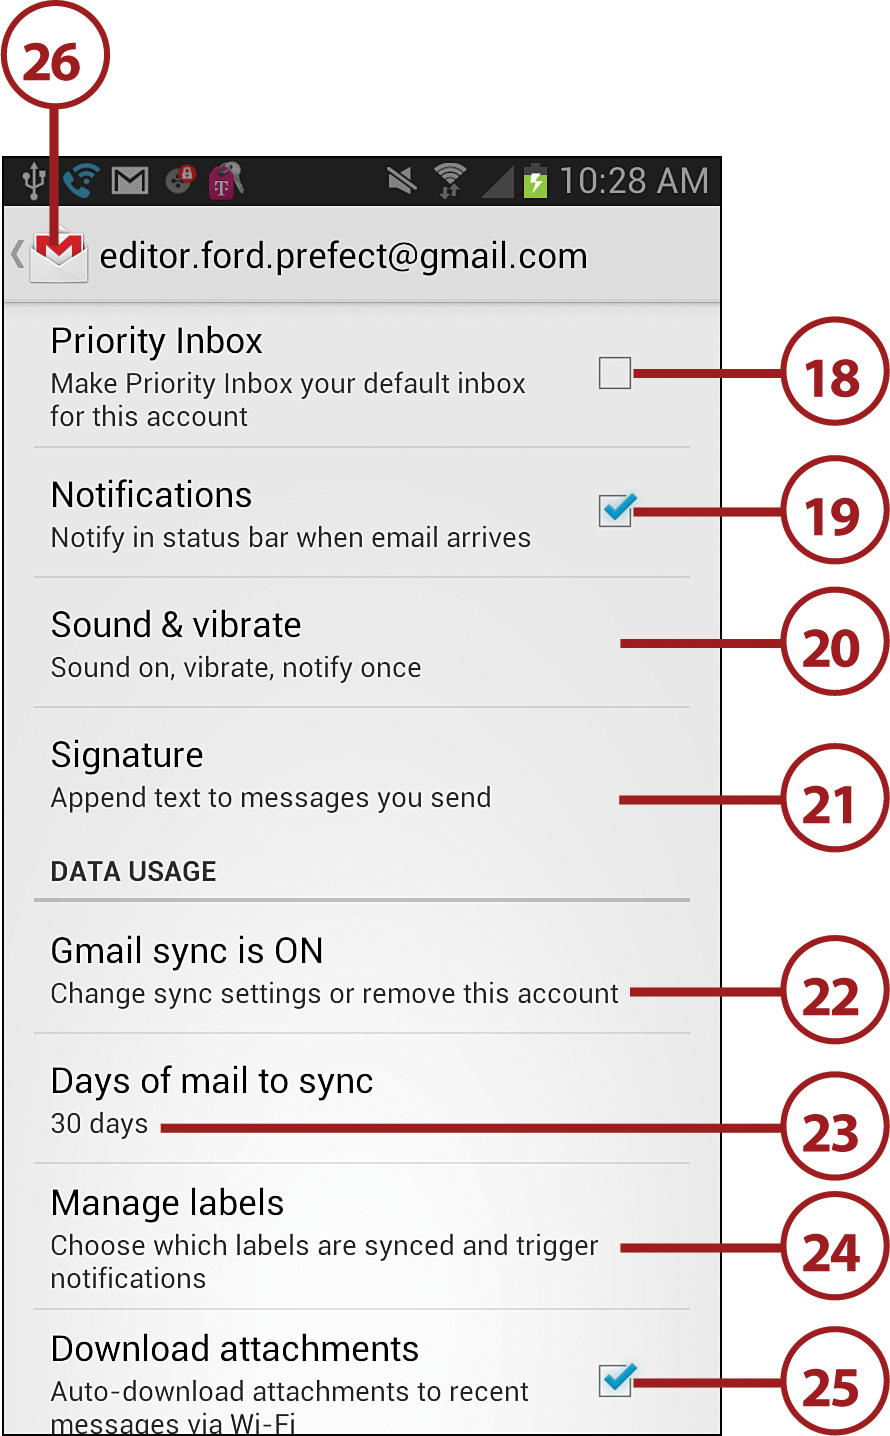
18. Touch to enable or disable showing your Priority Inbox instead of your regular Inbox when opening the Gmail app.
19. Touch to enable or disable getting notified when new email arrives for this Gmail account.
20. Touch to select how to get notified when new email arrives for this account.
21. Touch to enter a signature that will appear at the end of all emails composed using this account.
22. Touch to change how this account is synchronized, what is synchronized, or remove it entirely.
23. Touch to select how many days of mail to synchronize with your Galaxy Note II.
24. Touch to manage labels. Read more about managing labels in the next task.
25. Touch to enable or disable downloading attachments while connected to a Wi-Fi network.
26. Touch to return to the main Settings screen.
Manage Gmail Labels
Gmail labels are Google’s name for email folders. You can manage how each of them synchronize and alert you.
1. Touch the Inbox label.
2. Touch Show All Labels.

3. Touch Manage Labels.

4. Touch a label to manage it.
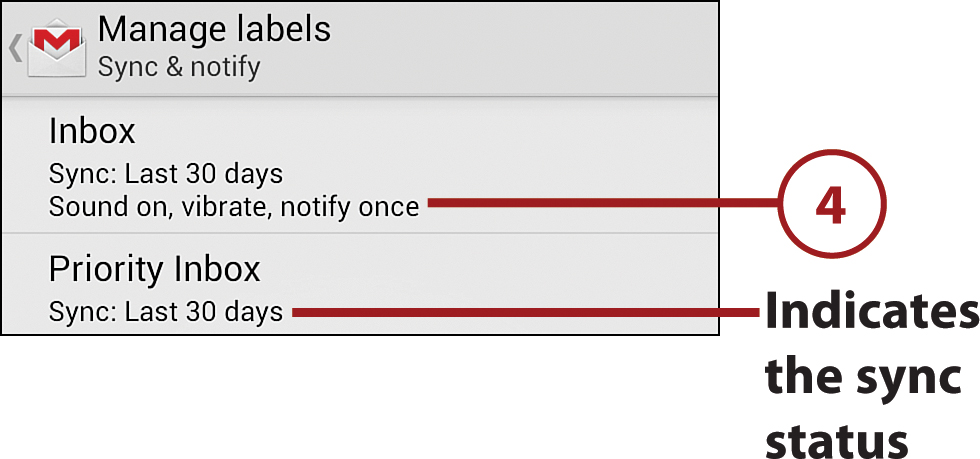
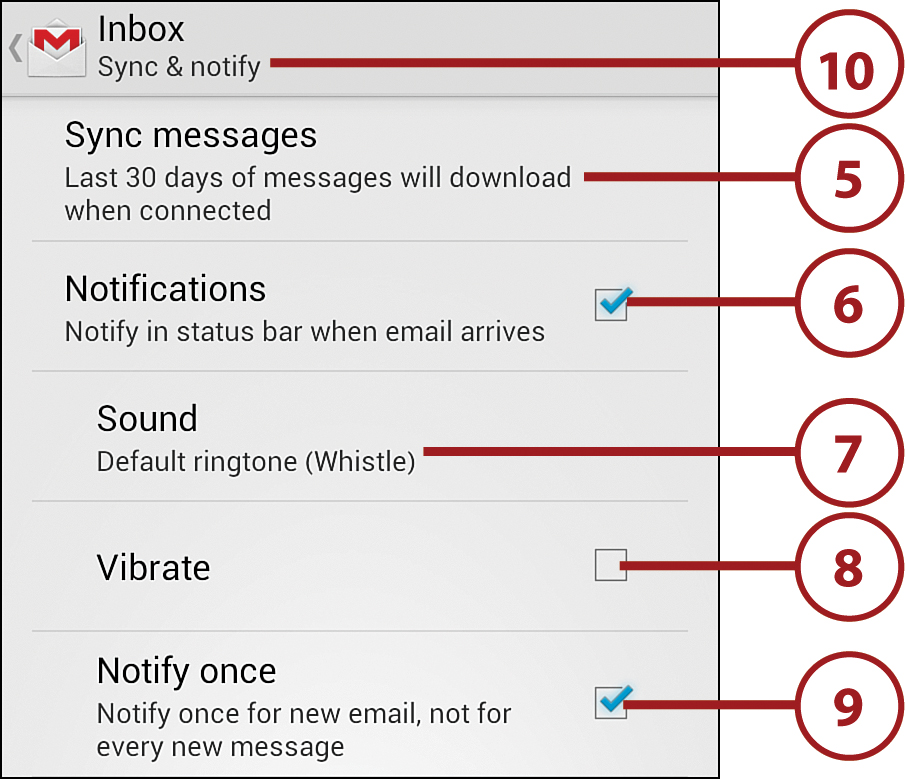
5. Touch to enable synchronization of this label to your Galaxy Note II and whether to synchronize 30 days of email or all email. After synchronization is enabled, the rest of the settings on this screen become available.
6. Touch to enable or disable being notified when new email arrives in this label.
7. Touch to select the ringtone that plays when you are notified of new email in this label.
8. Touch to choose whether to also vibrate when new email arrives in this label.
9. Touch to enable or disable notifying you once when multiple emails arrive in this label, as opposed to notifying for each one.
10. Touch to return to the list of labels.
Email Application
The Email application supports all email accounts with the exception of Gmail. This includes any corporate email accounts that use Microsoft Exchange or corporate emails systems such as Lotus Domino/Notes that have an ActiveSync gateway. In addition to corporate email accounts, the Email application also supports POP3 and IMAP accounts. These are typically hosted by your Internet service provider, but also by places like Yahoo! or Hotmail.
Add a Work Email Account
Your Galaxy Note II can synchronize your contacts from your work email account as long as your company uses Microsoft Exchange or an email gateway that supports Microsoft ActiveSync (such as Lotus Traveler for Lotus Domino/Notes email systems). It might be useful to be able to keep your work and personal contacts on one mobile device instead of carrying two phones around all day.
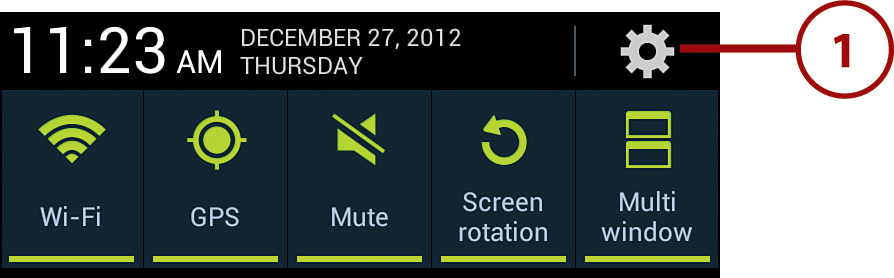
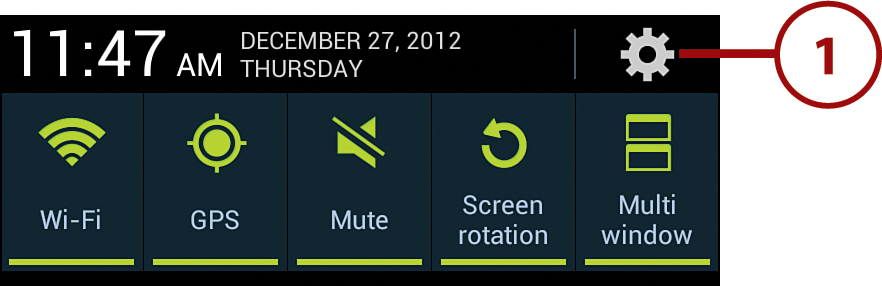
1. From the Home screen, pull down the Notification bar and touch the Settings icon.
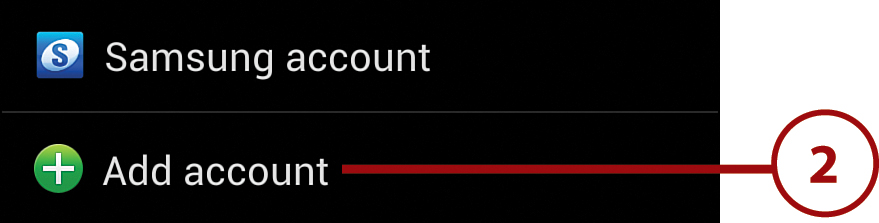
2. Scroll down to the Accounts section and touch Add Account.

3. Touch Microsoft Exchange ActiveSync.

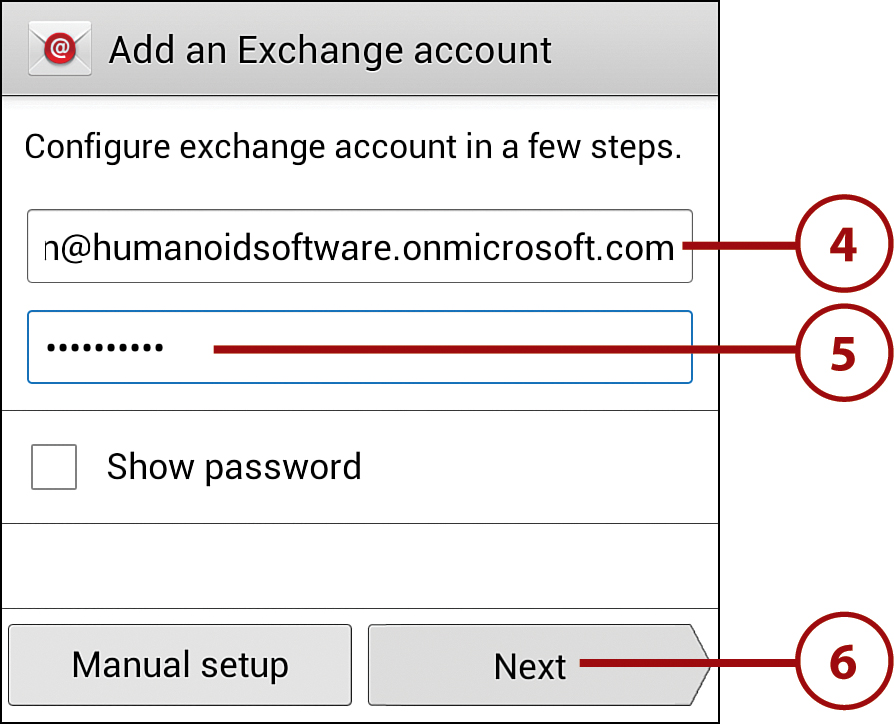
4. Enter your full corporate email address.
5. Enter your corporate network password.
6. Touch Next.
7. Enter your company’s mail server name.
Error Adding Account? Guess the Server
Your Galaxy Note II tries to work out some information about your company’s ActiveSync setup. If it can’t, you are prompted to enter the ActiveSync server name manually. If you don’t know what it is, you can try guessing it. If, for example, your email address is [email protected], the ActiveSync server is most probably webmail.allhitradio.com or autodiscover.allhitradio.com. If this doesn’t work, ask your email administrator.
8. Touch to use secure connections, which encrypts your email, calendar, and contacts between your Galaxy Note II and your company’s mail server. It is highly recommended that you leave this selected.
9. Touch Next.

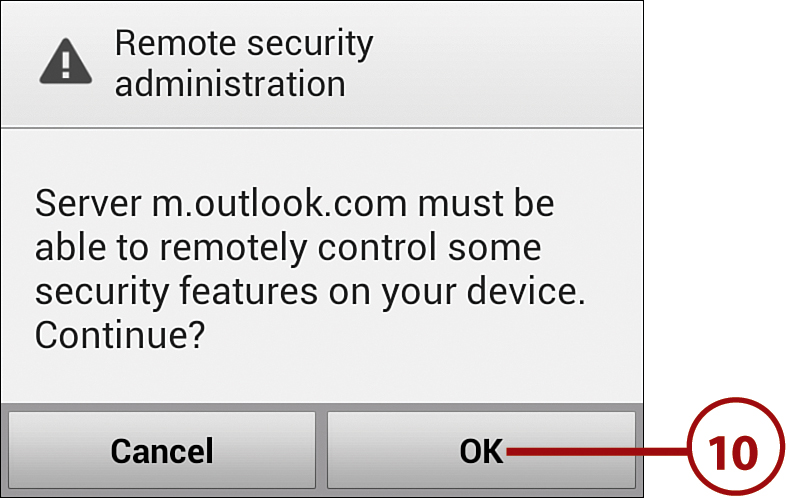
10. Touch to agree that your mail administrator may impose security restrictions on your Galaxy Note II if you proceed.
11. Touch to choose how often your corporate email is delivered to your Galaxy Note II. Push means that as it arrives in your Inbox at work, it is delivered to your phone. You can set it to Manual, which means that your work email is only delivered when you open the Email app on your phone. You can also set the delivery frequency from every 5 minutes to every hour.
12. Touch to choose how many days in the past email is synchronized to your Galaxy Note II.
13. Touch to choose how much of an email is retrieved.
14. Touch to choose how many days in the past calendar items are synchronized to your Galaxy Note II.
15. Touch to enable or disable being notified when new email arrives from your corporate Inbox.
16. Touch to enable or disable synchronizing your corporate email to your Galaxy Note II.
17. Scroll down to see more settings.

18. Touch to enable or disable synchronizing your corporate contacts to your Galaxy Note II.
19. Touch to enable or disable synchronizing your corporate calendar to your Galaxy Note II.
20. Touch to enable or disable synchronizing your corporate tasks to your Galaxy Note II.
21. Touch to enable or disable synchronizing SMS (text) messages you receive on your Galaxy Note II to your corporate Inbox.
22. Touch to enable or disable automatically downloading email attachments when your Galaxy Note II is connected to a Wi-Fi network.
23. Touch Next.

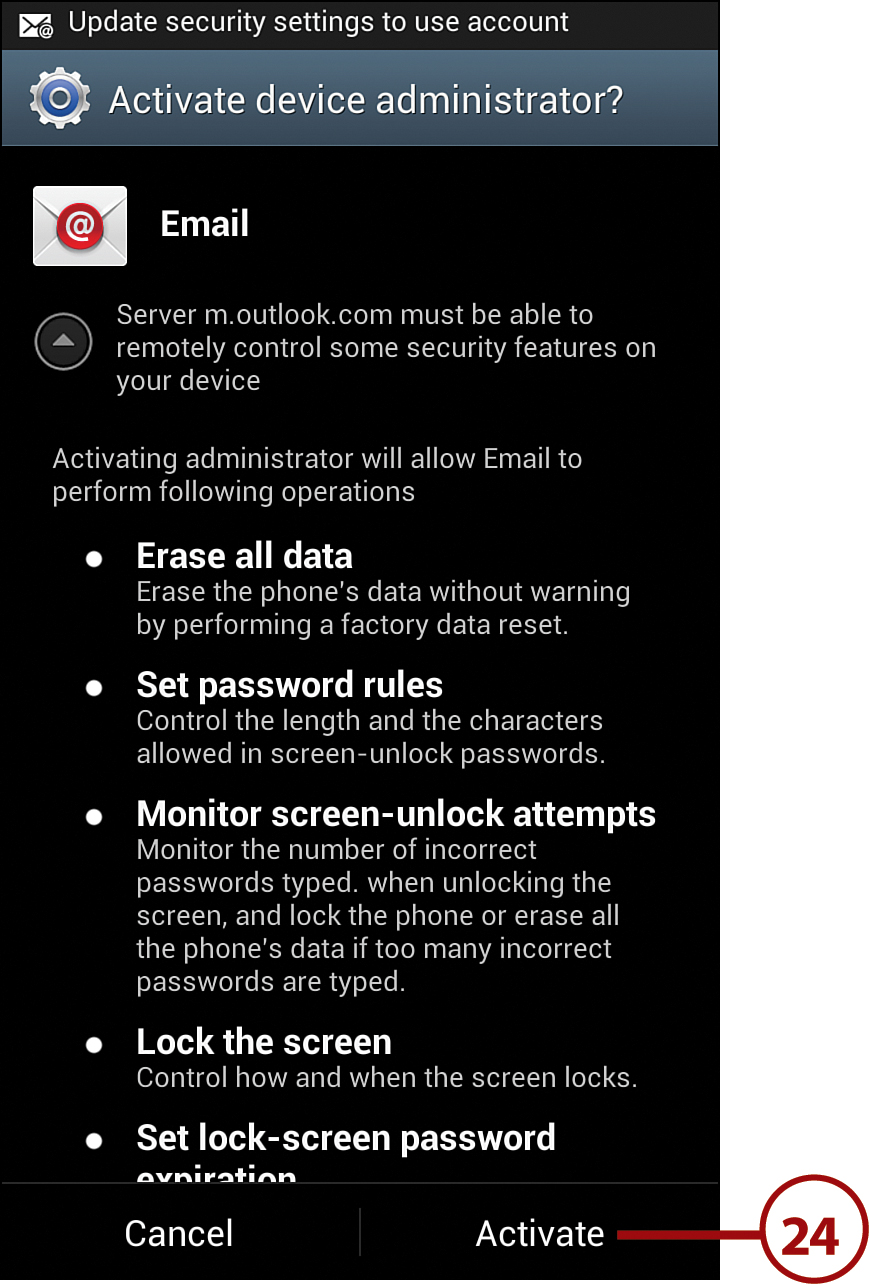
24. Touch Activate.
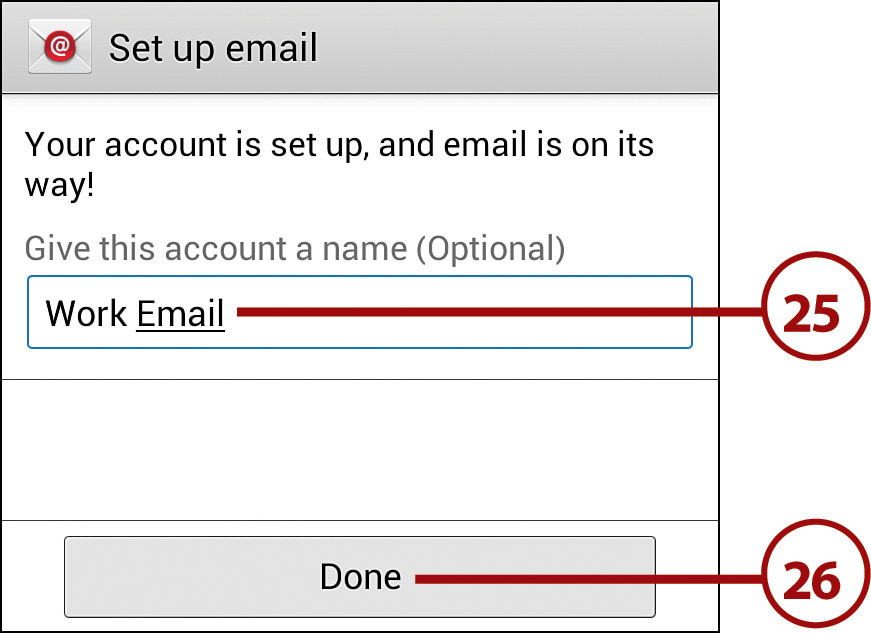
25. Enter a name for this email account. Use something meaningful that describes the purpose of the account, such as Work Email.
26. Touch Done to complete the setup.
To remove an account, from the Settings screen touch the type of account (for example, Microsoft Exchange ActiveSync) and then touch the account to be removed. Touch Remove Account.
Add a New POP3 or IMAP Account
1. Pull down the Notification bar and touch the Settings icon.
2. Scroll down to Accounts and touch Add Account.
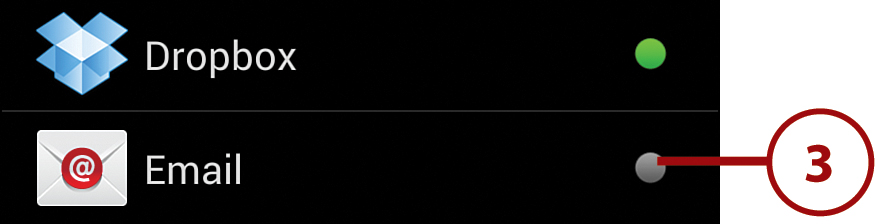
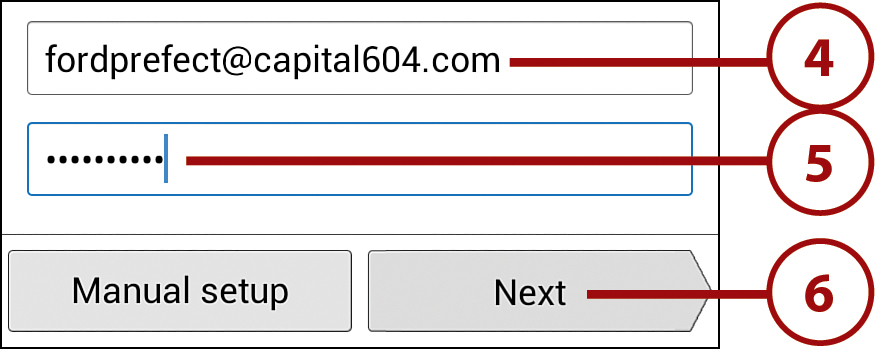
4. Enter your email address.
5. Enter your password.
6. Touch Next.
Why Manual Setup?
Your Galaxy Note II tries to figure out the settings to set up your email account. This works most of the time when you are using common email providers such as Yahoo! or Hotmail. It also works with large ISPs such as Comcast, Road Runner, Optimum Online, and so on. It might not work for smaller ISPs, in smaller countries, or if you have created your own website and set up your own email. In these cases, you need to set up your email manually.
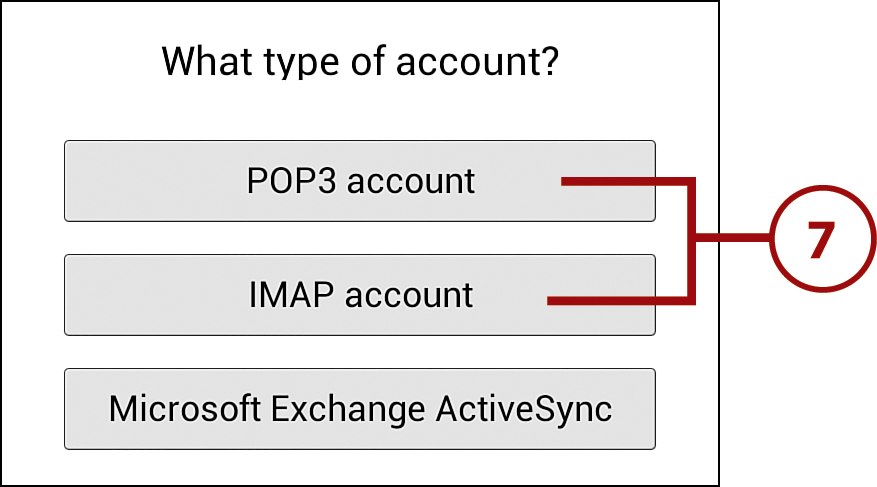
7. Touch POP3 or IMAP. IMAP has more intelligence to it, so select that when possible.
8. Ensure that the information on this screen is accurate.
9. Touch Next.
Where Can I Find This Information?
If you need to manually set up your email account, you must have a few pieces of information. Always check your ISP’s, or email service provider’s, website, and look for instructions on how to set up your email on a computer or smartphone. This is normally under the Support section of the website.
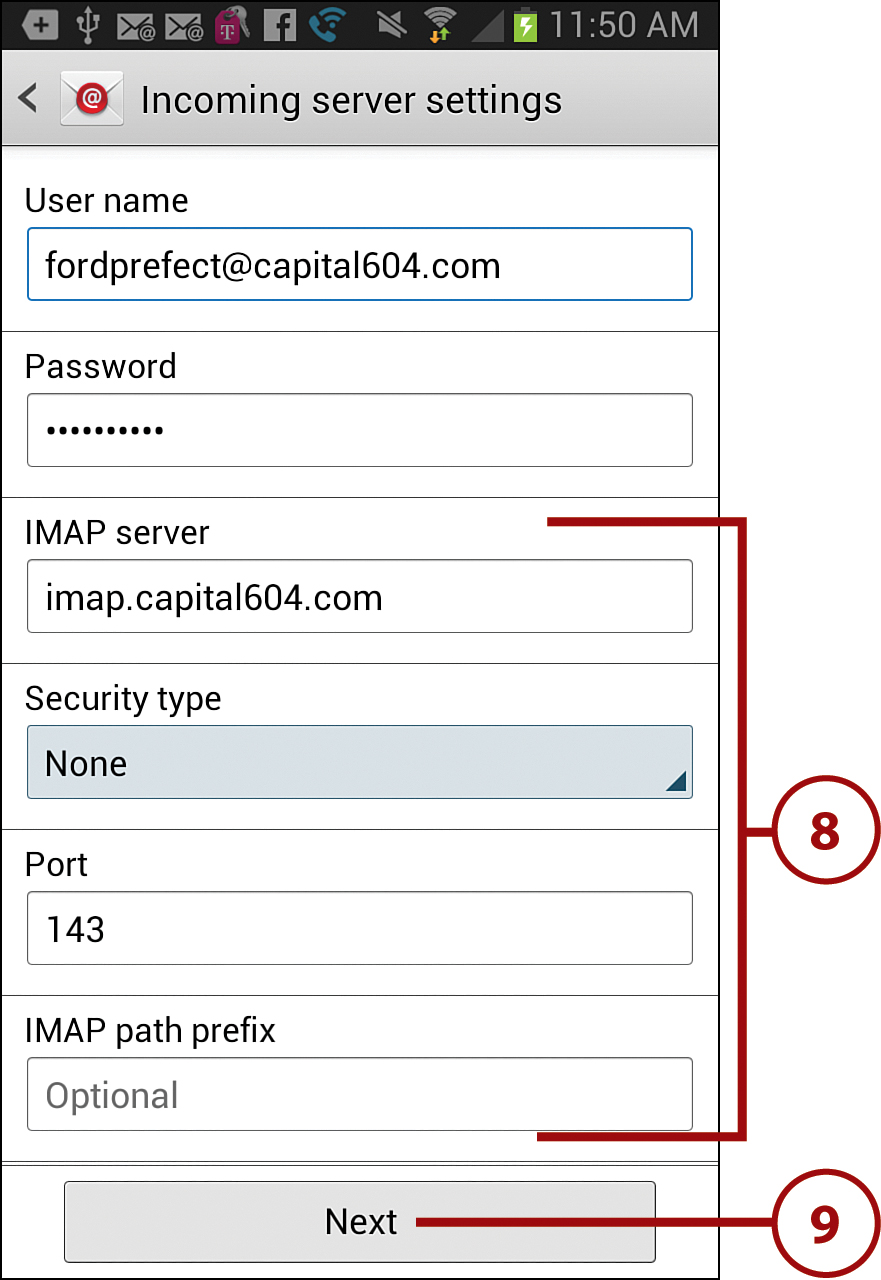
On the Incoming Server and Outgoing Server screens, your username and password should already be filled out because you typed them in earlier. If not, enter them.
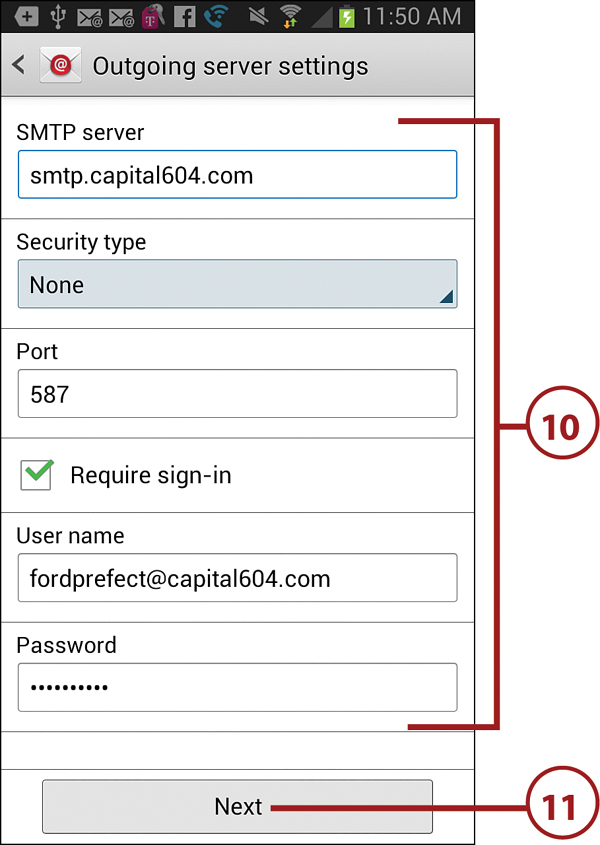
10. Ensure that the information on this screen is accurate.
11. Touch Next.
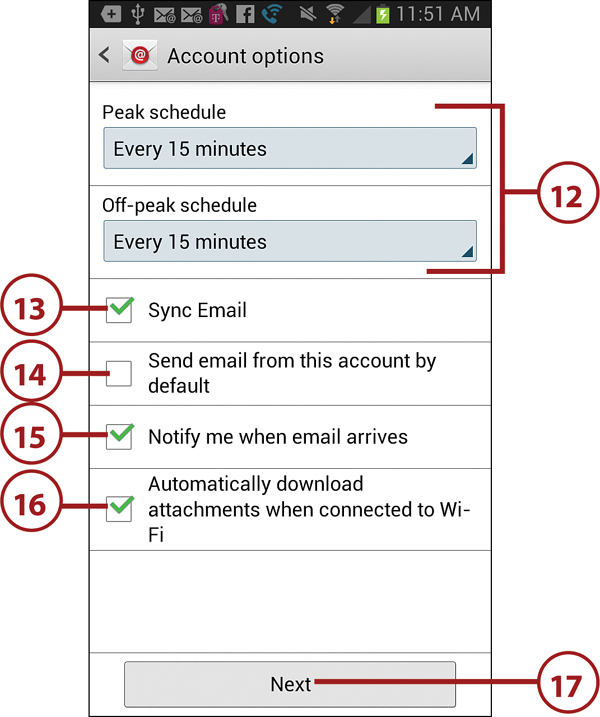
12. Touch to change the frequency in which email from this account synchronizes to your Galaxy Note II.
13. Touch to check the box if you want email to synchronize between this account and your Galaxy Note II.
14. Touch to check the box if you want email to be sent from this account by default.
15. Touch to check the box if you want to be notified when new email arrives into this account.
16. Touch to check the box if you want email to be automatically downloaded when you are connected to a Wi-Fi network.
17. Touch Next.
18. Enter a friendly name for this account, like Home Email.
19. Enter your full name or the name you want to be displayed when people receive emails sent from this account.
20. Touch Done to save the settings for this account and return to the Add Accounts screen.

If your mail provider supports email security, such as Secure Sockets Layer (SSL) or Transport Layer Security (TLS), you should strongly consider using it. If you don’t, emails you send and receive go over the Internet in plain readable text. Using SSL or TLS encrypts the emails as they travel across the Internet so nobody can read them. Set this under the Advanced settings for the incoming and outgoing servers.
Working with the Email App
Now that you have added two new accounts, you can start using the Email application. Everything you do in the Email application is the same for every email account. The Email app enables you to either work with email accounts separately or in a combined view.
Navigate the Email Application
Before you learn how to compose or read emails, you should become familiar with the Email application.
1. Touch to launch the Email app.
2. Touch to switch between email accounts or select the Combined view, which shows all emails from all accounts.
3. Touch the star to mark an email as flagged.
4. Each color represents a specific email account.
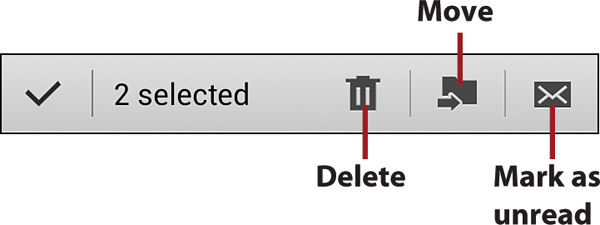
5. Check boxes next to emails to select more than one. Then you can take actions against multiple emails at once, such as Mark as Unread, Delete, or Move to a New Folder.
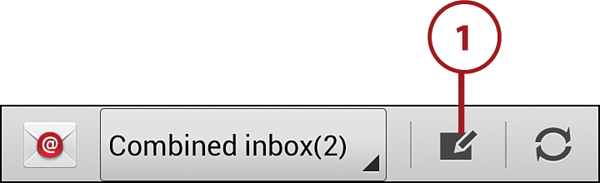
6. Touch to compose a new email.
When you select multiple emails by checking the boxes next to them, you can take action on all the selected messages at once. You can mark the messages as unread, move them to a different folder, or delete them.
Landscape Mode
Because your Galaxy Note II has such a large screen, Samsung rewrote the Email app to support a Landscape mode. If you rotate your Galaxy Note II sideways, the Email app reconfigures to show the email list on the left and the actual email you are reading on the right.

Compose an Email
1. Touch to compose a new email.
2. Enter one or more recipients. As you type, your Galaxy Note II tries to guess who you want to address the message to. If you see the correct name, touch it to select it. This includes names stored on your Galaxy Note II and in your company’s corporate address book.
4. Enter the body of the message. Use the formatting icons to change the font, font size, color, and other properties.
5. Touch to send the message.

Can You Carbon Copy (Cc) and Blind Carbon Copy(Bcc)?
While you are composing your email, you can add recipients to the To field as described in step 2, but there are no Carbon Copy (Cc) and Blind Carbon Copy (Bcc) fields shown. However, you can add these fields by touching the Menu button and touching Add Cc/Bcc. After you do that, the Cc and Bcc fields display.

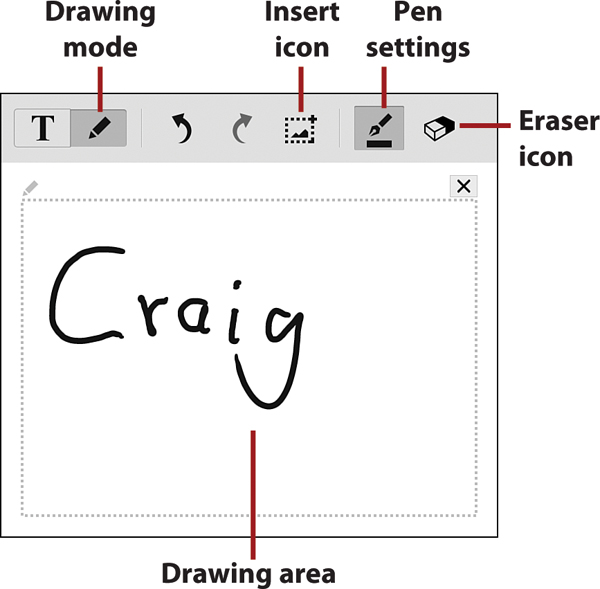
Drawing in Your Email
Instead of just typing your email, you can draw in it. Pull out your S Pen and touch the Drawing Mode icon. Then draw in the area indicated. Touch the Pen Settings icon to change the style of instrument (brush, pen, and so on) and the color of the ink. Touch the Eraser icon and use the S Pen to erase parts of your drawing. Touch the Insert icon to insert images from the Gallery.
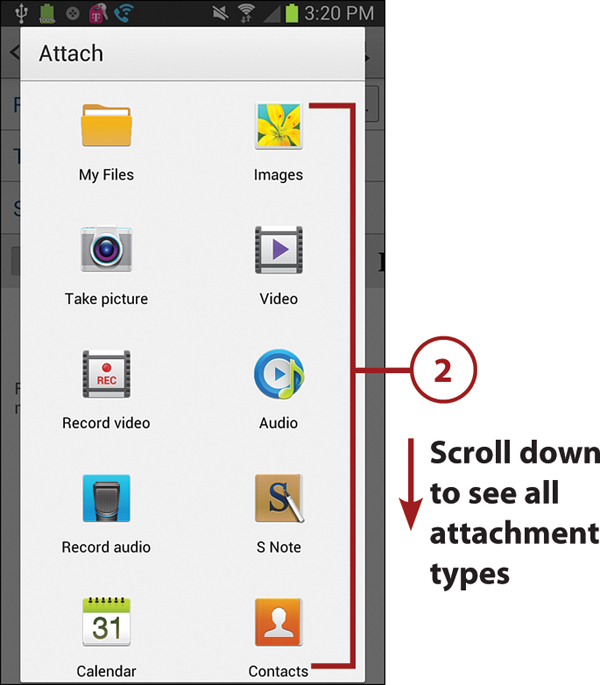
Add Attachments to a Message
Before you send your message, you might want to add one or more attachments. You can attach any type of file, including pictures, video, audio, contacts, and location.
1. Touch the Attach icon.

2. Choose the type of attachment.
Read Email
Reading messages in the Email application is the same regardless of which account the email has come to.
1. Touch an email to open it.

2. Touch to reply to the sender of the email. This does not reply to anyone in the Cc field.
3. Touch to forward the email.
4. Touch to expand the email header to see all recipients and all other email header information.
5. Touch to mark the message as flagged.
6. Touch to delete the message.
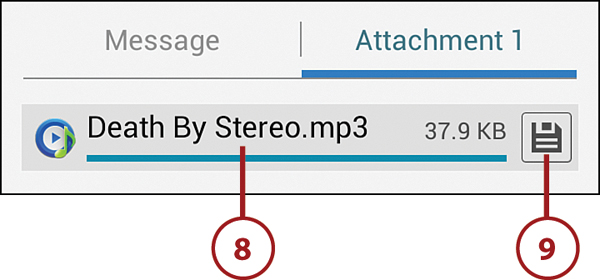
7. Touch to see the attachments.

8. Touch to play or view the attachment.
9. Touch to save the attachment to your phone.
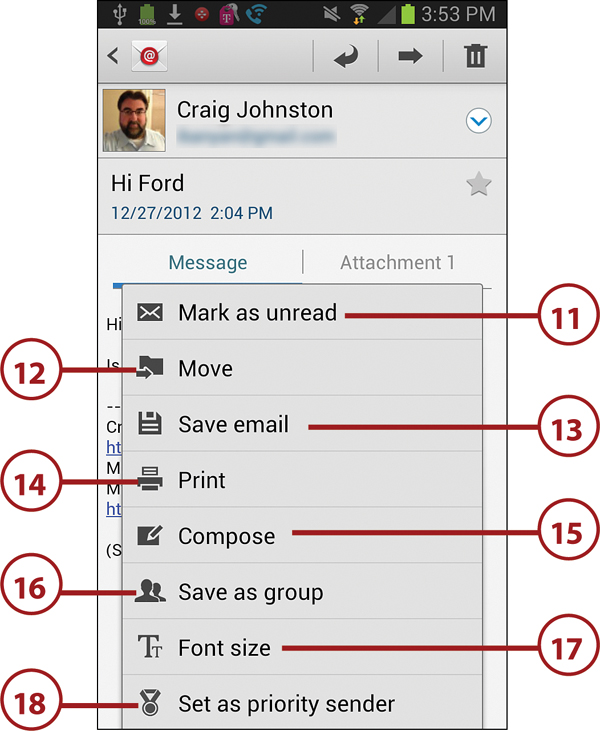
10. Touch the Menu button to see more options.
11. Touch to mark the message as unread.
12. Touch to move the message to a different folder.
13. Touch to save the email as a file on your phone (outside the Email app).
14. Touch to print the email on a Samsung printer available on the Wi-Fi network.
15. Touch to compose a new email.
16. Touch to save the recipients of the email to your Contacts as a group.
17. Touch to change the font size used when reading the message.
18. Touch to add the sender to the Priority Sender list. Email from people in the Priority Sender list are displayed in the Priority Sender view.
2. Touch Settings.

3. Touch General Preferences.

4. Touch to change how auto-advance works. You can choose to either advance to a newer message, older message, or back to the message list.
5. Touch to change how many lines of the email are shown in the preview.
6. Touch to set the title of the email. You can set it as the email subject or the email sender.
7. Touch to enable or disable email deletion confirmation.
8. Touch to edit and add Quick Responses.
Quick Responses
Quick responses are words, phrases, sentences, or paragraphs of text that you create ahead of time and save as Quick Responses. While you are composing an email, you can choose to insert one or more of your Quick Responses. The idea is that it saves on typing the same things over and over.
9. Touch to enable or disable Split View mode when you rotate your Galaxy Note II on its side.
10. Scroll down for more settings.

11. Touch to manage the Priority Sender list.
What Is the Priority Sender List?
Emails received from people who you have listed in the Priority Sender list are shown in the Priority Sender Inbox as well as in the regular Inbox. Opening the Priority Sender Inbox folder shows only emails from these people, which can be a way of filtering email so that you respond to the important people first and then switch to the regular Inbox and respond to everyone else.
12. Touch to enable or disable special email notifications when email is received into the Priority Inbox folder.
13. Touch to select the ringtone that plays when you are notified of new Priority Inbox emails.
14. Touch to also vibrate when being notified about new Priority Inbox emails.
15. Touch to go back to the main Settings screen.

Corporate Account Settings
You are able to change your email signature as well as control what components are synchronized and how often they are synchronized. Repeat steps 1 and 2 from the “Change Email App Settings” task to get started.
1. Touch a corporate account.

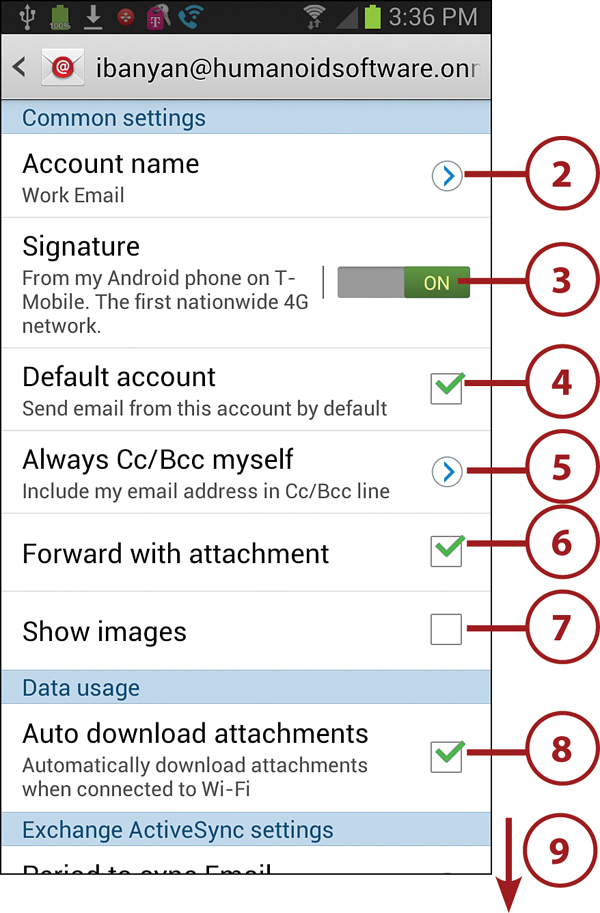
2. Touch to change the account name.
3. Touch to add an email signature or edit the one you already have.
4. Touch to enable or disable using this account as the default account when composing email.
5. Touch to set whether you are Cc’d or Bcc’d on emails that you send.
6. Touch to enable or disable including any attachments on emails that you forward.
7. Touch to enable or disable showing images in emails.
8. Touch to enable or disable automatically downloading attachments when you are connected to Wi-Fi.
9. Scroll down for more settings.
10. Touch to choose how many days of email to synchronize to your Galaxy Note II. You can choose between One Day and One Month, or choose All to synchronize every email ever received.
11. Touch to empty your Trash folder on the email server back in the office.
Why Empty the Office Trash Folder?
Step 11 describes how you can choose to empty your Trash folder back in the office. The reason that this is useful is sometimes your email administrator sets a limit on the size of your mailbox, and when you reach that limit, you are unable to send emails. By emptying your Trash folder back at the office, you might be able to clear a little bit of space in your mailbox so you can send that important email.
12. Touch to set the peak and off-peak schedule. By default, peak schedule is Monday to Friday 8:00 a.m. to 5:00 p.m. Off-peak is all other times. This setting enables you to change those times.
13. Touch to choose which folders you want to synchronize from your office email account and when they synchronize based on the peak and off-peak schedule.
14. Touch to set whether you are out of the office and your out-of-office message.
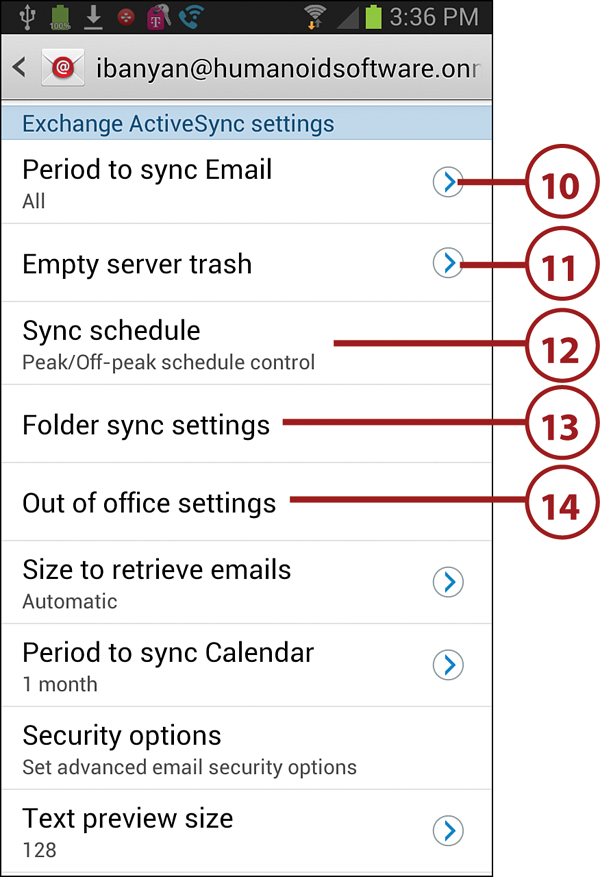
15. Touch to set the size of emails to retrieve, or leave it on Automatic to let the email administrator set this.
16. Touch to set how far back in the past your calendar syncs.
17. Scroll to set advanced security options, including whether you want to encrypt your emails, sign emails with an electronic signature, and email certificates to use with S/MIME (if your company supports it).
18. Touch to set the preview text size.
19. Scroll down for more settings.

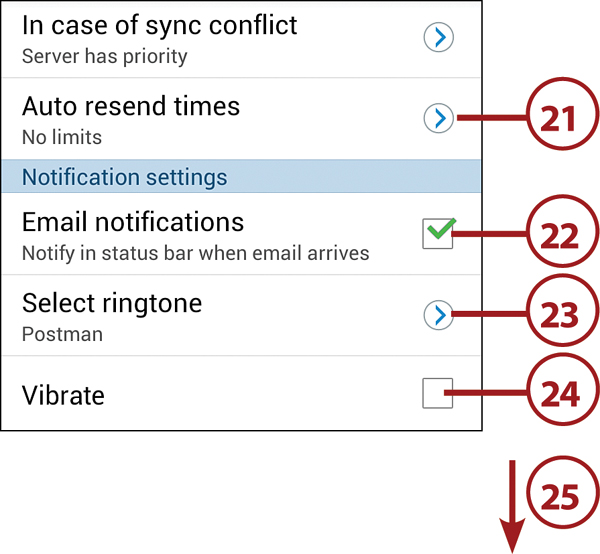
20. Touch to change which device wins if there is a conflict between your phone and your email account back at the office.

How Are There Conflicts?
A conflict can occur if you (or someone who has delegate access on your email account) makes a change in your mailbox using the desktop email client (like Outlook)—for example he moves an email to a folder—and you make a change on your Galaxy Note II—say you delete that same email. Now there is a conflict because an email has been both moved and deleted at the same time. If you set the server to have priority then the conflict is resolved using your rule that the server wins. In this example, the email is not deleted, but it is moved to a folder.
21. Touch to change the time range when your phone can resend emails that failed to send. No limits means it can resend anytime.
22. Touch to enable or disable being notified when new emails arrive for this account.
23. Touch to choose the ringtone that plays when you are notified of new email for this account.
24. Touch to enable or disable if the phone must also vibrate when the alert ringtone is played.
25. Scroll down for more options.
26. Touch to change the Exchange mail server settings for this account. This includes your account username and password if this has changed.
27. Choose what is synchronized to your phone.
28. Touch to return to the Settings main screen.


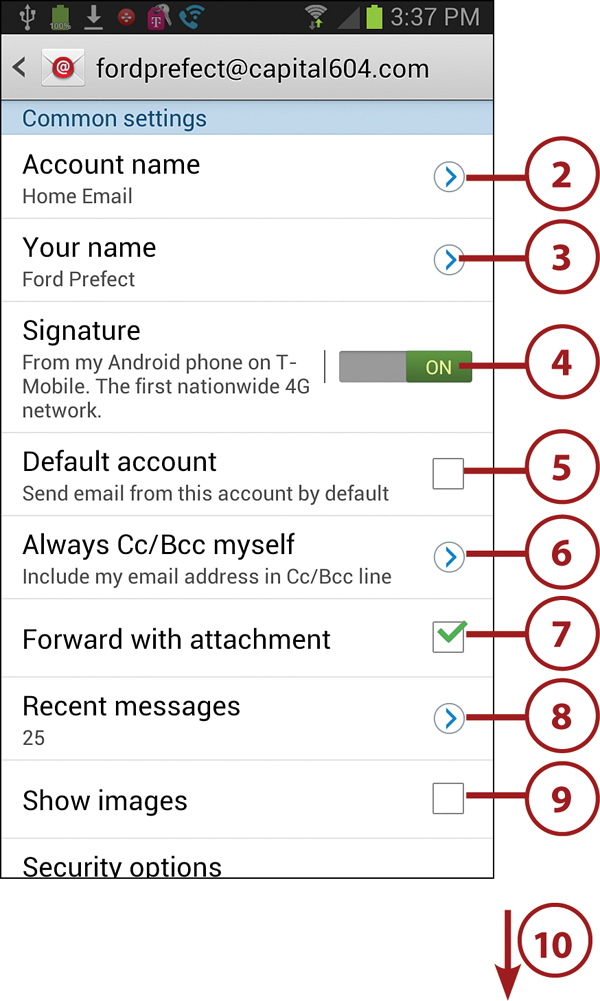
2. Touch to change the account name.
3. Touch to change the name that recipients see when you send them email from this account.
4. Touch to add an email signature or edit the one you already have.
5. Touch to check the box if you want this account to be used as the default account when composing email.
6. Touch to set whether you want to be CC’d or Bcc’d on all emails that you send from this account.
7. Touch to enable or disable including any attachments in emails that you forward.
8. Touch to set how many recent messages are kept on your phone.
9. Touch to enable or disable showing images in emails to this account.
10. Scroll down for more settings.
11. Touch to set advanced security settings for this account, including choosing to encrypt emails, sign them with a digital signature, and manage encryption keys on your phone for use with encrypting emails.
12. Touch to enable or disable synchronizing email for this account.
13. Touch to enable or disable automatically downloading email attachments when your Galaxy Note II is connected to a Wi-Fi network.
14. Touch to change the size of emails retrieved from your email server.
15. Touch to change when your phone attempts to resend emails that have failed to send. You can choose a time range or set it to No Limits, which means anytime.
16. Touch to set the peak and off-peak time ranges. By default, peak schedule is Monday to Friday 8:00 a.m. to 5:00 p.m. Off-peak is all other times. This setting enables you to change those times.
17. Scroll down for more settings.

18. Touch to enable or disable being notified when email arrives for this account.
19. Touch to choose the ringtone that plays when you are notified of new email for this account.
20. Touch to enable or disable having vibration when the notification ringtone is played.
21. Touch to change the incoming server settings for this account.
22. Touch to change the outgoing server settings for this account.
23. Touch to return to the Settings main screen.
