
Chapter 16. Reporting Services Issues
IN THIS CHAPTER
• How Do I Create a Shared Dataset in Report Builder?
• Report Builder Getting Started Dialog Not Displayed
• Enable Report Builder to Create or Edit Reports
• Is the Reporting Services Add-In Installed?
• How Do I Activate the Report Server Integration Feature?
• How Do I Create Report Artifacts in a SharePoint Library?
• Checking Report Project Settings
A number of configuration settings can affect running Reporting Services in SharePoint Integrated mode. This chapter covers some of the common settings that you might need to tweak to provide the desired user experience. In addition this chapter will touch on a few other areas of which you need to be aware to get Reporting Services running smoothly in SharePoint Integrated mode.
How Do I Create a Shared Dataset in Report Builder?
SQL Server Reporting Services 2008 R2 has a new shared dataset feature that provides for creating a dataset and reusing it in multiple reports. Report Builder 3.0 provides the Report Data window that is used to access built-in fields, parameters, images, data sources, and datasets, as shown in Figure 16.1. Right-clicking Datasets allows you to add a shared dataset to the current report or create a new dataset that will be embedded in the current report. It does not allow you to create a new shared dataset. There are two ways to create a shared dataset in Report Builder 3.0:
• Click New right below Report Data as shown in Figure 16.1 and then select Dataset from the popup menu.
• Select the New Dataset option on the Getting Started dialog, as shown in Figure 16.2. For a detailed walkthrough of the steps required to create a shared dataset, see the “Creating a Report with Report Builder 3.0” section in Chapter 14,“ Building a Management Dashboard Solution.”

Figure 16.2. Report Builder Getting Started dialog.
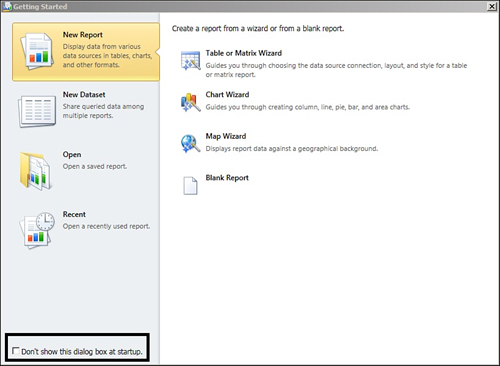
Report Builder Getting Started Dialog Not Displayed
By default, Report Builder 3.0 shows the Getting Started dialog on startup, as shown in Figure 16.2. This dialog provides an easy way to get started with a task in Report Builder. When the Don’t Show This Dialog at Startup check box in the lower-left area of the dialog is checked, the Getting Started dialog will no longer display automatically when you launch Report Builder.
To restore this functionality, follow these steps:
- Click the Reporting Services icon in the upper-left corner of the Report Builder window and then click the Options button.
- Check the Show the Getting Started Dialog Box at Startup check box, as shown in Figure 16.3.
Figure 16.3. Report Builder Options dialog.

Enable Report Builder to Create or Edit Reports
Report Builder is a click-once application, which allows it to be launched from a SharePoint library to create or edit a report without having to perform a local installation. Report Builder is simply launched on demand. However, this capability is controlled by the Enable Report Builder Download setting in the Reporting Services Server Defaults. Follow these steps to check this setting:
- Open SharePoint Central Administration from the Microsoft SharePoint 2010 Products program group.
- Select General Application Settings.
- Select Set Server Defaults in the Reporting Services section. The pertinent portion of the page is shown in Figure 16.4.
Figure 16.4. Enable Report Builder Download option.

- Make sure Enable Report Builder Download is checked to allow Report Builder to be launched on demand.
- In addition, note the Custom Report Builder Launch URL setting shown in Figure 16.4. This setting enables you to specify the location of the Report Builder click-once application. You only need to do this if you want to use a URL that is different than the default.
Is the Reporting Services Add-In Installed?
The Reporting Services add-in must be installed for Reporting Services to run in SharePoint Integrated mode. The Reporting Services add-in is included in the SharePoint prerequisite installer; it can also be downloaded from the SQL Server 2008 R2 feature pack site. As a general rule you should run the SharePoint prerequisite installer to install the components that are required by SharePoint. To check whether the Reporting Services add-in has been installed, go to the Control Panel and look at the installed programs, as shown in Figure 16.5.
Figure 16.5. Installed programs.

For the installation details, see the “Reporting Services Add-In for SharePoint” section in Chapter 3, “Reporting Services Setup and Installation.”
There are several versions of the Reporting Services Add-In. Make sure to match the version that you install with your version of SQL Server and SharePoint.
How Do I Activate the Report Server Integration Feature?
Report Server Integration is the name of the SharePoint feature that must be activated to run Reporting Services in SharePoint Integrated mode. The feature is installed by the Reporting Services add-in for SharePoint and should be activated during the installation. The feature is activated at the site collection level. To activate the feature, follow these steps:
- Click Site Actions.
- Click Site Settings.
- Click Site Collection Features (in the Site Collection Administration group).
- Click Activate next to the Report Server Integration feature.
Beginning with SQL Server Reporting Services 2008 R2 version of the Reporting Services add-in for SharePoint, the Report Server Integration feature is automatically activated in every site collection when installed. In addition, the feature is activated in any new site collections that are created.
How Do I Create Report Artifacts in a SharePoint Library?
Clicking New Document in a SharePoint library displays a drop-down menu with the options Report Builder Model, Report Builder Report, and Report Data Source. However, for these menu options to be displayed, the library must be configured to allow multiple content types, and the appropriate content types must be added to the list of content types for the library. For the complete details on setting this up, see the “Add Content Types to a Document Library” section in Chapter 3, “Reporting Services Setup and Configuration.”
Checking Report Project Settings
There are two report authoring tools available for designing and deploying reports in SharePoint Integrated mode for SharePoint 2010: Report Builder 3.0 and Business Intelligence Development Studio (BIDS). Both of these tools have their own property settings that must be specified correctly in order to successfully deploy reports to a SharePoint document library.
The most important setting for a BIDS report project is the TargetServerURL. The URL that you specify must be the root site in a site collection. When you install and configure SharePoint, a default site collection is created for you. The URL of the root site in the default site collection is typically the name of the server; for example http://SharePoint2010. If you create an additional site collection, the URL of the root site might look like this: http://SharePoint2010/sites/BI. You can go back to the “Deploy Report from BIDS” section of Chapter 4, “Report Management,” for the complete details on setting the BIDS report project properties.
The most important setting in Report Builder 3.0 is Use This Report Server or SharePoint Site by Default. The URL that you specify must be the root site in a site collection, same as what you specified in a BIDS report project. You can go back to the “Save from Report Builder” section of Chapter 4 for the complete details on setting Report Builder properties for SharePoint Integrated mode.
Summary
Getting Reporting Services and Report Builder working correctly in SharePoint Integrated mode is not too difficult. The main task is installing and configuring the Reporting Services add-in for SharePoint. There are also a couple of important settings to be aware of in BIDS, Report Builder, and SharePoint Central Administration. This chapter covered a couple of areas that might require some attention to get things running smoothly.
Best Practices
The following are best practices from this chapter:
• Pay close attention to the installation and configuration of the Reporting Services add-in for SharePoint. This is the key requirement for getting Reporting Services running in SharePoint Integrated mode.
• Make sure to become familiar with the Report Builder settings, because this is the end-user tool for developing reports.
• Make sure to become familiar with the BIDS project settings for deploying reports to a SharePoint document library.
• Remember to configure a SharePoint library with the appropriate content types to support developing reports, models, and data sources.