
Chapter 6. PerformancePoint Services Configuration
IN THIS CHAPTER
• Adding PerformancePoint Services
• Setting up the Secure Store Service
• Applying PerformancePoint Service Application Settings
• Enabling Non-Business Intelligence Center Sites with PerformancePoint Services
• Setting Trusted Data Source Locations and Trusted Content Locations
PerformancePoint Services, one of the new features in SharePoint Server 2010 Enterprise, makes possible the development of dashboards. Dashboards can contain interactive charts, scorecards, and reports that enable users to gain deeper insights into data, which is the goal of any business intelligence (BI) application.
The previous version of PerformancePoint was a combination of the Microsoft Office Business Scorecard Manager and ProClarity, which Microsoft purchased in April 2006. Initially, separate licensing was required for PerformancePoint Server, which was a major roadblock for the software to gain traction in Microsoft BI projects. In April 2009, Microsoft changed the licensing requirements to allow the software to be installed for those companies that have a client access license (CAL) for SharePoint Enterprise, which opened the door for acceptance of the software in terms of licensing costs but still relied on a separate configuration and servers before PerformancePoint could be brought into the environment.
In the new release of SharePoint Server 2010 Enterprise, PerformancePoint Services has been integrated without the need for additional licensing or software. In addition, configuring PerformancePoint Services is now relatively simple after SharePoint Server has been set up and configured.
Adding PerformancePoint Services
By default, PerformancePoint Services is included when a web application is created. However, if the application is set up via a custom selection of services and PerformancePoint Services is not included in the initial creation, follow the steps listed here in SharePoint 2010 Central Administration to add the service:
- Click the Application Management link from the Central Administration home page, and then click Configure Service Application Associations.
- For the web application being modified, in the Application Proxy Group column, click the custom link.
- Figure 6.1 displays the Configure Service Application Associations menu. Click the PerformancePoint Application check box and click OK.
Figure 6.1. Configure Service Application Associations menu.

Setting up the Secure Store Service
By default, the Business Intelligence Center creation results in a menu on the main page of the site collection that contains Monitor Key Performance, Build and Share Reports, and Create Dashboards options. Each menu item has a Start Using PerformancePoint Services link. If you click the link, Dashboard Designer is presented to allow development within PerformancePoint. If you are using a data source connection, and if the network has not been set up for a Kerberos delegation on a per-user identity basis, PerformancePoint Services requires an unattended service account. The unattended service account is set up in the PerformancePoint settings, but can be set up only if the Secure Store Service is set up for the web application. If either the unattended service account is not set up or the Secure Store Service was not set up initially for PerformancePoint Services, the application presents a message (when Dashboard Designer is connecting to the data source) stating that PerformancePoint Services has not been configured correctly.
The Secure Store Service is set up within a web application to map encrypted user and group credentials to the credentials of the external data sources. The Secure Store Service requires an initial pass phrase, which is used for the encryption process. To set up the Secure Store Service, complete the following steps:
- Click the Application Management link on the Central Administration home page and then click Manage Service Applications.
- In the list of service applications for the web application, click the Secure Store Service link.
On the Secure Store Application Secure Store Service menu, a Generate New Key button is available for encrypting the credentials, as shown in Figure 6.2.
Figure 6.2. Generate New Key button.

- When a Generate New Key menu appears, supply and confirm the pass phrase to encrypt the credentials.
Applying PerformancePoint Service Application Settings
PerformancePoint Services has a list of configurations available to customize the length of a query timeout, the number of items in a filtered list, and other options. However, the main setting is the setting of the secure store and unattended service account. The secure store and unattended service account authenticate the user to the data sources during the runtime of the PerformancePoint content. The settings are set within the SharePoint 2010 Central Administration as follows:
- Click the Application Management link on the Central Administration home page, and then click Manage Service Applications.
- In the list of service applications for the web application, click the PerformancePoint Service Application link.
- Click the PerformancePoint Service Application Settings link.
- Supply the Secure Store Service application name and the unattended service account, as shown in Figure 6.3.
Figure 6.3. PerformancePoint Service Application settings.

Other settings available include the following:
• Comments: Allows authenticated users to annotate scorecard cells. You can enable this feature and set the maximum annotated cells per scorecard. By default, this setting is enabled and the maximum number set to 1,000 cells.
• Cache: Defines the storage time for frequently accessed items. The default is 10 seconds.
• Data Sources: You can set the query timeout in the case that no response is received from the data source. The default is 300 seconds
• Filters: Dashboards enables you to select values out of a filter to see specific data associated within the dashboard from the selection. The Filters setting limits how long the filter remains active for a user before resetting itself and how many items will appear in the filter list. The active filter default is set for 90 days and 5,000 items for the filtered list.
• Select Measure Control: Sets the maximum number of members to be selected for a dashboard Select Measure control. The default is 1,000 measures.
• Show Details: Limits the number of rows returned when Show Details is selected. The initial retrieval limit default is 1,000 rows, and the maximum retrieval limit is 10,000 rows.
• Decomposition Tree: Defines the maximum number of items returned for a level within a tree to be displayed via the Decomposition Tree control. The default maximum number is 250.
Enabling Non-Business Intelligence Center Sites with PerformancePoint Services
When you are creating a site for a SharePoint web application, you can create a site without using the Business Intelligence Center template and still want to incorporate PerformancePoint Services.
Creating a site using the Business Intelligence Center template enables PerformancePoint Services by default.
To turn on the PerformancePoint application for these sites, the site collection and the site itself must be enabled to use PerformancePoint. To provide PerformancePoint Services to a non-Business Intelligence Center site, follow these steps:
- Navigate to the site to add PerformancePoint Services and click Site Actions, Site Settings.
- On the Site Settings page, under Site Collection Administration, click Site Collection Features.
- Click the Activate button for the PerformancePoint Services Site Collection Features. After you click Activate, an Active status displays.
- Click the Activate button for the SharePoint Server Publishing Infrastructure. After clicking Activate, an Active status displays.
Figure 6.4 shows what the collection features look like when both the PerformancePoint Services Site Collections Features and the SharePoint Server Publishing Infrastructure settings have been activated.
Figure 6.4. Site collection features.

- After the site collection has the features enabled to host PerformancePoint Services, the site can then set up PerformancePoint Services. Within the site, click Site Actions, Site Settings.
- From the Site Actions menu, choose Manage Site Features.
- Click the Activate button for the PerformancePoint Services Site Features. After you click Activate, an Active status displays.
- After the features have been enabled within the site, PerformancePoint development cannot be started until a data connection library has been created. The data connection library can be created by clicking DataConnections Library for PerformancePoint in the Libraries section or by creating a new data connection library and then modifying the library to add the PerformancePoint data source content type.
The following steps explain how to create the library using the DataConnections Library for PerformancePoint option:
- On the home page of the site, click the Libraries link.
- In the upper left of the page, click the Create button.
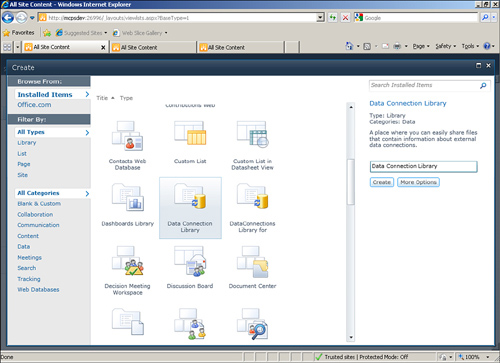
- Scroll to the DataConnections Library for PerformancePoint icon and supply a name for the library, as shown in Figure 6.5
Figure 6.5. DataConnections Library for PerformancePoint option.

- After the library has been created, click the Library ToolsDocuments tab and select New Document, PerformancePoint Data Source. The Dashboard Designer then launches and presents the Select a Data Source Template screen.
The following steps explain how to create the library using the data connection library:
- From the home page of the site, click the Libraries link.
- In the upper left of the page, click the Create button.
- Scroll to the Data Connection Library icon and supply a name for the library, as shown in Figure 6.6.
Figure 6.6. Data Connection Library.
- After the library has been created, click the Library ToolsLibrary tab and click the Library Settings icon on the ribbon.
- From the Content Types menu, choose the Add from Existing Site Content Types.
- On the Add Content Types page, select the PerformancePoint Data Source from the Available Site Content Types list and click the Add button to move the content type to the Content Types to Add list. Then click OK.
- Navigate back to the data connection library, click the Library ToolsDocuments tab, and then select New Document, PerformancePoint Data Source. Dashboard Designer then launches and presents the Select a Data Source Template screen.
Setting Trusted Data Source Locations and Trusted Content Locations
By default, all areas within the site collection are set as trusted, meaning there are no limits to where PerformancePoint content can use a data source for a report or where the PerformancePoint content can be saved. However, an administrator might want to restrict libraries and sites to prevent users from having access to data sources and content libraries. With this configuration requirement in mind, PerformancePoint Services enables an administrator to configure a trusted location within SharePoint 2010 Central Administration.
To set up a trusted data source location, complete the following steps:
- Click the Application Management link from the Central Administration home page, and then click Manage service applications.
- From the list of service applications for the web application, click the PerformancePoint Service Application link.
- Click the Trusted Data Source Locations link.
- By default, the All SharePoint Locations option is selected. Click the Only Specific Locations option, and then click Apply.
- Click the Add Trusted Data Source Location link.
- Supply the full site address on the Edit Trusted Data Source Location screen, as shown in Figure 6.7, and then click OK.
Figure 6.7. Edit Trusted Data Source Location screen.

- Repeat steps 4 and 5 for each data source location to grant access.
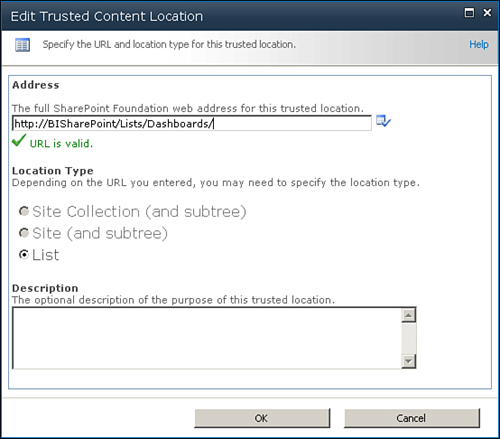
To set up a trusted content location, complete the following steps:
- Click the Application Management link on the Central Administration home page and then click Manage Service Applications.
- From the list of service applications for the web application, click the PerformancePoint Service Application link.
- Click the Trusted Content Locations link.
- By default, the option All SharePoint Locations is selected. Click the Only Specific Locations option, and then click Apply.
- Click the Add Trusted Content Location link.
- Supply the full site address within the Edit Trusted Content Location screen, as shown in Figure 6.8, and then click OK.
Figure 6.8. Edit Trusted Content Location screen.
- Repeat steps 5 and 6 for each content location to grant access.
Summary
PerformancePoint Services is a new feature in SharePoint 2010 Enterprise that allows for the creation of interactive dashboards that can display high-level analytics and the ability to drill further into the numbers for a more detailed analysis. However, although PerformancePoint Services is installed by default and available for SharePoint web applications, further configuration is needed before development can begin.
This chapter walked through the processes of configuring a web application to allow PerformancePoint Services, setting up authentication to communicate with the data sources, setting up trusted areas to store the content and data sources, and enabling a SharePoint site to build PerformancePoint content.
Best Practices
• Before setting up the unattended service account, ensure that you have set up the Secure Store Service within SharePoint.
• The unattended service account should follow service account guidelines and permit the account to access network resources needed for the application.
• By default, all areas within a SharePoint collection are trusted for data sources and PerformancePoint content. Administrators should limit which sites and libraries are available to ensure not exposing any sensitive data to nonprivileged users within the community.