Chapter at a Glance

The Microsoft Outlook 2010 user interface includes many features and tools, organized so that you can easily store, find, and display information. As with other Microsoft Office 2010 programs, Outlook commands are available on the ribbon at the top of the Outlook program window. In addition, a separate version of the ribbon appears at the top of each message window, appointment window, contact record window, and other type of item window.
The ribbon in each Outlook module displays commands specific to working with the Outlook items created and stored in that module. Similarly, the ribbon in each type of Outlook item window has a unique tab that displays commands specific to creating that type of item.
In this chapter, you'll first learn about the features and tools available in the Outlook program window. You'll learn how to use commands on the ribbon and the Quick Access Toolbar. Finally, you'll explore item window features in message windows, contact record windows, calendar item windows, and task windows.
Note
Practice Files You don't need any practice files to complete the exercises in this chapter. For more information about practice file requirements, see Using the Practice Files at the beginning of this book.
Unlike other Office 2010 programs, Outlook doesn't function for a single purpose or create a single category of files. You use it to create, organize, and track several types of information that are critical to keeping your daily life functioning smoothly. To minimize the work of dealing with such diverse items of information as e-mail messages, contacts, appointments, tasks, and notes, Outlook provides a module for each type and presents each module in a similar interface, allowing you to work with different items of information in consistent ways.
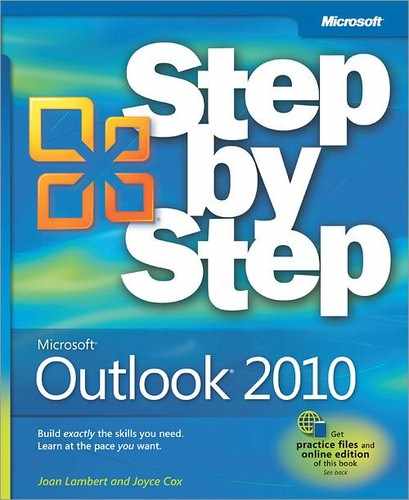
The Outlook program window includes eight areas in which you work with Outlook and your Outlook items.

Note
Troubleshooting The appearance of buttons and groups on the ribbon changes depending on the width of the program or item window. For information about changing the appearance of the ribbon to match our screen images, see Modifying the Display of the Ribbon at the beginning of this book.
Title bar The title bar displays the name of the active account. At the left end of the title bar is the Outlook icon. Clicking the icon displays a menu of commands for moving, sizing, and closing the program window. The three buttons at the right end of the title bar serve the same functions in all Windows programs: You can temporarily hide the program window by clicking the Minimize button, adjust the size of the window by clicking the Restore Down/Maximize button, and close the active document or exit Outlook by clicking the Close button.
Quick Access Toolbar By default, the Quick Access Toolbar appears to the right of the Outlook icon at the left end of the title bar. It displays the Send/Receive All Folders button and the Undo/Redo button. You can change the location of the Quick Access Toolbar and customize it to include any commands to which you want to have one-click access.
The program window and the windows in which you work with each type of Outlook item have individually configurable Quick Access Toolbars. So, for example, you can display commands specific to creating and formatting message content only in message item windows and commands specific to creating and managing tasks only in task item windows.
Tip
If you create and work with complicated Outlook items, you might increase your efficiency if you add all the commands you use frequently to the Quick Access Toolbar and display it below the ribbon, directly above the workspace. For information, see Customizing the Quick Access Toolbar in Chapter 13.
Ribbon Below the title bar is the ribbon. Commands for working with Outlook items and item content are available from this central location so that you can work efficiently with the program.
The program window and each of the Outlook item windows have individually configurable ribbons.
Note
See Also For information about ribbon elements, see Working with the Ribbon and the Backstage View later in this chapter.
Navigation Pane This collapsible pane appears on the left side of the Outlook window. Its contents change depending on the module you're viewing—it might display links to folders, links to external content or Help topics, view options, and so on.
Note
See Also For information about the available Outlook modules, see Outlook Modules later in this topic.
Content pane This pane appears in the center of the window. It displays the content of the selected module—your e-mail messages, calendar, contacts, and so on.
Reading Pane When this pane is displayed, you can preview the content of a selected item or attachment (including fully formatted Microsoft Word documents, Microsoft Excel worksheets, and Microsoft PowerPoint presentations) in this pane.
The Reading Pane can be displayed in any Outlook module but is displayed by default only in the Mail and Tasks modules.
Note
See Also For information about using the Reading Pane, see Viewing Messages and Message Attachments in Chapter 3.
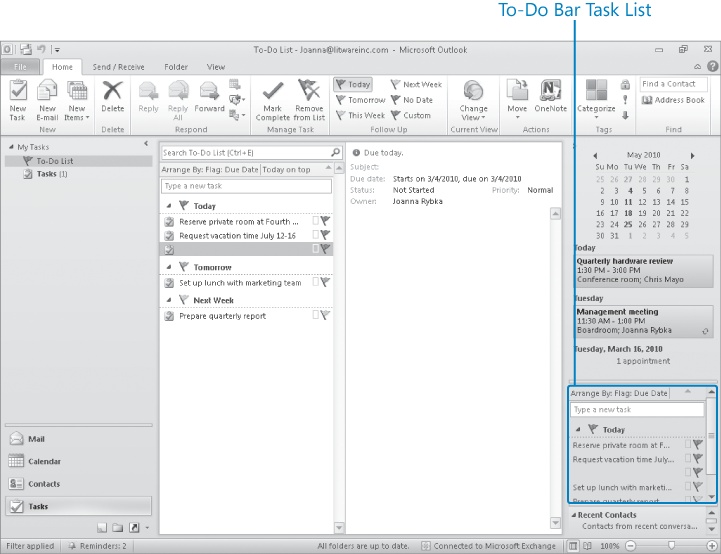
To-Do Bar On the right side of the Outlook window, this collapsible pane displays a monthly calendar, your upcoming appointments, and your task list.
The To-Do Bar can be displayed in any Outlook module but is displayed by default only in the Mail, Contacts, Tasks, and Notes modules.
Note
See Also For more information about keyboard shortcuts, see Appendix A at the end of this book. For information about working with tasks on the To-Do Bar, see Displaying Different Views of Tasks in Chapter 6.
Status bar Across the bottom of the program window, the status bar displays information about the current document and provides access to certain program features. You can control the contents of the status bar by right-clicking it to display the Customize Status Bar menu, on which you can click any item to display or hide it.
At the right end of the status bar are the View Shortcuts toolbar, the Zoom button, and the Zoom Slider. These tools provide you with convenient methods for adjusting the display of information in the content pane, the Reading Pane, item windows, and so on.


Tip
You might find that the default Outlook window layout isn't perfectly suited for the way you work on a day-to-day basis. Or perhaps you'd just like to try a different layout. There are many ways in which you can personalize the way Outlook appears and functions. For more information, see Personalizing the Outlook Program Window in Chapter 13.
Outlook functionality is divided among several modules that are specific to the content you work with in them, including Mail, Calendar, Contacts, Tasks, and Notes. You display and work with one module at a time in the program window. The program window elements of each module present content-specific functionality.
You can display any of the primary modules—Mail, Calendar, Contacts, Tasks, or Notes—by clicking the corresponding button at the bottom of the Navigation Pane. Or you can hold down the Ctrl key and then press the function key representing the module you want to display.
Module | Keyboard shortcut |
|---|---|
Ctrl+1 | |
Calendar | Ctrl+2 |
Contacts | Ctrl+3 |
Tasks | Ctrl+4 |
Notes | Ctrl+5 |
Module buttons may be large, medium, or small, depending on the size and arrangement of the Navigation Pane at that specific point in time. Each module button is labeled with an icon that represents the type of content you manage in that module.

The Navigation Pane contents differ depending on the displayed module. We discuss each module's Navigation Pane in module-specific topics later in this chapter.
The ribbon, first introduced in some of the Office 2007 programs, is common to all Office 2010 programs. The ribbon extends across the top of the program window, directly under the title bar, and consists of a set of tabs that change depending on the currently active module, item, or content. Clicking a tab name displays the associated set of commands.

The leftmost ribbon tab, labeled File and identified in Outlook by an orange tab (the File tab color in each Outlook 2010 program window matches that of the program icon) isn't actually a tab at all. Clicking the File tab displays the Backstage view, a new feature that is common to all Office 2010 programs.

Tip
The contents of the Backstage view when opened from the program window are identical regardless of which module you're working in.
You access commands in the Backstage view from the left pane. Simple file-management commands that interact with the Windows operating system are available at the top of the left pane. These commands change depending on the active module or item and include Save, Save As, Save Attachments, and Close.
Categories of commands related to managing Outlook and Outlook accounts (rather than items and item content) are organized on pages, which you display by clicking the page tabs in the left pane. The Outlook 2010 Backstage view includes the following pages:
Info From this page, you can manage account settings, automatic replies, mailbox size, rules, and alerts.
Open From this page, you can open an external calendar file, Outlook data file, or other Outlook user's folder in Outlook, and you can import files, settings, and RSS feeds into Outlook.
Print From this page, you can select a printer, set print options, preview the effect of the applied options, and print the selected item.
Help From this page, you can access information about your Outlook or Office installation, manage product activation and product keys, and access support resources, program options, and program updates.
Note
See Also For information about managing Outlook and Outlook accounts from the Backstage view, see Connecting to E-Mail Accounts in Chapter 1 and Personalizing Your Office and Outlook Settings in Chapter 13.
Commands related to working with the content of Outlook items are represented in function-specific groups on separate feature-specific tabs of the ribbon.
The ribbon in each module includes four standard tabs: Home, Send/Receive, Folder, and View. The Home tab changes to reflect the commands necessary to manage items within the current module.
The ribbon in each new Outlook item window includes an item-specific tab such as Message, Appointment, Contact, or Task. It also includes the Insert, Format Text, and Review tabs. The ribbon might also contain additional tabs specific to an item type, to a program installed on your computer, or to customizations you've made in the Outlook Options dialog box.
Note
See Also For information about adding standard tabs, removing standard tabs and groups, and creating custom tabs and groups, see Customizing the Ribbon in Chapter 13.
When certain types of item content (such as tables, charts, and graphics) are active (selected), additional contextual tabs appear at the right end of the ribbon. These contextual tabs are indicated by colored headers and a colored bottom border, and they contain commands that are specific to working with the selected content. For example, when the cursor is in a table, two Table Tools contextual tabs—Design and Layout—appear to the right of the Review tab. When a chart or chart element is selected, three Chart Tools contextual tabs—Design, Layout, and Format—appear to the right of the Review tab. Each of the available contextual tab groups has a unique color so you can easily differentiate between them.
To the right of the ribbon tab names, below the Minimize/Maximize/Close buttons, is the Minimize The Ribbon button. Clicking this button hides the commands but leaves the tab names visible. You can then click any tab name to temporarily display its commands. Clicking anywhere other than the ribbon hides the commands again. When the full ribbon is temporarily visible, you can click the button at its right end, shaped like a pushpin, to make the display permanent. When the full ribbon is hidden, you can click the Expand The Ribbon button to redisplay it.
Clicking the Microsoft Outlook Help button at the right end of the ribbon displays the Outlook Help window, in which you can use standard techniques to find information.
Note
See Also For information about the Outlook Help system, see Getting Help at the beginning of this book.
On each tab, buttons representing commands are organized into named groups. The groups that appear on each tab, and the buttons that appear in each group, vary based on the active module or item.
Depending on your screen resolution and the size of the program window, the commands in a group might be displayed as labeled buttons, as unlabeled icons, or as one or more large buttons that you click to display the commands within the group.
If a button label isn't visible, you can display the command, a description of its function, and its keyboard shortcut (if it has one) in a ScreenTip by pointing to the button.
Tip
In the Outlook Options dialog box, you can control the display and content of ScreenTips from the User Interface Options area of the General page, and change the language of ScreenTip content from the Language page. For more information, see Personalizing Your Office and Outlook Settings in Chapter 13.
Related but less common commands are not represented as buttons in a group. Instead, they are available in a dialog box or task pane, which you display by clicking the dialog box launcher located in the lower-right corner of the group.
Some buttons include an integrated or separate arrow. To determine whether a button and arrow are integrated, point to the button or arrow to display its border. If a button and its arrow are integrated within one border, clicking the button displays a list of related actions or options. If the button and arrow have separate borders, clicking the button carries out the default action indicated by the button's current icon. You can change the default action of the button by clicking the arrow and then clicking the action you want.


The goal of the entire ribbon is to make working with Outlook items and item content as intuitive as possible. Commands for tasks you perform often are readily available, and even those you might use infrequently are easy to find.
For example, when a formatting option has several choices available, they are often displayed in a gallery of thumbnails. These galleries give you an at-a-glance picture of each choice. If you point to a thumbnail in a gallery, Live Preview shows you what that choice looks like if you apply it to your document.

Tip
You might find that obscure commands you used in previous versions of Outlook are not available from the ribbon. However, these legacy commands are still available. You can make legacy commands accessible by adding them to the Quick Access Toolbar. For more information, see Customizing the Quick Access Toolbar in Chapter 13.
The Mail module is displayed by default when you start Outlook or when you click Mail in the Navigation Pane.
In the Mail module, the Navigation Pane displays the Favorites list and the folder structure of your mailbox (or mailboxes, if you have set up multiple e-mail accounts). When you connect to any type of e-mail account, these four folders are visible in your mailbox:
Sent Items When you send a message, Outlook stores a copy of it in this folder.
Deleted Items Outlook items that you delete from other folders are held in this folder. They are not deleted permanently until you empty the folder.
Note
See Also For information about deleting and restoring items, see Deleting Messages in Chapter 7.
Junk E-mail Outlook delivers messages blocked by the spam filter to this folder.
Tip
You can add any mailbox folder to the Favorites list by right-clicking the folder and then clicking Add To Favorites. If you're managing several e-mail accounts in Outlook, you might find it convenient and efficient to add the Inbox folders of each account to the Favorites list so that you can work with them all in one place.
In Exchange account mailboxes, these five folders are also visible:
Drafts Outlook stores temporary copies of in-progress messages in this folder.
Note
See Also For information about creating and working with message drafts, see Creating and Sending Messages in Chapter 3.
News Feed News feeds you subscribe to are available from this folder.
Outbox Outlook holds outgoing messages in this folder while establishing a connection to your mail server.
RSS Feeds Web site information feeds you subscribe to are available from this folder. When you first start Outlook, you might find information feeds recommended by Microsoft here.
Search Folders These folders contain up-to-date results of searches you've conducted for messages that match specific search criteria.
In every module, the area at the bottom of the Navigation Pane displays module buttons and Navigation Pane management commands. You can change the size of the buttons in this area by dragging the resize bar that appears above the Mail button.
If you click the Folder List button at the bottom of the Navigation Pane, these seven additional folders appear in Exchange account mailboxes:
Calendar The Outlook Calendar module
Contacts The Outlook Contacts module
Journal The Outlook Journal module
Notes The Outlook Notes module
Suggested Contacts A list of e-mail addresses with which you've recently corresponded that are not in your primary address book
Sync Issues A list of conflicts and communication failures on your mail server or in your mailbox
Tasks The Outlook Tasks module
We refer to the center pane that displays content in the Mail module as the Mail pane. The Mail pane displays the messages in your Inbox or other selected mail folder as well as the Reading Pane, which displays the content of the selected message.
There are two standard Mail module views:
You switch between views by clicking the View button you want on the status bar.
The ribbon in the Mail module includes the File tab and four tabs that appear in all modules:
Home This tab includes commands you need to create and manage e-mail messages (but not message content).
Send/Receive This tab includes commands for synchronizing data in Outlook with data on your mail server. You can control the sending and receiving of messages, whether Outlook automatically downloads full messages or only message headers, and manual download processes. You can also choose to disconnect Outlook from the active Internet connection if you want to work offline; for example, to halt incoming and outgoing messages for a period of time.
Folder This tab includes commands for creating and managing folders in which you can store messages, calendar items, contact records, notes, tasks, and other Outlook items, as well as Search Folders in which you can display up-to-date collections of messages that meet specific criteria. You can manage the contents of the folder and recover inadvertently deleted items; add a folder to the Favorites list; and control archive settings, folder access permissions, and the folder properties.
View This tab includes commands for changing the way items are displayed in the content pane; displaying, hiding or changing the location of program window panes; and opening or closing secondary program windows.


Outlook displays e-mail messages (as well as meeting requests and task assignments received from other Outlook users) in the Mail module. When you start Outlook, it displays the Inbox of your default e-mail account in the Mail module. When you create a new message or open an existing message, it opens in a message window. The message window has its own ribbon and Quick Access Toolbar separate from those in the Outlook program window. You can create, insert, and format message content, modify the settings of outgoing e-mail messages, and take action with received messages by using the commands on the message window ribbon.
The layout of all message windows is similar. However, depending on whether you're working in a message composition window or a message reading window, the content of the message window and the commands on the message window ribbon differ.
When you're composing an original message or a message response, you work in a message composition window.

The message composition window interface includes the following elements:
Quick Access Toolbar Provides access to the window-management menu (represented by a New Message icon) and the Save, Undo, Redo/Repeat, Previous Item, and Next Item buttons. The Save command is available in the Backstage view, but the other commands are not available either in the Backstage view or on the ribbon; they are available only from the Quick Access Toolbar.
Tip
You can add commands to the Quick Access Toolbar so that they are available regardless of which tab is currently active in the message composition window. Adding a command to the Quick Access Toolbar in a message composition window does not add it to the Quick Access Toolbar of any other Outlook item window (including the message reading window) or any other Microsoft Office 2010 program window.
Ribbon Includes the File tab (your link to the Backstage view) and the Message, Insert, Options, Format Text, and Review tabs.
Message header Includes the To and Cc address fields and the Subject field, by default. You can also display the From field (if you manage multiple accounts in one Outlook installation) and the Bcc field.
Note
See Also For information about the From field, see the sidebar Managing Multiple Accounts in Chapter 3. For information about the Bcc field, see Creating and Sending Messages in the same chapter.
Tip
You save information in a field by entering it into the corresponding text box. Outlook saves the information you enter as data attached to the message, and uses it in various ways. Some types of fields have special rules attached that affect the appearance of the data in the field. For example, telephone number fields in contact records automatically format the numbers you enter to match a standard (123) 456-7890 format.
Message body Is the area in which you create message content. The message body can include text, images, tables, charts, screen clippings, hyperlinks, and other types of content. An e-mail message created in Outlook 2010 can include virtually any element that you can insert into a standard electronic document, such as a Microsoft Word document.
People Pane Displays information about the intended message recipients. Clicking a person's icon displays information in the expanded People Pane about previous communications with that person.

Note
See Also For more information about the message header, message body, and People Pane, see Creating and Sending Messages in Chapter 3.
When opened from a message composition window, the Backstage view, which you access by clicking the File tab, includes commands related to message management tasks, such as saving message and message attachments and closing, restricting permissions to, moving, resending, recalling, and printing messages.

Commands on the ribbon of a message composition window are organized on five tabs:
Message This tab includes a selection of the commands you are most likely to use when creating a new message, some of which are also available on other ribbon tabs. Specific to the Message tab are commands for inserting and validating e-mail addresses, marking an outgoing message for follow-up, indicating the importance of an outgoing message to the message recipient, and magnifying the message content.
Insert This tab includes commands that are standard to all item-creation windows, for attaching items such as files and contact cards to the message, and for inserting specialized content such as e-mail signatures, tables, images, links, and artistic text into the body of the message. In addition to the standard commands, the Insert Calendar command is available in the Include group on the Insert tab of the message composition window ribbon.
Options This tab includes commands that are specific to the message composition window, for applying thematic formatting to message content, displaying less-frequently used address fields in the message header, and setting specialized message delivery options.
Format Text This tab includes commands that are standard to all item-creation windows, for manipulating and formatting characters and paragraphs; applying and working with Quick Styles and style sets; and finding, replacing, and selecting text and objects within a text box. In addition to the standard commands, commands for changing the message format are available in the Format group on the Format Text tab of the message composition window ribbon.
Note
See Also For information about inserting various types of illustrations, see Chapter 10. For information about setting permissions, tracking messages, and other options, see Changing Message Settings and Delivery Options in that same chapter. For information about formatting fonts and using styles, see Personalizing the Appearance of Message Text in the same chapter.
Review This tab includes commands that are standard to all item-creation windows, for working with the language of the message body, including checking spelling and grammar; researching word choices; tracking message content statistics (pages, words, characters, paragraphs, and lines); and translating content either directly or through an online service.


When you're working with a sent or received message, you work in a message reading window.

The message reading window interface includes the following elements:
Quick Access Toolbar Provides access to the window-management menu (repre-sented by a Received Message icon) and the same commands as it does in the message composition window. The Previous Item and Next Item buttons are active.
Ribbon Includes the File tab and a Message tab that contains a set of commands different from the commands on the Message tab in a message composition window.
Message header Displays the name and online status (if available) of the message sender and message recipients (those entered in the To and Cc boxes), along with the message subject and any message notifications, categories, or flags.
Message body Displays the content of the message. You cannot edit message content in a message reading window (but you can copy content from the message reading window to paste into another Office document).
People Pane Displays information about the message sender and the message recipients, including you.
When opened from a message reading window, the Backstage view includes the Set Permissions, Move To Folder, and Properties commands that are available from the message composition window, as well as commands related to viewing delivery reports and recalling and resending the message.

Note
See Also For information about the Print commands and options, see Printing Messages in Chapter 7. For information about moving Outlook items, see Organizing Messages in Folders in the same chapter. For information about setting advanced options and properties for a message, see Changing Message Settings and Delivery Options in Chapter 10. For information about restricting recipients from forwarding, copying, or printing messages you send, see Securing Your E-Mail in Chapter 11.
Commands on the ribbon of a message reading window are organized on one tab: the Message tab. This tab includes commands for working with the active message, including deleting, responding to, moving, tagging, editing, and viewing it. The Message tab also includes the Quick Steps gallery of command combinations that enable you to accomplish multiple tasks with one click.

Note
See Also For information about Quick Steps, see Managing Messages by Using Quick Steps in Chapter 7. For information about the elements of the ribbon in Outlook item windows, see Working in the Calendar Module, Working in the Contacts Module and Working in the Tasks Module later in this chapter.
In this exercise, you'll take a tour of the window-management tools and content-management tools in a message composition window. Along the way, you'll learn to work with commands on the ribbon, on the Quick Access Toolbar, and in the Backstage view.
Note
SET UP You don't need any practice files to complete this exercise. Display your Outlook Inbox, and then follow the steps.
 On the Home tab, in the New group, click the New E-mail button.
An untitled message window opens, with the cursor in the To box.
Click to insert the cursor in the message body.
Additional commands on the ribbon become active.
On the Message tab, review the available commands.
Commands are organized into six groups: Clipboard, Basic Text, Names, Include, Tags, and Zoom.
 In the lower-right corner of the
Clipboard group, click the
dialog box launcher.
In the lower-right corner of the
Clipboard group, click the
dialog box launcher.The Microsoft Office Clipboard task pane display cut and copied content.
The Clipboard is shared by the Office 2010 applications installed on your computer and might display content cut or copied from Outlook or from programs such as Word, Excel, or PowerPoint. The content source is indicated by the program icon preceding the content clip.
If the Clipboard contains clippings that you don't need, click Clear All.
You can remove all clippings from the Clipboard by using this command.
 In the message body, type Please respond to me as soon as possible by
e-mail, phone, or fax. Select the text you entered, and then on the Message tab, in the Clipboard group, click the Cut button.
In the message body, type Please respond to me as soon as possible by
e-mail, phone, or fax. Select the text you entered, and then on the Message tab, in the Clipboard group, click the Cut button.The text moves from the message body to the Clipboard and is now available to paste into a text field of any Outlook item or into any other type of Office document.
Point to the clipped text, and then click the arrow that appears.
A short menu of actions you can take with the selected clipping appears.
On the clipping menu, click Paste.
The text reappears in the message body but remains available on the Clipboard for later reuse.
Tip
When you paste text into a message, the Paste Options button appears at the lower-right corner of the pasted text. Clicking this button displays the Paste Options menu, from which you can choose to keep the original formatting of the pasted text, match the format of the text into which you pasted, and set other paste options.
 In the upper-right corner of the
Clipboard task pane, click the
Close button.
In the upper-right corner of the
Clipboard task pane, click the
Close button.In the message body, select the inserted text.
 On the Message tab, in the Basic Text group, click the Font arrow, and then in the Font list, click Arial Rounded MT Bold.
 In the Basic
Text group, click the Grow
Font button, and then click the Center button.
In the Basic
Text group, click the Grow
Font button, and then click the Center button.The font size increases from 11 points to 12 points, and the paragraph containing the sentence moves to the horizontal center of the message content pane.
Point to the other buttons in the Basic Text group, and note their functionality as described in the ScreenTips that appear. Then click the Basic Text dialog box launcher.
The Font dialog box opens, displaying the Font page, which contains many additional font-formatting commands.
In the Font dialog box, click the Advanced tab.
The second page of the dialog box appears. From the Advanced page, you can control character spacing and specific font characteristics.
In the lower-left corner of the dialog box, click Text Effects.
In the left pane of the Format Text Effects dialog box, click Shadow.
The Shadow page of the Format Text Effects dialog box includes many options for adding standard and custom shadows to characters.
 Click the Presets button, and then click the
first shadow setting in the Outer section (Offset Diagonal Bottom
Right).
Click the Presets button, and then click the
first shadow setting in the Outer section (Offset Diagonal Bottom
Right). Click the Color button, and then in the Standard Colors section, click the
Red square. Then in the Format Text Effects dialog box, click Close.
Click the Color button, and then in the Standard Colors section, click the
Red square. Then in the Format Text Effects dialog box, click Close.The Preview box displays the effects of the selected Text Effects options on the current text.
Click the Font tab of the Font dialog box, and in the Effects section, select the Small caps check box. Then click OK.
The message text changes to reflect your selected text formatting options.
 With the newly formatted text still
selected, click the Clipboard
dialog box launcher.
With the newly formatted text still
selected, click the Clipboard
dialog box launcher.The Clipboard task pane opens. It now contains both the original, unformatted text and the newly formatted version.
Close the Clipboard task pane. Then explore the other commands on the Message tab and on the Insert, Options, Format Text, and Review tabs.
Many of the commands available on these tabs are also available from the Message tab. We work with these commands later in this chapter and throughout this book.
 At the right end of the ribbon, click
the Minimize the
Ribbon button.
At the right end of the ribbon, click
the Minimize the
Ribbon button. On the Quick Access Toolbar, click the
Undo button.
On the Quick Access Toolbar, click the
Undo button.The formatting you applied from the Text Effects dialog box is reverted.
 Click the Format
Text tab one time, and then in the Font group, click the Clear Formatting button.
Click the Format
Text tab one time, and then in the Font group, click the Clear Formatting button.The text reverts to its original font and size, and the Format Text tab returns to its minimized state.
Tip
Clicking a tab on the minimized ribbon temporarily expands it so that you can perform a single command. You can collapse the ribbon without performing a command by clicking anywhere away from it or by pressing Esc. Either double-clicking a tab or clicking the Expand The Ribbon button permanently restores the ribbon to its maximized state.
On the minimized ribbon, click the File tab.
The Backstage view opens and displays the Info page, which contains information about the current message, such as its location (the Drafts folder) and size.
In the left pane, click Close.
Outlook prompts you to save or discard the draft message.
Note
See Also For information about message drafts, see Creating and Sending Messages in Chapter 3.
In the Microsoft Outlook message box, click No.
The message window closes.


The Calendar module is displayed when you click Calendar in the Navigation Pane.
In the Calendar module, the Navigation Pane displays the Date Navigator and a list of calendars that you can use. The list might include only the default Outlook Calendar, or it might include custom calendars you create, calendars that are shared with you by other Outlook users, and Internet Calendars or SharePoint Calendars that you connect to.
Tip
If only the standard Outlook calendar is available, the Calendar icon appears next to it in the Navigation Pane rather than a check box. This ensures that at least one calendar is always selected for display in the Calendars module.
We refer to the center pane that displays content in the Calendar module as the Calendar pane. The Calendar pane displays your calendar for a period of time that you select. The default time period is one day; however, you might find it more useful to have an overview of a longer period of time such as a week or a month.
There are four standard Calendar module views:
Normal In this view, the Navigation Pane is maximized, the To-Do Bar is turned off, and the Daily Task List is displayed below the calendar.
Calendar And Tasks In this view, the Navigation Pane is minimized, the To-Do Bar is turned off, and the Daily Task List is displayed below the calendar.
Calendar Only In this view, the Navigation Pane is minimized and the To-Do Bar and Daily Task List are turned off.
Classic In this view, the Navigation Pane and To-Do Bar are maximized and the Daily Task List is turned off.
The ribbon in the Calendar module includes the File tab and the four standard module tabs:
Home This tab includes the commands you need to create calendar items, display specific views of the calendar, manage other calendars and calendar groups, and share the calendar with other people.
Note
See Also For information about calendar views, see Displaying Different Views of a Calendar in Chapter 5.
Send/Receive This tab includes commands for synchronizing Outlook with your e-mail accounts. This set of commands is common to the Send/Receive tab in all modules.
Folder This tab includes commands for creating and working with calendars. From this tab, you can create a new calendar, manipulate an existing calendar, share a calendar with other Outlook users and specify what each user can do with the shared calendar, open a calendar that you're not currently connected to, and control the behind-the-scenes behavior of a calendar.
Note
See Also For information about creating calendars, see Working with Multiple Calendars in Chapter 8.
View This tab includes commands for viewing and arranging calendar items, changing the layout and appearance of the Calendar module, displaying missed reminders, opening multiple calendars in separate windows, and closing all open calendar item windows.


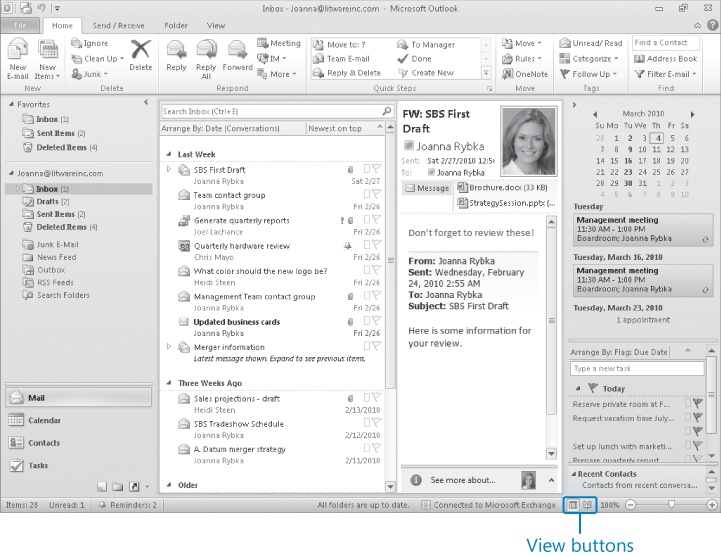
We refer to the window in which you create or respond to an appointment as the appointment window, to a meeting as the meeting window, and to an event as the event window; collectively we refer to these windows as the calendar item windows. Like the message windows, the calendar item windows contain their own commands arranged on the ribbon.
The calendar item window interface includes the Quick Access Toolbar, the ribbon, and the content area that displays the appointment, message, or event information.
When opened from a calendar item window, the Backstage view includes commands related to managing tasks, such as saving tasks and task attachments and closing, moving, and printing tasks.
Tip
The commands available in the Backstage view of a calendar item window are identical to those in the Backstage view of a contact record window. For more information, see Working in the Contacts Module later in this chapter.
Commands on the ribbon of a calendar item window are organized on four tabs: a main tab specific to the type of calendar item and the Insert, Format Text, and Review tabs. The latter three tabs are identical to those of other item windows.
The commands you use to create and manage appointments are available on the main tab. The tab name changes depending on the type of item you're creating and whether you invite other people to attend. Regardless of the tab name, commands are organized on the main tab in six groups: Actions, Show, Attendees, Options, Tags, and Zoom. You can create a calendar item by using only the commands available on this tab.
In this exercise, you'll take a tour of the calendar item window elements that differ from the message windows discussed earlier in this chapter. You'll also learn about the differences between the types of calendar items.
 In the Navigation
Pane, click the Calendar
button.
In the Navigation
Pane, click the Calendar
button.The Calendar module opens. The Calendar pane displays the calendar associated with your default e-mail account.
 On the Home tab, in the New group, click the New Appointment button.
Note
Keyboard Shortcut Press Ctrl+N to create an appointment from within the Calendar module. Press Ctrl+Shift+A to create an appointment from any Outlook module.
An untitled appointment window opens with the Appointment tab active.
 On the Appointment tab, in the Attendees group, click the Invite Attendees button.
The appointment window changes to a meeting window, and the Appointment tab is replaced by the Meeting tab.
Tip
The Insert, Format Text, and Review tabs of the calendar item windows contain the same commands as they do in other types of item windows.
The meeting request header includes a To field in addition to the Subject and Location fields present in the Appointment and Event windows. You can invite attendees by entering them in the To field, by clicking the To button and selecting them from an address list, or by entering them in the All Attendees list of the Scheduling Assistant.
 Enter one or more contact names or e-mail
addresses in the To box. Then on
the Meeting tab, in the Show group, click the Scheduling Assistant button.
Enter one or more contact names or e-mail
addresses in the To box. Then on
the Meeting tab, in the Show group, click the Scheduling Assistant button.The meeting window displays information about the available time of the requested meeting attendees.
Familiarize yourself with the information in the Scheduling Assistant. Then close the meeting window.
 On the Home tab of the Calendar module, in the New group, click New Items, and then click All Day Event.
An untitled event window opens with the Event tab active.
Tip
You can also open an Event window by selecting the All Day Event check box in the header of an appointment window.
The Event tab contents are nearly identical to the Appointment tab contents—the only change is that on the Event tab, in the Options group, your time is shown as Free by default rather than Busy, and the reminder is set to display 18 hours prior to the event rather than 15 minutes.
In the Start time area, clear the All day event check box to change the event to an appointment.
 On the Appointment tab, in the Options group, click the Time Zones button.
A new field displaying the time zone for each of the start and end times appears. With this useful Outlook 2010 feature, you can schedule an appointment that crosses time zones—for example, a flight from Los Angeles to New York.
Note
See Also For more information about displaying more than one time zone in your calendar, see Configuring Time Zones in Chapter 8.
Display the Backstage view, and then click Options.
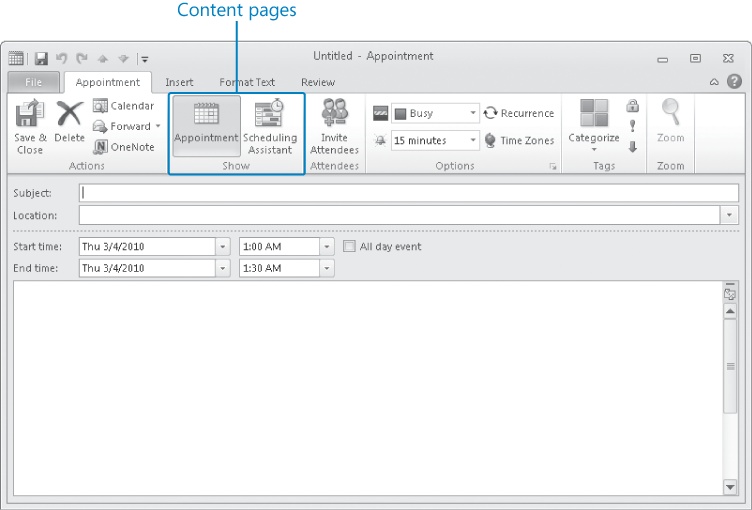
The Outlook Options dialog box opens, displaying the Calendar page.
Note the types of customizations you can make in the Work time and Calendar options areas. Then scroll to the bottom of the page.
Additional Calendar module features that you can customize are displayed.
Note the types of customizations you can make in the Display options, Time zones, Scheduling assistant, and Resource scheduling areas. Then click Cancel to return to the appointment window.


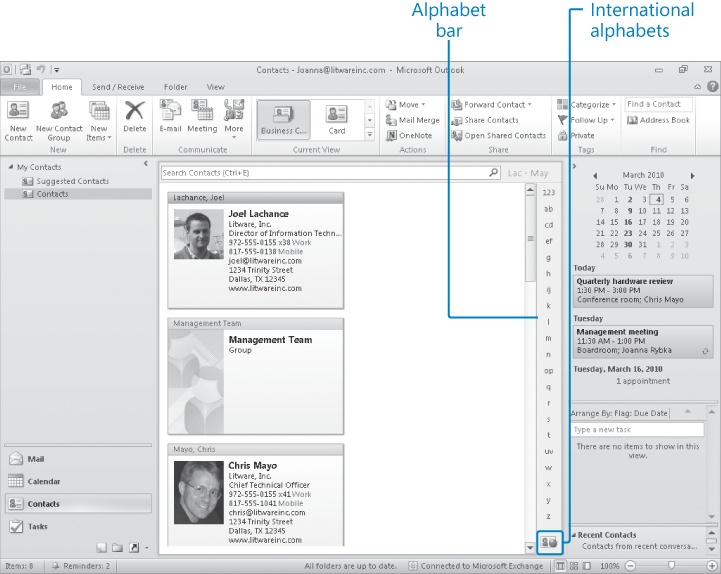
The Contacts module is displayed when you click Contacts in the Navigation Pane.
In the Contacts module, the Navigation Pane displays your available address books. The Contacts and Suggested Contacts address books appear by default, along with any custom address books you create and address books shared with you by co-workers.
We refer to the center pane that displays content in the Contacts module as the Contacts pane. The Contacts pane displays the contact records saved in the selected address book. By default, the contact records are displayed as business cards, but you can choose among several standard views, including text-only cards and various lists.
There are three standard Contacts module views:
The ribbon in the Contacts module includes the File tab and the four standard module tabs:
Home This tab includes the commands you need to create, manage, and view contact records, and to initiate communication with contacts. You can select contacts for a mail-merge process, send contact information to Microsoft OneNote, share contacts with other Outlook users, and tag contact records in ways that enable you to better locate or manage them.
Send/Receive This tab is identical to that in the Calendar and Tasks modules.
Folder This tab provides the same functionality as it does in the Calendar and Tasks modules, but is specific to contact records.
View This tab provides the same functionality as it does in the Mail and Tasks modules. The content of the Arrangement gallery is specific to contact records.


When you create a contact record or display the contact record for a person or group of people, it opens in a contact record window. The contact record window has its own ribbon and Quick Access Toolbar, separate from those in the Outlook program window and other types of item windows. You can insert, format, and work with information in a contact record or contact group record by using the commands on the contact record window ribbon.
The contact record window interface includes the Quick Access Toolbar, the ribbon, and the People Pane, as well as the content area that displays the contact record information.
Tip
Throughout this book, we frequently refer to people whose contact information you have stored in Outlook as contacts.
When opened from a contact record window, the Backstage view includes commands related to managing contact records, such as saving contact records and contact record attachments and closing, moving, and printing contact records.

Commands on the ribbon of a contact record window are organized on four tabs:
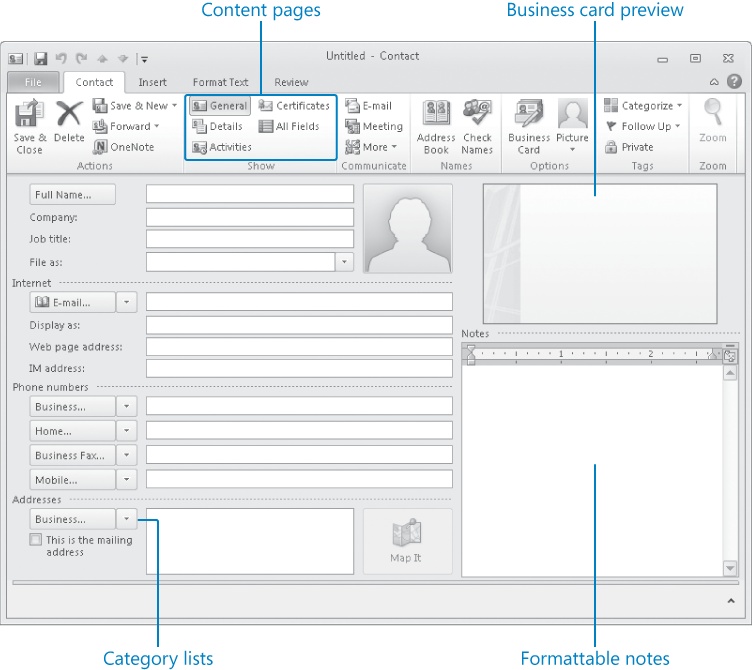
Contact This tab includes commands that are specific to managing and working with contact records. Commands include those for managing the contact record, switching among the contact record pages, communicating with the contact, accessing and verifying saved contact information, and personalizing a con-tact's electronic business card. This tab also includes commands for assigning a category or follow-up flag to a contact record, preventing other Outlook users from viewing the contact record when connected to your account, and changing the magnification level of the Notes pane (not of the contact record window).
Insert This tab includes the same standard commands as the Insert tab of a message composition window ribbon. The commands on the Insert tab of the contact record window ribbon, other than those in the Include group, apply only to the content of the Notes pane.
Note
See Also For information about inserting various graphic elements, see Chapter 10
Format Text This tab includes the same standard commands as the Format Text tab of a message composition window ribbon. The commands on the Format Text tab of the contact record window ribbon, other than the Paste commands and the Select command, apply only to the content of the Notes pane.
Review This tab includes the same standard commands as the Review tab of a message composition window ribbon. The commands on the Review tab of the contact record window ribbon, other than the Research and Thesaurus commands, apply only to the content of the Notes pane.


In this exercise, you'll familiarize yourself with the types of information you can store in a contact record and the customizations you can make to the way Outlook manages contact records.
 In the Navigation
Pane, click the Contacts
button.
In the Navigation
Pane, click the Contacts
button.Tip
If you want to work in two modules at the same time, you can open a module in a second instance of Outlook by right-clicking the module button in the Navigation Pane and then clicking Open In New Window.
The Contacts module opens. The content pane, which in the Contacts module is called the Contacts pane, displays your main address book, with any contact records it contains displayed as business cards.
Note
Troubleshooting If the contact records in your Contacts module aren't presented like those shown here, click Business Card in the Current View gallery on the Home tab.
Tip
Clicking a letter or letter pairing on the alphabet bar scrolls the Contacts pane to display contact records beginning with that letter. You can add a second alphabet bar that displays the Arabic, Cyrillic, Greek, Thai, or Vietnamese alphabet by clicking the International Contacts button and then clicking the language you want.
 On the Home tab, in the New group, click the New Contact button.
Note
Keyboard Shortcut Press Ctrl+N to create a contact record from within the Contacts module. Press Ctrl+Shift+C to create a contact record from any Outlook module.
A new, blank contact record window opens, displaying the General page of the contact record. The cursor is automatically active in the Full Name box, so you can immediately begin entering a contact's information.
Tip
An arrow to the right of a field name indicates that the displayed field is one of a group of related fields that you can display in that location, one at a time. For example, the arrow next to the e-mail name indicates that there are multiple e-mail address fields; clicking the arrow displays a list. Clicking a field in the list displays it in place of the previous related field.
The Contact tab is active by default. Buttons that represent commands related to creating and working with contact records are organized on this tab in seven groups: Actions, Show, Communicate, Names, Options, Tags, and Zoom. We work with most of these commands in the exercises in Chapter 4.
 On the Contact tab, in the Show group, click Details.
The Details page appears in the content pane of the contact record window.
 In the Show group, click Activities. Then on the Activities page, click the Show arrow.
Outlook displays the types of activities it tracks for each contact.
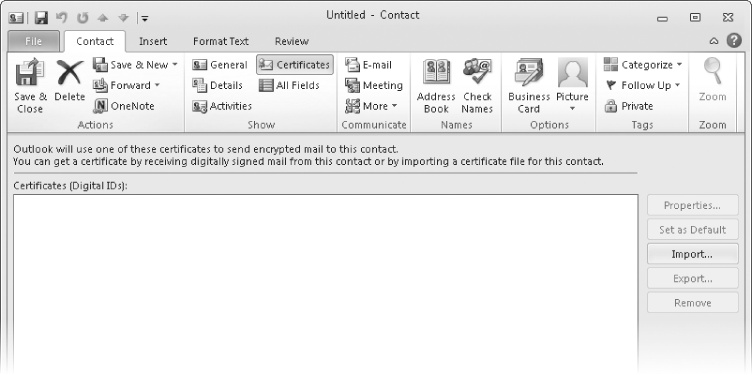
 In the Show group, click Certificates.
The Certificates page appears. This page displays digital IDs that are installed on your computer, and commands for managing digital IDs.
Note
See Also For information about digital IDs, see Securing Your E-Mail in Chapter 11.
 In the Show group, click All Fields.
The All Fields page of the contact record window appears. The default view displays custom fields that you define yourself, none of which are present in the default contact record window.
Note
See Also For information about defining custom fields, see the sidebar User-Defined Fields in Chapter 4.
Click the Select from arrow, and scroll the list to note the many categories on which you can filter the information displayed on the All Fields page. Then in the Select from list, click Phone number fields.
The All Fields page is filtered to display all the phone numbers that might be included in this contact record.
You can enter information into fields directly on the All Fields page of a contact record by clicking in the Value cell for the field, and then typing the associated entry.
 In the Show group, click General to return to the primary page of
the contact record window.
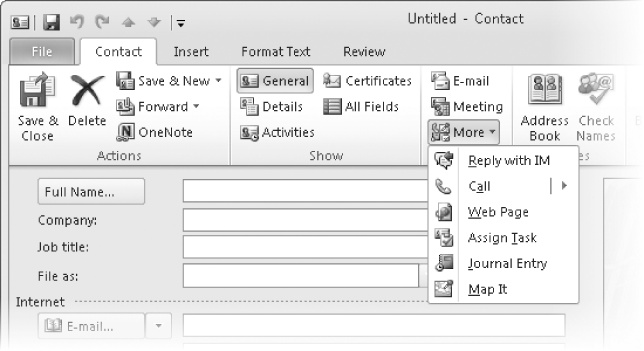
In the Show group, click General to return to the primary page of
the contact record window. In the Communicate group, click More.
The More list expands to display types of communication you can initiate with a contact from his or her contact record.
Click to position the cursor in the Notes box of the contact record. Then click the Insert, Format Text, and Review tabs in turn to see the available commands.
Tip
Many commands on the Insert, Format Text, and Review tabs of a contact record window are unavailable when the cursor is located anywhere other than in the notes pane.
The commands on these tabs are identical to those in the message window.
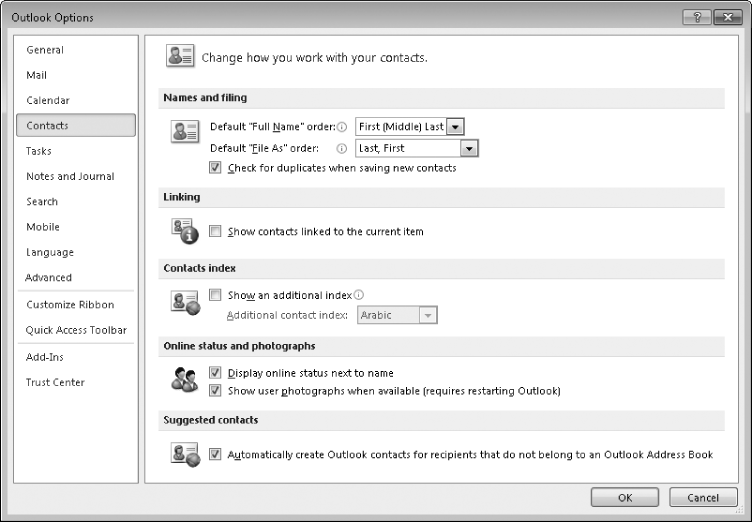
Display the Backstage view, and then click Options.
The Outlook Options dialog box opens, displaying the Contacts page.
Note the types of changes you can make to the functionality of the Contacts module. Then in the Outlook Options dialog box, click Cancel.
The dialog box closes and Outlook returns to the contact record window.
Note
See Also For information about changing the default settings for the Contacts module, see Personalizing Your Office and Outlook Settings in Chapter 13.
Display the Backstage view, and click Close. Then in the Microsoft Outlook message box that asks whether you want to save changes, click No.
By clicking Close in the Backstage view or on the Outlook menu that opens when you click the Outlook icon at the left end of the title bar, or by clicking the Close button at the right end of the title bar, you have the option to not save changes to the contact record. Clicking the Save & Close button in the Actions group on the Contact tab saves the contact record without further prompting.


The Tasks module is displayed when you click Tasks in the Navigation Pane.
The Navigation Pane in the Tasks module displays the task list variations you can display in the content pane, including the To-Do List and Tasks folder created by Outlook, as well as any custom folders you create to contain task items.
We refer to the center pane that displays content in the Tasks module as the Tasks pane. The Tasks pane displays either the To-Do List or a Tasks List.
The To-Do List is displayed by default. This list of tasks is organized by default in groups by due date. When the To-Do List is displayed, by default the Reading Pane is also displayed.
A Tasks List is displayed in multiple columns with each task preceded by a check box so that you can indicate when the task is complete. When a Tasks List is displayed, by default the Reading Pane is hidden.
There are two standard Tasks module views:
The ribbon in the Tasks module includes the File tab and the four standard module tabs:
Home This tab includes the commands you need to create, manage, and view tasks, and to initiate communication with contacts. You can assign tasks to coworkers and work with tasks assigned to you, send task information to a OneNote notebook, and tag tasks in ways that enable you to better locate or manage them.
Send/Receive This tab is identical to that of the Calendar and Contacts modules.
Folder This tab provides the same functionality as it does in the Calendar and Contacts modules, but is specific to task items.
View This tab provides the same functionality as it does in the Mail and Contacts modules. The content of the Arrangement gallery is specific to tasks.


The window in which you create or manage a task is a task window. Like the message, contact record, and calendar item windows, the task window includes the Quick Access Toolbar, a unique set of commands arranged on the ribbon, and the content area that displays the task information.

When opened from a task window, the Backstage view includes commands related to managing tasks, such as saving tasks and task attachments and closing, moving, and printing tasks.
Tip
The commands available in the Backstage view of a task window are identical to those in the Backstage view of a contact record window. For more information, see Working in the Contacts Module earlier in this chapter.
Commands on the ribbon of a task window are organized on four tabs: The Task tab and the Insert, Format Text, and Review tabs. The latter three tabs are identical to those of other item windows.
The commands you use to create and manage most tasks are available on the Task tab. Commands include those for managing the task, sending the task to a OneNote notebook, switching among the task pages, and managing task assignments and frequency. This tab also includes commands for assigning a category or follow-up flag to a task, preventing other Outlook users from viewing the task details when connected to your account, and changing the magnification level of the Notes pane (not of the task window).
In this exercise, you'll take a tour of the Tasks module and look at features in the task window that differ from those in the message, contact record, and calendar item windows.
In the Navigation Pane, click the Tasks button.
The Tasks module opens, displaying the To-Do List view of your task list.
If the To-Do Bar is expanded, you can see the contents of your task list in the To-Do Bar Task List as well as in the Tasks pane. If the To-Do Bar is minimized, the number of active tasks due today appears on the minimized To-Do Bar.
 On the Home tab, in the New group, click the New Task button.
An untitled task window opens.
Familiarize yourself with the fields in the task window.
The Subject field is the only field in which you must enter text to create a task. If you enter an end date, Outlook adds the task to the appropriate Due Date category (Today, Tomorrow, This Week, Next Week, or a custom category based on the date). Leaving the Due Date set to None adds the task to the No Date category.
 On the Task tab, in the Show group, click the Details button.
The Details page appears in the content pane of the task window.
Notice the type of information you can track on the Details page. This could be useful when tracking billable tasks for clients.
Display the Backstage view, and then click the Options button.
The Outlook Options dialog box opens, displaying the Tasks page.
Note
See Also For information about the commands available in the Outlook Options dialog box, see Personalizing Your Office and Outlook Settings in Chapter 13.
Familiarize yourself with the customizations you can make to the way Outlook manages tasks. Then click Cancel to return to the task window.


The Outlook program window includes eight areas in which you work with Outlook or with your Outlook items: the title bar, the ribbon, the Navigation Pane, the content pane, the Reading Pane, the To-Do Bar, and the status bar.
You give commands from the ribbon and from the Quick Access Toolbar.
The program window and each type of item window have individually configurable ribbons and Quick Access Toolbars, so you can make the commands you want available specifically where you want them.
The different item windows share certain common tabs, but each has a main tab containing all the commands you need when creating or working with a basic Outlook item of that type.