Chapter at a Glance

Welcome to the wonderful world of Microsoft Outlook 2010! Using Outlook 2010, you can easily manage one or more e-mail accounts. If your e-mail account includes additional information, such as calendar items and contact records, you can also manage that information from Outlook.
Before you can begin using Outlook, you need to provide Outlook with the information necessary to connect to your e-mail account. After you configure Outlook to connect to an account, you can easily manage the information stored with that account by using the Outlook features specifically designed for each type of information.
You can configure Outlook to connect to many different types of business and personal e-mail accounts. If your organization uses Microsoft Exchange Server, you can use Outlook to work with all the features of your Exchange account including e-mail, calendaring, contact tracking, task tracking, and notes. If your organization also uses Microsoft Office Communications Server features such as Microsoft Office Communicator, and Microsoft Office Live Meeting, you can initiate telephone calls, instant messaging sessions, online meetings, and more from Outlook 2010.
In this chapter, you'll configure Outlook to connect to one or more e-mail accounts.
Note
Practice Files You won't need any practice files to complete the exercises in this chapter. For more information about practice file requirements, see Using the Practice Files at the beginning of this book.
A default installation of Outlook 2010 supports the following types of e-mail accounts:
Exchange You can configure Outlook 2010 to connect to an Exchange account hosted on Microsoft Exchange Server 2010, Exchange Server 2007, or Exchange Server 2003. If your organization runs any of these versions of Exchange Server, you can send mail within or outside of your organization's network. Messages are stored centrally on the Exchange server. They are also stored locally in a data file on your computer. Outlook synchronizes with the server when you're connected to it either over a corporate network or over the Internet, so you can work with existing Outlook items and create new items while working offline.
If your computer is connected directly to the corporate network, Outlook handles the connection to your corporate Exchange account for you. If your computer is not connected directly to the corporate network—for example, if you're configuring your home computer or portable computer to connect to your corporate Exchange account—you can connect to your corporate Exchange account in one of two ways:
You can create a virtual private network (VPN) connection from your computer to the corporate network and then configure Outlook to connect to the corporate Exchange server through the VPN connection.
You can configure Outlook to connect to the Exchange server over the Internet by using Outlook Anywhere (a vaguely friendly name for a service otherwise known as HTTP over RPC). The Exchange server must be specifically configured to allow this type of connection.
Tip
Some Outlook features are dependent on the functionality of the specific version of Exchange hosting your e-mail account. The functionality described in this book is specific to Exchange Server 2010 accounts. Outlook provides additional functionality in enterprise environments that include Microsoft Office Communications Server (OCS).
Post Office Protocol (POP) When connected to a POP account, Outlook downloads (copies) messages from your e-mail server to your computer, and then removes the original messages from the server after a specified length of time. You read and manage messages on your computer (or locally), and Outlook synchronizes with the server when connected.
Internet Message Access Protocol (IMAP) When connected to an IMAP account, Outlook stores copies of messages on your computer, but leaves the originals on the e-mail server. You read and manage messages locally, and Outlook synchronizes with the server when connected.
Tip
Outlook 2010 can also support Windows Live Hotmail accounts. For more information, see the sidebar Connecting to Hotmail Accounts later in this chapter.
Before you can use Outlook, you need to configure the program to connect to your e-mail account(s). When you first start the program, the Microsoft Outlook 2010 Startup wizard guides you through an automated process. This process is a significant improvement over the manual account setup process of Outlook 2003 and earlier versions of Outlook, which required you to provide much more information. For most accounts, you need to supply only three pieces of information—your name, your e-mail address, and your e-mail account password—and the Startup wizard will handle the rest of the connection process for you. If the Startup wizard isn't able to configure Outlook to connect to your account, you can provide additional information to complete the process manually.
Configuring Outlook creates an Outlook profile, which stores information about your e-mail accounts. You can work with your profile from within Outlook or from the Mail control available in the Windows Control Panel. Your profile includes information about your e-mail account such as the user name, display name, server name, password, and where your Outlook data is stored. You can connect to more than one e-mail account per profile, to manage all your e-mail communications through Outlook. You can also create multiple profiles that link to different e-mail accounts or to different sets of e-mail accounts.
You can add multiple e-mail accounts of any type to your Outlook profile, either during setup or at any time thereafter.
In this exercise, you'll configure Outlook to automatically connect to an e-mail account and you'll manually configure Exchange account settings. Although we demonstrate connecting to an Exchange account, you can follow the same basic process to connect to another type of e-mail server.
Note
SET UP You need your e-mail account user name and password to complete this exercise. If you are connecting to a POP account, an IMAP account, or an Exchange account that is hosted by an external service provider, you might also need to know the names and authentication requirements of your incoming and outgoing servers. These will be available from your e-mail service provider.
On the Start menu, click All Programs, click Microsoft Office, and then click Microsoft Outlook 2010.
The next step depends on whether Outlook is already configured to connect to an e-mail account.
If you haven't yet configured Outlook to connect to an e-mail account, the Microsoft Outlook 2010 Startup wizard begins.
On the Startup wizard's Welcome page, and again on the E-mail Accounts page, click Next.
If Outlook is already configured to connect to one or more e-mail accounts, Outlook starts and displays the Inbox of an existing account. You need to manually start the account configuration process. Click the File tab at the left end of the ribbon to display the Backstage view. Then on the Info page of the Backstage view, under the current account information, click Add Account.
Tip
You control Outlook program settings and e-mail account settings from the Backstage view. For detailed information about this new Office 2010 feature, see Personalizing Your Office and Outlook Settings in Chapter 13.
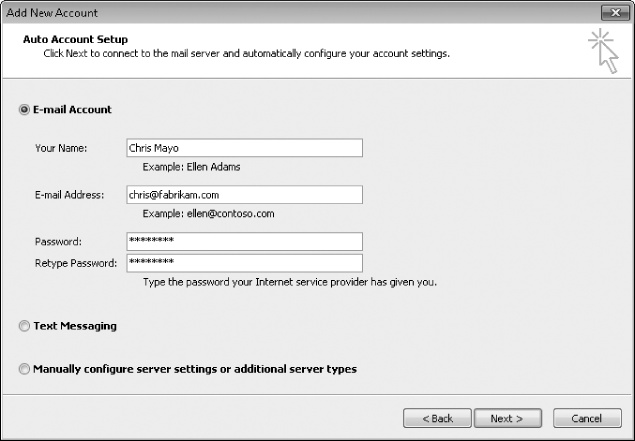
Whether you followed step 2a or step 2b, the Auto Account Setup page of the Add New Account wizard is now displayed.
On the Auto Account Setup page of the Add New Account wizard, enter your name, e-mail address, and e-mail account password in the text boxes provided.
Note that you must enter your password two times.
On the Auto Account Setup page, click Next.
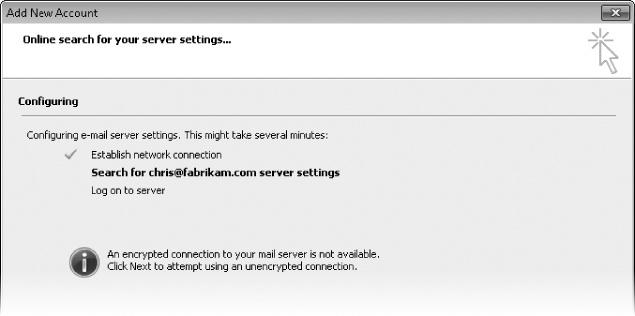
The Add New Account wizard searches your available networks and the Internet for the specified domain.
If the wizard locates an account matching the e-mail address you entered, it attempts to log on by using the password you entered. If the connection is successful, a confirmation appears, along with additional account configuration options. You can click Finish on the wizard's final page to begin using your account, or you can configure additional settings.
Tip
If this is the first time you have started a 2010 Microsoft Office system program, Office prompts you to enter your full name and initials. The programs in the 2010 Office system use this information when tracking changes, responding to messages, and so on. Next, Office prompts you to select the type of information you want to share over the Internet, and finally, offers the option of signing up for automatic program updates from the Microsoft Update service.
If the wizard successfully connects to your account, select the Manually configure server settings check box, click Next, and then skip to step 12 to practice configuring additional settings.
If the wizard is unable to connect to your account by using the credentials you provided, an informational message appears.
If the wizard doesn't connect to your account, click Back to return to the Auto Account Setup page (shown in step 3 of this exercise). Then click Manually configure server settings or additional server types, and click Next.
The Choose Service page opens.
On the Choose Service page, click Microsoft Exchange, and then click Next.
Important
The screen that appears next varies based on the selected account type. For the purpose of this exercise, we'll connect to an Exchange account.
Tip
It's more likely that you need to perform manual configuration when connecting to an Internet e-mail account than to an Exchange account. For information about manually configuring a connection to an Internet e-mail account, see Troubleshooting Connection Problems later in this chapter.
On the Microsoft Exchange Settings page, enter the name or address of your Exchange server (provided by your Exchange server administrator) and your user name (usually your e-mail address) in the boxes provided, and then click Check Name.
If you didn't provide your password on the Auto Account Setup page, Outlook prompts you for it now.
If the Connect to dialog box appears, enter your logon information, and then click OK.
The wizard contacts the specified server. If the user name and password you provided match the information stored on the server, the wizard replaces your user name with your display name (as recorded in your organization's Global Address List) and underlines it. (This is known as resolving the address.)
If the wizard is unable to validate the information, a Microsoft Exchange dialog box opens. This might occur if you're connecting to a corporate Exchange server over the Internet, and Outlook requires additional information to establish the connection.
If the Microsoft Exchange dialog box opens, click Cancel and then wait for the wizard to return to the Microsoft Exchange Settings page.
If the wizard successfully resolves your server name and user name, you can click Next and then Finish to begin using your account, or you can manually configure additional account settings.
For the purpose of this exercise, we'll look at the manual configuration options.
On the Microsoft Exchange Settings page, click More Settings.
A Microsoft Exchange account settings dialog box opens, displaying the General page. On this page, you can specify the name that identifies the account within Outlook (for example, on the program window title bar and in the Navigation Pane). This action does not affect the name that appears to message recipients.
Click each of the dialog box page tabs to review the available settings.
On the Advanced page, you can specify additional mailboxes on the same Exchange server that you want to open in Outlook. For example, if you monitor a departmental mailbox, you can specify it here.
On the Security page, you can choose to secure your locally stored account data by requiring logon credentials each time you start Outlook.
Note
See Also For information about Cached Exchange Mode, see Working with Outlook Items While Offline in Chapter 12.
Tip
Clicking Outlook Data File Settings on the Advanced page of the Microsoft Exchange dialog box displays the path to and name of the data file on your computer in which a local copy of your e-mail account information is stored.
From the Outlook Data File Settings dialog box, you can reduce the data file size by compacting its contents or disable offline use of the local data file so that account information is available only when Outlook is connected to the Exchange server.
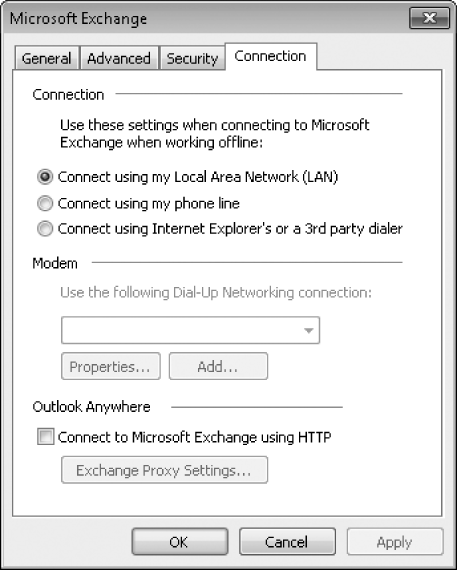
On the Connection page, you can select the way you want Outlook to connect to the Exchange server. The default connection option, Connect Using My Local Area Network, is appropriate for any wired or wireless broadband network connection.
If you connect to the network through an analog modem and need to dial in over a phone line, you need to select one of the other options and provide the necessary dial-up network connection information.
Tip
You create network connections from Windows. For information about creating a network connection from the version of Windows running on your computer, refer to Windows 7 Step by Step (Microsoft Press, 2009), Windows Vista Step by Step (Microsoft Press, 2007), or Windows XP Step by Step (Microsoft Press, 2004) by Joan Lambert Preppernau and Joyce Cox.
In the Microsoft Exchange dialog box, enter any additional connection information provided to you by your Exchange server administrator, and then click OK.
On the Microsoft Exchange Settings page, click Next. Then on the wizard's final page, click Finish.
The E-mail page of the Account Settings dialog box might appear and display the new e-mail account.
If the Account Settings dialog box opens, close it to display your e-mail account Inbox.
A test message from Outlook appears at the top of the Inbox, with your other e-mail messages below the test message.


Connecting to Hotmail Accounts
Windows Live Hotmail accounts are Hypertext Transfer Protocol (HTTP) accounts. Messages sent through an HTTP account are in the form of Web pages that your e-mail program copies from the HTTP mail server and displays within the message window.
The free Microsoft Outlook Hotmail Connector add-on provides a way to configure Outlook to connect to Windows Live Hotmail accounts, Windows Live Calendar, and Windows Live Contacts. The Outlook Connector add-on is available from the Microsoft Download Center (www.microsoft.com/downloads/). However, you can also install it directly from Outlook. Simply enter your Hotmail e-mail address on the Auto Account Setup page of the Add New Account wizard, and click Next. Outlook prompts you to install the Outlook Connector and provides a link to the installation file.
After you install the Outlook Connector, restart Outlook. The Outlook Connector then gives you the opportunity to configure Outlook to connect to a Hotmail account. You need to enter only your basic account information. You have the option to specify a friendly name by which you identify the account in Outlook, and an alternate reply address, just as you can with an Internet e-mail account.

After you complete the Outlook Connector process, you can use your Hotmail account within Outlook exactly as you do any other type of account.
The automatic account setup feature is very handy, but might not work every time. It is most successful when connecting over a corporate network to a corporate Exchange account. When connecting to a remote Exchange server or to an Exchange account hosted by an external hosting company, or when connecting to a POP or IMAP account, manual troubleshooting might be necessary.
Here are some common error messages and problems you could encounter when connecting to an Exchange account, and how to address them:
Server certificate does not match site If Outlook encounters security issues associated with the electronic file (digital certificate) that validates the mail server's identity—for example, if the digital certificate does not match the name of your domain—Outlook notifies you of this problem and lets you choose whether to proceed.
If a Security Alert message box appears, you can click the View Certificate button to see the digital certificate of the mail server and verify that you know and trust the company that issued the certificate. If you want, you can install the certificate on your computer by clicking the Install Certificate button and following the steps in the Certificate Import wizard.
Note
See Also For more information about digital certificates, see Securing Your E-Mail in Chapter 11.
Encrypted connection not available Outlook first tries to establish an encrypted connection with the server. If this attempt is not successful, Outlook notifies you of this problem and asks whether you want to try to establish an unencrypted connection.
If you select this option, Outlook might inadvertently configure your Exchange account as an IMAP or POP account instead of as an Exchange account. This configuration results in a loss of functionality—for example, the To-Do Bar will not display your calendar and task information.
If you encounter either of these errors when connecting to your Exchange account, verify that your computer is connected to your network domain (locally, over a VPN connection, or by using the HTTP option) and using the correct internal server address method. For example, if your e-mail address is [email protected], you might address your e-mail server as mail.adatum.com or by an internal address, such as ADATUMExchange.adatum.local.
To successfully troubleshoot your connection issues, you will likely need to manually configure your server settings. This requires that you have additional information from your server administrator about your e-mail account, including the names of the incoming and outgoing servers, and whether either of the servers requires additional authentication.
If the Add New Account wizard is unable to automatically configure Outlook to connect to your POP or IMAP account, you can manually configure the connection.

You need to provide the following information, which you can obtain from your e-mail service provider:
Name
E-mail address
Account type
Incoming mail server
Outgoing mail server
Account user name
Account password
Logon authentication requirements
You can supply additional information, such as the name by which you want to identify the account, the e-mail address you want to appear when you reply to a message, and additional outgoing server authentication information.

Most important, when connecting to a POP account, you can control the retention of messages on the e-mail server. By default, messages downloaded from a POP server to your computer are removed from the server after 14 days. You can, however, choose to leave the messages on the server permanently, leave them there for a specified amount of time, or leave them there until you delete them from Outlook. If you access your e-mail account from multiple computers, you probably want to leave messages on the server to ensure that they're available to you from all your computers.

After supplying the connection information for your Internet e-mail account, you can click Test Account Settings on the Internet E-mail Settings page of the Add New Account wizard to ensure that Outlook successfully connects to your incoming and outgoing servers.

You can configure Outlook to connect to Exchange, POP, and IMAP accounts. You can also connect to Windows Live Hotmail accounts by installing the Outlook Connector.
You can configure multiple e-mail accounts within one Outlook profile.
The Add New Account wizard can connect to most e-mail accounts automatically. You need to provide only your e-mail address and account password.