Chapter at a Glance

Although Microsoft Outlook 2010 helps you manage your calendar, contacts, tasks, and notes, the primary reason most people use Outlook is to send and receive e-mail messages. Over the past decade, e-mail (short for electronic mail) has become an accepted and even required form of business communication. And of course, many people use e-mail to keep in touch with friends and family, either from work or from home. Outlook makes it easy to connect to multiple e-mail accounts, either on a business network or over the Internet, and provides all the tools you need to send, respond to, organize, filter, sort, find, and otherwise manage e-mail messages.
Tip
In this chapter and throughout this book, for expediency's sake, we sometimes refer to e-mail messages simply as messages. When referring to other types of messages we use full descriptions such as instant messages or text messages.
When sending messages from Outlook, you can format the text to suit your preferences, and include attachments such as documents, workbooks, and images. You can also personalize your message in these ways:
Embed images, business graphics, and automatic signatures.
Set message options such as voting buttons, importance, sensitivity, and reminders.
Request electronic receipts when a message is delivered or opened.
Note
See Also For information about personalizing messages and setting message options, see Chapter 10.
Outlook 2010 has several fancy new features that make it easy to display and track information about the people you correspond with. These features include presence icons that indicate whether a person is currently online, contact cards that appear when you point to a name in an e-mail message, and the People Pane at the bottom of the message window.
In this chapter, you'll create, send, and view messages, with and without attachments. You'll view information about message participants. Then you'll reply to and forward messages.
Note
Practice Files Before you can complete the exercises in this chapter, you need to copy the book's practice files to your computer. The practice files you'll use to complete the exercises in this chapter are in the Chapter03 practice file folder. A complete list of practice files is provided in Using the Practice Files at the beginning of this book.
Important
You'll use the messages you create in this chapter as practice files for exercises in later chapters of this book.
Creating an e-mail message is a relatively simple process. The only information that is absolutely required is the recipient's e-mail address; however, you will usually provide information in the following fields:
To Enter the e-mail address of the primary message recipient(s) in this field.
This is the only field that is absolutely required to send a message.
Subject Enter a brief description of the message contents or purpose in this field.
The subject is not required, but it is important to provide information in this field, both so that you and the recipient can identify the message and so that the message isn't blocked as suspected junk mail by a recipient's e-mail program. Outlook will warn you if you try to send a message with no subject.
Message body Enter your message to the recipient in this field, which is a large text box.
You can include many types of information including formatted text, hyperlinks, and graphics in the message body.
Addressing an e-mail message is as simple as inserting the intended recipient's e-mail address into an address box in the message header of a message composition window. You can enter e-mail recipients into any of three address boxes:
To This address box is for primary message recipients. Usually, these are the people you want to respond to the message. Each message must have at least one address in the To box.
Cc This address box is for "courtesy copy" recipients. These are usually people you want to keep informed about the subject of the e-mail message but from whom you don't require a response.
Bcc This address box is for "blind courtesy copy" recipients. These are people you want to keep informed but whom you want to keep hidden from other message recipients. Bcc recipients are not visible to any other message recipients and therefore aren't included in message responses unless specifically added to one of the address boxes in the response message.
Tip
The Bcc address box is not displayed by default. You can display it in the message header by clicking the Bcc button, located in the Show Fields group on the Options tab of the message composition window.
You can insert an e-mail address into an address box in the following ways:
Type the entire address.
Type part of a previously used address and then select the address from a list.
Click the address box label to display an address book from which you can select one or more addresses.
Note
See Also For information about address books, see Saving and Updating Contact Information in Chapter 4.
Tip
Responding to a received message automatically fills in one or more of the address boxes in the new message window. For information, see Responding to Messages later in this chapter.
If your e-mail account is part of an Exchange network, you can send messages to another person on the same network by typing only his or her e-mail alias—for example, joan; the at symbol (@) and domain name aren't required. If you type only the name of a person whose e-mail address is in your address book, Outlook associates the name with the corresponding e-mail address, a process called validating, before sending the message.
Note
See Also For more information about keyboard shortcuts, see Appendix A at the end of this book.
If you type only a name and Outlook cannot find that person's e-mail address in your address book, when you send the message, Outlook prompts you to select an address book entry or provide a full e-mail address.
Depending on how you enter a message recipient's name or e-mail address into an address box, Outlook either validates the name or address immediately (if you chose it from a list of known names) or validates it when you send the message. The validation process (also known as resolving) for each name or address has one of two results:
If Outlook successfully resolves the name or address, an underline appears below it. If the name or address matches one stored in an address book, Outlook replaces your original entry with the content of the Display As field in the contact record, and then underlines it.
Note
See Also For information about contact record fields, see Saving and Updating Contact Information in Chapter 4.
If Outlook is unable to resolve the name or address, the Check Names dialog box opens, asking you to provide additional information.

In the Check Names dialog box, you can do one of the following:
Select from the suggested options.
Click Properties to learn more about the selected option.
Click Show More Names to display your address book.
Click New Contact to create a new contact record in your default address book, directly from the dialog box.
Outlook 2010 includes many features intended to simplify the process of addressing messages to recipients. As with any tool, these features can sometimes be more difficult to use than you'd like. In this section, we discuss troubleshooting tips for some common problems.
As you type a name or an e-mail address into the To, Cc, or Bcc box, Outlook displays matching addresses in a list below the box. You can insert a name or address from the list into the address box by clicking it or by pressing the arrow keys to select it and then pressing Tab or Enter.
From time to time, you might find that the address list contains incorrect e-mail addresses—for example, if you have previously sent a message to an incorrect e-mail address, or if a person changes his or her e-mail address. If you don't remove the incorrect address from the list, it can be easy to mistakenly accept Outlook's suggestion and send your message to the wrong address.
To clean up the AutoComplete Address list:
In the list, point to the name or address you want to remove.
Click the Delete button (the X) that appears to the right of the name or address.
By default, Outlook requires that you separate multiple e-mail addresses with semicolons. If you separate multiple addresses with another character such as a space or comma, or by pressing Enter, Outlook treats the addresses as one address and displays an error message when you attempt to send the message.
You can instruct Outlook to accept commas as address separators, in addition to semicolons. To do this, follow these steps:
In the Outlook program window or any item window, display the Backstage view, and then click Options.
In the left pane of the Outlook Options dialog box, click Mail.
On the Mail page, scroll to the Send Messages section.
Select the Commas Can Be Used To Separate Multiple Message Recipients check box, and then click OK.
By default, Outlook first searches your Global Address List (the corporate directory provided with an Exchange account, if you're working with one), then searches the contact records stored in the Contacts module of your default account and then searches the Suggested Contacts list. If an e-mail address isn't located in one of those locations, Outlook may search other address books such as those containing contact records stored with secondary e-mail accounts or custom address books that you create.
If you have multiple address books, particularly multiple address books associated with multiple accounts, Outlook does not, by default, search all of the address books and therefore might not locate an e-mail address you have saved.
To change the order in which Outlook searches the address books, or to add address books to the search list, follow these steps:
On the Home tab of the Outlook program window, in the Find group, click Address Book.
In the Address Book window, on the Tools menu, click Options.
The Addressing dialog box opens.
In the Addressing dialog box, click Custom. Then do any of the following:
To search additional address books, click Add. Then in the Add Address List dialog box, click the address list you want to add, click Add, and click Close.
To change the order in which Outlook searches the address books in the list, click an address book and then click the Move Up or Move Down button.
If you're uncertain which address book is represented by a list entry, click the address book and then click Properties to display the account name and folder name of the address book.
In the Addressing dialog box, click OK, and then close the Address Book window.

As long as you have an Internet connection, you can send e-mail messages to people within your organization and around the world by using Outlook, regardless of the type of e-mail account you have. Outlook can send and receive e-mail messages in three message formats:
Hypertext Markup Language (HTML) Supports paragraph styles (including numbered and bulleted lists), character styles (such as fonts, sizes, colors, weight), and backgrounds (such as colors and pictures). Most (but not all) e-mail programs support the HTML format—those that don't display HTML messages as Plain Text.
Rich Text Format (RTF) Supports more paragraph formatting options than HTML, including borders and shading, but is compatible only with Outlook and Microsoft Exchange Server. Outlook converts RTF messages to HTML when sending them outside of an Exchange network.
Plain Text Does not support the formatting features available in HTML and RTF messages but is supported by all e-mail programs.
E-mail message content isn't limited to simple text. You can create almost any type of content in an e-mail message that you can in a Word document. Because Outlook 2010 and Word 2010 share similar commands, you might already be familiar with processes for creating content such as lists and tables.
You can personalize your messages by using an individual font style or color and by inserting your contact information in the form of an e-mail signature or business card. (You can apply other formatting, such as themes and page backgrounds, but these won't always appear to e-mail recipients as you intend them to, and they can make your communications appear less professional.)
You can format the text of your message to make it more readable by including headings, lists, or tables, and you can represent information graphically by including charts, pictures, clip art, and other types of graphics. You can attach files to your message and link to other information, such as files or Web pages.
For the purposes of this book, we assume that you know how to enter, edit, and format content by using standard Microsoft Word techniques, so we don't discuss all of them in this book. We demonstrate many of these techniques within the step-by-step exercises, though, so keep an eye out for any new features that you aren't yet familiar with.
Note
See Also For extensive information about entering and editing content and about formatting content by using character and paragraph styles, Quick Styles, and Themes, refer to Microsoft Word 2010 Step by Step, by Joyce Cox and Joan Lambert (Microsoft Press, 2010).
Tip
You can also personalize a message by having Outlook add a predefined e-mail signature. You can specify different signatures for new messages and for replies and forwarded messages. For example, you might want to include your full name and contact information in the signature that appears in new messages, but only your first name in the signature that appears in replies and forwarded messages. For more information about e-mail signatures, see Personalizing the Appearance of Message Text in Chapter 10.
At regular intervals while you're composing a message, Outlook saves a copy of the message in the Drafts folder. This is intended to protect you from losing messages that are in progress.

You can save a message draft at any time by clicking the Save button on the Quick Access Toolbar in the message window.
To resume working on a message that's been saved as a draft and closed, display the Mail module, click the Drafts folder in the Navigation Pane, and then double-click the message you want to work on.
After you finish composing a message, you can send it by clicking the Send button located in the message header or by pressing Ctrl+Enter. The first time you press this key combination, Outlook asks you to confirm that you want to designate this as the keyboard shortcut for sending messages.
When you send the message, Outlook deletes the message draft, if one exists, and stores a copy of the sent message in the Sent Items folder.
Tip
Each account you access from Outlook has its own Drafts folder and its own Sent Items folder. Outlook automatically saves draft messages and sent messages in the folder affiliated with the e-mail account in which you compose or send the message.
You can change the location in which Outlook saves message drafts and sent messages from the Advanced E-mail Options dialog box. For more information about this dialog box, see Personalizing Your Office and Outlook Settings in Chapter 13.
In this exercise, you'll compose an e-mail message, save an interim message draft, and then send the message.
Note
SET UP You don't need any practice files to complete this exercise. Display your Inbox, and then follow the steps.
 On the Home tab, in the New group, click the New E-mail button.
A new message window opens.
In the To box, type your own e-mail address.
In the Subject box, type SBS Tradeshow Schedule.
 At the right end of the message window
title bar, click the Close
button.
At the right end of the message window
title bar, click the Close
button.Outlook prompts you to save a message draft.
Note
Troubleshooting The appearance of buttons and groups on the ribbon changes depending on the width of the program window or item window. For information about changing the appearance of the ribbon to match our screen images, see Modifying the Display of the Ribbon at the beginning of this book.
In the Microsoft Outlook message box, click Yes.
The message window closes. In the Navigation Pane, the number in the unread message counter to the right of the Drafts folder increases.
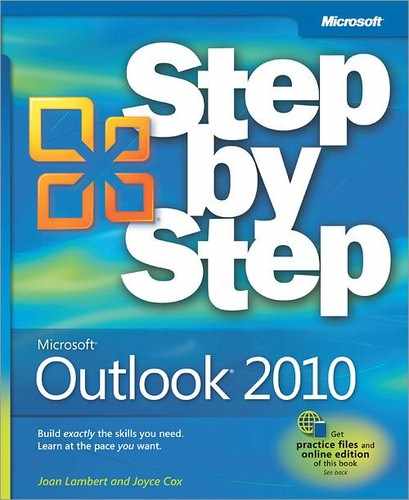
In the Navigation Pane, click the Drafts folder.
Your message and its current content are in this folder.
In the Mail pane, double-click the message to open it for editing.
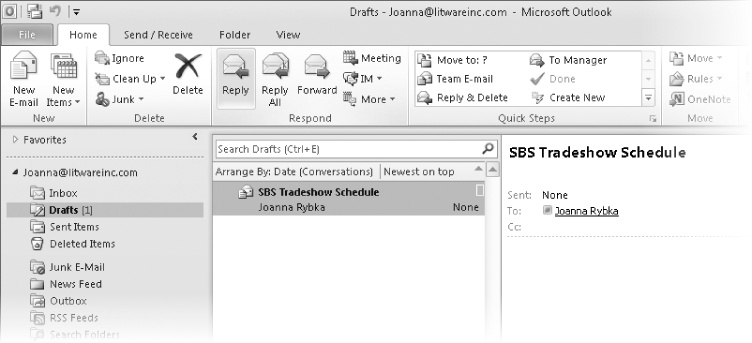
In the content pane, type The following people will be working at the tradeshow: and press the Enter key twice. Then type Amanda, Barry, Cory, and Doyle, pressing Enter once after each of the first three names, and twice after the fourth one.
The list of names is currently unformatted.
 Select the list of names. Then on the
Message tab, in the Basic Text group, click the Bullets button (not its arrow).
Select the list of names. Then on the
Message tab, in the Basic Text group, click the Bullets button (not its arrow).Tip
The Bullets button and other paragraph-formatting commands are also available in the Paragraph group on the Format Text tab.
Outlook converts the list of names to a simple bulleted list.
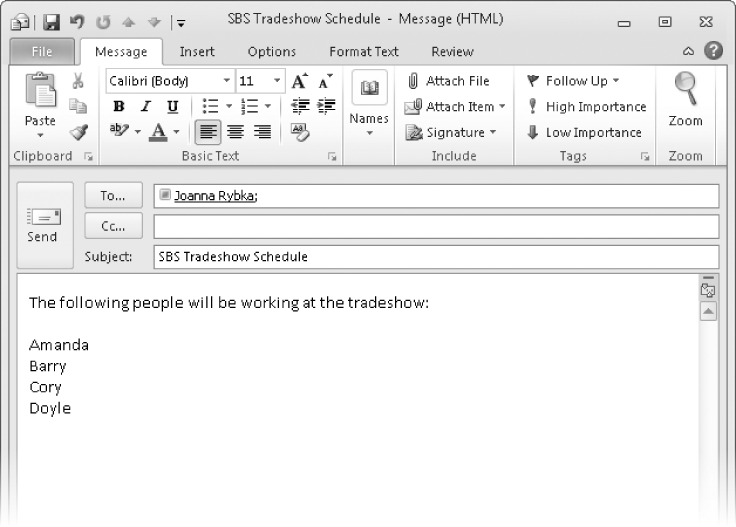
 With the bulleted list still selected, in
the Basic Text group, click the
Bullets arrow.
With the bulleted list still selected, in
the Basic Text group, click the
Bullets arrow.Notice the types of bullets available in the Bullet Library section of the gallery. You can change the list to use any of these bullets by clicking the bullet you want.
In the Bullets gallery, point to Change List Level.
A menu illustrating bullets used by a multilevel list opens.
You can demote (or promote) a list item to any of nine levels, differentiated by the bullet character and indent level.
Press Esc twice to close the Bullets gallery without making changes.
Press Ctrl+End to move the cursor to the end of the message. Type Giveaways are: and then press Enter twice.
 On the Insert tab,
in the Tables group, click the
Table button.
On the Insert tab,
in the Tables group, click the
Table button.In the Table gallery, point to the third cell in the second row.
A live preview of a three-column by two-row table appears at the cursor location in the message window.
Click the selected cell to insert a three-column by two-row table in the message.
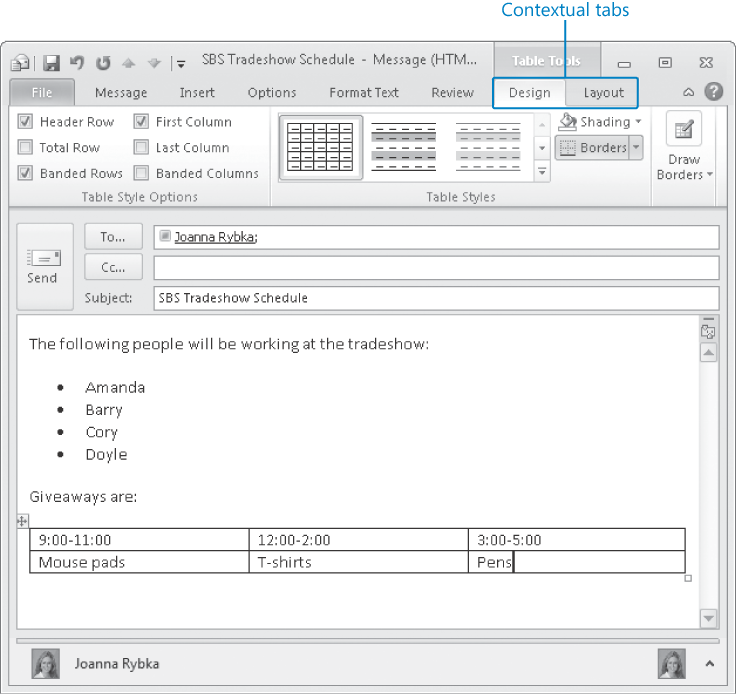
The Table Tools contextual tabs, Design and Layout, appear on the Ribbon.
Enter the following information in the table, pressing Tab to move between table cells:
9:00-11:00
12:00-2:00
3:00-5:00
Mouse pads
T-shirts
Pens
The table and table content are currently unformatted.
 With the cursor still active in the
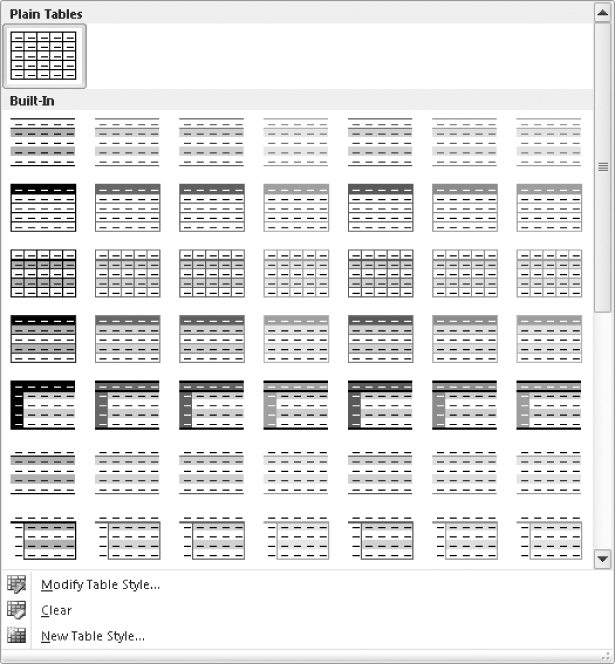
lower-right table cell, click the More button in the Table Styles gallery on the Design contextual tab.
With the cursor still active in the
lower-right table cell, click the More button in the Table Styles gallery on the Design contextual tab.The Table Styles gallery opens. A box around the Plain Tables thumbnail indicates the formatting of the active table.
In the Built-In section of the Table Styles gallery, point to the third thumbnail in the second row (the table with a red header row, identified by the ScreenTip Light List – Accent 2), and then click it.
Outlook displays a preview when you point to the thumbnail, and then applies the selected table style.
Notice that the default table style formats the first column as bold.
On the Design tab, in the Table Style Options group, clear the First Column check box.
The content in the first row of the table is now bold, and the content of the second row is not.
 In the message header, click the Send button.
Outlook closes the message window and sends the message. The message draft disappears from the Drafts folder.
In the Navigation Pane, click the Inbox folder.
The received message is in this folder.
Tip
We're working with the To-Do Bar closed, so you can see more of the message content. To close the To-Do Bar in your Outlook program window, click the Minimize The To-Do Bar button in its upper-left corner. For more information about working with the To-Do Bar, see Personalizing the Outlook Program Window in Chapter 13.
In the Navigation Pane, click the Sent Items folder.
The sent message is in this folder.


Note
CLEAN UP Display your Inbox. Retain the SBS Tradeshow Schedule message in your Inbox and Sent Items folders for use in later exercises.
Managing Multiple Accounts
If you have configured Outlook to connect to multiple e-mail accounts, you need to ensure that the message is being sent from the correct account.
By default, Outlook assumes that you intend to send a message from the account you're currently working in. If you begin composing a message while viewing the Inbox of your Work account, for example, Outlook selects the Work account as the message-sending account. If you reply to a message received by your Personal account, Outlook selects the Personal account as the message-sending account.
You can easily change the message-sending account. When Outlook is configured to use multiple accounts, a From button appears in the message header.
Tip
If Outlook is configured to connect to only one account, you can display the From button by clicking From in the Show Fields group on the Options tab of a message composition window.
Clicking the From button displays a list of active accounts from which you can choose. If the account from which you want to send the message doesn't appear in the list, you can specify another account; however, you must have permission to send messages from that account.

A convenient way to distribute a file (such as a Microsoft Word document, Excel workbook, PowerPoint presentation, or picture) is by attaching the file to an e-mail message. Message recipients can preview or open the file from the Reading Pane, open it from the message window, forward it to other people, or save it to their computers.
Tip
You can also e-mail Microsoft Office files from within the Office program you're working in, by using commands in the Backstage view.
For example, to send a Word document, open the document, display the Backstage view, click the Save & Send tab, and then click Send Using E-mail. Word offers the options of sending the document as an attached Word document, PDF file, or XPS file (Word converts the file for you before sending it), sending a link to the document (if it's saved in a shared location), or sending the document to a fax machine.
In this exercise, you'll send a Word document and a PowerPoint presentation as attachments to an e-mail message.
Note
SET UP You need the Brochure document and the StrategySession presentation located in the Chapter03 practice file folder to complete this exercise. Display your Inbox, and then follow the steps.
- On the Home
tab, in the New group, click the
New E-mail button.
In the To box of the new message window, type your own e-mail address.
In the Subject box, type SBS First Draft.
In the content pane, type Here is some information for your review. Then press Enter to move to the next line.
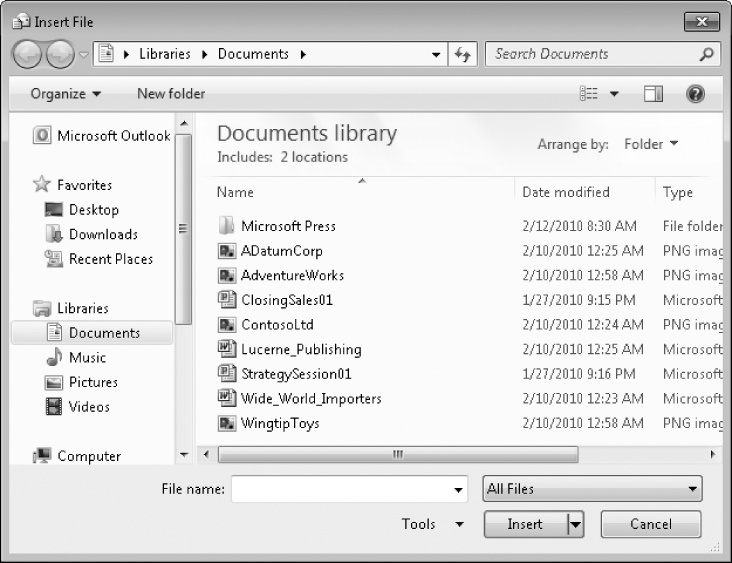
 On the Message tab, in the Include group, click the Attach File button.
The Insert File dialog box opens, displaying the contents of your Documents library.
Navigate to your Chapter03 practice file folder. In the Chapter03 folder, click the Brochure document, hold down the Ctrl key, click the StrategySession presentation, and then click Insert.
In the message header, click the Send button.
Outlook closes the message window and sends the message.

Note
CLEAN UP When you receive the SBS First Draft message in your Inbox, retain it for use in later exercises.
Tip
If you want to send personalized copies of the same e-mail message to several people, you can use the mail merge feature of Word 2010. For more information, refer to Microsoft Word 2010 Step by Step by Joyce Cox and Joan Lambert (Microsoft Press, 2010).
Tip
Many picture files are large, requiring a lot of bandwidth to send and a lot of storage space to receive. Instead of opening a message and then attaching a full-size picture file to it, you can send and simultaneously resize a picture by right-clicking the picture file in Windows Explorer, clicking Send To, and then clicking Mail Recipient. In the Attach Files dialog box that appears, choose from among five picture size options; the corresponding file size appears when you select a picture size. Then click Attach to open a message window in your default e-mail program.
Each time you start Outlook and connect to your e-mail server, any new messages received since the last time you connected appear in your Inbox. Depending on your settings, Outlook downloads either the entire message to your computer or only the message header, which provides basic information about the message, such as:
The item type (message, meeting request, task assignment, and so on)
Who sent it
When you received it
The subject
Icons displayed in the message header indicate optional information such as:
The most recent response action taken
Whether files are attached
If it has been digitally signed or encrypted
If the sender marked it as being of high or low importance

There are three standard views of the message list:
Compact The default view, which displays two lines of message properties, including the read status, subject, sender, time received, whether files are attached to the message, and any color categories or follow-up flags associated with the message.
Single This one-line view displays the importance, reminder, item type or read status, whether files are attached to the message, sender, subject, received, size, category, and follow-up flags. The Reading Pane is open by default in this view.
Preview This view displays from one to four lines of information about each message. For every message, Preview view displays the same information as Single view. For each unread message, Preview view also displays a part of the message content—specifically, the first 255 characters (including spaces). If a message contains fewer than 255 characters, <end> appears in the preview text. The Reading Pane is closed by default in this view.
These three standard views are available from the Change View gallery on the View tab.
Messages that you haven't yet read are indicated by closed envelope icons and bold headers. When you open a message, Outlook indicates that you have read it by changing the message icon from a closed envelope to an open envelope and changing the header font in the message list from bold to normal.
Note
See Also For more information, see the sidebar Marking Messages as Read or Unread in Chapter 7.
You can view the text of a message in several ways:
You can open a message in its own window by double-clicking its header in the message list.
You can read a message without opening it by clicking its header once in the message list to display the message in the Reading Pane.
You can display the first three lines of each unread message under the message header by using the Preview feature. Scanning the first three lines of a message frequently gives you enough information to make basic decisions about how to manage it. The only drawback is that in Preview view, each unread message takes up five lines rather than the two lines in the default Messages view, so fewer messages are visible on your screen at one time.
Note
See Also For information about turning on specific view features, see Arranging Messages in Different Ways in Chapter 7.
You can view message attachments in several ways:
You can preview certain types of attachments (including Excel spreadsheets, PowerPoint slideshows, Word documents, and Portable Document Format (PDF) files) directly in the Reading Pane by clicking the attachment in the message header.
When you click the attachment, the message text is replaced by a preview of the attachment contents, and the Attachments contextual tab appears on the ribbon.
Tip
You can turn off the Attachment Preview feature from the Attachment Handling page of the Trust Center window, which you open from the Outlook Options dialog box. For information about Trust Center settings, see Personalizing Your Office and Outlook Settings in Chapter 13.
You can open the attachment from the Reading Pane or from an open message window by double-clicking the attachment in the message header.
You can save the attachment to your hard disk and open it from there. This strategy is recommended if you suspect an attachment might contain a virus because you can scan the file for viruses before opening it (provided that you have a virus scanning program installed).

Note
See Also For information about protecting your computer from viruses, refer to Windows 7 Step by Step (Microsoft Press, 2009) or Windows Vista Step by Step, (Microsoft Press, 2007), both by Joan Lambert Preppernau and Joyce Cox.
If you receive a contact record or business card as a message attachment, you can add it to your primary address book by dragging the attachment from the e-mail message to the Contacts button in the Navigation Pane. To add the contact record to a secondary address book, expand the folder structure in the Navigation Pane and drag the attachment to that folder.
If you want to concentrate on reading messages without the distraction of other information typically presented in the Outlook program window, you can quickly reconfigure the program window to optimize message reading by clicking the Reading View button on the status bar, to the left of the zoom controls.
In this exercise, you'll preview and open a message and two types of attachments.
Note
SET UP You need the SBS First Draft message you created earlier in this chapter to complete this exercise. If you did not create that message, you can do so now, or you can substitute any received message with an attachment in your Inbox. Display your Inbox, and then follow the steps.
 On the View
tab, in the Current View group,
click the Change View button, and then click Preview.
On the View
tab, in the Current View group,
click the Change View button, and then click Preview.Note
Troubleshooting If the Preview icon on the Change View menu is shaded, this feature is already turned on.
The Reading Pane closes, and the first 255 characters of each message appear in the Inbox below the message header.
On the View tab, in the Change View list, click Single.
The preview text disappears, and the Reading Pane reopens.
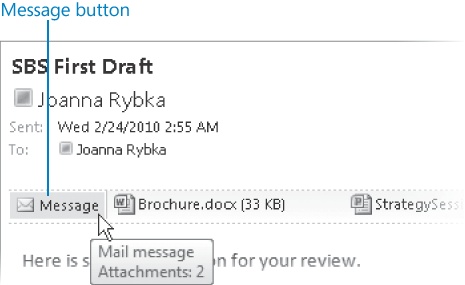
Locate the SBS First Draft message in your Inbox, and then click the message.
Outlook displays the message in the Reading Pane. Below the message header area, the Reading Pane displays a Message button (which looks rather more like just the word Message than it does like a button) and the names of the attached files (Brochure.docx and StrategySession.pptx).
In the Reading Pane, point to (don't click) the Message button below the message header.
Point to the Brochure.docx attachment.
A ScreenTip displays the name, type, and size of the attached file.
Click the Brochure.docx attachment once.
The Attachments contextual tab appears on the ribbon, and the fully formatted Word 2010 document appears in the Reading Pane.
You can scroll through the entire document within this pane, without starting Word.
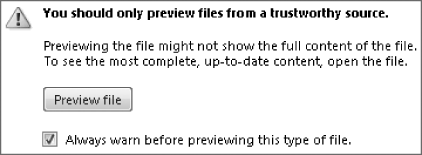
Tip
Clicking certain types of attachments displays an interim warning message in the Reading Pane, rather than immediately displaying the attached file's content. After reading the message, you can click Preview File to display the usual file preview.
You can give Outlook permission to display previews of a specific type of file by clearing the Always Warn Before Previewing This Type Of File check box before clicking Preview File.
Click the StrategySession.pptx attachment.
Word starts the PowerPoint previewer and displays the title slide of the presentation in the Reading Pane. You can move among the presentation's slides by clicking the Previous Slide and Next Slide buttons in the lower-right corner of the pane.
 In the lower-right corner of the Reading
Pane, click the Next
Slide button.
In the lower-right corner of the Reading
Pane, click the Next
Slide button.The presentation transitions to the second slide, exactly as it would if you were displaying the slide show in PowerPoint. The slide currently displays only a title.
 At the bottom of the vertical scroll bar,
click the Next button once.
At the bottom of the vertical scroll bar,
click the Next button once.An animated graphic appears on the slide. The animation works in the Reading Pane the same way it would within the PowerPoint program window.
In the Reading Pane, click the Message button (or, in the Message group on the Attachments tab, click Show Message).
The message text reappears in the Reading Pane.
In the Reading Pane, double-click the StrategySession.pptx attachment (or, in the Actions group on the Attachments tab, click Open).
PowerPoint 2010 starts and opens the presentation, which is titled The Master Plan.
Close the presentation to return to your Inbox.
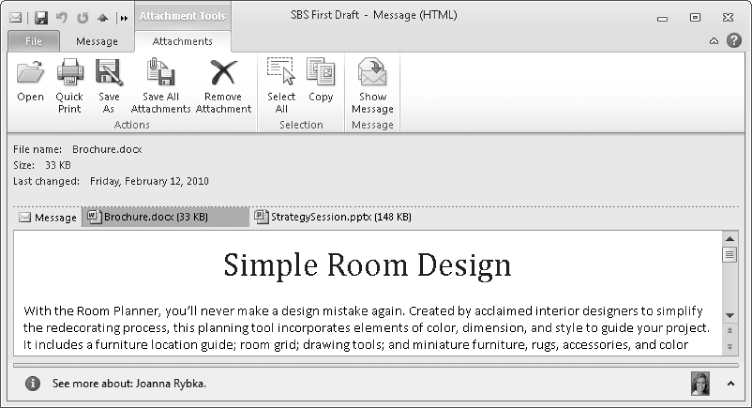
In the message list, double-click the SBS First Draft message.
The message opens in its own window. The Message button and attachments are shown below the message header in the message window, as they are in the Reading Pane.
In the Attachments area below the message header, click the Brochure.docx attachment once.
The Attachments contextual tab appears on the ribbon, and a preview of the document appears in the message content pane exactly as it did in the Reading Pane.


You will frequently read and work with messages and other Outlook items in the Reading Pane. You can display the Reading Pane to the right of or below the module content pane.
You might find it difficult to read the text in the Reading Pane at its default size, particularly if your display is set to a high screen resolution, as is becoming more and more common. You can change the size of the content displayed in the Reading Pane by using the Zoom controls located at the right end of the program window status bar to change the pane's magnification level.

You can change the magnification of the Reading Pane contents in the following ways:
To set a specific magnification level, click the Zoom Level button to open the Zoom dialog box.
To change the zoom level in 10 percent increments, click the Zoom Out and Zoom In buttons.
To quickly change the zoom level to any setting between 10 percent and 500 percent, move the Zoom slider to the left or right.

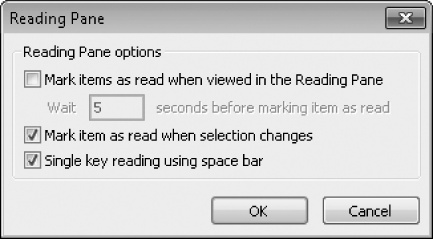
By default, Outlook does not change the read status of a message when you preview it in the Reading Pane. If you commonly read your messages in the Reading Pane rather than opening them in message windows, you can keep better track of read and unread messages by changing the default setting.
To instruct Outlook to mark a message as read after you have previewed it in the Reading Pane:
Display the Backstage view, and then click Options.
On the Mail page of the Outlook Options dialog box, in the Outlook Panes area, click Reading Pane.
In the Reading Pane dialog box, select the check box corresponding to the way you want Outlook to handle messages you view in the Reading Pane.
Mark items as read when viewed in the Reading Pane Outlook will mark the item as read after it has been displayed in the Reading Pane for five seconds or an alternative amount of time (up to 999 seconds) that you specify.
Mark item as read when selection changes Outlook will mark the item as read when you select another item.
Click OK in the Reading Pane dialog box and in the Outlook Options dialog box.
You can scroll through a long message in the Reading Pane in the following ways:
Scroll at your own pace by dragging the vertical scroll bar that appears at the right side of the Reading Pane.
Move up or down one line at a time by clicking the scroll arrows.
Move up or down one page at time by clicking above or below the scroll box.
Move up or down one page at a time by pressing the Spacebar. When you reach the end of a message by using this feature, called Single Key Reading, pressing the Spacebar again displays the first page of the next message. This option is very convenient if you want to read through several consecutive messages in the Reading Pane, or if you find it easier to press the Spacebar than to use the mouse.
After you receive a message (or after Outlook validates a recipient's name in a message that you're sending), you can easily display contact information and a history of your communications with that person.
If presence information is available, a square presence icon appears to the left of each message participant's name. The presence icon (more casually referred to as a jelly bean) is color-coded to indicate the availability or online status of the message participant, as follows:
Green indicates that the message recipient is available.
Red indicates that the message recipient is busy.
Orange indicates that the message recipient is away.
White indicates that the message recipient is offline.
Tip
This set of presence icons is used in Outlook, Windows Live Messenger, and Microsoft Office Communicator to provide a consistent user experience.
Depending on the environment, Outlook uses presence information from Office Communications Server or from Windows Live Messenger.
Pointing to a presence icon displays an interactive contact card of information that includes options for contacting the person by e-mail, instant message, or telephone; for scheduling a meeting; and for working with the person's contact record.
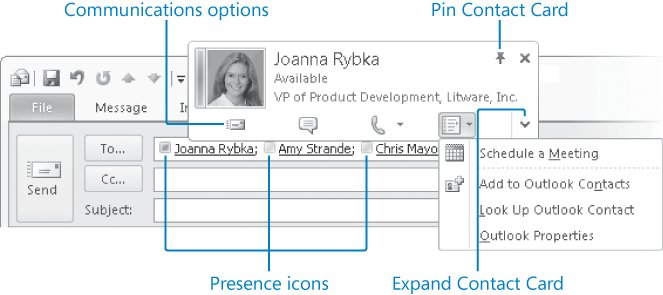
Clicking the Expand Contact Card button displays a more extensive range of information and interaction options.

Tip
A distribution list is a membership group created through Exchange and available from an organization's Global Address List. You can't create distribution lists, but you can create contact groups, which are membership groups saved in the Outlook Contacts module. For more information, see Creating Contact Groups in Chapter 9.
Clicking any of the blue links initiates contact with the person through the stored telephone number or e-mail address, initiates a meeting request, or, if the person is in your address book, opens his or her contact record.
When available, the Organization tab displays information about the contact's manager and direct reports. The Member Of tab displays information about distribution lists the contact is a member of. This information is available only for Exchange accounts.
The People Pane at the bottom of the message window displays extensive information about your previous communications with each message participant.
In its collapsed state, the People Pane displays small thumbnails representing each message participant. If a person's contact record includes a photograph, the photo appears in the People Pane. If no photograph is available, a silhouette of one person represents an individual message participant, and a silhouette of three people represents a distribution list.

You can expand the People Pane either by clicking the Expand button at the right end of the pane or by dragging the horizontal bar that appears at the top of the pane. The People Pane can occupy only a certain percentage of the message window, so the amount you can manually adjust the height of the People Pane is dependent on the height of the message window.
In its expanded state, the People Pane displays either large thumbnails or a tabbed breakdown of communications for each message participant.

You can switch between the simple view and the detailed view by clicking the Toggle button located near the right end of the expanded People Pane header.

The All Items tab of the detailed view displays all your recent communications with the selected person. If you're looking for a specific item, such as a meeting request or a document attached to a message, you can filter the item list by clicking any of the tabs to the left of the list.
You can respond to most e-mail messages that you receive by clicking a response button either within the message window or in the Respond group on the Message tab.
The most standard response to a message is a reply. When you reply to a message, Outlook fills in one or more of the address boxes for you, as follows:

Message replies include the original message header and text, preceded by a space in which you can respond. Replies do not include any attachments from the original message.
You can add, change, and delete recipients from any reply before sending it.
You can forward a received message to any e-mail address (regardless of whether the recipient uses Outlook) provided the message was not sent with restricted permissions. Outlook 2010 has the following message-forwarding options:
Forwarded messages include the original message header and text, preceded by a space in which you can add information. Forwarded messages include attachments from the original message.
When you forward a message, Outlook does not fill in the recipient boxes for you (the assumption being that you want to forward the message to someone who wasn't included on the original message).
Note
See Also For information about restricting recipients from copying, printing, or forwarding messages, see Securing Your E-Mail in Chapter 11.
If you reply to or forward a received message from within the message window, the original message remains open after you send your response. You can instruct Outlook to close original messages after you respond to them—you'll probably be finished working with the message at that point. To do so, display the Mail page of the Outlook Options dialog box, select the Close Original Message Window When Replying Or Forwarding check box in the Replies And Forwards area, and then click OK.
Tip
When responding to an e-mail message, take care to use good e-mail etiquette. For example, if your response is not pertinent to all the original recipients of a message, don't reply to the entire recipient list, especially if the message was addressed to a distribution list that might include hundreds of members.
You can prevent other people from replying to all recipients of a message you send by addressing the message to yourself and entering other recipients in the Bcc box. Then the recipient list will not be visible to anyone.
If your organization runs Office Communications Server, you may also have these additional response options:
Call Uses the telephone calling functionality of Office Communicator to place Voice Over IP (VOIP) calls from your computer, over the Internet, to the telephone number of the original message sender.
Call All Uses the telephone calling functionality of Office Communicator to initiate a VOIP conference call to the telephone numbers of the original message sender and other message recipients.
Reply With IM or Reply All With IM Opens an Office Communicator chat window with the original message subject as its title and the message sender or sender and recipients as the chat participants.

Note
Troubleshooting The response options available in your Outlook installation might vary from those described here. The available response options always feature prominently on the main ribbon tab in the item window.
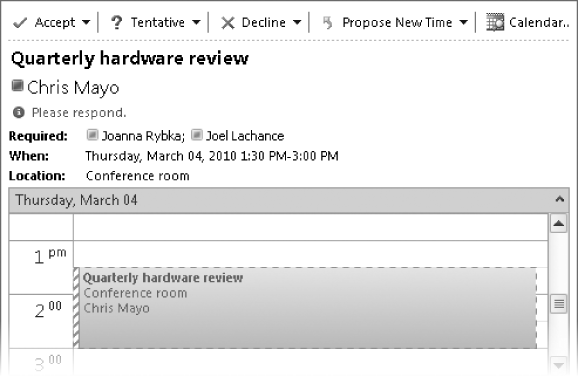
Nonstandard messages have alternative response options, such as the following:
A meeting request includes options for responding to the request.
Note
See Also For information about meeting requests, see Scheduling Meetings in Chapter 5.
A task assignment includes options for accepting or declining the assignment.
Note
See Also For information about task assignments, see Managing Task Assignments in Chapter 6.
If a message contains voting buttons, you can respond by opening the message, clicking the Vote button in the Respond group on the Message tab, and then clicking the response you want to send. Or you can click the Info bar (labeled Click here to vote) in the Reading Pane and then click the response you want.


Note
See Also For information about polling other Outlook users in your organization, see Changing Message Settings and Delivery Options in Chapter 10.
In this exercise, you'll reply to and forward a message that has an attachment.
Note
SET UP You need the SBS First Draft message you created earlier in this chapter to complete this exercise. If you did not create that message, you can do so now, or you can substitute any received message with an attachment in your Inbox. Display your Inbox, and then follow the steps.
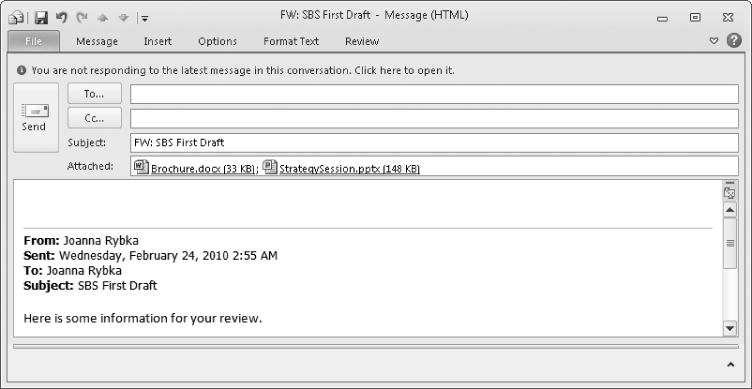
Open the SBS First Draft message in a message window.
The message includes two attachments. The message window ribbon displays only the Message tab containing all the commands you use with a received message.
 On the Message tab, in the Respond group, click the Reply button.
Outlook creates a response, already addressed to you (the original sender). If the message had been sent to any other people, the reply would not include them.
The RE: prefix appears at the beginning of the message subject to indicate that this is a response to an earlier message. Note that the response does not include the original attachments (and in fact there is no indication that the original message had any). The original message, including its header information, appears in the content pane separated from the new content by a horizontal line.
With the cursor at the top of the content pane, type the following sentence:
We'll need to get approval from the Marketing team before proceeding.
- In the response header, click the Send button.
Outlook sends your reply, which appears in your Inbox as the active message in the SBS First Draft conversation. The original message remains open on your screen.
 In the original message, in the Respond group, click the Forward button.
Note
Troubleshooting If the original message closes, select the message in your Inbox and then click the Forward button in the Respond group on the Home tab.
Outlook creates a new version of the message that is not addressed to any recipient. The FW: prefix at the beginning of the message subject indicates that this is a forwarded message. The files that were attached to the original message appear in the Attached box. The message is otherwise identical to the earlier response.
You address and send a forwarded message as you would any other.
In the To box, enter your e-mail address.
Click to position the cursor at the top of the content pane, and then type the following sentence:
Don't forget to review these!
Send the message, and then close the original message window.
When the second message appears in your Inbox, compare the two messages and note the similarities and differences.
For example, the Subject prefixes are different, and the forwarded message includes the original message attachments.

You can easily create e-mail messages that include attachments.
By default, messages you receive appear in your Inbox.
You can see the first few lines of each message in Preview view, open a message in its own window, or preview messages in the Reading Pane. You can preview message attachments in the Reading Pane.
You can reply to the message sender only or to the sender and all other recipients. You can also forward a message and its attachments to other people.