Chapter at a Glance

Having immediate access to current, accurate contact information for the people you need to interact with—by e-mail, telephone, mail, or otherwise—is important for timely and effective communication. You can easily build and maintain a detailed contact list, or address book, in the Microsoft Outlook 2010 Contacts module. From your address book, you can look up information, create messages, and share contact information with other people. You can also keep track of your interactions with a person whose contact information is stored in Outlook.
If you need to take contact information with you in a non-electronic format, you can print an address book or selected contact records, in many different formats.
In this chapter, you'll create and edit contact records and view them in different ways. Then you'll print a contact record and a list of contact information.
Note
Practice Files You don't need any practice files to complete the exercises in this chapter. For more information about practice file requirements, see Using the Practice Files at the beginning of this book.
You save contact information for people and companies by creating a contact record in an address book.

Tip
You can create a personalized electronic business card for yourself or for any of your contacts. For information, see Personalizing Electronic Business Cards in Chapter 9.
You can store the following types of contact information in a contact record:
Name, company name, and job title
Business, home, and alternate addresses
Business, home, mobile, pager, and other telephone numbers
Business, home, and alternate fax numbers
Web page address (URL), instant messaging (IM) address, and up to three e-mail addresses
Photo or other identifying image
General notes, which can include text and illustrations such as photos, clip art images, SmartArt diagrams, charts, and shapes
You can also store personal and organization-specific details for each contact, such as the following:
Professional information, including department, office location, profession, manager's name, and assistant's name
Personal information, including nickname, spouse or partner's name, birthday, anniversary, and the title (such as Miss, Mrs., or Ms.) and suffix (such as Jr. or Sr.) for use in correspondence
You typically create a contact record by displaying the Contacts module and then clicking the New Contact button in the New group on the Home tab. In the contact record window that opens, you insert the information you want to save. After you save the contact record, it is displayed in the Contacts pane.
You can create a contact record containing only one piece of information (for example, a name or company name), or as much information as you want to include. You can quickly create contact records for several people who work for the same company by cloning the company information from an existing record to a new one. And of course, you can add to or change the information stored in a contact record at any time.
The order in which Outlook displays contact records in the Contacts pane is controlled by the File As setting. By default, Outlook files contacts by last name (Last, First order). If you prefer, you can change the order for new contacts to any of the following:
First, Last
Company
Last, First (Company)
Company (Last, First)
To set the filing order for all your contacts, display the Backstage view, click Options, and then on the Contacts page of the Outlook Options dialog box, click the Default "File As" Order arrow and select an order from the list. You can change the filing order for an individual contact by selecting the order you want in the File As list in the contact record.
Tip
In addition to individual contact records, you can create groups of contacts so that you can manage messaging to multiple people through one e-mail address. For information, see Creating Contact Groups in Chapter 9.
Outlook stores contact information from different sources in separate address books. Some are created by Outlook, some by your e-mail server administrator, and others by you.
Outlook automatically creates a Contacts address book and a Suggested Contacts address book for each account you connect to. These address books are available from the My Contacts list in the Navigation Pane of the Contacts module.

The Contacts address book of your default e-mail account is your main address book, and it is the address book that appears by default in the Contacts module. The Contacts address book is empty until you add contact records to it.
If you correspond with someone who isn't already in your Contacts address book, Outlook automatically adds that person to the Suggested Contacts address book. You can work with the contact information saved in this address book, or you can move the information from the Suggested Contacts address book to create an official contact record for that person in a different address book.
Tip
If you have an Outlook Mobile Service account, Outlook automatically creates a Mobile Address Book containing all the contacts in your Contacts address book for whom mobile phone numbers are listed. For more information, refer to Microsoft Outlook 2010 and Office Communications Server Inside Out by Jim Boyce (Microsoft Press, 2010).
You can create additional address books; for example, you might want to keep contact information for family and friends in an address book separate from client contact information, or you might maintain an address book for team members working on a specific project.
You create an address book by creating a folder and specifying that the folder will contain contact items.

When you display the Folder List in the Navigation Pane, your custom address books appear along with other folders you create, and you can organize them in the same manner—for example, at the same level as your Inbox, as a subfolder of the Contacts address book, or inside a project folder. All address books are available from the My Contacts list in the Navigation Pane of the Contacts module.
Note
See Also For information about creating address books, see Organizing Messages in Folders in Chapter 7.
Tip
If your organization stores contact information in a SharePoint Contacts List, you can import the list contents from SharePoint into Outlook as an address book. For more information, see Working with SharePoint Site Content in Chapter 12.
If you have an Exchange account, you also have access to an official address book called the Global Address List (or GAL). The GAL is maintained by your organization's Exchange administrator and may include information about individuals within your organization, distribution lists, and resources (such as conference rooms and media equipment) that you can reserve when you schedule meetings. It can also include organizational information (each person's manager and direct subordinates) and group membership information (the distribution lists each person belongs to).
The GAL doesn't appear in the My Contacts list shown in the Navigation Pane of the Contacts module. To display the GAL, click the Address Book button located in the Find group on the Home tab of the Contacts module or the Address Book button located in the Names group on the Message tab of a message composition window. Outlook users can view the GAL but not change its contents.
Dialing Rules
The first time you enter a phone number for a contact, the Location Information dialog box opens, prompting you to enter your own country, area code, and any necessary dialing information, such as a carrier code.

Outlook sets up dialing rules based on the information you enter. You must enter at least your country and area code in the dialog box and then click OK; you can't close the dialog box without entering the requested information.
In this exercise, you'll create and edit a contact record in your main address book.
Note
SET UP You don't need any practice files to complete this exercise. Display the Contacts module, and then follow the steps.
 On the Home tab, in the New group, click the New Contact button.
A new contact record window opens.
Note
See Also For information about the features and functions of the contact record window, see Working in the Contacts Module in Chapter 2.
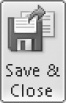
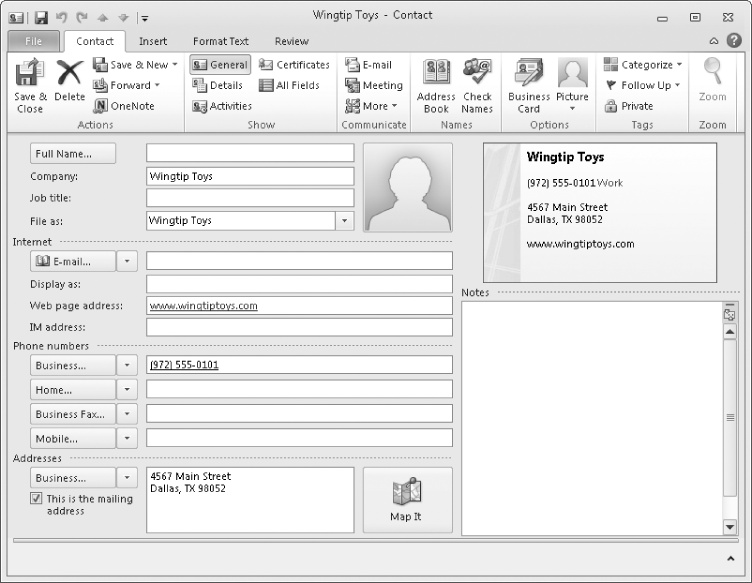
In the Full Name box, type Sara Davis, and then press the Tab key to move to the Company box.
Outlook transfers the name to the File As box and displays it in the default order (Last, First). The name also appears on the contact record window title bar and in the business card representation.
Note
Troubleshooting The appearance of buttons and groups on the ribbon changes depending on the width of the program window or item window. For information about changing the appearance of the ribbon to match our screen images, see Modifying the Display of the Ribbon at the beginning of this book.
In the Company box, type Wingtip Toys.
In the Job title box, type Assembly Plant Manager.
In the Internet area, type [email protected] in the E-mail box, and press Tab.
Outlook automatically formats the e-mail address as a hyperlink and then enters the contact's name, followed by the e-mail address in parentheses, in the Display As box. This box indicates the way the contact will appear in the headers of e-mail messages you exchange with this contact.
In the Display as box, select the e-mail address inside the parentheses and then type Work.
Click the E-mail arrow (not the button).
A list displays the e-mail address fields available in the contact record.
In the E-mail list, click E-mail 2.
The E-mail 2 field replaces the E-mail field. The e-mail address you entered in the E-mail field, and its associated Display As text, disappears.
In the E-mail 2 field, enter [email protected], and then press Tab.
Outlook enters the original name and the second e-mail address in the Display As field. Although the field name doesn't change to indicate it, this information is specific to the E-mail 2 field.
In the Display as box, select the e-mail address inside the parentheses and then type Personal.
The business card representation displays both e-mail addresses.
In the Web page address box, type www.wingtiptoys.com.
Outlook automatically formats the text as a hyperlink.
In the Phone numbers area, type 9725550101 in the Business box, and then press Tab. If the Location Information dialog box opens, enter your country and area code, and click OK. Then in the Phone and Modem dialog box, with the location associated with your area code selected, click OK.
Note
See Also For information about the Location Information dialog box, see the sidebar Dialing Rules earlier in this topic.
Outlook formats the series of numbers you entered as a telephone number, using the regional settings governed by Windows.
In the Addresses area, click in the text box to the right of Business, type 4567 Main Street, press the Enter key, and then type Dallas, TX 98052.
Click the Business arrow to display the Addresses list and then, in the list, click Home.
The button label changes to indicate that you are displaying Sara's home address information.
In the text box, type 111 Magnolia Lane, press Enter, and then type Flower Mound, TX 98053.
The contact record now contains both business and personal contact information.
 On the Contact tab, in the Actions group, click the Save & Close button.
The contact record window closes. The Contacts pane now includes the new contact record for Sara Davis.
In the Contacts pane, double-click the contact record for Sara Davis.
 On the Contact tab, in the Show group (or in the Show list, if the Show group is compacted), click the
Details button.
On the Contact tab, in the Show group (or in the Show list, if the Show group is compacted), click the
Details button.Outlook displays the Details page of the contact record.
Tip
You can assign follow-up flags to contact entries, and link contact entries to e-mail messages, appointments, tasks, and other Outlook items. For more information, see Creating Tasks from Outlook Items in Chapter 6. You can view all items linked to a contact on the Activities page of the contact record.
Click the Birthday arrow, scroll the calendar to July, and then click 31.
The Birthday box displays the day and date information for July 31 of the current year.
 In the Actions group, click the Save & New arrow (not the button),
and then in the list, click Contact from
the Same Company.
In the Actions group, click the Save & New arrow (not the button),
and then in the list, click Contact from
the Same Company.Note
Troubleshooting Clicking the Save & New button rather than the Save & New arrow opens a new, blank contact record. If this occurs, close the new contact record window to return to Sara Davis's contact record, and repeat step 21.
Outlook creates a new contact record that already contains the company name, Web page address, business phone number, and business address from Sara Davis's contact record.
Because no person's name has been provided, the File As name is currently set to the company name.
In the Full Name box, type Andrea Dunker, and in the Job title box, type Sales Associate.
In the E-mail box, type [email protected]. Leave the default Display As text.
Save and close the open contact records.
Use the techniques described in this exercise to create contact records for the following people:
Full name
Company
Job title
E-mail address
Andrew Davis
Trey Research
Account Manager
Idan Rubin
Trey Research
Research Associate
Nancy Anderson
Trey Research
Research Associate
The Contacts pane now includes the five records you've created.


Note
CLEAN UP Save and close any open contact records to return to the Contacts pane. Retain the Nancy Anderson, Andrew Davis, Sara Davis, Andrea Dunker, and Idan Rubin contact records for use in later exercises.
Tip
You can create a contact record for the sender of a message you have received by right-clicking the sender's name in the message header—either in the Reading pane or the open message item—and then clicking Add To Outlook Contacts. Outlook creates a contact record with the name and e-mail address already filled in. Add any other information you want to record, and then save the contact record.
Conforming to Address Standards
When you finish entering information in the Addresses area, Outlook verifies that the address conforms to a standard pattern. If Outlook detects irregularities in the address you enter, the Check Address dialog box opens, prompting you to enter the street address, city, state or province, postal code, and country in separate fields from which it reassembles the address.
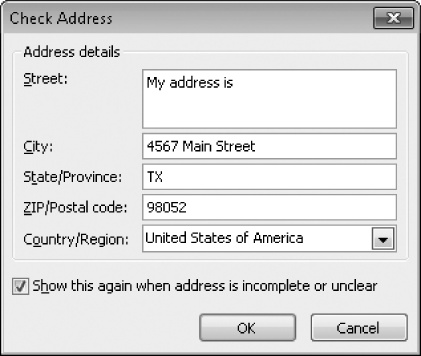
The intention of this feature is to verify that you have the information necessary to send mail to the contact. If you determine that the information in the Check Address dialog box is correct, you can click Cancel to close the dialog box without making changes.
Saving contact information for people in a physical or electronic address book is useful because it centralizes the information in one place so that you no longer have to remember the information or where to find it. The added benefit of saving contact information in an Outlook address book is that it makes the process of initiating communication with a contact much more efficient.
Contact records aren't useful only for storing information; you can also initiate a number of actions that are specific to a selected contact. Commands for initiating communication are available in the Communicate group on the Contact tab of an open contact record.

You can perform many actions from within a contact record by using the commands in the Communicate group on the Contact tab, including the following:
Create an e-mail message addressed to the contact by clicking the E-mail button.
Create a meeting request that includes the contact by clicking the Meeting button.
Initiate a chat session with the contact by clicking the Reply With IM button. (Requires Office Communicator.)
Place a call to the contact by clicking the Call arrow and then, in the list, clicking the telephone number you would like Outlook to dial. (Requires Internet telephone capabilities.)
Display the contact's Web site by clicking the Web Page button.
Create a task assigned to the contact by clicking the Assign Task button.
Create a journal entry assigned to the contact by clicking the Journal Entry button.
Display a map of the contact's address by clicking the Map It button in the Addresses area.
If Microsoft OneNote 2010 is installed on your computer, you can create a OneNote notebook entry linked to the contact record by clicking the OneNote button in the Actions group on the Contact tab.
When you send an e-mail message to a person whose contact information is stored in one of your address books, you can quickly address the message to that person by entering his or her name exactly as it appears in the address book and letting Outlook validate the address. If you don't know the exact spelling of the name, follow these steps:
In the message composition window, click the Address Book button in the Names group on the Message tab.
In the Address Book list, click the arrow, and then click the address book you want to search.
Scroll through the Name list, and locate the person's name.
To add the person in the To box as a primary message recipient, double-click the name, or click it and then press Enter. To add the person as a secondary or private recipient, click in the Cc or Bcc box at the bottom of the dialog box and then double-click the name, or click it and press Enter.
After selecting all message recipients from the address book, click OK to close the Select Names dialog box and return to the message composition window.

Note
See Also For information about creating e-mail messages, see Creating and Sending Messages in Chapter 3.
You can view all your address books in the Contacts module. You can also display a list of the contacts in an address book in one of these ways:
Click the Address Book button in the Find group on the Home tab of the program window in any module to open the Address Book window.
Click the Address Book button in the Names group on the Contact tab of a contact record window to open the Select Name dialog box.
In either case, you can expand the Address Book list and then click the name of the address book you want to display.

You can view an address book in many different formats. You can choose any standard view from the Current View gallery on the Home tab of the Contacts module.

Each view presents information from your contact records either as cards or in a list:
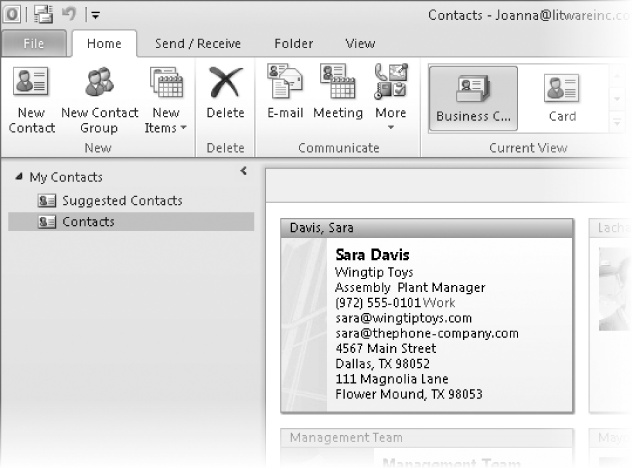
Business Card This view displays the business card associated with each contact record—either the default card created by Outlook or a custom card if you have one. Business cards are displayed in alphabetical order by first or last name, depending on the File As selection.
Card This view displays contact information as truncated business cards that include limited information, such as job title and company name.
Phone This view displays a columnar list including each contact's name, company, and contact numbers.
List This view displays a columnar list with contact records arranged in groups. You can choose the grouping you want from the Arrangements gallery on the View tab.
In any list view, you can expand and collapse the groups or select and take action on an entire group of contacts. You can also enter information directly into any contact record field displayed in the list.
You can search and filter your contact records in any view by using the Instant Search feature. You can sort contact records by any displayed column in a list view by clicking the column header.
You can change the fields displayed in each view; the way records are grouped, sorted, and filtered; the display font; the size of business cards; and other settings to suit your preferences. You can personalize a view from the Advanced View Settings dialog box, which you open by clicking View Settings in the Current View group on the View tab.

In this exercise, you'll look at different views of contact records within the Contacts pane, add and remove columns in a list view, and reset a customized view.
Note
SET UP This exercise uses the Nancy Anderson, Andrew Davis, Sara Davis, Andrea Dunker, and Idan Rubin contact records you created in the exercise Saving and Updating Contact Information earlier in this chapter. If you didn't complete that exercise, you can do so at this time or use contact records of your own. Display the Contacts module, and then follow the steps.
 On the Home
tab, in the Current View gallery, click the Business Card button if that view isn't
already selected.
On the Home
tab, in the Current View gallery, click the Business Card button if that view isn't
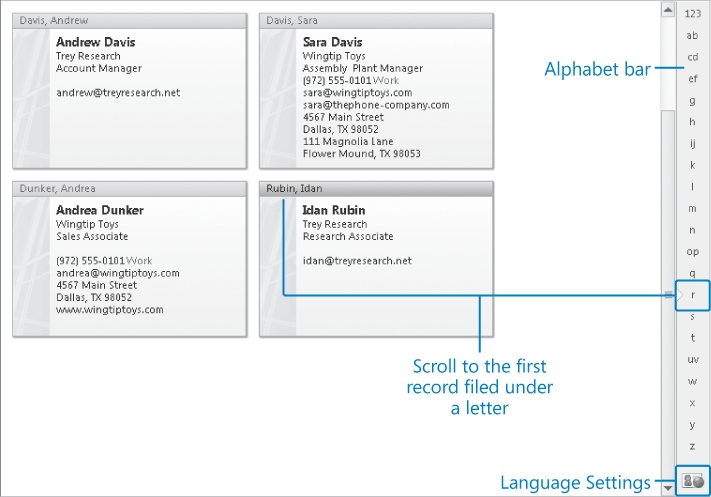
already selected.In Outlook 2010, this default Contacts module view displays standard business cards for each contact, as well as any personalized business cards you have saved. The cards are organized by File As name, which by default is alphabetically by last name.
On the alphabet bar located on the right side of the Contacts pane, click the letter r.
The Contacts pane scrolls as necessary to display the business card for Idan Rubin (or the first contact record in your Contacts module that is filed under R).
Tip
You can display an additional alphabet in the alphabet bar. Options include Arabic, Cyrillic, Greek, Thai, and Vietnamese—other alphabets might be available depending on the version of Outlook and any language packs you have installed. To get started, click the Language Settings button at the bottom of the alphabet bar.
 If the card columns are not wide enough to
display the information saved with the contact records, click the Zoom In button at the right end of the status bar until the
information is visible.
If the card columns are not wide enough to
display the information saved with the contact records, click the Zoom In button at the right end of the status bar until the
information is visible.Outlook displays your contact records in a card-like format that includes only text and no additional graphic elements.
 In the Current
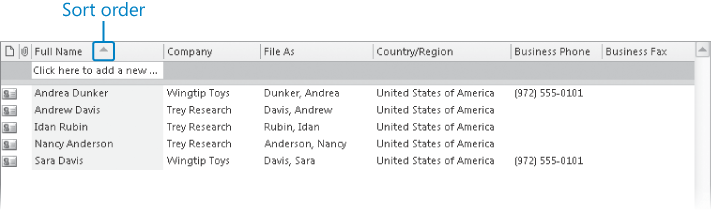
View gallery, click the Phone button.
In the Current
View gallery, click the Phone button.Outlook displays your contact records in a grid of columns and rows organized in ascending order based on the File As column.
Click the Full Name column heading.
Outlook sorts the contact records in ascending order based on the Full Name field, as indicated by the upward-pointing sort arrow to the right of the column heading. You can reverse the sort order by clicking the active heading again.
Click the Company column heading.
Outlook sorts the contact records in ascending order based on the Company field.
Right-click the Company column header, and then click Field Chooser.
The Field Chooser window opens.
Scroll down the Field Chooser list until the Job Title field is visible. Drag the Job Title field from the Field Chooser dialog box to the column heading area, and when the red arrows indicate that it will be inserted between the Company and File As fields, release the mouse button.
The list view now includes a column displaying the Job Title for each contact.
Point to the column separator between Job Title and File As. When the cursor changes to a double-headed arrow, double-click.
Drag the Country/Region column header down from the column heading row until a black X appears. Then release the mouse button.
The Country/Region column is removed from the list view.
 On the View
tab, in the Current View group,
click the Reset View button. Then
in the Microsoft Outlook dialog box that asks whether you want to reset the
view to its original settings, click Yes.
On the View
tab, in the Current View group,
click the Reset View button. Then
in the Microsoft Outlook dialog box that asks whether you want to reset the
view to its original settings, click Yes.The view returns to its original settings.


Note
CLEAN UP Return the Contacts module to the default Business Card view. Retain the Nancy Anderson, Andrew Davis, Sara Davis, Andrea Dunker, and Idan Rubin contact records for use in later exercises.
User-Defined Fields
If you'd like to save information that doesn't fit into the default contact record fields, you can create a custom field. A custom field can contain information such as text, numbers, percentages, currency, Yes/No answers, dates, times, durations, keywords, and formulas.
You can create a custom information field from any view of the All Fields page by clicking the New button in the lower-left corner of the page and then specifying the name, type, and format of the field in the New Column dialog box that opens.

Custom fields appear when you filter the All Fields page on User-Defined Fields In This Folder. When you enter information in the custom field for a specific contact, it also appears in the User-Defined Fields In This Item list within that contact record.
You can print an address book or individual contact records, either on paper or to an electronic file (such as a PDF file or an XPS file), from any address book view. Depending on the view, Outlook offers a variety of print styles, such as those described in the following table.
Style | Description | Available in these views |
|---|---|---|
Card | Contact information displayed alphabetically in two columns. Letter graphics appear at the top of each page and the beginning of each letter group | Business Card, Card |
Small Booklet | Contact information displayed alphabetically in one column. Formatted to print eight numbered pages per sheet. Letter graphics appear at the top of each page and the beginning of each letter group, and a contact index at the side of each page indicates the position of that page's entries in the alphabet. Print double-sided if possible. | Business Card, Card |
Medium Booklet | Contact information displayed alphabetically in one column. Formatted to print four numbered pages per sheet. Letter graphics appear at the top of each page and the beginning of each letter group, and a contact index at the side of each page indicates the position of that page's entries in the alphabet. Print double-sided if possible. | Business Card, Card |
Memo | Contact information displayed under a memo-like header containing your name. One record per sheet. | Business Card, Card |
Contact names and telephone numbers displayed in two columns. Letter graphics appear at the top of each page and the beginning of each letter group. | Business Card, Card | |
Table | Contact information displayed in a table that matches the on-screen layout. | Phone, List |
You can customize the layout of most of the default print styles, as well as save custom print styles.
In this exercise, you'll set up Outlook to print a phone list and then to print individual address cards.
Note
SET UP This exercise uses the Nancy Anderson, Andrew Davis, Sara Davis, Andrea Dunker, and Idan Rubin contact records you created in the exercise Saving and Updating Contact Information earlier in this chapter. If you didn't complete that exercise, you can do so at this time or use contact records of your own. Display the Contacts module in Card view, and then follow the steps.
Display the Backstage view, and then click Print.
The Backstage view displays the current Print settings.
Tip
The Backstage view on your computer reflects your individual printer settings and might display more print options than shown here.
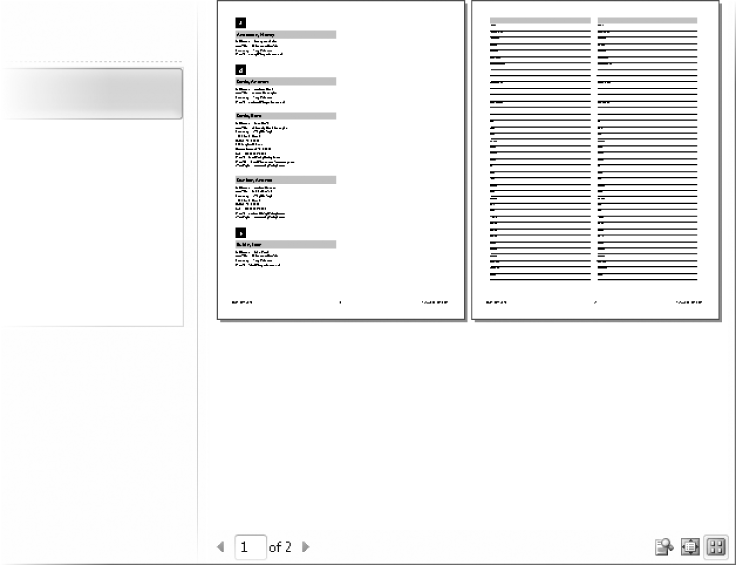
The preview pane displays the way the cards will appear if printed in the default Card Style, with the current settings. The page indicators at the bottom of the preview pane indicate that the cards will be printed on two pages.
Important
To fully complete this exercise, you must have a printer installed. If you don't have a printer installed, you can perform all the steps of the exercise other than printing.
To install a printer, click the Start button, click Devices And Printers, and then on the toolbar, click Add A Printer. Follow the wizard's instructions to install a local or network printer. If you are working on a corporate network, your administrator can provide the information you need to install a printer.
 In the lower-right corner of the preview
pane, click the Multiple Pages
button.
In the lower-right corner of the preview
pane, click the Multiple Pages
button.The preview pane displays both pages. The second page contains a series of lines and illegible text.
 In the lower-right corner of the preview
pane, click the Actual Size
button.
In the lower-right corner of the preview
pane, click the Actual Size
button.The preview pane displays a full-size version of the document. The magnified text is large enough to read.
At the bottom of the preview pane, to the right of the number of pages, click the right arrow.
The preview pane displays the second page, which provides an area for you to record information about an additional contact. Outlook refers to this page of the print style as a blank page.
In the middle pane, click Print Options.
The Print dialog box opens, displaying the options for the Card Style print style.
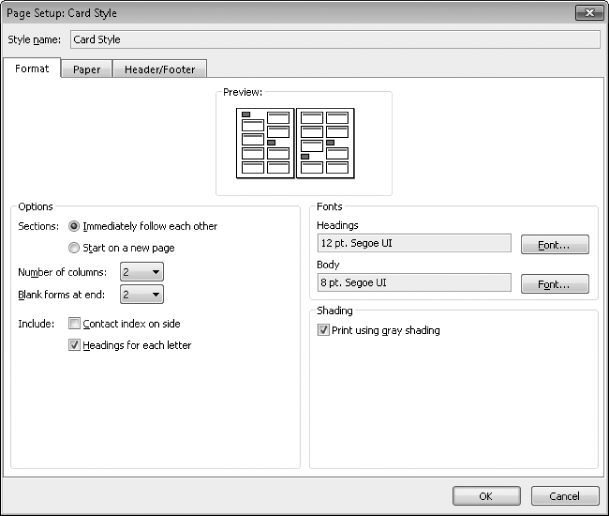
In the Print dialog box, click Page Setup.
The Page Setup: Card Style dialog box opens, displaying the Format page.
Look at the settings available on each of the dialog box pages.
For all print styles, you can change the fonts, paper size, page orientation and margins, header and footer, and other basic settings. For this print style you can also change the layout of cards on the page, the number of blank forms to be printed, and how the alphabetical division of the cards is indicated.
In the Page Setup dialog box, in the Options area of the Format page, click None in the Blank forms at end list. Select the Contact index on side check box, and then clear the Headings for each letter check box.
Click OK in the Page Setup dialog box, and then click Preview in the Print dialog box.
The preview pane displays the previously selected Actual Size view of the card list, which is now only one page.
 In the lower-right corner of the preview
pane, click the One Page
button.
In the lower-right corner of the preview
pane, click the One Page
button.The preview pane displays the entire card list as it will appear when printed.
If you want to print the card list, click the Print button.
After printing the card list, Outlook returns to the Contacts module.
 On the Home
tab, in the Current View gallery,
click the List button.
On the Home
tab, in the Current View gallery,
click the List button.In the Contacts pane, click the Sara Davis contact record to select it, press and hold the Ctrl key, and then click the Andrea Dunker contact record to add it to the selection.
Display the Print page of the Backstage view.
The Settings list displays only two options—Table Style and Memo Style. Memo Style is selected by default.
If the Preview button appears in the preview pane, click it to display the previews of the two selected contact records.
In the Settings list, click Table Style.
The preview of Table Style indicates that all contact records will be printed rather than only the two you selected.
In the middle pane, click Print Options.
The Print dialog box opens, displaying the options for the Table Style.
In the Print range area, click Only selected rows. Then click Preview.
The preview pane changes to display only the two contact records you selected.
If you want to print the two records, click the Print button.
Outlook prints a page displaying only the selected contacts.
Experiment with the other ways in which you can print your contact records and your address book.


You can create and access different types of address books including the Global Address List provided by your Exchange Server account, your main address book, and any custom address books that you create.
Contact records can include names, e-mail and IM addresses, phone numbers, mailing addresses, birthdays, and other information.
You can display contact records in many different views. In card views, you can move among records by clicking the alphabet bar. In list views, you can sort records by any field.
You can print your address book or individual contact records in several formats.