This section will operationalize our learning by showcasing how to build containers for our BrownField PSS microservices.
Perform the following steps to build Docker containers for BrownField PSS microservices:
- Install Docker from the official Docker site at https://www.docker.com.
Follow the Get Started link for the download and installation instructions based on the operating system of choice. Once installed, use the following command to verify the installation:
$docker –version
Docker version 1.10.1, build 9e83765
- In this section, we will take a look at how to dockerize the Search (
chapter8.search) microservice, the Search API Gateway (chapter8.search-apigateway) microservice, and the Website (chapter8.website) Spring Boot application. - Before we make any changes, we need to edit
bootstrap.propertiesto change the config server URL from localhost to the IP address as localhost is not resolvable from within the Docker containers. In the real world, this will point to a DNS or load balancer, as follows:spring.cloud.config.uri=http://192.168.0.105:8888
- Similarly, edit
search-service.propertieson the Git repository and change localhost to the IP address. This is applicable for the Eureka URL as well as the RabbitMQ URL. Commit back to Git after updating. You can do this via the following code:spring.application.name=search-service spring.rabbitmq.host=192.168.0.105 spring.rabbitmq.port=5672 spring.rabbitmq.username=guest spring.rabbitmq.password=guest orginairports.shutdown:JFK eureka.client.serviceUrl.defaultZone: http://192.168.0.105:8761/eureka/ spring.cloud.stream.bindings.inventoryQ=inventoryQ
- Change the RabbitMQ configuration file
rabbitmq.configby uncommenting the following line to provide access to guest. By default, guest is restricted to be accessed from localhost only:{loopback_users, []}The location of
rabbitmq.configwill be different for different operating systems. - Create a Dockerfile under the root directory of the Search microservice, as follows:
FROM frolvlad/alpine-oraclejdk8
VOLUME /tmp
ADD  target/search-1.0.jar search.jar
EXPOSE 8090
ENTRYPOINT ["java","-jar","/search.jar"]
The following is a quick examination of the contents of the Dockerfile:
FROM frolvlad/alpine-oraclejdk8: This tells the Docker build to use a specificalpine-oraclejdk8version as the basic image for this build. Thefrolvladindicates the repository to locate thealpine-oraclejdk8image. In this case, it is an image built with Alpine Linux and Oracle JDK 8. This will help layer our application on top of the base image without setting up Java libraries ourselves. In this case, as this image is not available on our local image store, the Docker build will go ahead and download this image from the remote Docker Hub registry.VOLUME /tmp: This enables access from the container to the directory specified in the host machine. In our case, this points to thetmpdirectory in which the Spring Boot application creates working directories for Tomcat. Thetmpdirectory is a logical one for the container, which indirectly points to one of the local directories of the host.ADD target/search-1.0.jar search.jar: This adds the application binary file to the container with the destination filename specified. In this case, the Docker build copiestarget/search-1.0.jarto the container assearch.jar.EXPOSE 8090: This is to tell the container how to do port mapping. This associates8090with external port binding for the internal Spring Boot service.ENTRYPOINT ["java","-jar", "/search.jar"]: This tells the container which default application to run when a container is started. In this case, we are pointing to the Java process and the Spring Boot fat JAR file to initiate the service.
- The next step is to run
docker buildfrom the folder in which the Dockerfile is stored. This will download the base image and run the entries in the Dockerfile one after the other, as follows:docker build –t search:1.0 .The output of this command will be as follows:

- Repeat the same steps for Search API Gateway and Website.
- Once the images are created, they can be verified by typing the following command. This command will list out the images and their details, including the size of image files:
docker imagesThe output will be as follows:

- The next thing to do is run the Docker container. This can be done with the
docker runcommand. This command will load and run the container. On starting, the container calls the Spring Boot executable JAR to start the microservice.Before starting the containers, ensure that the Config and the Eureka servers are running:
docker run --net host -p 8090:8090 -t search:1.0
docker run --net host -p 8095:8095 -t search-apigateway:1.0
docker run --net host -p 8001:8001 -t website:1.0
The preceding command starts the Search and Search API Gateway microservices and Website.
In this example, we are using the host network
(--net host) instead of the bridge network to avoid Eureka registering with the Docker container name. This can be corrected by overridingEurekaInstanceConfigBean. The host option is less isolated compared to the bridge option from the network perspective. The advantage and disadvantage of host versus bridge depends on the project. - Once all the services are fully started, verify with the
docker pscommand, as shown in the following screenshot: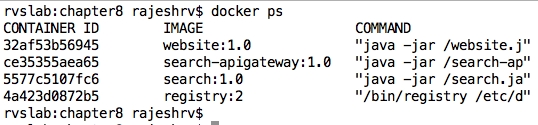
- The next step is to point the browser to
http://192.168.99.100:8001. This will open the BrownField PSS website.Note the IP address. This is the IP address of the Docker machine if you are running with Boot2Docker on Mac or Windows. In Mac or Windows, if the IP address is not known, then type the following command to find out the Docker machine's IP address for the default machine:
docker-machine ip defaultIf Docker is running on Linux, then this is the host IP address.
Apply the same changes to Booking, Fares, Check-in, and their respective gateway microservices.