
The preceding chapters have taught you the skills you need to be able to use Kali Linux to conduct a penetration test using your laptop and a wireless adapter. The challenge with wireless penetration testing is that in order to assess the target network, you have to physically be within the transmitting distance of the target's RF signal rather than from across the Internet. There may be times when you'd like to be able to conduct a wireless assessment remotely, say, from the comfort of your office or home. Or there may be times where a full size laptop is too large or cumbersome for the task at hand.
If you run into either of these scenarios, you'll need to adapt your methodology and testing platforms. To do this, you'll need a Wi-Fi-enabled device running Kali or another platform that supports the aircrack-ng suite that can either be accessed remotely or is small enough to be easily carried on premises. Enter several hardware platforms that have a small footprint (great for hiding at the target location or putting into a backpack or pocket) and enough computing power to be able to run the majority of the tools that have been documented in this book.
In this chapter, we will examine three different hardware platforms: a small wireless router running OpenWrt, the Raspberry Pi 2 computer, and mobile Android devices. Each of these platforms can be loaded with the required tools to successfully test the target network. However, they are small enough to be concealed while you conduct your testing.
We will specifically cover the following topics in this chapter:
- Acquiring and installing the OpenWrt distribution on a router
- Capturing wireless traffic using OpenWrt devices
- Introducing the Raspberry Pi as a wireless testing platform
- Installing Kali Linux on the Raspberry Pi
- Using AutoSSH to control the Raspberry Pi remotely
- Deploying Kali Linux on Android smartphones and tablets
OpenWrt (https://www.openwrt.org) is a custom Linux-based distribution that is designed for embedded platforms, such as home wireless routers. It supports many different processor types, wireless radios, and hardware configurations. The primary challenge with these embedded hardware platforms is their limited RAM, disk space, and processing power. For example, the Cisco Linksys E2000, used to demonstrate the commands in this chapter, has a Broadcom MPS74Kc processor running at 354 MHz, 8 MB of Flash, and 32 MB of RAM, which is a very constrained space to run an operating system and additional applications in. Since the platforms are embedded systems on chips, they can be made very small and hence can be great for this use case.
There are several devices that can be purchased, and they are preinstalled with OpenWrt and are powered by USB, have onboard wireless, support USB 3G interfaces and, most importantly, are tiny. This makes them a great platform for this application.
The following example measures just 2.3 in x 2.3 in x 0.9 in:

TBMax N150 Mbps Wireless Router (http://www.amazon.com/TBMAX-Smallest-Router-Matchbox-Support/dp/B00PNJRDT4)
While this example comes preloaded with OpenWrt, the majority of these embedded devices are preinstalled with firmware from the original equipment manufacturer. This firmware will need to be replaced with a compatible version of OpenWrt before we begin to use it for our wireless assessment.
To begin, you'll need to have access to the default administrative interface for your device and have admin or root-level access. You'll also need to find the appropriate binary on https://openwrt.org in order to replace the OEM firmware on your device. If the device is supported by OpenWrt, there should be a device page that tells you which file is correct for your specific device and revision:
- Browse http://wiki.openwrt.org/toh/start and search for your manufacturer and model to determine whether your hardware is supported. Once there, the device page should guide you to the appropriate file to download.

The Device Page link of the Hardware Compatibility Guide page should assist you in selecting the binary image that is appropriate for your device and should also contain helpful tips, including any installation caveats.
- Once you have identified and downloaded the appropriate image for your device, verify the md5 hash of the file before you install it. This can be done in most operating systems using the md5 command. The directory where the image was downloaded from has an md5sums file that you can use to compare it to. Obviously, these commands will differ slightly based on the binary that is specific to your hardware platform:
#md5 openwrt-15.05-brcm47xx-mips74k-linksys-e2000-v1-squashfs.bin
#grep e2000-v1 md5sums
You should see something like what is shown in the following screenshot:

- Browse your device administrative interface and find the tab or option that allows you to upgrade or install new firmware.
You should now see a window like the following screenshot:

- Choose the file that you downloaded from https://OpenWrt.org and click to start the upgrade. After the upgrade is complete, you can reboot your router and should now have the default configuration for OpenWrt.

- After OpenWrt is installed on your platform, you can plug a wired connection into the LAN ports on your router and you should receive an IP address from the internal DHCP server. It should be in the
192.168.0.X/24format. The default administrative interface is located at192.168.0.1. - Browse
http://192.168.0.1, log in as a root with no password, and then navigate to System | Administration.
- After that, you can open up a terminal window and SSH into the router now running OpenWrt, as shown in the following screenshot:

The OpenWrt operating system also includes a package manager called OPKG that's used to install new applications. This is how we will install the required packages for aircrack-ng or any of the other packages that you will use on this platform. This serves as another reminder that this is best used as a collection platform, and it is also best used for the capturing of the traffic that will be exported to another server or laptop that has more power and can do things such as PSK cracking or any brute force activities.
Note
A list of wireless tools available in the default OpenWrt repository is available at this address: http://wiki.openwrt.org/doc/howto/wireless.overview#wireless_packages_available_in_the_openwrt_repository.
Some notable tools included are as follows:
- Airpwn: A package for 802.11 packet injection
- Karma: A wireless sniffing app that determines clients' trusted network by listening to probe requests
- Mdk3: A tool to exploit common 802.11 protocol weaknesses discussed in the previous chapter
- Wireless-tools: A collection of tools that includes the aircrack-ng suite that we will be demonstrating in this chapter
Note
Other software packages demonstrated in earlier chapters, such as reaver, are available in other repositories. These packages have specific hardware requirements, which may vary from the architecture of the device on which you are running OpenWrt. If you are looking for a device that is purpose-built to run security applications on top of OpenWrt, it is recommended that you look at one of the commercially available projects.
Several examples of this are the MiniPwner (http://minipwner.com) and the Wifi Pineapple (http://wifipineapple.com). These platforms are built with the wireless security professional in mind rather than trying to use a generic platform or one originally intended as a home router.
Listed here are the steps to install aircrack-ng on Open Wrt:
- Logged in as a root, install the wireless-tools package using the
opkgpackage manager. This is similar to other package managers, such asaptoryum. From Command Prompt, execute the following command:#opkg install wireless-toolsThe following output will be displayed if the installation is successful:

- This should be followed by the
opkgcommand to install the aircrack-ng suite of tools:#opkg install aircrack-ngIf successful, you will see aircrack-ng installed along with the supporting libraries and packages.

Now we're ready to start identifying and cracking the wireless networks that are visible to this device. To begin, we'll need to put the wireless network into the monitor mode. You should currently be SSHed into the wired interface, since moving the wireless interface from managed to monitor will disconnect any sessions. Follow these steps:
- Identify the name of the wireless interface that will be use for our testing. In most cases, the embedded device will only have one wireless interface even though it might have multiple radios, such as a 2.4 GHz and 5 GHz:
#IwconfigYou should see the following information:

- Next, put the wireless interface into the monitor mode. You can do this either through the LuCI interface, which is documented, or you can use the airomon-ng command that has been detailed earlier in this book.
- Navigate to Network | WiFi. Find your wireless interface and click on Edit.

- Scroll down to the Interface Configuration section and find the Mode dropdown. Move it from Managed, the default setting, to Monitor.

- Returning to your terminal window and rerunning
iwconfigshould now show yourwlan0interface in the monitor mode and a new monitor interface,mon0.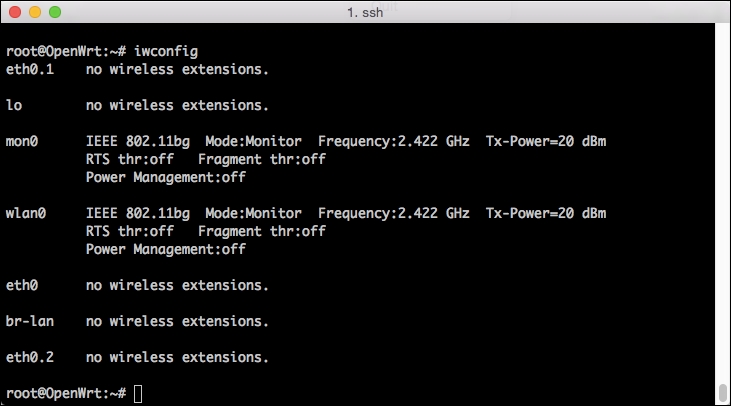
- Next, we can identify a wireless network that we will be targeting. Run airodump-ng to get a list of the entire visible network; we will be focusing on one in particular:
airodump-ng mon0
This example uses the ESSID of Secure.

The various airodump-ng options can be summarized in the following table:
|
|
The channel to listen on |
|
|
The Basic Service Set Identifier of the target network |
|
|
The file to write the captured traffic in |
|
|
The monitor mode interface to be used |
After executing the airodump-ng command, you'll need to wait until you've captured a four-way handshake from one of the clients before you can proceed with cracking the WPA PSK. If this is not a busy network or clients do not regularly associate with the access point, you may need to proceed with one of the other techniques detailed in the other chapters.
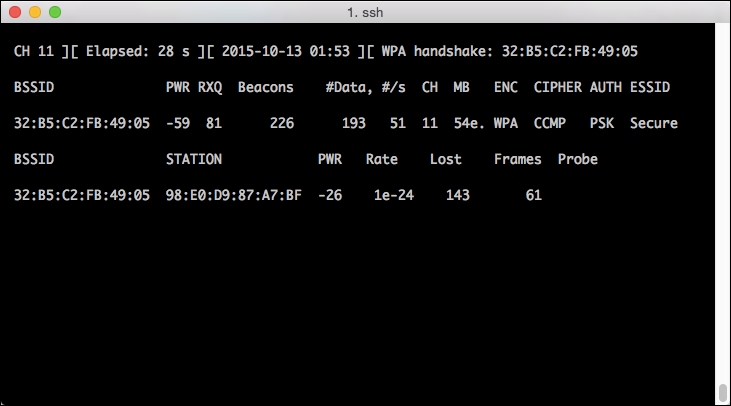
Once you've successfully captured a handshake, airodump-ng will alert you by adding "WPA Handshake: BSSID" to the upper-right hand corner of the screen.
The following example shows a successfully captured handshake:
At this point, you can exit airodump-ng using Ctrl + C. When you return to your prompt, make sure that you find the the .cap files where the exchanges have been captured using the ls command.

The only thing to be done now is run aircrack-ng against the capture files to discover the preshared key for the WPA network. You'll need a password list to compare the hashes to, as described in other chapters.

Note
Due to the extremely restricted hardware platform, running aircrack-ng is not recommended on this device. The amount of flash available is probably not sufficient for any decently sized dictionary or password list nor is the processor going to be capable of comparing hashes at an acceptable speed. It is recommended that you copy your capture files and proceed with cracking them on another device or in the cloud where these restrictions do not exist.
If the captured handshake matches hashes from your dictionary or password file, running aircrack-ng should result in the PSK for the target network being displayed, as shown in the following screenshot:
