
Most projects involve more than one person working together at any given time. It's common in design for many people to work collaboratively to meet deadlines and create a set of construction documents. Revit has tools that allow for a collaborative design and documentation process while allowing multiple people simultaneous access to its single-file building model. Keeping with the theme of an integrated single-file building model, Revit allows for this workflow without breaking apart the model. A complex model can be edited by many people at once using a feature called worksharing. In this chapter, we'll focus on enabling the worksharing feature of Revit.
In this chapter, you learn how to:
Understand key worksharing concepts
Use worksharing in your project
Manage workflow with worksets
Understand element ownership in worksets
Note
Worksharing in Revit refers to the use of worksets to divide a model for the purpose of sharing the workload among multiple people. A workset is a collection of building elements and components (building skin; core; interior walls; furniture, fixtures, and equipment [FF&E]; and so on) that can be used to manage project responsibilities. By separating these various building components into sets (worksets) that allow control over visibility and element ownership, multiple people can collaborate and work within the same file. By default, worksharing is not enabled when you start a project in Revit because Revit assumes you are in a single-user environment at project startup.
Work is shared by creating and saving to a central file located on a network drive. This central file becomes the repository where all the individual work is stored. Access to elements is managed through permissions as in a database. By taking permission of a workset or element—checking out elements or worksets—the central file can manage all the components within a model and make sure that none of the team members are working on the same things.
You share your work by saving the central file to a shared network location. This central file becomes the repository where all the individual work on the project is collected and permissions are managed.
Once the central file has been established, each team member then makes a "local copy" by copying the central file to the desktop or C: drive. All the project work is then done solely in this local copy, which keeps an active association with the central file. All work is done directly in these copied local files. This enables all users to open their local files simultaneously and work concurrently on the project (see Figure 6.1).

The elements in each local file are tied to permissions linking them back to the central file. This makes it impossible to edit an element in one local file if that same element is owned or has been edited by someone else on the same team in another local file.
Remember, Revit is built on top of a database. In effect, when you are working on elements within the model, you're obtaining permission to edit one or more of them from the central database. Once permission to modify an element is granted, no one else can make changes to that element until the changes are reconciled with the central file. This occurs when you use the Synchronize With Central (SWC) command on the Collaborate tab to copy changes you've made back to the central file and simultaneously update your local file with any other changes that have been published to the central file by other team members. If one team member has ownership over an element, no other team members can edit that element until its permissions or changes have been reconciled with the central file.
Worksets allow you to group building elements into collections of objects for the purpose of managing visibility, file performance, or work activity. The actual use of worksets can vary greatly from project to project. Simply enabling worksharing facilitates a multi–team member file and using the worksets beyond the defaults is technically not necessary. However, using the worksets allows you to take advantage of other benefits such as the following:
You can control the visibility of groupings of building components such as building skin, core, interior walls, and so on, without having to use temporary view settings or control visibility manually.
Closing worksets or turning them on or off as needed removes those elements from active memory and thus improves performance.
You can quickly take permission of the entire workset and all the elements contained within at one time.
The worksharing feature is designed to accommodate a variety of ways to group elements within your model. There are no inherent restrictions in how you use worksharing. For example, you can use worksharing to divide a model into one workset for the shell and core and another workset for interior partitions. You can turn worksharing on during any stage of the project, create and remove worksets, or move elements between worksets.
Revit's worksharing feature is designed to accommodate any division of labor you see fit. There are no inherent restrictions in how you use worksharing to divide up a model. For example, you can break up a model and have one group work on the shell and another work on the interior core of a building. You can turn worksharing on at any stage of the project, and you can create or remove individual worksets during the project cycle.
You can find the worksharing feature on the Worksets panel of the Collaborate tab, as shown in Figure 6.2.

You can initiate worksharing by clicking the Worksets button, as shown in Figure 6.3. It will initially be the only active button on the panel.

Selecting this button opens the Worksharing dialog box alerting you that you are about to enable worksharing for your project (Figure 6.4). Remember, once activated, worksharing cannot be turned off. Click OK to confirm you want to enable worksets. Depending on the size of your model and your processor speed, this process can take a few minutes for Revit to complete.

Once that is done, Revit will open the Worksets dialog box and automatically create two worksets within your project: Shared Levels and Grids, which contains only the levels and grids within the model, and Workset1, which will contain everything else (Figure 6.5). New levels and grids created in the project will automatically be placed on the Shared Levels and Grids workset.

There are four types of worksets in any project: User-Created, Families, Project Standards, and Views. User-Created worksets such as Shared Levels and Grids and Workset1 are shown by default, and you have the option to make the others visible by selecting the check boxes at the bottom of the Worksets dialog box.
- User-Created Worksets
Besides the Shared Levels and Grids and the Workset1 worksets that Revit created for you, all of the worksets created in the Worksets dialog box will fall under this category. The User-Created worksets are the only ones by default that will appear in the Worksets dialog box when it is first opened. Only elements on User-Created worksets can be moved between other User-Created worksets.
- Families Worksets
For each family type created or loaded in the project, a workset is automatically created. When editing the properties of a family, you will automatically take ownership over that family. You cannot make changes to a family or family type without first having permission over the family itself.
- Project Standards Worksets
The Project Standards workset type is dedicated to all the project settings such as materials, dimension styles, annotations, tags, line styles, and so on. Any time you need to edit a project standard, such as modifying the graphics of a dimension string, you will be taking ownership of the element's workset.
- Views Worksets
Every view created in a project has its own view workset type. The Views workset type controls ownership of the View Properties and any view-specific elements such as annotations, dimensions, tags, detail lines, and so on. You can take ownership of a particular view workset by selecting it from the workset list and clicking the Editable button. Alternatively, you can also take permission of a view by right-clicking the view in the Project Browser and choosing Make Workset Editable from the context menu. This can be a helpful shortcut in construction documents when much of the effort on the project is more view specific. Regardless of ownership, any team member always has the ability to add elements, components, annotations, or whatever to any view.
The Worksets dialog box lets you add and remove User-Created worksets and take and relinquish permissions over existing worksets. By default, when a new workset is created, it does not contain any model elements or components.
When dividing your project into worksets, it's important to think about the holistic building rather than trying to isolate its individual components. A good way to think about dividing up worksets is to consider the building elements and the number of people working on each of these elements. A basic breakdown of a project's elements might include the following:
Exterior skin
Core
Interior partitions (in a larger building, by floor)
Site
FF&E
This breakdown mirrors some of the roles and responsibilities on the project as well. There might be a small group working on exterior skin design and detailing, another group working on interior partitions, and a third working on FF&E.
For the Jenkins Building, we have divided the model into four worksets, as shown in Figure 6.6.

- Exterior and Structure
This workset contains all the exterior skin of the building as well as the elevator, stair, slabs, and columns.
- Furniture
This workset contains all the furniture, fixtures, casework, and appliances.
- Interiors
This workset contains all the interior walls, furniture, and other items are managed with this workset.
- Shared Levels and Grids
This workset contains the level and grid information from the model, as was originally established when worksharing was enabled.
Notice that Workset1 has been renamed, in our case, to Exterior and Structure. The title Workset1 is not descriptive enough to be of much use, so it can be modified once all the model elements have been moved to relevant worksets. The worksets we've set up demonstrate how a typical breakdown might occur in a project of this size, but it's by no means limited to this scheme. Depending on how you structure work in your office, the worksets might be quite different.
Once worksharing is enabled, there is always a single central file that is used to manage element permissions and create local files. This is the file that will collect all the work done by your team members and allow the team to see regular updates of changes being made to the model or documents. After initializing worksharing, there are a few more steps to complete before all the team members can begin working in a multiuser environment.
Now that you've activated worksharing, you need to set up the new central file to initiate the multiuser environment. To do this, you'll first create the central file on your network; then you'll create the local files that the team will be using.
To create the central file, click the Application button and choose Save As
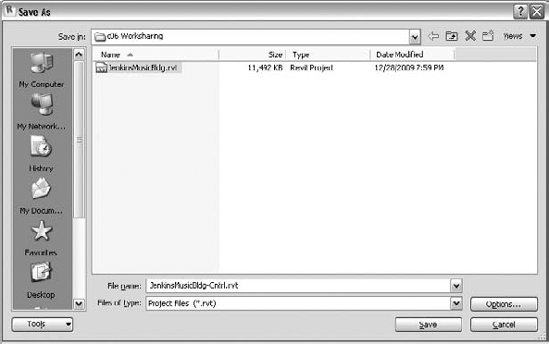
Before renaming the new file, click the Options button at the lower right of this dialog box. A File Save Options dialog box opens that will look like Figure 6.8.
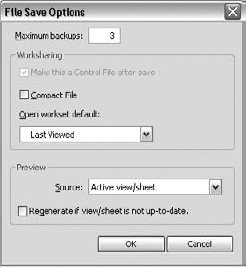
This dialog box contains some important settings. At the top, you can set the number of backups the file will keep in the folder history after saves. The default value is 20. Depending on the storage availability on your network, how often your network is backed up, and the number of people working in the model (remember, local files are also backups), you might want to reduce this number. Because of our space limitations, we've reduced this number to 3.
Also note here that the Make This A Central File After Save check box is selected and grayed out. This is because we've activated worksharing in this file and Revit assumes that we will be making a central file on the next save. Click OK to exit the dialog box.
Back in the Save As dialog box, choose a network location for your central file that everyone on the team has access to. Be sure that when you are naming your new central file, you choose a new name. Do not save over the existing Revit file. There are two reasons for this. First, it automatically gives you a backup of your pre-workshared file in case you need to revert to a non-multiuser file for some reason. Second, saving over an open Revit file can sometimes cause corruption, even if it is the same model.
Once you've entered a new name for the file, click OK to save the file. Now that your file is saved to the network, close all the open windows. Make sure that you never work directly within the central file. Doing so will change the file attributes on the server and prohibit anyone with a local file from being able to synchronize with the central file. The possibility of losing a lot of work and effort from team members exists, so it is safer to err on the side of simply never opening the file.
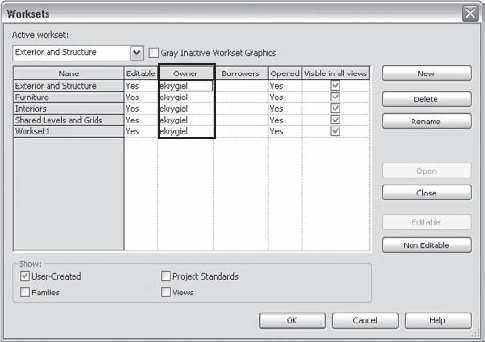
As one final step, make sure that as the person who has created the central file, you don't accidentally retain any rights over the objects and elements within the central file, thereby prohibiting anyone from editing those elements.
To do this, select the Collaborate tab and click the Worksharing button again to open the Worksets dialog box. In the Editable column, change all the Yes entries to No, as shown in Figure 6.9. This will ensure that you have relinquished all the permissions over elements before creating any local files.

Now that you've made a central file, you'll need to create a local file to work from. To do this, simply open the network location of the central file and drag a copy from the network to your desktop or anywhere on your C: drive. Be careful not to move the file—only copy it.
Now, open the new local file. The first time any local file is opened, you'll see a warning message alerting you that you are opening a local file (Figure 6.10). All this means is that you've made a local file and you'll be the owner of the local file. Click Close to dismiss the warning and continue the file-opening process.
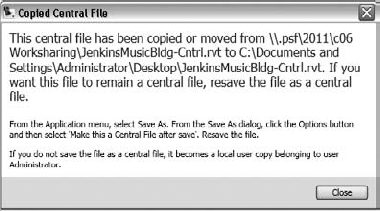
Each local file is "owned" by the local machine, and once it's opened, Revit will pair the local machine with that local file. By default, Revit assigns a username to the local file that matches the login name on the active workstation. So, a typical Windows login might be first initial and the last name, such as ekrygiel. That user would then become the owner of the local file. In this case, the local login is Administrator, which you can see in the Owner column of Worksets dialog box (Figure 6.11).
It can be a good idea to adjust this naming convention to help team communication and identification of who owns what on a project. In a smaller office, it might not be as necessary, but in a larger office or if you're working across multiple offices, clarification of ownership is vital. A good workflow is to change this name to a first name, last name, and phone extension. This way, team members can quickly identify and contact you if they need you to relinquish permission over a given element. To make this modification, follow these steps:
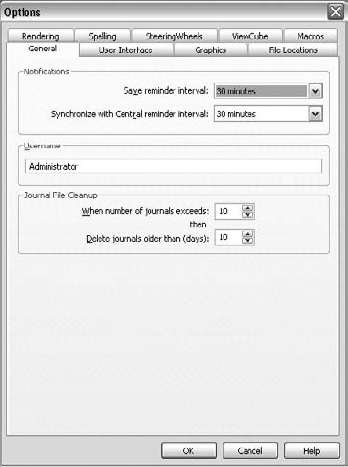
Navigate to the Application button, and choose Options at the bottom.
In the Options dialog box, select the General tab.
In the Username field, enter a new value (Figure 6.12). Click OK to exit. You'll need to close and reopen Revit for the change to take effect.
Once in a worksharing environment, every element in the file and added to the file belongs to a workset. To make sure that you are placing elements in the proper workset while working, there are a couple places to ensure the right workset is selected.
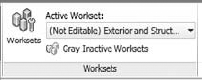
One such location is on the Collaborate tab, where we originated worksharing to begin with. In Figure 6.13, our active workset is Exterior and Structure. Note that this also tells us that the Exterior and Structure workset is not editable. What this means is that as a user, we have not taken ownership of this workset. However, as we mentioned earlier, you don't need to own a workset to add elements to the workset. It just needs to be visible in this window.
The second location is new to Revit 2011 and is located in the status bar at the bottom of the application (Figure 6.14). This drop-down menu serves the same function as the Collaborate tab, but it allows you to visually verify the proper workset is active without having to bounce between tabs and interrupt your workflow. From this location you can also change the active workset and even open the Worksets dialog box using the small button to the left of the drop-down menu.

A helpful tool located on the Collaborate tab is the Gray Inactive Worksets button. This disables all the elements that aren't active, helping you identify what elements are in your current, active workset. This is a temporary view state and will not affect any printing or other output.
Once in a workset environment, you can see or change an object's workset by accessing its Element Properties. At the bottom of the Element Properties dialog box, you can view which workset an object or group of objects belongs to, and you can modify that workset. Note that you can move elements to other worksets only if you own the elements. You do not need to own the entire workset to do this—just the individual elements.

Additionally, you can always tell what workset an object belongs to by hovering your mouse pointer over the object and viewing its workset in the status bar. This location will also display an object's family and category. In the example shown here, the chair is in the Interiors workset, in the Furniture category, and its type is an Armless Chair.

Once you begin working in a worksharing environment, it will eventually become necessary to save your work and share your progress with others in the model. There are three ways for you to both save work and view others' efforts:
- Save
The Save button saves the work you've done to your local copy only; the work isn't shared or published back to the central file. This can be a useful step if you're in the middle of a process, want to make sure your work is saved, but aren't ready to share the changes with the rest of the team. You can find the Save tool either by clicking the Application button and selecting Save or by clicking the save icon on the Quick Access toolbar (QAT).

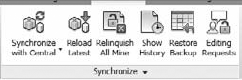
- Synchronize With Central
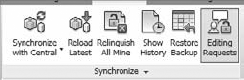
You can use the Synchronize With Central (SWC) command when you are ready to publish your work to the central file for the rest of your team to see. Using SWC also acquires all the changes that other team members have made and loads those into your local file. You can access this command in a couple of ways. The first is on the Collaborate tab in the Synchronize panel, as shown in Figure 6.15. The Synchronize With Central button is located on the left of this panel.
Alternatively, you can use the Synchronize With Central button located on the QAT. Both buttons perform the same action and will open the Synchronize With Central dialog box (Figure 6.16). This dialog box gives you some additional tools to assist your workflow:
The Compact Central File check box allows you to compact the model to save on disk space. It will take some additional save time, but it can temporarily decrease your file size significantly. This should not be seen as a permanent solution to managing a large file, however. Compaction will decrease the file size, but use of the file will expand the compacted elements. Reducing file size is discussed in Chapter 5.
There are five additional check boxes that will be available (depending on what work you've done to the file) to allow you to relinquish or keep permission over the elements you've previously edited. Unchecking these boxes means that you will retain ownership over all the elements you currently own with the model. This can be useful if you are planning to continue working on the same elements and only want to publish recent changes of the model.
A final check box, Save Local File Before And After Synchronizing With Central, allows you to save your changes locally, get any new changes from the central file, and then save locally again, ensuring your local copy is up-to-date. This is the longest of save options, and you might choose to uncheck this periodically if you're pressed for time or have a large file that typically takes longer to save.
- Synchronize With Central Synchronize Now

By selecting the fly-out from the Synchronize With Central button on the QAT, you'll see another save option, shown in Figure 6.17. Choosing this option allows you to bypass the Synchronize With Central dialog box and simply sync your file immediately. Keep in mind that when choosing this option, you'll be saving your changes to the central file and relinquishing all your permissions over any elements you happen to own.


Revit will remind you to save your work at regular intervals. Once worksharing is enabled, you will receive an additional reminder to synchronize with the central file as well as to save your work (Figure 6.18). You can always dismiss these dialog boxes by clicking Cancel at the lower right, but remember, it's always a good idea to save regularly so you don't lose any work.

When the Save To Central dialog box appears, you'll have three options to choose from:
Synchronize With Central, which will save identically to the Synchronize Now command
Synchronize With Central And Set Reminder Intervals, which will synchronize your file, then pull up the Options dialog box, allowing you to set the intervals in which you receive this message
Do Not Synchronize And Set Reminder Intervals, which will cancel all future reminders for the remainder of your Revit session
The reminder time shown in the dialog box can be modified at any time by clicking the Application button and selecting Options and then choosing the General tab.
It is possible to update your model and review or load work from other team members without publishing your own work back to the central file. This process, called Reload Latest, basically updates your model and refreshes the content so you can continue working with current information. Since you are only downloading content from the central file, this process only takes a portion of the time a full SWC does. To do this, click the Collaborate tab on the ribbon, and choose Reload Latest from the Synchronize panel (Figure 6.19).

Once your worksets have been established, you'll need to separate your existing model elements between those worksets. The easiest way to move elements between worksets is by subtracting them from a 3D view. The following exercise will walk you through moving elements from Workset1 to the worksets we have established using a subtractive method to locate and move the model geometry. Note this should be done by a single person who owns all the elements. This is will ensure there are no permissions issues when elements are being moved between worksets.
Open the default 3D view, {3D}, so you can see all of the model. Open the Visibility/Graphics Overrides dialog box, and choose the Worksets tab. Choose to hide all the worksets except for Workset1, and click OK. This will turn off any elements that are visible on those worksets and allow you to "subtract" elements from this view as you move them to the nonvisible worksets.
Now, depending on your model size, you have a few options:
For a smaller model, in your 3D view, select a comfortable number of elements and click the Element Properties button (if it is not active in your Project Browser). What constitutes a "comfortable" number of elements depends on your computer capabilities. Then use the Filter tool located on the Modify Elements tab to filter out all the elements that are in opposing worksets. As an example, if we select a series of elements in our Jenkins model, we can choose to keep the furniture and casework active and uncheck the remaining items. Click OK. Finally, in the Element Properties dialog box, choose a new workset (Figure 6.20).
For a larger model, it might first be necessary to select some individual components and move those separately. Although the process remains the same (select elements, change the workset using the Element Properties), the selection system can vary. Another example of moving elements by selection would be to highlight an exterior wall and use the Tab key to select a chain of exterior walls. Those can be moved to the Exterior and Structure workset.
Using the same technique, you can move the remainder of the site elements to their respective worksets. When the default 3D view is empty, you'll know that all the elements have been reassigned to new worksets.

At any point in this process, you can check your work by opening the Workset tab in the Visibility/Graphic Overrides dialog box and clearing all the boxes but one to see what is in each workset. Figure 6.21 shows the Furniture workset with all its elements.

Moving Every Instance of an Element
A quick way to move every instance of an element type to a new workset is to use the Select All Instances option from the context menu. For example, select a chair in the model and right-click it. From the context menu, choose Select All Instances
Another way to select all instances of an element is to right-click the family name in the Project Browser tree under the Family node. Simply navigate to your family in its proper category.
One of the fundamental processes in working in a workshared model is taking ownership of an element. You can do this to directly edit the element, or take ownership to keep other team members from editing an element key to your area of responsibility or your design process.
Determining whether you own an element is fairly easy. Simply select it. It will highlight in blue. If you do not own it, you will see three blocks, as shown in Figure 6.22. To take permission of an unowned element, simply click the stack of blocks. If you already own an element, you won't see any blocks, but the element will still highlight in blue.

There are a few other ways you can obtain ownership of an element or group of elements:
Using the Workset dialog box, you can obtain permission of any workset and all the elements contained therein.
Using the technique we just discussed, you can highlight any element or series of elements and take permission of them by clicking the blue stack of boxes.
If you edit, move, or modify any element in Revit, Revit will automatically grant you permission over the element.
You can right-click any element and choose Make Elements Editable from the context menu (see Figure 6.23). Note that you also have the ability to make editable the entire workset this object is on.
You can right-click any element in the Project Browser under the Family node. In the context menu that appears, you can take ownership of a group or name of elements.

Using any of these options, if it is already owned by another team member, Revit will alert you and you will not be able to modify the element or take permission of it.

It's human nature: eventually an accident will occur on a project, and elements will get modified or deleted unexpectedly. It's important to know how to recover when these accidents occur.
On one project we worked on, someone new to Revit and new to the team was working on detailing windows in a three-sided building. In the detailing process, he somehow deleted one of the walls in the project. By deleting the wall, he also deleted the elevation as well as all the wall sections associated with that wall, along with any of the details in plan and section. When the new team member deleted the element, he wasn't aware of the mistake and then performed Synchronize With Central, publishing all the deletions to other team members. Fortunately, we caught the mistake before everyone performed a Synchronize With Central, and we did not have to resort to restoring the model from the previous night's backup. We were able to use another team member's local file to create a new central file, thereby minimizing the loss of work. Once everyone on the team made a new local copy, we were back in business.
Had the deleted elements been more isolated (like a conference room layout), recovery would have been much less invasive. In such a case, you simply group all the elements you would like to save, then right-click the group in the Project Browser. You'll have the option to save the group out of the file, which can then be inserted into a different file and ungrouped again.
When working in a worksharing project, it is not always necessary to take ownership of an entire workset in order to begin editing elements. As we discussed earlier in this chapter, it is possible to take permission of singular elements (one by one or in groups). This process is referred to as borrowing.
By borrowing elements, team members can take ownership of only portions of a workset, leaving the remainder of the workset to be edited by someone else. Taking permission of elements in this style creates a more "take what you need" approach to editing and usually results in less overlap between team members.
If you need to work on an element that already belongs to someone else, Revit will alert you that the element(s) have already been checked out, and you'll be given the option to request permission.
Borrowing is a critical concept in Revit for multiuser teams; it allows users to transfer permission of objects without having to constantly save all their work to the central file and relinquish all worksets. Let's look at this interchange of permissions in more detail.
Imagine you are happily working away on your model in a workshared environment and you realize that someone else is an owner of an element that you need to modify. What do you do? When that situation occurs, you will be presented with a dialog box that allows you to request permission of that element from the other user (Figure 6.24). This will happen every time you are working in a model with worksharing enabled and you attempt to modify (even if it's indirectly) an element owned by another team member.

Looking at the dialog box, you have two options:
You can click Cancel and not take permission of the element and then focus your efforts on another part of the design.
You can click Place Request to ask your team member to relinquish permission over the element in question. When you click Place Request, the dialog box shown in Figure 6.25 opens.

Once you have placed your request, you're in a bit of a holding pattern. You cannot continue to edit this element until the other user has granted permission over it, and you cannot continue working on other portions of the project. It is also important to note that the other team member will not receive any notification through Revit that you have placed a request. You will need to contact the team member so your permission can be granted, and you can get back to work.
Once you've made your request known to your team member, you can click Check Now and see whether the request has been granted or whether there are additional steps you'll need to take to gain permission over that element. While this is happening, you always have the option to click Continue. This will undo your most recent edit to the element you are attempting to borrow and let you get back to working on another portion of the project.
Once the other user has granted your editing request and you click Check Now, you'll see the dialog box shown in Figure 6.26, alerting you that your permission has been granted and you can resume your workflow with your edits intact.

Now suppose you are on the other end of this scenario, where you have been working away and you receive a call or IM or visit from someone looking to acquire permission for an element you own in the model. How do you grant permission?
On the Worksets panel of the Collaborate tab, there is a button called Editing Requests. Clicking this button will open a dialog box allowing you to see all the outstanding requests you have for elements in the model.
To deal with the request for permission, you have a few options, as shown in Figure 6.27:
- Grant
Gives permission for the requested element to your team member
- Deny/Retract
Denies permission to your team member
- Show
Shows you which element or elements have been requested to help you make an informed decision
Once you are ready to grant permission of the element, one of two things will happen. If there have been no edits to the element, you can simply click Grant and the permission for the element will be transferred to your team member.
If you have made edits to this element or one that is dependent or hosted to the element in question, you will be alerted that you'll need to SWC before the permission can be switched. Your team member on the other end will also need to SWC to receive the recent changes, and then they can begin editing the most recent version of that element. Permission requests that require an SWC are flagged in this dialog box by an asterisk next to the permission request.

It is not always necessary to wait for a request from another team member to relinquish permission over your elements. Fortunately in Revit, there is a tool to do just that. On the Worksets panel of the Collaborate tab is a button called Relinquish All Mine (Figure 6.28). This feature returns the permissions for any elements you have not edited back to the central file so they are freely available to the rest of your team.
Eventually, you will need to close your project and Revit and leave for lunch or go home for the day. Don't worry—the project will still be there tomorrow. But in the meantime, it's important to understand how to close the project correctly so you don't accidentally leave the office and maintain permission over any elements. This situation—where a team member has accidentally left the office and not closed Revit or relinquished permissions—leaves the other team members without a way to edit those elements or even request permission. So that you are not the unfortunate victim of their wrath upon your return, make sure you close Revit properly.
The most thorough way to close the file is to simply quit the application completely. You can do this by clicking the red X at the upper right or clicking the Application button and selecting Close. Both will provide the same results. You'll be presented with a dialog box asking you to save your file locally. After that, you'll see a second dialog box asking you to Synchronize With Central (Figure 6.29). As we noted, if you do not SWC, your changes will not appear on the network for other users to see and you'll maintain permission over some of your elements.

Sometimes you've opened a file to do something simple such as review a detail or print a set. You might have inadvertently taken permission over an element or group of elements but not performed any edits. On closing the file, you'll get a dialog box like Figure 6.30, alerting you that you have permissions that need to be reconciled. Again, the proper workflow is to choose to relinquish elements and worksets.

- Understand key worksharing concepts.
Once the team has created local files, it is necessary to understand how to keep both the local file and central file up-to-date as changes occur on the project. This ensures that everyone is working from an updated and recent copy of the model at all times.
- Master It
Once you've begun working out of your local file, how do you publish your changes to the central file? How do you download changes from the central file to your local file?
- Use worksharing in your project.
Knowing how to activate and utilize worksharing is indispensible to working in a team environment using Revit.
- Master It
How do you transition a single-user Revit file to a multiuser environment using worksharing?
- Manage workflow with worksets.
Once the central file has been created, you'll need to organize and structure the model into logical worksets to maintain workflow with Revit.
- Master It
How do worksets differ from layers in 2D CAD? What are some logical ways to create worksets within a model?
- Understand element ownership in worksets.
Editing elements in a central file means you have sole ownership over further changes to those elements. Understanding the permissions will be critical to working in a team.
- Master It
How do you edit an element in the model if someone has already taken permission of it in a worksharing environment?