
Chapter 5. Extending Map Interactions
The basics of mapping in Drupal are fairly simple: create your configuration in Drupal with PHP; send that configuration to the web browser; do a bit of custom JavaScript processing; and then let your chosen JavaScript library, such as Google Maps, do its magic. How this gets constructed varies from module to module; in the last two chapters we have shown how to build the basic setup with both Location and GMap, and with Geofield and OpenLayers. This chapter will focus on creating richer interactions for your users by adding onto those two architectures. With this understanding, you can do things like animate your map or display a real-time map of Foursquare checkins.
This will involve writing code. We do not expect you to be a Drupal rockstar, but we do make some basic assumptions: you know how to create a simple Drupal module, and you know what a Drupal hook is. The most advanced expectation is that you know the basics of how JavaScript is used in Drupal.
Note
If you have never written a Drupal module, don’t worry, there is help to get you started. Read the Drupal.org documentation on how to write a module. If you are unfamiliar with the Drupal API, there is a complete reference at api.drupal.org. There is no definitive guide to JavaScript in Drupal, but a good place to start is the JavaScript section of Working with the Drupal API.
In this chapter, we will go through an example of extending both the GMap module and OpenLayers module with HTML5 Geolocation functionality: the website user’s position is imported from their smartphone or computer and the map is centered on them. Creating the same feature in both GMap and OpenLayers gives an insight into the differences in their architecture. If you are not familiar with HTML5 Geolocation, check out the W3C specification or take a look at the geolocation demo from HTML5 Demos.
GMap
In previous chapters, the GMap module was used to improve the user interface for adding addresses to content (Extending the Location module with the GMap module) and also to integrate with Views to create maps of content (Mapping with the GMap Module). We will now dig into the module’s architecture and use PHP and JavaScript to add the HTML5 Geolocation Behavior.
Architecture
The GMap module follows the standard method of mapping in Drupal: create a configuration object in the Drupal interface, then send the configuration object over to the web browser for the Google Maps JavaScript library to handle.
GMap stores its configurations as either a PHP array or a macro (see Extending the Location module with the GMap module for an explanation of macros).
Note
The GMap module builds maps based on the default map defined at admin/config/services/gmap. This means that new map configurations that you create are overriding or adding to this default.
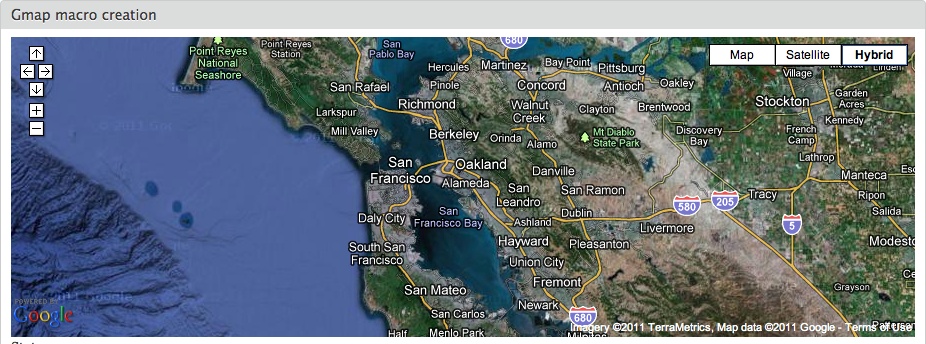
This GMap macro shows a satellite hybrid map centered on San Francisco:
[gmap zoom=9 |center=37.77071473849608,-122.24761962890625 |width=100%
  |height=300px |control=Small |type=Hybrid]
The macro above is equivalent to the following PHP array:
$map = array(
  'zoom' => '9',
  'width' => '100%',
  'height' => '300px',
  'maptype' => 'Hybrid',
  'controltype' => 'Small',
  'longitude' => '-122.24761962890625',
  'latitude' => '37.77071473849608',
  'id' => 'auto1map',
);
Each of these will generate a map that looks like look the one shown in Figure 5-1.
Geolocation Example
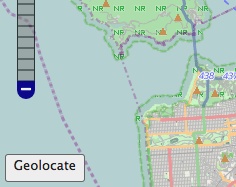
For our example, we will build a Drupal module that provides a geolocation Behavior for GMap by writing code that will hook into the GMap architecture. This module will work in two ways. First, there will be a link next to the map, which someone using the site can click to center the map on their location. Second, the administrator of the site will be able to change a setting so that whenever someone visits the website, the map automatically centers on their location. However, this will require each user to allow their phone or computer to access their location. The code for all of this will be done in a custom module called mappingdrupal_gmap_extensions. The steps for creating this module are:
Create a Drupal block to hold the link that can be used to update the map.
Hook into the GMap execution to add some options for the map.
Hook into the GMap execution to add some JavaScript.
Bind the geolocation interaction to the map with JavaScript.
This will create the interface shown in Figure 5-2.

Creating the geolocation block
The block that we are creating will contain a link so that a user can allow our website to use their location to center the map on them. There is nothing specific to making maps in this first section; we are just creating a block.
The assumption here is that you have your mappingdrupal_gmap_extensions.info file defined and now are working in a blank mappingdrupal_gmap_extensions.module file.
The first step is to define our new block with hook_block_info():
<?php
/**
 * @file
 * Main module file for Mapping with Drupal GMap Extensions module.
 *
 * Provides basic examples to show how to extend the GMap module.
 */

/**
 * Implements hook_block_info().
 */
function mappingdrupal_gmap_extensions_block_info() {
  // Provide a block for user to choose to geolocate
  // themselves.
  $blocks['gmap_geolocate'] = array(
    'info' => t('GMap Geolocate'),
  );

  return $blocks;
}
The next step is to use the hook_block_view()
function to create the link that will be displayed by the
block:
/**
 * Implements hook_block_view().
 */
function mappingdrupal_gmap_extensions_block_view($delta = '') {
  $block = array();

  switch ($delta) {
    case 'gmap_geolocate':
      $block['subject'] = t('Geolocate Yourself'),
      $block['content'] = array(
        '#theme' => 'mappingdrupal_gmap_extensions_block_content',
      );
      break;
  }

  return $block;
}
For the block output, we are using Drupal Render Arrays, a standard way of building a page in Drupal. We have to define a theme function for the rendering:
/**
 * Implements hook_theme().
 */
function mappingdrupal_gmap_extensions_theme($existing, $type, $theme, $path) {
  return array(
    'mappingdrupal_gmap_extensions_block_content' => array(
      'variables' => array(),
    ),
  );
}
Finally, we define the default implementation of the theme function. Our goal here is to create a link in HTML that we can reference from our JavaScript; we will do this with a specific class name, “mappingdrupal-gmap-geolocate-action.” We will also hide this link using inline CSS in case the browser does not support HTML5 geolocation:
/**
 * Theme callback for block content.
 */
function theme_mappingdrupal_gmap_extensions_block_content() {
  return '<a class="mappingdrupal-gmap-geolocate-action"
    style="display:none;"></a>';
}
Add geolocation options to maps
Our next step is to add some configuration options to the “Map
Behavior Flags” form at
admin/config/services/gmap. These configuration
options will allow the administrator of the site to decide whether
users should be geolocated automatically, or whether the link to
geolocate will be displayed. This is accomplished by using the
hook_gmap() function provided by
the GMap module.
Warning
At the time of this writing, this functionality did not work as intended. The options are available in the configuration form, but the chosen settings were not available to our code when rendering the map. Later in this exercise, where the bug impacts our code, we provide a way to work around this problem. This issue should be resolved soon. For updates you can read the bug report in the GMap module’s issue queue.
/**
* Implements hook_gmap().
*/
function mappingdrupal_gmap_extensions_gmap($op, &$map) {
// For documentation on this hook, look at the
// gmap.php file in the gmap module.
switch ($op) {
case 'behaviors':
return array(
'geolocate_auto' => array(
'title' => t('Geolocate user automatically'),
'default' => FALSE,
'help' => t('This will geolocate the user on each page load and
focus the map there.'),
),
'geolocate_block' => array(
'title' => t('Geolocate user with block link'),
'default' => FALSE,
'help' => t('This will geolocate the user only if they use
the action on the GMap Geolocate block.'),
),
);
}
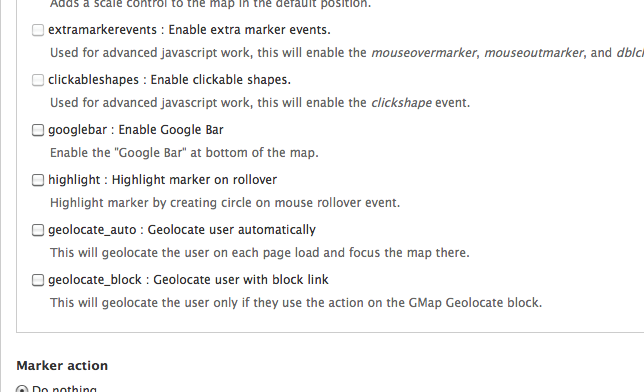
}The hook_gmap() function
accepts an $op (operation)
parameter to determine what part of rendering
we are at, as well as a $map
parameter so that we can alter the map along the way. The above code
hooks into the behaviors operation
to add two options: “Geolocate user automatically” and “Geolocate user
with block link.” You will see these options in the GMap interface at
admin/config/services/gmap (Figure 5-3 shows the options).
Note
There is some documentation on this hook found directly in the GMap module in the file gmap.php.
Add JavaScript
Now that we have the configuration, we need to add our
client-side JavaScript (the code that runs in the user’s browser to
generate the map and our geolocation Behavior). We could add the
JavaScript to every page though our module’s .info file, but this would slow down the
rest of the site by adding unnecessary JavaScript. We only need this
JavaScript when maps are generated with the GMap module. Luckily,
hook_gmap() gives us an opportunity
to do things when the map is rendered and before the markup is
generated, through the pre_theme_map operation. Let’s add that now.
The following is the hook_gmap()
implementation. We use drupal_add_js() to include our
JavaScript file:
/**
 * Implements hook_gmap().
 */
function mappingdrupal_gmap_extensions_gmap($op, &$map) {
  // For documentation on this hook, look at the
  // gmap.php file in the gmap module.

  switch ($op) {
    case 'pre_theme_map':
      // We should check if the behavior is enabled, but it does not
      // seem to be available here.
      drupal_add_js(drupal_get_path('module', 'mappingdrupal_gmap_extensions') .
        '/mappingdrupal_gmap_extensions.js'),
      break;

    case 'behaviors':
      return array(
        'geolocate_auto' => array(
          'title' => t('Geolocate user automatically'),
          'default' => FALSE,
          'help' => t('This will geolocate the user on each page load and
            focus the map there.'),
        ),
        'geolocate_block' => array(
          'title' => t('Geolocate user with block link'),
          'default' => FALSE,
          'help' => t('This will geolocate the user only if they use
            the action on the GMap Geolocate block.'),
        ),
      );
      break;
  }
}
Bind interactions to the map
Finally, we will bind some interactions to the map. Up until this point we were just setting things up; this is where we will actually make the map do something. The first step is to provide a basic container for the functionality and make a geolocation function to get the user’s location from their phone or computer.
Note
We are using Drupal’s JavaScript Behaviors. Behaviors in Drupal are a way of attaching JavaScript functionality to elements on a page. Almost all JavaScript written for Drupal should use Behaviors. Documentation on JavaScript for Drupal is a little sparse, but a good place is Managing JavaScript in Drupal.
For finding the user’s location, we use the HTML5 Geolocation API. Note that not all browsers can take advantage of this. It is supported by Internet Explorer 9 and later, Firefox 3.5 and later, Chrome 5.0 and later, Safari 5.0 and later, and Opera 10.60 and later.
/**
 * @file
 * Main JavaScript file for Mapping with Drupal GMap Extensions module.
 *
 * Provides geolocation functionality for a GMap.
 */

// Namespace $ for jQuery.  This ensures that $ will
// actually equal the jQuery function.
(function($) {

/**
 * Wrap handlers in a Drupal behavior so that
 * we can be sure that everything is available.
 */
Drupal.behaviors.mappingdrupal_gmap_extensions = {
  'attach': function(context, settings) {
    // The following ensures that the behavior is only performed
    // once.  Since we are adding a handler for all GMap maps,
    // we are not concerned with context.
    $('body').once(function() {

      // More code to go here later in the tutorial.

    });
  },

  // General function to geolocate user.
  'geolocate': function(map) {
    // First ensure that the HTML5 geolocation controls
    // are available.  We might use some more helpful
    // libraries for this, like Modernizr
    if (typeof navigator != 'undefined' &&
      typeof navigator.geolocation != 'undefined') {
      navigator.geolocation.getCurrentPosition(function (position) {
        lat = position.coords.latitude;
        lng = position.coords.longitude;
        map.setCenter(new google.maps.LatLng(lat, lng));
        map.setZoom(11);
      });
    }
  }
};

})(jQuery);
Let’s break this down a bit. First, we wrap all our code in the
following block to ensure that the dollar sign variable, $, is actually the jQuery function. This is important if there
are other libraries included that want to use this variable:
// Namespace $ for jQuery.  This ensures that $ will
// actually equal the jQuery function.
(function($) {

// ...

})(jQuery);
The next part is where we use Drupal’s Behaviors. The property
that we add onto Drupal.behaviors
is up to us, but it must be uniquely named, so it is good to prefix it
with the name of your module:
/**
 * Wrap handlers in a Drupal behavior so that
 * we can be sure that everything is available.
 */
Drupal.behaviors.mappingdrupal_gmap_extensions = {

  // ...

};
Drupal Behaviors expect an attach function (and optionally a detach function) that will be fired whenever
the Drupal.attachBehaviors method
is called (for instance, on page load or when new elements are added
with an AJAX call). Since we do not know how often Drupal.attachBehaviors will be called and
why, we use the .once() method to
ensure our code is only run once per page. We are adding this as a
placeholder for now; we will add code to this part of the function in
a later step of this tutorial:
  'attach': function(context, settings) {
    // The following ensures that the behavior is only performed
    // once.  Since we are adding a handler for all Gmap maps,
    // we are not concerned with context.
    $('body').once(function() {

      // More code to go here later in the tutorial.

    });
  },
Now we add our own custom method to Drupal.behaviors.mappingdrupal_gmap_extensions
to do the geolocation. Our method takes in the Google Maps API map
object, then performs the HTML5 geolocation lookup; if a location is
found, the map gets centered on it.
Note
This geolocate function
could be in a separate JavaScript object, but since we already have
this object to add to, this will help keep our code tidy.
  // General function to geolocate user.
  'geolocate': function(map) {
    // First ensure that that the HTML5 geolocation controls
    // are available.  We might use some more helpful
    // libraries for this, like Modernizr
    if (typeof navigator != 'undefined' &&
      typeof navigator.geolocation != 'undefined') {
      navigator.geolocation.getCurrentPosition(function (position) {
        lat = position.coords.latitude;
        lng = position.coords.longitude;
        map.setCenter(new google.maps.LatLng(lat, lng));
        map.setZoom(11);
      });
    }
  }
So far we have created a JavaScript behavior that will get a user’s location. Now we need to write some code that will use the GMap module’s JavaScript API to allow our geolocation behavior to change the map. Here is the complete JavaScript file:
/**
 * @file
 * Main JavaScript file for Mapping with Drupal GMap Extensions module.
 *
 * Provides geolocation functionality for a Gmap.
 */

// Namespace $ for jQuery.  This ensures that $ will
// actually equal the jQuery function.
(function($) {

/**
 * Wrap handlers in a Drupal behavior so that
 * we can be sure that everything is available.
 */
Drupal.behaviors.mappingdrupal_gmap_extensions = {
  'attach': function(context, settings) {
    // The following ensures that the behavior is only performed
    // once.  Since we are adding a handler for all GMap maps,
    // we are not concerned with context.
    $('body').once(function() {
      // Add a handler to the map
      Drupal.gmap.addHandler('gmap', function(elem) {
        var gmap = this;

        // gmap (this) is the main gmap module with the following
        // main properties:
        // - map: The Google Maps API object.
        // - vars: The configuration passed from Drupal.
        //
        // elem is the DOM object that holds the Google Map.

        // The ready event is fired when things are ready with
        // the map.
        gmap.bind('ready', function() {
          // Normally should check the map object to see if the
          // geolocation behavior has been enabled for this website,
          // but it does not seem to be available.
          Drupal.behaviors.mappingdrupal_gmap_extensions.geolocate(gmap.map);

          // Again, we would normally check the map object to see
          // if this behavior has been enabled, but for some reason
          // this setting it is not available.
          //
          // We utilize jQuery to turn out block into a link
          // to update the map with user's location.
          $('.mappingdrupal-gmap-geolocate-action')
            .show()
            .html(Drupal.t('Find me on the map.'))
            .click(function(e) {
              Drupal.behaviors.mappingdrupal_gmap_extensions.geolocate(gmap.map);
              e.preventDefault();
            });
        });
      });
    });
  },

  // General function to geolocate user.
  'geolocate': function(map) {
    // First ensure that that the HTML5 geolocation controls
    // are available.  We might use some more helpful
    // libraries for this, like Modernizr
    if (typeof navigator != 'undefined' &&
      typeof navigator.geolocation != 'undefined') {
      navigator.geolocation.getCurrentPosition(function (position) {
        lat = position.coords.latitude;
        lng = position.coords.longitude;
        map.setCenter(new google.maps.LatLng(lat, lng));
        map.setZoom(11);
      });
    }
  }
};

})(jQuery);
To interact with the map, we use the Drupal.gmap.addHandler JavaScript method,
which allows us to interact with two things: the map object itself and
the configuration that is specific to the GMap module:
      Drupal.gmap.addHandler('gmap', function(elem) {
        var gmap = this;

        // gmap (this) is the main gmap module with the following
        // main properties:
        // - map: The Google Maps API object.
        // - vars: The configuration passed from Drupal.
        //
        // elem is the DOM object that holds the Google Map.

        // The ready event is fired when things are ready with
        // the map.

        // ....

      )};
In this section of the JavaScript, since we have access to the
map object, we can bind event handlers to the map object.
Specifically, we will bind an event handler to the ready state, which is the event that happens
when the map is first loaded by the user. Within this event handler,
we do two things. The first is to geolocate the user as soon as the
map is ready using our geolocation method we created above. The second
is to display the link we created in our block which, when clicked,
will do the same geolocation of the user:
        // The ready event is fired when things are ready with
        // the map.
        gmap.bind('ready', function() {
          // Normally should check the map object to see if the
          // geolocation behavior has been enabled for this website,
          // but it does not seem to be available.
          Drupal.behaviors.mappingdrupal_gmap_extensions.geolocate(gmap.map);

          // Again, we would normally check the map object to see
          // if this behavior has been enabled, but for some reason
          // this setting it is not available.
          //
          // We utilize jQuery to turn out block into a link
          // to update the map with user's location.
          $('.mappingdrupal-gmap-geolocate-action')
            .show()
            .html(Drupal.t('Find me on the map.'))
            .click(function(e) {
              Drupal.behaviors.mappingdrupal_gmap_extensions.geolocate(gmap.map);
              e.preventDefault();
            });
        });
And that is it! We now have a way of geolocating the user and centering the map to that location. In the next section, we will do the same task, but with the OpenLayers module.
OpenLayers
The OpenLayers module has been in development for a few years and has a more contemporary architecture and API than the GMap module. There is plenty of documentation around the OpenLayers module in the module’s code and on Drupal.org, but the easiest way to learn the API is to find something in the code that is similar to what you want to do and learn from that by adapting it.
Architecture
The OpenLayers module architecture is more complicated than the GMap module, but the basic structure is still the same as described at the beginning of this chapter: we create a configuration object in PHP; we send the object to the client (web browser) to be processed with JavaScript; and finally the object is rendered by the OpenLayers library. The main difference is that the OpenLayers module separates out aspects of the map creation into Layers, Styles, Behaviors, and Maps, as outlined in Mapping with the OpenLayers Module.
The architecture of the OpenLayers module is based on a widely used Drupal module called CTools. The CTools module provides APIs and tools to do a broad range of things in Drupal more easily, including multistep forms, displaying modal windows, and handling AJAX requests. The most important role that the CTools module plays in OpenLayers is that it allows for plug-ins. CTools plug-ins is an architecture that activates code within other modules so that they carry out extra tasks or interact with one another in various useful ways. Layer Types and Behaviors are examples of CTools plug-ins. The Layer Types are plug-ins that handle the processing of different layers available for the map. Behavior plug-ins allow for interaction code to be added to the map (for instance the geolocation behavior, which is what we will do in this tutorial).
The other part of the CTools module that is used by OpenLayers is exportables. Layers, Styles, and Maps are all CTools exportables. A CTools exportable is a data record that can be stored in the database or exported in code. Exportables are covered in Chapter 7.
Note
The CTools module provides most of its documentation within the module itself, and this documentation will be available on your site if you enable the Advanced Help module.
One straightforward example of an OpenLayers map configuration object is just the default map taken from the module itself. The map configuration object is an example of a CTools exportable. To see this exportable code, go to the OpenLayers maps page on your site at admin/structure/openlayers/maps and click the Export link next to one of the maps that you created in an earlier tutorial. Here is the code that you would export:
$default = new stdClass();
$default->api_version = 1;
$default->name = 'default';
$default->title = t('Default Map'),
$default->description = t('This is the default map that comes
  with the OpenLayers module.'),
$default->data = array(
  'projection' => '900913',
  'width' => 'auto',
  'height' => '400px',
  'default_layer' => 'osm_mapnik',
  'center' => array(
    'initial' => array(
      'centerpoint' => '0,0',
      'zoom' => '2'
    )
  ),
  'displayProjection' => '4326',
  'maxExtent' => openlayers_get_extent('4326'),
  'behaviors' => array(
    'openlayers_behavior_panzoombar' => array(),
    'openlayers_behavior_layerswitcher' => array(),
    'openlayers_behavior_attribution' => array(),
    'openlayers_behavior_keyboarddefaults' => array(),
    'openlayers_behavior_navigation' => array(),
  ),
  'layers' => array(
    'osm_mapnik' => 'osm_mapnik',
  )
);
This map is shown in Figure 5-4.

Geolocation Example
We are going to build a Geolocation extension to the OpenLayers module, much like we did with the GMap example in Geolocation Example. This extension will do two things: first, it will geolocate the user and center the map on that position; second, it will provide a mechanism for the user to update the map with their position. Both of these will be configurable by administrators of the site.
OpenLayers already has a geolocation control that comes with the library itself, but only for the 2.11 version of the OpenLayers JavaScript library. The geolocation control that we will create will not depend on a specific version of the OpenLayers library. All the code for this example can be found in the custom module mappingdrupal_ol_extensions. The steps we will go through are the following:
Tell OpenLayers about our new Behavior.
Define the new Behavior plug-in object.
Geolocate the user with JavaScript.
Use CSS to clean up the appearance.
This will produce the map shown in Figure 5-5, although the map will show your own current location, rather than that of the author!

Define Behavior
OpenLayers Behaviors are defined and explained in Exploring OpenLayers Behaviors. Most of the Behaviors
that come with the module are implementations of the OpenLayers
library Controls. The first step of our example is to tell
OpenLayers about our new Behavior plug-in. This is done with hook_openlayers_behaviors(). The following
is the complete .module file (we
are assuming you have already made your .info file):
<?php
/**
 * @file
 * Main module file for Mapping with Drupal OpenLayers Extensions module.
 *
 * Provides basic examples to show how to extend the OpenLayers module.
 */

/**
 * Implements hook_openlayers_behaviors().
 */
function mappingdrupal_ol_extensions_openlayers_behaviors() {
  // For more documentation on writing OpenLayers behaviors,
  // see the docs/BEHAVIORS.txt within the OpenLayers module.

  return array(
    'mappingdrupal_ol_extensions_geolocate' => array(
      'title' => t('HTML Geolocate'),
      'description' => t('Allows for geolocation of the user
        utilizing HTML5.'),
      'behavior' => array(
        'path' => drupal_get_path('module', 'mappingdrupal_ol_extensions') .
          '/behaviors',
        'file' => 'mappingdrupal_ol_extensions_geolocate.inc',
        'class' => 'mappingdrupal_ol_extensions_geolocate',
        'parent' => 'openlayers_behavior',
      ),
    ),
  );
}
The hook_openlayers_behaviors() function returns
an array, which has the ID of the Behavior as its key. This array
contains another array with the following data:
The
titleis the name of the Behavior and will show up in the administrative interface.The
descriptionis used in the administrative interface as well, to give guidance on the purpose of the Behavior.The
behavioritem is another array (Drupal loves nested arrays), describing where we will find the plug-in. This Behavior plug-in is a file.
The Behavior plug-in object
Now that we have told OpenLayers about where our Behavior plug-in file will be, we will need to create that file and define the Behavior behavior. We will add some configuration options to the Behavior so that the administrative user can choose how the map behaves. There are three options to be made available: whether to geolocate on page load; whether to create a button for geolocating; and what zoom level to go to when centering the map.
The first step is to create a subfolder in our module called
behaviors. In that subfolder, we
will create a new file named mappingdrupal_ol_extensions_geolocate.inc.
The following is the complete file.
Note
Our Behavior does not necessarily have to be in a behaviors folder. We defined the name of
the file and where it lives in hook_openlayers_behaviors() in Define Behavior.
In upcoming versions of the OpenLayers module, Behaviors will
be using a new CTools interface for plug-ins; this will involve
telling CTools where plug-ins are found, and then putting the
.inc files in this place along
with some extra metadata. However, the method described here will
still work.
<?php
/**
 * @file
 * Implementation of OpenLayers behavior for HTML5 geolocation.
 */

/**
 * Geolocation behavior.
 */
class mappingdrupal_ol_extensions_geolocate extends openlayers_behavior {
  /**
   * Provide initial values for options.
   */
  function options_init() {
    return array(
      'on_load' => FALSE,
      'button' => TRUE,
      'zoom' => 11,
    );
  }

  /**
   * Provide form for configurations per map.
   */
  function options_form($defaults) {
    return array(
      'on_load' => array(
        '#title' => t('Geolocate on load'),
        '#type' => 'checkbox',
        '#description' => t('When checked, the map will geolocate the user
          and zoom in when the map first loads.'),
        '#default_value' => isset($defaults['on_load']) ?
          $defaults['on_load'] : FALSE
      ),
      'button' => array(
        '#title' => t('Geolocate button'),
        '#type' => 'checkbox',
        '#description' => t('When checked, provides a button on the map that
          will geolocate the user.'),
        '#default_value' => isset($defaults['button']) ?
          $defaults['button'] : TRUE
      ),
      'zoom' => array(
        '#title' => t('Zoom level'),
        '#type' => 'textfield',
        '#description' => t('Determine the zoom level when geolocating.  Higher
          is more zoomed in.'),
        '#default_value' => isset($defaults['zoom']) ?
          $defaults['zoom'] : 11
      ),
    );
  }

  /**
   * Render.
   */
  function render(&$map) {
    drupal_add_css(drupal_get_path('module', 'mappingdrupal_ol_extensions') .
      '/behaviors/mappingdrupal_ol_extensions_geolocate.css'),
    drupal_add_js(drupal_get_path('module', 'mappingdrupal_ol_extensions') .
      '/behaviors/mappingdrupal_ol_extensions_geolocate.js'),
    return $this->options;
  }
}
That is a fair amount of code, but it is really only a few parts, so let’s break it down:
/**
 * Geolocation behavior.
 */
class mappingdrupal_ol_extensions_geolocate extends openlayers_behavior {

  // ...

}
We define a new class. The class name mappingdrupal_ol_extensions_geolocate was
defined in the first step of the example in Define Behavior, and it extends openlayers_behavior, which is a base class
defined in the OpenLayers module. The mappingdrupal_ol_extensions_geolocate class
contains several methods; the first of these
methods is options_init():
  /**
   * Provide initial values for options.
   */
  function options_init() {
    return array(
      'on_load' => FALSE,
      'button' => TRUE,
      'zoom' => 11,
    );
  }
The options_init() method
returns an array of default values that we have now chosen for our
configuration options:
  /**
   * Provide form for configurations per map.
   */
  function options_form($defaults) {
    return array(
      'on_load' => array(
        '#title' => t('Geolocate on load'),
        '#type' => 'checkbox',
        '#description' => t('When checked, the map will geolocate the user
          and zoom in when the map first loads.'),
        '#default_value' => isset($defaults['on_load']) ?
          $defaults['on_load'] : FALSE
      ),
      'button' => array(
        '#title' => t('Geolocate button'),
        '#type' => 'checkbox',
        '#description' => t('When checked, provides a button on the map that
          will geolocate the user.'),
        '#default_value' => isset($defaults['button']) ?
          $defaults['button'] : TRUE
      ),
      'zoom' => array(
        '#title' => t('Zoom level'),
        '#type' => 'textfield',
        '#description' => t('Determine the zoom level when geolocating.  Higher
          is more zoomed in.'),
        '#default_value' => isset($defaults['zoom']) ?
          $defaults['zoom'] : 11
      ),
    );
  }
The options_form() method
takes in default values from the map object, and returns a Drupal form
array for the configuration options of our Behavior. If you are unsure
of how to create this array, please see the reference on the Drupal
Form API. When adding or editing maps, you can see these form
items if you go to the OpenLayers Map interface at
admin/structure/openlayers/maps, and go to the
Behaviors section. The form is shown in Figure 5-6:
  /**
   * Render.
   */
  function render(&$map) {
    drupal_add_css(drupal_get_path('module', 'mappingdrupal_ol_extensions') .
      '/behaviors/mappingdrupal_ol_extensions_geolocate.css'),
    drupal_add_js(drupal_get_path('module', 'mappingdrupal_ol_extensions') .
      '/behaviors/mappingdrupal_ol_extensions_geolocate.js'),
    return $this->options;
  }
Finally the render() method
is called when the map is rendered for display. The map object is
passed to the render() method in
case there is any last-minute configuration to add to the map. In our
example, we are adding a JavaScript file to add interaction to the map
and a CSS file to make things look nicer.
JavaScript interactions
In the behaviors subfolder,
create a new file named mappingdrupal_ol_extensions_geolocate.js. As
with the GMap module, we will be using Drupal Behaviors to interact
with elements on the page, including the OpenLayers map. First, set up
the basic Drupal Behavior and geolocation method:
/**
 * @file
 * JS Implementation of OpenLayers behavior for Geolocation.
 */

// Namespace $ to jQuery
(function($) {

/**
 * Geolocation Behavior
 */
Drupal.behaviors.mappingdrupal_ol_extensions_geolocate = {
  'attach': function(context, settings) {

    // ...

  },

  // Method to geolocate user.
  'geolocate': function(map, zoom) {
    // First ensure that the HTML5 geolocation controls
    // are available.  We might use some more helpful
    // libraries for this, like Modernizr
    //
    // We have to make sure we are explicit of the projection
    // as latitude and longitude are different from
    // spherical mercator (or other possiblilities).
    if (typeof navigator != 'undefined' &&
      typeof navigator.geolocation != 'undefined') {
      navigator.geolocation.getCurrentPosition(function (position) {
        var center = new OpenLayers.LonLat(
          position.coords.longitude,
          position.coords.latitude
        ).transform(
          new OpenLayers.Projection("EPSG:4326"),
          map.getProjectionObject()
        );
        map.setCenter(center, zoom);
      });
    }
  }
};

})(jQuery);
The first step is to define a new Drupal Behavior, mappingdrupal_ol_extensions_geolocate, and
create an attach method for this
Behavior. The attach method is
empty at this point; we will add code here later. The second step is
to create a JavaScript method for geolocating,
geolocate, that accepts an
OpenLayers map object and a zoom level.
Next we will add our OpenLayers Behavior wrapper within the
attach method that we just
created:
    var data = $(context).data('openlayers'),
    if (data && data.map.behaviors['mappingdrupal_ol_extensions_geolocate']) {
      // Data about the map configuration and the map itself are stored
      // with jQuery's .data() functionality on the element that
      // contains the map.
      //
      // You can access the following from the data variable:
      // - data.map: The map configuration object.
      // - data.openlayers: The OpenLayers map object.

      // This makes it easy to reference the local behavior options.
      var options = data.map.behaviors['mappingdrupal_ol_extensions_geolocate'];

      // ...

    }
The OpenLayers module uses the data() method of jQuery to
store the map configuration settings. The settings are attached to the
DOM element that contains our map. Our first step shown above is to
get any data that is attached to the map object and check if
OpenLayers data is stored there. We then check if our geolocation
behavior is enabled. Finally, we add a an options variable that gets the configuration
for our geolocation Behavior.
Next we will add the code that actually calls our geolocate method when necessary:
      // First, check if the option to geolocate on load is
      // enabled.
      if (options.on_load) {
        Drupal.behaviors.mappingdrupal_ol_extensions_geolocate.geolocate(
          data.openlayers, options.zoom);
      }

      // Then check if a button was enabled.  We are utilizing
      // OpenLayers Button and Panels Controls for this,
      // but this could be any sort of button.
      if (options.button) {
        var button = new OpenLayers.Control.Button({
          displayClass: 'mappingdrupal-ol-geolocate-button',
          title: Drupal.t('Geolocate'),
          trigger: function() {
            Drupal.behaviors.mappingdrupal_ol_extensions_geolocate.geolocate(
              data.openlayers, options.zoom);
          }
        });
        var panel = new OpenLayers.Control.Panel({
          displayClass: 'mappingdrupal-ol-geolocate-panel',
          defaultControl: button
        });
        panel.addControls([button]);
        data.openlayers.addControl(panel);
        panel.activate();
      }
We are doing two things here. First, we are checking the
configuration of this map to see if the it should geolocate the user
when they view it. If this setting is enabled, then the code calls our
geolocate method.
Second, we are checking the configuration of this map to see if
the geolocation button has been enabled. If so, we are adding this as
an OpenLayers Control Button. The
OpenLayers Control Button is a type of OpenLayers Control; you can see
it defined in the OpenLayers
documentation. As explained in that documentation, when the
button is clicked, it calls the trigger function. In the code above, this
trigger function is where we call our geolocate method.
Calling the geolocate method
will update the center of the map based on the user’s location and
will zoom to the level that was chosen when configuring the
map.
Here is the full JavaScript file for the example that we have just worked through:
/**
 * @file
 * JS Implementation of OpenLayers behavior for Geolocation.
 */

// Namespace $ to jQuery
(function($) {

/**
 * Geolocation Behavior
 */
Drupal.behaviors.mappingdrupal_ol_extensions_geolocate = {
  'attach': function(context, settings) {
    var data = $(context).data('openlayers'),
    if (data && data.map.behaviors['mappingdrupal_ol_extensions_geolocate']) {
      // Data about the map configuration and the map itself are stored
      // with jQuery's .data() functionality on the element that
      // contains the map.
      //
      // You can access the following from the data variable:
      // - data.map: The map configuration object.
      // - data.openlayers: The OpenLayers map object.

      // This makes it easy to reference the local behavior options.
      var options = data.map.behaviors['mappingdrupal_ol_extensions_geolocate'];

      // First, check if the option to geolocate on load is
      // enabled.
      if (options.on_load) {
        Drupal.behaviors.mappingdrupal_ol_extensions_geolocate.geolocate(
          data.openlayers, options.zoom);
      }

      // Then check if a button was enabled.  We are utilizing
      // OpenLayers Button and Panels Controls for this,
      // but this could be any sort of button.
      if (options.button) {
        var button = new OpenLayers.Control.Button({
          displayClass: 'mappingdrupal-ol-geolocate-button',
          title: Drupal.t('Geolocate'),
          trigger: function() {
            Drupal.behaviors.mappingdrupal_ol_extensions_geolocate.geolocate(
              data.openlayers, options.zoom);
          }
        });
        var panel = new OpenLayers.Control.Panel({
          displayClass: 'mappingdrupal-ol-geolocate-panel',
          defaultControl: button
        });
        panel.addControls([button]);
        data.openlayers.addControl(panel);
        panel.activate();
      }
    }
  },

  // General function to geolocate user.
  'geolocate': function(map, zoom) {
    // First ensure that that the HTML5 geolocation controls
    // are available.  We might use some more helpful
    // libraries for this, like Modernizr
    //
    // We have to make sure we are explicit of the projection
    // as latitude and longitude are different from
    // spherical mercator (or other possiblilities).
    if (typeof navigator != 'undefined' &&
      typeof navigator.geolocation != 'undefined') {
      navigator.geolocation.getCurrentPosition(function (position) {
        var center = new OpenLayers.LonLat(
          position.coords.longitude,
          position.coords.latitude
        ).transform(
          new OpenLayers.Projection("EPSG:4326"),
          map.getProjectionObject()
        );
        map.setCenter(center, zoom);
      });
    }
  }
};

})(jQuery);
The final touch
As you may have noticed, we included a CSS file in our Behavior
plug-in. This is required to make our OpenLayers Control Button show
up on the map. In the behaviors
subdirectory, create a file named mappingdrupal_ol_extensions_geolocate.css:
/**
 * @file
 * CSS for the Geolocation behavior
 */

.mappingdrupal-ol-geolocate-panel {
  bottom: 5px;
  left: 5px;
  z-index: 999999;
}

.mappingdrupal-ol-geolocate-buttonItemActive {
  background-color: #EEEEEE;
  border: 1px solid #666666;
  color: #222222;
  border-radius: 3px;
  height: 2em;
  width: 6em;
  text-align: center;
}

.mappingdrupal-ol-geolocate-buttonItemActive:after {
  content: "Geolocate";
}
Note
For the purpose of this tutorial, we used CSS to get the text “Geolocate” in our button. A better solution would be to use a background image in CSS.
The final button ends up on our map in the bottom left corner, as shown in Figure 5-7.
Putting all these steps together: you have created a custom module that extends the OpenLayers module to add geolocation and put your user in the middle of your map.
Conclusion
When working out how to add new ways of interacting with your maps, think about maps as configuration objects that can be processed by the appropriate module and library. The tutorials in this chapter have shown how these configuration objects are created, and have illustrated the different ways the architecture is handled by the GMap module and the OpenLayers module.