
Chapter 3. Spatial Data
Before you can display a map, you need to get spatial data into your site in some way. Drupal gives you many options for modules and data formats to use. This chapter provides an overview of these and outlines the strengths and weaknesses of each. Four aspects of dealing with spatial data will be covered: how the data is stored in Drupal, how the data is input by users, how the data is manipulated, and how it can be queried.
Note
Many modules handle several aspects of data storage, manipulation, and display, so you will notice the same modules in several sections of this chapter and the rest of the book.
Drupal has a vibrant community of contributors, and this translates to many different modules and approaches to similar problems. This is great for promoting innovation and solving specific needs, but can make it difficult for site builders to work out the best solutions for their particular problems. This chapter will not be able to cover all the possibilities for spatial data in Drupal, but it will give you an in-depth look at the more established methods.
Note
The Drupal Mapping Group has a wiki page that describes the different geospatial modules and is the best place to get an overview of the modules available for your geospatial needs.
Data Storage
Different data formats for spatial data were introduced in Data Storage. This section will introduce the different modules and approaches for working with those data formats, and work through tutorials for implementing these with Drupal.
Note
If you are unfamiliar with Drupal terminology like module and node, you can look them up online in the Drupal glossary.
Database Layer in Drupal
Drupal 7 offers a powerful and adaptable database abstraction layer. The abstraction layer allows developers to write database queries and modules that will work on different types of databases. Drupal aims to support MySQL, Postgres, and SQLite. Other database, such as Microsoft SQL Server and Oracle, can be supported by installing contributed modules.
Note
Drupal core has a huge amount of inline documentation in the code, which is automatically parsed and collected on Drupal’s API reference website. This includes a page on the database abstraction layer. There is also lots of community-sourced documentation on the database documentation page.
As discussed in Data Storage, spatial databases have specific data types to handle geographical features, and they provide specific querying ability for spatial data. Unfortunately Drupal does not natively support these data types or these querying methods, so there are a number of contributed modules to solve this problem.
Note
There is currently a ticket in the Drupal issue queue to add support for spatial data. Feel free to help out or just show your support by commenting on the ticket.
Methods
There are two main methods for storing spatial data in Drupal 7: one is with the Geofield module, and the other is the Location module. The rest of this chapter and Chapter 4 will illustrate the differences between the Geofield and Location modules and help you choose the correct approach for your maps.
Warning
Please be aware that the methods outlined in this chapter are not interchangeable. They all store the spatial data in their own ways. This means that you should think carefully right at the start about what kind of spatial data you want to store and what you will need to do with it. Halfway through is too late to decide that you want to input the routes of your mountain bike rides and should have been using Geofield rather than Location!
Geofield
The Geofield module is a new module that was created for Drupal 7. Geofield allows geographical data to be attached to an entity, such as a node. It provides several different widgets for data input and formatters for data output. It integrates with several of the other popular mapping modules (including OpenLayers, GMap, and Geocoder), and there are plans to integrate with more.
Of all the modules that handle geographic data storage in Drupal 7, the Geofield module is the one that has seen most development recently and takes the most advantage of the new Fields API. For these reasons, it is the best choice for all but the simplest mapping applications.
For data storage the Geofield module can be configured to handle many formats:
- Latitude and Longitude
Data can be entered either as Decimal Degrees (122.340932) or as Degrees-Minutes-Seconds (123° 49’ 55.2” W). The Degrees-Minutes-Seconds input is tolerant of inconsistent input (123° 49’ 55.2” W or 40:26:46N). Decimal Degrees is what you are most likely to be using.
- Bounding Box
The latitude and longitude of each corner of a rectangle can be entered in four text fields.
- Well Known Text (WKT)
A text area for direct WKT input (see Data Types for an explanation of WKT).
In addition to these formats, the Geofield module can store data for points, lines, polygons, and bounding boxes drawn on a map by a user. Geofield can integrate with the Geocoder module to store spatial data that has been extracted from addresses, KML files, GeoJSON data, and geotagged images. This is discussed in Geocoder and Addressfield.
Location
The Location module has been around since Drupal 4.6 in 2005 and is one of the oldest spatial modules for Drupal. The Location module allows spatial data (such as a full address or latitude and longitude) to be attached to nodes and users.
The Location module’s strengths include an established interface; the interface of this module may not be perfect, but it has been around long enough for most Drupal users to have come across it at some point. Location is also quite full-featured, handling address data from around the world, as well as plugging into geocoding services.
Of course, “full-featured” also means that the module can be heavy and may load lots of functionality you do not need. A more serious drawback is that the Location module does not allow for line or polygon spatial data types. You can only store simple point data (a single latitude and longitude for each location). You will not be able to make a map that shows hiking routes or the area affected by an oil spill.
The architecture (how the code is written) of the Location module, which was appropriate when it was first conceived, does not follow current Drupal conventions. For example, it stores locations in a separate table and attaches them to entities like nodes and users with custom code, as opposed to using the Fields API, which is the best practice in Drupal 7. The Location module cannot currently attach spatial information to any entities other than users and nodes.
Note
The developers of the Location module are planning a new version of the module that will handle location data as entities. You can follow the progress of this in the Location module’s issue queue.
Despite these drawbacks, there are two good reasons to use the Location module. If you are upgrading a site from Drupal 6 or earlier that uses the Location module, it will be easier to keep your data in the same format. Additionally, as will be discussed in Chapter 4, it is quicker and simpler to create maps based on the Location module than it is to use Geofield.
Text fields
Text fields are a very simple, yet valid, way of storing spatial data in Drupal. All that is needed are two text fields to store latitude and longitude. As will be discussed in Chapter 4, most mapping modules are able to use any fields that contain a latitude and longitude; these values do not need to come from the Geofield or Location module.
The downside is that it is not very flexible or extensible: there is no ability to do spatial querying on the data (e.g., to show all the schools within 20 miles of the nuclear power plant), and there is no way to store lines or polygons. Also, most users may only know the address of a location; they will not have a latitude and longitude. However, if you are importing spatial data from another source and already have a latitude and longitude, this can sometimes be the best method. Usually Geofield is better because it will allow you to do spatial calculations, as well as displaying your data on a map.
Geo
Though the Geo module does not exist for Drupal 7, it is still an important module conceptually. The main goal of Geo is to provide a robust interface between a spatial database such as PostGIS or MySQL and Drupal so as to fully use the capabilities of these storage engines in your Drupal application. Other modules are in progress to do this in Drupal 7. If you are going to create spatially complex and demanding maps, this subject is discussed in The Future of Mapping with Drupal.
Data Input
The Geofield and Location modules store spatial information in different ways, so the data must be input in different ways. The tutorials in this section show how to work with Drupal and these modules to collect and store spatial data.
Geofield Module
As explained in Geofield, the Geofield module has many different ways to collect spatial data. This tutorial will explain the simplest configuration, and will provide the basis for exploring more advanced techniques.
Basic configuration of Geofield
Setting up the Geofield module includes a few extra steps not normally followed when setting up a Drupal module. Geofield requires that you add the geoPHP library. GeoPHP is an open source PHP library for doing spatial operations, such as converting geographic data from JSON to WKT or calculating the area of a polygon.
Download the latest stable release of the Geofield module to your site’s modules directory.
Download the latest stable release of the Libraries module to your site’s modules directory. The Libraries module is used by Drupal modules like Geofield that require a third-party library or plug-in.
If it is not already there, create a libraries directory inside your Drupal installation’s sites/all directory.
Download the geoPHP library (alternatively, the git repository can be cloned, or it can be downloaded as a zip file from the project’s github page).
Note
The geoPHP library, an open source library for doing geospatial operations, also aims to provide a transparent layer on top of the GEOS extension in PHP. Geometry Engine, Open Source (GEOS) is a C++ port of the Java Topology Suite (JTS), which is an API for modelling and manipulating two-dimensional linear geometry; GEOS is extremely efficient in doing geospatial operations. This means that if you install GEOS on your server, you will get a significant performance increase and will be able to do some more serious geospatial operations within PHP that normally would be done in a geospatial database like PostGIS. For more information, see the GEOS wiki page at geoPHP.
Extract the downloaded geoPHP library and place it inside sites/all/libraries. The file should now show in your directory structure as sites/all/libraries/geoPHP/geoPHP.inc.
Enable the Geofield and Libraries modules at admin/modules. Neither of these modules require any further configuration or permissions.
Adding geographic data to a node with Geofield
The example website that we are building throughout this book contains information about the Drupal community. Right now we will create a new content type to store local user groups. The content type will contain the name of the group, a short description, and some geographical data about where the group is located.
From the Content types page, add a new content type at admin/structure/types/add.
Enter
User Groupas the Name.Enter
A local Drupal user
            group
as the Description.Change the “Title field label” to
Group name.All other options can remain as default for now. Click the “Save and add fields” button.
You are now taken to the “Manage fields” page for this content type at admin/structure/types/manage/user-group/fields. The third field listed should be “Body.” Click the “edit” link to change this.
Change the “Label” field from
BodytoGroup description. All other fields can stay with the default values. Click the “Save settings” button.On the “Manage fields” page, go to the “Add new field” row. Enter
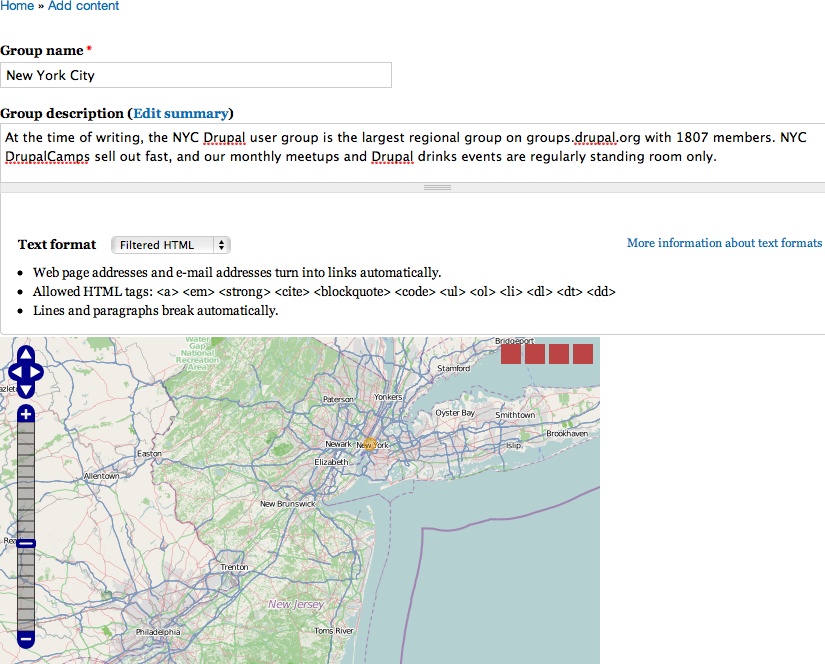
Group locationas the Label andgroup_locationas the Field name. In the “Select a field type” drop-down, choose “Geofield.” In the Widget drop-down choose “OpenLayers map.” Your configuration should now look like Figure 3-1.Click the Save button at the bottom of the page to create this field.
You are first taken to the field level settings; there is no further configuration for this widget, so click “Save field settings” on the next screen.
On the final screen, tick the “Required field” checkbox so that a location has to be set for this content type. Enter some useful Help text, too:
Clickonthemapto set the location for this group. There is currently just one option in the “OpenLayers Map” drop-down (Geofield Widget Map). As we go through the exercises in later chapters, more maps will be added to this list.It is possible to set a default location for nodes of this content type by clicking on the map in the “Default value” section, but this is not useful for this example. It is also possible to change the “Number of values” for the location field, but leave this set to 1 for this example. Click the “Save settings” button.
Create a sample “User Group.” From the “Add Content” page at node/add, add a “User Group.” Enter the name of the group (e.g., New York City). Enter a description for the group. Zoom in on the map and click to set the location of the group. This should look something like Figure 3-2.
Save the node.
When viewing this node, you’ll see the location displaying something like “POINT (-73.9987036058 40.7345513658).” This is the location in Well Known Text (WKT) format, as described in Data Types. Unless you are a robot, this display isn’t useful when searching for your local Drupal user group. To see what other display options are available, go to the “Manage Display” page for the User Group content type at admin/structure/types/manage/user_group/display.
In the “Format” column for the “Group location” field change the display from “Well Known Text (WKT)” to “OpenLayers.”
Click on the cog symbol on the right side to open the configuration options for the field display. Again, at this point, the only available map is the one that comes with the Geofield module for this purpose, so select “Geofield Formatter Map.” For the data option select “Use full geometry.” It should look as shown in Figure 3-3. Click “Update” to save your settings, then click “Save.”
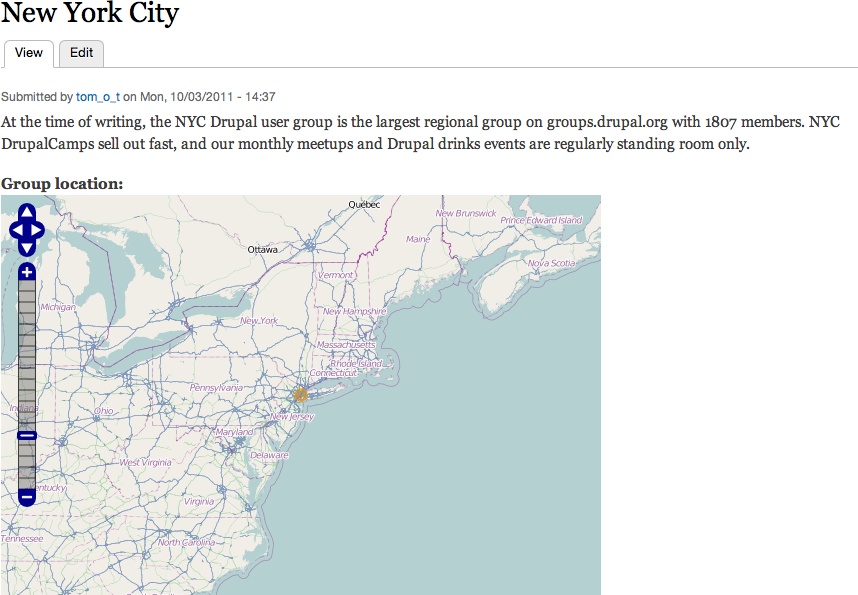
Go to the content management page at admin/content/node and view the “User Group” content that you have just created. The location should now be shown as a dot at the center of a map, as shown in Figure 3-4.


Congratulations! You now have a content type configured to collect spatial data using a point-and-click map interface. The information that is collected for a node is then displayed on a map.
Location Module
As mentioned in Location, when using the Location module, spatial information can only be attached to nodes and users. In this example we will create a new content type that will be used as a business listing for Drupal development companies.
Basic configuration of location
The Location module is fairly simple to configure, but it is important to understand which of the included modules to use. At the time of publication, there is not a stable release of the Location module for Drupal 7, but the development version works fine.
Download the latest development release of the Location module to your site’s modules directory.
Warning
The Location module that you download contains several modules, two of which will be used in this example.
Confusingly, the Location module contains both the Node Location module and the Location CCK module. You should probably just ignore the Node Location module.
These two modules both allow a location to be attached to a node in different ways: the Node Location module is a relic of the way that modules worked in Drupal 4.7 and Drupal 5 and does not use the Fields API (or CCK in Drupal 6). If you use the Node Location module, the location form will show up in the vertical tabs at the bottom of the node adding form.
The Location CCK module takes advantage of the Fields API (or CCK in Drupal 6) and is usually the better option to use unless you are upgrading an old site and want a simpler migration process. It is usually a bad idea to enable both modules, as it can be confusing, and if you accidentally enable both methods of collecting location on a particular content type, the location data will be not be stored. More information about this is in the Location module issue queue, and also in the INSTALL.txt file in the Location module.
Enable two modules at admin/modules: the Location and Location CCK modules.
Configure permissions for the Location module at admin/people/permissions#module-location. The first three permissions should only be assigned to the Administrator role, but the “Submit latitude/longitude” permission will need to be given to the Authenticated User role. Click the “Save permissions” button.
Tip
If you ever need people to enter a location before they have an account on your site, remember to give the “Submit latitude/longitude” permission to the Anonymous User role. This setting would be necessary if people need to submit their location when creating their user profile.
No changes are needed on the Location module configuration page at admin/config/content/location.
The more important configuration page is the Geocoding options tab at admin/config/content/location/geocoding. Geocoding is the process of turning some text (such as an address) into numerical spatial information (such as a latitude and longitude). It will be discussed in more detail below in Geocoding.
The first field on the form sets how accurate we require geocoding to be. For our example, we are mapping the location of Drupal businesses, so it is quite important to know where these businesses are. However, people are not going to be using our maps to drive or walk to the location. To require a higher level of accuracy than the default, change the setting to “Town.”
The second group of choices are which geocoding service to use for every country in the world. Not every country has a service that can geocode an address (e.g., North Korea doesn’t), but for almost every country that does, Google is the only choice. Unfortunately you have to manually select Google Maps for each country, so do this for every country that you care about. For the United States and Australia you also have the choice of using Yahoo!’s geocoding service; for Canada there is the option of GeoCode.ca.
Note
If you need to work with lots of countries, see the Note for a simpler way to set up geocoding for the Location module.
After you click the “Save configuration” button, you will see a “Configure parameters” link next to each country for which you have enabled geocoding. Click on one of these links to bring up the form to enter the Google Maps API Key. Thankfully this API Key only needs to be entered once; it does not need to be repeated for each country. Go to the Google Maps API Sign Up page to get the key.
Read the terms, particularly the usage limits, as these can have a significant implication for your website if you expect high traffic volumes or if you are using the maps on an intranet or other site that is not accessible for free by the public.
Tick the box and enter the URL for your site. It is best to enter the domain without the www (e.g.,
http://mappingdrupal.com). If you have a development or local version of your site, this API key will work on subdomains of this URL (e.g., http://staging.mappingdrupal.com or http://local.mappingdrupal.com), but the API key will not work on other domains (e.g., http://localhost/mappingdrupal or http://mappingwithdrupal.com). You will need to sign up for a different API key for those other domains.Copy your new API Key (the long string of letters and numbers) to the “Google Maps API Key” field on your site and click the “Save configuration” button.
Adding geographic data to a node with the Location module
Now that we have the necessary modules enabled and the Google Maps API key stored, we need to create the content type to store information about Drupal development companies. The content type will contain the company’s name, a short description, and its address.
From the Content types page, add a new content type at admin/structure/types/add.
Enter
Drupal Companyas the Name.Enter
A Drupal development
            company
as the Description.Change the “Title field label” to
Company name.All other options can remain as default for now. Click the “Save and add fields” button.
You are now taken to the “Manage fields” page for this content type at admin/structure/types/manage/drupal-company/fields. The third field listed should be “Body.” Click the “edit” link to change this.
Change the “Label” field to
Company description. All other fields can stay with the default values. Click the “Save settings” button.On the “Manage fields” page, go to the “Add new field” row. Enter
Company locationas the Label andcompany_locationas the Field name. In the “Select a field type” drop-down, choose “Location.” In the Widget drop-down, choose “Location Field.”Click the “Save” button at the bottom of the page to create this field.
The next screen that comes up is the Field settings for the Company location field. This determines both what information will be collected when someone creates a new Drupal company, and also what information will be displayed about that company when someone views the site.
Under “Collection settings”, change the Collect drop-down for “Location name” to “Do not collect.” We are using the title field for this information. Leave “Street location,” “Additional,” “Country,” and “Coordinate Chooser” set at “Allow.” Change “City,” “State/Province,” and “Postal code” to “Allow.” There is also a field to set a default value for each of these fields, and to use the “Force Default” option to only allow users to enter an address for a particular country, state, etc.
The Display Settings section allows certain fields to be hidden. Leave these all visible for now. Click the “Save field settings” button.
On the final screen, tick the “Required field” checkbox so that a location has to be set for this content type. Click the “Save settings” button.
Create some “Drupal Company” content. From the “Add Content” page at node/add, add a “Drupal Company.” Enter the name and description of a company, and a full street address. Click the “Save” button. You should now see something similar to Figure 3-5. If you do not see the address, check the modules page at admin/modules to make sure that you did not accidentally enable the Node Location module (see Warning).
It is useful to see the latitude and longitude below the address so that we know that geocoding has been successful, but we do not need to display this to people visiting our site. In this example we do not want to show the “See Map” link either. Go to the “Manage fields” page for the content type at admin/structure/types/manage/drupal-company/fields/field_company_location and edit the “Company location” field. At the very end of this form, under the “Display Settings” section, check the “Map link” and “Coordinates” checkboxes to prevent these from being displayed. Click the “Save settings” button to save your changes.

Extending the Location module with the GMap module
Seeing the address of a business is useful, but often you want to display a map of a business. The easiest way to do this with the Location module is to use the GMap module. Like the Location module, the GMap module has been around since Drupal 4.6 in 2005, and its architecture reflects that. It is a very large module, but it integrates well with the Location module and is in use on tens of thousands of sites. It implements various parts of the Google Maps API on Drupal sites. The GMap module does three specific things:
It provides a clickable map for entering the location of a node.
It provides a map to display a node’s location.
It integrates with the Views module to display the results of a View on a Google map.
In this exercise we will cover the first two aspects of the module. The third aspect will be covered in Mapping with the GMap Module.
Note
The GMap module integrates with version two of the Google Maps JavaScript API. This version of the API was deprecated in May 2010. While it will continue to work, it lacks the newer features of the current version three Google Maps JavaScript API, such as mobile support, better speed, and removing the need for an API key. There are plans in the module’s issue queue to add support for version three, but this is a large task, so it is unlikely to happen soon. The GMap module works fine for most purposes despite this.
There is not yet a stable release of the GMap module for Drupal 7, but the development version works fine. Download the latest development release to your site’s modules directory.
Enable two modules: the GMap and GMap Location modules at admin/modules. There are some permissions that can be set for these modules, but they apply to components that are not used by these examples.
Note
The GMap Location module is only used in these examples to allow different kinds of markers to be selected for different content types. This module also creates a page that displays a map of all content on your site, which is rarely useful. For many websites, this module will not be necessary and does not need to be enabled. The GMap module, however, should be used.
Go to the GMap configuration page at admin/config/services/gmap. You will get a JavaScript error about the Google Maps API Key. Click OK to dismiss this message, and enter the same API Key that you entered earlier when configuring the Location module in Step 10. Leave all the other settings at their default value for now and scroll to the bottom of the page to click the “Save configuration” button.
Note
The process of setting up the Google Maps API key earlier in Basic configuration of location can actually be skipped because, when geocoding, the Location Module first tries to use the GMap module’s API key. If the GMap module is not installed, the Location module falls back to its own API key. In the Location Module exercise, we did not skip that configuration because we were seeing how the Location module worked when the GMap module was not installed.
If your site will be accessed from several different domains, use the Keys module to automatically switch to the correct API key for each domain.
When the page reloads after saving, you should not get the JavaScript error, and you should see a small Google Map of southern Europe and northern Africa. If you do not see these things, check that you have entered the API Key correctly.
Go to the Location module’s configuration page at admin/config/content/location/main and tick the “Use a Google Map to set latitude and longitude” checkbox. This will allow users to click on a map to set the business’s location instead of (or in addition to) entering an address. Click the “Save configuration” button.
Create some more “Drupal Company” content. From the “Add Content” page at node/add add a “Drupal Company.” Enter the name and description of a company. For this example, we will create a virtual company that does not have an office address, and instead has a PO Box like, “PO Box 23505, Brooklyn, NY 11202.” This address, when geocoded by Google, shows up in downtown Brooklyn. To see this, click the “Save” button.
Note
If you want to create lots of content for testing a new site, the Devel Generate module will do this for you. When doing this, the GMap module will insert random countries and coordinates for this content.
Edit the company that you just saved. On the small map, zoom in until you can see the streets. The business owner of this company wants to be associated with downtown Manhattan, so click the map in that location and notice how the latitude and longitude fields change. (There are two pairs of latitude and longitude: one showing the current coordinates for the node under the heading “Current Coordinates”; and the other pair, further down the form, appearing as two text fields. The latter are the ones that change when you click a new location on the map.) Click the “Save” button again. The business still has the same address, but if you edit the business again, you will see that the location on the map is now lower Manhattan, where you clicked, and the “Source” for the current coordinates is now “User-submitted” instead of “Geocoded (Exact).”
Note
This is a useful feature when mapping things that cannot be easily geocoded, such as a park, or when you are mapping things at a very detailed scale and want to pinpoint the entrance to a conference hall rather than the middle of the building.
As you edit the business and look at the map, you have found it unhelpful because it is a small map showing most of the world. To change this, go to the Location module’s configuration page again at admin/config/content/location/main. Toward the bottom of this page is a field titled “Location chooser macro,” which contains
[gmap]. This is the GMap module’s way of setting up behaviors and display options for a map. The current setting uses the default values set on the GMap module’s configuration page, admin/config/services/gmap. The easiest way to create a new macro is to use the module provided for this purpose.Go to the module page at admin/modules and enable the GMap Macro Builder module. Enable permissions for the roles that will need to configure map defaults at admin/people/permissions#module-gmap_macro_builder—usually just the “Administrator role.”
Go to the “Build a GMap macro” page at map/macro. The map at the top of this page is the one that will be set by the macro that you are creating. The first section is the “Overlay editor.” When someone is editing a location, the Overlay editor determines stuff like the colors of the map pins and lines. The defaults are fine for now.
The next section of the form contains the more important settings. If you are creating a website that has a particular geographic focus, you probably want a map that defaults to a location in that area, rather than one that shows the whole world. Enter a location that represents this focus in the “Address” field (for example,
New York,
            NY
). When you click or tab out of this field, the location will be geocoded and the latitude and longitude will be updated below, in the field labeled “The Latitude and Longitude of the centre of the map.”If you scroll back to the top of the page, you will now see a small map centered on the location you entered. The map is still very zoomed out, so change this in the field labeled “The current magnification of the map.” This defaults to 3, so increase it and look at the updated map at the top of the page to see if the new value works.
We now have the map showing a more useful location, but it is still very small. To change the size of the map, we need to update the “Map width” and “Map height” fields. For a map that is being used to set a location, we want to use the full space available on the page, so change the width to
95%. Percentage heights are not well supported across browsers, so change the height to300px.As you have gone through these steps, you may have noticed that the last field on the page, “Macro text,” has been changing each time you changed a value. It should now read something like:
[gmap zoom=9 |center=40.7143528,-74.0059731 |width=95% |height=300px |control=Small |type=Map]
Copy this macro (it can not be saved) and go back to the Location module’s configuration page at admin/config/content/location/main. Paste the macro you created into the “Location chooser macro” field. Click the “Save configuration” button.
Now, if you create a new Drupal company, you will see that the map is much larger, it is showing at a more useful scale, and it is centered on the location that you set. If you edit an existing Drupal company, you will see that the map is centered on that company’s location, but that the zoom level is the same as you set in the macro, and the width and height of the map are also as you set.
The GMap module has allowed for a richer user interface for adding location information. In Chapter 4 we will integrate this with the Views module, so as to display multiple locations on a map for people visiting the site.
Geocoding
In Adding geographic data to a node with the Location module we introduced the concept of geocoding. Geocoding is the process of creating spatial data from nonspatial information. Geocoding can be converting an address into latitude and longitude coordinate, or turning the name “Mount Everest” into a polygon. Going in the opposite direction, turning geospatial data into nongeospatial data, such as a coordinate into an address, is called reverse-geocoding.
Note
The process of geocoding, especially address conversion, usually involves a large amount of data and heavy processing power. This means that you are unlikely to create your own geocoding service, and it is why most of these modules integrate with existing services.
Modules
We have already worked through an example where the Location module geocoded the address that you entered for the Drupal company content type. To achieve similar results for the Geofield module, we will use the Geocoder and Addressfield modules. One other module that handles geocoding for Drupal 7 is the Geonames module, which will be briefly discussed.
Geocoder and Addressfield
To integrate with the OpenLayers and Geofield modules, the easiest way to allow users to enter an address and have it automatically geocoded is to install the Addressfield and Geocoder modules. For our example website, we will create a new content type to store Drupal events. The content type will contain the name of the event, a description of the event, a date, an address, and a latitude and longitude.
Warning
Be careful not to confuse the Geocode and the Geocoder modules. They are two separate modules, though Geocoder is mostly a Drupal 7 port of Geocode, which is only for Drupal 6. There is a post in the Geocode issue queue that provides some background on the two modules and their future.
Download the latest stable release of the Addressfield module to your site’s modules directory.
Enable the Address Field module at admin/modules. There are no configuration or permissions changes needed for this module.
From the “Content types page,” add a new content type at admin/structure/types/add.
Enter
Eventas the Name.For the Description, enter
A
            Drupal event.
Change the “Title field label” to
Event name.All other options can remain as default for now. Click the “Save and add fields” button.
You are now taken to the “Manage fields” page for this content type at admin/structure/types/manage/event/fields. The third field listed should be “Body.” Click the “edit” link to change this.
Change the “Label” field to
Event
            details
. All other fields can stay with the default values. Click the “Save settings” button.On the “Manage fields” page, go to the “Add new field” row. Enter
Event locationas the Label andevent_locationas the Field name. In the “Select a field type” drop-down, choose “Postal address.” In the Widget drop-down, choose “Dynamic address form” (the only choice).Click the “Save” button at the bottom of the page to create this field.
On the screen that comes up there are no further field settings, so click the “Save field settings” button.
The final configuration page for this field is where the field is configured for the Event content type at admin/structure/types/manage/event/fields/field_event_location. Set it to be a required field by checking the “Required field” checkbox.
Under the “Available countries” field, to enable all countries leave it at the default with nothing selected, or else select a few countries.
The “Format handlers” checkboxes allow different fields to be shown in addition to the default country-specific address form. For example, if you are using the address for shipping a product to customers, you might want to enable the Name and Organization fields. In this example just leave it as the default “Address form.”
It is possible to set a default value for the address or to allow multiple addresses (for example, for different invoicing and shipping addresses), but in this example just leave all the values unchanged.
Click the “Save settings” button.
We have now created a content type for an event with a title, a description and an address.
How does this differ from the address field provided by the Location module in Adding geographic data to a node with the Location module? If you are building a website that will be used outside the United States, the differences are significant.
Create some “Event” content at node/add/event. Enter the name and description of an event. Try changing the country in the drop-down and see how the address form changes. For the United States, there is a drop-down field labeled “State” and a field labeled “ZIP Code.” For Canada, the state field becomes “Province” and the ZIP Code becomes “Postal Code.” The United Kingdom has the same “Postal Code” field but the “State” field is a text field rather than a drop-down. The United States and Canada are the only countries with a list of states or provinces included with the Addressfield module.
For comparison, create some “Drupal company” content at node/add/drupal-company. With the United States as the country, start typing the name of a state and notice how it autocompletes. Most countries have states or provinces that will autocomplete like this. However notice how the labels of the fields do not change; it is always “State/Province” and “Postal Code.”
This comparison shows an important difference between the two approaches (Location and GMap versus Geofield and Addressfield). Location and GMap give you more functionality just by installing the modules. OpenLayers, Geofield, and Addressfield give you less ready-made functionality, but they try to be more semantically correct with the data, and they provide a pluggable API to add the data that you need. For example, if there is a country for which you need a list of states, you can look at the addressfield_example module that is included inside the Addressfield module to see how to do this (the example shows how to add states for Switzerland).
The Event content type that we have created has an address, but this is not yet being geocoded. The Geocoder module will integrate with the Geofield and Address modules to handle this.
Download the latest release of the Geocoder module to your site’s modules directory. At the time of writing there is no stable release, so download the latest development release.
Enable the Geocoder API module. There are no configuration or permissions changes needed for this module.
On the “Manage fields” page for the Event content type at admin/structure/types/manage/event/fields go to the “Add new field” row. Enter
Event
            geo
as the Label andevent_geoas the Field name. In the “Select a field type” drop-down, choose “Geofield.” In the Widget drop-down, choose “Geocode from another field.”Click the “Save button” at the bottom of the page to create this field.
On the next screen that comes up, there are no further field settings, so click the “Save field settings” button.
This field will never be visible to a user of your website when they are creating events, so many of the settings on the final configuration page at admin/structure/types/manage/event/fields/field_event_geo are unnecessary. There are two important fields, though.
Under “Geocode from field,” select “Event location” (the field that contains the address).
Note
The Geocoder module can geocode any text field that contains properly formatted location data. It can also get the location from an uploaded JPEG photo that contains a geotag embedded as EXIF in the metadata. Many recent digital cameras and smartphones support this.
Under the “Geocoder” drop-down, select “Google Geocoder.”
Click the “Save settings” button.
The final step is to set the display for this field. Rather than displaying the latitude and longitude, the location of the event should be displayed on a map. Go to the “Manage Display” page for the Event content type at admin/structure/types/manage/event/display. For the “Event geo” field, change the Label to “<Hidden>”. Change the Format to “OpenLayers.” Click on the cog on the right side to configure the “OpenLayers display” widget. In the “OpenLayers Preset” drop-down, select “Geofield Formatter Map.” In the “Data options” drop-down, choose “Use full geometry.”
Note
The “Geofield Formatter Map” is the default map display that comes with the Geofield module. As shown in Figure 3-6, this default map is quite small-scale (zoomed out). If you wish to change this, you can create a new map preset, as described in Setting Up an OpenLayers Map. Including the Geofield placeholder layer in a new preset will make it show up in the list in the “OpenLayers Preset” drop-down.
Click the “Update” button to save the field display widget, and then click the “Save” button to save all the display settings.
The Event content type now displays a map with the geocoded location of the event, but is missing the crucial thing for an event: the date.
Download the latest release of the Date module to your site’s modules directory.
Enable the Date, Date API, and Date Popup modules. There are no important permissions or other configuration changes needed for these modules.
Go back to the “Manage fields” page for the Event content type at admin/structure/types/manage/event/fields and go to the “Add new field” row. Enter
Event dateas the Label andevent_dateas the Field name. In the “Select field” drop-down, choose “Date.” In the Widget drop-down, choose “Pop-up calendar.”Click the “Save button” at the bottom of the page to create this field.
The default field settings should be fine, so just click the “Save field settings” button. The default values on the next page are fine too, so click “Save settings.”
Create a new Event. Include an address and a date using the “Event date” field. When you save the Event, the address should be geocoded and displayed on the map as shown in Figure 3-6.

Other geocoding modules and services
The Location and Geocoder modules for Drupal 7 are the only ones that will geocode addresses entered by users. However, there are some other geocoding services that can be integrated with Drupal if you are able to do some coding: among them are GeoNames and the GeoCommons Geocoder.
GeoNames is a huge geographic database that is available to download and use for free under a Creative Commons Attribution 3.0 License. It provides several services for looking up spatial information, such as searching for location information for place names, finding postal codes or Wikipedia articles near a particular location, or getting a list of postal codes for a particular country. It does not provide a geocoding service for an address, but it is very useful if you need other structured spatial data. The GeoNames module allows you to query these services from a Drupal site.
GeoCommons is a mapping platform and a community working to create an open repository of data and maps. One of the projects being worked on is an open source geocoder that can be installed on your own server. It is built using the Ruby programming language, and it currently only works for US addresses because it is based on the US Census Bureau’s free TIGER/Line data set. It can be downloaded from the GeoCommons github page. Installing this and configuring it to work with a Drupal site is a significant effort, but if you need to geocode large amounts of US-based addresses and cannot use one of the web-based geocoding services because of license restrictions, this is a good alternative.