
Chapter 7. Managing Maps as Features
Throughout the tutorials in this book, all the configuration has been done through the user interface. Drupal stores this configuration in your database, which is a problem for two main reasons:
It is difficult to manage these changes when deploying or changing environments.
There is no history log of modifications.
One tool that has been developed over the last couple of years to solve this is the Features module. With the Features module, all the work you have done configuring your map settings can be bundled up and saved in a handy format. You can then reuse the configurations in your next mapping project, and share them with other Drupal developers. Your settings can be easily backed up with version control. For more background on Features, see the Features handbook page.
Features is well supported by OpenLayers and Geofield. Much of the configuration for maps built with GMap and Location is based on Views, which also has good support for the Features module. In this section we will walk through the process of exporting your map configurations to Features.
Note
There are other ways to export configuration to code, such as CTools export, but the Features module is the simplest to use.
The first step is to set up the Features module and another module that helps with this process: the Strongarm module.
Download the latest stable release of the Features module and the Strongarm module to your site’s Modules directory.
Enable the Features module.
Configure the permissions for the Features module at admin/people/permissions#module-features. The administrator role should have permission for both “Administer features” and “Manage features.”
Exporting OpenLayers and Geofield with Features
In this chapter, names of various Modules, Fields, Content Types, etc., may be different from what you have in your site, and some things won’t be there if you did not complete all of the tutorials. This Feature will contain the configuration for the Content Types, Views, and Maps, Styles, etc., that we created to demonstrate OpenLayers and Geofield in earlier chapters. This was based around Drupal User Groups and Drupal Events.
From the Manage features page, create a new Feature at admin/structure/features/create.
In the “Name” field, enter
User groups and events.In the “Description” field, enter
Configuration for user groups and events.The “Version” and “URL of update XML” fields can be left blank, as they are only needed if you plan to distribute your Features beyond your own site.
The “Edit components” section of the form is the where you choose which of the available configurations you want to include in your Feature. It is easiest to start with the most important pieces of configuration. The Features module has a fairly sophisticated set of dependency-checking logic, so it will detect much of the other configuration for you.
In the “Edit components” drop-down, select “Content types: node.” In the list of content types, select “Event” and “User Group.” These are the two content types that were used in the tutorials for making maps with OpenLayers and Geofield. Notice how those two content types now show up in gray on the right and many other things in other sections will now suddenly show up in blue. These are the other parts of the configuration that Features will export to code without any further instruction on your part; this is the dependency checking.
In the “Edit components” drop-down, select “OpenLayers: openlayers_layers.” There is nothing listed here to add to our Feature, because all the layers were created in Views, which Features handles separately.
In the “Edit components” drop-down, select “OpenLayers: openlayers_maps.” In the list of maps, select “Drupal user groups.” This is the Map that was configured in OpenLayers Maps.
In the “Edit components” drop-down, select “OpenLayers: openlayers_styles.” In the list of styles, select “Drupal user groups.” This is the style that was configured in OpenLayers styles.
In the “Edit components” drop-down, select “Permissions: user_permission.” In the very long list of permissions, find any that relate to the modules that are part of this feature:
Node: Event: Create new content
Node: Event: Edit own content
Node: Event: Edit any content
Node: Event: Delete own content
Node: Event: Delete any content
Node: User Group: Create new content
Node: User Group: Edit own content
Node: User Group: Edit any content
Node: User Group: Delete own content
Node: User Group: Delete any content
OpenLayers UI: Administer OpenLayers
In the “Edit components” drop-down, select “Strongarm: variable.” In the very long list of variables, find any that relate to this feature:
openlayers_default_map
openlayers_source
In the “Edit components” drop-down, select “Views: views_view.” In the list of Views, select “Drupal groups,” “Map of Drupal groups,” and “Upcoming events.” These are the Views that were used to make the maps and other tutorials for OpenLayers and Geofield.
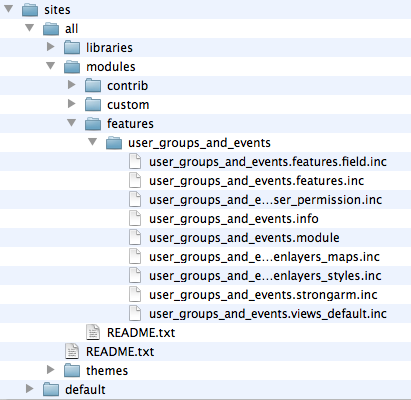
The Feature is now complete. At the bottom of the page, click the “Download feature” button. Extract the downloaded file to your site. This downloaded Feature is a special sort of module, and it is usually placed in a separate directory, such as in sites/all/modules/features or sites/default/modules/features, as shown in Figure 7-1.
The new Feature is disabled by default. At admin/structure/features on the Manage Features page, tick the checkbox next to the “User groups and events” Feature and click the “Save settings” button to enable the Feature.
All of the configuration for the Content Types, Views, and Maps for User Groups and Events are now stored in code. This code can be added to version control and moved between development and production sites. For more details on managing Features, see the Features handbook page.
Exporting GMap and Location with Features
As in the previous tutorial, some of the names or configurations might be different from what is shown below, depending on which of the tutorials you completed throughout the book. This Feature will contain the configuration for the Content Types and Views that we created to demonstrate GMap and Location in earlier chapters. This was based around Drupal Companies.
From the Manage features page, create a new Feature at admin/structure/features/create.
In the “Name” field, enter
Drupal companies.In the “Description” field, enter
Configuration for Drupal companies.In the “Edit components” drop-down, select “Content types: node”. In the list of content types, select “Drupal Company.”
In the “Edit components” drop-down, select “Permissions: user_permission.” In the very long list of permissions, find any that relate to the modules that are part of this feature:
GMap Macro Builder: Create gmap macro
Location: Submit latitude/longitude
Node: Drupal Company: Create new content
Node: Drupal Company: Edit own content
Node: Drupal Company: Edit any content
Node: Drupal Company: Delete own content
Node: Drupal Company: Delete any content
In the “Edit components” drop-down, select “Strongarm: variable.” In the very long list of variables, find any that relate to this feature. This is rather difficult for the Location module, because it creates a variable for every country in the world. Try to find the ones that relate to the countries you care about, though only the two-letter country codes tell you which is which:
gmap_default
gmap_marker_file
gmap_markermanager
gmap_mm_type
location_default_country
location_defaultnum_drupal_company
location_display_location
location_general_geocoders_in_use
location_geocode_google_minimum_accuracy
location_geocode_google_apikey
Warning
Be careful about exporting the Google Maps API key to code. It only works for domains with the same URL. So if you have a development site at exampletest.com and a production environment at example.com, you will need a different API key for each.
location_geocode_au
location_geocode_ca
location_geocode_dk
location_geocode_es
location_geocode_fr
location_geocode_gb
location_geocode_jp
location_geocode_us
In the “Edit components” drop-down, select “Views: views_view.” In the list of Views, select “Drupal companies.” This is the View that was used to make the map for Location and GMap in Chapter 4.
The Feature is now complete. At the bottom of the page, click the “Download feature” button. Extract the downloaded file to your site and put it in the location where you put the Feature from the previous exercise.
The new Feature is disabled by default, so enable it on the Features page at admin/structure/features.
Exporting your map configuration to code may take a little time, but it will save time and effort in the long term. If you are new to web development, it is worth learning to use a version control system to manage your code. Git has become the main version control system used with Drupal. The Drupal documentation for Git is useful, but if you are totally new to version control, the GitHub help is an easy introduction.