
Chapter 5. Insert and Format Objects
The skills tested in this section of the Microsoft Office Specialist exam for Microsoft Word 2013 relate to inserting and formatting content objects. Specifically, the following objectives are associated with this set of skills:
| 5.1 Insert and format building blocks |
| 5.2 Insert and format shapes and SmartArt |
| 5.3 Insert and format images |
Professional-looking graphic elements and document parts such as cover pages and sidebars can provide the finishing touches necessary to make a Word document both appealing and useful. Word 2013 provides a wide range of tools that make it easy to create informative, coordinated graphics, graphic elements, and text elements.
This chapter guides you in studying ways of inserting and formatting preformatted document elements known as building blocks, simple shapes, complex business diagrams, and pictures.
Note
Practice Files To complete the practice tasks in this chapter, you need the practice files contained in the MOSWord2013Objective5 practice file folder. For more information, see Download the practice files in this book’s Introduction.
5.1 Insert and format building blocks
Building blocks are preformatted text and document elements. There are many types of building blocks. Some are covered in other sections of this book because they fall into the domain of exam objectives other than this one. These include headers, footers, watermarks, and preformatted page numbers (1.3 Format documents), Quick Tables (3.1 Create tables), and bibliographies (4.1 Create endnotes, footnotes, and citations).
Other available building blocks include AutoText entries, cover pages, equations, tables of contents, and text boxes. (Text box building blocks include those designed to display sidebars and quotes.) These building blocks are the focus of this section.
Each type of building block is available from its own gallery on the Insert, Design, or References tab of the ribbon, and all are available from the Building Blocks Organizer. Custom building blocks can be made available in the corresponding gallery or in the Quick Parts gallery, which provides easy access to any building blocks you save there. You can also insert document properties and field values (2.1 Insert text and paragraphs) from the Quick Parts menu.
Inserting structural building blocks
Word 2013 includes several types of building blocks that provide structure, which is particularly important for long documents.
Cover pages Inserted at the beginning of a document, a preformatted cover page presents information such as the document title, subtitle, author, company, date, or other information that you want to include. Word 2013 comes with many built-in cover pages, and others are available from the Microsoft Office website.
A document can have only one cover page; inserting a different cover page replaces the previous version. For this reason, most cover pages display document properties, so they are automatically populated with the correct information.
You can insert a cover page from any location within a document; Word inserts cover pages only in the correct position, before the first page of the document. A cover page does not have a page number. The page that follows the cover page—the first page of the actual document—remains page 1.
Tables of contents A table of contents at the beginning of a document (after the cover page or title) provides a quick overview of the document’s content in addition to an easy way for readers to locate specific document sections.
Word can automatically generate a table of contents based on the document headings (specifically, the heading levels assigned to styles). By default, a table of contents includes three heading levels, but you can modify the settings to include from one to nine heading levels, choose from various page number leaders or hyperlinks, and select from six styles in addition to the style associated with the template.
Text boxes To reinforce key concepts and also alleviate the monotony of page after page of plain text, you can insert text boxes designed to hold sidebars and quotes. These preformatted text boxes coordinate with other building blocks (cover pages, headers, footers, and page numbers) to create an extremely professional impression.
Each text box appears in a specific location on the page and contains placeholder text. You can modify the appearance, location, and content of the preformatted text boxes if they don’t quite meet your needs.
To insert a predefined cover page
On the Insert tab, in the Pages group, click Cover Page, and then click the cover page you want to insert, or click More Cover Pages from Office.com and then click the cover page you want.
Tip
Point to a cover page thumbnail to display a ScreenTip that describes the cover page design and its content.
Or
To remove a predefined cover page
On the Insert tab, in the Pages group, click Cover Page, and then click Remove Current Cover Page.
Select the cover page content and following page break, and then press the Delete key.
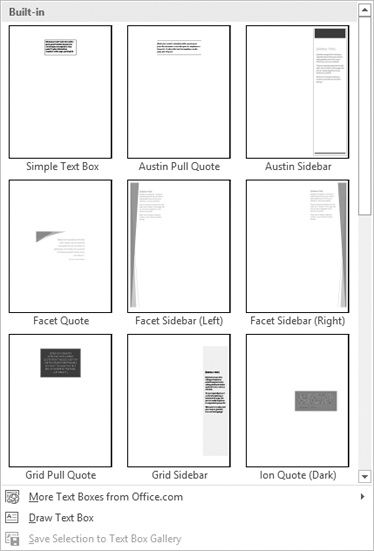
To insert a predefined text box
On the Insert tab, in the Text group, click the Text Box button, and then click one of the available text boxes from the gallery.
In the Building Blocks Organizer, click any building block that is a member of the Text Boxes gallery, and then click Insert.
To insert a custom text box
On the Insert tab, in the Text group, click the Text Box button, and click Draw Text Box. Then do one of the following:
Click anywhere on the page to insert a dynamic text box that resizes as you enter text.
Drag anywhere on the page to draw a text box of a fixed size.
To copy a text box to a new location
Hold down the Ctrl key and drag the text box to the second location.
To format a text box
Click the text box frame so that the text box is surrounded by a solid (not dashed) border.
On the Format tool tab, do any of the following:
In the Shape Styles gallery, click the built-in style you want to apply.
In the Shape Styles group, in the Shape Fill, Shape Outline, and Shape Effects menus, click the settings you want.
To change the default formatting for text boxes
Select a formatted text box, right-click its border, and then click Set as Default Text Box.
Managing building blocks
The Building Blocks Organizer contains all the building blocks that are available in the default Building Blocks template (which is available globally) and any other active templates.

Building blocks can be sorted by name, gallery (type), category (built-in or a custom category that you create), template (storage location), behavior, or description. The names of some building blocks indicate that they belong to a design family, such as Facet or Ion. The behavior setting indicates whether Word inserts the building block in the existing text, in its own paragraph, or on its own page. The description includes information about the building block and, in some cases, recommendations for its use.
Tip
To locate a set that includes all the design elements you want to use in the document, sort the list by name to group the building blocks by design family. To identify the alternative locations from which you can insert each type of building block, sort the list by gallery.
To insert a building block
5.2 Insert and format shapes and SmartArt
Drawing and modifying shapes
If you want to add visual interest and impact to a document but you don’t need anything as fancy as a picture or a clip art image, you can draw a shape. Shapes can be simple, such as lines, circles, or squares; or more complex, such as stars, hearts, and arrows.
When you finish drawing the shape, it is automatically selected. Later, you can select the shape by clicking it. While the shape is selected, you can move and size it, and you can modify it by using commands on the Format tool tab to do the following:
Change the shape to a different shape.
Change the style, fill color, outline, and effects assigned to the shape, including the three-dimensional aspect, or perspective, from which you are observing the shape.
Specify the position of the shape on the page, and the way text wraps around the shape.
Control the position of the shape in a stack of shapes.
Specify the shape’s alignment and angle of rotation.
Precisely control the size of the shape.
You can right-click a shape and click Add Text to place a cursor in the center of the shape. After you enter the text, you can format it with the commands in the WordArt Styles group and control its direction and alignment with the commands in the Text group.

If you build a picture by drawing individual shapes, you can group the shapes so that they act as one object. Then when you move or size the grouped object, the shapes retain their positions in relation to each other. To break the bond, you ungroup the object.
If your picture consists of more than a few shapes, you might want to draw the shapes on a drawing canvas instead of directly on the page. The drawing canvas keeps the parts of the picture together, helps you position the picture, and provides a framelike boundary between your picture and the text on the page. You can draw shapes on the canvas in the usual ways. At any time, you can size and move the drawing canvas and the shapes on it as one unit.
On the Insert tab, in the Illustrations group, click the Shapes button.
In the Shapes gallery, click the shape you want, and then do one of the following:
Click anywhere on the page to insert a standard-size shape.
Drag anywhere on the page to draw a shape the size you want.
To change the appearance of a selected shape
To change the form of a selected shape
On the Format tool tab, in the Insert Shapes group, click the Edit Shape button, and then click Edit Points.
Drag the intersection points that appear on the shape to change specific vertices, or drag anywhere on the shape border.
To add text to a selected shape
Click the shape, and then enter the text.
Right-click the shape, click Add Text or Edit Text, and then enter the text.
To move a selected shape
Drag the shape to a new location and configure its position and layout options.
To copy a selected shape to a new location
Hold down the Ctrl key and drag the shape to the second location.
To group shapes
Select the first shape, hold down Ctrl, and then click the additional shapes you want to group.
On the Format tool tab, in the Arrange group, click the Group button, and then click Group.
To ungroup shapes
Select the grouped shapes.
On the Format tool tab, in the Arrange group, click the Group button, and then click Ungroup.
On the Insert tab, in the Illustrations group, click the Shapes button, and then click New Drawing Canvas.
Controlling shape layout options
By default, Word inserts a shape in front of the surrounding text, and other graphic objects in line with the surrounding text. You can change the position of the object on the page and the way text wraps around it.

The text wrapping options specify the relationship of the object to the text and include:
In Line with Text The line spacing increases as necessary to accommodate the object. The bottom of the object aligns with the bottom of the text on the same line.
Square The text wraps to the leftmost and rightmost points of the object.
Tight The text wraps closely to the left and right edges of the object.
Through The text wraps as closely as possible to all edges of the object.
Top and Bottom The text flows above and below the object, but the space to its left and right are left clear.
Behind Text The text flows in front of the object without interruption.
In Front of Text The text flows behind the object without interruption.
When you choose a text wrapping option other than In Line With Text, you can specify that an object be positioned in one of two ways:
You can take the guesswork out of setting an object’s position by choosing one of nine predefined position options from the Position gallery. These options all implement square text wrapping in a specific location relative to the margins of the page.

Even if you use one of the predefined options to position an object, you can move the object manually by dragging it to another position on the page. Often it is easier to drag objects into position if you display an on-screen grid to align against. You can also use alignment commands to align objects with the margins and with each other.
Changing the document text after you position an object might upset the arrangement of content on the page. On the Position page of the Layout dialog box, you can specify whether an object should move with its related text or remain anchored in its position. You can also specify whether the object should be allowed to overlap other objects.
After you arrange objects on the page, you can hide and display them by clicking the Visible icons in the Selection pane, so that you can judge each object’s contribution to the whole.

If you insert several objects and then position them so that they overlap, they are said to be “stacked.” The stacking order (which object appears on top of which) is initially determined by the order in which you inserted the objects, but it can also be determined by other factors such as the type of text wrapping assigned to each object. Provided all the objects have the same kind of text wrapping, you can change their order by selecting an object and clicking the Bring Forward or Send Backward button in the Arrange group to move the object to the top or bottom of the stack. If you click either button’s arrow and then click Bring Forward or Send Backward, the object moves forward or backward in the stack one position at a time.
To control the flow of text around a selected shape
Click the Layout Options button that appears in the upper-right corner of the shape, and then click the text wrapping option you want.
On the Format tool tab, in the Arrange group, click Wrap Text, and then click the wrapping style you want.
To position a shape absolutely
Click the Layout Options button that appears in the upper-right corner of the shape, and then click See more.
Or
On the Format tool tab, in the Arrange group, click Position, and then click More Layout Options.
On the Position page of the Layout dialog box, in the Horizontal and Vertical sections, click Absolute position, select the page element on which you want to fix the position of the shape (Margin, Page, Column, Character, Paragraph, Line, or specific margin), and enter the specific distance from the element.
To position a shape relatively
On the Position page of the Layout dialog box, in the Horizontal and Vertical sections, click Relative position, select the page element on which you want to fix the position of the shape (Margin, Page, or specific margin), and enter the percentage difference from the element.
To change the stacking order of multiple shapes
Select the shape you want to move up or down in the stack.
On the Format tool tab, in the Arrange group, do any of the following:
Click the Bring Forward or Send Backward button to move the shape up or down one level.
In the Bring Forward list, click Bring to Front to move the shape to the top of the stack.
In the Bring Forward list, click Bring in Front of Text to move the shape on top of the surrounding text.
In the Send Backward list, click Send to Back to move the shape to the bottom of the stack.
In the Send Backward list, click Send Behind Text to move the shape behind the surrounding text.
On the Format tool tab, in the Arrange group, click the Selection Pane button.
On the Home tab, in the Editing group, click Select, and then click Selection Pane.
Inserting and modifying SmartArt graphics
When you want to clearly illustrate a concept such as a process, cycle, hierarchy, or relationship, the powerful SmartArt Graphics tool makes it easy to create dynamic, visually appealing diagrams. By using predefined sets of coordinated formatting and effects, you can almost effortlessly construct any of the following types of diagrams:
List These diagrams visually represent lists of related or independent information—for example, a list of items needed to complete a task, including pictures of the items.
Process These diagrams visually describe the ordered set of steps required to complete a task—for example, the steps for getting a project approved.
Cycle These diagrams represent a circular sequence of steps, tasks, or events, or the relationship of a set of steps, tasks, or events to a central, core element—for example, the looping process for continually improving a product based on customer feedback.
Hierarchy These diagrams illustrate the structure of an organization or entity—for example, the top-level management structure of a company.
Relationship These diagrams show convergent, divergent, overlapping, merging, or containment elements—for example, how using similar methods to organize your email, calendar, and contacts can improve your productivity.
Matrix These diagrams show the relationship of components to a whole—for example, the product teams in a department.
Pyramid These diagrams illustrate proportional or interconnected relationships—for example, the amount of time that should ideally be spent on different phases of a project.
Picture These diagrams rely on pictures instead of text to create one of the other types of diagrams—for example, a process picture diagram with photographs showing the recession of glaciers in Glacier National Park. Picture diagrams are a subset of the other categories but are also available from their own category so that you can easily locate diagram layouts that support images.
SmartArt graphic layouts are available from the Choose A SmartArt Graphic dialog box. The categories are not mutually exclusive, meaning that some layouts appear in more than one category. Word 2013 includes some new built-in SmartArt templates, in addition to an internal connection to additional templates on the Office website.

After you choose a layout, Word inserts the basic diagram into the document, and sometimes displays the associated list format in the Text pane, into which you can enter information. (If the Text pane doesn’t open automatically, you can display it by clicking the button on the left edge of the diagram.) You can enter more or less information than is required by the original diagram; most diagrams support a range of entries (although a few are formatted to support only a specific number of entries). You can insert and modify text either directly in the diagram shapes or in the associated Text pane. The selected layout determines whether the text appears in or adjacent to its shapes.
Tip
You change the size, shape, and location of a SmartArt graphic by using the same techniques as you do with other graphic elements.
After you create a diagram and add the text you want to display in it, you might find that the diagram layout you originally selected doesn’t precisely meet your needs. You can easily change to a different diagram layout without losing any of the information you entered in the diagram. If a particular layout doesn’t support the amount or level of information that is associated with the diagram, the extra text will be hidden but not deleted, and will be available when you choose another layout that supports it.
Tip
If a gallery has a sizing handle (three dots) in its lower-right corner, you can drag the handle upward to reduce the height of the gallery. You can then display more of the document and the gallery at the same time.

When you decide on the layout you want to use, you can add and remove shapes and edit the text of the diagram by making changes in the Text pane, or by using the options on the SmartArt Tools tabs.
You can make changes such as these by using the commands on the Design tool tab:
You can customize individual shapes in the following ways by using the commands on the Format tool tab:
Change an individual shape—for example, you can change a square into a star.
Apply a built-in shape style.
Change the color, outline, or effect of a shape.
Change the style of the shape’s text.
The Live Preview feature displays the effects of these changes before you apply them. If you apply changes and then decide you preferred the original version, you can click the Reset Graphic button in the Reset group on the Design tool tab to return to the unaltered diagram layout.
To insert a SmartArt graphic
On the Insert tab, in the Illustrations group, click the SmartArt button.
In the left pane of the Choose a SmartArt Graphic dialog box, click the type of diagram you want.
In the center pane, click the layout you want, and then click OK.
To delete a shape from a SmartArt graphic
Click the shape, and then press the Delete key.
To apply a style to a selected diagram
To apply a style to a selected diagram shape
On the Format tool tab, in the Shape Styles gallery, click the style you want to apply.
Or
On the Format tool tab, click the Shape Styles dialog box launcher.
In the Format Shape pane, on the Fill & Line, Effects, and Layout & Properties pages, choose the effects you want to apply.
5.3 Insert and format images
Inserting images
You can insert digital photographs or pictures created in almost any program into a Word document. You specify the source of the image you want to insert by clicking one of these two buttons, which are located in the Illustrations group on the Insert tab:
Pictures Click this button to insert a picture that is saved as a file on your computer, on a network drive, or on a device (such as a digital camera) that is connected to your computer.
Online Pictures Click this button to insert a royalty-free clip art image from Office.com, a web search result from Bing, or an image stored on your Microsoft SkyDrive or another online source.
You can also capture and insert images of content displayed on your computer screen directly from Word. By using the built-in screen clipping tool, you can insert screen captures of entire windows or selected areas of on-screen content.
Note
Strategy Tasks related to inserting charts, screenshots, screen clippings, apps, or media are not necessary to demonstrate for this exam.
To insert an image from a file
On the Insert tab, in the Illustrations group, click the Pictures button.
In the Insert Picture dialog box, browse to and click the file you want. Then do one of the following:
Click Insert to insert the image into the document.
In the Insert list, click Link to File to insert an image that will update automatically if the image file changes.
In the Insert list, click Insert and Link to insert an image that you can manually update if the image file changes.
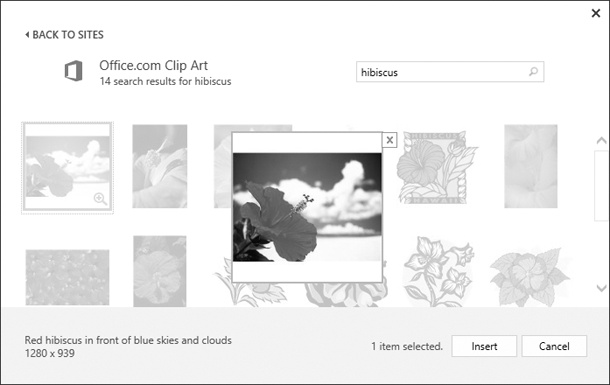
On the Insert tab, in the Illustrations group, click the Online Pictures button.
In the Insert Pictures window, click the online source (Office.com, Bing Image Search, a Microsoft SharePoint site or SkyDrive folder, or one of the available linked third-party sites).
Enter a keyword in the search box and press Enter, or navigate to the picture you want to insert.
Double-click the image you want to insert.
Formatting images
After you insert an image in a document, you can modify it in many ways. For example, you can crop or resize an image, change the image’s brightness and contrast, recolor it, and apply artistic effects to it. You can apply a wide range of preformatted styles to an image to change its shape and orientation, in addition to adding borders and picture effects.
You modify the image by using commands on the Format tool tab, which is displayed only when an object is selected.
The Adjust group contains commands that enable you to change the image’s brightness and contrast, recolor it, apply artistic effects to it, and compress it to reduce the size of the document containing it.
The Picture Styles group offers a wide range of picture styles that you can apply to an image to change its shape and orientation, and add borders and picture effects. This group includes the Quick Styles gallery, which contains many preformatted styles that you can apply very quickly.
The Arrange group contains commands for specifying the relationship of the image to the page and to other elements on the page.
The Size group contains commands with which you can crop and resize images.

The Picture Styles group offers a wide range of picture styles that you can apply to an image to change its shape and orientation and add borders and picture effects. You can select a preset style or select individual border, effects, and layout settings. Effect options include shadow, reflection, glow, soft edge, bevel, and rotation effects.
The Artistic Effects gallery provides many preformatted effects designed to make a photograph appear more like a watercolor or pastel painting, mosaic, or chalk or pencil sketch.

In addition to changing the style of an image, you can crop or resize it, recolor it, and compress it to reduce the size of the document containing it. Changing an image’s brightness, contrast, or color is done by choosing options on the Picture page of the Format Picture pane. You can make precise adjustments to the image’s size by selecting options on the Size page of the Layout dialog box or in the Crop section of the Picture page of the Format Picture pane.
To apply a style to a selected image
On the Format tool tab, click the Picture Styles dialog box launcher.
In the Format Picture pane, on the Fill & Line, Effects, Layout & Properties, and Picture pages, choose the settings you want to apply. Then click Close.
To apply artistic effects to a selected image
On the Format tool tab, in the Adjust group, expand the Artistic Effects gallery, and then click the effect you want to apply.
To apply picture effects to a selected image
On the Format tool tab, in the Picture Styles group, click Picture Effects, point to any category to expand the gallery, and then click the effect you want to apply.
To change the brightness, contrast, or color of a selected image
In the Format Picture pane, on the Picture page, modify the settings in the Picture Corrections and Picture Color sections.
To change the size and/or shape of a selected image
Drag its sizing handles.
On the Format tool tab, in the Size group, change the Height and Width settings.
On the Format tool tab, click the Size dialog box launcher. Then on the Size page of the Layout dialog box, change the Height, Width, or Scale settings.
Objective review
Before finishing this chapter, ensure that you have mastered the following skills:
| 5.1 Insert and format building blocks |
| 5.2 Insert and format shapes and SmartArt |
| 5.3 Insert and format images |