
Chapter 3. Create Tables and Lists
The skills tested in this section of the Microsoft Office Specialist exam for Microsoft Word 2013 relate to creating and modifying tables and lists. Specifically, the following objectives are associated with this set of skills:
| 3.1 Create tables |
| 3.2 Modify tables |
| 3.3 Create and modify lists |
Some types of document content are easier to read when presented in a structured format; specifically, in a table or list. Tables are particularly useful for presenting numeric data, but also for organizing text. Numbered lists are an effective means of presenting information that has a specific order or for which you want to designate labels. Bulleted lists present unordered sets of information in a tidy format that is far more legible than running the information together in a long paragraph.
This chapter guides you in studying ways of creating, modifying, and formatting tables, bulleted lists, and numbered lists; sorting table data; and performing calculations in tables.
Note
Practice Files To complete the practice tasks in this chapter, you need the practice files contained in the MOSWord2013Objective3 practice file folder. For more information, see Download the practice files in this book’s Introduction.
3.1 Create tables
Creating basic tables
Numeric data can often be presented more efficiently in a table than in a paragraph of text. Tables present large amounts of data, or complex data, in a format that is easier to read and understand by structuring it in rows and columns. Tables frequently include row and column headers to explain the purpose or meaning of the data.
You can create a table in several ways:
Select the number of rows and columns you want from a grid. Clicking a cell in the grid inserts an empty table the width of the text column. The table has the number of rows and columns you indicated in the grid, with all the rows one line high and all the columns of equal width.
Specify the number of columns and rows, and the width of the table and its columns, in the Insert Table dialog box.
Manually draw a table that contains rows and columns of the size you want. The cells you draw connect by snapping to a grid, but you have some control over the size and spacing of the rows and columns. After drawing a table, you can erase parts of it that you don’t want and adjust the table, column, and row size by using tools on the Layout tool tab for tables.
Convert selected text to a table of a specified or relative width.
Note
Strategy You can also insert existing data from a Microsoft Excel worksheet in a Word document, but the intricacies of using the Microsoft Office programs together are not likely to be tested on the Word certification exam.

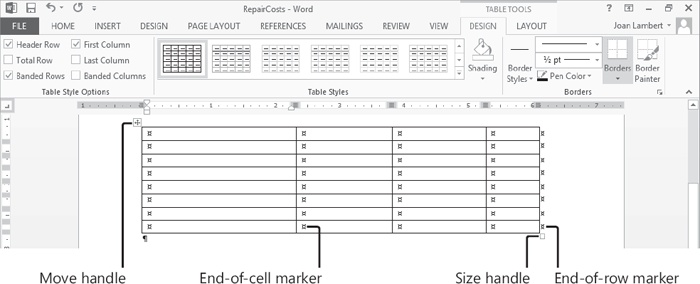
A table appears in the document as a set of cells, usually delineated by borders or gridlines. (In some Quick Tables, borders and gridlines are turned off.) Each cell contains an end-of-cell marker, and each row ends with an end-of-row marker.
Tip
Two separate elements in Word 2013 are named gridlines, and both can be used in association with tables. From the Show group on the View tab, you can display the document gridlines with which you can position content on the page. From the Table group on the Layout tool tab, you can display the table gridlines that define the cells of a table.
When you point to a table, a move handle appears in its upper-left corner and a size handle in its lower-right corner. When the cursor is in a table, two Table Tools tabs—Design and Layout—appear on the ribbon.
Tip
The end-of-cell markers and end-of-row markers are identical in appearance, and are visible only when you display formatting marks in the document. The move handle and size handle appear only in Print Layout view and Web Layout view.
Converting between text and tables
Converting text to a table is particularly easy when the text has a consistent structure, such as that of a tabbed list. You can convert cell entries that are separated by tabs, commas, paragraph marks, or another single character. Similarly, you can convert any table to text that is separated by the same selection of characters.

Setting AutoFit options
In the Insert Table or Convert Text To Table dialog box, or from the Layout tool tab at any time after creating a table, you can specify an exact or relative table width by selecting an AutoFit Behavior option. The default AutoFit behavior is Fixed Column Width: Auto, which divides the available page width into equal columns. Other AutoFit Behavior options include:
Fixed Column Width with a dimension, which creates columns of the specified width.
AutoFit To Contents, which creates columns only as wide as they need to be to contain their content.
AutoFit To Window, which sets the table width to the page width and creates equal columns or, when applied to a table that has columns of relative width, maintains the relation.
Nesting multiple tables
Most people are accustomed to thinking of a table as a means of displaying data in a quick, easy-to-grasp format. But tables can also serve to organize your pages in creative ways. For example, suppose you want to display two tables side by side. The simplest way to do this is to first create a table with one tall row and two wide columns and no gridlines. You can then insert one table in the first cell and the other table in the second cell. These nested tables then seem to be arranged side by side.

As with regular tables, you can create a nested table from scratch, by formatting existing information, or by inserting Excel data, and you can format a nested table either manually or by using one of the ready-made table styles.
Tip
You can use nested tables to organize a mixture of elements such as text, tables, charts, and diagrams.
To insert a table
On the Insert tab, in the Tables group, click the Table button.
In the grid, move the pointer across and down to select the number of columns and rows you want, and then click the lower-right cell in the selection.
Or
On the Insert tab, in the Tables group, click the Table button, and then click Insert Table.
In the Insert Table dialog box, in the Table size area, specify the number of columns and rows you want the table to include.
In the AutoFit behavior area, do one of the following, and then click OK:
Click Fixed column width, and then specify a standard width for the table columns.
Click AutoFit to contents to size the table columns to fit their contents. The width of the resulting table can be less than the width of the page.
Click AutoFit to window to create a table that fits within the page margins and is divided into columns of equal size.
On the Insert tab, in the Tables group, click the Table button, and then click Draw Table.
When the pointer changes to a pencil, drag across and down in the document to define the outer edges of the table or an individual column, row, or cell.
Drag to create additional cells, or draw column and row boundaries inside the first cell.
Press Esc to turn off the table-drawing pointer.
Tip
You can add and remove lines from an existing table by using the Draw Table and Eraser commands in the Draw Borders group on the Layout tool tab. You can change the style, weight, and color of the borders of drawn tables by setting the options in the Borders group on the Design tool tab and then using the Border Painter command.
To convert selected text to a table
Select the text that you want to convert to a table.
On the Insert tab, in the Tables group, click the Table button, and then click Convert Text to Table.
In the Convert Text to Table dialog box, adjust the Table size and AutoFit behavior settings, select the type of text separator, and then click OK.
Click anywhere in the table.
On the Layout tool tab, in the Data group, click the Convert to Text button.
In the Convert Table to Text dialog box, do one of the following, and then click OK:
Click Paragraph marks, Tabs, or Commas to separate the content of table cells with one of these standard elements.
Click Other, and then enter any single character in the Other box to separate the content of table cells with that character.
Inserting preformatted tables
In addition to blank tables and tables converted from text, you can create Quick Tables, which are preformatted tables containing sample data. You can replace the sample data with your own and modify the formatting as you would with any other table.
Built-in Quick Tables include a variety of calendars, simple tables, tables with subheadings, and tabbed lists. Some of the tables present fictitious data for the purpose of illustrating the table layout.

Tip
The calendar content of a Quick Table cannot be programmatically set to a specific month and year; that information must be replaced manually. You can create calendars specific to a calendar year or academic year by selecting a calendar template from the New page of the Backstage view.
Note
Strategy You can save your own custom tables (including content) to the Quick Tables gallery so that you can easily insert a frequently used table structure and data into any document. The objective domain for Exam 77-418 includes coverage of inserting preformatted tables. Saving custom building blocks, including Quick Tables, is part of the objective domain for Exam 77-419, Word 2013 Expert.
3.2 Modify tables
Formatting tables
To quickly and professionally format a table, you can apply one of the built-in table styles. These include a variety of borders, shading choices, text colors, and other attributes to give the table a professional look. When formatting a table, you can choose the table elements that you want to emphasize, such as a header or total row or the first or last column, and you can format the table with banded columns or rows to make the contents more legible.
Tip
When the edges of table cells are not visually differentiated by borders or other formatting, you can display nonprinting gridlines that define the edges of the table cells.
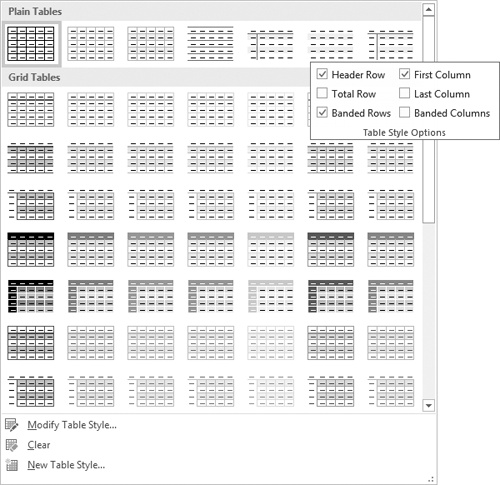
To apply a built-in table style
Click anywhere in the table you want to format.
On the Design tool tab, in the Table Styles gallery, click the built-in style you want to apply.
To manually format table elements
To shade cells, columns, or rows, select the element and then on the Design tool tab, in the Table Styles group, click the Shading arrow and select the color you want.
To change the color or width of borders, on the Design tool tab, in the Borders group, select the border style, line style, line weight, and pen color you want, and then do one of the following:
On the Borders menu, click the border configuration that you want to insert with the selected settings.
Click the Border Painter button, and then click individual table borders to apply the selected settings.
To remove selected cell borders, do one of the following:
Select one or more cells, rows, or columns from which you want to remove the borders. Then on the Design tool tab, in the Borders group, on the Borders menu, click No Border.
On the Layout tool tab, in the Draw group, click the Eraser button, and then click individual table borders to remove them. Click the Eraser button again, press Esc, or click away from the table to turn off the feature.
To display or hide table gridlines
On the Layout tool tab, in the Table group, click the View Gridlines button.
Select the text and format it as you would regular text, by clicking buttons on the Mini Toolbar and in the Font, Paragraph, and Quick Styles groups on the Home tab.
Modifying table data
After creating a table, you can enter text, numbers, and graphics into its cells. You can edit the information as you would normal text.
Sorting table data
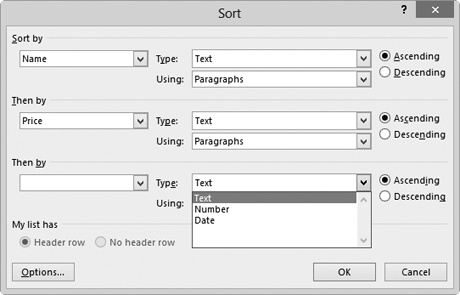
You can sort the data within a table by the contents of one or more table columns. Word sorts only the data rows in your table, and not the header row (if you indicate in the Sort dialog box that the table has one) or the Total row (if you format a Total row in the Table Style Options group).
Note
Strategy Create a table that contains multiple columns and many rows of data and observe the effect of sorting the table by various columns, with and without a header row, and with and without a Total row, to understand the sorting process.
To sort table data
Click anywhere in the table.
On the Layout tool tab, in the Data group, click the Sort button.
In the Sort dialog box, do the following, and then click OK:
In the Sort by area, select the primary column by which you want to sort the content, the content type (Text, Number, or Date) if necessary to set the correct numeric sorting order, and Ascending or Descending.
In the Then by area, select and configure up to two additional nested sorting criteria.
Using formulas in tables
When you want to perform a calculation on numbers in a Word table, you can construct a formula by using the tools in the Formula dialog box. In Word 2013 tables, you can create formulas that use the following functions:
ABS() Returns the absolute (positive) value of the specified cell value
AND() Returns the value TRUE if all arguments in the formula are true
AVERAGE() Returns the average value of the specified cell values
COUNT() Returns the number of cells in the specified cell range
DEFINED() Evaluates an argument specified in the formula and returns 1 if the argument has been defined and 0 if it has not been defined or returns an error
FALSE() Returns the alternative output value FALSE
IF() Evaluates a condition specified in the formula and returns one value if the condition is true and another value if the condition is false
INT() Rounds a number down to the nearest whole number
MAX() Returns the maximum value in the specified cell range
MIN() Returns the minimum value in the specified cell range
MOD() Returns the remainder of a division operation
NOT() Returns the opposite of a given or calculated TRUE or FALSE value
OR() Returns one of two values based on criteria specified in the formula
PRODUCT() Returns the product (by multiplication) of the specified cell values
ROUND() Rounds a number to the specified number of digits
SIGN() Returns the value 1 if a number is positive, 0 if the number is zero, or -1 if the number is negative
SUM() Returns the sum (by addition) of the specified cell values
TRUE() Returns the alternative output value TRUE
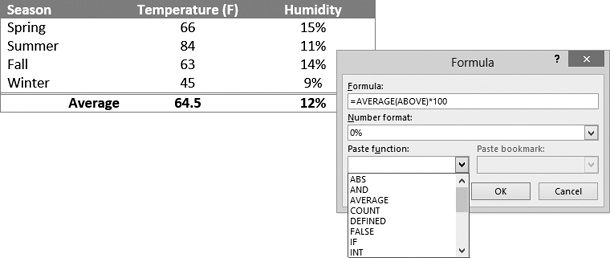
A formula consists of an equal sign (=), followed by a function name, followed by a relative or absolute reference to the cells on which you want to perform the calculation. You can reference the cells as ABOVE, BELOW, RIGHT, or LEFT, or use the cell address or range. The cell address is a combination of the column letter and the row number—for example, A1. Multiple contiguous cells can be addressed as a range consisting of the upper-left cell and the lower-right cell separated by a colon, such as A1:B4.
If you change a value that is used in a formula, you must recalculate the formula.
To total a column of values in a table
Click the cell in the table where you want the total to appear.
On the Layout tool tab, in the Data group, click the Formula button.
Enter the formula you want to use in the Formula box.
Or
In the Paste function list, select the function you want to insert. Then enter the cell reference in parentheses and any arguments or values required by the formula.
In the Number format list, click the output format for the value to append the correct code for that format to the Formula box.
In the Formula dialog box, click OK.
To view and modify table formulas
To display the field codes of a formula rather than its value, right-click the value, and then click Toggle Field Codes.
To manually recalculate a formula value, right-click the value, and then click Update Field.
To modify an existing formula, click the formula value, and then on the Layout tool tab, in the Data group, click the Formula button.
Modifying table structure
You can modify a table’s structure at any time. The basic ways to do so are as follows:
Change the height or width of the table, columns, or rows.
Insert or delete rows, columns, or cells.
Merge multiple cells into one cell or split one cell into multiple cells.
Modify the alignment and spacing within cells.

Click anywhere in the table, column, row, or cell you want to select. On the Layout tool tab, in the Table group, on the Select menu, click Select Cell, Select Column, Select Row, or Select Table.
To select a table, point to the table, and then click the move handle that appears outside its upper-left corner.
To select a row, point to the left border of the row. When the pointer changes to a white, right-pointing arrow, click once.
To select a column, point to the top border of the column. When the pointer changes to a black, down-pointing arrow, click once.
To select a cell, triple-click the cell or click its left border.
To select adjacent cells, click the first cell, hold down the Shift key, and then press the arrow keys.
To display the Table Properties dialog box
Right-click anywhere in the table, and then click Table Properties.
Or
Click anywhere in the table or select any table element.
On the Layout tool tab, in the Table group, click the Properties button.
To modify properties from the Table Properties dialog box
On the Table page, set the table width, specify the way the table interacts with the surrounding text, and access border and shading options, including the internal margins of table cells.
On the Row page, set the height of the selected rows, whether rows can break across pages (in the event that the table is wider than the page), and whether the header row is repeated at the top of each page when a table is longer than one page.
Tip
The Repeat As Header Row option applies to the entire table. The option is available only when the cursor is in the top row of the table. Selecting this option helps readers of a document to more easily interpret data in multipage tables. It also allows assistive devices such as screen readers to correctly interpret the table contents.
On the Column page, set the preferred width of the selected column or columns.
On the Cell page, set the width of selected cells and the vertical alignment of text within them. Click the Options button on this page to set the internal margins and text wrapping of individual cells.
To change the size of a selected table
Drag the size handle in the lower-right corner of the table. If you want to maintain the original aspect ratio of the table, hold down the Shift key while dragging the size handle.
On the Table page of the Table Properties dialog box, specify the table width in inches or percentage of the available page width, and then click OK.
To change the height of a selected row
Drag the row’s bottom border up or down.
Drag the row’s Adjust Table Row marker on the vertical ruler up or down.
On the Layout tool tab, in the Cell Size group, change the Table Row Height setting.
On the Row page of the Table Properties dialog box, specify the exact or minimum row height, and then click OK.
With multiple rows selected, click the Distribute Rows button in the Cell Size group on the Layout tool tab, or right-click the selection and then click Distribute Rows Evenly.
To change the width of a selected column
Double-click the column’s right border to set it to the narrowest width that fits its content.
Drag the column’s right border to the left or right.
Drag the column’s Move Table Column marker on the horizontal ruler to the left or right.
On the Layout tool tab, in the Cell Size group, change the Table Column Width setting.
On the Column page of the Table Properties dialog box, specify the column width in inches or percentage of the table width, and then click OK.
With multiple columns selected, click the Distribute Columns button in the Cell Size group on the Layout tool tab, or right-click the selection and then click Distribute Columns Evenly.
To insert rows or columns
Point to the left edge of the table, between two rows where you want to insert another, or to the top of the table between two columns where you want to insert another. A gray insertion indicator labeled with a plus sign appears as you approach a possible insertion point (after any existing row or column). When the insertion indicator turns blue, click to insert the row or column where indicated.
Position the cursor in the last cell of a table, and then press Tab to extend the table by one row.
Or
Click anywhere in a column or row adjacent to which you want to add a single column or row, or select the number of columns or rows you want to insert.
On the Layout tool tab, in the Rows & Columns group, click Insert Above, Insert Below, Insert Left, or Insert Right.
Or
On the Mini Toolbar, click the Insert button, and then click Insert Above, Insert Below, Insert Left, or Insert Right.
To insert cells
Click the cell adjacent to which you want to add a single cell, or select the number of cells you want to insert.
On the Layout tool tab, click the Rows & Columns dialog box launcher.
In the Insert Cells dialog box, specify how adjacent cells should be moved to accommodate the new cell or cells, and then click OK.
To delete a table, rows, or columns
Click anywhere in the table, row, or column you want to delete, or select the rows or columns you want to delete.
On the Layout tool tab, in the Rows & Columns group, on the Delete menu, click Delete Rows, Delete Columns, or Delete Table.
Or
On the Mini Toolbar, on the Delete menu, click Delete Rows, Delete Columns, or Delete Table.
To delete cells
Click the cell, or select the cells you want to delete.
On the Layout tool tab, in the Rows & Columns group, click the Delete button, and then click Delete Cells.
Or
On the Mini Toolbar, click the Delete button, and then click Delete Cells.
In the Delete Cells dialog box, specify how adjacent cells should move to replace the deleted cell or cells, and then click OK.
To create cells that span multiple rows or columns
Select the adjacent cells you want to connect. Then on the Layout tool tab, in the Merge group, click the Merge Cells button.
To divide a selected cell into multiple cells
On the Layout tool tab, in the Merge group, click the Split Cells button.
In the Split Cells dialog box, specify the number of columns and rows into which you want to divide the cell, and then click OK.
To configure the alignment and margins of a selected cell
On the Layout tool tab, in the Alignment group, click one of the nine Align buttons to specify a combination of top, middle, or bottom and left, center, or right alignment.
In the Alignment group, click the Cell Margins button. In the Table Options dialog box, set the top, bottom, left, and right margins; specify whether to insert space between cells and how much space to insert; and specify whether to automatically resize cells to fit their contents.
3.3 Create and modify lists
Creating bulleted and numbered lists
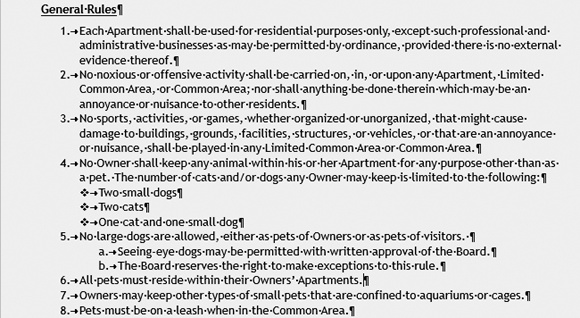
Lists are paragraphs that start with a character and are formatted with a hanging indent so that the characters stand out on the left end of each list item. You can create bulleted, numbered, or multilevel lists. You can choose the starting character from a library of preselected bullet symbols, numbering patterns, or multilevel combinations, or you can create your own.
You can format an existing set of paragraphs as a list or create the list as you enter information into the document.
To create a bulleted list
Enter the list items as separate paragraphs, and then select the paragraphs.
On the Home tab, in the Paragraph group, click the Bullets button, or click the Bullets arrow and then click the bullet symbol you want to appear before each list item.
Or
Enter * (an asterisk) at the beginning of a paragraph, press the Spacebar or the Tab key, enter the first list item, and then press Enter.
Enter items and press Enter to add subsequent bulleted items.
To end the list, do one of the following:
To start the next paragraph at the left margin, press Enter twice.
To indent the next paragraph at the same level as the list, press Enter and then press Backspace or click None in the Bullet Library.
Tip
If you want to start a paragraph with an asterisk or number but don’t want to format the paragraph as a bulleted or numbered list, click the AutoCorrect Options button that appears after Word changes the formatting, and then in the list, click the appropriate Undo option. You can also click the Undo button on the Quick Access Toolbar.
To create a numbered list
Select the paragraphs you want to include in the list. On the Home tab, in the Paragraph group, do one of the following:
Click the Numbering button to apply the standard numbered list format.
Click the Numbering arrow and then click the numbering format you want the list to follow.
Or
Enter 1. (the number 1 followed by a period) at the beginning of a paragraph, press the Spacebar or the Tab key, enter the first list item, and then press Enter.
Enter items and press Enter to add subsequent numbered items.
To end the list, do one of the following:
To start the next paragraph at the left margin, press Enter twice.
To indent the next paragraph at the same level as the list, press Enter and then press Backspace or click None in the Numbering Library.
Select the paragraphs you want to include in the list. On the Home tab, in the Paragraph group, click the Multilevel list button, and then click the format you want the list to follow.
To move a list item to a lower level (indented more) press Tab at the beginning of the paragraph. To move a list item to a higher level (indented less) press Shift+Tab at the beginning of the paragraph.
Modifying bulleted and numbered lists
After you create a bulleted or numbered list, you can modify the content and formatting of the list items, or even change the list type. You can change the bullet symbols, numeric characters, and list item levels, and start or restart list numbering at any value.
To change the level of an active list item
On the Home tab, in the Paragraph group, click the Increase Indent button to demote the item or the Decrease Indent button to promote the item.
On the Home tab, in the Paragraph group, click the Bullets arrow or the Numbers arrow, click Change List Level, and then in the Change List Level gallery, click the level you want.
To change the order of list items
To move list items, drag them to the new location or cut and paste them. If necessary, click the Paste Options button and then click the Merge List or Don’t Merge List button to insert the list item at the hierarchical level you want.
Sort list items into ascending or descending order by clicking the Sort button in the Paragraph group on the Home tab.
To change the bullet symbol, numbering style, or multilevel list pattern
Click anywhere in the list you want to format, and then on the Home tab, in the Paragraph group, do one of the following:
On the Home tab, in the Paragraph group, click the Bullets arrow, and then click Define New Bullet.
In the Define New Bullet dialog box, do one of the following, and then click OK to add the bullet to the Bullet Library area of the Bullets menu.
Click the Symbol button. In the Symbol dialog box, locate and click the bullet symbol you want to use, and then click OK.
Click the Picture button. In the Picture Bullet dialog box, locate and click the bullet graphic you want to use, and then click OK.
If you want to specify a font instead of using the document fonts, click the Font button, select the font attributes you want, and then click OK.
In the Alignment list, click Left, Centered, or Right to specify the bullet alignment.
To define a custom number format
On the Home tab, in the Paragraph group, click the Numbering arrow, and then click Define New Number Format.
In the Define New Number Format dialog box, do any of the following, and then click OK to add the number format to the Numbering Library area of the Numbering menu:
In the Number style list, click the numbering style you want to use.
If you want to specify a font instead of using the document fonts, click the Font button, select the font attributes you want, and then click OK.
In the Number format box, enter any characters (such as a period or the word Level) that you want to insert before or after the number.
In the Alignment list, click Left, Centered, or Right to specify the number alignment.
To define a custom multilevel list pattern
On the Home tab, in the Paragraph group, click the Multilevel List button, and then click Define New Multilevel List.
In the Define new Multilevel list dialog box, click the More button to display all the list options, if necessary.
In the Click level to modify list, click the list level you want to modify.
If the cursor is currently in a list and you want to format all or part of that list with the new definition, click Whole list, This point forward, or Current paragraph in the Apply changes to list.
In the Link level to style list, click the style to which you want to assign the level you’re defining (for example, if you’re defining a Level 2 bulleted list item, you might link it to the List Bullet 2 style).
Note
See Also For information about styles, see 2.2 Format text and paragraphs.
In the Level to show in gallery list, click the number of the first level you want to display in the thumbnail on the Multilevel List menu. The selected level becomes bold in the preview pane.
In the Number format area, do either of the following:
In the Number style for this level list, click the numbering style or bullet symbol you want to use for the list level.
Tip
You can define a custom bullet or numbering style by clicking New Picture or New Bullet in the list.
If you want to specify a font instead of using the document fonts, click the Font button, select the font attributes you want, and then click OK.
If you select a numbering style in the Number style for this level list, you can also do the following:
If you want to prepend the number of a previous level to the selected format, click that level in the Include level number from list.
If you want to specify a starting number or letter other than the default, enter the number or letter in the Start at box.
If you want to ensure that the list numbering does not continue past a specific style (for example, a heading), select the Restart list after check box, and then click the style in the associated list.
If you want to force the use of only Arabic numbers (not Roman numerals), select the Legal style numbering check box.
In the Position area, set the number alignment and text indent for the level.
Or
To set an alignment and indent pattern for all levels, click the Set for All Levels button. In the Set for All Levels dialog box, specify the character and text indent for Level 1, specify the additional indent for subsequent levels, and click OK.
Repeat the preceding process for each level you want to define. Then click OK to add the level definition to the Lists Library area of the Multilevel List menu.
To restart the numbering of a numbered list
Right-click the number of the first list item you want to change, and then click Restart at 1.
Or
To continue the numbering of a numbered list
Right-click the number of the first list item you want to change, and then click Continue Numbering.
Or
Position the cursor in the first list item you want to change.
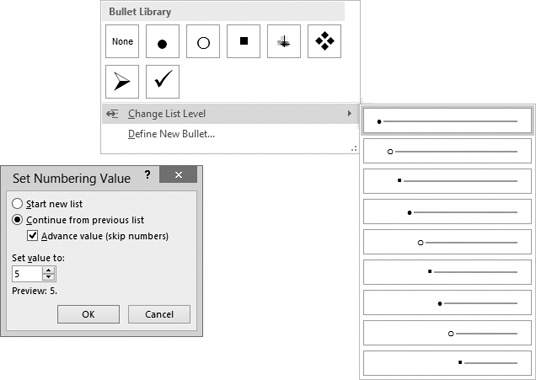
On the Numbering menu, click Set Numbering Value.
In the Set Numbering Value dialog box, click Continue from previous list.
If you want to skip over numbered lists that are between the original list and the continuation, select the Advance value check box and then, in the Set value to box, enter the number you want to assign to the list item.
In the Set Numbering Value dialog box, click OK.
Objective review
Before finishing this chapter, ensure that you have mastered the following skills:
| 3.1 Create tables |
| 3.2 Modify tables |
| 3.3 Create and modify lists |