
Chapter 2. Format Text, Paragraphs, and Sections
The skills tested in this section of the Microsoft Office Specialist exam for Microsoft Word 2013 relate to formatting document content. Specifically, the following objectives are associated with this set of skills:
| 2.1 Insert text and paragraphs |
| 2.2 Format text and paragraphs |
| 2.3 Order and group text and paragraphs |
Word documents are merely containers for their content. The way that you present that content—by formatting its appearance and structure and by maintaining consistency—can improve the effectiveness of the document in communicating a specific message.
This chapter guides you in studying ways of inserting text, symbols, special characters, document properties, and fields by using different methods; formatting text and creating WordArt objects; formatting paragraph indentation, spacing, and layout; and structuring a document by inserting page and section breaks.
Note
Practice Files To complete the practice tasks in this chapter, you need the practice files contained in the MOSWord2013Objective2 practice file folder. For more information, see Download the practice files in this book’s Introduction.
2.1 Insert text and paragraphs
Note
See Also For basic information about cutting, copying, and pasting content, see the Prerequisites section that precedes the objective coverage.
Pasting and appending text
Cutting, copying, pasting, and moving text are basic skills within Microsoft Office programs. The Microsoft Office Clipboard stores items (up to 24) that have been cut or copied from any Office program. When the Clipboard is full, the oldest item is deleted when a new one is added. All items are deleted when you turn off the computer, or you can manually delete individual items or all items.
Invoking the Paste command pastes the newest item from the Clipboard. You can view and work with all the items that have been cut or copied to the Clipboard in the Clipboard pane.

To manage the display of the Clipboard pane
To manually display the Clipboard, on the Home tab, click the Clipboard dialog box launcher.
To control the automatic display of the Clipboard, click Options at the bottom of the Clipboard pane, and then select one of the following:
To always display the Clipboard when you cut or copy an item, select Show Office Clipboard Automatically.
To display the Clipboard only when you use a specific keyboard shortcut, select Show Office Clipboard When Ctrl+C Pressed Twice.
To never display the Clipboard automatically, select Collect Without Showing Office Clipboard.
To close the Clipboard pane, click the Close button at the right end of its title bar.
To manage items in the Clipboard pane
To paste an individual item at the cursor, click the item; or point to the item, click the arrow that appears, and then click Paste.
To paste all the items stored on the Clipboard at the same location, click the Paste All button.
To remove an item from the Clipboard, point to the item, click the arrow that appears, and then click Delete.
To remove all items from the Clipboard, click the Clear All button.
Items are pasted from the Clipboard with the default formatting specified in the Cut, Copy, And Paste section of the Advanced page of the Word Options dialog box. You can change the default behavior to suit your needs, select a paste option from the Paste menu in the Clipboard group, or paste an item and then select a paste option from the shortcut menu. Available paste options vary based on the source content and destination formatting, and can be related to any type of formatting applied to the content.
Tip
By default, the Use Smart Cut And Paste check box is selected on the Advanced page of the Word Options dialog box, so Word inserts and deletes any necessary spaces. To control the spacing yourself, clear this check box.
To override the default formatting when pasting content
Paste the content by using a standard method, click the Paste Options button that appears near the lower-right corner of the pasted content, and then select the paste option you want.
On the Home tab, in the Clipboard group, click the Paste arrow, and then in the Paste Options section of the menu, click the option you want.
Pasting content in alternative formats
You can paste cut or copied content into a document in a variety of formats by clicking Paste Special on the Paste menu. If you cut or copy a file, Microsoft PowerPoint slide, or other individual item, options to paste a linked copy of the item or of a representative icon are active. When you paste a link, you can update the linked item if the original item changes. And you can paste a hyperlink to the copied item so that you can easily jump to the original from the linked copy.
The Paste Special dialog box lists formats that are valid for the content that was most recently placed on the Clipboard. These might include such formats as Picture, Bitmap, Device Independent Bitmap, GIF, PNG, JPEG, Formatted Text, Unformatted Text, Unformatted Unicode Text, HTML, Word Document Object, Excel Worksheet Object, PowerPoint Slide Object, and Files.
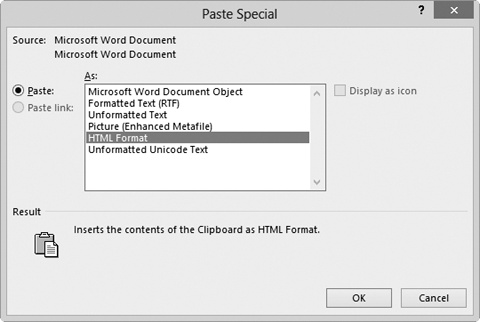
To paste a cut or copied item or content in a different format
On the Home tab, in the Clipboard group, click the Paste arrow, and then click Paste Special.
In the Paste Special dialog box, click the format you want, and then click OK.
To paste a link or hyperlink to a copied item
In the Paste Special dialog box, click Paste link, and then click the format you want.
To display an icon rather than the item content, select the Display as icon check box.
Click OK.
To update a linked copy to reflect changes to the original
Right-click the copy, and then click Update Link.
Appending text to documents
You can quickly append the contents of other documents to the active document without having to copy and paste large quantities of content or content from multiple sources.
To append content to the current document
Press Ctrl+End to position the cursor at the end of the document. Ensure that the cursor is in a blank paragraph.
On the Insert tab, in the Text group, click the Object arrow (not the button), and then click Text from File.
In the Insert File dialog box, browse to and select the document or documents you want to insert. Then click the Insert button.
Finding and replacing text
When developing document content, you can ensure that the text in your documents is consistent and accurate by using the Find feature to review every occurrence of a specific word or phrase, or the Replace feature to consistently modify text, formatting, or styles.
You can conduct simple text searches from the Navigation pane. You can conduct more complex searches, and replace search terms with other text or special characters, from the Find And Replace dialog box.

In the Navigation pane, enter the text in the Search box.
Display the Results page of the Navigation pane, and then do any of the following:
Point to a search result to display the number of the page on which it appears and the heading that precedes it.
Click a search result to display it in the document.
Click the Previous or Next button to move among the search results.
Click the End your search button (the X) at the right end of the search box to clear the search results.
To restrict text search results from the Navigation pane
In the Navigation pane, click the Search for more things arrow at the right end of the search box, and then click Options.
In the Find Options dialog box, select the search criteria you want, and then click OK.
Enter the search text in the Search box.
In the Navigation pane, click the Search for more things arrow at the right end of the search box, and then do one of the following:
Click Graphics, Tables, Equations, Footnotes/Endnotes, or Comments to highlight all instances of the item in the document and on the Headings page of the Navigation pane, and display the specific results on the Pages page of the Navigation pane.
Click Go To. On the Go To page of the Find and Replace dialog box, click the type of object you want to locate, and then click the Previous or Next button to move among those items in the document.
To locate nonspecific text and special characters
Display the Find page of the Find and Replace dialog box by doing any of the following:
In the Navigation pane, click the Search for more things arrow at the right end of the search box, and then click Advanced Find.
On the Home tab, in the Editing group, in the Find list, click Advanced Find.
With the cursor in the Find what box, click Any character, Any digit, or Any letter, or click the special character you want to locate.
Enter any text fragments or formatting that accompany the text or character you want to locate, and then click Find Next:
Display the Replace page of the Find and Replace dialog box by doing any of the following:
In the Navigation pane, click the Search for more things arrow at the right end of the search box, and then click Replace.
On the Home tab, in the Editing group, click Replace.
Press Ctrl+H.
In the Find what box, specify the text or characters you want to locate.
In the Search Options area, select the check boxes of any applicable search options.
In the Replace with box, enter the text or characters with which you want to replace the search term.
Do any of the following:
Click Find Next to find the next occurrence of the search term.
Click Replace to replace the selected occurrence with the text in the Replace with box and move to the next occurrence.
Click Replace All to replace all occurrences of the search term in the document without individually reviewing them.
Inserting symbols and special characters
Some documents require characters not found on a standard keyboard. These characters might include the copyright (©) or registered trademark (®) symbols, currency symbols (such as € or £), Greek letters, or letters with accent marks. Or you might want to add arrows (such as ![]() or
or ![]() ) or graphic icons (such as
) or graphic icons (such as ![]() or
or ![]() ). Word gives you easy access to a huge array of symbols that you can easily insert into any document. Like graphics, symbols can add visual information or eye appeal to a document. However, they are different from graphics in that they are actually characters associated with a specific font.
). Word gives you easy access to a huge array of symbols that you can easily insert into any document. Like graphics, symbols can add visual information or eye appeal to a document. However, they are different from graphics in that they are actually characters associated with a specific font.

Tip
You can insert some common symbols by using a keyboard shortcut. You can review the assigned keyboard shortcuts in the Symbol dialog box and the AutoCorrect Options dialog box.
To insert a common symbol
On the Insert tab, in the Symbols group, click the Symbol button, and then click the symbol you want to insert.
Enter any of the following keyboard shortcuts:
To insert a copyright symbol, enter (c) or press Alt+Ctrl+C.
To insert a Euro symbol, enter (e).
To insert a registered trademark symbol, enter (r) or press Alt+Ctrl+R.
To insert a trademark symbol, enter (tm) or press Alt+Ctrl+T.
To insert a special character
On the Insert tab, in the Symbols group, click the Symbol button, and then click More Symbols.
On the Special Characters page of the Symbol dialog box, double-click the character you want to insert.
Or
On the Symbols page of the Symbol dialog box, locate and double-click the symbol you want to insert.
After you insert all the symbols you want, close the Symbol dialog box.
Inserting text and symbols by using AutoCorrect
The AutoCorrect feature corrects common spelling errors and capitalization issues. AutoCorrect includes a default list of frequently misspelled words and their correct spellings. It also includes text shortcuts for commonly used symbols.
In addition to using it for its standard purpose, you can use the AutoCorrect feature to insert text that you frequently enter in documents. Rather than entering an entire phrase, you can enter an abbreviation that isn’t a standard word, and have AutoCorrect replace it for you. For example, you could create the text shortcut tyfyb for the phrase Thank you for your business.
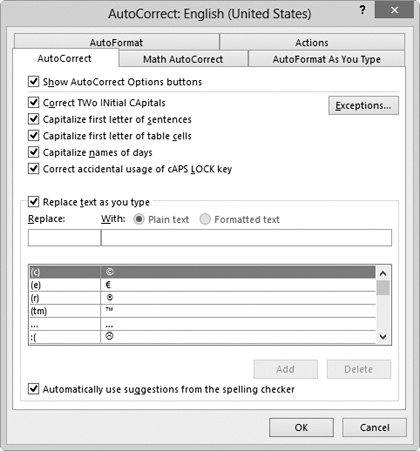
To add a text shortcut to the AutoCorrect list
On the Proofing page of the Word Options dialog box, click AutoCorrect Options.
On the AutoCorrect page of the AutoCorrect dialog box, enter the text shortcut you want to use in the Replace box.
Enter the text with which you want AutoCorrect to replace the text shortcut in the With box. Click Add, and then click OK.
Note
Strategy The objective domain for Exam 77-418, “Microsoft Word 2013,” includes using the AutoCorrect feature to insert text. You can also use the AutoText function to insert text or formatted content in a document. The use of AutoText and other Quick Parts is part of the objective domain for Exam 77-419, “Microsoft Word 2013 Expert.”
Inserting properties and fields
1.4 Customize document options and views, includes saving information as document properties. You can insert document properties into a document—for example, on a title page or in a header or footer—as a field. If you edit the field contents in the document or the property value from the Backstage view, the change is reflected in the other location.
Fields are other values that are defined and saved with a document. You can insert a field that tells Word to supply specified information or to perform a specified action in a specified way. Inserting a field in a document displays the field value. The field code that generates the value consists of a set of curly braces containing the field name and any required or optional instructions or settings. These settings, called switches, refine the results of the field—for example, by formatting it in a particular way. Different fields have different field options—some have only general options, whereas others have multiple types of switches. You can’t enter field codes directly in a document; you must insert them from the Field dialog box.

Inserting some types of fields requires advanced knowledge of the fields and how to control them. However, some fields are very easy. For example, several fields in the Date And Time category provide useful information. By default, date and time fields are updated every time you open the document.
To insert a dynamic document property
On the Insert tab, in the Text group, click the Quick Parts button, click Document Property, and then click the property you want to insert.
To insert a field
On the Insert tab, in the Text group, click the Quick Parts button, and then click Field.
In the Field dialog box, do the following, and then click OK:
In the Field names list, click the field you want to insert.
In the Field properties or Advanced field properties area, set any properties associated with the field.
To display or hide the field syntax, click Field Codes or Hide Codes.
To add optional switches, click Options. In the Field Options dialog box, click any switch you want to add, and click Add to Field. Then click OK.
Click the field to select it, and then press F9.
Right-click the field, and then click Update Field.
To insert the current date and time
On the Insert tab, in the Text group, click the Date & Time button.
In the Date and Time dialog box, select the format you want to use.
If you want to insert the information as a field rather than as regular text, select the Update Automatically check box.
To prevent a date or time field from updating automatically
Select the field, and then press Ctrl+F11 to lock it (or Ctrl+Shift+F11 to unlock it).
To display the field codes in a document
Click the field to select it, and then press Alt+F9.
Right-click the field, and then click Toggle Field Codes.
2.2 Format text and paragraphs
Formatting text by using the Replace command
In addition to searching for words and phrases in the Find And Replace dialog box, you can use the dialog box to search for a specific character format, paragraph format, or style, and replace it with a different one. By using this method, you can locate specific words or content types and apply character or paragraph styles to that content.

To replace a specific format with a different format
On the Home tab, in the Editing group, click the Replace button.
Or
Press Ctrl+H.
On the Replace page of the Find and Replace dialog box, click the More button to expand the dialog box if it isn’t already expanded.
In the Find what box, enter the text you want to locate, if applicable.
In the Replace section, on the Format menu, click Font, Paragraph, Tabs, Language, Frame, Style, or Highlight. In the dialog box corresponding to your menu selection, indicate the format or style you want to find, and then click OK.
Click in the Replace with text box and enter the replacement text, if applicable. On the Format menu, click the format category with which you want to replace the original formatting. In the corresponding dialog box, indicate the replacement format or style, and then click OK.
Click Find Next to locate the first occurrence of the specified format, and then click Replace to replace that one occurrence or Replace All to replace every occurrence.
Formatting text by using Format Painter
Format Painter is a convenient tool that you can use to copy formatting from one location to another. When using Format Painter you have the option of copying the formatting to one location or to multiple locations.
To copy existing formatting to other text
Select the text that has the formatting you want to copy.
On the Mini Toolbar or in the Clipboard group on the Home tab, click the Format Painter button once if you want to apply the copied formatting only once, or twice if you want to apply the copied formatting multiple times.
Click or select the text to which you want to apply the copied formatting.
If you clicked the Format Painter button twice, click or select additional text you want to format. Then click the Format Painter button again, or press the Esc key, to turn off the Format Painter.
Creating WordArt
WordArt provides a method for applying a series of effects to text content. These effects can include outlines, fills, shadows, reflections, glow effects, beveled edges, and three-dimensional rotation. You can use one of the 15 default WordArt styles, modify the effects applied to a WordArt object, or build a combination of effects from scratch. The WordArt color scheme is provided by the document theme.

When you create a WordArt object, Word attaches it to the active paragraph. Thereafter, you can position the WordArt object independently of the document text.
To create a WordArt object
On the Insert tab, in the Text group, click the WordArt button.
In the WordArt gallery, click the style you want.
Replace the placeholder text in the WordArt object.
Set the size and other attributes of the text as you would with any other text.
To format the background of a selected WordArt object
On the Format tool tab, do any of the following:
In the Shape Styles gallery, click the built-in style you want to apply.
In the Shape Styles group, in the Shape Fill, Shape Outline, and Shape Effects galleries, click the settings you want.
To format the text of a selected WordArt object
On the Format tool tab, do any of the following:
In the WordArt Styles gallery, click the built-in style you want to apply.
In the WordArt Styles group, in the Text Fill, Text Outline, and Text Effects galleries, click the settings you want.
In the Text group, click Text Direction, and then click the direction in which you want the text to flow.
Setting paragraph indentation and spacing
You can control the position of paragraphs between the document margins by setting the paragraph indentation. You can control individual line and paragraph indentation by setting indents.
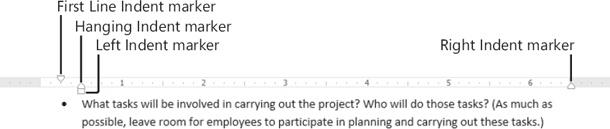
First Line Indent The paragraph’s first line of text begins at this setting.
Hanging Indent The paragraph’s second and subsequent lines of text begin at this setting.
Left Indent The left side of the paragraph aligns with this setting.
Right Indent The paragraph text wraps when it reaches this setting.
When the rulers are displayed, markers on the horizontal ruler indicate the individual indent settings.
A paragraph has internal spacing (the space between the lines within the paragraph, also called line spacing) and external spacing (the space before and after the paragraph).
Paragraph spacing is set by the style that is applied to the paragraph. You can modify the paragraph spacing by manually formatting the paragraph, modifying the style, changing the style set, or changing the paragraph spacing setting for the entire document.
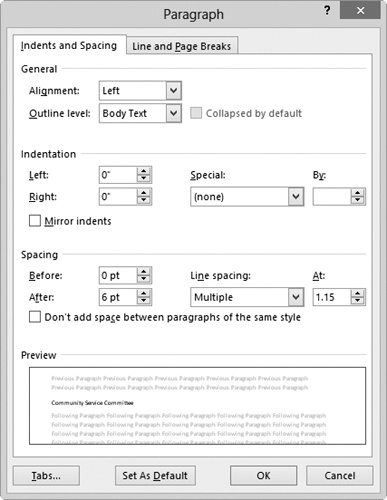
To set the indentation and spacing of selected paragraphs
Display the Indents and Spacing page of the Paragraph dialog box by doing any of the following:
On the Home tab or Page Layout tab, click the Paragraph dialog box launcher.
On the Line and Paragraph Spacing menu, click Line Spacing Options.
Right-click a selected paragraph and then click Paragraph.
In the Indentation area, specify the Left, Right, and Special settings.
In the Spacing area, specify the Before, After, and Line spacing settings. If you want to maintain the line spacing between paragraphs of the same style, select the Don’t add space between paragraphs of the same style check box.
Click OK in each open dialog box.
To set the indentation of selected paragraphs
On the Home tab, in the Paragraph group, click the Increase Indent or Decrease Indent button to change only the left indent.
On the Page Layout tab, in the Paragraph group, in the Indent area, specify the Left or Right settings.
On the horizontal ruler, drag the First Line Indent, Hanging Indent, Left Indent, and Right Indent markers.
To set the spacing of selected paragraphs
On the Page Layout tab, in the Paragraph group, in the Spacing area, specify the Before or After setting.
On the Home tab, in the Paragraph group, click the Line and Paragraph Spacing button, and then do one of the following:
Click Add Space Before Paragraph, Remove Space Before Paragraph, Add Space After Paragraph, or Remove Space After Paragraph to change the external spacing. (Only two options will be visible, depending on the current settings of the active paragraph.)
Click 1.0, 1.15, 1.5, 2.0, 2.5, or 3.0 to select a standard line spacing.
To set paragraph spacing for an entire document
On the Design tab, in the Document Formatting group, click Paragraph Spacing and then click Default, No Paragraph Space, Compact, Tight, Open, Relaxed, or Double.
On the Paragraph Spacing menu, click Custom Paragraph Spacing. On the Set Defaults page of the Manage Styles dialog box, in the Paragraph Spacing area, specify the Before, After, and Line spacing settings. Then click OK.
To set the indentation and spacing for all paragraphs of a specific style
Set the indentation and paragraph spacing of an individual paragraph of that style. Then in the Styles gallery or pane, right-click the style and click Update style to Match Selection.
Or
In the Styles gallery or pane, right-click the style, and then click Modify.
In the Modify Style dialog box, on the Format menu, click Paragraph.
On the Indents and Spacing page of the Paragraph dialog box, do any of the following:
In the Indentation area, specify the Left, Right, and Special settings.
In the Spacing area, specify the Before, After, and Line spacing settings.
To maintain the line spacing between paragraphs of the same style, select the Don’t add space between paragraphs of the same style check box.
Click OK in each open dialog box.
Displaying content in columns
By default, Word 2013 displays the content of a document in one column that spans the width of the page between the left and right margins. You can choose to display content in two or more columns to create layouts like those used in newspapers and magazines.
You can format an entire document or a section of a document in columns. When you select part of a document and format it in columns, Word inserts section breaks at the beginning and end of the selection to delineate the area in which the columnar formatting is applied. Content fills the first column on each page and then moves to the top of the next column. When all the columns on one page are full, the content moves to the next page. You can insert column breaks to specify where you want to end one column and start another. Section breaks and column breaks are visible when you display formatting marks in the document.
When dividing text into columns, you can choose one, two, or three columns of equal width or two columns of unequal width. If the standard options don’t suit your needs, you can specify the number and width of columns. The number of columns is limited by the width and margins of the page. Each column must be at least a half inch (or 0.27 centimeter) wide.
To format all the content in a document in multiple columns
Position the cursor anywhere in the document, but do not select content.
On the Page Layout tab, in the Page Setup group, click the Columns button, and then click the number of columns you want.
To format part of a document in multiple columns
Select the contiguous content you want to appear in columns.
On the Page Layout tab, in the Page Setup group, click the Columns button, and then click the number of columns you want.
To change the width of a section of columns
Click anywhere in a column. Then on the Page Layout tab, in the Page Setup group, click the Columns button, and click More Columns.
In the Columns dialog box, do any of the following, and then click OK:
Clear the Equal Column Width check box.
In the Width and spacing area, change the Width dimensions or the Spacing dimensions.
To display lines between columns
In the Columns dialog box, select the Line between check box.
To insert a manual column break
On the Page Layout tab, in the Page Setup group, click the Breaks button, and then click Column.
Applying styles to text
Styles are named sets of paragraph and/or character formatting that you can use in place of manual formatting to produce a consistent look throughout a document. There are five types of styles: Character, Paragraph, Linked, Table, and List. The most common types of styles you will use are the following:
Paragraph styles You can use these styles to apply a consistent look to different types of paragraphs, such as headings, body text, captions, quotations, and list paragraphs. Some built-in paragraph styles, such as Heading 1 and Heading 2, are associated with outline levels.
Character styles You can use these styles to change the appearance of selected words.
You can view the available styles in several locations, including the following:
In the Styles group on the Home tab of the ribbon, the Style gallery displays selected styles. Part of the Style gallery is visible at all times in the Styles group—the number of visible styles depends on the width of your program window and screen resolution. You can scroll through the gallery or expand it to display the entire gallery.
The Styles pane displays all the currently available styles or a subset thereof that you designate, such as only those that are currently in use. You can display or hide the Styles pane, and from it you can apply and manage all styles.
In the Styles pane, paragraph styles are identified by a paragraph mark, and character styles are identified by the letter a. You can point to any style to display a ScreenTip detailing the formatting included in the style.
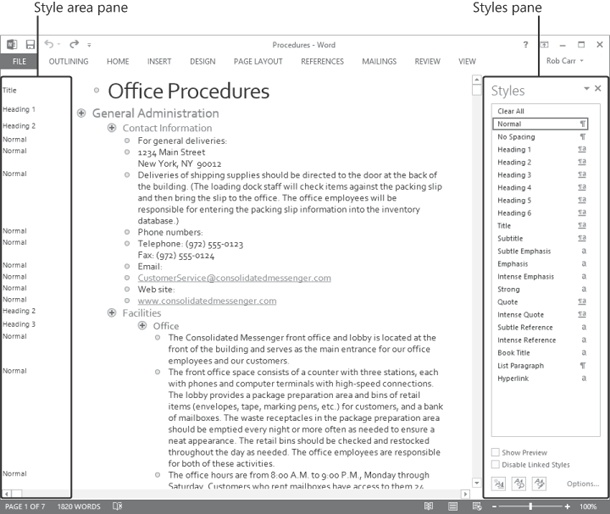
At the left side of a document displayed in Draft view or Outline view, the style area pane displays the name of the style attached to each paragraph. The style area pane does not display character styles. You can display or hide the style area pane.
Note
See Also For information about modifying the appearance of styles by changing style sets, see 1.3 Format documents.
Select the text you want to format, or position the cursor anywhere in a single word you want to format.
In the Styles pane or Style gallery, click the character style you want to apply.
To apply a paragraph style
Select or position the cursor anywhere in the paragraph you want to format.
In the Styles pane or Style gallery, click the paragraph style you want to apply.
To modify the content of the Style gallery
To add a style to the Style gallery, right-click the style in the Styles pane, and then click Add to Style Gallery.
To remove a style from the Style gallery, right-click the style in the Styles pane or Style gallery, and then click Remove from Style Gallery.
To display the Styles pane in the program window
On the Home tab, click the Styles dialog box launcher.
To display visual representations of styles in the Styles pane
At the bottom of the Styles pane, select the Show Preview check box.
To display a specific selection of styles in the Styles pane
At the bottom of the Styles pane, click Options.
In the Style Pane Options dialog box, click Recommended, In use, In current document, or All styles in the Select styles to show list.
In the Select how list is sorted list, click Alphabetical, As Recommended, Font, Based on, or By type.
Select the check boxes for the types of formatting you want to show as styles, and then click OK.
To display the style area pane in a document
Display the document in Draft view or Outline view.
Display the Advanced page of the Word Options dialog box.
In the Display area, enter a positive number in the Style area pane width in Draft and Outline views box. Then click OK.
Clearing formatting and styles
From time to time you might want to remove manually applied formatting or styles from document content.
To clear formatting or styles
To remove manually applied formatting and revert selected content to the settings of the applied styles, press Ctrl+Spacebar.
To revert selected content to the Normal style, do one of the following:
In the Styles pane, click Clear All.
On the Home tab, in the Font group, click the Clear All Formatting button.
To revert all content of a specific style to the Normal style, in the Styles pane, point to the style you want to clear, click the arrow that appears, and then click Clear Formatting. The command name indicates the number of instances of the selected style that are currently applied.
2.3 Order and group text and paragraphs
Managing page breaks
When a document includes more content than will fit between its top and bottom margins, Word creates a new page by inserting a soft page break (a page break that moves if the preceding content changes). If you want to break a page in a place other than where Word would normally break it, you can insert a manual page break.
Tip
As you edit the content of a document, Word changes the location of the soft page breaks, but not of any manual page breaks that you insert.
To insert a manual page break
On the Insert tab, in the Pages group, click the Page Break button.
On the Page Layout tab, in the Page Setup group, click the Breaks button, and then in the list, click Page.
Press Ctrl+Enter.
To remove a manual page break
To force a page break before a specific paragraph
Right-click anywhere in the paragraph, and then click Paragraph.
On the Line and Page Breaks page of the Paragraph dialog box, in the Pagination area, select the Page break before check box. Then click OK.
Managing paragraph breaks
If a paragraph breaks so that only its last line appears at the top of the next page, the line is called a widow. If a paragraph breaks so that only its first line appears at the bottom of a page and the rest of the paragraph appears on the next page, the line is called an orphan. These single lines of text can make a printed document hard to read, so by default, Word specifies that a minimum of two lines should appear at the top and bottom of each page. As with so many other aspects of the program, however, you can control the way that Word breaks paragraphs and ensure that related paragraphs of information stay together.
Tip
You can apply these options to individual paragraphs, or you can incorporate them into the styles you define for document elements such as headings.
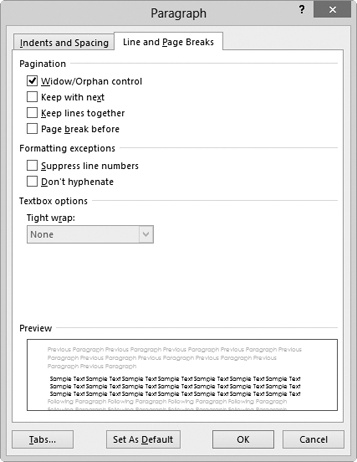
Select one or more paragraphs. On the Line and Page Breaks page of the Paragraph dialog box, in the Pagination area, do any of the following, and then click OK:
To prevent a page break that leaves only one line of the selected paragraph on a page, select the Widow/Orphan control check box.
To prevent a page break after the selected paragraph, select the Keep with next check box.
To prevent a page break within the selected paragraph, select the Keep lines together check box.
To force a page break before the selected paragraph, select the Page break before check box.
Creating document sections
You can apply different page layout settings, page numbering, headers and footers, and print options to different parts of a document by creating sections. Sections are separated by section breaks. It is not necessary to have a section break at the beginning or end of a document.
When you format selected content to display columns, Word automatically inserts section breaks before and after the selected content. (If you format an entire document in columns, no section breaks are inserted.)
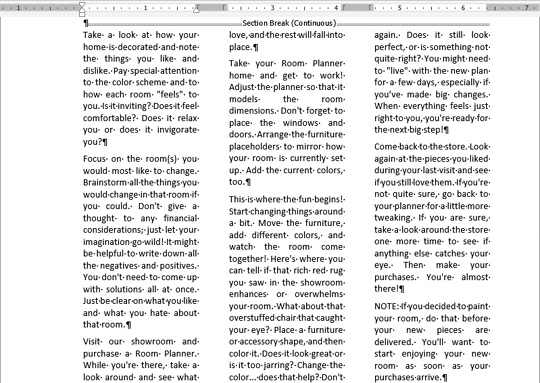
When formatting marks are displayed, a section break appears as a double dotted line from the preceding paragraph mark to the margin, with the words Section Break and the type of section break in the middle of the line.
To manually insert a section break
On the Page Layout tab, in the Page Setup group, click the Breaks button, and then in the Section Breaks section, click one of the following:
To create a section that starts content on the next page, click Next Page.
To create a section that starts content on the next even-numbered page, click Even Page.
To create a section that starts content on the next odd-numbered page, click Odd Page.
To create a section that does not affect page breaks, click Continuous.
To specify different settings for a document section
Position the cursor in the section you want to format, and display the settings you want to change.
In the Apply to list, click This section. Then select the settings you want, and click OK.
To remove a section break
Objective review
Before finishing this chapter, ensure that you have mastered the following skills:
| 2.1 Insert text and paragraphs |
| 2.2 Format text and paragraphs |
| 2.3 Order and group text and paragraphs |