
Chapter 1. Create and Manage Documents
The skills tested in this section of the Microsoft Office Specialist exam for Microsoft Word 2013 relate to creating and managing documents. Specifically, the following objectives are associated with this set of skills:
| 1.1 Create documents |
| 1.2 Navigate through documents |
| 1.3 Format documents |
| 1.4 Customize document options and views |
| 1.5 Configure documents to print or save |
You can create many types of documents in Word and modify the appearance and format to fit your needs.
This chapter guides you in studying ways of creating, working in, and saving documents; formatting the page size and content; printing documents; and modifying the Word program window to fit your needs.
Note
Practice Files To complete the practice tasks in this chapter, you need the practice files contained in the MOSWord2013Objective1 practice file folder. For more information, see Download the practice files in this book’s Introduction.
1.1 Create documents
Creating blank and custom documents from templates
When you start Word 2013 without opening an existing document, a Start screen appears. From this screen you can open a recent document or create a document—either a blank document based on the Normal template or a custom document based on another template. When Word is already running, you can create documents from the New page of the Backstage view.
Some templates are installed on your computer with Office, but you can download many others from the Office website. To locate a template suitable for your purposes, enter a search phrase in the Search Online Templates box and then click the Start Searching button, or click a category in the Suggested Searches list below the box.
The Start screen and New page display thumbnails of popular templates and templates that are specific to the season or an upcoming holiday. If you create custom templates and save them in your Personal Templates folder, Featured and Personal links appear below the search box. You can click these links to switch between viewing program-supplied templates and your own. If you save templates in a location other than your Personal Templates folder, you can create documents based on those templates either from File Explorer or from the Open page of the Backstage view.
Tip
In Windows 8, File Explorer has replaced Windows Explorer. Throughout this book, we refer to this utility by its Windows 8 name. If your computer is running Windows 7 or an earlier version of Windows, use Windows Explorer instead.

Tip
In Word 2013, you can choose your own Personal Templates folder from the Save page of the Word Options dialog box.
Note
Strategy The objective domain for Exam 77-418 includes coverage of creating documents based on existing templates. Creating and modifying document templates is part of the objective domain for Exam 77-419, Word 2013 Expert.
Clicking the thumbnail of a program-supplied template displays a preview and description of the document that will be created by the template, along with ratings provided by people who have downloaded the template.
To create a new blank document
Start Word. When the program Start screen appears, do one of the following:
Press the Esc key.
Click the Blank document thumbnail.
Display the New page of the Backstage view, and then click the Blank document thumbnail.
To create a new document based on a custom template
From the Start screen or from the New page of the Backstage view, locate the template from which you want to create a document, and then do one of the following:
Click the thumbnail, and then in the template information window, click Create.
Double-click the thumbnail.
In File Explorer, navigate to the template location and then double-click the template.
From the Open page of the Backstage view, navigate to the template location and then double-click the template.
Opening non-native files directly in Word
Word 2013 creates files in Office Open XML formats, which support a greater range of access and reuse options and produce a smaller file than earlier Word document formats. The default file format for a document created in Word 2013 is the .docx format, which supports all the Word 2013 features.
You can save Word 2013 files in these native file formats:
Tip
Although the file extensions are the same, Word 2013 recognizes a difference between files saved in Word 2013 and files of the same type saved in Word 2010 or Word 2007. A Word 2013 .docx file can be opened and edited in Word 2010 or Word 2007 on a computer running Windows, or in Word 2011 or Word 2008 on a Mac, but if it is saved in one of those programs, the next time you open it in Word 2013 it will be displayed in Compatibility View.
In addition to these native formats, Word 2013 supports many types of files that can be created in other programs, including the following:
Files created in earlier versions of Word
Files created in WordPerfect version 5 or 6
OpenDocument Text files
PDF files
Plain Text files
Rich Text Format files
Webpages
XML files
A particularly exciting feature of Word 2013 is the ability to edit PDF files in Word rather than in a third-party program such as Adobe Acrobat. You can open a PDF file in Word 2013 exactly as you would any other type of file. When you do so, Word converts the file to an editable Word document. If the file contains complicated formatting and layout, the Word version of the document might not be a perfect replica of the PDF file, but most simple files convert quite cleanly.
To open a non-native file in Word from File Explorer
Right-click the file, click Open With, and then click Word (desktop).
To open a non-native file in Word from the program window
On the Open page of the Backstage view, navigate to the file location.
In the Open dialog box, in the file type list to the right of the File name box, click All Files to display all the files in the folder, or click the specific type of file you want to locate.
In the Open dialog box, click the file you want to open, and then click Open.
1.2 Navigate through documents
Searching for text
You can search for text from the Navigation pane or from the Find page of the Find And Replace dialog box. The Results page of the Navigation pane displays the search results in context, whereas the Find page locates only one instance of the search term at a time but allows you to define more search criteria.

You can narrow the search results that are shown on the Results page of the Navigation pane by specifying search parameters. The parameters available for a Navigation pane search are limited, but usually sufficient for defining searches that don’t include wildcards, special characters, or formatting.

You can perform an even more specific search from the Find And Replace dialog box, in which you can specify many formatting options and also include special characters within your search term.

To search for text from the Navigation pane
Display the Results page of the Navigation pane by using any of the following methods:
In the Navigation pane, click the Results link.
On the Home tab, in the Editing group, click the Find button.
Press Ctrl+F.
Enter characters in the search box at the top of the Navigation pane to highlight all occurrences of those characters in the document and display them on the Results page.
Scroll through the document to display the highlighted results or click any result in the Navigation pane to move directly to that occurrence.
Click the Next and Previous buttons to move among the results or to redisplay the results on the Results page.
To refine a Navigation pane search
In the Navigation pane, click the Search for more things arrow at the right end of the search box, and then click Options to display a simple list of search options.
To search for text from the Find And Replace dialog box
Display the Find page of the Find and Replace dialog box by using any of the following methods:
In the Navigation pane, click the Search for more things arrow at the right end of the search box, and then click Advanced Find.
On the Home tab, in the Editing group, click the Find arrow, and then click Advanced Find.
Click More in the lower-left corner of the dialog box to display additional search options.
In the Find what box, enter the text you want to search for, or click the Special button and then click the symbol or formatting symbol you want to locate.
Modify your search by selecting any of the following options in the expanded dialog box:
Guide the direction of the search by selecting Down, Up, or All from the Search list.
Locate only text that matches the capitalization of the search term by selecting the Match case check box.
Exclude occurrences of the search term that appear within other words by selecting the Find whole words only check box.
Find two similar words, such as effect and affect, by selecting the Use wildcards check box and then including one or more wildcard characters in the search term.
Find occurrences of the search text that sound the same but are spelled differently, such as there and their, by selecting the Sounds like check box.
Find occurrences of a particular word in any form, such as try, tries, and tried, by selecting the Find all word forms check box.
Locate formatting or styles by selecting them from the Format list.
Locate words with the same beginning or end as the search term by selecting the Match prefix or Match suffix check box.
Locate words with different hyphenation or spacing by selecting the Ignore punctuation characters or Ignore white-space characters check box.
Inserting hyperlinks
Word documents can include hyperlinks that provide a quick way to perform tasks such as the following:
Link to a location within a document.
Open another document.
Link to a website.
Download a file.
Send an email message.
While creating a hyperlink to a document or a webpage, called the target, you can specify whether the target information should appear in the same window or frame as the active document or in a new one. You can also make a particular setting the default for all hyperlinks.
Within a document, hyperlinks appear underlined and in the color specified for hyperlinks by the document’s theme. You can jump to the target of the hyperlink by holding down the Ctrl key and clicking the link. After you click the hyperlink, its color changes to the color specified for followed hyperlinks.

To insert a hyperlink to a file
Select the text or graphic object to which you want to attach the hyperlink.
Open the Insert Hyperlink dialog box by doing one of the following:
On the Insert tab, in the Links group, click the Add a Hyperlink button.
Right-click the selection, and then click Hyperlink.
Press Ctrl+K.
In the Insert Hyperlink dialog box, on the Link to bar, click the Existing File or Web Page button.
In the Look in area, browse to the target file.
Or
In the Address box, enter the absolute path to the target file.
Click Target Frame. In the Set Target Frame dialog box, specify where the hyperlink target will be displayed, and then click OK.
In the Insert Hyperlink dialog box, click OK.
To insert a hyperlink to a webpage
Select the text or graphic object to which you want to attach the hyperlink, and then open the Insert Hyperlink dialog box.
On the Link to bar, click the Existing File or Web Page button.
In the Address box, enter the URL of the webpage or click the Browsed Pages button and select one from the list.
Click Target Frame. In the Set Target Frame dialog box, click New window, and then click OK.
In the Insert Hyperlink dialog box, click OK.
To insert a hyperlink to a heading or bookmark within the document
Select the text or graphic object to which you want to attach the hyperlink, and then open the Insert Hyperlink dialog box.
On the Link to bar, click the Place in This Document button.
In the Select a place in this document box, click the heading or bookmark you want to link to.
In the Insert Hyperlink dialog box, click OK.
To insert a hyperlink that opens an email message form
Select the text or graphic object to which you want to attach the hyperlink, and then open the Insert Hyperlink dialog box.
On the Link to bar, click the E-mail Address button.
In the E-mail address box, enter the email address to which you want to address the message.
Or
In the Recently used e-mail addresses list, click the email address to which you want to address the message.
In the Subject box, enter the subject of the message.
In the Insert Hyperlink dialog box, click OK.
To modify a hyperlink
Right-click the hyperlink, and then click Edit Hyperlink.
In the Edit Hyperlink dialog box, make the necessary changes, and then click OK.
To remove a hyperlink
Right-click the hyperlink, and then click Remove Hyperlink.
Creating bookmarks
Whether you are creating a document or working in a document created by someone else, you can insert named bookmarks to identify information to which you might want to return later. (Word automatically creates bookmark names for headings down to the fourth level by duplicating the heading; removing articles, spaces, and punctuation; and capitalizing the first letter of each word.) You can use whatever naming schema you like, provided it doesn’t include spaces. You can move to bookmarked locations within a document either by creating hyperlinks to the bookmarks or by navigating to them.
Tip
Bookmarks are accessible in the Bookmark dialog box, on the Go To page of the Find And Replace dialog box, and in the Place In This Document list in the Insert Hyperlink dialog box.

To insert a bookmark
Place the cursor at the location in which you want to insert the bookmark, or select the text or object to which you want to attach the bookmark.
On the Insert tab, in the Links group, click the Bookmark button.
In the Bookmark dialog box, enter a name for the bookmark in the Bookmark name box, and then click Add.
To move to a bookmark
Open the Bookmark dialog box, and then click the bookmark you want to move to.
Click Go To, and then click Close.
Or
On the Home tab, in the Editing group, click Go To in the Find list.
On the Go To page of the Find and Replace dialog box, in the Go to what list, click Bookmark.
In the Enter bookmark name list, click the bookmark you want.
Click Go To, and then click Close.
Moving to specific locations and elements
From the Go To page of the Find And Replace dialog box, you can quickly move between pages, sections, lines, bookmarks, comments, footnotes, endnotes, fields, tables, graphics, equations, objects, or headings in a document.

To use the Go To function to find elements within a document
Display the Go To page of the Find and Replace dialog box by using one of the following methods:
On the Home tab, in the Editing group, click the Find arrow, and then click Go To.
Press Ctrl+G.
In the Go to what list, click the type of element you want to locate.
In the Enter element box, select or enter the identifier of the specific element you want to locate. Then click Go To to move to that element.
Or
Click the Next or Previous button to move among instances of the selected element in the document.
1.3 Format documents
Modifying page setup
You control the layout of the pages in a document. You can change the margins, orientation, and size of the document pages.
You can format text in multiple columns, and manually divide a document into pages or sections. When you define sections, you can set up the pages within an individual section differently from other pages of the document.
When appropriate to the document type, you can preface each line of text in the document with a line number. Line numbers can span the length of a document, restart at the beginning of each page or section, or skip text that you specify.
By default, Word breaks lines between words and after punctuation. When the automatic hyphenation feature is turned on, Word inserts line breaks and hyphens within words to help achieve a more uniform line length. You can stop Word from breaking a line between two words that you want to keep together by inserting a nonbreaking space between the words.
On the Page Layout tab, in the Page Setup group, click the Margins button, and then click the standard margin set you want.
Or
On the Margins menu, click Custom Margins.
On the Margins page of the Page Setup dialog box, specify the individual margins, the gutter width and position, the configuration of multiple pages, and the area of the document to which you want to apply the custom margins. Then click OK.
To change the page orientation
On the Page Layout tab, in the Page Setup group, click the Orientation button, and then click Landscape or Portrait.
To change the page size
On the Page Layout tab, in the Page Setup group, click the Size button, and then click the standard page size you want.
Or
On the Size menu, click More Paper Sizes.
On the Paper page of the Page Setup dialog box, select Custom size in the Paper size list, define the width and height of the page, and then click OK.
To format selected text into columns
On the Columns menu, click More Columns.
In the Columns dialog box, specify the number of columns, column width, and spacing, and then click OK.
To manually break column content
Position the cursor where you want to insert the column break, and then do one of the following:
On the Page Layout tab, in the Page Setup group, click the Breaks button, and then in the Page Breaks group, click Column.
Press Ctrl+Shift+Enter.
Position the cursor where you want to insert the page break, and then do one of the following:
On the Page Layout tab, in the Page Setup group, click the Breaks button, and then in the Page Breaks group, click Page.
Press Ctrl+Enter.
To divide a document into sections
Position the cursor at the beginning of the content with which you want to start the new section.
On the Page Layout tab, in the Page Setup group, click the Breaks button.
On the Breaks menu, in the Section Breaks group, click Next Page, Continuous, Even Page, or Odd Page to define the starting page of the new section.
To control hyphenation settings
On the Page Layout tab, in the Page Setup group, click the Hyphenation button, and then click Hyphenation Options.
In the Hyphenation dialog box, specify whether you want Word to automatically hyphenate the document or to hyphenate uppercase words, the maximum distance of a hyphen from the document margin (the hyphenation zone), and how many consecutive lines of a paragraph may be hyphenated. Then click OK.
To turn off automatic hyphenation
On the Page Layout tab, in the Page Setup group, click the Hyphenation button, and then click None.
To selectively hyphenate words in a document
On the Page Layout tab, in the Page Setup group, click the Hyphenation button, and then click Manual.
For each hyphenation suggested in the Manual Hyphenation dialog box, click Yes or No.
Press Ctrl+Shift+Space.
Or
On the Insert tab, in the Symbols group, click the Symbol button, and then click More Symbols.
On the Special Characters page of the Symbol dialog box, click Nonbreaking Space, and then click Insert.
Changing document themes
Every document you create is based on a template, and the appearance of the content within the template is controlled by a theme. The theme is a combination of coordinated colors, fonts, and effects that visually convey a certain tone. By default, Word applies the Office theme to all new, blank documents. To quickly change the appearance of a document, you can apply a different theme. To change the appearance of all new documents, you can make a different theme the default.

If you like the background elements of one theme but not the colors or fonts, you can mix and match theme elements. In addition to colors and fonts, you can control more subtle elements such as paragraph spacing and visual effects that are associated with a theme.
If you create a combination of theme elements that you would like to be able to use with other documents, you can save the combination as a new theme. When you save a theme in the default Document Themes folder, it is available in the Themes gallery.
You don’t have to store custom themes in the Document Themes folder; you can store them anywhere on your hard disk, on removable media, or in a network location.
To apply a theme
On the Design tab, in the Document Formatting group, click the Themes button, and then click the theme you want.
If the theme is stored outside of the default Document Themes folder, click Browse for Themes on the Themes menu, navigate to the theme you want, and then click Open.
To change the theme colors, fonts, paragraph spacing, or effects
On the Design tab, in the Document Formatting group, click the Theme Colors, Theme Fonts, Paragraph Spacing, or Theme Effects button.
In the corresponding gallery, click the color scheme, font set, paragraph spacing, or combination of effects you want.
To save a modified theme
Adjust the colors, fonts, or effects of the current theme to suit your needs.
In the Themes gallery, click Save Current Theme.
In the Save Current Theme dialog box, enter a name for the theme in the File name box, and then click Save.
To change the default theme
Select the theme you want to use as the default, or modify the current theme.
On the Design tab, in the Document Formatting group, click Set as Default.
Changing document style sets
You can easily change the look of words, phrases, and paragraphs by using styles. More importantly, you can structure a document by applying paragraph styles that are linked to outline levels. In doing so, you build a document outline that is reflected in the Navigation pane and can be used to create a table of contents.

Styles can include character formatting, paragraph formatting, or a combination of both. Styles are stored in the template that is attached to a document. By default, blank new documents are based on the Normal template. The Normal template includes a standard selection of styles that fit the basic needs of most documents. These styles include nine heading levels, various text styles including those for multiple levels of bulleted and numbered lists, index and table of contents entry styles, and many specialized styles such as those for hyperlinks, quotations, placeholders, captions, and other elements. Commonly used styles are available in the Styles gallery on the Home tab.
You can access all the styles available in a document from the Styles pane, which you display by clicking the Styles dialog box launcher.
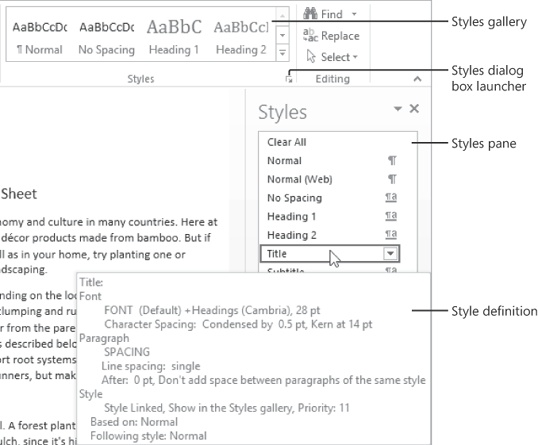
Styles stored in a template are usually based on the Normal style and use only the default body and heading fonts associated with the document’s theme, so they all go together well. For this reason, formatting document content by using styles produces a harmonious effect. After you apply styles from the default style set, you can easily change the look of the entire document by switching to a different style set, which associates different formatting rules with the same styles. So if you have applied styles throughout a document, you can change the properties of the styles simply by changing the style set.

Inserting simple headers and footers
You can display information on every page of your document by creating headers and footers. You can populate and format headers and footers independently. You can have a different header and footer on the first page of a document, different headers and footers on odd and even pages, or different headers and footers for each section.
You can manually insert text or graphic elements in a header or footer, select common elements (such as page number, date and time, or a document property) from a menu, or insert a preformatted building block.
When the header or footer is active for editing, Word displays a dashed border between the header or footer and the document body, and the Design tool tab appears on the ribbon. You can enter information in the header and footer areas the same way you enter ordinary text. You can also use the commands on the Design tool tab to enter and format document information, move from one header or footer to another, and establish the location and position of the header and footer.

Tip
If your document contains section breaks, each successive section inherits the headers and footers of the preceding section unless you break the link between the two sections. After you break the link, you can create a different header and footer for the current section.
You can manually insert a page number element in a header or footer, or you can use the separate Page Number feature to insert stylized page numbers.
Note
See Also For more information about inserting preformatted page numbers, see Inserting page numbers later in this section. Word 2013 includes many preformatted header and footer building blocks. For information about building blocks, see 5.1 Insert and format building blocks.
To insert custom header or footer content
Activate the header or footer by using one of these methods:
Position the cursor anywhere in the document. On the Insert tab, in the Header & Footer group, click the Header button or the Footer button, and then click the corresponding Edit command on the menu.
In Print Layout view, double-click in the top margin of a page to activate the header or in the bottom margin to activate the footer.
In the header or footer area, do any of the following:
In the Close group, click the Close Header and Footer button.
To insert a preformatted header or footer
On the Insert tab, in the Header & Footer group, click the Header button or the Footer button.
In the Header gallery or the Footer gallery, click the design you want.
Replace any text placeholders and enter any other information you want to appear.
In the Close group, click the Close Header and Footer button.
To insert the current date and/or time in a header or footer
In the header or footer, position the cursor where you want the date and/or time to appear.
On the Design tool tab, in the Insert group, click the Insert Date and Time button.
In the Date and Time dialog box, do the following, and then click OK:
Click the format in which you want the date and/or time to appear in the header or footer.
If you want Word to update the date and/or time in the header each time you save the document, select the Update automatically check box.
To modify standard header or footer settings
On the Design tool tab, in the Options group, do any of the following:
Select the Different First Page check box if you want to use a different header or footer on the first page of the document. You might want to do this if, for example, the first page of the document is a cover page.
Select the Different Odd & Even Pages check box if you want to use different headers or footers for odd pages and for even pages. Select this option if the content of the header or footer is not centered and the document content will be viewed on facing pages.
Clear the Show Document Text check box if you find that you’re distracted by the main document text when you’re working in the header or footer.
In the Position group, set the Header from Top or Footer from Bottom distance.
In the Close group, click the Close Header and Footer button.
To delete a header or footer
Activate the header or footer. Press Ctrl+A to select all the content of the header or footer, and then press Delete.
On the Insert tab, in the Header & Footer group, click Header or Footer, and then click the corresponding Remove command.
Inserting watermarks
A watermark is a transparent word or phrase, or a muted graphic, that appears on the page background of a document but doesn’t interfere with its readability. You can use a text watermark such as Draft or Important to indicate information about a document. You can use a graphic watermark to brand a document with your logo or to simply add flair.
Watermarks are visible when you display a document in Print Layout view or Web Layout view, and are optional when printing a document.

On the Design tab, in the Page Background group, click the Watermark button.
In the Watermark gallery, click the thumbnail for one of the predefined text watermarks.
Or
On the Watermark menu, click Custom Watermark.
In the Printed Watermark dialog box, select Text watermark.
Either select the watermark text you want from the Text list, or enter the text in the Text box.
Format the text by changing the settings in the Font, Size, and Color boxes.
Choose a layout, select or clear the Semitransparent check box, and then click OK.
To use a picture as a watermark
On the Watermark menu, click Custom Watermark.
In the Printed Watermark dialog box, select Picture watermark, and then click the Select Picture button.
In the From a file area of the Insert Pictures dialog box, click Browse. In the Insert Picture dialog box that opens, navigate to the folder where the picture is stored, and double-click the picture file to insert the file path in the Printed Watermark dialog box.
In the Scale list, choose how big or small you want the watermark picture to appear in the document.
If you want to display a more vibrant picture, clear the Washout check box. Then click OK.
Inserting page numbers
It is quite common to insert page numbers in a document that will be printed. You can insert stylized page numbers in the header, footer, left margin or right margin, or at the current cursor position on each page. You can format the page numbers to follow a specific pattern.

To insert a preformatted page number in a header or footer
On the Insert tab, in the Header & Footer group, click the Page Number button.
In the Page Number list, click the location at which you want to insert the page number, and then click the page number style you want.
To change the format of page numbers
On the Insert tab or Design tool tab (when the header or footer is active), in the Header & Footer group, click the Page Number button, and then click Format Page Numbers.
In the Page Number Format dialog box, in the Number format list, click the format you want.
Select any other options you want, and then click OK.
1.4 Customize document options and views
Changing document views
In Word, you can display a document in a variety of views, each suited to a specific purpose.
The document views available in Word 2013 include the following:
Print Layout view This view displays a document on the screen the way it will look when printed. You can review elements such as margins, page breaks, headers and footers, and watermarks.
Read Mode view This view displays as much of the content of the document as will fit on the screen at a size that is comfortable for reading. In this view, the ribbon is replaced by one toolbar at the top of the screen with buttons for searching and navigating in the document. You can view existing comments, but you can’t make changes to the document while in this view.
Web Layout view This view displays the document the way it will look when viewed in a web browser. You can review backgrounds and other effects. You can also review how text wraps to fit the window and how graphics are positioned.
Outline view This view displays the structure of a document as nested levels of headings and body text, and provides tools for viewing and changing the hierarchy.
Draft view This view displays the content of a document with a simplified layout so that you can quickly enter and edit text. You cannot view layout elements such as headers and footers.
The View Shortcuts toolbar includes buttons for changing the view of the document window.
To switch views
On the View tab, in the Views group, click the Read Mode, Print Layout, Web Layout, Outline View, or Draft View button.
At the right end of the status bar, on the View Shortcuts toolbar, click the Read Mode, Print Layout, or Web Layout button.
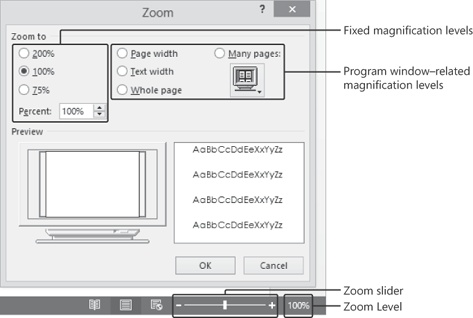
Changing magnification levels
You can adjust the magnification of a document by using the tools available in the Zoom group on the View tab, or the Zoom slider or Zoom Level button at the right end of the status bar.
To zoom in or out in 10-percent increments
Click the Zoom In (+) button or the Zoom Out (-) button.
To zoom to a specific magnification
Drag the Zoom slider.
On the View tab, in the Zoom group, click the 100% button.
Or
Do either of the following:
Click the Zoom level button.
On the View tab, in the Zoom group, click the Zoom button.
In the Zoom dialog box, click a fixed magnification level, or in the Percent box, enter or select a magnification level. Then click OK.
To zoom to a program window–related magnification
In the Zoom dialog box, do one of the following, and then click OK:
Click Page width, Text width, or Whole page.
Click Many pages, click the monitor icon below the option, and then click the page configuration you want (from 1x1 to 2x4 pages).
On the View tab, in the Zoom group, click the One Page, Multiple Pages, or Page Width button.
Customizing the Quick Access Toolbar
By default, buttons representing the Save, Undo, and Redo commands appear on the Quick Access Toolbar. If you regularly use a few commands that are scattered on various tabs of the ribbon and you don’t want to switch between tabs to access the commands, you can add them to the Quick Access Toolbar so that they’re always available to you. You can add commands to the Quick Access Toolbar from the Customize Quick Access Toolbar menu (which includes 11 common commands), from the ribbon, or from the Word Options dialog box. You can add any type of command to the Quick Access Toolbar, even a drop-down list of options or gallery of thumbnails.

The default Quick Access Toolbar appears in all Word documents. You can also create a separate Quick Access Toolbar that is embedded in a specific document.
As you add commands to the Quick Access Toolbar, it expands to accommodate them. If you add a lot of commands, it might become difficult to view the text in the title bar, or some commands on the Quick Access Toolbar might be hidden. To resolve this problem, you can move the Quick Access Toolbar below the ribbon.
To change the location of the Quick Access Toolbar
On the Customize Quick Access Toolbar menu, click Show Below the Ribbon or Show Above the Ribbon.
Right-click the Quick Access Toolbar, and then click Show Quick Access Toolbar Below the Ribbon or Show Quick Access Toolbar Above the Ribbon.
On the Quick Access Toolbar page of the Word Options dialog box, select or clear the Show Quick Access Toolbar below the Ribbon check box.
To add a command to the Quick Access Toolbar
Display the Quick Access Toolbar page of the Word Options dialog box.
In the Choose commands from list, click the group of commands from which you want to select.
In the Choose commands pane, locate the command you want to add. Then click the Add button.
To create a separate Quick Access Toolbar that is specific to the current document
On the Quick Access Toolbar page of the Word Options dialog box, in the Customize Quick Access Toolbar list, click For document name.
To remove a command from the Quick Access Toolbar
Right-click the command on the Quick Access Toolbar, and then click Remove from Quick Access Toolbar.
On the Customize Quick Access Toolbar menu, click any active command (indicated by a check mark) to remove it.
On the Quick Access Toolbar page of the Word Options dialog box, in the Quick Access Toolbar pane, click the command. Then click the Remove button.
To change the order of commands on the Quick Access Toolbar
On the Quick Access Toolbar page of the Word Options dialog box, in the Quick Access Toolbar pane, click a command you want to move. Then click the Move Up or Move Down button.
To separate commands on the Quick Access Toolbar
On the Quick Access Toolbar page of the Word Options dialog box, in the Quick Access Toolbar pane, click the command after which you want to insert a separator. At the top of the Choose commands pane, click <Separator>. Then click Add.
To reset the Quick Access Toolbar to its default content
On the Quick Access Toolbar page of the Word Options dialog box, click the Reset button, and then click Reset only Quick Access Toolbar or Reset all customizations.
Customizing the ribbon
Experienced users who upgrade to Word 2013 might identify a few commands that no longer seem to be available. Lesser-used commands do not appear on the ribbon; instead, they are hidden in dialog boxes or panes, or not available at all from the standard user interface. You can make any of these commands easily accessible by adding it to the Quick Access Toolbar or to the ribbon.

To display a list of commands that do not appear on the ribbon
On the Quick Access Toolbar or Customize Ribbon page of the Word Options dialog box, in the Choose commands from list, click Commands Not in the Ribbon.
To modify the ribbon tabs and groups
Display the Customize Ribbon page of the Word Options dialog box.
In the Customize the Ribbon list, click the group of tabs on which you want to modify content.
In the Customize the Ribbon pane, do any of the following:
To prevent a tab from appearing on the ribbon, clear the check box that precedes the tab name.
To allow a tab to appear on the ribbon, select the check box that precedes the tab name.
To remove a group from a tab, click the Expand button that precedes the tab name to display its groups, then click a group name and click the Remove button.
To change the display name of a built-in tab or group, click the tab name or group name, and then click the Rename button. In the Rename dialog box, enter the name you want in the Display name box, and then click OK.
To move a group of commands to another tab, expand the source and destination tabs, and click the group you want to move. Then drag the group to its new location or click the Move Up or Move Down button until the group is where you want it.
To add a tab to the ribbon
Select the tab after which you want the new tab to appear, and then click the New Tab button.
Click New Tab (Custom), and then click the Rename button.
In the Rename dialog box, enter the name you want to assign to the custom tab in the Display name box, and then click OK.
To add a group to a tab
Select the tab on which you want the group to appear, and then click the New Group button.
Click New Group (Custom), and then click the Rename button.
In the Rename dialog box, click the icon that you want to appear when the custom group is condensed. In the Display name box, enter the name you want to assign to the custom group. Then click OK.
To add a command to a custom group
On the Customize Ribbon page of the Word Options dialog box, in the Customize the Ribbon pane, click the custom group to which you want to add the command.
In the Choose commands from list, click the group of commands from which you want to select.
In the Choose commands pane, locate the command you want to add, and then click the Add button.
To remove a command from a custom group
On the Customize Ribbon page of the Word Options dialog box, in the Customize the Ribbon pane, click the command. Then click the Remove button.
To reset the ribbon to its default content and configuration
On the Customize Ribbon page of the Word Options dialog box, click the Reset button, and then click Reset only selected Ribbon tab or Reset all customizations.
Splitting the window
It can be cumbersome to work in a long document that requires you to frequently scroll up and down to view data elsewhere in the document.
In any view other than Read Mode, you can display multiple parts of a document at one time by splitting the window. You can then independently scroll and work in two views of the document within one program window. The Navigation pane and any active panes are displayed for the entire document, as part of the program window. Each part of the split window has its own ruler and scroll bars. Some commands (such as the Zoom commands and some views) apply only to the currently active part of the split window; others apply to the currently selected content or to the entire document.

To split the window
To remove a split
Double-click the split bar that divides the panes.
Drag the split bar to the top of the scroll bar.
On the View tab, in the Window group, click the Remove Split button.
Modifying document properties
In Word 2013, the properties of a document are easily accessible from the Info page of the Backstage view. You can view and modify some properties directly on the Info page, or you can work in the Document Panel or Properties dialog box.

To add an author to the Author property
On the Info page of the Backstage view, in the Related People area, click Add an author, and then do one of the following:
Enter one or more author names or email addresses, separated by semicolons, and then click Verify the contact names you have entered to validate the entry against your organization’s Global Address List and your other Microsoft Outlook address books.
Click the Search the Address Book for contacts button. In the Address Book dialog box, select the address book in which the author’s contact information is saved, and then select the author.
To remove an author from the Author property
On the Info page of the Backstage view, in the Related People area, right-click the author, and then click Remove Person.
On the Info page of the Backstage view, click Properties, and then click Show Document Panel.
To display the Properties dialog box
On the Info page of the Backstage view, click Properties, and then click Advanced Properties.
In File Explorer, right-click the file, and then click Properties.
Showing and hiding formatting symbols
When you are fine-tuning the layout of a document, you might find it helpful to display formatting marks and hidden characters. Formatting marks, such as tabs, paragraph marks, page breaks, and section breaks, control the layout of your document, and hidden characters provide the structure for behind-the-scenes processes, such as indexing.
Recording simple macros
Macros are useful for completing repetitive tasks or tasks that you perform frequently. You can record a series of simple actions that you perform in Word and save the recorded actions as a macro. If you want to automate a more advanced task and have some basic coding skills, you can record the basic actions and then modify the code in the recorded macro to meet your needs.

To record a macro
On the View tab, click the Macros arrow, and then click Record Macro.
In the Record Macro dialog box, enter a name for the macro in the Macro name box. The name cannot include spaces.
In the Store macro in list, click the template or document in which you want to save the macro.
If you want to assign the macro to a button on the Quick Access Toolbar, do the following:
In the Assign macro to area, click Button.
On the Quick Access Toolbar page of the Word Options dialog box, click the macro name in the left pane, click Add, and then click Modify.
In the Modify Button dialog box, select a symbol to display on the button. Then click OK in each of the open dialog boxes.
If you want to assign the macro to a keyboard shortcut, do the following:
In the Assign macro to area, click Keyboard.
In the Customize Keyboard dialog box, with the cursor in the Press new shortcut key box, press the key combination you want to assign to the macro. If the shortcut is already assigned to another macro, or to a symbol or command, the existing target is shown below the Current keys box.
After verifying that you want to assign the selected keyboard shortcut, click Assign, and then click Close.
When the cursor shape changes to a cassette to indicate that Word is recording your actions, perform each step of the task that you want to record as a macro.
When you complete the task, click the Macros arrow, and then click Stop Recording.
To modify a macro
On the View tab, click the Macros button (or press Alt+F8).
In the Macros dialog box, click the name of the macro you want to modify, and then click Edit.
In the Microsoft Visual Basic for Applications window, select the macro you want to modify, and then edit the code.
Assigning keyboard shortcuts
You can use keyboard shortcuts to run commands, insert symbols, and run macros. Many commands and symbols already have associated keyboard shortcuts. The keyboard shortcut for a command that appears on the ribbon is displayed by default in the ScreenTip that appears when you point to the command. If a command you use frequently doesn’t have a built-in keyboard shortcut, or if you don’t like the keyboard shortcut that is assigned to the command, you can create one either in a specific document or in a template. You can also modify the built-in keyboard shortcuts.
To manage keyboard shortcuts for commands
Display the Customize Ribbon page of the Word Options dialog box.
Below the Choose commands pane, to the right of Keyboard shortcuts, click the Customize button.
In the Customize Keyboard dialog box, select the category containing the command for which you want to create a keyboard shortcut, and then select the command.
Click to position the cursor in the Press new shortcut key box, and then press the key combination you want to use as a keyboard shortcut for the selected command.
To delete an existing keyboard shortcut to make it available for reassignment, select it in the Current keys box, and then click the Remove button.
To assign an available keyboard shortcut to the selected command, do one of the following:
To save the keyboard shortcut in all documents based on the current template, verify that the template name is selected in the Save changes in list, and then click Assign.
To save the keyboard shortcut only in the current document, click the document name in the Save changes in list, and then click Assign.
To delete all custom keyboard shortcuts, click Reset All.
Close the Customize Keyboard dialog box and the Word Options dialog box.
To assign a keyboard shortcut to a symbol
On the Insert tab, in the Symbols group, click the Symbol button, and then click More Symbols.
On the Symbols page of the Symbol dialog box, locate and click (don’t double-click) the symbol to which you want to assign a shortcut key, and then click the Shortcut Key button.
In the Customize Keyboard dialog box, press the key combination you want to assign to the symbol. If the shortcut is already assigned to another symbol, or to a command or macro, the target symbol or command is shown below the Current keys box.
After verifying that you want to assign the selected keyboard shortcut, click Assign.

Managing macro security
When you open a document that contains macros, the macros are automatically disabled, and an information bar alerts you to that fact. You can work in the document without enabling the macros, but if you want to use a macro, you must first enable them.
To enable macros in an open document
On the Message Bar, click Enable Content.
On the Info page of the Backstage view, click the Enable Content button, and then do one of the following:
Click Enable All Content.
Click Advanced Options. In the Microsoft Office Security Options dialog box, click Enable content for this session, and then click OK.
1.5 Configure documents to print or save
Configuring documents to print
When printing a document, you can specify what part of the document is printed and whether markup (tracked changes) is indicated in the printed document. In addition, you have the option of printing the following information instead of the document content:
Document properties
Tracked changes
Styles
AutoText entries
Custom shortcut keys
In addition to these options, you can specify the following print settings:
Print a multipage document on one or both sides of the paper. If your printer supports double-sided printing, you have the option of flipping the double-sided page on the long edge or the short edge (depending on how you plan to bind and turn the document pages).
Print multiple copies of a document either with collated pages (all pages of each copy together) or uncollated pages (all copies of each page together).
Print up to 16 pages on each sheet of paper. You can use this option to print a booklet with two pages per sheet that will be folded in the middle. You might also use this option to save paper when you’re printing a long document, but bear in mind that as the number of pages per sheet increases, the size of the content printed on the page decreases.
If your printer has multiple paper trays or a manual paper feeder, select the paper source you want to use.
To select a printer
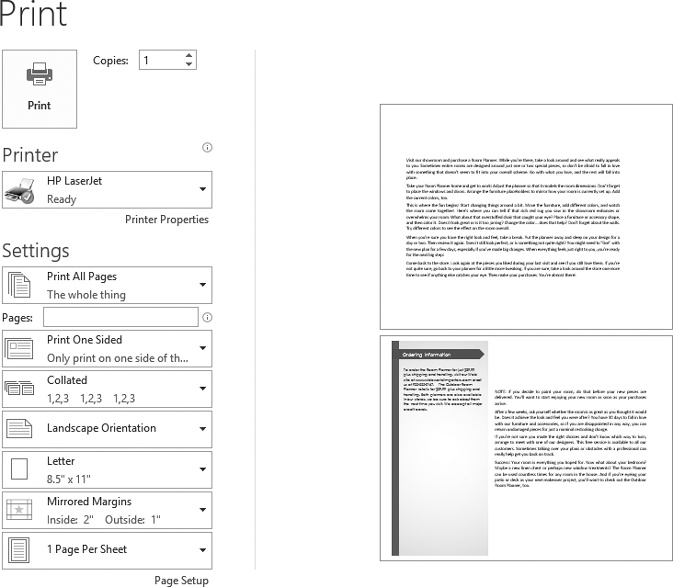
To print multiple copies of a document
On the Print page of the Backstage view, in the Copies box, click the arrows or enter the number of copies you want to print. If you want to print the copies of each page separately, click Collated in the Settings area, and then click Uncollated.
To print a specific portion of a document
On the Print page of the Backstage view, in the Settings area, click Print All Pages and then do any of the following:
To print only the currently selected content, click Print Selection.
To print only the page on which the cursor is active, click Print Current Page.
To print specific pages or sections, click Custom Print and enter the pages, sections, or page ranges you want to print in the Pages box. Indicate page ranges by using a hyphen and multiple page selections by using a comma (for example, 1-3, 6 prints pages 1, 2, 3, and 6). Indicate sections and page ranges within sections by prefacing the page with p and the section with s (for example, s2 prints the entire second section, and p2s2-p4s2 prints pages 2-4 of the second section).
To print a document double-sided
On the Print page of the Backstage view, in the Settings area, click Print One Sided and then click the Print on Both Sides option that you want.
To scale pages to a specific size
On the Print page of the Backstage view, in the Settings area, click 1 Page per Sheet, click Scale to Paper Size, and then click the paper size to which you want to scale the sheets.
To specify a paper source
On the Print page of the Backstage view, in the Settings area, click the Page Setup link. On the Paper page of the Page Setup dialog box, in the Paper source area, click the paper source you want. Then click OK.
Saving documents in alternate file formats
The Office 2013 programs use file formats based on XML, called the Microsoft Office Open XML Formats, that were introduced with Office 2007. By default, Word 2013 files are saved in the .docx format, which is the Word variation of this file format. The .docx format provides the following benefits:
File size is smaller because files are compressed when saved, decreasing the amount of disk space needed to store the file and the amount of bandwidth needed to send files in email, over a network, or across the Internet.
Recovering at least some of the content of damaged files is possible because XML files can be opened in a text program such as Notepad.
Security is greater because .docx files cannot contain macros, and personal data can be detected and removed from the file. (Word 2013, Word 2010, and Word 2007 provide a different file format—.docm—for documents that contain macros.)
In addition to these default Word 2013 formats, you can save a document that you create in Word 2013 in many other formats, including Word Macro-Enabled Document, Word Macro-Enabled Template, Word XML Document, Web Page, Word 97-2003 Template, Word 2003 XML Document, Strict Open XML Document, and Works 6-9 Document.
If you want to save a Word document in a format that can be opened by the widest variety of programs (including text editors that are installed with most operating systems), use one of these two formats:
If you want people to be able to view a document exactly as it appears on your screen, use one of these two formats:
PDF (.pdf) This format is preferred by commercial printing facilities. Recipients can display the file in the free Microsoft Reader or Adobe Reader programs, and can display and edit the file in Word 2013 or Adobe Acrobat.
XPS (.xps) This format precisely renders all fonts, images, and colors. Recipients can display the file in the free Microsoft Reader program or the free XPS Viewer program.
The PDF and XPS formats are designed to deliver documents as electronic representations of the way they appear when printed. Both types of files can easily be sent by email to many recipients and can be made available on a webpage for downloading by anyone who wants them. However, the files are no longer Word documents. A PDF file can be converted to the editable Word format. An XPS file cannot be opened, viewed, or edited in Word.
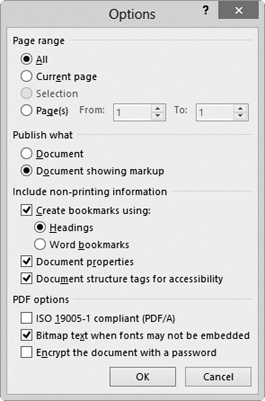
When you save a Word document in PDF or XPS format, you can optimize the file size of the document for your intended distribution method—the larger Standard file size is better for printing, whereas the Minimum file size is suitable for online publishing. You can also configure the following options:
Specify the pages to include in the PDF or XPS file.
Include or exclude comments and tracked changes in a PDF file.
Include or exclude non-printing elements such as bookmarks and properties.
Select compliance, font embedding, and encryption options in a PDF file.
To save a file in an alternative file format with the default settings
To save a file in PDF or XPS format with custom settings
On the Export page of the Backstage view, click Create PDF/XPS Document, and then click the Create PDF/XPS button.
In the Publish As PDF or XPS dialog box, click Options.
In the Options dialog box, select the options you want for the PDF or XPS file, and then click OK.
Or
Display the Save As dialog box. In the Save as type list, click either PDF or XPS Document.
In the Save As dialog box, click Options.
In the Options dialog box, select the options you want for the PDF or XPS file, and then click OK.
Maintaining backward compatibility
If you work with people who are using a version of Word earlier than 2007, they can install the free Microsoft Office Compatibility Pack For Word, Excel, And PowerPoint File Formats from the Microsoft Download Center at download.microsoft.com. The Compatibility Pack doesn’t provide additional functionality in the older program version, but it does enable users to open .docx files in the older version of Word.
To ensure that the appearance and functionality of a document is consistent in current and earlier versions of Word, you can run the Compatibility Checker. This tool identifies formatting and features that aren’t supported or won’t work as expected in earlier versions of Word.

The following Word 2013 formatting and features aren’t supported in Word 2003 or earlier versions of Word:
Word 2007 content controls
Themes
Major/minor fonts
Tracked moves
Margin tabs
SmartArt graphics
Office 2007 charts
Open XML Embedded objects
Building blocks
Bibliographies and citations
Equations
Relative text boxes
In addition to those previously listed, the following Word 2013 formatting and features aren’t supported by Word 2007 or earlier versions of Word:
New numbering formats
New shapes and text boxes
Text effects
Alt text for tables
OpenType features
Blocking authors
New WordArt effects
New content controls
In addition to those previously listed, the following Word 2013 formatting and features aren’t supported by Word 2010 or earlier versions of Word:
Web video
Apps for Office
Repeating section content controls
Customized footnote columns
Collapsed by Default headings
Marking comments as done
To run the Compatibility Checker before saving a document
On the Info page of the Backstage view, click the Check for Issues button, and then click Check Compatibility.
In the Select versions to show list, select the Word versions you want to support, and clear the Word versions against which you do not want to validate the document. Selected versions are indicated by check marks preceding the version.
To maintain backward compatibility with a previous version of Word
Saving files to remote locations
From the Save As page of the Backstage view, you can connect to a variety of storage locations, including a Microsoft SkyDrive, Microsoft SharePoint site, or other online storage location; a folder on your computer; or another network location. The locations available from the Save As page vary depending on where you have previously saved files.

To add a SharePoint site that is not associated with Office 365 to your Web Locations list
On the Save As page of the Backstage view, click Other Web Locations, and then click Browse.
In the Save As dialog box, enter the URL of the SharePoint site in the Address bar, and then click the Go to button.
Enter your user credentials for the SharePoint site, and then click OK.
To add an Office 365 SharePoint site or SkyDrive to your Save As locations
On the Save As page of the Backstage view, click Add a Place.
In the Add a Place list, click Office 365 SharePoint or SkyDrive.
In the Add a service window, enter the email address with which you sign in to the SharePoint site or SkyDrive, and then click Next.
In the Sign In window, enter your user credentials for the SharePoint site or SkyDrive, and then click Sign in.
To save a document to a remote location
On the Save As page of the Backstage view, click the type of remote location in which you want to save the file.
In the remote location list, click the folder in which you want to save the file, or click Browse and then enter your credentials for the remote location.
In the Save As dialog box, navigate to an existing folder or create a new folder, modify the name in the File name box if necessary, and then click Save.
Protecting documents by using passwords
Sometimes, you might want only certain people to be able to open and change a document. The easiest way to exercise this control is to assign a password to protect the document. Word then requires that the password be entered correctly before it will allow the document to be opened and changed.
Word offers two levels of password protection:
Unencrypted The document is saved in such a way that only people who know the password can open it, make changes, and save the file. People who don’t know the password can open a read-only version. If they make changes and want to save them, they have to save the document with a different name or in a different location, preserving the original.
Encrypted The document is saved in such a way that people who do not know the password cannot open it at all.
To require a password to modify a document
On the Save As page of the Backstage view, click Browse. Then enter or select a save location and file name for the password-protected document, if necessary.
In the Save As dialog box, click Tools, and then click General Options.
In the General Options dialog box, in the Password to modify box, enter the password you want to assign to the document. Then click OK.
In the Confirm Password dialog box, enter the password in the Reenter password to modify box, and then click OK.
In the Save As dialog box, click Save. If prompted to do so, click Yes to confirm that you want to replace the existing file.
To require a password to open a document
On the Info page of the Backstage view, click the Protect Document button, and then click Encrypt with Password.
In the Encrypt Document dialog box, enter the password you want to assign to the document in the Password box, and then click OK.
Or
On the Save As page of the Backstage view, click Browse. Then enter or select a save location and file name for the password-protected document, if necessary.
In the Save As dialog box, click Tools, and then click General Options.
In the General Options dialog box, in the Password to open box, enter the password you want to assign to the document. Then click OK.
In the Confirm Password dialog box, in the Reenter password to open box, enter the password, and then click OK.
In the Save As dialog box, click Save. If prompted to do so, click Yes to confirm that you want to replace the existing file.
To remove unencrypted password protection
On the Save As page of the Backstage view, click Browse. Then enter or select a save location and file name for the password-protected document, if necessary.
In the Save As dialog box, click Tools, and then click General Options.
In the General Options dialog box, delete the contents of the Password to open or Password to modify box. Then click OK.
In the Save As dialog box, click Save. Then click Yes to confirm that you want to replace the existing file.
To remove encrypted password protection
Open the document by using the password.
On the Info page of the Backstage view, in the Protect Document list, click Encrypt with Password.
In the Encrypt dialog box, delete the contents of the Password box, and then click OK.
Objective review
Before finishing this chapter, ensure that you have mastered the following skills:
| 1.1 Create documents |
| 1.2 Navigate through documents |
| 1.3 Format documents |
| 1.4 Customize document options and views |
| 1.5 Configure documents to print or save |