
Chapter 4. Apply References
The skills tested in this section of the Microsoft Office Specialist exam for Microsoft Word 2013 relate to creating references within document content. Specifically, the following objectives are associated with this set of skills:
| 4.1 Create endnotes, footnotes, and citations |
| 4.2 Create captions |
Word 2013 provides many ways of adding supporting information to a document for the purpose of referencing sources or aiding a reader in locating information.
When you want to provide ancillary information about document content, you can insert footnotes or endnotes in the content that link to that information in another location, usually at the bottom of the page or the end of the document. To indicate the source of content within a document, you can insert citations throughout the content and compile a bibliography based on those citations. In a document that references legal standards, you can mark legal citations within the document and compile a table of authorities from those citations. To clearly indicate the source of images embedded in a document, you can add image captions and optionally compile a table of figures based on the captions.
This chapter guides you in studying ways of creating endnotes, footnotes, bibliographical citations, legal citations, and captions.
Note
Practice Files To complete the practice tasks in this chapter, you need the practice files contained in the MOSWord2013Objective4 practice file folder. For more information, see Download the practice files in this book’s Introduction.
4.1 Create endnotes, footnotes, and citations
Inserting footnotes and endnotes
When you insert a footnote or endnote in the text of a document, a reference number, letter, or symbol appears at the insertion location. Your associated note, indicated by the same reference mark, appears in the location that you specify:
Footnotes can appear at the bottom of the page (relative to the margin) or immediately after the page content. The default location is at the bottom of the page, which provides a consistent experience for readers.
Endnotes can appear at the end of the document or at the end of the section, if the document contains multiple sections. The default location is at the end of the document.
In most views, footnotes and endnotes are divided from the main text by a note separator line.

A document can contain both footnotes and endnotes. The decision to position a note as a footnote or as an endnote might be governed by your organization’s editorial standards, or might simply be a matter of preference. In general, if the associated note contains information that you’d like a reader to be able to immediately reference (such as supporting information), use a footnote; if the note contains information that would be more appropriate gathered with other notes in a central location (such as a source reference), use an endnote.
Tip
When inserting notes specifically for the purpose of referencing content sources, use citations instead of endnotes or footnotes. You can then generate a bibliography from the citations. For more information, see Inserting and referencing citations later in this section.
To create a footnote or endnote
Place the cursor in the location from which you want to reference the footnote or endnote.
On the References tab, in the Footnotes group, click the Insert Footnote button or the Insert Endnote button.
In the linked area at the bottom of the page or end of the document or section, enter the note text.
To set the location of all footnotes or endnotes in a document
Ensure that no footnote or endnote is currently selected.
On the References tab, click the Footnotes dialog box launcher.
In the Footnote and Endnote dialog box, do any of the following, and then click OK:
In the Location area, click Footnotes and then, in the associated list, click Bottom of page or Below text.
In the Location area, click Endnotes and then, in the associated list, click End of section or End of document.
Modifying footnotes and endnotes
After you insert a footnote or endnote, you can convert it to the other type of note at any time. You can convert either individual notes or all the notes in a document.
By default, footnote reference marks use the 1, 2, 3 number format, and endnote reference marks use the i, ii, iii number format. You can change the reference mark system used by either type of note, set the beginning reference mark, and specify the scope of the numbering change.

The standard number formats available for both footnotes and endnotes include the following:
1, 2, 3, …
a, b, c, …
A, B, C, …
i, ii, iii, …
I, II, III, …
*, †, ‡, §, …
You can optionally enter a custom reference mark or select one from the Symbol dialog box.
Numbering options include Continuous, Restart Each Section, and Restart Each Page.
The formatting of reference marks and note text is based on the current document theme. As with other document content, you can also manually format reference marks and note text.
To change the type of a single footnote or endnote
Right-click the associated note, and then click Convert to Endnote or Convert to Footnote.
To change the type of all footnotes or endnotes
In the Footnote and Endnote dialog box, click the Convert button.
In the Convert Notes dialog box, do one of the following, and then click OK:
To change the number format of footnotes or endnotes
Ensure that no footnote or endnote is currently selected.
In the Location area of the Footnote and Endnote dialog box, click Footnotes or Endnotes to indicate the element you want to modify.
In the Format area, in the Number format list, click the number format you want to use.
With Whole document shown in the Apply changes to box, click Apply to change all footnotes or endnotes to the new number format.
To manually format all reference marks or note text
In the document text, select the reference mark for any footnote or endnote.
Or
Select the text of any footnote or endnote.
On the Home tab, in the Editing group, click the Select button, and then click Select All Text with Similar Formatting.
Apply the formatting you want.
To remove a footnote or endnote from a document
Delete the reference mark.
Inserting and referencing citations
Citations are embedded references to content and information sources from which you can build a reference table or document. A Word document can include two types of citations:
Citations referencing content sources such as books, magazines, and websites, from which you can build a bibliography
Citations referencing legal information such as regulations, cases, and statutes, from which you can build a table of authorities
Compiling a bibliography
Many types of documents that you create might require a bibliography that lists the sources of the information that appears or is referenced in the document.

Whether your sources are books, articles, reports, recordings, websites, interviews, or any of a dozen other types, you can record details about them and then select a common style, such as APA Style (detailed in the Publication Manual of the American Psychological Association) or Chicago Style (detailed in the Chicago Manual of Style), to have Word automatically reference the sources in that style’s standard format.
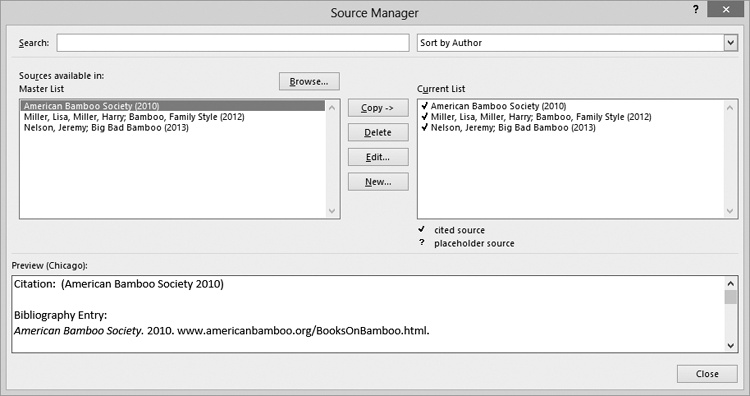
When you create sources, Word stores them in a master list saved in a separate file on your computer’s hard disk, so that you can cite them in any document. In the Source Manager dialog box, you can specify the sources that you want to have available to the current document. You can use the Source Manager to help you keep track of sources you use while researching a document, and to ensure that you reference them in the proper format.
At each location in a document from which you want to reference a bibliographical source, you insert a citation from the Citations & Bibliography group on the References tab.
There are three ways in which you can create and cite sources:
Provide details for all the sources, and then cite an existing source.
Provide details for sources as you insert citations.
Create source placeholders as you insert citations, and then modify the source information in the Source Manager dialog box.
After you enter citations in a document, you can easily compile their sources into a formatted source list, with or without a preformatted heading of Bibliography, References, or Works Cited.
When you compile a bibliography, Word inserts it at the cursor as one field. You can edit the text of a bibliography, but if the source information changes, it is more efficient to edit the source in the Source Manager and then update the bibliography.
On the References tab, in the Citations & Bibliography group, select the reference style you will be using, if you know it.
In the Citations & Bibliography group, click Insert Citation, and then click Add New Source.
Or
In the Citations & Bibliography group, click Manage Sources, and then in the Source Manager dialog box, click New.
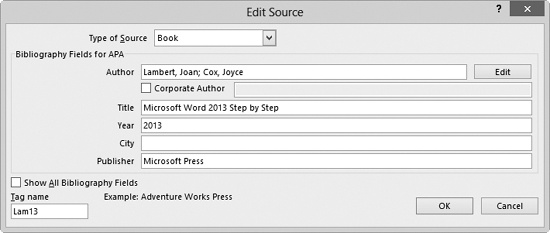
In the Create Source dialog box displaying the recommended fields for the selected style, select the source type, do one of the following, and then click OK:
Enter the applicable information in the displayed fields.
To save additional information about the source, select the Show All Bibliography Fields check box, and then enter the information you want.
To create a source placeholder
To update a source placeholder
In the Citations & Bibliography group, click Manage Sources.
In the Source Manager dialog box, click the placeholder source (indicated by a question mark) in the Current List box, and then click Edit.
In the Edit Source dialog box, enter the information that is applicable to the source, and then click OK to change the source placeholder to a valid source.
To cite a source
Position the cursor after the content for which you want to cite the source.
In the Citations & Bibliography group, click Insert Citation, and then click the source or source placeholder.
To specify a bibliography style
To create a bibliography
On the References tab, in the Citations & Bibliography group, click the Bibliography button.
In the Bibliography gallery, click Bibliography, References, or Works Cited to insert the source list with that heading.
Or
On the Bibliography menu, click Insert Bibliography to insert the source list without a heading.
To update a bibliography
Click the bibliography field, and then click the Update Citations and Bibliography button that appears above the field.
Right-click anywhere in the bibliography field, and then click Update Field.
To convert a bibliography from a field to text
Click the bibliography field, click the Bibliography button that appears above the field, and then click Convert bibliography to static text.
Compiling a table of authorities
If a legal document contains items such as regulations, cases, and statutes, you can mark these as legal citations and compile the citations into a table of authorities. In the table, citations are categorized as cases, statutes, rules, treatises, regulations, or other authorities.

At each location in a document from which you want to reference an authority, you mark a citation from the Mark Citation dialog box, which you open from the Table Of Authorities group on the References tab.
Word uses the citations to create this type of table the same way it uses headings to create a table of contents and captions to create a table of figures. You must insert a citation for each legal reference you want to include, and then generate the table.
Note
See Also For more information about compiling a table of figures, see 4.2 Create captions.
To mark a legal citation
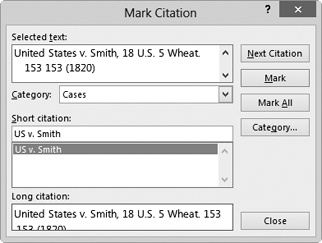
Select the legal reference that you want to mark with a citation.
On the References tab, in the Table of Authorities group, click the Mark Citation button to open the Mark Citation dialog box.
Or
Press Alt+Shift+I to open the Mark Citation dialog box.
In the Short citation box, edit the citation to reflect the way you want it to appear in the table.
The default category is Cases. If you want to change the category, display the Category list, and click the category that applies to the citation.
To mark one citation, click Mark. To mark all citations that match the selected citation, click Mark All. Word inserts hidden field codes in the document that identify the citation.
To create a table of authorities
Position the cursor where you want to insert the table of authorities. On the References tab, in the Table of Authorities group, click Insert Table of Authorities.
In the Table of Authorities dialog box, in the Category list, click the category of citations that you want to appear in the table, or click All to include all categories.
Select formatting options for the table, and then click OK to insert the table of authorities.
4.2 Create captions
Inserting captions
Tables, graphics, and equations—collectively referred to in this context as figures—can be a significant source of information within a document. In most cases, these elements appear inline, near the text that references them. Sometimes, however, it is necessary to reference these elements from other locations. To simplify this process, you can insert figure captions that label each of these elements. You can then easily insert cross-references to the captioned figures.

The standard number formats available for captions include the following:
1, 2, 3, …
a, b, c, …
A, B, C, …
i, ii, iii, …
I, II, III, …
By default, captions use the 1, 2, 3 number format. You can select a different number format for each type of captioned element, if you prefer.
In the caption, the number is preceded by a label of your choice—the default options are Equation, Figure, and Table—or you can create a custom label, such as Image or Map. The number can also incorporate a reference to the current chapter.
The number assigned to a captioned element is determined by its order in the document. If you caption an element of the same type earlier in the document, the caption numbers that follow, and references to those captions, will update automatically.
Tip
The formatting of captions is controlled by the Caption style and changes with the selected document theme elements. Updating the Caption style updates the appearance of all captions.
To insert a caption
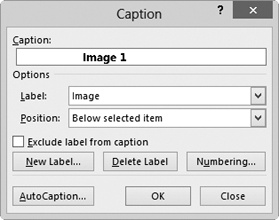
Select the element you want to caption.
On the References tab, in the Captions group, click the Insert Caption button.
In the Caption dialog box, do one of the following:
To use an existing designator, click it in the Label list.
To create a new designator, click New Label. Then in the New Label dialog box, enter the label you want to assign to this type of element, and click OK.
To remove the label entirely and use only the number as a caption, select the Exclude label from caption check box.
In the Position list, click Above selected item or Below selected item.
To select a numbering scheme other than the one shown in the Caption box, do the following, and then click OK:
Click the Numbering button.
In the Caption Numbering dialog box, in the Format list, click the numbering format you want to use.
If you want to incorporate the chapter number or other specifically styled text in the caption, select the Include chapter number check box, the name of the chapter number style, and the separator you want to insert between the chapter number and element number.
If you want to include a description after the label, click to the right of the label and number in the Caption box, press the Spacebar, and enter the caption.
In the Caption dialog box, click OK.
To reference a captioned figure
Position the insertion point in the location in which you want to insert the cross-reference.
On the References tab, in the Captions group, click Cross-reference.
In the Cross-reference dialog box, do any of the following, and then click Insert:
in the Reference type list, click the type of item you want to reference (for example, Figure).
If you want to provide a link to the captioned item, select the Insert as hyperlink check box.
If you want to provide a text reference to the element, select the designator you want to reference (for example, Page Number).
If you want to include an (above) or (below) designator, select the Include above/below check box.
In the For which caption box, click the captioned element you want to reference.
Compiling a table of figures
In a long document that contains many figures, you can help readers locate captioned elements by compiling a table of figures. Unlike a table of authorities, which references all cited authorities in a document divided by type, a table of figures lists only one type of captioned element. Therefore, if you want to list, for example, all equations, figures, and tables in a document, you must create these tables individually.

To create a table of figures
On the References tab, in the Captions group, click Insert Table of Figures.
In the Table of Figures dialog box, do any one of the following:
To hide page numbers in the table, clear the Show page numbers check box.
To display page numbers immediately after the captions, clear the Right align page numbers check box.
To precede page numbers with spaces, hyphens, or underscores rather than periods, select the option you want in the Tab leader list.
In the General area, in the Caption label list, click the type of captioned elements you want to display in the table.
Do any of the following, and then click OK:
To use a table format other than the default, click Classic, Distinctive, Centered, Formal, or Simple in the Formats list.
To include only the manually entered description of the captioned elements in the table, clear the Include label and number check box.
Objective review
Before finishing this chapter, ensure that you have mastered the following skills:
| 4.1 Create endnotes, footnotes, and citations |
| 4.2 Create captions |