
Chapter 9: Tracing the Kernel Flow
Tracing is the ability to collect relevant details as code executes. Typically, data collected will include function names (and perhaps parameters and return values) of function calls made along the code path being followed, the context that issued the call, when the call was made (a timestamp), the duration of the function call, and so on. Tracing allows you to study and understand the detailed flow of a system or a component within it. It's akin to the black box in an aircraft – it simply collects data, allowing you to interpret and analyze it later. (You can also consider tracing to be loosely analogous to logging.)
Profiling is different from tracing in that it typically works by taking samples (of various interesting events/counters) at periodic points in time. It won't capture everything; it (usually) captures just enough to help with runtime performance analysis. A profile of code execution, a report, can usually be generated, allowing you to catch outliers. So, profiling is statistical by nature, while tracing isn't. It captures literally everything.
Tracing can be, and certainly often is, a debugging technique well worth understanding and using; profiling, on the other hand, is meant for performance monitoring and analysis. This book is about kernel debugging; hence, in this chapter, we keep the focus on a few tracing technologies (among the many available) and their frontends, which can prove useful. (To be honest, there will be overlap at times – some tools serve as both tracers as well as profilers, depending on how they're invoked.)
In this chapter, we're going to cover the following main topics:
- Kernel tracing technology – an overview
- Using the ftrace kernel tracer
- Using the trace-cmd, KernelShark, and perf-tools ftrace frontends
- An introduction to kernel tracing with LTTng and Trace Compass
Technical requirements
The technical requirements and workspace remain identical to what's described in Chapter 1, A General Introduction to Debugging Software. The code examples can be found within the book's GitHub repository here: https://github.com/PacktPublishing/Linux-Kernel-Debugging. The only new requirements are installing LTTng and Trace Compass for your Ubuntu 20.04 LTS system.
Kernel tracing technology – an overview
In order to trace or profile, a data source (or several) are required; the Linux kernel provides them, of course. Tracepoints are a primary data source within a kernel (in fact, we covered using the kernel's dynamic event tracing in Chapter 4, Debug via Instrumentation – Kprobes in the The easier way – dynamic kprobes or kprobe-based event tracing section). The kernel has several predefined tracepoints; you can see them here: /sys/kernel/tracing/events/. Many tracing tools rely on them. You can even set up tracepoints dynamically by writing to /sys/kernel/tracing/kprobe_events (we covered this too in Chapter 4, Debug via Instrumentation – Kprobes via dynamic kprobes, as just mentioned).
Other data sources include kprobes, uprobes (the equivalent of kprobes for userspace), USDT/dprobes and LTTng-ust (these latter two are for user mode tracing; also, LTTng has several kernel modules that it inserts into the kernel for kernel tracing – there will be more on LTTng later in this chapter).
A well-known look at the state of Linux tracing (and the many tools and technologies encompassed within it) is this blog article by Julia Evans (@b0rk): Linux tracing systems & how they fit together, Julia Evans, July 2017: https://jvns.ca/blog/2017/07/05/linux-tracing-systems/. Do check it out. Here, I use the same methodology to organize the rather large Linux tracing infrastructure; we divide it up into data sources (as mentioned previously), infrastructure technologies that collect or extract data from them, and finally, frontends, enabling you to use them more easily and effectively. The following diagram is my attempt to sum this up in one place:
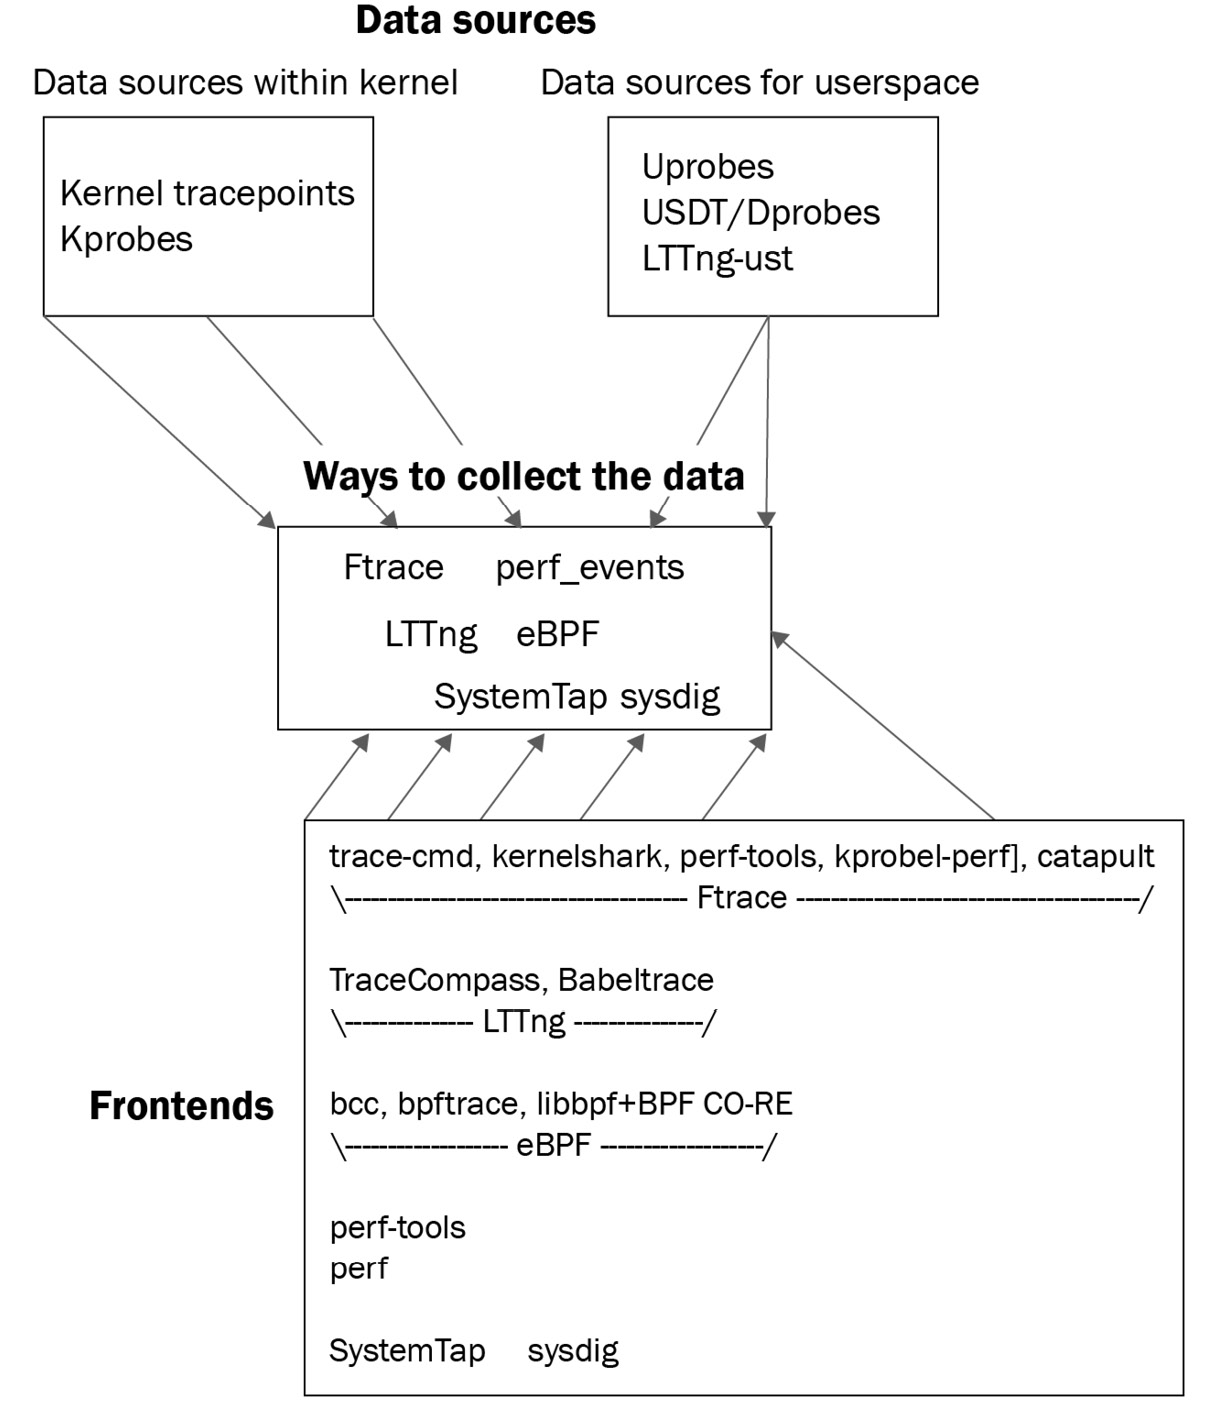
Figure 9.1 – The Linux tracing infrastructure
Steven Rostedt is the original developer of ftrace and, I dare say, is intimately familiar with much of Linux's vast tracing landscape. A slide from one of his many presentations on Linux tracing goes a long way toward summing up the state of the system (as of 2019 at least):

Figure 9.2 – The rich Linux tracing ecosystem, one where the underlying tech is shared
Here is the credit for the previous slide: Unified Tracing Platform, Bringing tracing together, Steven Rostedt, VMware 2019: https://static.sched.com/hosted_files/osseu19/5f/unified-tracing-platform-oss-eu-2019.pdf.
As you can see (Figure 9.1 and Figure 9.2), there's a pretty vast plethora of technologies here; taking into account the fact that this book is about kernel debugging (and the space constraints within the book), we will only cover a few key kernel tracing technologies, focusing on their usage rather than on their internals. Again, the point Rostedt convincingly makes (which is echoed in this article: Unifying kernel tracing, Jack Edge, Oct 2019: https://lwn.net/Articles/803347/) is that in today's world, Linux tracing technologies aren't really competing with each other; rather, they're building off each other, as sharing ideas and code is not only allowed, it's encouraged! Thus, he visualizes a common userspace library that unifies all the disparate (yet powerful) kernel tracing technology in such a way that anyone can take advantage of all of it.
Do refer to the Further reading section for links to the other tracing technologies (as well as to what's covered here). Also, we've already covered kprobes and the related event tracing tooling, the usage of the kprobe[-perf] script, and the basics of using eBPF tooling back in Chapter 4, Debug via Instrumentation – Kprobes.
So, buckle up, and let's dive into kernel tracing with ftrace!
Using the ftrace kernel tracer
Ftrace is an inbuilt kernel feature; its code is deeply ingrained into that of the kernel itself. It provides developers (anyone with root access, really) with a way to look deep within the kernel, perform detailed traces to see exactly what's going on inside, and to even get help with performance/latency issues that may crop up.
A simple way to think about ftrace's functionality is this – if you'd like to see what a process is up to, performing strace on it can be very useful indeed; it will display every system call that the process invokes in a meaningful way, with parameters, return values, and so on. Thus, strace is useful and interesting, as it shows what occurs at the interesting system call point – the boundary between user and kernel space. But that's it; strace cannot show you anything beyond the system call; what does the system call code do within the kernel? What kernel APIs does it invoke, and thus which kernel subsystems does it touch? Does it move into a driver? Ftrace can answer these questions (and more)!
Tip
Don't knock the sheer usefulness of strace (and even ltrace – a library call tracer) in helping to understand and solve issues, obviously more so at the userspace layers. I highly recommend you learn to leverage them; read their man pages and search for tutorials.
Ftrace works essentially by setting up function hooks via compiler instrumentation (a bit simplistically, by enabling the compiler's -pg profiler option, which adds a special mcount call), ensuring that the kernel is aware of the entry (prologue) and possibly the exit/return (epilogue) of (almost) every single function in kernel space. (The reality is more complex; this would be too slow. For performance, there's a sophisticated dynamic ftrace kernel option – more on this is mentioned in the Ftrace and system overhead section.) In this way, ftrace is more like the Kernel Address Sanitizer (KASAN), which uses compiler instrumentation to check for memory issues, and less like the Kernel Concurrency Sanitizer (KCSAN), which works using a statistical sampling-based approach. (We covered KASAN in Chapter 5, Debugging Kernel Memory Issues – Part 1, and KCSAN in Chapter 8, Lock Debugging.) But by virtue of the dynamic ftrace option, it runs with native performance for the vast majority of the time, making it a superb debug tool on even production systems.
Accessing ftrace via the filesystem
Modern ftrace (kernel 4.1 onward) is implemented as a virtual (API) filesystem named tracefs; this is how you're expected to work with it. The default mount point is a leaf directory under the debugfs mount point named tracing; it's also made available under sysfs:
mount | grep "^tracefs"
tracefs on /sys/kernel/tracing type tracefs (rw,nosuid,nodev,noexec,relatime)
tracefs on /sys/kernel/debug/tracing type tracefs (rw,nosuid,nodev,noexec,relatime)
As mentioned earlier, it's possible – especially on a production kernel – that the CONFIG_DEBUG_FS_DISALLOW_MOUNT kernel config is set to y, implying that although debugfs is available, it isn't visible. In cases like this, having access to kernel tracepoints via sysfs (/sys/kernel/tracing) becomes important. Until Linux 4.1, only the traditional mount point – /sys/kernel/debug/tracing – was present. From 4.1 onward, mounting debugfs (typically done at boot, as systemd is configured to mount it) will also result in the sys/kernel/tracing mount being automatically set up. As the kernel version we typically work with here is a much later one (5.10), we'll assume from now on that you'll work within the /sys/kernel/tracing directory.
Configuring the kernel for ftrace
Most modern Linux distributions are preconfigured to support ftrace out of the box. The relevant config is CONFIG_FTRACE, which should be set to y. Using the familiar make menuconfig UI, you'll find ftrace (along with its sub-menus) here: Kernel hacking | Tracers.
The key dependency is the TRACING_SUPPORT config; it's arch-dependent and must be y. Realistically, most architectures (CPU types) will have this dependency satisfied. Here's a screenshot of the default sub-menu for ftrace on x86:
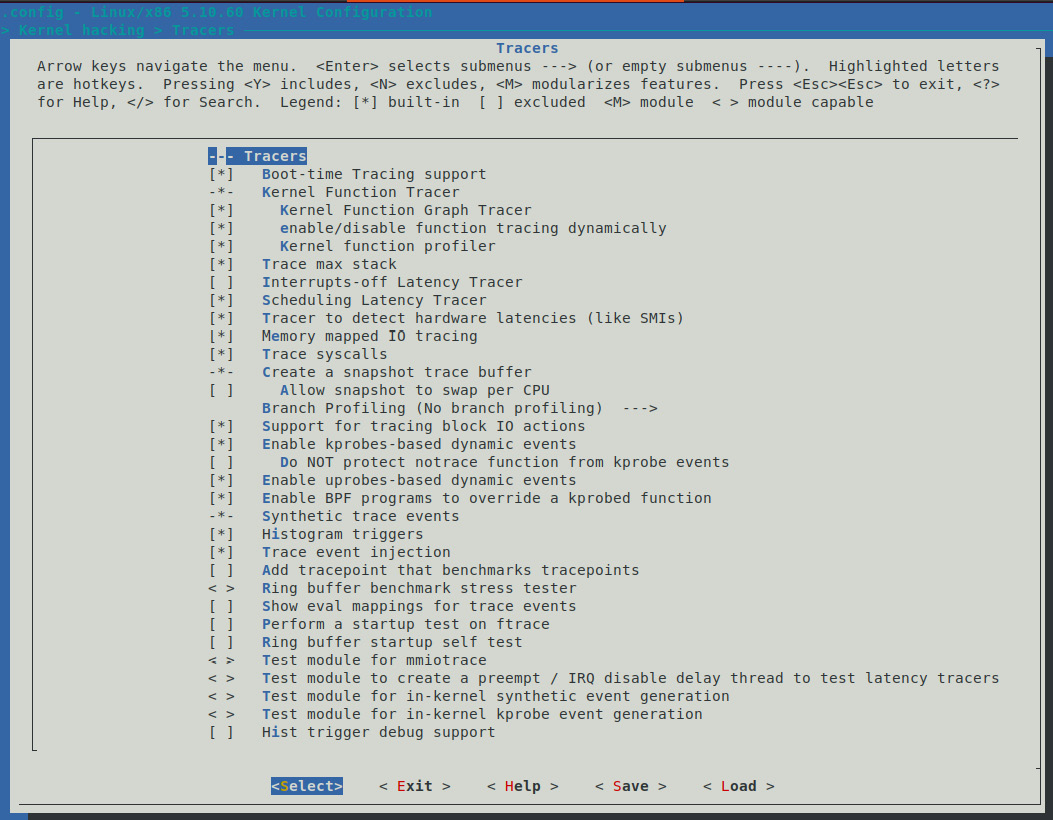
Figure 9.3 – A screenshot of the Tracers sub-menu (defaults) on x86_64 (5.10.60)
Also, if you want to enable the Interrupts-off Latency Tracer (CONFIG_IRQSOFF_TRACER), it depends on TRACE_IRQFLAGS_SUPPORT=y (which is usually the case; we will briefly cover the interrupt (IRQ) and preempt-off latency tracers within the Ftrace – miscellaneous remaining points via FAQs section). In addition, several options depend upon the ability to figure out and display (kernel) stack traces (CONFIG_STACKTRACE_SUPPORT=y), which, again, is typically on by default.
All the sub-menus and further configs belonging to ftrace are defined (and described) in the Kconfig file here: kernel/trace/Kconfig; you can look it up for details on any particular ftrace config directive.
So, practically speaking, on a common distro kernel (such as that of Ubuntu 20.04.3 LTS), is ftrace enabled or not? Let's check:
$ grep -w CONFIG_FTRACE /boot/config-5.11.0-46-generic
CONFIG_FTRACE=y
It is. What about the embedded system on your project? I wouldn't know; check it out (run grep on your project's kernel config file). On our custom 5.10.60 production kernel, we have ftrace enabled. As an aside, this book's technical reviewer, Chi Thahn Hoang, has vast experience on embedded Linux projects; he mentions that, in his experience, ftrace is always configured into a project, as it's very useful and can be used on demand, with virtually zero overhead when off.
Ftrace and system overhead
If tracing is enabled by default, you would indeed imagine that the system overheads would be pretty high. The good news is that although tracing is enabled, it's not turned on by default. Let's begin to check it out:
# cd /sys/kernel/tracing
(As this is the first time we're using it, I explicitly show the cd to the directory. Also, the # prompt hints that we're running as root; you do need to.)
The tracefs filesystem has many control knobs (pseudofiles, of course, just as with procfs, sysfs, and other API-based filesystems); one of them, named tracing_on, toggles the actual tracing functionality on or off; here it is:
-rw-r--r-- 1 root root 0 Jan 19 19:00 tracing_on
Let's query its current value:
# cat tracing_on
1
It's quite intuitive – 0 means it's off, and 1 means it's on. So, ftrace is on by default? Isn't that risky performance-wise? No, it's actually/practically off – as the current_tracer pseudofile's value (soon explained) is nop, implying it's not tracing.
Back to the question of performance – even with the ability to toggle ftrace on/off, performance will still be an issue. Think about this – pretty much every function entry and return point (if not more fine-grained) will have to perform an if clause, something akin to the pseudocode: if tracing's enabled, trace.... This if clause itself constitutes far too much overhead; remember, this is the OS we're talking about; every nanosecond saved is a nanosecond earned!
The brilliant solution to this situation is to enable a config option called dynamic ftrace – CONFIG_DYNAMIC_FTRACE. When set to y, the kernel performs something amazing (and, in truth, scary); it can (and does!) modify kernel machine instructions on the fly in RAM, patching kernel functions to jump into ftrace or not, as required (this is often called a trampoline)! This config option is turned on by default, resulting in native performance of the kernel when tracing is disabled and near-native performance when tracing for only some functions is enabled.
Using ftrace to trace the flow of the kernel
By now, you'll begin to realize that, as with tracing_on, there are several pseudofiles under tracefs (that is, within the /sys/kernel/tracing directory) that are considered to be the "control knobs" of ftrace! (By the way, now that you know that the files under tracefs are pseudofiles, we'll mostly refer to them as simply files from now on.) The following screenshot shows us that there are indeed plenty of them:
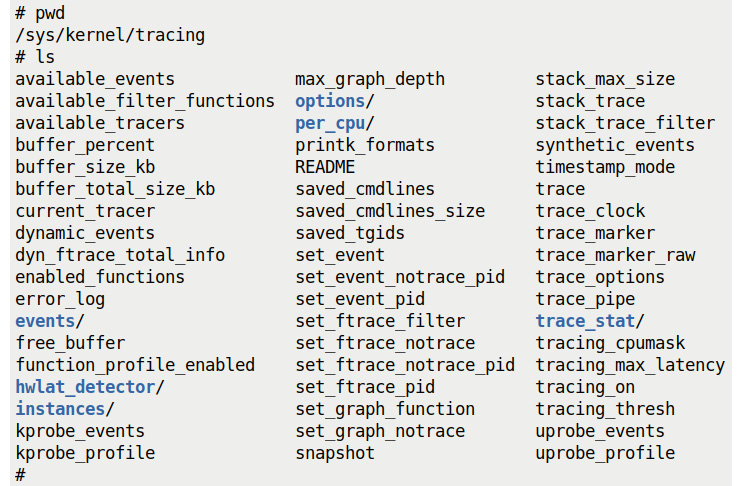
Figure 9.4 – A screenshot showing the content within the tracefs pseudo-filesystem
Don't stress regarding the meaning of all of them; we'll consider just a few key ones for now. Understanding what they're for and how to use them will have you using ftrace in a jiffy.
Ftrace uses the notion of a tracer (sometimes referred to as a plugin) to determine the kind of tracing that will be done under the hood. The tracers need to be configured (enabled) within the kernel; several are by default, but not all of them. The ones that are already enabled can be easily seen (here we assume you're running as root within the /sys/kernel/tracing directory):
# cat available_tracers
hwlat blk function_graph wakeup_dl wakeup_rt wakeup function nop
So, among the ones seen in the preceding snippet, which one will be used when tracing? Can you change it? The tracer (plugin) to be used is the content of the file named current_tracer; and yes, you can modify it as root. Let's look it up:
# cat current_tracer
nop
The default tracer is called nop; it's an abbreviation for No Operation (No-Op), implying that nothing will actually be done. Another tracer's named function; when tracing's enabled (toggled on) and the function tracer's selected, it will show every function that's executed within the kernel! Shouldn't we use it? Sure we can; there's an even better one though – function_graph. It will also have the trace display every kernel function executed during the trace session; in addition, it has the intelligence to indent the function name output in such a manner that it becomes almost like reading code – like a call graph!
Documentation on All the ftrace Tracers
As seen just previously, ftrace makes several tracers or plugins available. Here, we focus on using the function_graph tracer. Some of them are latency-related (hwlat, wakeup*, irqsoff, and preempt*off). How come the irqsoff and preempt[irqs]off tracers didn't show up previously? They're kernel configurables. The ones that show under available_tracers are the ones configured in; you'll have to reconfigure (enable) and rebuild the kernel to get any others! (Tip – execute grep "CONFIG_.*_TRACER" on your kernel config file to see which are enabled/disabled.)
Do refer to the official kernel docs for details on all ftrace tracers: https://www.kernel.org/doc/html/v5.10/trace/ftrace.html#the-tracers.
The following table enumerates a few key files under tracefs; do check it out carefully:

Table 9.1 – A few key files under tracefs (/sys/kernel/tracing)
The file named trace is a key one; it contains the actual report – the output from the trace. We use this knowledge to save this output to a regular file.
Trying it out – a first trial (run one)
Here, we'll keep things as simple as possible – just getting ftrace enabled and running, tracing everything that occurs within the kernel for just a second then we turn tracing off. Ready? Let's do it; before that:
# cat tracing_on
1
Surprised? It appears that tracing's currently on (by default)! It's not actually tracing anything though; this is because the current tracer is set to the nop value by default, which of course means that it isn't really tracing anything:
# cat current_tracer
nop
So, we'll have to change the current tracer. What's available? Check by seeing the content of the available_tracers pseudofile:
# cat available_tracers
hwlat blk function_graph wakeup_dl wakeup_rt wakeup function nop
#
You'll realize that the list of available tracers depends on your kernel configuration. Great, let's use one of them, the function graph tracer:
# echo function_graphix > current_tracer
bash: echo: write error: Invalid argument
Oops, we made a typo; it isn't accepted. That's good; tracefs internally validates the input passed to it. Now, let's do it correctly. Realize though that setting a valid tracer will have the kernel immediately start tracing! So, we first turn tracing off and then set up a valid tracer:
# echo 0 > tracing_on
# echo function_graph > current_tracer
Done. Now, let's begin tracing the kernel – for just a second – and then turn it off:
# echo 1 > tracing_on ; sleep 1; echo 0 > tracing_on
#
Tracing done, for 1 second. Where's the report? It's within the file named trace:
# ls -l trace
-rw-r--r-- 1 root root 0 Jan 19 17:25 trace
The trace file is empty (with a size of 0 bytes). Well, as you'll realize, this is a pseudofile (not a physical disk file) under tracefs; the majority of these pseudofiles have their size deliberately set to 0 as a hint that it's not a real file. It's a callback-based technology – reading it will cause the underlying kernel filesystem code to dynamically generate the data (or do whatever's appropriate). So let's copy the trace pseudofile's content to a regular file:
# cp trace /tmp/trc.txt
# ls -lh /tmp/trc.txt
-rw-r--r-- 1 root root 4.8M Jan 19 19:39 /tmp/trc.txt
Aha! It seems to have worked. The trace report file is quite large, yes? In this particular instance, in literally 1 second, we got 98,376 lines of tracing output (I checked with wc). Well, this is the kernel; whatever code ran within the kernel in that 1 second is now in the trace report. This includes code that ran in that second on any and all CPU cores in kernel mode, including interrupt contexts. This is great, but also illustrates one of the problems with ftrace (and tracing in general, especially within something as large and complex as the kernel!) – the output can be enormous. Learning to filter the functions traced is a key skill; worry not, we will!
Let's look up a few lines from the report; to make it a bit more interesting, I've shown you the actual trace data I got from line 24 onward... (you'll realize, of course, that the following output is from one sample run on my setup; it could, and very likely would, vary on your system):
# head -n40 /tmp/trc.txt
# tracer: function_graph
#
# CPU DURATION FUNCTION CALLS
# | | | | | | |
[...]
5) 1.156 us | tcp_update_skb_after_send();
5) 1.034 us | tcp_rate_skb_sent();
5) | tcp_event_new_data_sent() {
5) 1.107 us | tcp_rbtree_insert();
5) | tcp_rearm_rto() {
5) | sk_reset_timer() {
5) | mod_timer() {
5) | lock_timer_base() {
5) | _raw_spin_lock_irqsave() {
5) 0.855 us | preempt_count_add();
5) 2.754 us | }
5) 4.820 us | }
[...]
#
Also, do realize that, having saved the report under /tmp, it's volatile and won't survive a reboot. Remember to save your most important ftrace reports to a non-volatile location.
Interpreting the ftrace report output seen previously is easy; clearly, the first line tells us that the tracer employed is function_graph. The output is column-formatted and the header line clearly indicates the content of each of them. In this particular trace session (for at least the first portion), the kernel functions (seen on the extreme right) have executed on CPU core 5 (the first column; CPU core numbering begins at 0). The duration of each function's execution is shown in microseconds (yes, it's fast, even on a VM). Note the careful indentation of the function names; it allows us to literally understand the control flow, which is the whole idea behind using this tracer!
Trying it out – function_graph options plus latency-format (run two)
Our first trial run with ftrace was interesting but missing some key details. You can see the kernel code that ran (in that single second of time), which CPU core it ran on, and how long each function took, but think about this – who ran it?
Monolithic Design
There's no such concept as the kernel runs the code within it. As you will understand, one of the key aspects of a monolithic kernel design like Linux's is that kernel code executes in one of two contexts – process or interrupt. Process context is one where a process (or thread) issues a system call; now, the process itself switches into kernel mode and runs the code of the system call within the kernel (and possibly a driver). Interrupt context is the situation where a hardware interrupt causes a processor to immediately switch to a designated code path (the interrupt handler routine) – kernel/driver code that runs in the context of the interrupt (well, there's more to it – the so-called bottom-half mechanisms – tasklets and softirqs – run in an interrupt context as well). We covered system calls briefly in Chapter 4, Debug via Instrumentation – Kprobes in the System calls and where they land in the kernel section.
So, guess what? Ftrace can show you the context the kernel code ran in; you simply have to enable one of the many options ftrace provides. Several useful options to render the output can be found under the options directory under the tracefs mount point, as shown in the following screenshot:
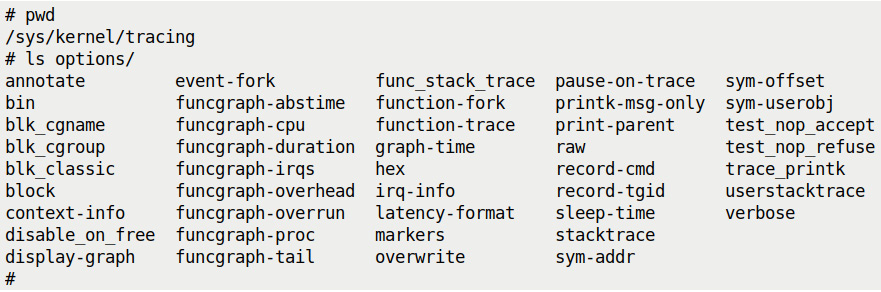
Figure 9.5 – A screenshot showing the content of the options directory under /sys/kernel/tracing
Again, we cover using some of these soon...
Resetting ftrace
If the ftrace system is in any kind of transient (or in-between) state, it's a good idea to reset everything to defaults, clear its internal trace (ring) buffers (thus freeing up memory as well), and so on. This can be done manually by writing a value (typically 0 or null) into several relevant tuning files within it. The perf-tools project has a script named reset-ftrace that resets ftrace to a known sane state: https://github.com/brendangregg/perf-tools/blob/master/tools/reset-ftrace.
We specified installing the perf-tools[-unstable] (and the trace-cmd) packages back in Chapter 1, A General Introduction to Debugging Software, in the Installing required software packages section.
So, let's make use of it now to help reset ftrace to reasonable defaults:
# reset-ftrace-perf
Reseting ftrace state...
current_tracer, before:
1 nop
current_tracer, after:
1 nop
[...]
It displays the before-and-after values of all the ftrace files it resets. There's a caveat – it doesn't reset every ftrace file (you'll see the ones it does at the bottom of the script). So, as an example, we'll manually reset one of them for now:
# echo 0 > options/funcgraph-proc
#
As well, it's also useful to leverage a really powerful (and simple) frontend to ftrace named trace-cmd, to help achieve a reset of the ftrace system. Internally, it turns tracing off and brings the system performance back to its native state. (It does take a bit of time to reset; there are option switches to reset internal buffers as well):
# trace-cmd reset
(We will cover trace-cmd in an upcoming section within this chapter.) Also, we've provided a pretty comprehensive reset_ftrace() function as part of this convenience script – ch9/ftrace/ftrace_common.sh.
Tip
Once reset, note that the ftrace system has the tracing_on file set to 1 (it's on) and current_tracer set to nop, thus effectively rendering tracing off. This implies that setting up a valid tracer plugin (such as function_graph) in the current_tracer file will cause tracing to begin immediately. Further, you can wipe out the current content of the trace buffer by doing echo > trace (as root).
Okay, back to the main point – now that ftrace is reset, how do we enable showing the context that runs kernel code? The relevant option file is this one – options/funcgraph-proc (proc is usually an abbreviation for process). Write 1 into it to enable ftrace to print the process context info:

Figure 9.6 – A screenshot of our ftrace trial run with the funcgraph-proc option enabled
The figure makes it clear by highlighting the new option and the effect it has on the trace output. Here, in this instance, you can see that it happens to be the idle thread on CPU core 2 (with PID 0, seen as <idle>-0), and the bash process with PID 1153 on CPU core 4, which is executing the functions seen on the extreme right! (Yes, we can literally see the parallelism on two CPU cores here as a bonus!)
Several other function graph-related options exist; they're the files under the options directory that are prefixed with funcgraph-. Here, they are alongside their default values (a bit of bash foo is also helpful!):
# for f in options/funcgraph-* ; do echo -n "${f##*/}: "; cat $f; done
funcgraph-abstime: 0
funcgraph-cpu: 1
funcgraph-duration: 1
funcgraph-irqs: 1
funcgraph-overhead: 1
funcgraph-overrun: 0
funcgraph-proc: 0
funcgraph-tail: 0
#
Do refer to the official kernel docs to get the details on what each of these means: trace_options, under Options for function tracer: https://www.kernel.org/doc/html/v5.10/trace/ftrace.html#trace-options.
Delving deeper into the latency trace info
This small example (in Figure 9.6) actually brings up a really interesting point! The CPU idle thread is scheduled to run when no other thread wants the processor; it might well be the case here. But don't take things for granted; it could also happen that the idle thread – or any other thread for that matter – gets interrupted by a hardware interrupt that then executes, but the context information (the column labeled TASK/PID) will still show the original context – the thread that got interrupted by the interrupt! So, how do we know for sure whether this code ran in a process or an interrupt context?
To know for sure, we must enable another really useful ftrace option – the latency-format one; the file is options/latency-format. Writing 1 into this file enables the latency format; what effect does this have? It causes an additional column (typically, after the CPU and TASK/PID ones) to appear that provides pretty deep insight into the state of the system when this kernel code executed (even helping you see why latencies occurred). Let's actually use it and then analyze the output. We first reset ftrace and then enable the function_graph tracer, along with both the funcgraph-proc and latency-format options:

Figure 9.7 – A screenshot showing resetting ftrace and then focused on turning on the useful latency-format option for a sample 1-second trace
Here's the (truncated) ftrace report obtained (to make it interesting, I am showing a few different parts of the trace report):
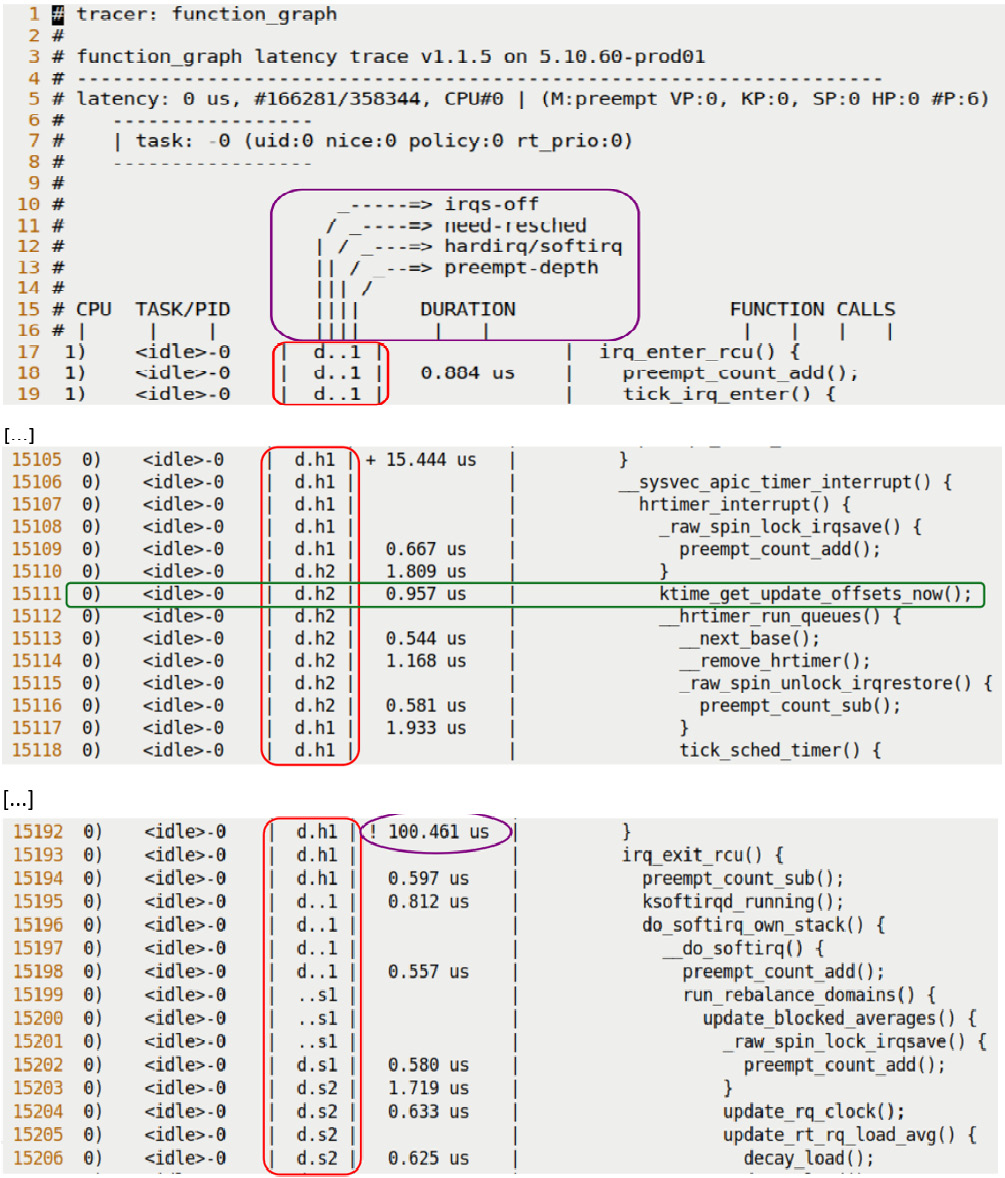
Figure 9.8 – Screenshots showing the effect of turning on the latency-format option; the latency format trace info column is highlighted
You may have noticed that the new output column (highlighted in the figure, the one between the TASK/PID and DURATION columns) looks familiar. We used pretty much precisely this format to encode information in our code base's PRINT_CTX() macro, defined within our convenient.h header. (Do note that here, as we use pr_debug() to emit output, it only shows up if you define the DEBUG symbol or employ the kernel's powerful dynamic debug framework to see the debug prints. We covered using dynamic debug and a lot more back in Chapter 3, Debug via Instrumentation – printk and Friends.)
To interpret this latency trace info (and the rest of the line), let's just consider a single line of output from Figure 9.8 (the line – # 15,111 – is highlighted by a green horizontal bar in the middle screenshot in the figure); we reproduce it here:
0) <idle>-0 | d.h2 | 0.957 us | ktime_get_update_offsets_now();
Let's interpret the preceding line column-wise, from left to right (it's one line, the function name on the extreme right might wrap around to the next line):
- First column – 0): The CPU core that the kernel function ran on (remember that CPU core numbering starts at 0).
- Second column – <idle-0>: The process context running the kernel function; do note that it could have run in the interrupt context (as we'll see in the next column). In cases like this, this second column shows the process context that was interrupted by the interrupt!
- Third column – d.h2: What we're really after here is the latency trace information (enabled via the options/latency-format option being set to 1). This information allows us to figure out in detail exactly what context the kernel function ran in – was it normal process context or an interrupt? Within the latter, was it a hardware interrupt (a hardirq), a softirq (bottom-half), a Non Maskable Interrupt (NMI), or a hardirq preempting a softirq? Moreover, were interrupts enabled or disabled, was a reschedule pending at the time, and was the kernel in a non-preemptible state? It's really very detailed and precise! This column itself consists of four columns – here, their value happens to be d.h2, whose output is interpreted as follows:
- First (latency trace info) column – IRQ (hardware interrupts) state – d:
- Second (latency trace info) column – the "need-resched" bit (does the kernel need to reschedule?):
- N implies that both the TIF_NEED_RESCHED and PREEMPT_NEED_RESCHED bits are set (in effect, implying that a reschedule is needed on this preemptible kernel).
- n implies that only the TIF_NEED_RESCHED bit is set.
- p implies that only the PREEMPT_NEED_RESCHED bit is set.
- . implies that both bits are cleared (the normal case, no reschedule is needed).
FYI
The TIF_NEED_RESCHED bit when set implies that a schedule is pending (and will run soon – the N and n cases).
The PREEMPT_NEED_RESCHED bit is explained in the x86 arch code, as follows. "We use the PREEMPT_NEED_RESCHED bit as an inverted NEED_RESCHED, such that a decrement hitting 0 means we can and should reschedule."
- Third (latency trace info) column – more on the running context (interestingly, the following list is sorted by execution priority):
- Z implies that a NMI occurred inside – and thus preempted – a hard irq (hardware interrupt).
- z implies that a NMI is running.
- H implies that a hardirq occurred inside – and thus preempted – a softirq (a softirq is the internal kernel underlying implementation of an interrupt bottom-half mechanism)
- h implies that a hardirq is running.
- s implies that a softirq is running.
- . implies a normal (process/thread) context is running.
- Fourth (latency trace info) column – the preempt-depth: This is also known as the preempt_disabled level. In effect, if positive, it implies that the kernel is in a non-preemptible state (when 0, the kernel is in a preemptible state). This matters when you're running a preemptible kernel (implying that even a kernel thread or kernel process context can be preempted!). As a simple case, consider a preemptible kernel and a thread context holding a spinlock. This is to be an atomic section; it shouldn't be preempted before it unlocks. To guarantee this, the preempt counter (in effect, what we're seeing here as preempt-depth) is incremented every time a spinlock is taken and decremented every time one of them is unlocked. Thus, while one or more spinlocks are held – in effect, while preempt-depth is positive – the context holding it shouldn't be preempted. You can see more on this here: https://www.kernel.org/doc/Documentation/preempt-locking.txt.
So, let's quickly interpret the latency trace info we're seeing here and now – d.h2:
- d: Hardware interrupts are disabled.
- .: Both the TIF_NEED_RESCHED and PREEMPT_NEED_RESCHED bits are cleared. This is the normal case, with no pending reschedule.
- h: The running context (here, the <idle-0> idle thread running on CPU 0) has been interrupted by a hardware interrupt, and its hardirq handler (or the so-called top-half, or Interrupt Service Routine (ISR)) is currently executing code on the processor core.
- 2: The preempt-depth counter value is 2, implying that the kernel is currently marked as being in a non-preemptible state.
- Fourth column – 0.957 us: This is the duration of the function call (in microseconds). When a function terminates (shown as a single close brace, }, in the last column), the duration is that of the entire function. Further, ftrace gives us a visual clue as to how long the function took by employing the notion of a delay marker (covered in detail in the upcoming Viewing the context switch and delay markers section). Also, the options/graph-time option (on by default) has, for the function graph tracer, the cumulative time spent in all nested functions displayed. Setting it to 0 will cause only individual function durations to be displayed.
- Fifth column – ktime_get_update_offsets_now();: This is the kernel function being executed. If only a single close brace, }, shows up here, it implies the termination of the overarching function. Setting this option switch – options/funcgraph-tail – to 1 will show the terminating function name as well (in the } /* function name */ format). You can also try using the % operator in vi[m] to jump to the function's start and thus see which function it represents (note, though, that this simple trick doesn't always work).
All this is very valuable information indeed!
The (upward and right-pointing) ASCII-art arrows at the header portion (see the top portion of Figure 9.8) briefly explain the latency trace info columns as well. In addition, the header portion of the ftrace report shows this line:
latency: 0 us, #166281/358344, CPU#0 | (M:preempt VP:0, KP:0, SP:0 HP:0 #P:6)
The code that generates the preceding header line is here: https://elixir.bootlin.com/linux/v5.10.60/source/kernel/trace/trace.c#L3887. So, interpreting it via the code, we find the following.
If a latency tracer is being used to measure latency (delay) – for example, the irqsoff tracer – in those cases, the maximum latency seen during the trace session will be shown (here, it's 0, as we aren't running a latency tracer). It then shows the number of trace entries displayed in this report (166,281) and the total number of entries (358,344). Obviously, there were too many entries to hold. Increasing the size of the memory buffers is indicated (we will cover this in the Other useful ftrace tuning knobs to be aware of section). Also, the trace-cmd record frontend to ftrace allows us to use the -b <buffer-size-in-KB-per-cpu> option switch (we'll cover trace-cmd in detail in the Using the trace-cmd, KernelShark, and perf-tools ftrace frontends section). The next set of entries (in parentheses) begins with M for model – one of server, desktop, preempt, preemp_rt, or unknown. The next four entries – VP, KP, SP, and HP – are always 0 (they're reserved for later use). P specifies the number of online processor cores.
Figure 9.8 shows some portions of the ftrace report. These portions clearly indicate how kernel code ran with interrupts disabled, in a hardirq context, followed by switching into a softirq context (of course, it did many other things as well; we just can't show everything here).
Exercise
Let's say that the latency trace info field's value is dNs5. What does this mean?
So, this section also (more than) effectively answers our earlier puzzle – knowing whether code is executing in a process or interrupt context. Note that the latency trace format column also appears when you use any of the tracers related to latency measurement.
A quick aside – hardware interrupts aren't typically load-balanced by the kernel across all available CPU cores. Ftrace can help you understand on which core they execute, and thus you can load-balance them yourself (also look up /proc/irq/<irq#> and the irqbalance[-ui] utility). Note, though, that arbitrarily distributing an interrupt across CPU cores can cause CPU caching and thus performance issues! (You can find out more on hardware interrupt processing on Linux in my earlier Linux Kernel Programming – Part 2 book in the chapter on hardware interrupt handling.)
Interpreting the delay markers
The first line of the third partial screenshot in Figure 9.8 shows an ellipse surrounding the duration column. The line is reproduced here; check it out:
0) <idle>-0 | d.h1 | ! 100.461 us | }
The DURATION column (its default unit is microseconds) has an interesting annotation displayed at certain times to the left of the actual time duration. Here, for example, you can see the ! symbol to the immediate left of the time duration. This is one among the delay markers that can be shown, indicating that the function in question has taken a rather long time to execute! Here's how you interpret these delay markers (us, of course, means microseconds):

Table 9.2 – The ftrace delay markers
As indicated by the last row in the preceding table, the absence of a delay marker (or simply white space) to the immediate left of the duration indicates that the function's execution took less than 10 us (which is considered to be the normal case).
There's one last thing regarding the delay markers. When the tracer is function-graph (as was the case here), the function graph-specific option named options/funcgraph-overhead plays a role – the delay markers are only displayed if this is enabled (which is the default). To disable delay markers, write 0 into this file.
You might come across an arrow marker, =>, in the ftrace report. It's quite intuitive – it displays the fact that a context switch occurred.
As you'll have by now no doubt realized, in order to test ftrace, you can certainly put the commands we ran (such as those in Figure 9.7) into a script to avoid having to retype them and in effect have a custom tool at your service! Again, the Unix philosophy at work. (Actually, we've already done this for your convenience; you'll find, among others, very simple wrapper scripts here: ch9/ftrace; this particular one, tracing the kernel for 1 second with the function_graph tracer, is named ftrc_1s.sh)
Again, the really large number of ftrace options preclude our reproducing them individually here. You really must refer to the official kernel documentation on ftrace to view all options, their meaning, and possible values: https://www.kernel.org/doc/html/v5.10/trace/ftrace.html. Having said that, a few useful options to be aware of follows.
Other useful ftrace tuning knobs to be aware of
It is necessary to be aware of a few of the ftrace options. The following table is an attempt at a quick summarization:
.jpg)
.png)
Table 9.3 – A summary of a few more ftrace (tracefs) files
The following notes flesh out some details.
Checking out trace_options
Reading the content of the trace_options tracefs pseudofile shows several ftrace options and their current values. Here are the default values on our 5.10.60 production kernel:

Figure 9.9 – A look at the trace_options pseudofile content under tracefs (with default values on x86_64 5.10.60)
The format works like this – the option name by itself implies that that option is enabled, and the option name prefixed with the word no implies that it's disabled. In effect, it's like this:
echo no<option-name> > trace_options : disable it
echo <option-name> > trace_options : enable it
For example, you can see in Figure 9.9 the trace option called nofunction-fork. It specifies whether the children of a process will be traced as well. Clearly, the default is no. To trace all children, do this:
echo function-fork > trace_options
You'll recall from our detailed discussions on interpreting an Oops (Chapter 7, Oops! Interpreting the Kernel Bug Diagnostic, in the Finding the code where the Oops occurred section), one of the big clues as to where the issue is the format in which the instruction pointer content is displayed, as shown in the following example:
RIP: 0010:do_the_work+0x124/0x15e [oops_tryv2]
As we learned, the hex numbers following the + sign specify the offset from the beginning of the function and the length of the function (in bytes). In this example, it shows we're at an offset of 0x124 bytes from the beginning of the do_the_work()function, whose length is 0x15e bytes. As Chapter 7, Oops! Interpreting the Kernel Bug Diagnostic, showed us, this format can be really useful. You can specify that all functions in the trace report are shown in this manner by doing the following:
echo sym-offset > trace_options
The default is nosym-offset, implying that it won't be shown this way.
A Caveat
The sym-offset and sym-addr options seem to apply to only the function tracer (and not function_graph). By the way, the printk format specifier, %pF, (and friends) also prints a function pointer in this manner! (See the useful printk format specifiers documented here: https://www.kernel.org/doc/Documentation/printk-formats.txt.)
Again, there are just too many trace_options options to cover individually here. I urge you to refer to the official kernel docs for details regarding trace_options: https://www.kernel.org/doc/html/v5.10/trace/ftrace.html#trace-options.
Useful ftrace filtering options
As you've surely noticed by now, the sheer volume of report data that ftrace can pump out can easily overwhelm you. Learning how to filter out stuff that's not required or secondary to your investigation is key!
Ftrace keeps all functions that it can trace in a file named available_filter_functions. On x86_64 and the 5.10 kernel, it's really pretty large. There are well over 48,000 functions within the kernel that can be traced!
# wc -l available_filter_functions
48660 available_filter_functions
Several powerful filters can be enabled via various tracefs files. The following table attempts to summarize some key ones; do study it carefully:
.jpg)
.png)
Table 9.4 – A summary of some key ftrace filter options
The following sections help to flesh out this discussion. Please check them out, as they have some valuable details.
More on the set_ftrace_filter file
For function-based filtering, glob matching (commonly called globbing) can be very useful! You can specify a subset of functions (which must be present within available_filter_functions, of course) using wildcards, like so:
- 'foo*': All function names that start with foo
- '*foo': All function names that end with foo
- '*foo*': All function names that contain the foo substring
- 'foo*bar': All function names that start with foo and end with bar
For example, to trace the ksys_write() and ksys_read() functions, we can do this:
echo "ksys_write" > set_ftrace_filter
echo "ksys_read" >> set_ftrace_filter
This also illustrates that you can employ the >> append notation with the usual semantics; here, both these functions (and their nested code by default) get traced.
There's actually a lot more control you can exert with the set_ftrace_filter file; instead of simply duplicating it here, you can view this (and a lot more!) by reading the content of the /sys/kernel/tracing/README file – a nice mini-HOWTO on ftrace! Here's the portion relevant to the set_ftrace_filter file:
cat /sys/kernel/tracing/README
tracing mini-HOWTO:
[...]
The following shows the relevant portion of the output:

Figure 9.10 – A partial screenshot of the content of the README mini-HOWTO file
So, here's another interesting thing – you can disable tracing when a certain function is hit (see the traceoff examples in Figure 9.10).
Index-based function filtering
String processing (as seen in the preceding section) can dramatically slow things down! So, an alternative is index-based filtering. The index is the numerical position of the function you want (or don't want, depending on the filter) in the available_filter_functions file. For example, let's use sed to look up the line numbers of all kernel functions that have the tcp string within them:
# grep -n tcp available_filter_functions |cut -f1 -d':'|tr ' ' ' '
3504 3505 30425 30426 30427 30428 30429 30430 30431 30432 30433 30434 30435 38537 38540 38541 38542 39133 39134 39198 [...] 43589 43590 43591 43593 #
It's a long list of line numbers (584 on 5.10.60):
# grep -n tcp available_filter_functions |cut -f1 -d':'|tr ' ' ' ' |wc -w
584
We use the tr utility to replace the newline with a space. Why? Because this is the format expected by the filter file. So, to set ftrace to trace only these functions (the ones with tcp in their name), we do the following:
grep -n tcp available_filter_functions | cut -f1 -d':' | tr ' ' ' ' >> set_ftrace_filter
We use this very technique for function filtering in one of our scripts (which we'll use in a later section) – ch9/ftrace/ping_ftrace.sh. Here's a bash function to do this generically (the parameter(s) are the substring or regular expression that the function name contains):
filterfunc_idx()
{[ $# -lt 1 ] && return
local func
for func in "$@"
do
     echo $(grep -i -n ${func} available_filter_functions |cut -f1 -d':'|tr '
' ' ') >> set_ftrace_filter
done
}
Here's a sample invocation:
filterfunc_idx read write net packet_ sock sk_ tcp udp
skb netdev netif_ napi icmp "^ip_" "xmit$" dev_ qdisc
Now, all kernel functions containing these substrings (or regular expressions) will be traced! Cool, huh?
How about the reverse? We'd perhaps like to filter out some functions, telling ftrace to not trace them. In the same script that we just referred to (ch9/ftrace/ping_ftrace.sh), we write this bash function to achieve this:
filterfunc_remove()
{[ $# -lt 1 ] && return
local func
for func in "$@"
do
echo "!${func}" >> set_ftrace_filter echo "${func}" >> set_graph_notracedone
}
Note the ! character prefixing the function string; this tells ftrace to not trace the matching functions. Similarly, writing the parameter into the set_graph_notrace file achieves the same (when the tracer is function_graph, as is the case here). Here's a sample invocation:
filterfunc_remove "*idle*" "tick_nohz_idle_stop_tick" "*__rcu_*" "*down_write*" "*up_write*" [...]
These techniques not only achieve function filtering but are also fast; useful.
Module-based filtering
Write a string of the :mod:<module-name> form into set_ftrace_filter to allow functions from this module to be traced, as shown in the following example:
echo :mod:ext4 > set_ftrace_filter
This traces all functions within the ext4 kernel module. This example, and the usage of the mod keyword, is one case of using something called filter commands.
Filter commands
More powerfully, you can even employ so-called filter commands by writing in a certain format into the set_ftrace_filter file. The format is as follows:
echo '<function>:<command>:<parameter>' > set_ftrace_filter
Using the >> append form is also supported. A few commands are supported – mod, traceon/traceoff, snapshot, enable_event/disable_event, dump, cpudump, and stacktrace. Do refer to the official kernel docs for more details and examples of filter commands: https://www.kernel.org/doc/html/v5.10/trace/ftrace.html#filter-commands.
Note that filter commands being set do not affect ftrace filters! For example, setting a filter command to trace some module's functions or to toggle tracing on some condition does not affect the functions being traced via the set_ftrace_filter file.
Okay, you've seen a lot on how to set up and use ftrace – configuring the kernel, simple tracing, and plenty of the more powerful filtering maneuvers. Let's put this knowledge to practical use, leveraging ftrace to trace the kernel code paths taken when the following command – a single ping – is issued:
ping –c1 packtpub.com
Now, that would be interesting! Let's get this going.
Case 1 – tracing a single ping with raw ftrace
We'll employ the function_graph tracer throughout. The filtering of functions can be done in one of two broad ways here:
- Via the regular available_filter_functions file interface
- Via the set_event file interface
They're mutually exclusive; if we set our script's (ch9/ftrace/ping_ftrace.sh) FILTER_VIA_AVAIL_FUNCS variable to 1 (which is the default), then we filter via method 1, else via method 2. The first gives a much more detailed trace, showing all relevant functions (here, the networking-related ones), but it takes a bit more work – via index-based filtering – to set up and keep it quick. In our script, we keep filtering via the first method as the default:
// ch9/ftrace/ping_ftrace.sh
[...]
FILTER_VIA_AVAIL_FUNCS=1
echo "[+] Function filtering:"
if [ ${FILTER_VIA_AVAIL_FUNCS} -eq 1 ] ; then[...]
# This is pretty FAST and yields good detail!
filterfunc_idx read write net packet_ sock sk_ tcp udp skb netdev
netif_ napi icmp "^ip_" "xmit$" dev_ qdisc [...]
[...]
The usage and implementation of our filterfunc_idx() function was explained in the preceding Index-based function filtering section. Also, we use our filterfunc_remove() function to ensure that certain patterns of functions within the kernel aren't traced. Further, the script turns on tracing for any functions from the e1000 module (the network driver, really):
KMOD=e1000
echo "[+] module filtering (for ${KMOD})"if lsmod|grep ${KMOD} ; then echo "[+] setting filter command: :mod:${KMOD}" echo ":mod:${KMOD}" >> set_ftrace_filterfi
A bit of complexity in the script occurs when implementing the code to run the ping. Why? Well, as far as is possible, we'd like to only trace the ping process on the CPU core on which it runs. To do so, we assign it to a specific CPU core by leveraging the taskset utility. We then tell ftrace the following:
- Which process to trace by setting set_event_pid to the PID of the ping process
- Which CPU core(s) to trace by setting the tracing_cpumask filter to a specified value, the one we set taskset to use.
Okay, now, let's think about this. To set the PID correctly, we first need the ping process running, but if it's running, it will execute (at least some) code before our script can set up and trace it. However, we can't obtain its PID until it's alive and running. A bit of a chicken-and-egg problem, isn't it?
So, we employ a wrapper script (named runner) to run the ping process. This script will synchronize with our main script (ping_ftrace.sh). It does so like this – the main script will run the runner script in the background and grab its PID, saving it in a variable (named PID). Then, the runner script will execute – via the shell's exec keyword – the ping process, thus ensuring that the PID of our ping process will be the same as it's PID (this is because, when an exec operation is performed, the successor process ends up with the same PID as that of the predecessor)!
Hang on, though. To properly synchronize, the runner script won't perform the exec operation until a so-called "trigger file" is created by the main script. It will then understand that only now tracing has become ready, and it will exec the ping process. The main script thus, once ready, creates the trigger file and then turns tracing on, tracing the target process.
When the process is done, it saves the report (I'll leave it to you to browse through the code of these scripts). If you (quite rightly) feel that this is a rather laborious way to trace a given task (process/thread), you'd be right. Our coverage on the trace-cmd frontend to ftrace will clearly reveal this!
Here's a sample run of our ping_ftrace.sh script:

Figure 9.11 – A screenshot showing our raw ftrace script tracing a single ping
You can see from the preceding screenshot that our scripts ran, that the ping process did its job and was traced, and the report was generated. The report obtained has a very decent size – just 272 KB here – implying that our filtering has indeed paid off.
FYI, this sample report is available here: ch9/ftrace/ping_ftrace_report.txt. (You will realize, though, that this report represents just one sample run on my setup; the results you see will likely vary, at least slightly.) It's still quite big; a few good places to start looking within this trace report are as follows:
- The call to __sys_socket() by the ping process.
- The transmit path (often called tx; more details follow). See the sock_sendmsg() API initiating the transmit path (you'll find it – among other instances – in our saved ping_ftrace_report.txt file at about 86% of the way down).
- The receive path (often called rx; more details follow).
The (very approximate) transmit path functionality (shown in a top-down fashion) includes these kernel functions – sock_sendmsg(), inet_sendmsg() (you can see these functions highlighted in the upper portion of Figure 9.12), udp_sendmsg(), udp_send_skb() (you can see the functions that follow them highlighted in the lower portion of Figure 9.13), ip_send_skb(), ip_output(), dev_queue_xmit(), dev_hard_start_xmit() (the last call leads to the e1000 network driver's transmit code routine; here, it's named e1000_xmit_frame()), and so on. The transmit and receive function lists here are certainly not exhaustive, just an indication of what you can expect to see.
Figure 9.12 shows a portion of the filtered report showing some of the transmit paths, where the ping process context is running this code within the kernel. (The leftmost column is merely the line number. Of course, this is what I got on one sample run. What you see may not precisely match this output):
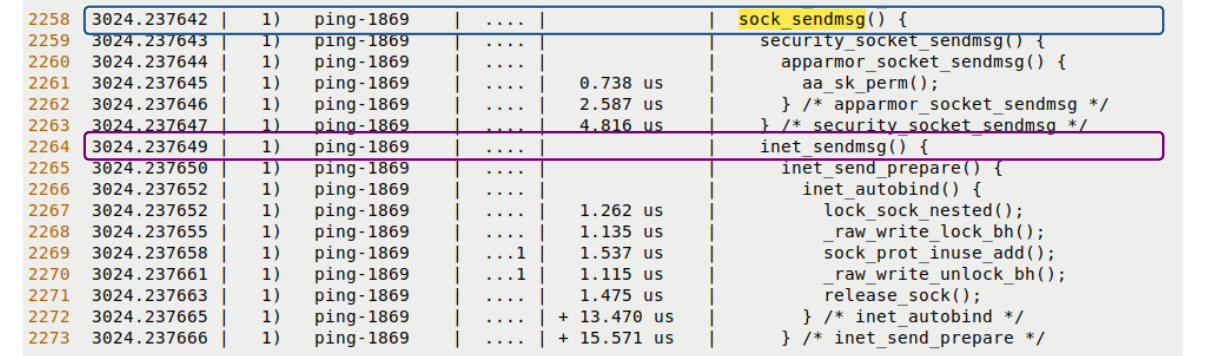
Figure 9.12 – A portion of the transmit portion of the ping trace via the raw ftrace regular filtering interface
Here is some more ftrace output from the transmit path:
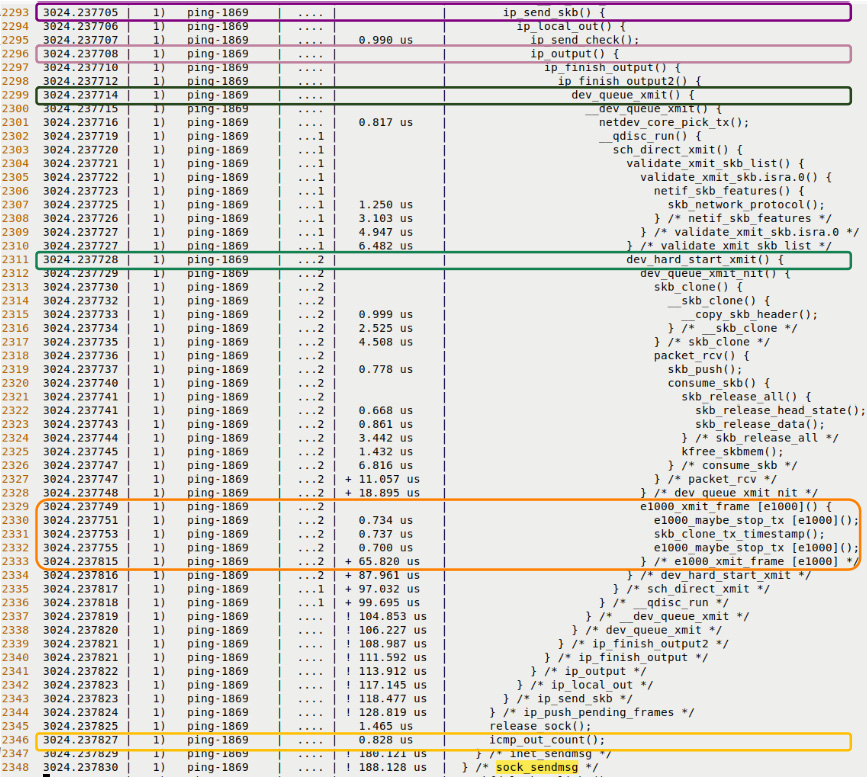
Figure 9.13 – Partial screenshots – a portion of the transmit portion of the ping trace via the raw ftrace regular filtering interface
Interesting, isn't it? This simple exercise shows us that ftrace is (also) literally a means to see the kernel in action (here, of course, we're seeing a portion of the kernel network stack in action), to be empirical, and to test theory.
In a similar fashion, on the network receive path functionality, we'll see some of the typical kernel routines that are invoked. You can see some of the following functions highlighted in the upper portion of Figure 9.14 – net_rx_action() (this, in fact, is the kernel softirq – NET_RX_SOFTIRQ – that handles network packets on the receive path, pushing them up the protocol stack), __netif_receive_skb(), ip_rcv(), and udp_rcv(). You can also see some of the following functions highlighted in the lower portion of Figure 9.15 – sock_recvmsg() and inet_recvmsg():
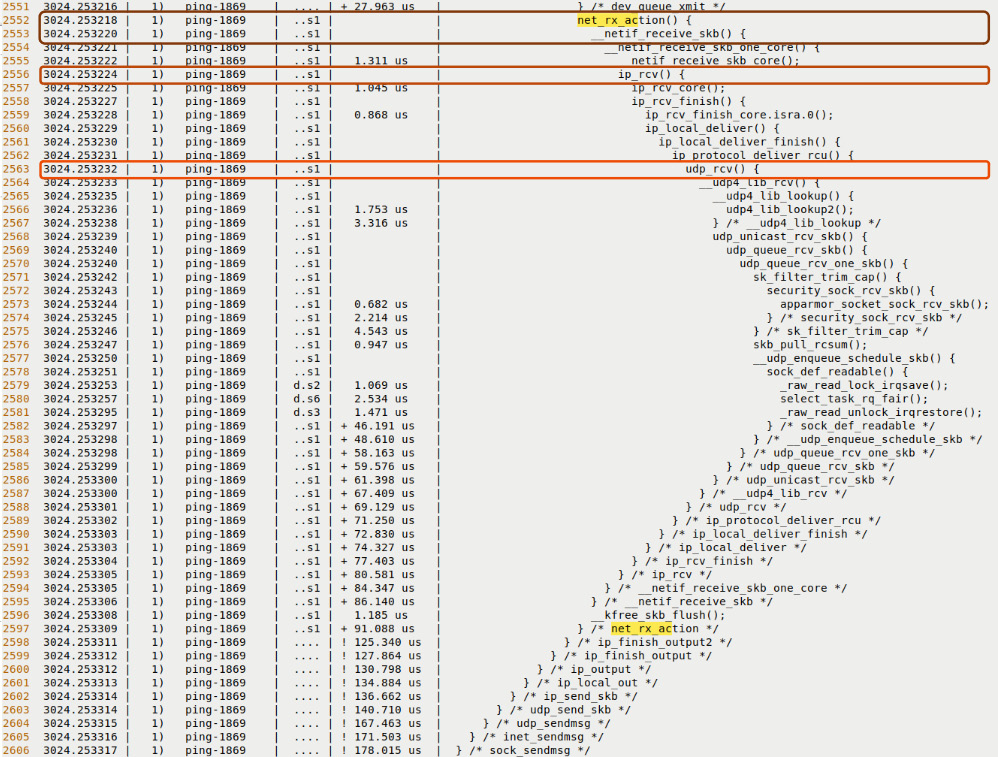
Figure 9.14 – Partial screenshots – a portion of the receive portion of the ping trace via the raw ftrace regular filtering interface
Here is some more ftrace output from the receive path:
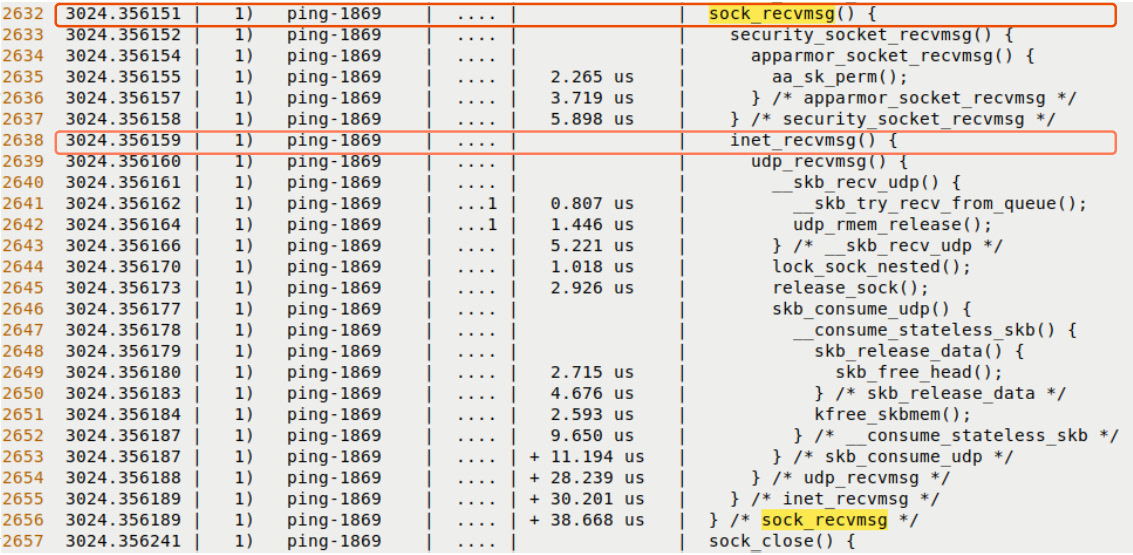
Figure 9.15 – Partial screenshots – a portion of the receive portion of the ping trace via the raw ftrace regular filtering interface
I enjoy seeing the ftrace function_graph tracer report's function indentation dramatically move from left to right (as functions are invoked) and vice versa (as the functions return). This is great. At the very least, you can see how ftrace has allowed us to look deep into the kernel's network protocol stack!
Case 2 – tracing a single ping with raw ftrace via the set_event interface
Here, we change the way ftrace grabs (and even presents) information by employing an alternate means to specify what functions to trace – via the set_event interface. To use this method, you write the function(s) to trace into the set_event pseudofile. This won't be very different from what we just did in the previous section, using the available_filter_functions pseudofile, will it? The trick here is that we can specify a whole class of functions to trace by enabling a set of events; the events fall into classes such as net, sock, skb, and so on. How do we do this? Hang on a second...
Where do these events come from? Ah, they're the kernel tracepoints! You can see them all under the events directory within the tracefs mount point. The following screenshot makes this apparent:
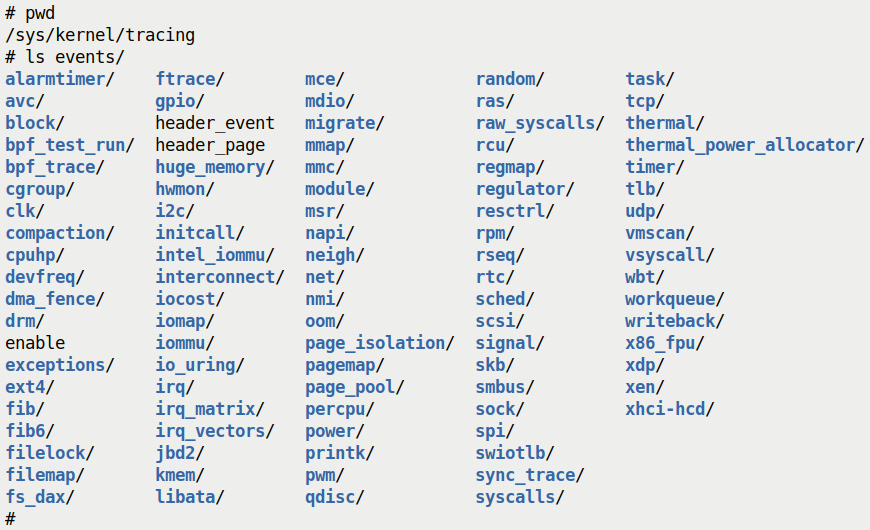
Figure 9.16 – A screenshot showing the content of the events directory – all kernel tracepoints
We have, in fact, covered using kernel tracepoints in some detail with regard to dynamic kprobes in Chapter 4, Debug via Instrumentation – Kprobes, in the Using the event tracing framework to trace built-in functions section.
To illustrate the usage of a class of events, let's consider the one named net. (You can see it as a directory in Figure 9.16. Peeking within the /sys/kernel/tracing/events/net directory will reveal (again, as directories) all the kernel functions that can be traced via this class of tracepoints.) So, to tell ftrace that we want to trace all these network-related functions, we simply have to echo the net:* string into the set_event pseudofile!
The relevant code – where we set up to use the set_event interface to ftrace – from our script follows. Also, the only change required in the script is setting the FILTER_VIA_AVAIL_FUNCS variable to 0 (to try this case out, you'll have to manually make this edit in the script):
// ch9/ftrace/ping_ftrace.sh
[...]
FILTER_VIA_AVAIL_FUNCS=0
echo "[+] Function filtering:"
if [ ${FILTER_VIA_AVAIL_FUNCS} -eq 1 ] ; then[... already seen above ...]
else # filter via the set_event interface
# This is FAST but doesn't yield as much detail!
# We also seem to lose the function graph indentation (but do gain seeing function parameters!)
echo " Alternate event-based filtering (via set_event):"
echo 'net:* sock:* skb:* tcp:* udp:* napi:* qdisc:* neigh:* syscalls:*' >> set_event
fi
Note how we try and trace only network-related kernel code (as well as all system calls, to lend context to the trace report). The remainder of the script's code is identical to what we saw in the previous section.
Here's a sampling of the output report (filtered to see only the ping process's work within the kernel) with this set_event-based approach:
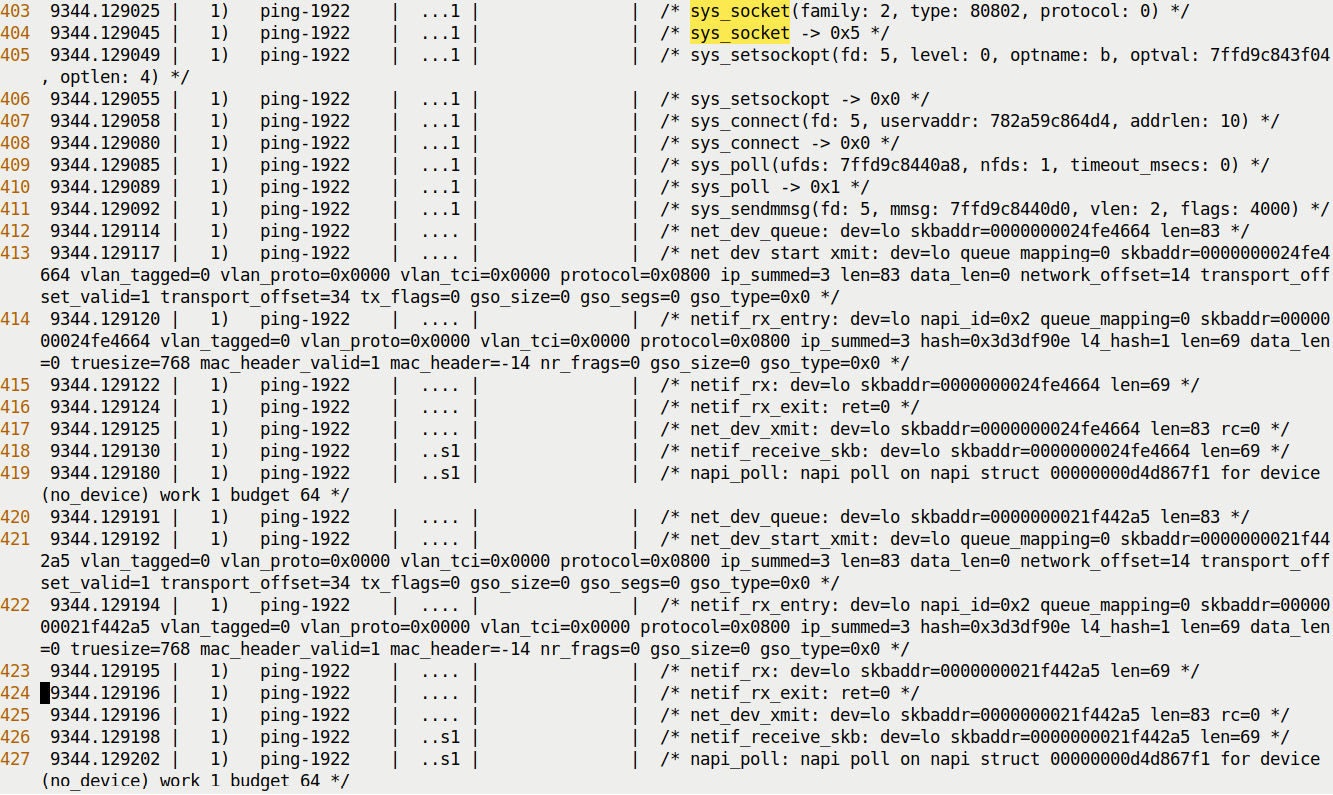
Figure 9.17 – A partial screenshot of the (filtered) ftrace report for ping via the set_event interface
With this approach, it's interesting and useful to be able to see each function's parameters along with their current value! This is at the cost of not being able to see the call graph indentation, nor the level of detail regarding the trace (as compared with tracing the previous way, via the regular available_filter_functions interface). You can find this ftrace set_event-based report (a sample run) in the ch9/ftrace/ping_ftrace_set_event_report.txt file.
From a debugging perspective, being able to see function parameters can be really useful (as, quite often, incorrect parameters might be the underlying defect or contribute to it). Further, with the trace-cmd frontend as well (which we will cover in the next main section), not using the function_graph plugin auto-enables the printing of function parameters.
Using trace_printk() for debugging
The trace_printk() API is used to emit a string into the ftrace buffer. The syntax is identical to printf(). Here is an example:
trace_printk("myprj: at %s:%s():%d
",__FILE__, __func__, __LINE__);
Thus, it's typically used as a debugging aid, an instrumentation technique. But then why not simply employ printk() (or the pr_foo() wrapper or dev_foo() macros)? trace_printk() is much faster, writing only to RAM, and never to the console device. Thus, it's really useful for debugging fast code paths (interrupt code, for example), where printk() might be too slow (recall that we briefly talked about Heisenbugs in the introduction to Chapter 8, Lock Debugging). Also, the printk() buffer can be far too small at times; the ftrace buffers are (much) larger and tunable.
It's recommended that you use trace_printk() only for debug purposes. Now, if trace_printk() writes only to the ftrace buffer, how do you look up the content? Easy – simply read from the trace or trace_pipe files (not via dmesg or journalctl). The trace_printk() output is valid in all tracer plugins and works (like printk()) from any context – process or interrupt, and even NMIs. (By the way, it appears as a comment in the function_graph tracer report.)
Also, the kernel documentation mentions optimizations – for example, using trace_puts(). This only emits a literal string (which is often sufficient), as well as other optimization with trace_printk(): https://www.kernel.org/doc/html/latest/driver-api/basics.html#c.trace_printk.
trace_printk() can be disabled from writing into the trace buffer by writing notrace_printk into the trace_options file (it's enabled by default). Alternatively, it can be toggled by writing 0 / 1 into options/trace_printk.
Ftrace – miscellaneous remaining points via FAQs
Let's wrap up this content on kernel ftrace in a useful and familiar FAQ format:
- Is there a documented quick way to get started with ftrace?
The ftrace subsystem includes a nice quick summary of using ftrace via a tracing mini-HOWTO; you can read it by doing the following:
sudo cat /sys/kernel/tracing/README
- I can't find some ftrace options or tracefs files on my system.
Remember that the tracefs pseudofiles and directories are an integral part of the kernel and thus there will be variances in what you see, based on the following:
- The CPU architecture (typically x86_64 is the most rich and updated one)
- The kernel version (here, it's based on the x86_64 arch and the 5.10.60 kernel)
- How can I obtain trace data from the kernel as it's generated – that is, in a streaming fashion?
You can stream in ftrace data by reading from the trace_pipe pseudofile; you can simply read from it using tail -f or a custom script, or even filter it "live" by simply filtering the incoming trace data from trace_pipe via standard utilities such as awk and grep.
- Within a tracing session with ftrace, can I toggle tracing on/off?
Toggling ftrace programmatically within a kernel (or a module for that matter) is easily done. Simply call these APIs (note that they're GPL-exported only):
- tracing_on(): Turns tracing on
- tracing_off(): Turns tracing off
This is the programming equivalent of writing 1 or 0 into the tracing_on file, which you can use to toggle tracing via a script (running as root).
Note that the entire ftrace system can be turned off by writing 0 to the /proc/sys/kernel/ftrace_enabled sysctl. This is obviously not to be done trivially. The kernel documentation (https://www.kernel.org/doc/html/latest/trace/ftrace.html#ftrace-enabled) has more details on this aspect.
- Can ftrace help when a kernel Oops or panic occurs? How?
The powerful kdump/kexec infrastructure allows us to capture a snapshot of the entire kernel memory space when a crash – an Oops or panic – occurs. Subsequently, the crash tool allows you to perform post-mortem analysis of the kernel dump image (we will mention this technology briefly in this book's last chapter).
However, even though this can be very helpful to debug a kernel crash, it doesn't actually provide any details on what occurred before the kernel crashed. This is where ftrace can, again, be very useful – we can set up ftrace to perform tracing prior to a known crash point. But once the system crashes, it could well be in an unusable state (completely frozen/hung); thus, you may not be able to even save the trace data to a file.
This is where the ftrace_dump_on_oops facility comes in. Enable it by writing 1 to the proc pseudofile,/proc/sys/kernel/ftrace_dump_on_oops (it's always 0 by default). This will have the kernel write the current content of the ftrace buffer(s) to the console device and the kernel log! Kdump will thus capture it along with the kernel dump image, and you'll now have not only the entire kernel state at the time of the crash but also the events leading up to the crash, as evidenced by the ftrace output. This can help in debugging the root cause of the crash.
The facility is also invokable at boot time via a kernel command-line parameter (which you can pass at boot time via the bootloader). The following screenshot from the kernel documentation on kernel parameters (https://www.kernel.org/doc/html/latest/admin-guide/kernel-parameters.html) makes its purpose amply clear:

Figure 9.18 – A partial screenshot of kernel parameters showing the ftrace_dump_on_oops one
This is interesting. Using ftrace_dump_on_oops=orig_cpu can often be very useful. Only the relevant ftrace buffer – the one for the CPU where the Oops got triggered – will get dumped to the kernel log (and console).
Tip – Kernel Parameters Relevant to Ftrace
Ftrace can be programmed to start collecting trace data as early as possible after boot by passing the ftrace=[tracer] kernel parameter (where [tracer] is the name of the tracer plugin to employ) to help you debug early boot issues. Similarly, several other ftrace-related kernel parameters are available. To see them, navigate to the official kernel docs on kernel command-line parameters (https://www.kernel.org/doc/html/latest/admin-guide/kernel-parameters.html) and search for the [FTRACE] string.
- What's the irqsoff and the other latency-measurement tracers for?
It's best to not disable hardware interrupts; sometimes though, it becomes necessary to. For example, the critical section of a spinlock – the code between the spinlock being taken and released – has interrupts disabled (in order to guarantee its correct functioning). Keeping interrupts disabled for long-ish periods of time though – anything more than, say, 100 microseconds – can certainly contribute to system latencies and lags. The irqsoff tracer can measure the longest time for which hardware interrupts are turned off; even better, it allows you to see where exactly this occurred as well.
Usage details regarding the irqsoff tracer have already been covered in my earlier (free) ebook Linux Kernel Programming – Part 2, in Chapter 4, Handling Hardware Interrupts, in the Using Ftrace to get a handle on system latencies section. Do check it out.
The official kernel documentation on ftrace (https://www.kernel.org/doc/html/latest/trace/ftrace.html#irqsoff) does indeed cover the meaning and specifics of measuring latencies via these latency-measurement-related tracers. Please do check it out. Here are the latency measurement-related ftrace tracers:
- irqsoff: Measures and reports the maximum duration for which hardware interrupts (IRQs) are turned off (disabled).
- preemptoff: Measures and reports the maximum duration for which kernel preemption is turned off.
- preemptirqsoff: Measures and reports the maximum duration for which hardware IRQs and/or kernel preemption are turned off. In effect, that is the maximum of both of the preceding tracers, and, in actuality, the total time during which the kernel cannot schedule anything!
- wakeup: Measures and reports the schedule latency – the time that elapses between a task being awoken and the time to which it actually runs. It's measured for the highest priority non-real-time task only.
- wakeup_rt: Same as the previous, except that it measures and reports the schedule latency for the highest priority real-time task currently on the system. This is an important metric for real time.
As mentioned (in the following section), the first three tracers listed previously are often used to check whether drivers have left hardware interrupts or kernel preemption on for too long.
IRQs Off/Kernel Preemption Off – How Long Is Too Long?
In general, anything in the range of tens of milliseconds – in effect, anything over 10 milliseconds – is considered too long for hardware interrupts and/or kernel preemption to be turned off.
Here's a quick pro tip – monitor your project's irqqsoff and preemptoff worst-case times with the above mentioned latency measurement tracers.
- Can I perform more than one ftrace recording/reporting session simultaneously on the same kernel?
Ftrace has an instances model. It allows for more than one trace to be done at a time! Simply create a directory under the /sys/kernel/tracing/instances/ directory (with mkdir) and proceed to use it, just as you would with normal ftrace. Each instance has its own set of buffers, tracers, filters, and so on, allowing multiple simultaneous tracing when required. For more information, this presentation by Steven Rostedt covers using ftrace instances: Tracing with ftrace – Critical tooling for Linux Development, June 2021: https://linuxfoundation.org/wp-content/uploads/ftrace-mentorship-2021.pdf.
Ftrace use cases
Here, we will mention a few of the many ways that ftrace has been (or can be) leveraged, with a focus on debugging.
Checking kernel stack utilization and possible overflow with ftrace
As you'll know, every (user-mode) thread alive has two stacks – a user-mode stack and a kernel-mode stack. The user-mode stack is dynamic and large. (The maximum size it can grow to is a resource limit, RLIMIT_STACK, typically 8 MB on vanilla Linux. Also, kernel threads only have a kernel-mode stack, of course.) The kernel-mode stack, however, is fixed in size and is small – typically, just 8 KB on 32-bit systems and 16 KB on 64-bit systems. Overflowing the kernel-mode stack is, of course, a memory-related bug and will usually cause a system to abruptly lock up or even panic. It's a dangerous thing.
Tip
Enabling CONFIG_VMAP_STACK (essentially, using the kernel vmalloc region for kernel stacks) can be useful. It enables the kernel to set up a guard page to catch any overflow gracefully and report it via an Oops; the offending process context is killed as well. Also, enabling CONFIG_THREAD_INFO_IN_TASK helps mitigate the problems that a stack overflow bug can cause. See the Further reading section for more info on these kernel configs.
So, monitoring/instrumenting a kernel-mode stack size at runtime can be a useful task to carry out, to flag any outliers! Ftrace has a way to do so – the so-called stack tracing (or stack tracer) functionality. Enable it by setting CONFIG_STACK_TRACER=y in the kernel config (it's typically set by default). The tracer is controlled via the proc pseudofile /proc/sys/kernel/stack_tracer_enabled, and is turned off by default.
Here's a quick sample run where we'll turn on ftrace's stack tracer, do a sample tracing session, and see which kernel functions had the highest kernel-mode stack utilization (note that we're running as root):
- Turn the ftrace stack tracer on:
echo 1 > /proc/sys/kernel/stack_tracer_enabled
- Perform a tracing session. We make use of our very simple script, ch9/ftrace/ftrc_1s.sh, which traces whatever executes within the kernel for 1 second:
cd /sys/kernel/tracing
<...>/ch9/ftrace/ftrc_1s.sh
[...]
- Look up the maximum kernel stack utilization and the details:
cat stack_max_size
cat stack_trace
The following screenshot displays a sample run. Here, the maximum kernel stack size utilization turned out to be over 4,000 bytes:

Figure 9.19 – A partial screenshot showing a sample kernel stack utilization via ftrace's stack tracer
The official kernel documentation has information on the stack tracer: https://www.kernel.org/doc/html/v5.10/trace/ftrace.html#stack-trace.
How the AOSP uses ftrace
The Android Open Source Project (AOSP) indeed uses ftrace to help debug kernel/driver issues. (Internally, it uses what is essentially wrapper tooling – atrace, systrace, and Catapult – over ftrace, though ftrace can be used directly as well.)
The AOSP describes using dynamic ftrace (just as we have been doing) to debug and find the root cause of difficult-to-figure performance-related defects. A brief quote – from https://source.android.com/devices/tech/debug/ftrace – is in order:
We, in fact, just talked about using the irqsoff, preemptoff, and preemptirqsoff tracers in the previous section.
An actual use case – an Android smartphone, a Pixel XL, after taking a High Dynamic Range (HDR) photo and immediately rotating the viewfinder, resulted in jank – was root-caused using ftrace: https://source.android.com/devices/tech/debug/ftrace#expandable-1.
Similarly, the AOSP documentation also refers to actual cases where the following occurs:
- Drivers can leave hardware IRQs and/or preemption disabled for too long, causing performance issues (https://source.android.com/devices/tech/debug/jank_jitter#drivers).
- Drivers can have long softirqs, again causing performance issues (why? As softirqs disable kernel preemption (https://source.android.com/devices/tech/debug/jank_jitter#long-softirqs).
This is interesting stuff.
We mention one more interesting use case – that of using the powerful and user-friendly perf-tools scripts (another frontend to ftrace) – to help debug performance issues on Netflix Linux (Ubuntu) cloud instances. We will discuss this in a later section – Investigating a database disk I/O issue on Netflix cloud instances with perf-tools.
On an unrelated note, perhaps you'll find by studying an ftrace report several – perhaps too many – calls to security-related interfaces, typically enforced via Linux Security Modules (LSMs), such as SELinux, AppArmor, Smack, TOMOYO, and so on. In a highly performance-sensitive app (or project – for example, a near real-time system), this might indicate the need to disable these security interfaces (via kernel configuration – if possible, at least during the time-critical code paths). This can be especially true when several LSMs are enabled.
Using the trace-cmd, KernelShark, and perf-tools ftrace frontends
There's no doubt that the Linux kernel ftrace infrastructure is immensely powerful, enabling you to look deep inside the kernel, throwing light into the dark corners of the system, as it were. This power does come at the cost of a somewhat steep learning curve – lots of sysfs-based tuning and options knobs that you need to be intimately aware of, plus the burden of filtering a possibly huge amount of noise in the resulting traces (as you'd have already learned from the previous sections of this chapter!). Steven Rostedt thus built a powerful and elegant command-line-based frontend to ftrace, trace-cmd. What's more, there's a true GUI frontend to trace-cmd itself, the KernelShark program. It parses the trace data recorded (trace.dat by default) by trace-cmd and displays it in a more human-digestible GUI. In a similar manner, Brendan Gregg has built the perf-tools script-based frontend project to ftrace as well.
An introduction to using trace-cmd
The trace-cmd utility – in the style of modern Linux console software such as git – has several sub-commands. They allow you to easily record a tracing session, for the entire system or a particular process only (optionally, as well as its descendants), and generate a report. It can do a lot more – control ftrace config parameters, clear and reset ftrace, see the current status, and list all available events, plugins, and options. It can even perform profiling, show a histogram of the trace, take a snapshot, listen on a network socket for clients, and more. As trace-cmd works upon the underlying ftrace kernel subsystem, you typically need root access when running its sub-commands. Here, we're working with the trace-cmd version, available as an Ubuntu 20.04 LTS package at the time of writing – version 2.8.3.
Getting help
The trace-cmd utility is well documented. A few ways to get help include the following:
- Every trace-cmd sub-command has its very own man page – for example, to read the man page on the record sub-command, type man trace-cmd-record. Of course, man trace-cmd gives an overview of the tool and every sub-command.
- To get a quick help screen, type the command followed by -h – for example, trace-cmd record -h.
- Several excellent tutorials are available. Refer to the Further reading section of this chapter for some.
Running trace-cmd and checking for available man pages related to it (by using bash auto-complete) are shown in the following screenshot:
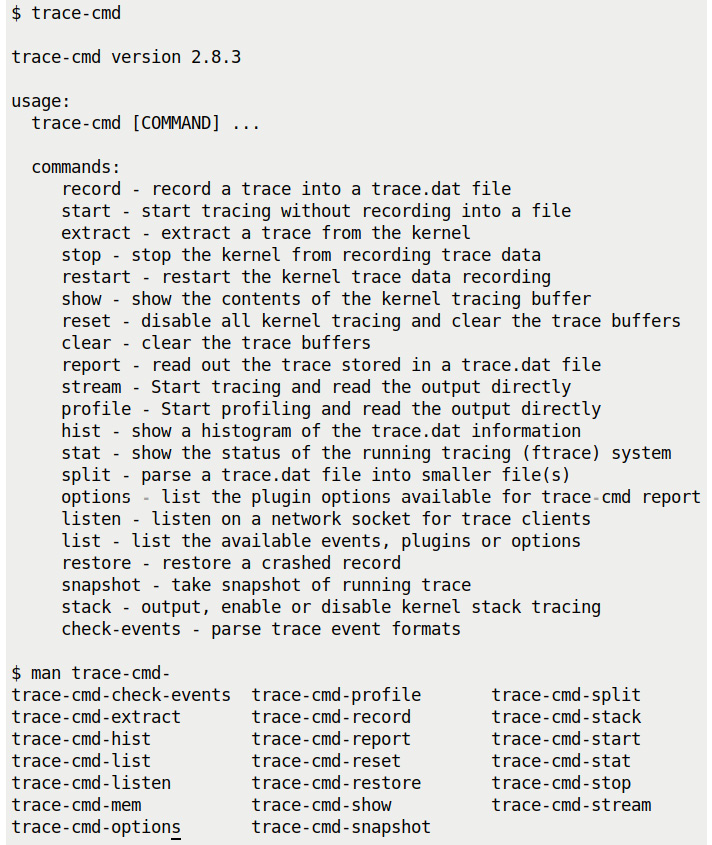
Figure 9.20 – A screenshot showing trace-cmd's brief help screen and available man pages
A simple first tracing session with trace-cmd
Here, we present steps to carry out a very simple tracing session via trace-cmd. As space is limited, we won't repeat what the man pages (and other docs) already explain in depth. We will leave it to you to read through the deeper details. Let's jump right into it:
- Reset the ftrace tracing subsystem (optional):
sudo trace-cmd reset
- Record a trace. Let's record everything that goes on in the kernel for 1 second, using the powerful function_graph plugin (or tracer) , specified via the –p option switch. The -F <command> option switch has trace-cmd trace only that command (adding -c before the -F switch will also trace its descendants, if there are any):
sudo trace-cmd record -p function_graph -F sleep 1
- Save the trace report (in ASCII text format). The -l option adds a column showing the really useful latency output format (we covered this in the Delving deeper into the latency trace info section). In addition to the four latency info columns we already saw, trace-cmd prefixes an additional column – the CPU core that the function ran upon:
sudo trace-cmd report -l > sleep1.txt
Alternatively, trace-cmd show will show you the current content of the ftrace buffers. Also, note that in step 2, instead of specifying a command to trace (via the -F switch), you can specify a process to trace via the -P <PID> option.
It's also worth noting that the second step produces a binary trace file named, by default, trace.dat (you'll find we use it with the KernelShark GUI frontend). Do try out these simple steps and trace the kernel easily! You'll quickly realize how much easier this is compared with directly working with raw ftrace. Of course, on constrained embedded systems, setting up frontends such as trace-cmd may not be viable at all (it really does depend on your project/product); thus, knowing how to leverage raw ftrace is indeed still important!
Tip
It's advisable to not run trace-cmd from within the tracefs (/sys/kernel/[debug]/tracing) directory. It can fail as it attempts to write the trace data (you'll have to override this with the -o option switch, and so on).
Viewing and leveraging all available events
It gets a lot more powerful. trace-cmd list shows you all available events (as well as plugins and other options) that can be leveraged while recording a trace. While doing this reveals all possible events that can be traced, the list is huge – over 1,400 of them at the time of writing (with the 5.10 kernel series – try it out and see for yourself). Here's a truncated view:
$ sudo trace-cmd list
events:
drm:drm_vblank_event
drm:drm_vblank_event_queued
drm:drm_vblank_event_delivered
initcall:initcall_finish
initcall:initcall_start
initcall:initcall_level
vsyscall:emulate_vsyscall
xen:xen_cpu_set_ldt
[...]
tracers:
hwlat blk mmiotrace function_graph wakeup_dl wakeup_rt wakeup function nop
options:
print-parent
nosym-offset
[...]
To see a sorted list of just the event labels – which are similar to event classes – and not each and every function associated with each event, in an abbreviated format, we firstly employ the -e option to trace-cmd list (show only events) and perform some quick bash magic:
$ sudo trace-cmd list -e | awk -F':' 'NF==2 {print $1}' | sort | uniq | tr ' ' ' '
alarmtimer asoc avc block bpf_test_run bpf_trace bridge cfg80211 cgroup clk compaction cpuhp cros_ec devfreq devlink dma_fence drm error_report exceptions ext4 fib fib6 filelock filemap fs_dax gpio gvt hda hda_controller hda_intel huge_memory hwmon hyperv i2c i915 initcall intel_iommu intel_ish interconnect iocost iomap iommu io_uring irq irq_matrix irq_vectors iwlwifi iwlwifi_data iwlwifi_io iwlwifi_msg iwlwifi_ucode jbd2 kmem kvm kvmmmu libata mac80211 mac80211_msg mce mdio mei migrate mmap mmap_lock mmc module mptcp msr napi neigh net netlink nmi nvme oom page_isolation pagemap page_pool percpu power printk pwm qdisc random ras raw_syscalls rcu regmap regulator resctrl rpm rseq rtc sched scsi signal skb smbus sock spi swiotlb sync_trace syscalls task tcp thermal thermal_power_allocator timer tlb ucsi udp v4l2 vb2 vmscan vsyscall wbt workqueue writeback x86_fpu xdp xen xhci-hcd $
The precise event classes seen depend on the architecture, the kernel version, and the kernel config. Now, the wonderful thing is that you can pick one or more of these event classes and have trace-cmd record only trace and report the functionality corresponding to them by using the -e option switch. Here's an example:
trace-cmd record <...> -e net -e sock -e syscalls
As you'll guess, this has trace-cmd record all network, socket, and system call-related tracing events (functions) only, that occur within the kernel during its recording run.
The trace-cmd list sub-command can show interesting stuff – for example, trace-cmd list –t shows all available tracers (completely equivalent to cat /sys/kernel/tracing/available_tracers). To see all that it can show, display the list sub-command help screen as follows:
# trace-cmd list -h
trace-cmd version 2.8.3
usage:
trace-cmd list [-e [regex]][-t][-o][-f [regex]]
-e list available events
-F show event format
-R show event triggers
-l show event filters
-t list available tracers
-o list available options
-f [regex] list available functions to filter on
-P list loaded plugin files (by path)
-O list plugin options
-B list defined buffer instances
-C list the defined clocks (and active one)
#
Do look up man trace-cmd-list to understand the details. Also, if you want to trace particular functions (and not all ones that correspond to an encompassing event, which we did with the -e <event1> -e <event2> option to trace-cmd record), then execute trace-cmd record [...] -l <func1> -l <func2> [...].
Case 3.1 – tracing a single ping with trace-cmd
Performing a trace of a single ping, in a manner very similar to what we achieved with ftrace-ing via the set_event interface (we covered this in the section Case 2 – tracing a single ping with raw ftrace via the set_event interface), with function parameters being revealed, can be easily done in simply two steps with trace-cmd:
- The recording of data:
sudo trace-cmd record -q -e net -e sock -e skb -e tcp -e udp -F ping -c1 packtpub.com
- The reporting of the trace:
sudo trace-cmd report -l -q > reportfile.txt
If, in the recording step, you add the -p function_graph parameter, you'll get the report with function call graph indentation but without any function parameters (as you will now realize, both ways are useful).
This single ping trace via trace-cmd has been encapsulated via a simple bash script – ch9/tracecmd/trccmd_1ping.sh. When running, the script requires, via an option switch, a decision on whether to trace so that a function graph-style report or function parameters (and their current values) are displayed in the trace report. Do try it out!
Kernel modules and trace-cmd
Ftrace has the ability to automatically recognize any and all functions within kernel modules! This is excellent; thus, trace-cmd – being a frontend to ftrace – also automatically recognizes them. To test this, I simply loaded up a module we used earlier (ch5/kmembugs_test/test_kmembugs.ko). Then, we use trace-cmd list -f, grepping for the presence of this module's functions. They do indeed show up:
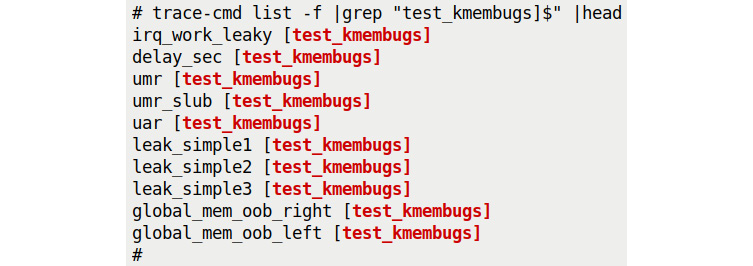
Figure 9.21 – A screenshot showing how trace-cmd automatically recognizes module functions available to it for tracing
Now, to trace a particular module's functions, do the following:
trace-cmd record [...] --module <module-name> [...]
Also, as an aside, I'm working upon a wrapper script over the trace-cmd utility called trccmd. Please see the GitHub repository of this small project here: https://github.com/kaiwan/trccmd. As an example, here's this utility being used to trace the flow of a single ping packet:
./trccmd -F 'ping -c1 packtpub.com' -e 'net sock skb tcp udp'
Right, let's move on to graphically visualizing our hard work!
Using the KernelShark GUI
KernelShark is an excellent GUI frontend to the output produced by trace-cmd. More specifically, it parses the binary trace.dat file produced by either the trace-cmd record or trace-cmd extract sub-commands.
Getting a trace.dat type output from raw ftrace
This might leave you wondering – what if you're using raw ftrace to trace (not trace-cmd) and still want to visualize the trace with KernelShark? It's easy – you simply have to use trace-cmd extract to extract the raw trace buffer content to a file – it will be in the expected binary format! Follow along with this example (as root):
cd /sys/kernel/tracing
trace-cmd reset ; echo > trace
echo function_graph > current_tracer
echo 1 > tracing_on ; sleep .5 ; echo 0 > tracing_on
trace-cmd extract -o </path/to/>trc.dat
Now, the trc.dat file can be provided as input to KernelShark.
Moving along, the latest version of KernelShark (at the time of writing, in March 2022) is 2.1.0. It's moved on from GTK+ 2.0 to Qt 5. (The 1.0 release got an LWN article for itself: KernelShark releases version 1.0, Jake Edge, July 2019: https://lwn.net/Articles/794846/.)
Being pretty new, the combination of the latest trace-cmd version (3.0.-dev, at the time of writing) and KernelShark 2.1.0 gave me some trouble; hence, I am just going with the older distro-package (Ubuntu 20.04 LTS) releases here – trace-cmd version 2.8.3 and KernelShark version 0.9.8.
Very useful and detailed documentation for KernelShark is available here: https://kernelshark.org/Documentation.html.
Case 3.2 – viewing the single ping with KernelShark
We come back to our favorite trace test – that of tracing a single ping! Of course, the whole idea is that this time, we'll visualize the trace report via KernelShark. To do so, we first execute our simple bash script (ch9/tracecmd/trccmd_1ping.sh) that will capture the trace data and write it to the trace.dat file:
cd <booksrc>/ch9/tracecmd
./trccmd_1ping.sh -f
[...]
(We covered the basics on this in the earlier Case 3.1 – tracing a single ping with trace-cmd section; the -f option provided here has the recording done via the function_graph tracer plugin). The ASCII text report file we generate (ping_trccmd.txt, here) is of no use to KernelShark. It instead uses the binary trace.dat report file (which also gets generated by trace-cmd).
KernelShark is essentially a trace reader. It parses and displays the content of the trace.dat file in a useful GUI. The picking up of the trace.dat file is automatic when you run KernelShark from the directory where a trace.dat file is present. Alternatively, you can always override this and pass the relevant binary trace file via the -i parameter, or even open it from the GUI's File | Open menu. Here's a screenshot of the KernelShark GUI, visualizing our single ping trace:
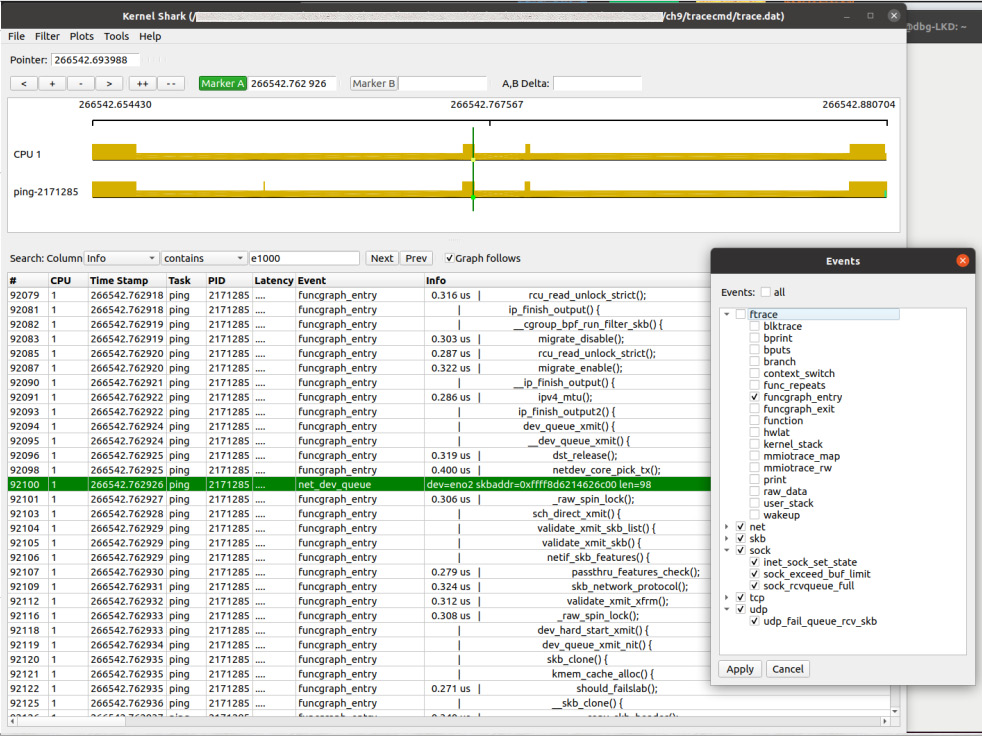
Figure 9.22 – A screenshot of the KernelShark GUI visualizing the single ping; the Events filter dialog is seen as well
Note how usefully we can filter the output. Here, I've applied a few filters:
- CPU: Set to CPU 1 only (or whichever are appropriate). Access it via Plots | CPUs.
- Tasks: Set to the ping-[PID] task only. Access it via Plots | Tasks.
- Events: This is very useful. It's set to filter events of interest – we eliminate all ftrace events except funcgraph_entry; this one allows us to see the names of kernel functions as they're entered in the list view. Access it via Filter | Show events. (Here's a quick tip – as you probably know, all kernel events can be seen under /sys/kernel/tracing/events/.)
Very powerful indeed!
There are two major tiled widgets – the graph and list views. The former – the upper portion of the GUI – shows the kernel flow graphically, with vertical tick marks indicating events. The list widget (the lower pane) is literally a list of the events – essentially, it's the raw ftrace/trace-cmd output. Above the graph region is the "Pointer", navigation/zoom, and two Marker widgets. Between the graph and list regions is a widget, allowing you to search and filter on any of the available columns. Again, it's very intuitive, so do try it out. The KernelShark doc clearly explains the GUI layout. Here's a few elements of the GUI (note that this screenshot is a different session from the previous one):
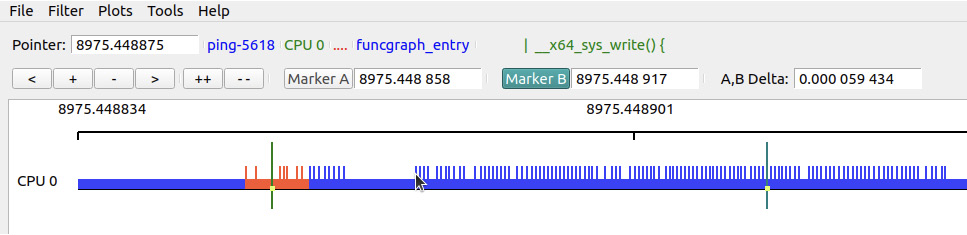
Figure 9.23 – A partial screenshot showing the upper portion of the KernelShark GUI
Here's a quick run-through of some key elements of Figure 9.23:
- The so-called "Pointer" – this shows the current location in the timeline. As you move the mouse over events, the information pertaining to that event – in effect, the last column in the list view (labeled Info) – is seen to the right of the Pointer. (You can see the mouse pointer on the graph and the corresponding event info to the right of the Pointer: widget – it shows that the mouse pointer is currently on the ping process, on entry to the write() system call.)
- The buttons to zoom and move (<, +, -, and >):
- The < button moves the graph left.
- The + button zooms in and the – button zooms out (as does scrolling the mouse).
- The > button moves the graph right.
- The ++ button zooms into the graph to the maximum extent, and the -- button zooms out to the full timeline width.
- The two Marker widgets can be very helpful, allowing you to focus on a particular section of the code path and to see the time delta between the two. Using them is easy – for example, to set Marker B, click on it first, and then double-click anywhere on the graph or list. This sets it (do the same for Marker A), and when both are set, the time delta also shows up!
A few interesting gems turn up while reading the KernelShark HTML doc; Here's one:
Also, detailed custom filtering can be done via the Filters | TEP Advance Filtering (or Advanced Filtering, in older versions) menu; documentation on this can be found in the KernelShark HTML doc in the Advanced Event Filter section.
As we saw with ftrace, KernelShark too is used professionally to debug both performance issues as well as help root-cause defects. Here's an article by (who else?) Steven Rostedt: Using KernelShark to analyze the real-time scheduler, Feb 2011: https://lwn.net/Articles/425583/. As with ftrace's (and perf's) other frontends, KernelShark is moving away from being "the one GUI" solution to being merely one of any number of frontends that can take advantage of a framework where libraries will provide interfaces to access raw trace data (as Figure 9.2 hints at – although it doesn't explicitly include KernelShark).
An introduction to using perf-tools
The perf-tools project is a collection of (mostly bash) scripts that are essentially wrappers over the kernel's ftrace and the perf_events (perf) infrastructure. They help automate much of the work when performing performance analysis/observability/ debugging at the level of the kernel (and userspace, to an extent). The primary author is Brendan Gregg. This is the GitHub repository of the project: https://github.com/brendangregg/perf-tools.
It's not new to us – we covered, pretty in depth, the usage of the kprobe[-perf] tool within the perf-tools collection in Chapter 4, Debug via Instrumentation – Kprobes, in the The easier way – dynamic kprobes or kprobe-based event tracing section.
Once you've installed the perf-tools[-unstable] package, the scripts are typically installed in /usr/sbin. Let's check it out:
$ (cd /usr/sbin; ls *-perf)
bitesize-perf execsnoop-perf funcgraph-perf
functrace-perf iosnoop-perf kprobe-perf
perf-stat-hist-perf
syscount-perf tpoint-perf cachestat-perf
funccount-perf funcslower-perf iolatency-perf
killsnoop-perf opensnoop-perf reset-ftrace-perf
tcpretrans-perf uprobe-perf
$
These tools tend to help with performance observability (and debug) at various portions of the Linux stack. A picture is, of course, worth a thousand words; thus, I reproduce this useful diagram from the perf-tools GitHub repository here: https://github.com/brendangregg/perf-tools/raw/master/images/perf-tools_2016.png:

Figure 9.24 – The perf-tools collection of scripts (pic credit – the perf-tools GitHub repository)
Glancing at the diagram, you can see how these tools can be employed at various portions of the stack!
A big plus is that these tools are documented really well. Each has its own man page. Further, when any of these tools is run on the command line with the -h option switch, they shows a brief summary, often with very helpful one-line example usage (see the upper portion of Figure 9.25 as an example). Due to limited space, we'll check out just a couple of examples (again, we covered using the kprobe[-perf] script in an earlier chapter).
Tracing all open()s via perf-tool's opensnoop
You'll recall how, back in Chapter 4, Debug via Instrumentation – Kprobes, via a multitude of ways, we worked hard to figure out which files were being opened (via the open() system call, which becomes the do_sys_open() function within the kernel). Let's revisit this, this time using ftrace! We could use raw ftrace or trace-cmd to quite easily do this, but let's use the (even easier to use) perf-tools wrapper script, opensnoop[-perf]! It does the job handily. Needless to say, run it as root:
![Figure 9.25 – A screenshot showing the help screen – with examples! – of opensnoop[-perf], along with a quick example, tracing the open system call of all files ending in conf system-wide](https://imgdetail.ebookreading.net/2023/10/9781801075039/9781801075039__9781801075039__files__image__B17445_09_025.jpg)
Figure 9.25 – A screenshot showing the help screen – with examples! – of opensnoop[-perf], along with a quick example, tracing the open system call of all files ending in conf system-wide
Tip – Digging In
I suggest you look at the code of some of these perf-tools scripts. funcgraph[-perf] is a good one: https://github.com/brendangregg/perf-tools/blob/master/kernel/funcgraph. It's a useful bash script wrapper over precisely what we learned to do earlier in this chapter – use raw ftrace via the function_graph tracer.
Also, recall how in Chapter 4, Debug via Instrumentation – Kprobes, in the Observability with eBPF tools – an introduction section, we used one of the powerful BPF Compiler Collection (BCC) frontends, opensnoop-bpfcc, to figure out which files are being opened by which process/thread.
Tracing functions that are latency outliers via perf-tool's funcslower
Here's one more quick perf-tools example – finding functions that are latency outliers with the funcslower[-perf] tool! To try this, I check for the mutex_lock() kernel function, taking longer than 50 microseconds to complete (I ran this on my native x86_64 laptop, running Ubuntu 20.04 LTS):
![Figure 9.26 – A partial screenshot showing how the funcslower[-perf] tool catches function outliers](https://imgdetail.ebookreading.net/2023/10/9781801075039/9781801075039__9781801075039__files__image__B17445_09_026.jpg)
Figure 9.26 – A partial screenshot showing how the funcslower[-perf] tool catches function outliers
Note the big fat outlier here – a kworker thread taking over 32 milliseconds, a likely corner case! Again, this shows that vanilla Linux is by no means a Real-Time Operating System (RTOS). This has me unable to resist pointing out that Linux can indeed run as an RTOS – look up the Real-Time Linux (RTL) wiki site and patches.
The perf-tools GitHub site has example content on most, if not all, the perf tools – you can check out interesting examples using funcslower[-perf] here: https://github.com/brendangregg/perf-tools/blob/master/examples/funcslower_example.txt. Several more interesting screenshots and links with respect to other tools can also be found here, so do check it out.
Don't forget eBPF and its frontends
Note that many of these perf-tools wrapper scripts are now superseded by the more recent and powerful eBPF technology. Brendan Gregg's answer to this is his newer frontend to eBPF – the *-bpfcc toolset! (You can read more on it here: https://www.brendangregg.com/ebpf.html.) Recall how, in Chapter 4, Debug via Instrumentation – Kprobes, in the Observability with eBPF tools – an introduction section, when we tried to figure out who was issuing the execve() system call to execute a process, the perf-tools execsnoop-perf wrapper script didn't quite cut it. The execsnoop-bpfcc BCC frontend wrapper script worked well instead.
Investigating a disk I/O issue on Netflix cloud instances with perf-tools
Brendan Gregg describes using ftrace via his powerful and user-friendly perf-tools scripts to help debug performance issues on Netflix Linux (Ubuntu) cloud instances. An article by him on this topic (you'll find the link to it shortly), although pretty old (August 2014), clearly illustrates how powerful ftrace – and the perf-tools frontend – can be at digging deep into and figuring out performance issues.
In this article, he shows how exactly he figured out an issue with a Cassandra database that was experiencing abnormally heavy disk I/O. It was caused by an initially incorrect disk readahead setting. At first, it seemed that even after tuning the readahead values to saner ones, it had no effect on the disk I/O. Digging deeper with the perf-tools scripts (he uses many interesting ones – iosnoop[-perf], tpoint[-perf], funccount[-perf], funcslower[-perf], kprobe[-perf], and funcgraph[-perf]), he found that the tuning had no effect, as the initialization of the disk readahead setting took place within the context of the open() system call (but Cassandra was still running). Restarting Cassandra on the instance had the readahead value initialized to the correct value, the disk I/O dropped, and all was good again.
The article can be found here: ftrace: The Hidden Light Switch, Brendan Gregg, August 2014: https://lwn.net/Articles/608497/.
An introduction to kernel tracing with LTTng and Trace Compass
The Linux Trace Toolkit – next generation (LTTng) is a powerful and popular tracing system for the Linux kernel as well as userspace apps and libraries; it's open source, released under the Lesser GPL (modules and libraries), the GPL (tooling), and some components under the MIT license. Its original version (LTT) dates back to 2005, and LTTng is actively maintained. It has made a name for itself in helping track down performance and debug issues on multicore parallel and real-time systems. (Here, we're using the latest stable version at the time of writing – v2.13.)
The LTTng website (https://lttng.org/) does an excellent job documenting all aspects (learn what exactly tracing is at https://lttng.org/docs/v2.13/#doc-what-is-tracing). Due to space constraints, we shall simply refer you to the appropriate links. To install LTTng, please see this link: https://lttng.org/docs/v2.13/#doc-installing-lttng.
Tip – LTTng Package Installation for Ubuntu 20.04
Though you won't get the latest version, it's easy to simply install these LTTng packages like this – sudo apt install lttng-tools lttng-modules-dkms -y. (Using this technique, at the time of writing, I got LTTng version 2.11 and 2.12 for the modules.)
A quick introduction to recording a kernel tracing session with LTTng
Once installed, please do read the Quick start guide on the LTTng website: https://lttng.org/docs/v2.13/#doc-getting-started. As this is a book on kernel debugging, we will only make use of LTTng for kernel tracing (it has the capability to perform user mode tracing as well). Thus, I suggest you read these sections – at least to begin with:
- Record Linux kernel events: https://lttng.org/docs/v2.13/#doc-tracing-the-linux-kernel
- View and analyze the recorded events: https://lttng.org/docs/v2.13/#doc-viewing-and-analyzing-your-traces
To very briefly summarize recording a kernel tracing session with LTTng, perform the following steps (all performed as root):
- Create a session:
lttng create <session-name> --output=~/my_lttng_traces/
If the --output parameter isn't provided, it defaults to saving it in ~/lttng_traces/.
- Set up kernel events to trace. Here, we'll be simplistic and simply trace all kernel events (which could result in large raw data files being saved though):
lttng enable-event --kernel --all
- Perform the recording:
lttng start
Do whatever's necessary on the system to reproduce your issue (or simply do something for now).
- Stop recording (optional):
lttng stop
- Destroy the recording session. Relax – this doesn't delete the raw trace data (also, this step implicitly stops the recording session):
lttng destroy
- Make the raw trace data accessible to other users (optional):
sudo chown -R $(whoami):$(whoami) ~/my_lttng_traces
I've made a small (lightly tested, so no promises!) attempt at these steps via a wrapper bash script (ch9/lttng/lttng_trc.sh). It's just to get you started quickly. It expects a session name followed by either 0, implying the entire kernel gets traced, or the name of a program to execute, and it traces all kernel events as it executes (of course, it's simplistic – the trace isn't exclusive to the process):
$ cd <lkd_src>/ch9/lttng ; sudo ./lttng_trc.sh
Usage: lttng_trc.sh session-name program-to-trace-with-LTTng|0
1st parameter: name of the session
2nd parameter, ...:
If '0' is passed, we just do a trace of the entire system (all kevents),
else we do a trace of the particular process (all kevents).
Eg. sudo ./lttng_trc.sh ps1 ps -LA
[NOTE: other stuff running _also_ gets traced (this is non-exclusive)].
$
As a quick usage example, let's trace a single ping packet using LTTng (what a surprise)! The following screenshot shows its execution:

Figure 9.27 – A screenshot showing the execution of our simple LTTng kernel trace wrapper script
The script makes a few validity checks and then performs kernel-level tracing – while the user app (here, ping) executes – with all the kernel events enabled. It sets up so that the actual trace data is saved under /tmp/lttng_<sessionname>_<timestamp>. Further, once done, it archives and compresses this data – you can see the file at the end of the screenshot (here, it's named lttng_ping1_08Mar22_1104.tar.gz). This enables you to transfer and analyze the trace on a different system.
Analyzing LTTng traces on the command line – a mention
LTTng includes a set of libraries and tools to analyze its raw trace data. The primary tool is called Babeltrace 2, which is a command-line-based utility. I refer you to this link on the LTTng website to delve into how exactly to use it: Use the babeltrace2 command-line tool: https://lttng.org/docs/v2.13/#doc-viewing-and-analyzing-your-traces-bt. Being console-based, the output can be overwhelming. (The babeltrace output from the single ping trace just performed yielded over 123,000 lines of information!)
LTTng has another set of powerful tools to interpret and analyze its raw trace data called the LTTng analyses project. Though command-line-based, it provides intuitive Python-based interfaces to help visualize the trace session. You can learn more on this here: https://github.com/lttng/lttng-analyses.
Using the Trace Compass GUI to visualize the single ping LTTng trace
A very visually appealing and popular GUI interface for interpreting and analyzing LTTng traces is via the superb Trace Compass GUI. Trace Compass is an Eclipse-based project. Do look up its excellent site, for installation, documentation, and even screenshots: https://www.eclipse.org/tracecompass/. Here, we only introduce the usage of the Trace Compass GUI.
Once installed, simply run Trace Compass, go to the File | Open Trace... menu, and select the directory where your LTTng tracing session was saved. Trace Compass parses and displays it – here's a portion of the GUI (I also popped up the Legend dialog so that you can understand the color-coding applied in the upper pane, the graph area):
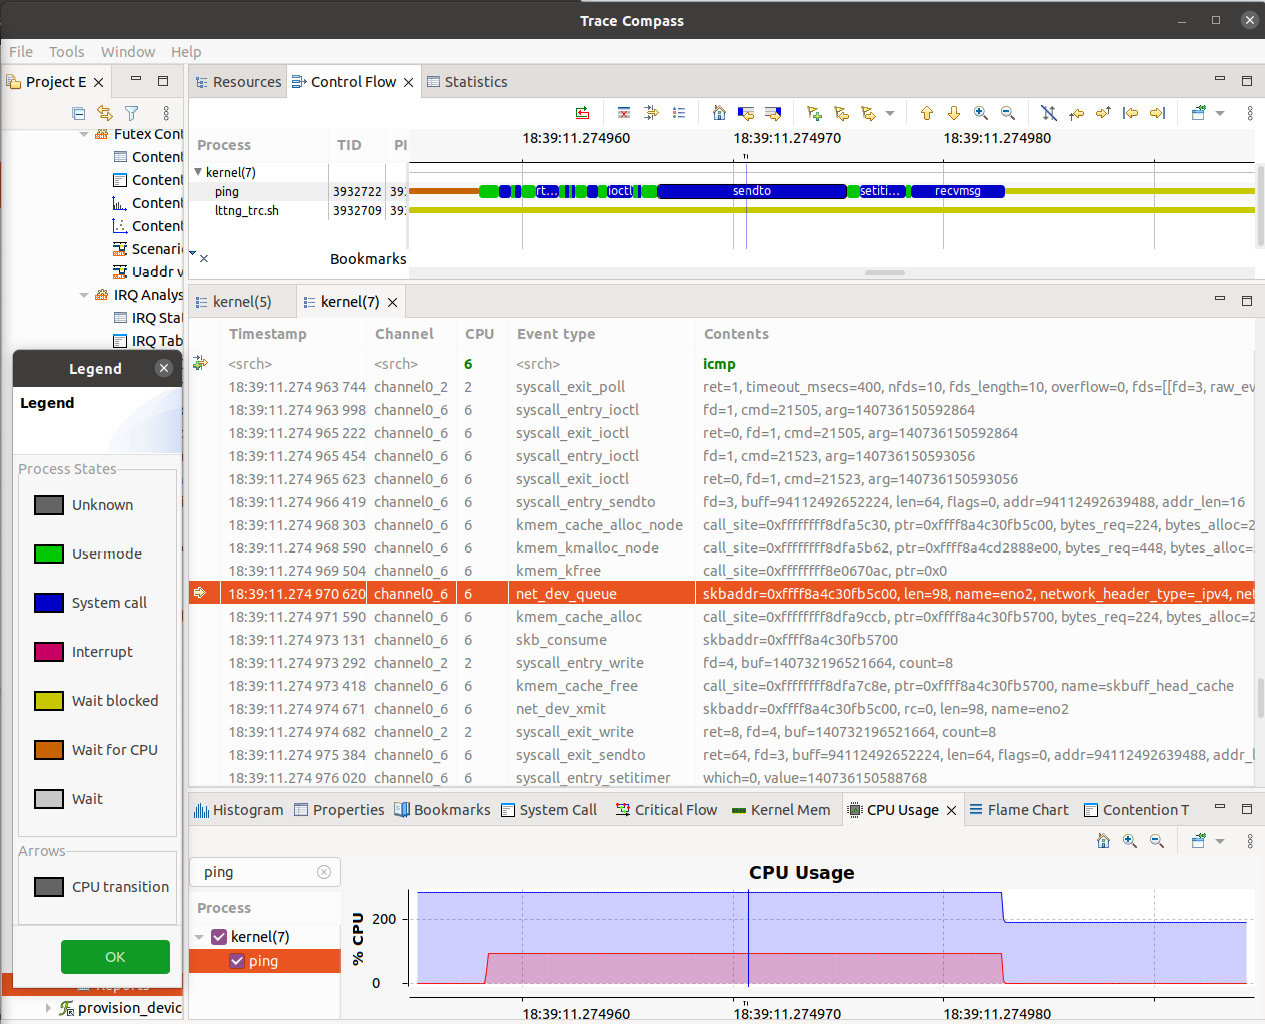
Figure 9.28 – A truncated screenshot of the superb Trace Compass GUI
There's a lot of customization possible with Trace Compass's views and perspectives – try and spend some time with it. In this particular case, to help zoom into the relevant region of the trace, I filtered in the following manner. Type 6 into the CPU column search widget (as that's the CPU core that ping happened to run upon in this particular section). Also, type the icmp string into the Contents column search widget – now lines containing it get matched. Here, there's only one – the net_dev_queue kernel event seen in the screenshot. This may not always work, though; if not, try searching the Contents column for known events, such as net_dev_xmit. (Here's a quick tip – as you know, all kernel events can be seen under /sys/kernel/tracing/events/).
Right-click on the line item or event of choice. Here, I clicked on the item seen highlighted in the screenshot – net_dev_queue. Select the Copy to Clipboard menu item. Pasting it, this is what I see (the text has wrapped):
Timestamp Channel CPU Event type Contents TID Prio PID Source
18:39:11.274 970 channel0_6 6 net_dev_queue skbaddr=0xffff8a4c30fb5c00, len=98, name=eno2, network_header_type=_ipv4, network_header=ipv4=[version=4, ihl=5, tos=0, tot_len=84, id=0x2950, frag_off=16384, ttl=64, protocol=_icmp, checksum=0xe6db, saddr_padding=[], saddr=[192, 168, 1, 16], daddr_padding=[], daddr=[104, 22, 0, 175], transport_header_type=_icmp, transport_header=icmp=[type=8, code=0, checksum=393, gateway=720897]] 3932722 20 3932722
As mentioned before, knowing the value of parameters at runtime can be crucial to debugging a given scenario. In addition, other information is provided (this is due to how the kernel events subsystem works).
To help see (a part of) the ping process's execution timeline more clearly, here's a zoomed (and truncated) screenshot of the (interesting!) graph area:

Figure 9.29 – A screenshot showing a part of the ping process's timeline
You can see we've filtered down to the ping process (on the left side). Its timeline and the functions in its execution code path are seen to its right. Note the very useful color coding – blue represents a system call, green, userspace code (the Legend dialog seen in Figure 9.28 displays the current color-coding settings). Placing the mouse over any part of the graph shows more information on it (including its duration).
With LTTng and Trace Compass, we find that it makes the state of the concerned thread (as well as all others) very clear, by appropriately color-coding it. This helps you understand the overall context visually. You can literally see what is happening – is it blocking on I/O, is it running user/kernel code paths, or is a softirq or hardirq running? All is clear. For example, the left extreme of ping in the preceding figure has a brown color bar representing it, waiting for the CPU (in a non-blocking manner; clicking on it, I can see that it's in the sched_switch event for 48.6 us). The lemon yellow color bar on the extreme right shows that it's blocked on I/O here. Again, clicking on it, I can see that it happens to be blocked on the power_cpu_idle event for 14.6 us). On the other hand, KernelShark (and thus ftrace and trace-cmd) clearly detail the context – via the super useful latency format info columns – which is missing in Trace Compass's (and LTTng's) information.
Exercises
Trace the kernel flow of the following:
- The classic K&R "Hello, world" app
- A simple "Hello, world" kernel module
Do this using (raw) ftrace, the trace-cmd frontend, and (possibly) my trccmd frontend. (I could provide solutions but it's pointless. The end result here isn't the thing that really matters; it's the process.). Visualize your traces with KernelShark. You can also try exporting the trace into the Common Trace Format (CTF) employed by Trace Compass and visualize it there as well.
Summary
Well done on completing this long and useful topic on tracing within the Linux kernel. We began this chapter with an overview of the many available tracing mechanisms on the Linux kernel – the first couple of figures nicely summarized this. A large portion of this chapter dealt with how you can leverage the powerful ftrace kernel infrastructure. It is high-performance and minimally invasive, with pretty much no dependencies, making it ideal for even constrained embedded systems!
To make it easier though, several useful frontends for ftrace exist. We covered using trace-cmd, the KernelShark GUI, and the perf-tools project. We finished the chapter with an introduction to using LTTng for kernel tracing and the Trace Compass GUI for visualizing the trace.
You'll tend to find that one tracing/visualization tool may be superior to another in some respects but is inferior in others. This, of course, is very typical (of pretty much everything – trade-offs, right). Remember, as Fred Brooks has told us back in 1975 (in his timeless book The Mythical Man Month) there's no silver bullet! Learning to use several powerful tools will stand you in good stead.
Do try working with all this technology on your own (and try the few specified exercises)! Then, the next chapter awaits – kernel panic and more. Don't panic! We'll get through it.
Further reading
- Unified Tracing Platform – Bringing tracing together, Steven Rostedt, VMware, 2019: https://static.sched.com/hosted_files/osseu19/5f/unified-tracing-platform-oss-eu-2019.pdf
- Unifying kernel tracing, Jack Edge, Oct 2019: https://lwn.net/Articles/803347/
- Linux tracing systems & how they fit together, Julia Evans (@b0rk), July 2017: https://jvns.ca/blog/2017/07/05/linux-tracing-systems/
- Using the Linux Tracing Infrastructure, Jan Altenberg, Linutronix GmbH, Nov 2017: https://events.static.linuxfound.org/sites/events/files/slides/praesentation_0.pdf
- The comprehensive kernel index – all articles on tracing on LWN: https://lwn.net/Kernel/Index/#Tracing
- Ftrace:
- Official kernel documentation – very detailed and comprehensive: ftrace - Function Tracer: https://www.kernel.org/doc/html/v5.10/trace/ftrace.html#ftrace-function-tracer
- The LWN kernel index and ftrace: https://lwn.net/Kernel/Index/#Ftrace
- Ftrace: The hidden light switch, Brendan Gregg, August 2014: https://lwn.net/Articles/608497/
- Ftrace internals: Two kernel mysteries and the most technical talk I've ever seen, Brendan Gregg, Oct 2019: https://www.brendangregg.com/blog/2019-10-15/kernelrecipes-kernel-ftrace-internals.html
- Older but definitely useful:
- Debugging the kernel using Ftrace - part 1, Steven Rostedt, December 2009: https://lwn.net/Articles/365835/
- Debugging the kernel using Ftrace - part 2, Steven Rostedt, December 2009: https://lwn.net/Articles/366796/
- Secrets of the Ftrace function tracer, Steven Rostedt, January 2010: https://lwn.net/Articles/370423/
- Welcome to ftrace & the Start of Your Journey to Understanding the Linux Kernel!, Steven Rostedt, November 2019: https://blogs.vmware.com/opensource/2019/11/12/ftrace-linux-kernel/
- Debugging the kernel using Ftrace, Programmer Group, November 2021: https://programmer.group/debugging-the-kernel-using-ftrace.html
- ftrace: trace your kernel functions!, Julia Evans, March 2017: https://jvns.ca/blog/2017/03/19/getting-started-with-ftrace/
- Ftrace cheat sheets:
- Ftrace Favorites Cheat Sheet - Fun Commands to Try with Ftrace: http://linux-tipps.blogspot.com/2011/05/ftrace-favorites-cheat-sheet-fun.html
- Kernel Tracing Cheat Sheet: https://lzone.de/cheat-sheet/Kernel%20Tracing
- Linux Tracing Workshops Materials: https://github.com/goldshtn/linux-tracing-workshop
- Virtually mapped kernel stacks, Jon Corbet, June 2016, LWN: https://lwn.net/Articles/692208/
- Virtually mapped stacks 2: thread_info strikes back, Jon Corbet, June 2016, LWN: https://lwn.net/Articles/692953/
- The trace-cmd frontend:
- trace-cmd: A front-end for Ftrace, Steven Rostedt, LWN, October 2010: https://lwn.net/Articles/410200/
- Kernel tracing with trace-cmd, G Kamathe, RedHat, July 2021: https://opensource.com/article/21/7/linux-kernel-trace-cmd
- The KernelShark GUI:
- Useful – the "official" KernelShark HTML documentation page: https://www.kernelshark.org/Documentation.html
- A colorful presentation – Swimming with the New KernelShark, Yordan Karadzhov, VMware, 2018: https://events19.linuxfoundation.org/wp-content/uploads/2017/12/Swimming-with-the-New-KernelShark-Yordan-Karadzhov-VMware.pdf
- KernelShark (quick tutorial), Steven Rostedt, ELC 2011: https://elinux.org/images/6/64/Elc2011_rostedt.pdf
- The perf-tools wrapper scripts over ftrace and perf[_events]:
- GitHub repository: https://github.com/brendangregg/perf-tools/
- Examples of most perf-tools scripts: https://github.com/brendangregg/perf-tools/tree/master/examples
- Linux Performance Analysis: New Tools and Old Secrets, November 2014, Brendan Gregg, at USENIX LISA14:
- Video presentation: https://www.usenix.org/conference/lisa14/conference-program/presentation/gregg
- Slides: https://www.slideshare.net/brendangregg/linux-performance-analysis-new-tools-and-old-secrets
- You can find useful links to eBPF and its frontends in Chapter 4, Debug via Instrumentation – Kprobes, in the Further reading section
- LTTng:
- The LTTng main website: https://lttng.org/
- The LTTng site's Quick start guide: https://lttng.org/docs/v2.13/#doc-getting-started
- Babeltrace 2: The command-line interface (CLI): https://lttng.org/blog/2020/06/01/bt2-cli/
- The LTTng analyses project: https://github.com/lttng/lttng-analyses#lttng-analyses
- Finding the Root Cause of a Web Request Latency, Julien Desfossez, February 2015: https://lttng.org/blog/2015/02/04/web-request-latency-root-cause/
- Tutorial: Remotely tracing an embedded Linux system, C Babeux, March 2016: https://lttng.org/blog/2016/03/07/tutorial-remote-tracing/
- LTTng: The Linux Trace Toolkit Next Generation – A Comprehensive User's Guide (version 2.3 edition), Daniel U. Thibault, DRDC Valcartier Research Centre: https://cradpdf.drdc-rddc.gc.ca/PDFS/unc246/p804561_A1b.pdf
- Trace Compass GUI:
- Trace Compass website: https://www.eclipse.org/tracecompass/#home
- Alternate tracing tools: https://lttng.org/docs/v2.13/#doc-lttng-alternatives
- Miscellaneous:
- Boot-time tracing via ftrace: https://www.kernel.org/doc/html/latest/trace/boottime-trace.html
- Trace Linux System Calls with Least Impact on Performance in Production, December 2020: https://en.pingcap.com/blog/how-to-trace-linux-system-calls-in-production-with-minimal-impact-on-performance/