
We have seen the power of workflows and how we can enhance the usefulness of JIRA by adapting to everyday business processes. With our help desk project, as with most support-oriented systems, it is often the case that our help desk staff will require more information from the business user who has submitted the support ticket to help further diagnose and solve the problem. Our requirements for the business process would then include the following:
- Ability for support staff to request more information from the business user
- Allowing business users to reassign the ticket back after the requested information is supplied
Furthermore as a bonus, it will be ideal to automate certain aspects of this process. For example, whenever our help desk staff requests information, he/she will not need to decide who to assign the ticket to, but rather, let the system work it out. The same can be applied to the business user so when he/she resubmits the ticket, it will be reassigned accordingly. As we will see in the next chapter, this level of automation not only enhances the user experience, it is also very useful when facilitating communication between parties involved.
The first task when setting up our workflow is to make sure we have the issue statuses prepared so we can map them to steps. From our requirements, we need to create a new step, which represents waiting for additional information from the business users, so we will need to create the issue status for this.
We have seen how to manage issue statuses from Chapter 2, Project Management, so if you have skipped or forgotten some of the steps, now will be a good time for a refresh:
- Browse to the JIRA Administration console.
- Select Statuses under the Issue Attributes section.
- Name our new status,
Waiting for Info. - Provide a helpful description such as
The issue is waiting for additional information from users. - Choose /images/icons/status_needinfo.gif for Icon URL.
- Click on the Add button to create the new status.
Now that we have our status, we can use that as the linked status for our workflow step.
Now it is time to create our new workflow. Since our requirements state that we need to have an extra step that will allow our help desk team to reassign the issue back to the business user (reporter), instead of creating a workflow from scratch, we will make a copy of the existing workflow as a template, and modify its configurations. This is usually the preferred approach as it saves you time to set up some of the common transitions.
The first step is to create a workflow for the help desk team by performing the following steps:
- Browse to the JIRA Administration console.
- Select Workflows under the Workflows section.
- Click on the Copy link for the jira workflow.
- Name the new workflow,
Help Desk Workflow. - Provide a helpful description such as
Workflow for the help desk team. - Click on the Copy button to create our workflow.
The next step is to add in the extra steps we have:
- Click on the Edit link for Support Workflow.
- Name our new step,
Waiting for Info. - Select Waiting for Info for Linked Status.
- Click on the Add button to create the workflow step.
Now that we have our step added to our workflow, we need a way for our help desk team to get there, and the answer is to add a new transition. What we need is to be able to go after users for more information once our team has started working on the issue, and once the business users provide the information, the issue can then be handed back to the help desk team. So what we need to do is to add a new transition to the In Progress step that will link to the new Waiting for Info step:
- Click on the Add Transition link for In Progress step. This will bring up the Add Workflow Transition page.
- Name the new transition,
Request for Info. - Provide a helpful description such as
Request the business user for additional information. - Select Waiting for Info for Destination Step.
- Select No view for transition.
- Click on the Add button to create the transition.
We will also need to add another transition that will link the issue back to In Progress when the business users have provided the requested information:
- Click on the Add Transition link for the Waiting for Info step.
- Name the new transition,
Re-submit. - Provide a helpful description such as
Resubmitting the ticket back to support. - Select In Progress for Destination Step.
- Select No view for transition.
- Click on the Add button to create the transition.
With this setup, our team can continue requesting information if required. Now, we would want to make sure that only the currently assigned help desk team member can ask business users for more information, and to automatically reassign the issue back to the business user (reporter) so he/she will be notified. This means we need to add a condition and a post function to our transition:
- Click on the Request for Info transition link for the In Progress step.
- Click on the Conditions tab.
- Click on the Add link to bring up the Add Condition To Transition page.
- Select Only Assignee Condition.
- Click on the Add button to add the condition.
- Click on the Post Functions tab.
- Click on the Add link.
- Select Assign to Reporter.
- Click on Add to add the post function to the transition.
Now, only the team member who is the currently assigned the ticket will be able to request the business users for information, and when he/she does, the ticket will be automatically reassigned back to the business user. We will also need to do the same for the resubmit transition, so when the business user provides the requested information, the issue will be reassigned back to the help desk team:
- Click on the Re-submit transition link for the In Progress step.
- Click on the Post Functions tab.
- Click on the Add link to bring up the Add Post Function To Transition page.
- Select Assign to Lead Developer.
- Click on Add to add the post function to the transition.
With our workflow in place and set up, we need to let JIRA know which issue types will be using our new workflow, so we need to create a new workflow scheme:
- Browse to the Workflow Schemes page.
- Click on the Add Workflow Scheme button.
- Name the new workflow scheme,
Help Desk Workflow Scheme. - Provide a helpful description such as
Workflow Scheme for the help desk team. - Click on the Add button to create the workflow scheme.
We now need to associate our new support workflow with the appropriate issue types:
- Click on the Assign link for Support Workflow Scheme.
- Click on the Assign an Issue Type with a Workflow button to bring up the Add Workflow to Scheme dialog.
- Select Incident for Issue Type.
- Select Help Desk Workflow for Workflow.
- Click on Add to create the association.
- Repeat this for the Ticket issue type.
- Create another association for All Unassigned Issue Types; this time, select jira as the workflow.
This associates our new workflow with the issue types specifically for our help desk team project and uses the default workflow for the others.
We have created a status, workflow, and workflow scheme; all we have to do now is tell our project to use them all, and this is the easiest part:
- Browse to the Project Administration page for our Help Desk project.
- Select the Workflows tab.
- Click on the Switch Scheme button.
- Select Help Desk Workflow Scheme and click on the Associate button.
- Click on the Associate button again in the next screen for JIRA to migrate all existing issues to use the new workflow.
Wait for JIRA to finish migrating the existing issue and that's it, all done! We can now create a new ticket, and start testing our implementation. Since we need to simulate a scenario where a business user submits a ticket to the help desk team, we need to create a new business user and add him/her to the jira-developers group. We will look at user management and security in Chapter 8, Securing JIRA. For now, we will simply add a new user to our system:
- Browse to the JIRA Administration console.
- Select Users under the Users section.
- Click on the Create User button to bring up the Create New User dialog.
- Name the new user
john.doe (John Doe). - Set the password and e-mail address for this new user.
- Unselect the Send Notification Email option.
- Click on the Create button to create the user.
- Click on the Edit Groups link.
- Select jira-developers from the Available Groups list.
- Click on the Join button.
Now log in to JIRA as a new business user john.doe and create a new incident. After you have created the incident issue, you will notice that you cannot execute any transitions. This is because the issue is not currently assigned to you. You need to be the assignee of the issue (member of the help desk team) to start working on the issue. So let's log out and log back in as a member of the team (admin).
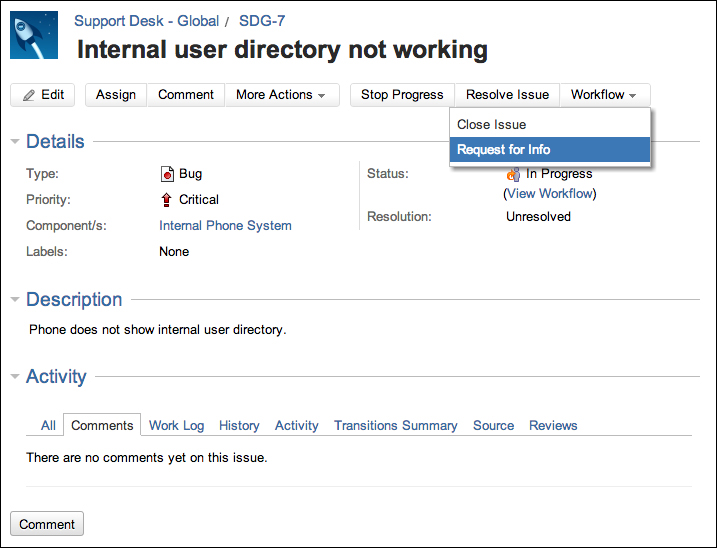
Once logged in, you will see familiar transitions such as Start Progress and Resolve Issue are once more available. If you click on the Workflow drop-down box, you will also see that our new Request for Info transition is listed as shown in the following screenshot:
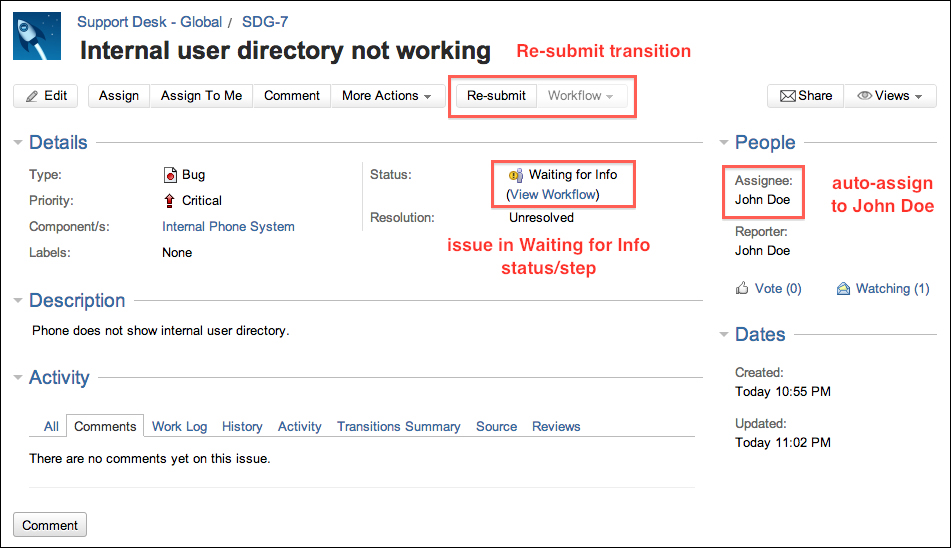
Executing that transition will place the issue in the Waiting for Info status and the Assignee field automatically changed to John Doe, the reporter of the issue, as shown in the following screenshot:
Try resubmitting the issue as the business user and you will see that the issue will be reassigned back to Administrator.
You will notice right now, even as a member of the help desk team, you are able to resubmit the issue, which is not ideal. As an exercise, you need to add a validation rule so that only the business user will be able to resubmit the issue back.