
10
Extract Meanings with Document Processing
Despite the push for the digitization of content for many years, there are still a lot of paper documents that require workers to read and interpret the information – whether it is structured data, such as tax forms, or semi-structured data, such as invoices, utility bills, and so on. This chapter describes how to set up an automated document processing pipeline using the Automation Document Processing (ADP) technology in IBM Cloud Pak for Business Automation.
In this chapter, we’ll cover the following topics:
- Example scenario - Bill of Lading
- Setting expectations for AI document processing systems
- Problem statement – automating inventory management systems
- Content classification and extraction with AI
- Building a document processing application
- Customized document types and data formats
- Data enrichment
- Data standardization
There are two major steps to setup a document processing pipeline; we will first train the document classification model so the system can identify the type of documents, and we will then train the extraction model to teach the system how to extract meaning from within the document itself. However, before we do that, let’s take a look at a simple example.
Technical requirements
The source code of this chapter can be found on GitHub at https://github.com/PacktPublishing/Intelligent-Automation-with-IBM-Cloud-Pak-for-Business-Automation/tree/main/Chapter%2010.
Example – a bill of lading document
Let’s take an example of a Bill of Lading document, which is one of the most important transport documents in international trade. It describes the contents of the shipment, its value, and the origin of the goods. It is still mostly written in paper form and is used for customs clearance, as well as for both the shipper and receiver to validate the contents of the shipment.
In many instances, where it is important to make sure the goods can be managed by an inventory system, there will be a team of human operators whose job is to adjust the inventory of a warehouse by taking information from the bill of lading document from a received package and enter it manually into an inventory system such as SAP:

Figure 10.1 – Bill of lading processing
Initially, the operators will be responsible for processing 100% of the information manually. We can automate this process somewhat by employing a combination of traditional OCR software and RPA bots to read the bill of lading document. However, since traditional OCR is more about recognizing the characters in a document, the software does not know whether a particular sequence of numbers is a phone number or a serial number. As a result, the majority of the work still requires human operators to interpret the information, particularly if there are multiple formats of the documents from different suppliers.
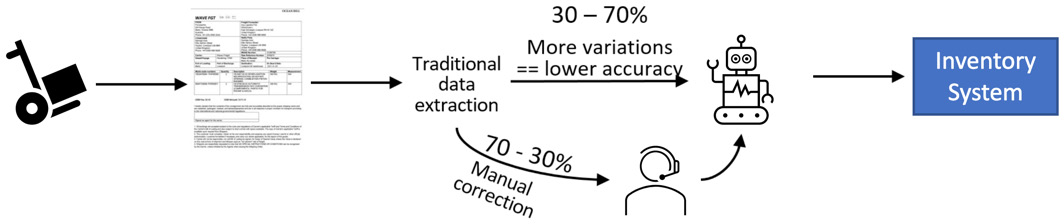
Figure 10.2 – Bill of lading processing with help from RPA
The purpose of ADP is to further increase the percentage of automatable data extraction. This is possible because, in addition to OCR, ADP applies a mix of AI techniques, for example, visual recognition, machine learning, deep learning, business rules, and heuristics, to derive meanings from the document in context.
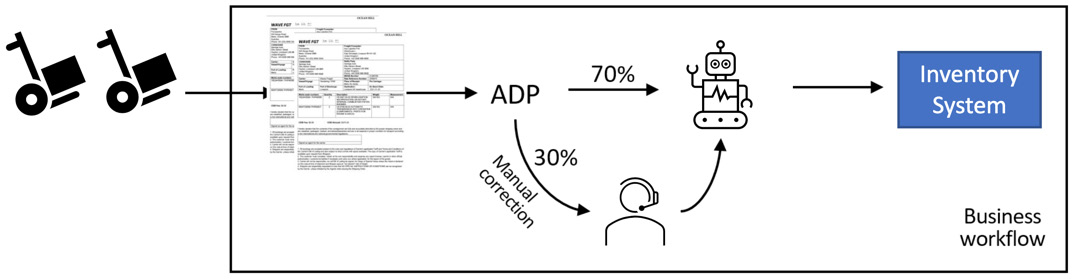
Figure 10.3 – Bill of lading processing with document processing
In the beginning, when the system is still learning, it might only be able to process 70% of the documents, and the remaining 30% of the documents would still require manual human processing. The goal is that, over time, ADP will be able to learn more about document formats and will be able to raise the accuracy rate of automated processing to the point where only a small portion of the work will be carried out by human operators.
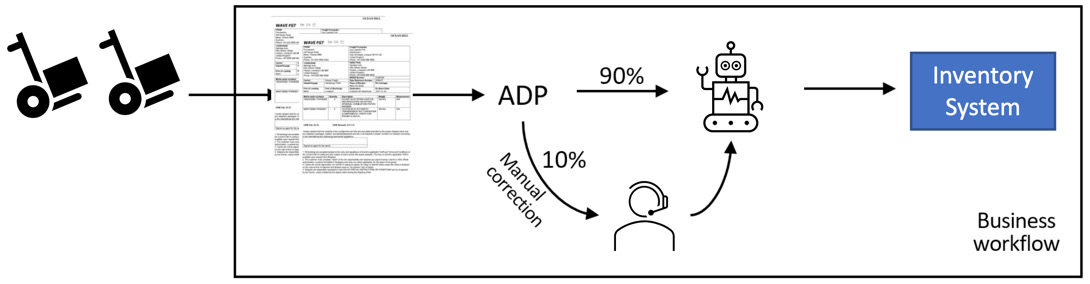
Figure 10.4 – Bill of lading processing with document processing over time
The preceding example shows how we can significantly speed up the processing of document-based information. However, AI is not magic, so we should set realistic expectations on what AI can and cannot do.
Setting expectations for AI document processing systems
Here are the expectations for AI-based document processing systems such as ADP:
- High accuracy (> 80%) can only be achieved with sufficient training documents. Accuracy will be higher for document formats that the system have seen before.
- AI training takes time. This is particularly true for a deep learning model. So having a system with access to a Graphics Processing Unit (GPU) is essential during the training process.
- At this point in the technology curve, an expert human operator will still likely produce better results. On the other hand, AI can produce more consistent results and can be scaled based on available computing resources.
Now, let’s examine how ADP can help with a specific use case.
Problem statement – automating inventory management systems
A bookstore would like to automate part of its inventory management system. In particular, the bookstore will receive book shipments from various publishers, and normally, a staff member of the bookstore verifies the shipment content against the invoice and then enters the invoice information into the bookstore’s inventory system. In our example, we would like to automate the entering of the information by teaching the machine to read the invoice and extract shipment details from it.
Content classification and extraction with AI
To get started, we will create a new document processing automation project within Business Automation Studio by selecting Document processing on the landing page of the studio:
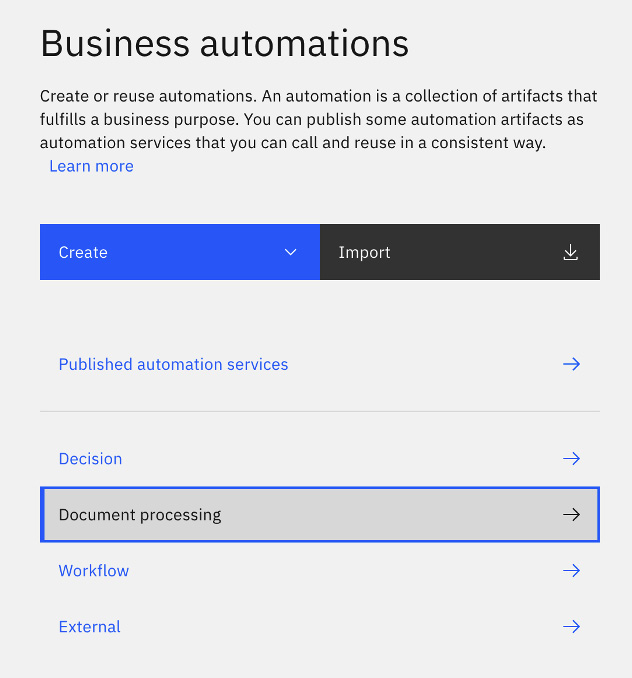
Figure 10.5 – Creating a document processing automation project
For this example, we will create an automation project called ADP and use it to train our document extraction model:

Figure 10.6 – Document processing automation project overview
Upon opening the project, there are three major sections: Build, Enrich, and Configure:
- Build: This is what we will be spending most of our time on. Here, we will deal with the following options:
1. Document types and samples: Here, we will define the document types that can be recognized by this automation and upload sample documents for training. By default, any project will be pre-populated with three pre-trained document types (Bill of Lading, Invoice, and Utility Bill).
2. Classification model: Here, we will teach the system how to recognize the different document types.
3. Extraction model: Here, we will teach the system how to extract information for each document type based on the classification.
4. Data standardization: This allows further refinement of the extracted information. For example, we want to standardize all dates to be formatted as YYYY/MM/DD. Having a standardized data format will help with any subsequent automation processing.
5. Document retention: This allows us to define how long we want our documents to be kept in the system. Documents that have exceeded the retention period will be automatically expunged. This could be important for regulatory compliance or for managing the overall storage size.
- Enrich: In this section, we can define additional enrich rules. An example of an enrich rule is to specify the expected format for an invoice number (all numerical) or a driver’s license. The more we can tell document processing about how different data will be formatted, the higher the chance it will recognize the information.
- Configure: This is where we can configure other operational aspects of the project, such as the Git repository that we want to use to store the project details.
Let’s first examine what we have in the Document types and samples section.
Document types and samples
Selecting the Document types and samples section opens a new page where we can examine the available document types and samples that we have in the project. There are three built-in document types – Bill of Lading, Invoice, and Utility Bill. In our example, we will be extending the Invoice document type. However, automation developers can also define new document types depending on the specifics of the business scenario.
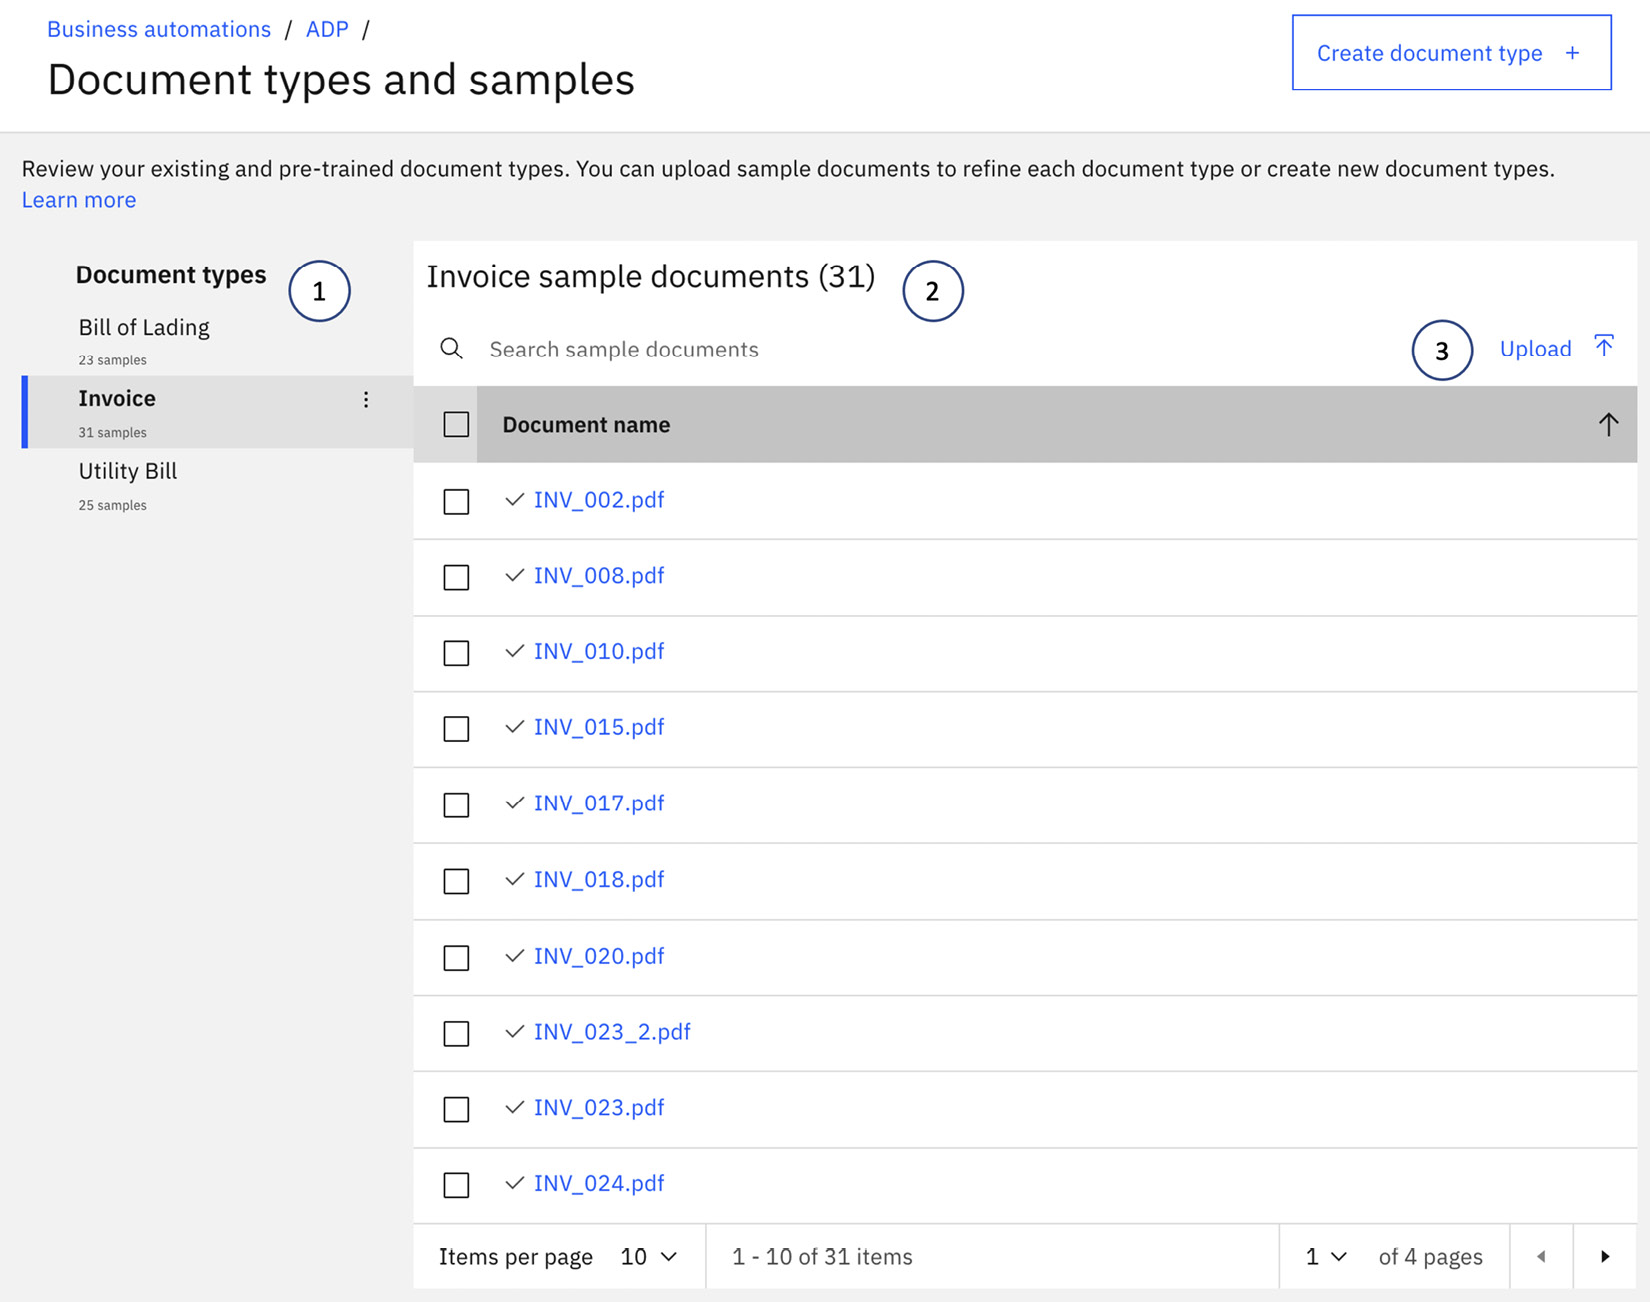
Figure 10.7 – Sample documents per document type
These points describe the preceding screenshot:
- Document types: This is a list of the available document types in this project. For each document type, automation developers will have to teach document processing how to recognize it by identifying the key information that would be expected.
- Invoice sample documents: This is a list of all available sample documents of a given type. By default, the project provides a set of sample invoices. To improve accuracy, we must supplement the built-in set with additional samples that better match our intended use case.
- Upload: To add additional sample documents, we can use the Upload option.
For this exercise, we have prepared a couple of sample invoices, and we will upload the first one (Packt Invoice 1.pdf), as shown in the following screenshot:

Figure 10.8 – Upload of new sample documents
Once the document has been successfully uploaded, we can preview the document by selecting it:
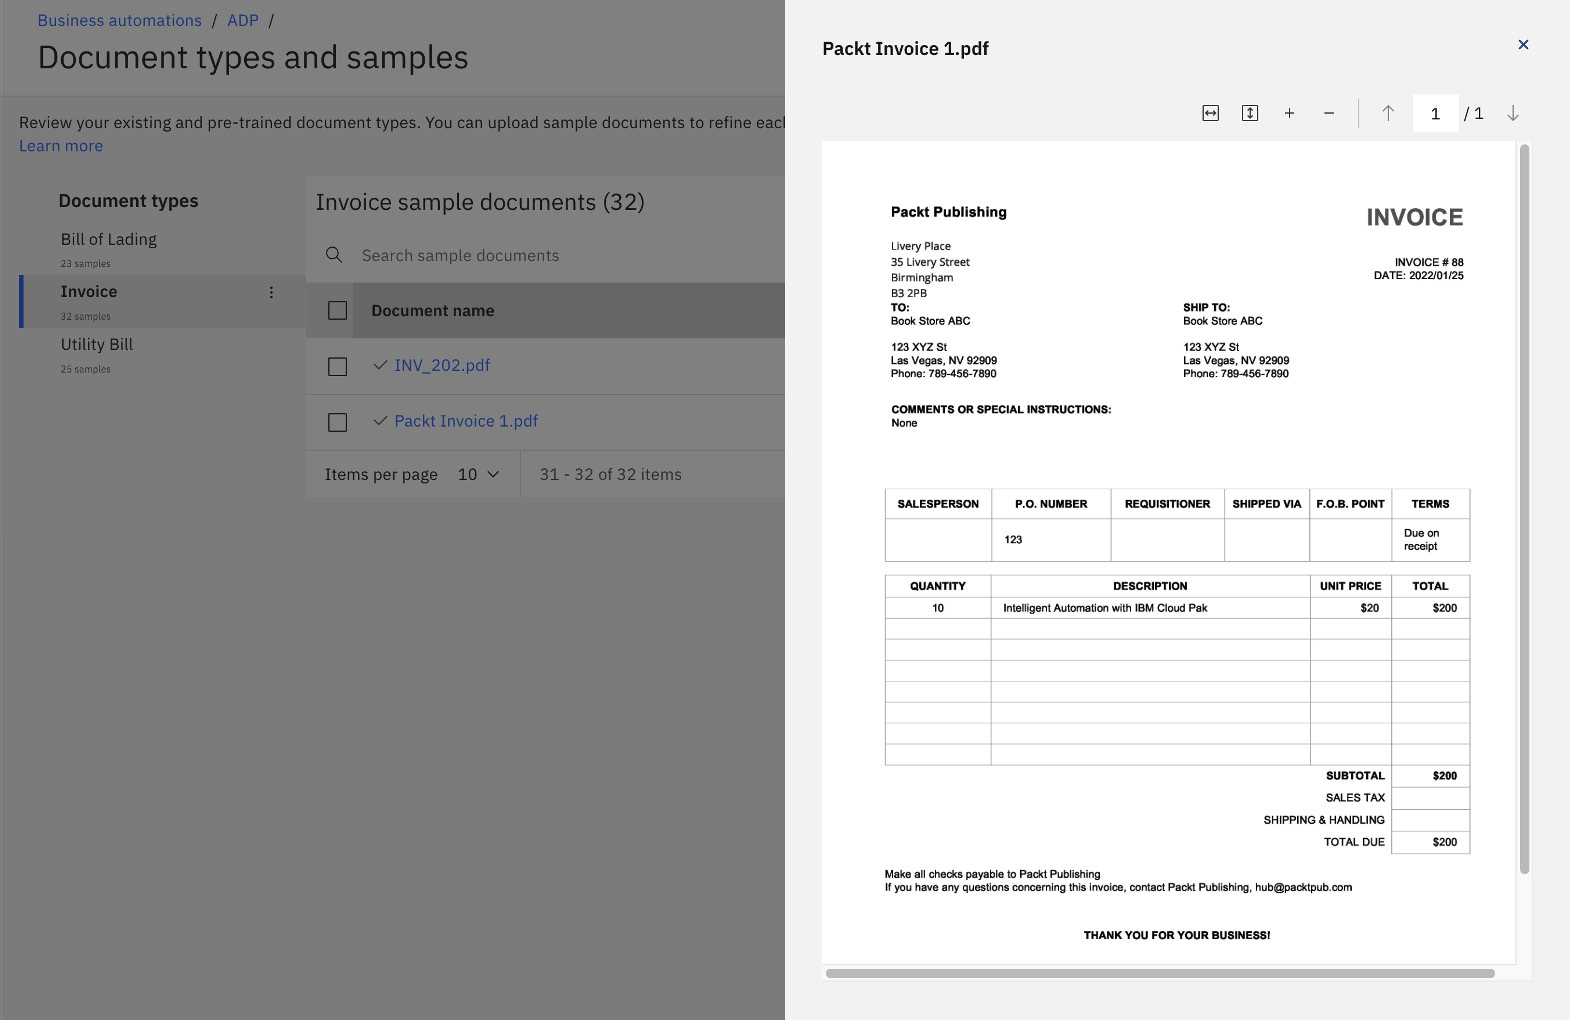
Figure 10.9 – Sample invoice document
In the sample invoice, Packt Publishing is sending 10 copies of the book Intelligent Automation with IBM Cloud Pak to a fictitious bookstore Book Store ABC. The invoice also specifies the unit price ($20) and the total amount ($200). What we want to do is to teach document processing how to recognize the invoice and extract information from it.
Once we are done uploading the new sample document, we can go back to the initial project overview page, and we now see two Retrain alerts – one for Classification model and one for Extraction model. This is because the system is no longer certain whether the new samples will introduce any changes in the underlying AI model and is suggesting that we should rerun the training.
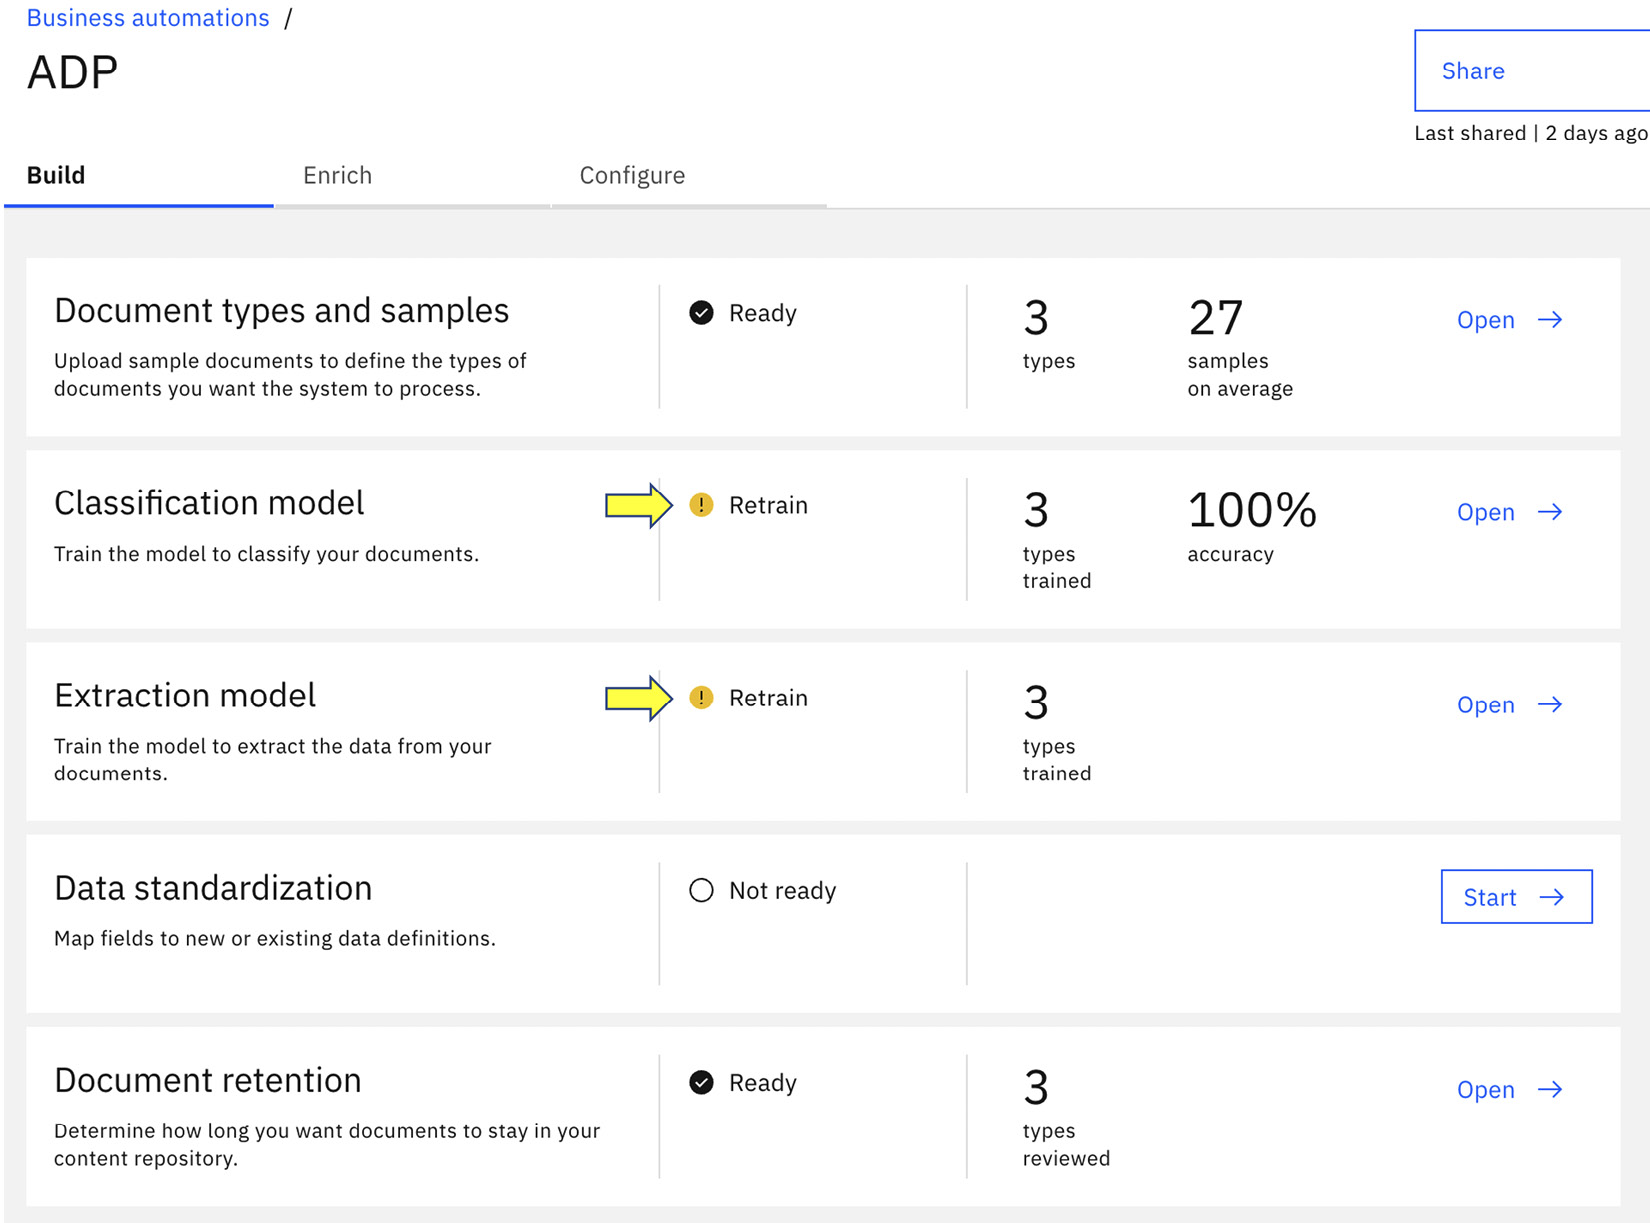
Figure 10.10 – Retrain alerts for Classification model and Extraction model
Next, let’s look at the Classification model option.
Training the classification model
Once we open the classification model, we will be presented with details on how to perform the retraining. There are four basic steps – Confirm inputs, Review samples, Review training results, and Test trained model.
Confirm inputs
Here, we can confirm all the documents that will be used in this training exercise. We can also use this opportunity to remove documents that are no longer relevant or upload additional documents.
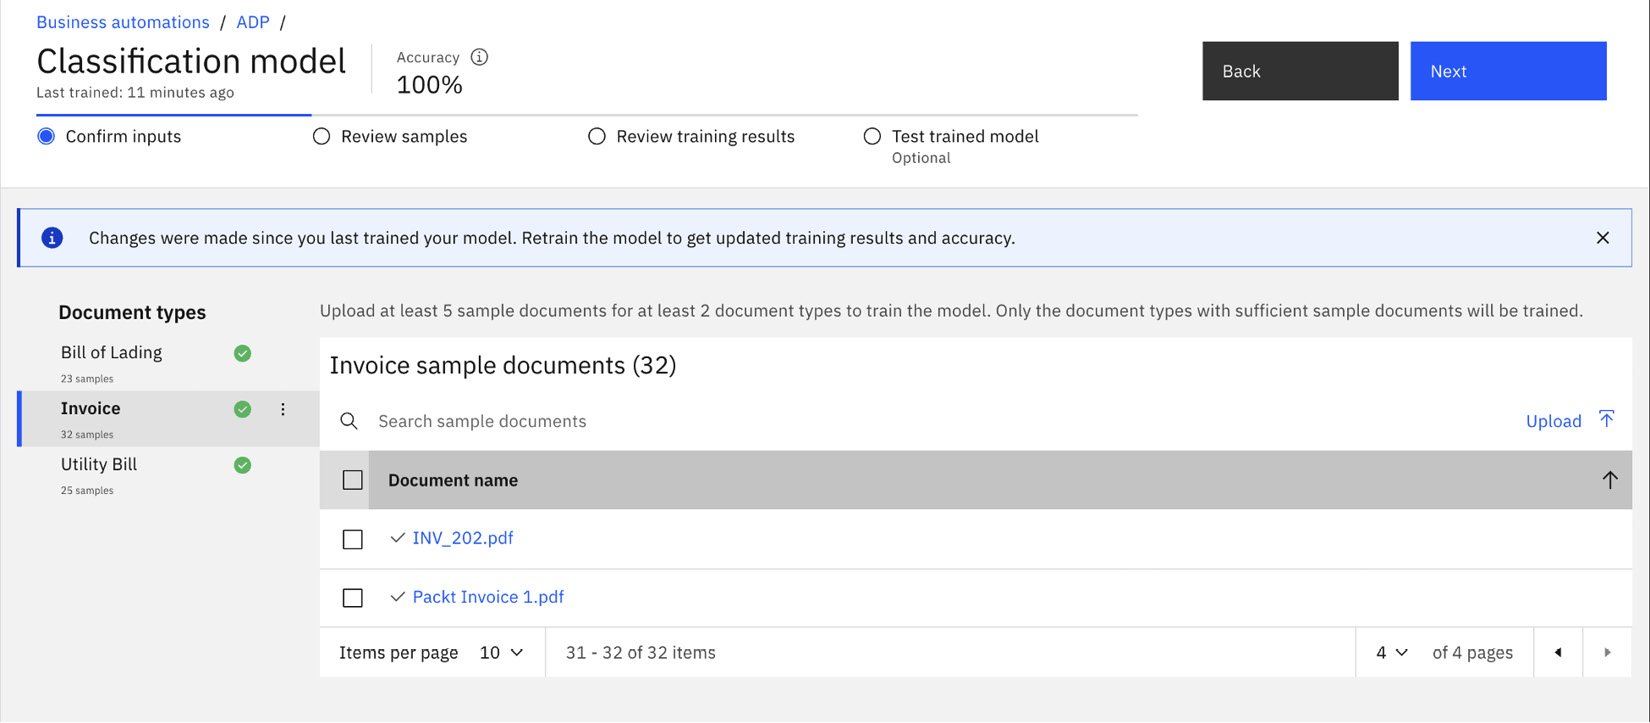
Figure 10.11 – Verifying the set of sample documents
Review samples
Review samples is where we will set up how we will perform the training by telling the system which documents we should use as the training set and which documents we should use as the test set. The suggested split is 70/30 – that is, 70% of the available sample documents should be used for training, and we will validate the training results with 30% of the sample documents. This split is only a suggestion, and we can adjust it, but 70/30 is a good starting point.
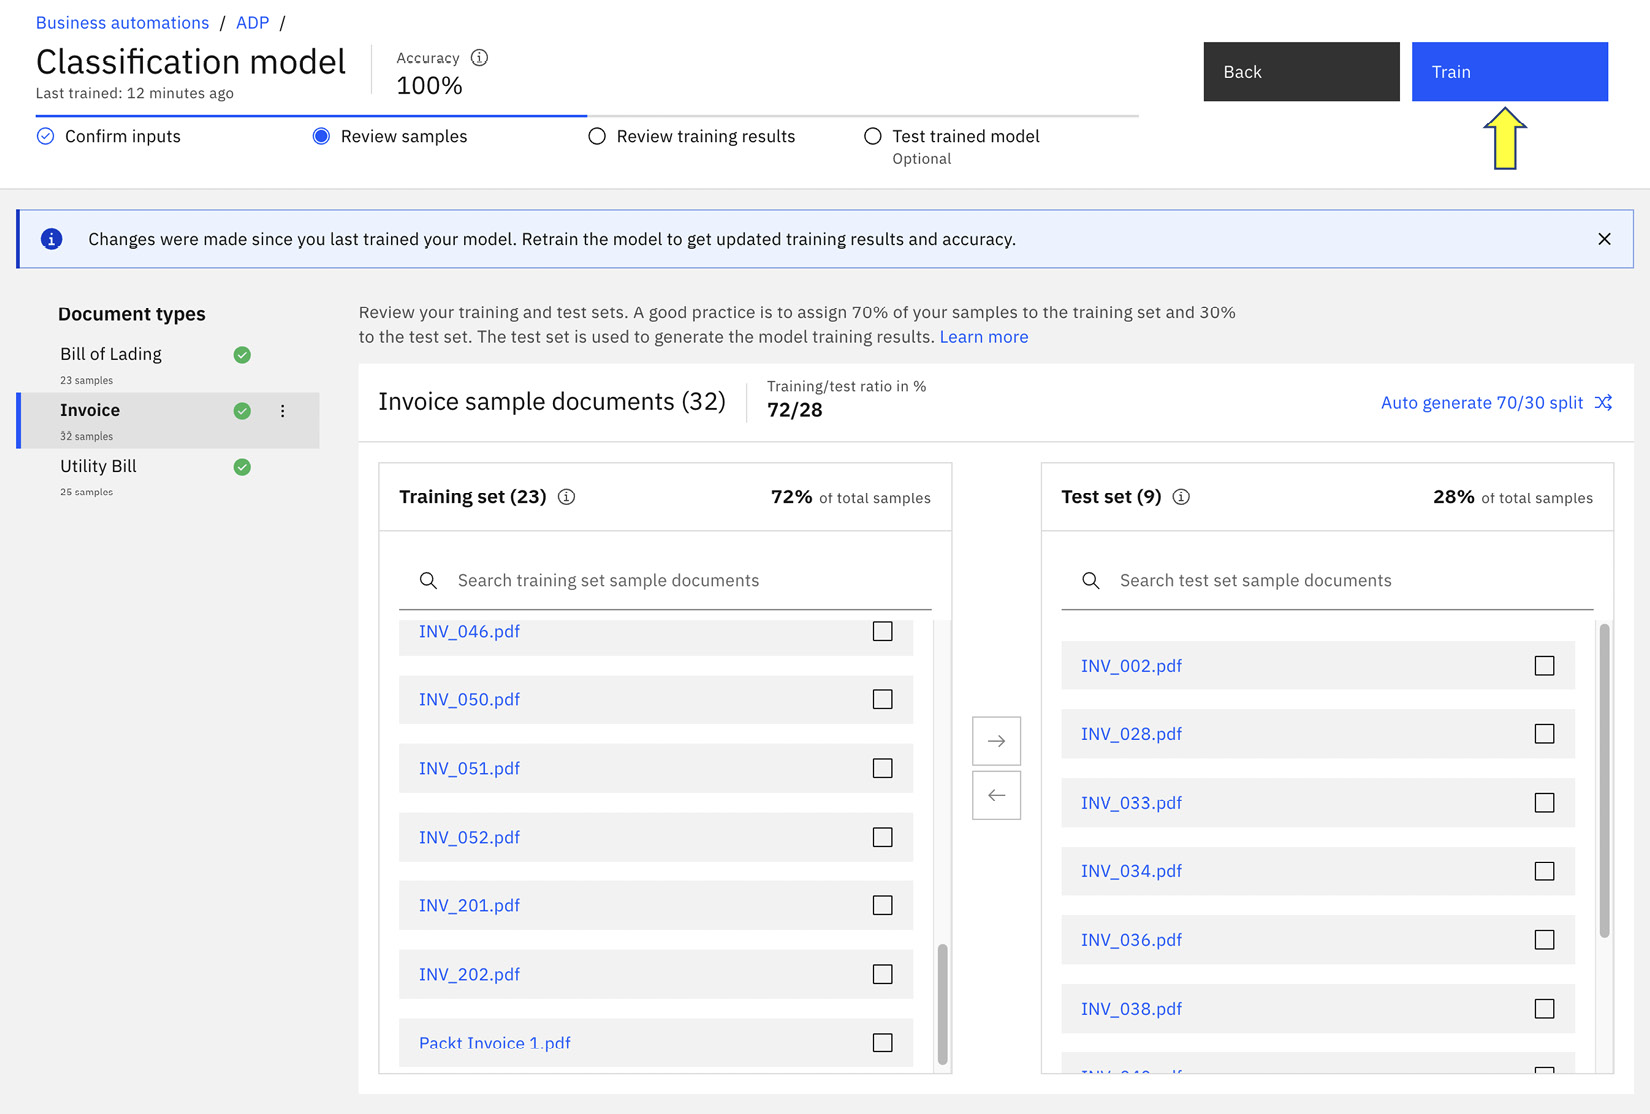
Figure 10.12 – Verifying the training set and test set
Assuming we are happy with the split, we can click the Train button. This will start a background job to train the document using a built-in machine learning model. Depending on the number of document types and sample documents, this can take several minutes.
Review training results
Once the training is completed, we will be presented with the training results in Review training results. In our example, document processing should be able to recognize all the documents, including the new sample we added as Invoice. We can check whether the result is to our satisfaction, and if not, we can go back to add more sample documents or adjust the training and test sets.
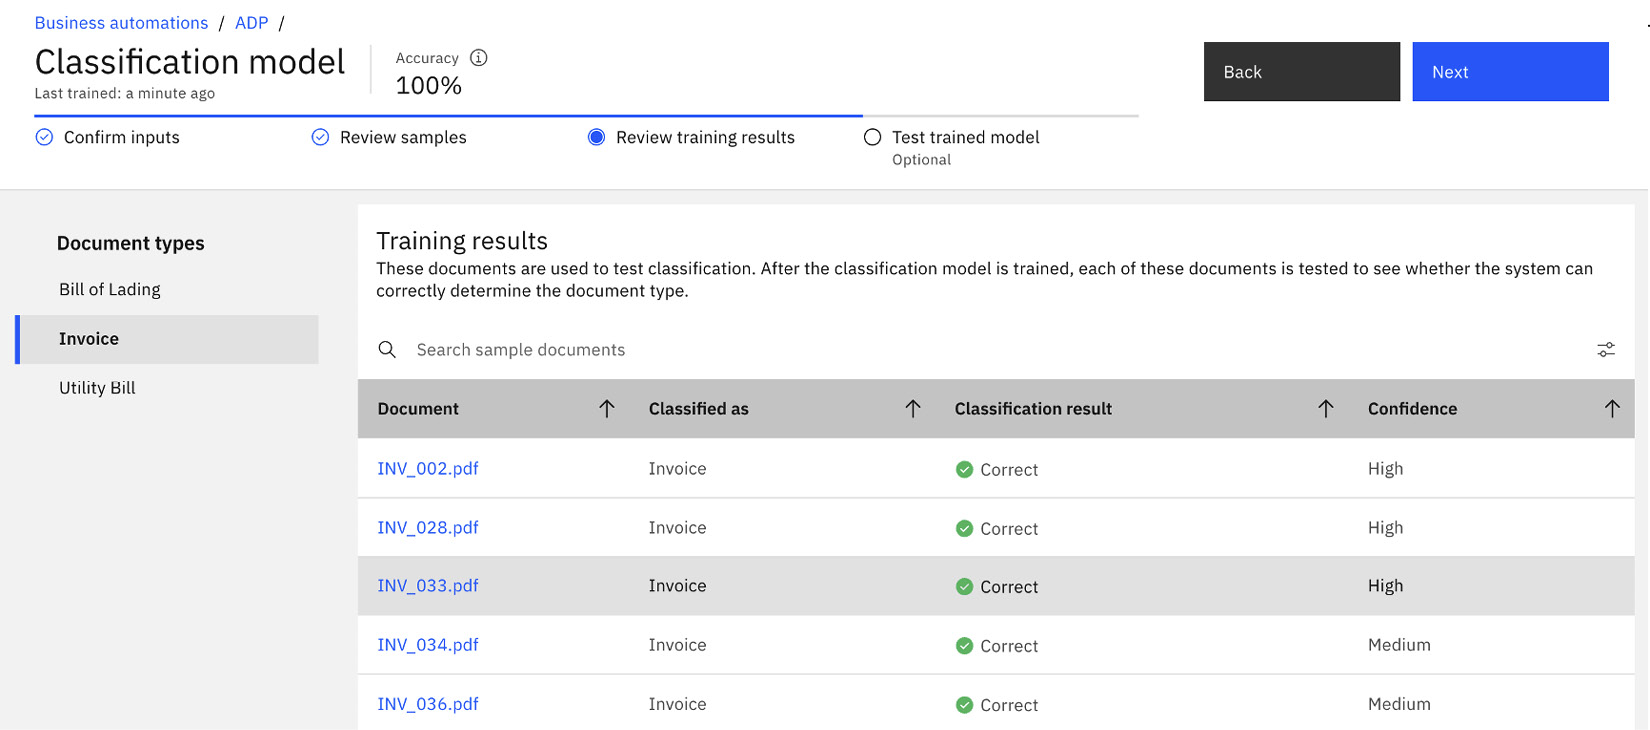
Figure 10.13 – Reviewing training results for the classification model
Test trained model
In Test trained model, automation developers can upload new documents to test the training model. This step is optional but would be useful to try out the AI model to determine whether additional samples are necessary. In our example, we uploaded a new invoice from Packt Publishing to make sure it is classified correctly:
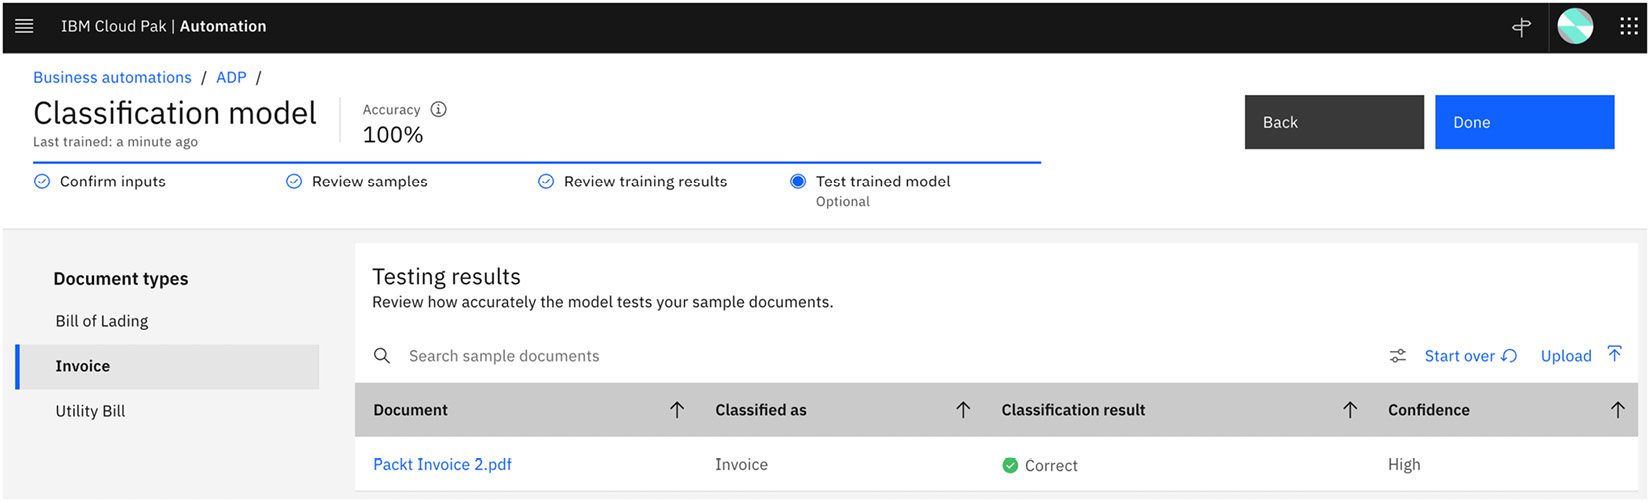
Figure 10.14 – Testing the newly trained classification model with a new sample document
With the classification model’s accuracy at 100%, this is as good as it can get at this point. We are now ready to tackle the extraction model.
Training the extraction model
When we go back to the project overview page, we now see that we have completed the Classification model training with 100% accuracy, but there is still a Retrain alert for Extraction model. In general, automation developers will spend most of their time on document processing to teach AI how to extract information from documents.
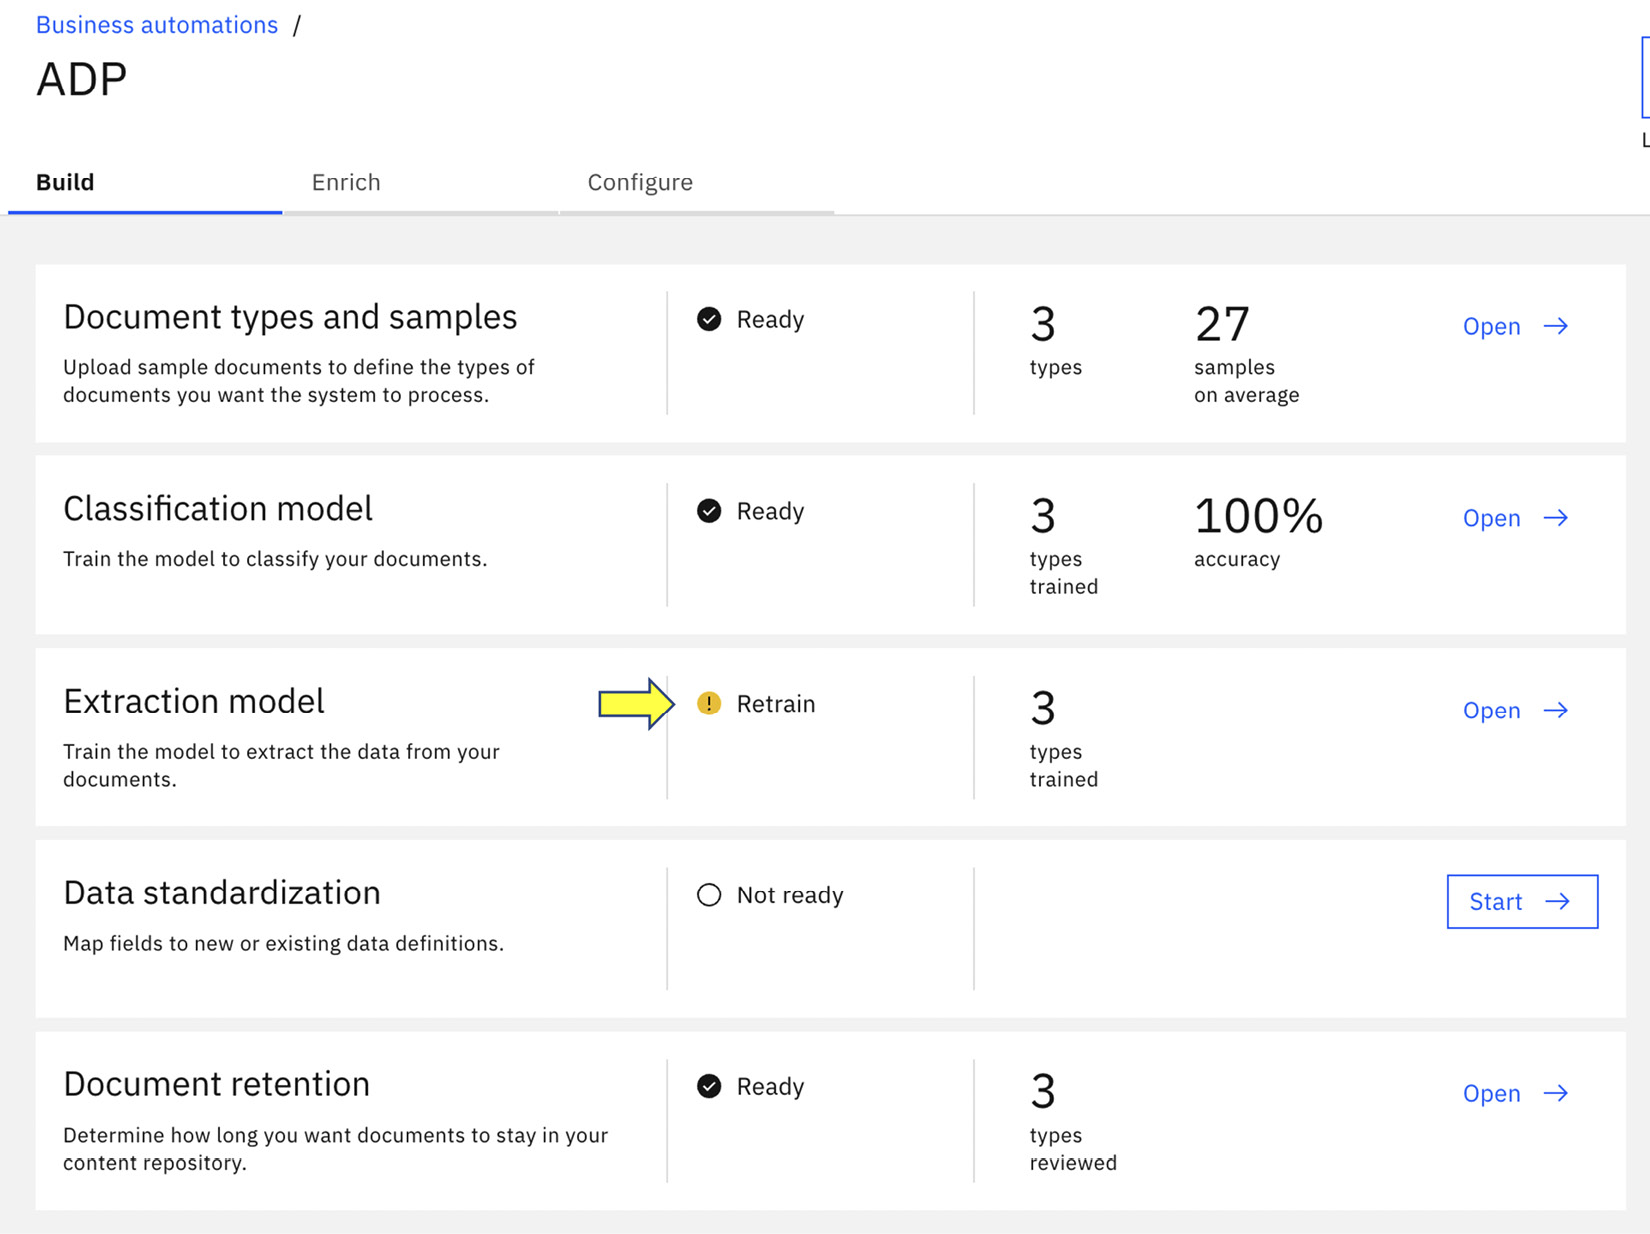
Figure 10.15 – Retrain the extraction model
Once we open Extraction model, we will be presented with details on how to perform the retraining. There are five basic steps – Review samples, Add fields, Teach the model, Review the trained model, and Test the model.
Review samples
This is like the Review samples step in Classification model. This is where we will set up how we will perform the training by telling the system which documents we should use as the training set, and which documents we should use as the test set. The suggested split is 70/30, however, in this case, as we are extending from the built-in sample, we can use the existing split (94/6). In general, deep learning-based AI requires a larger number of sample documents to achieve a reasonable result.
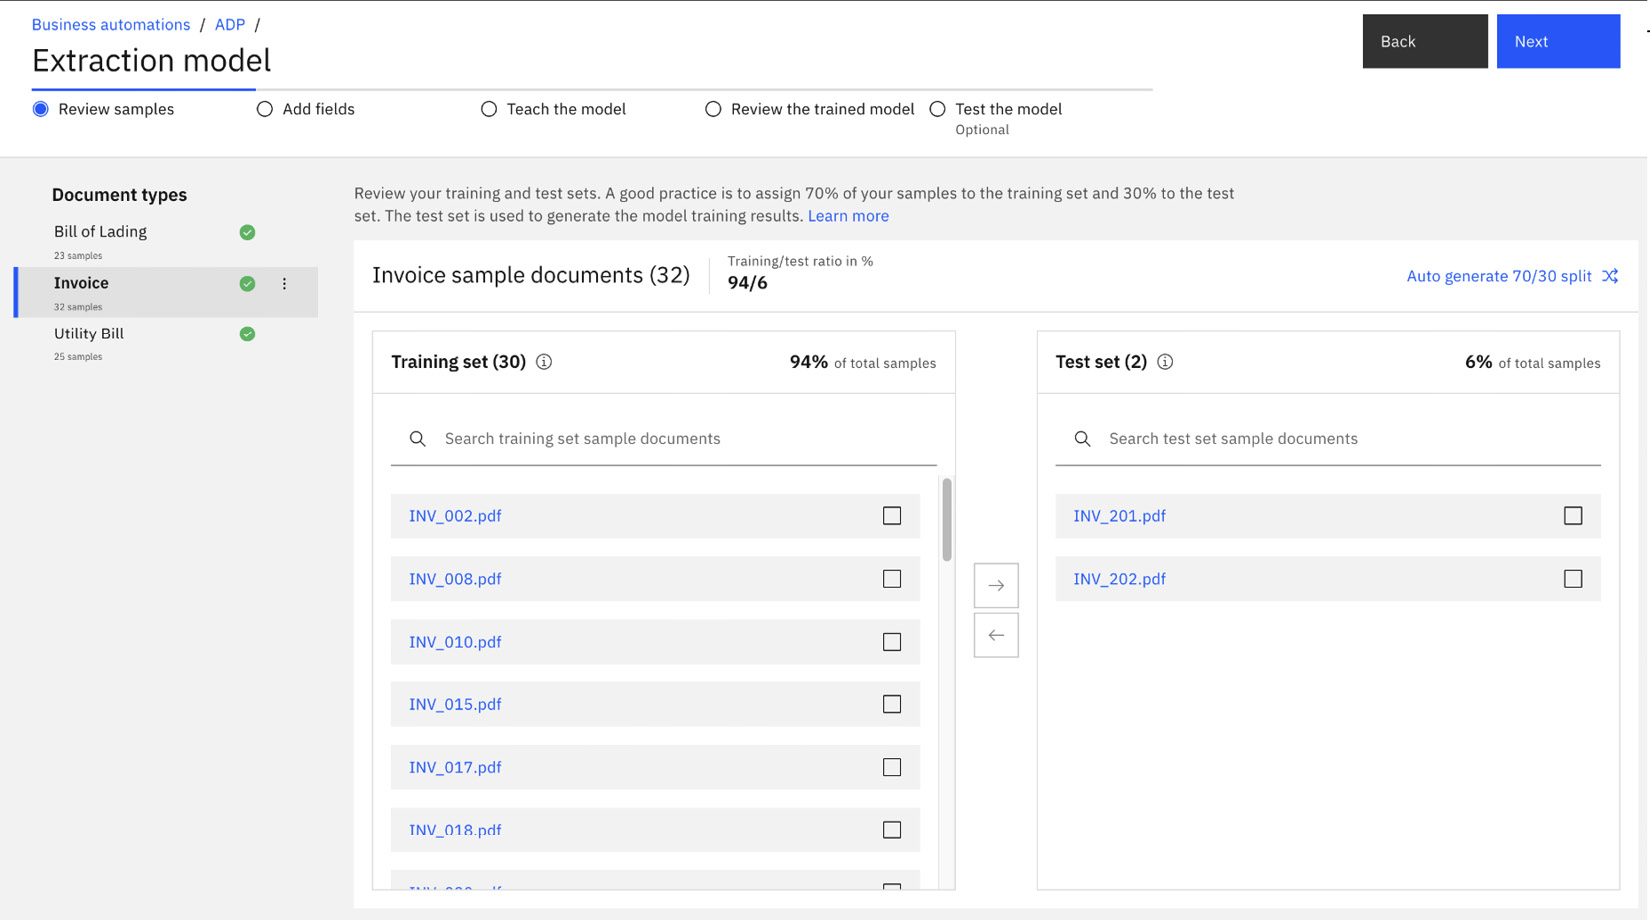
Figure 10.16 – Validating the training set and test set for the extraction model
Add fields
Add fields is where we configure the system to extract more information from the invoices. Since we are not introducing any additional data, we will skip it for this exercise.
Teach the model
Teach the model is where automation developers will spend most of their time. When we go to the last page of the sample documents, we will see that document processing has highlighted the new invoice Packt Invoice 1.pdf as Not Ready:
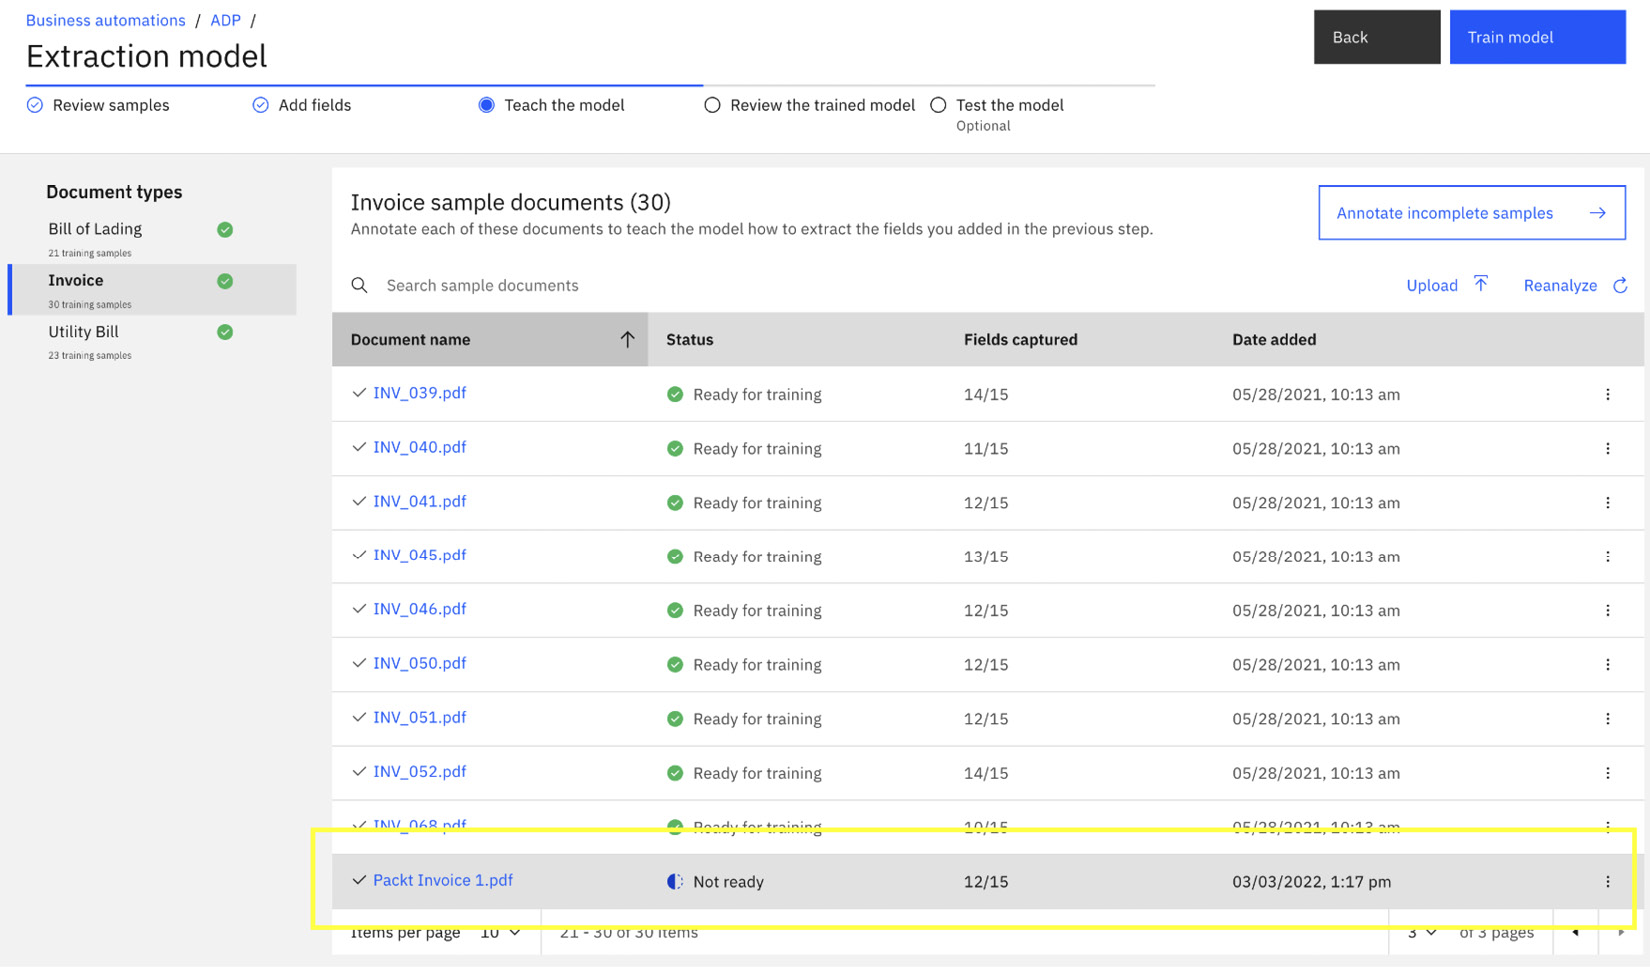
Figure 10.17 – Teach the model with new documents
We can click on the document and open its training profile. Document processing will use the existing extraction model to extract information from the invoice.
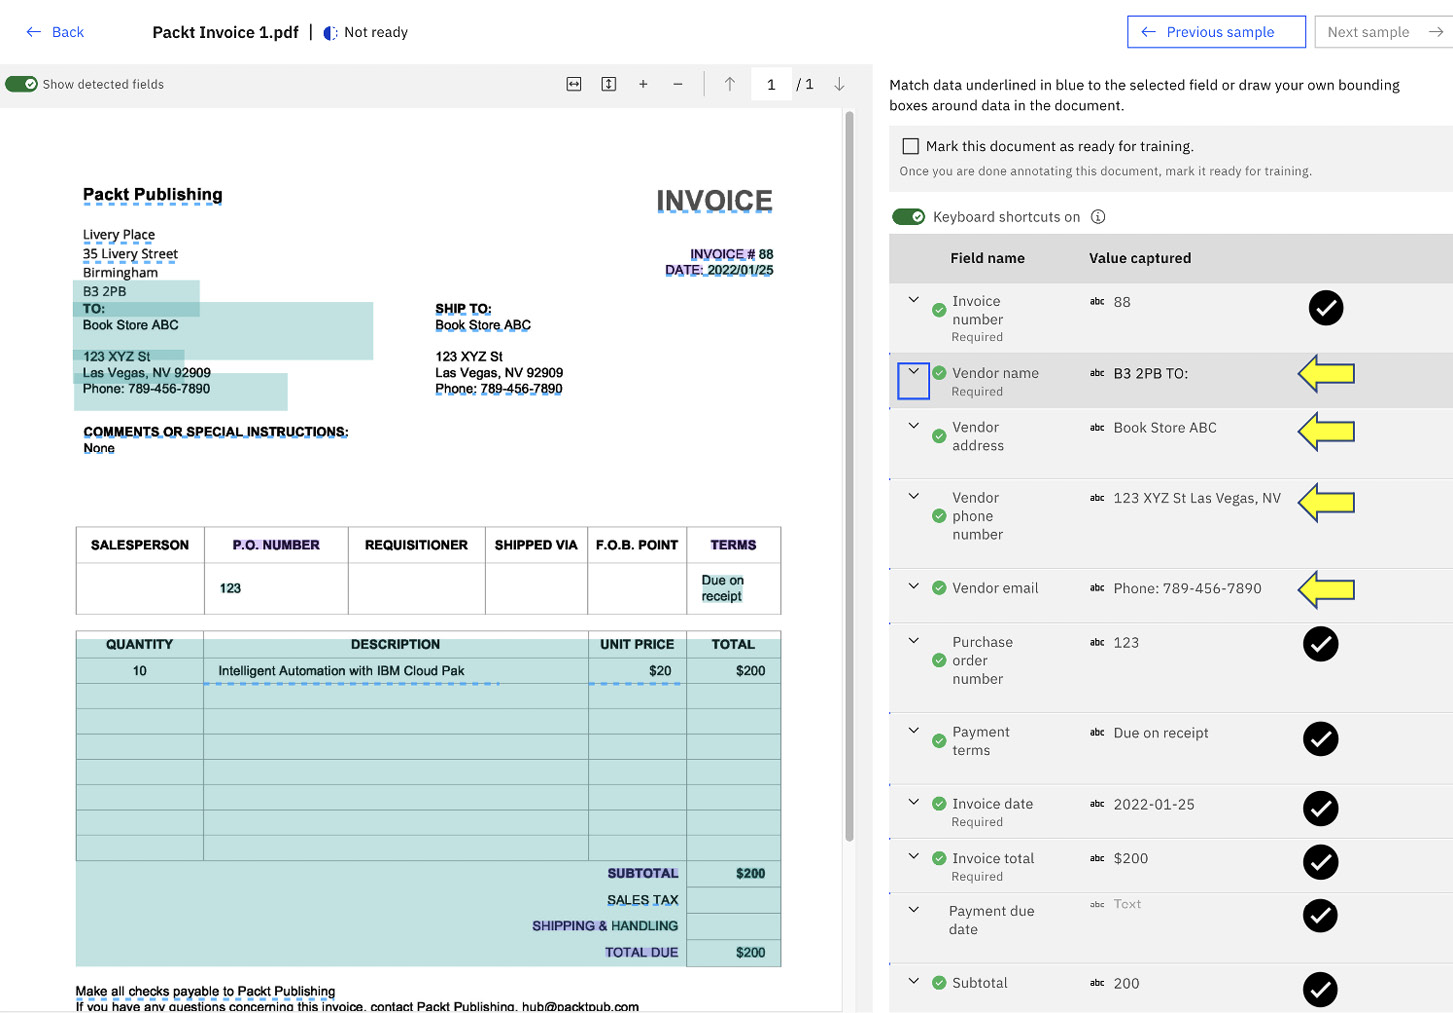
Figure 10.18 – Validate the correctness of the extraction
Even though this is the first time the system has seen this document, we can see from the preceding screenshot that out of the 11 fields extracted, 7 were correct, and 4 were incorrect (Vendor name, Vendor address, Vendor phone number, and Vendor email). We will notice, in this case, that the system has mistaken the shipping address for the vendor address. Our next step is to teach the system how to correctly recognize the information.
We can do that by expanding the Vendor name field, which allows us to see where it is getting the information from:
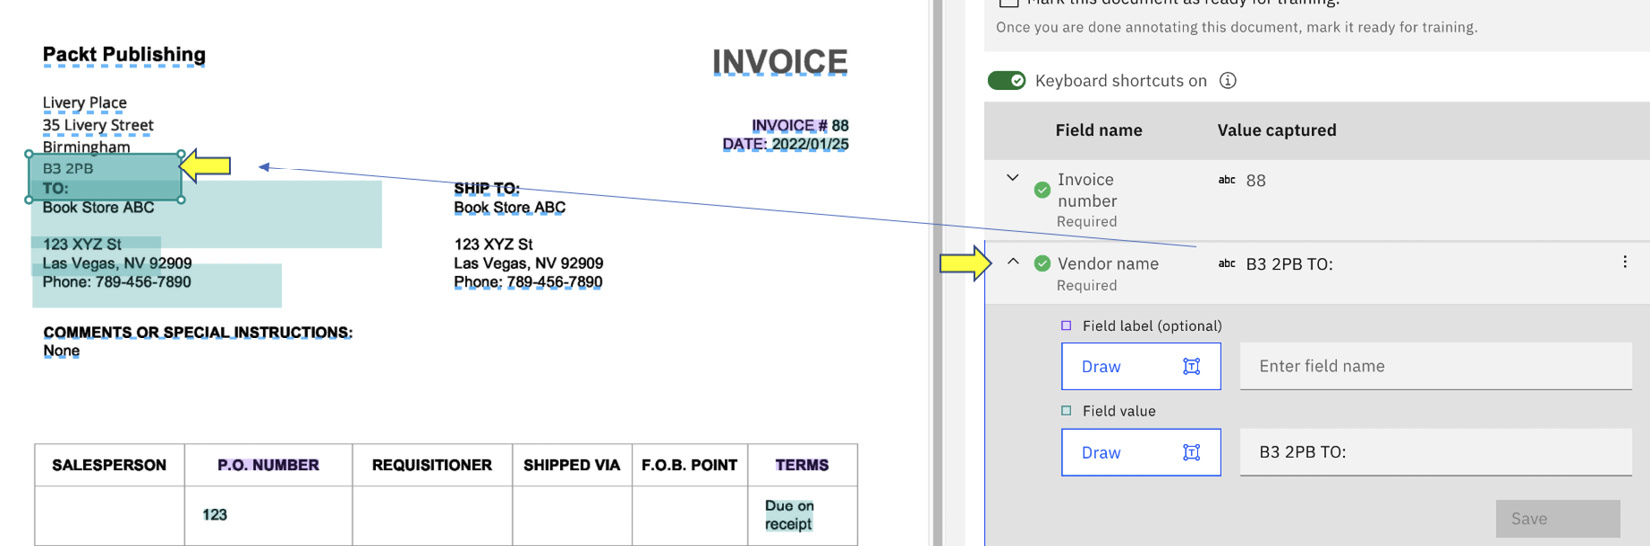
Figure 10.19 – Identifying the extraction source
What we need to do now is to suggest to the system where it can obtain the correct vendor name by selecting the Draw button to redraw the location of the information. Once we redraw the location, the system will make use of its built-in OCR engine to extract the correct information from the document.

Figure 10.20 – Correcting the extraction source
We will have to go through similar steps to teach the system how to recognize the remaining fields. Once we have completed that teaching, we can select Mark this document as ready for training.:
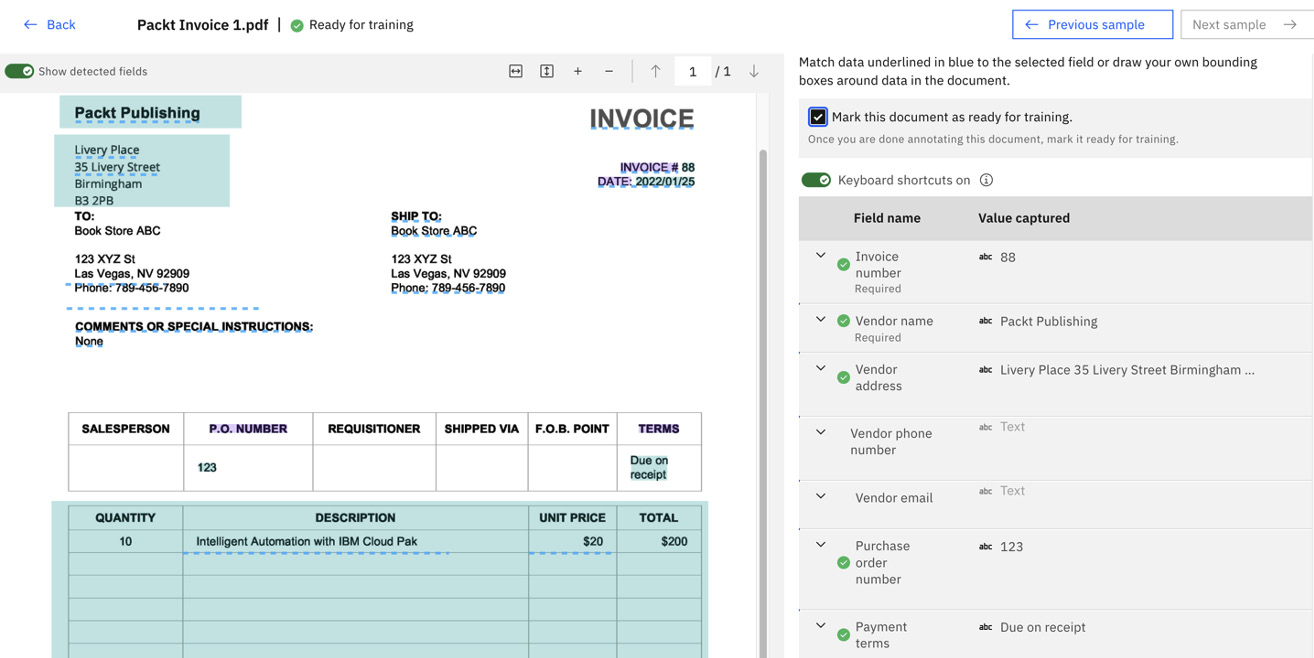
Figure 10.21 – Mark this document as ready for training.
We can now go back to the Extraction model page and select Train model to start the training:

Figure 10.22 – Starting the training process
At this point, we will be presented with the following dialog that tells us model training might take several hours to multiple days:
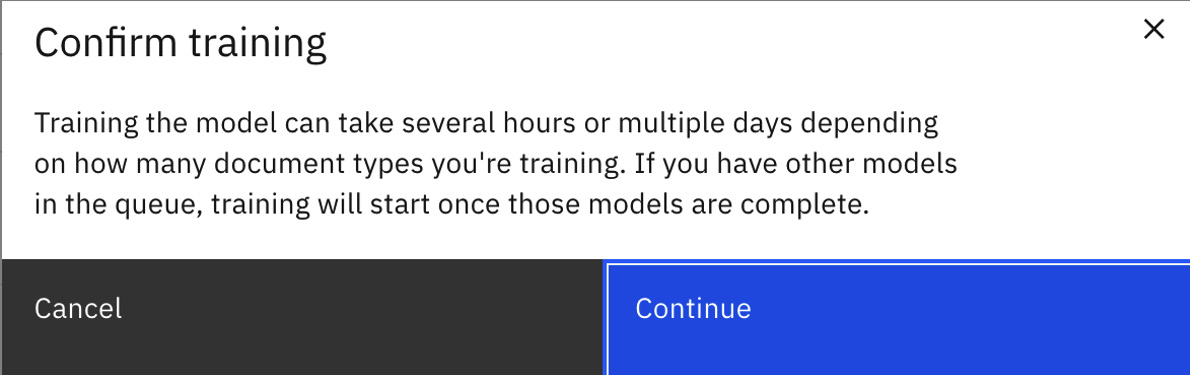
Figure 10.23 – Training a deep learning model takes time
Internally, document processing uses a deep learning model for data extraction to create a flexible extraction model that will allow us to extract information from documents it has not seen before. This also means getting access to a GPU-enabled system is important as that will speed up the training process dramatically.
Review the trained model
Once the training is completed, we can review the training results in Review the trained model. In the summary, we can see for Invoice, we have instructed the system to look for 15 fields, and the system was able to find 13.5 fields on average with High Average confidence:
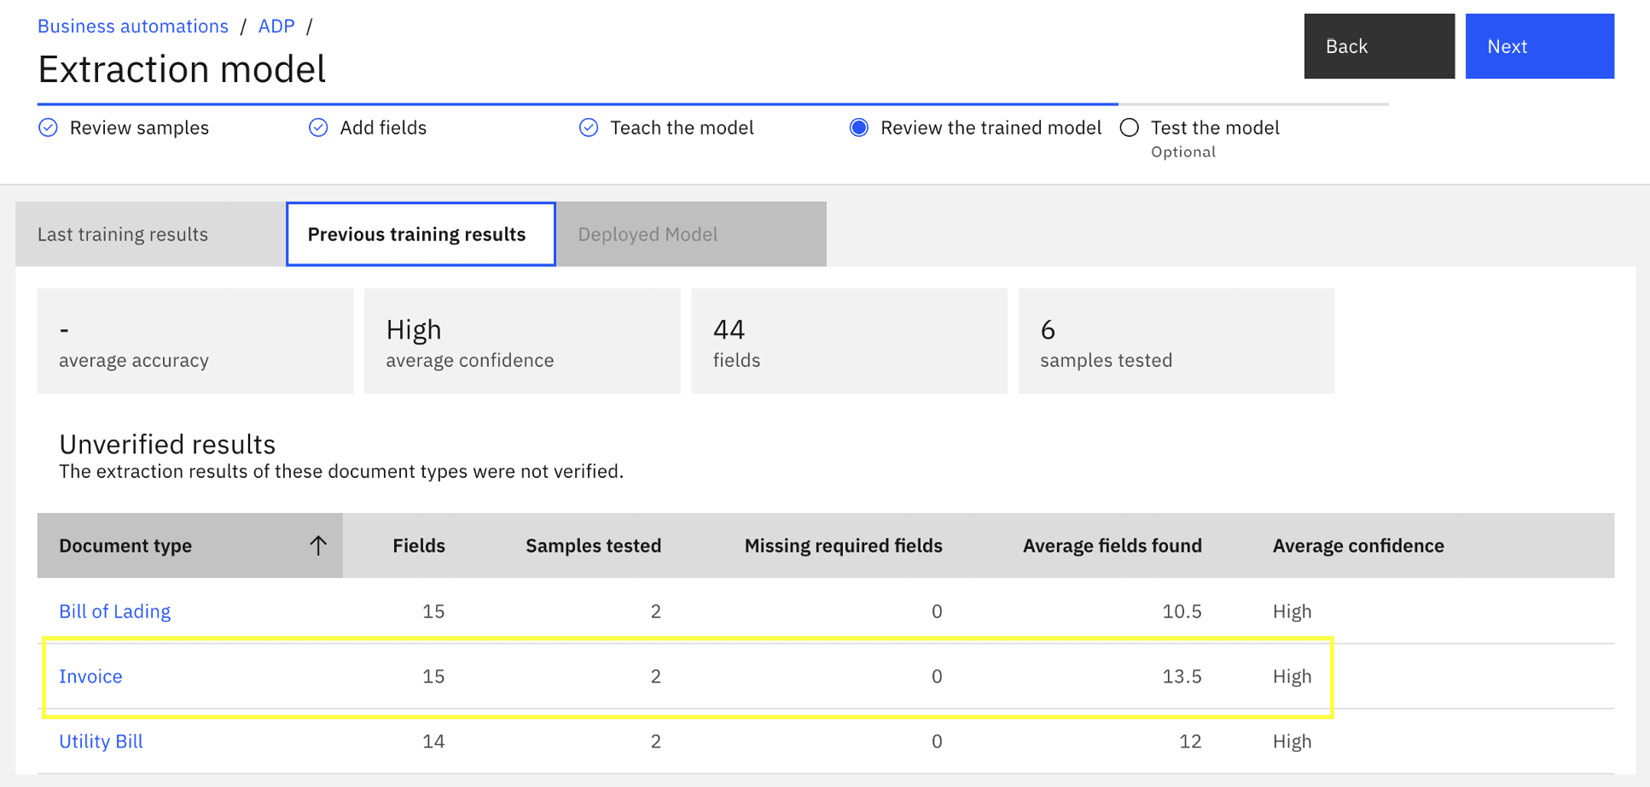
Figure 10.24 – Review trained models
It is possible in certain cases that the system is not able to identify all the fields or it has low confidence. In those cases, additional samples and retraining will be needed to increase its confidence.
Test the model
To validate the trained model is sufficient for our purposes, we will upload a new document for extraction in the Test the model section:
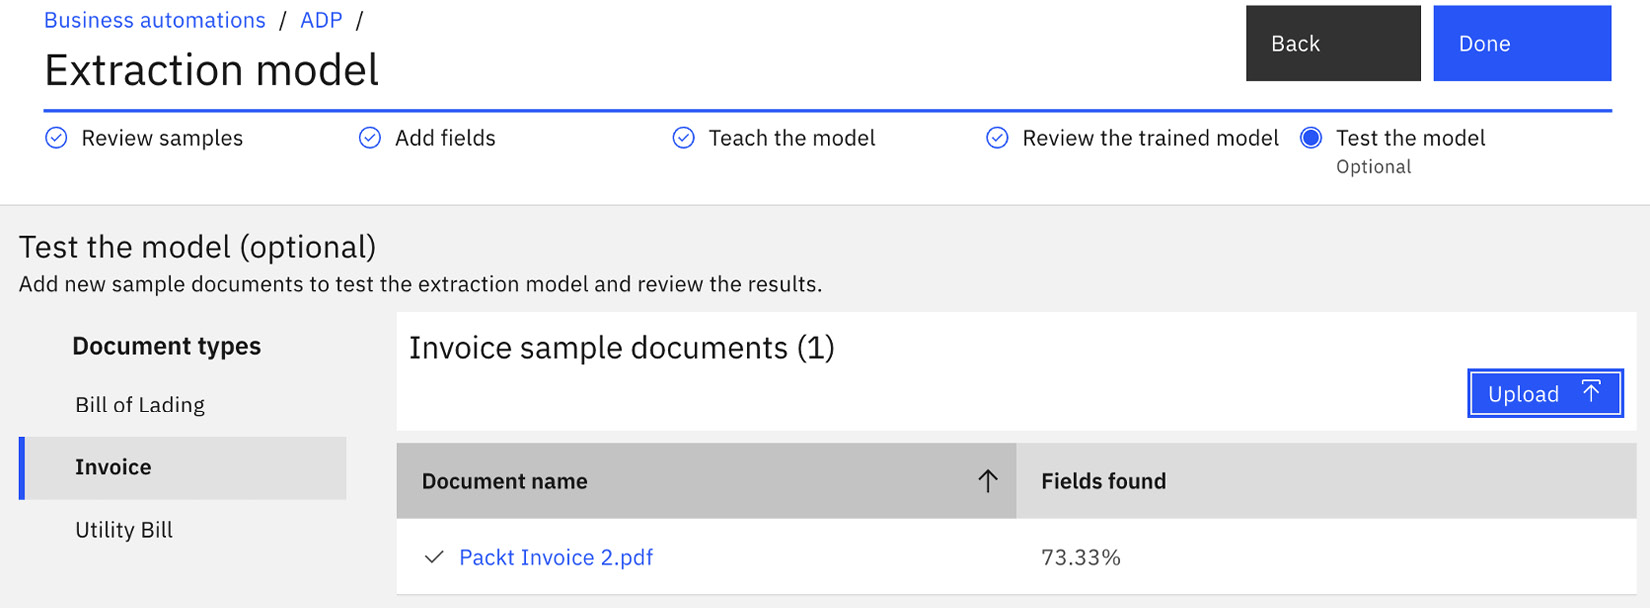
Figure 10.25 – Test the trained model with new documents
When we examine the extracted data, we notice the system has got most of the information correct, except for Invoice number and Vendor phone number:
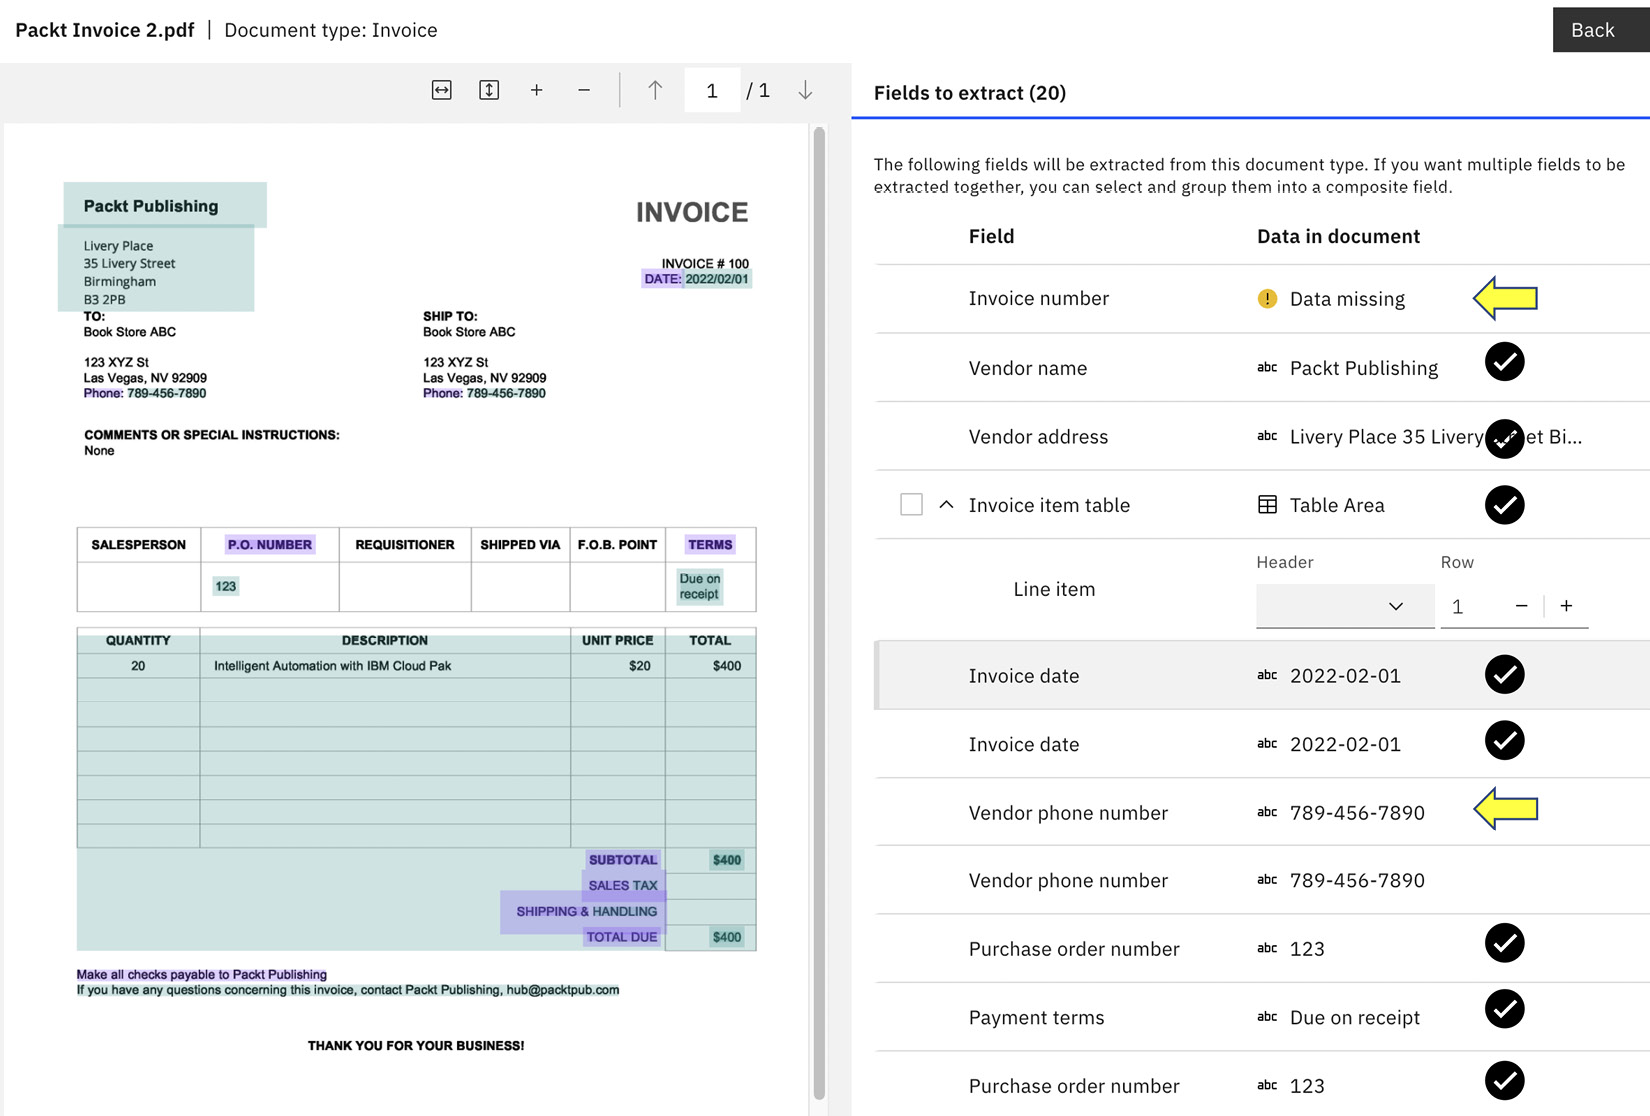
Figure 10.26 – Validating field accuracy with new documents
Since we have only supplied one sample document from Packt Publishing for the training, there is probably not enough data to build a robust extraction model. At this point, we can decide whether that is good enough for the automation application. If we want higher accuracy, we can supply more sample documents and go through the training process again.
Now that we have completed our training, we can build an application that will make use of the information extracted from the document.
Building a document processing application
Before we can build a document processing application, we will need to deploy the business automation project.
Here are the steps for deploying the ADP project:
- Go back to the main project screen and click on the Version / Deploy button for the project:

Figure 10.27 – Version / Deploy project
- Since this is a new project, there is no previous version, so we will need to save a new version by clicking Save a new version. Then we click the Create a new version button:

Figure 10.28 – Save a new version of the project
- Once the new version is saved, we can deploy the version by clicking Deploy:
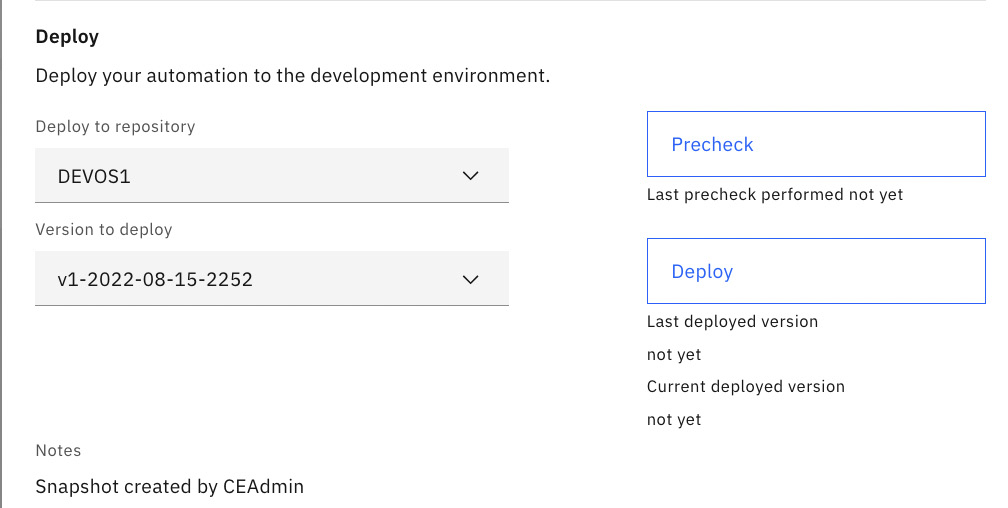
Figure 10.29 – Deploy a new version of the project
Figure 10.30 – Deployed versions of the project
Now we are ready to build the business application:
- Go to the home page of Business Automation Studio, click on the hamburger menu in the top-left corner, and select Business applications:
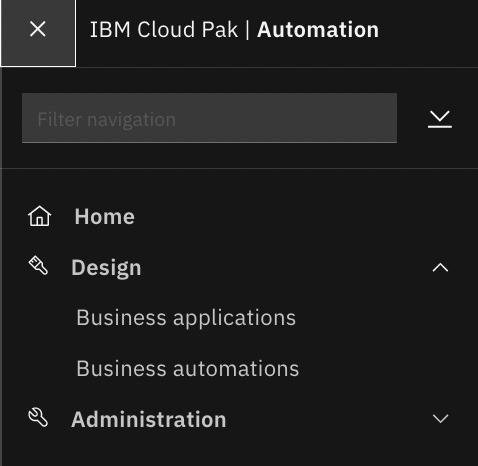
Figure 10.31 – The Business applications option
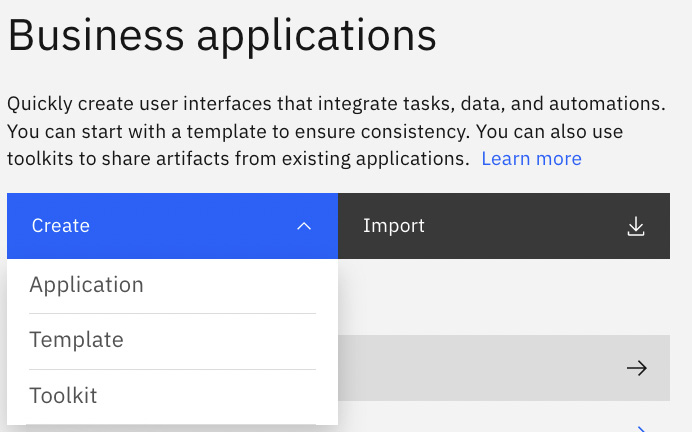
Figure 10.32 – The Business applications options
We are going to give our business application a name and select Batch Document Processing template (BCAT). We could also have selected Document Processing template (CAT) if we only wanted to process a single document at a time. Click Next to continue:
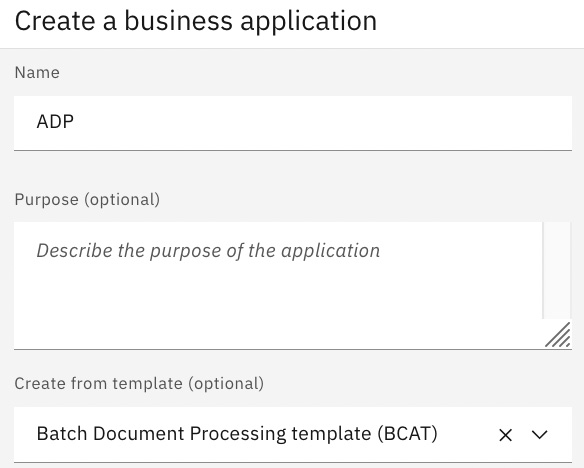
Figure 10.33 – The Create a business application window
We need to associate the business automation project we created and deployed previously with the application. Click the Create button when done:
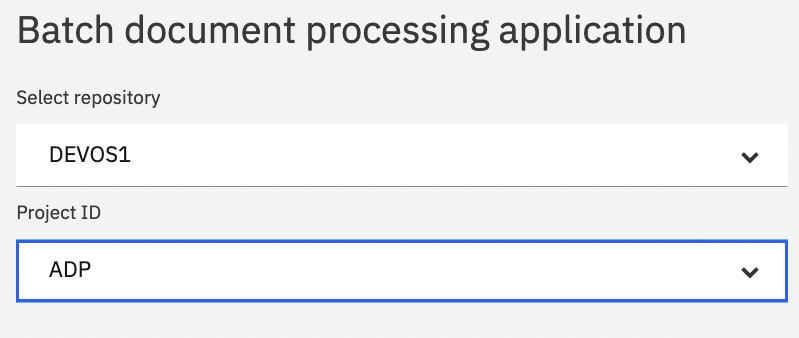
Figure 10.34 – Associate the automation project to the application
Batch Document Processing template (BCAT) has all the necessary pages and configuration to start using the application. Using this designer user interface, you have the option to further customize the application, such as its page design or actions, to fit your requirements. Click the Preview button to test the application:
Figure 10.35 – Preview the business application
Note
Ensure that your browser allows pop-up windows from the current site.
Now we are ready to create a sample batch to test the application. Click the Add | Upload options:
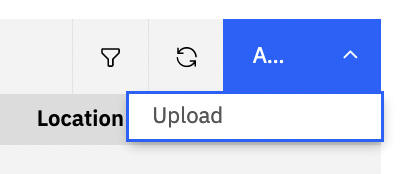
Figure 10.36 – Add and upload a batch
Give the batch a name and set the Priority option to High; then click the Select Files button:
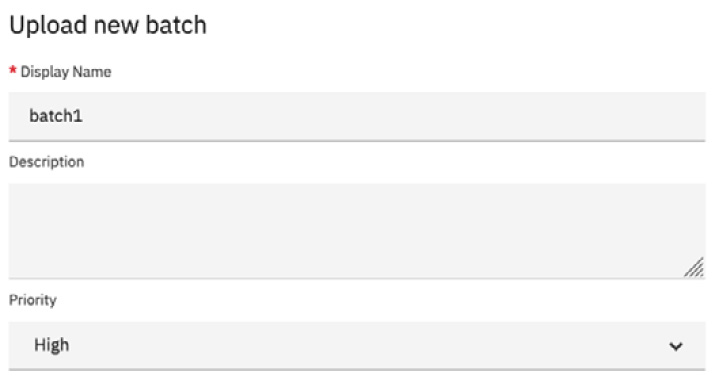
Figure 10.37 – Create a new batch
Select the files you want to use for testing the application, then click Add:
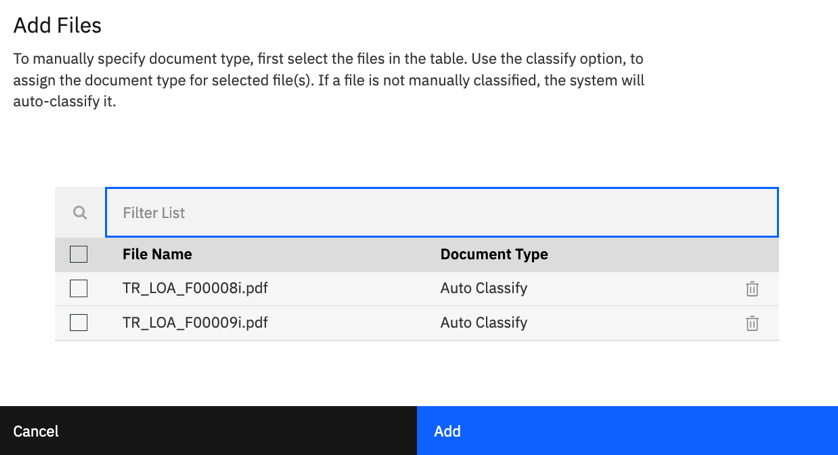
Figure 10.38 – Add files to the batch
Click the refresh icon to see the new batch that you just created:

Figure 10.39 – New batch created
Click the three dots on the batch and select Open:
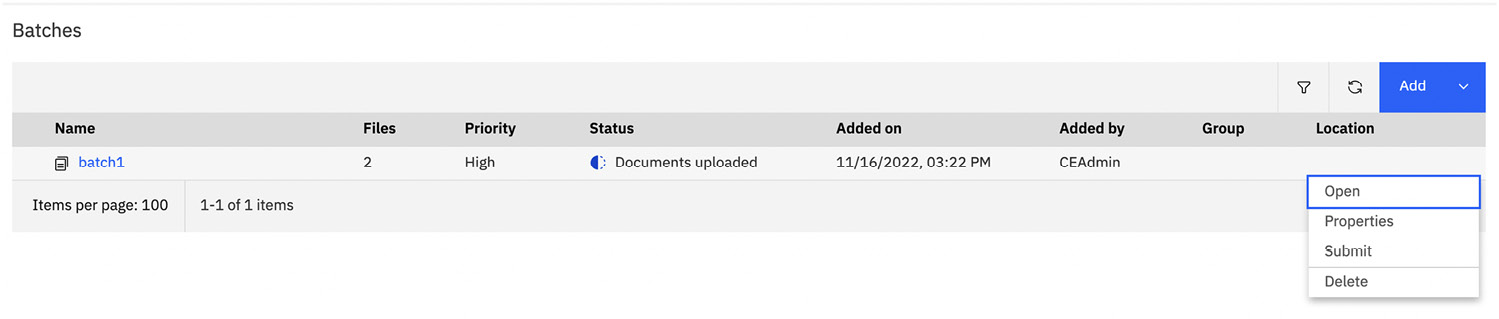
Figure 10.40 – Open the batch
The document will get processed and potentially show that there were issues with the classification of the data. This will be denoted by a yellow exclamation triangle symbol next to the document. We will need to fix the classification.
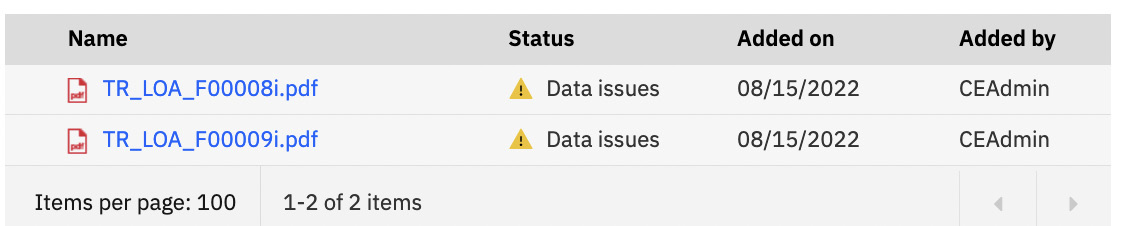
Figure 10.41 – Classification issue with documents
To fix the classification issue, we will need to return to the main batch page and click on the Document type and page order issues button:
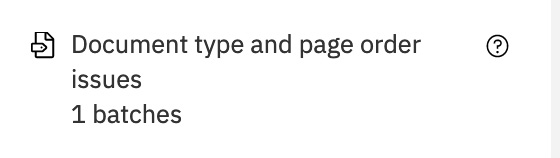
Figure 10.42 – Document type and page order issues to correct the issue
Click on the batch name itself to open the batch to view the issues. In the following case, the system wants to ensure that the document type is correct for the sample documents we upload. As you can see, the Document type field is indeed Loan application for the two documents we uploaded. We can simply select each of the documents and click the Dismiss button. Now we are ready to submit the documents again.
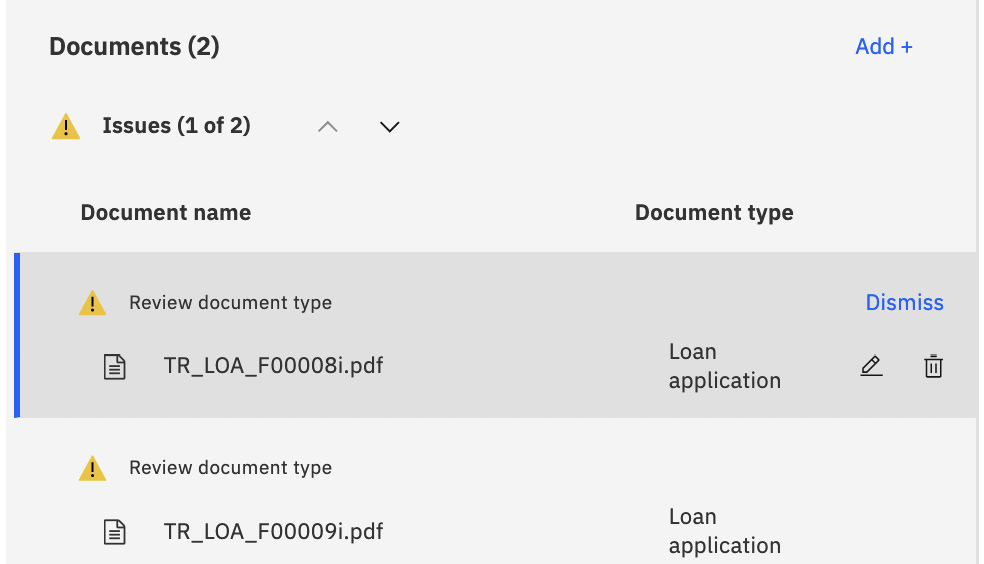
Figure 10.43 – Correct the issues for the batch
When we go back to the main batch screen, we can now see that the batch has a data extraction issue that we need to fix. Click on Data extraction issues:
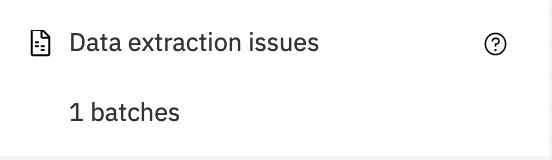
Figure 10.44 – Fix data extraction issues
Once again, click on the batch name to review the extraction issues. Click the three dots next to the document and select the Review issues option:
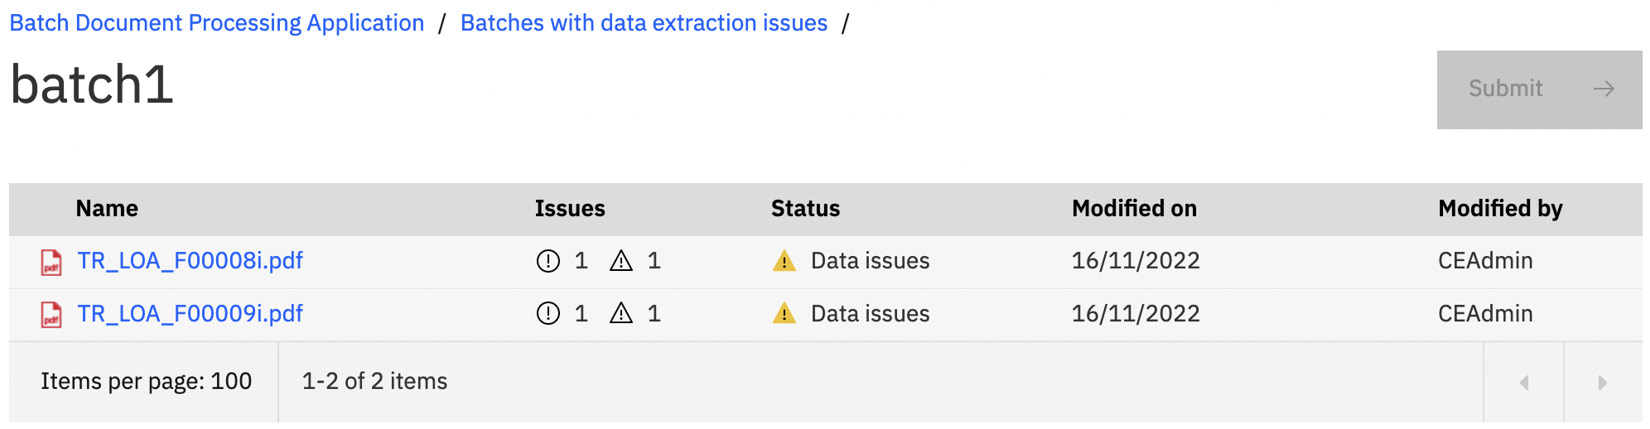
Figure 10.45 – Open document to review and fix issues
For each of the documents that have issues, you will see what the issues are, and ADP will suggest the correction for you to select. In the following case, the amount is a numeric value, but the field value has a dollar sign, which is causing the error. In a later section, we will look at a data enrichment technique called formatter, which can help remove the dollar symbol. For the time being, we will select the correct value without the dollar symbol. The document processing reviewer can also do the same during the production runtime of the application. As ADP processes more documents and the user continues to train it with the correct values, less user intervention is needed over time. Click Done once you’ve completed fixing all the issues.
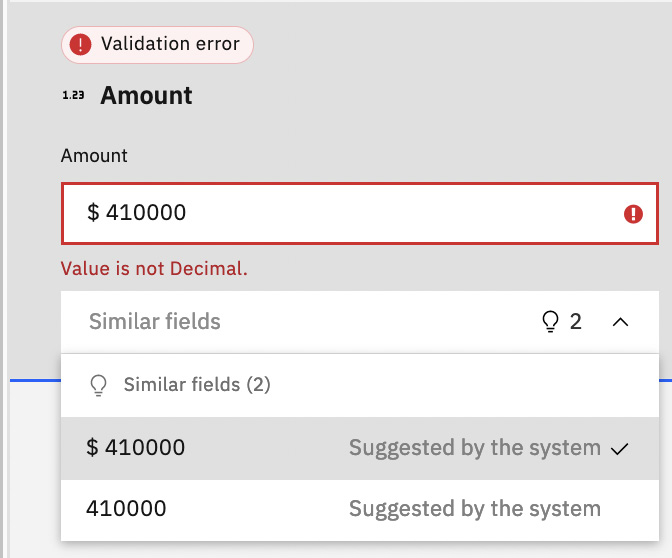
Figure 10.46 – Fix extraction issues
Click the Submit button to finish the batch:
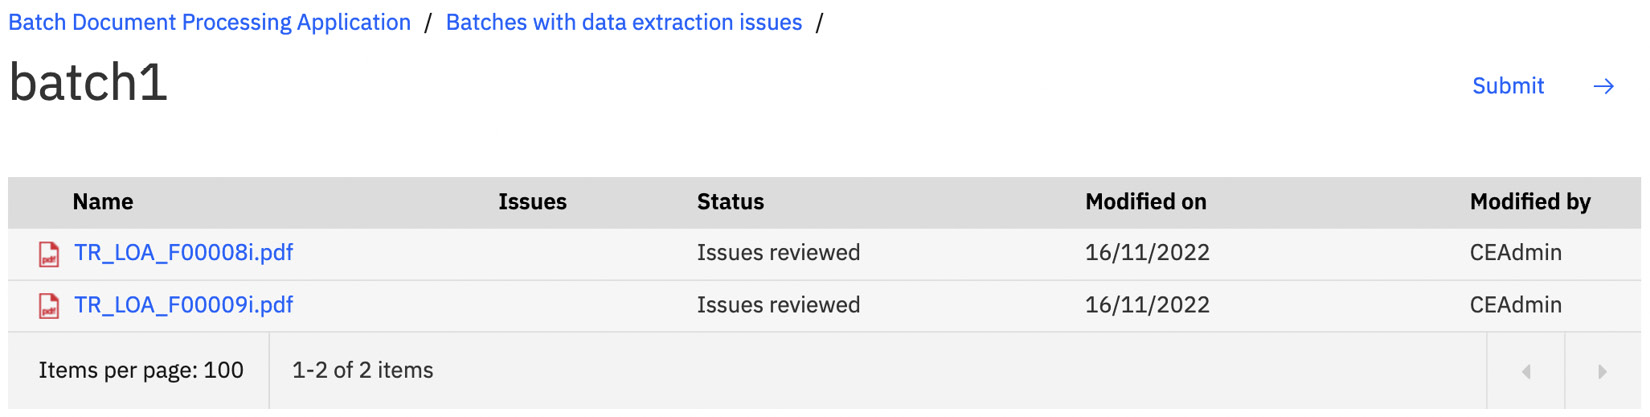
Figure 10.47 – Submit the batch to complete the processing
Your batch is now complete. The documents are stored in FileNet in an object store with the correct document class. The extracted data values are stored as properties of the document object:

Figure 10.48 – Batch processing completed
The application preview is just a simulation of what the application will be like if it is deployed to the application runtime. You will need to export and import the application to Business Automation Navigator to release the application to your end users.
We have walked through a complete tutorial on how to build a document processing application from initial training to final deployment. In the next section, we will discuss several advanced topics that will be useful to further customize your document processing pipeline.
Customized document types and data formats
There are going to be cases where you will need to create a customized document type for documents that are not provided as samples in ADP. ADP provides you with the ability to create a customized document type and take it through the training process to optimize data extraction, as was shown in the previous sections. Previously, using the built-in Invoice document type, we did not have to do much, and the system recognized most of the data fields typical for invoices. And we didn’t really have to train the system too much to fully classify the invoice from Packt Publishing with a high confidence level.
To add a custom document type unknown by ADP, you have to add the initial set of fields that you want to get the data from, that is, the document type, and train the system. This process is very similar to what you have done previously, but the difference here is that there is no existing model, and you will have to define and train the system yourself. The initial accuracy might not be high, but over time, it will increase with more documents and training.
Create document type
Here is how we can create a new document type:
- Once again, going back to the automation project and selecting the Document types and samples section will open a new page where we can create a new document type. Click the Create document type | with my sorted samples menu options:

Figure 10.49 – Create document type with samples
- Enter a name for the new document type and upload the sample documents into the Upload sample files (optional) drag-and-drop field box. Once completed, click the Done button at the bottom:
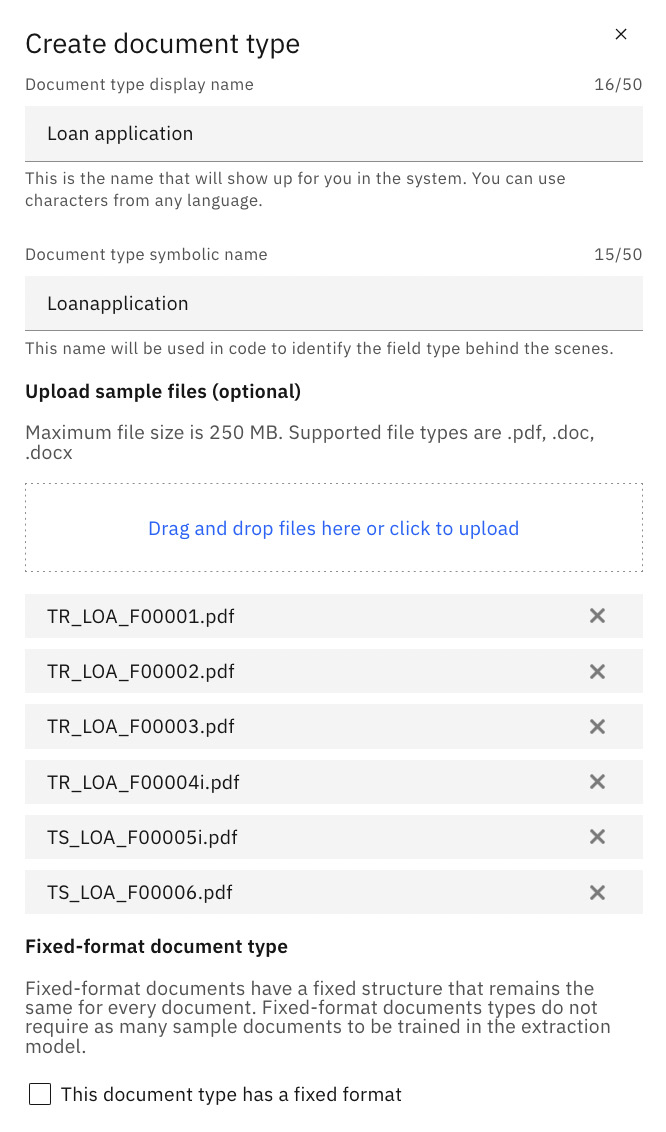
Figure 10.50 – Create document type and upload samples
- ADP will start to process the sample documents for the new document type. Once the system completes the upload of the sample document, you will see a spinning circle beside each of the new sample documents to indicate the upload process:
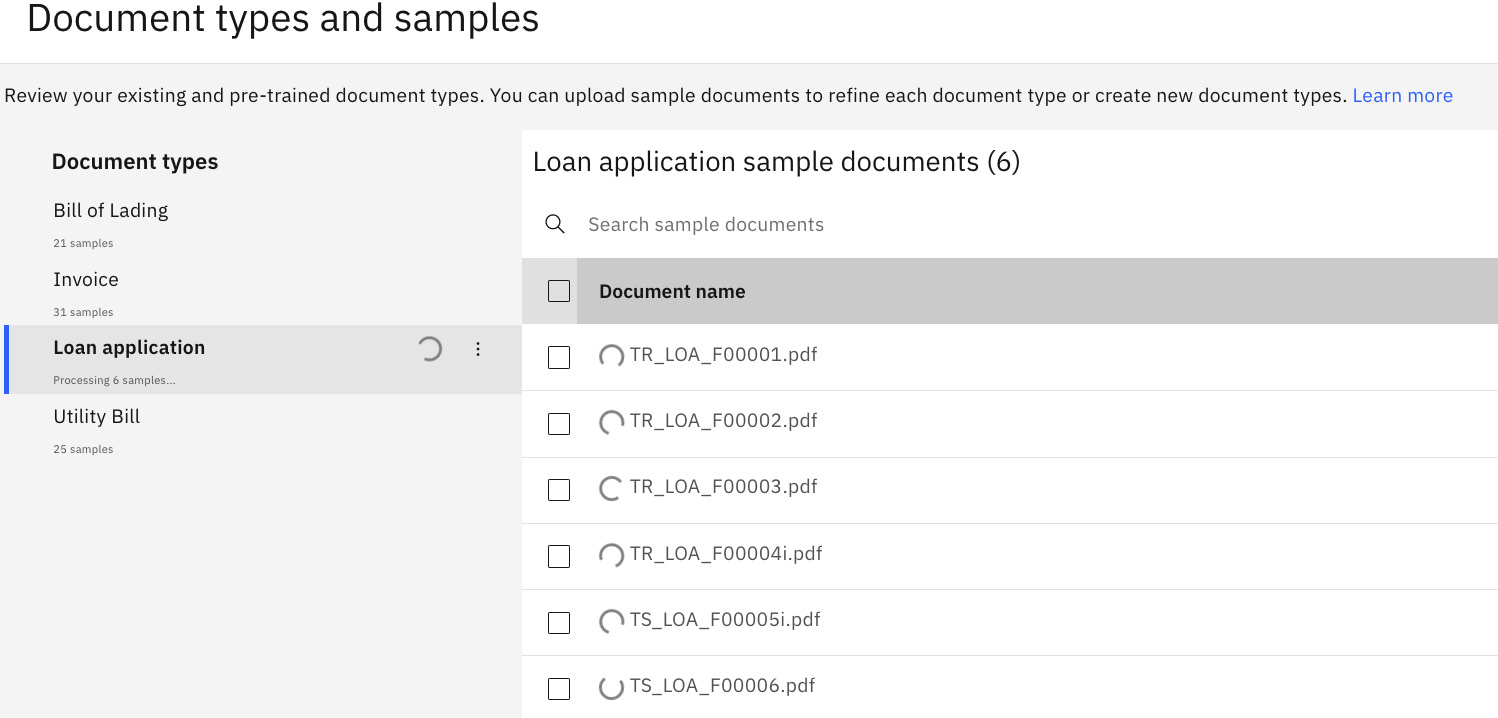
Figure 10.51 – ADP processing sample documents for new document type
After we have completed the upload of the document, we need to train the system for the new document type. The training process for new document types is the same as shown previously. Similar to before, once the training is completed Classification model should now show Ready:
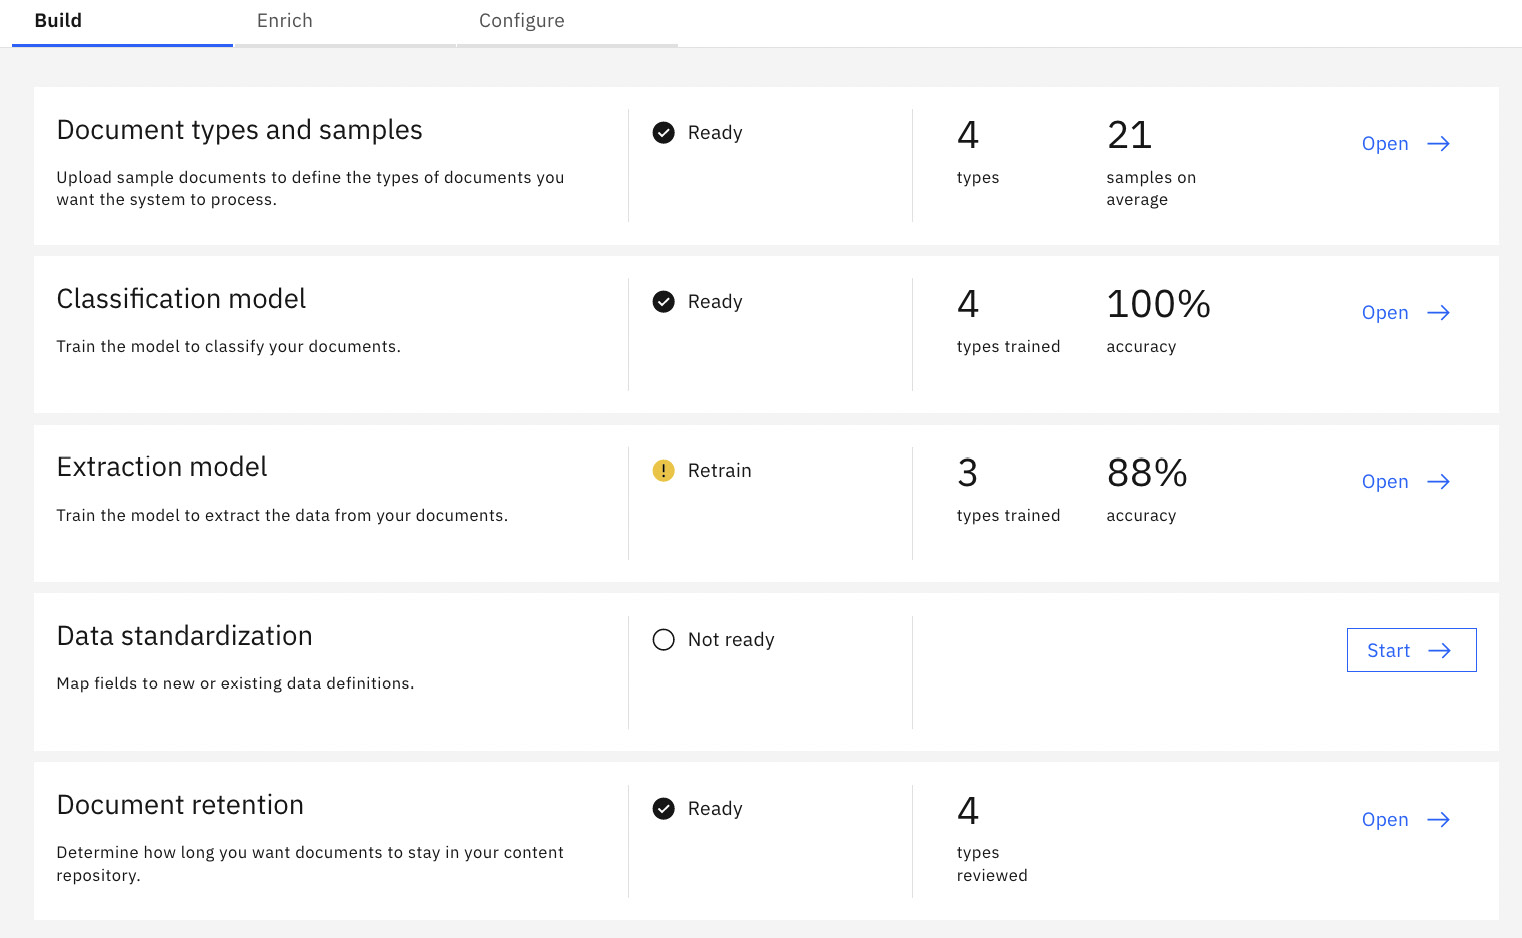
Figure 10.52 – ADP training completed for new document type
We have seen how easily ADP can classify existing known document types and how easily we can correct the data field mapping. But for new document types, we have to fully define the extraction model. Since we just added the Loan application document type, ADP requires us to create the fields and teach them to extract the data. This is indicated in the following screenshot by the missing green check mark:
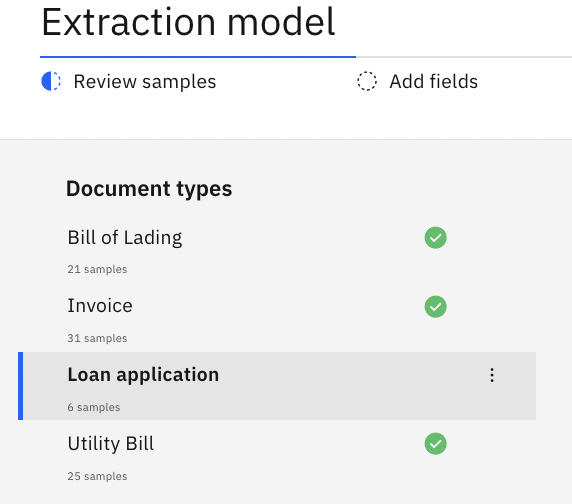
Figure 10.53 – The Loan application document type needs the extraction model defined
The next section will explain how we can configure ADP to recognize more data formats in a document.
Customizing data definitions
Here, we will be looking beyond the basic data field mapping we have done previously. But before we can do that, we need to provide a set of test documents for the system to work with. In the following screenshot, we have added two test documents and clicked Next:
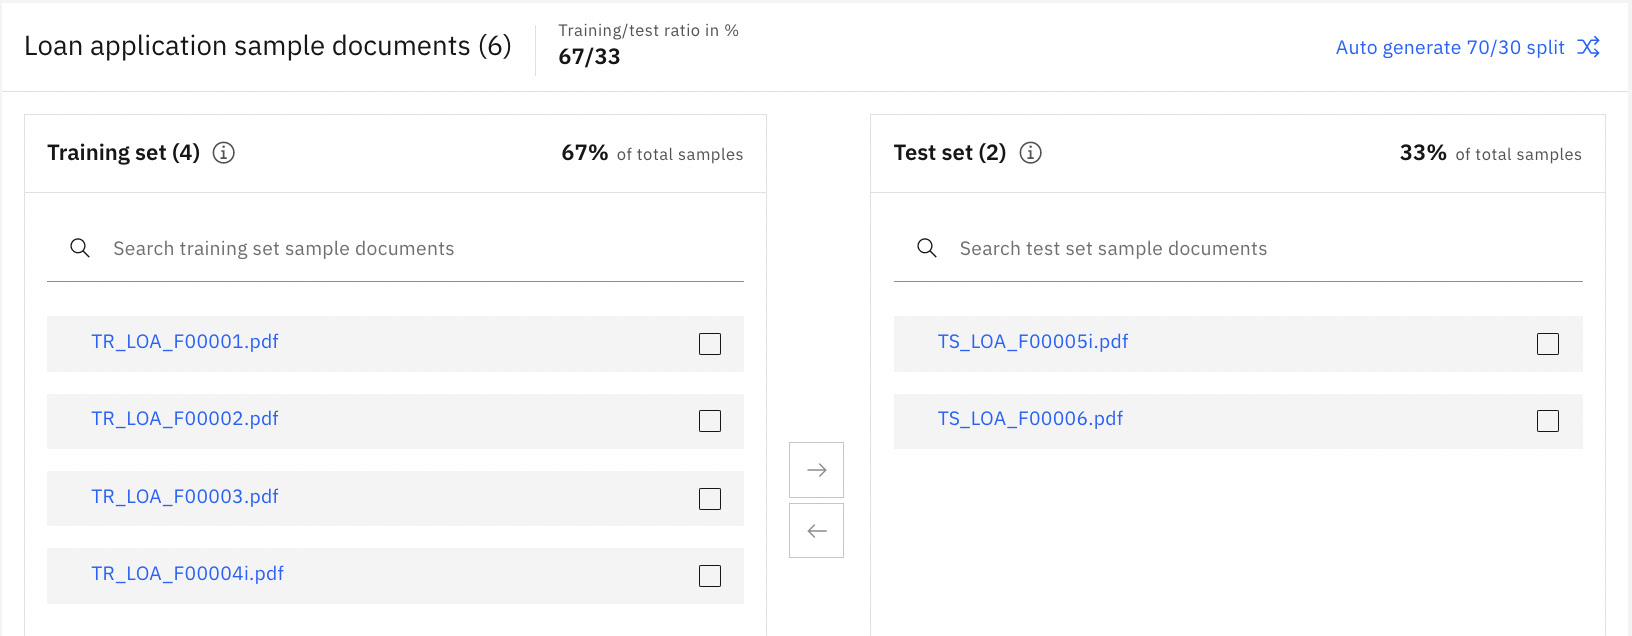
Figure 10.54 – Selected test documents
Now we need to add data fields to continue, as indicated in the following screenshot. We can easily add data fields by clicking on the Add fields button:
Figure 10.55 – Adding data fields for the extraction model
The first field we will add is the Agency Case Number field, as shown in the following screenshot, and then we will click the Add fields button when done.
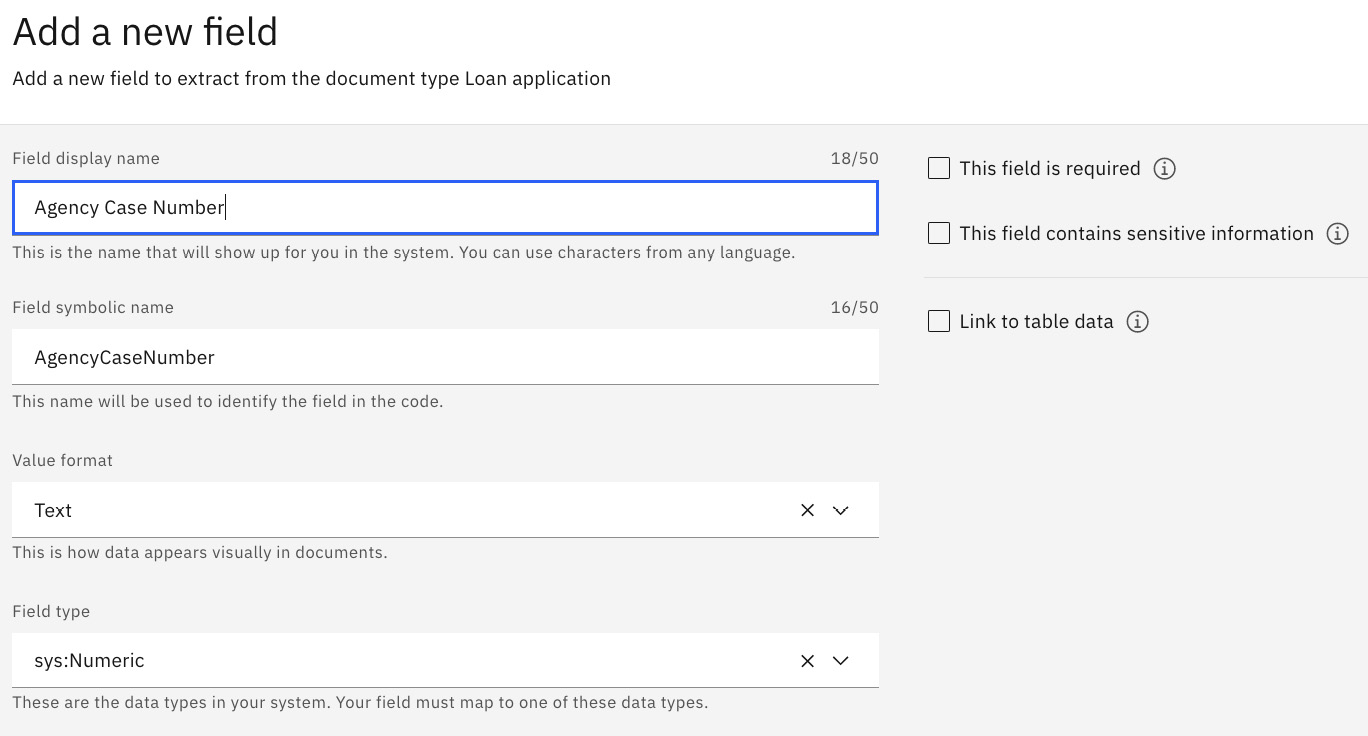
Figure 10.56 – Adding a data field for Loan application
You can add the following details in the respective fields:
- Field display name: Agency Case Number
- Value format: Text
- Field type: sys.Numeric
Let us add some additional fields based on the following table:
|
Field name |
Value format |
Field type |
|
Amount |
Text |
Decimal |
|
Interest Rate |
Text |
Decimal |
|
Borrowers name |
Text |
String |
|
Social Security Number |
Text |
Social security number |
|
DOB |
Text |
Date |
Table 10.1 – Data fields and corresponding details
Once completed, you should see something similar to the following screenshot. Now we are ready to teach the model by clicking Next:
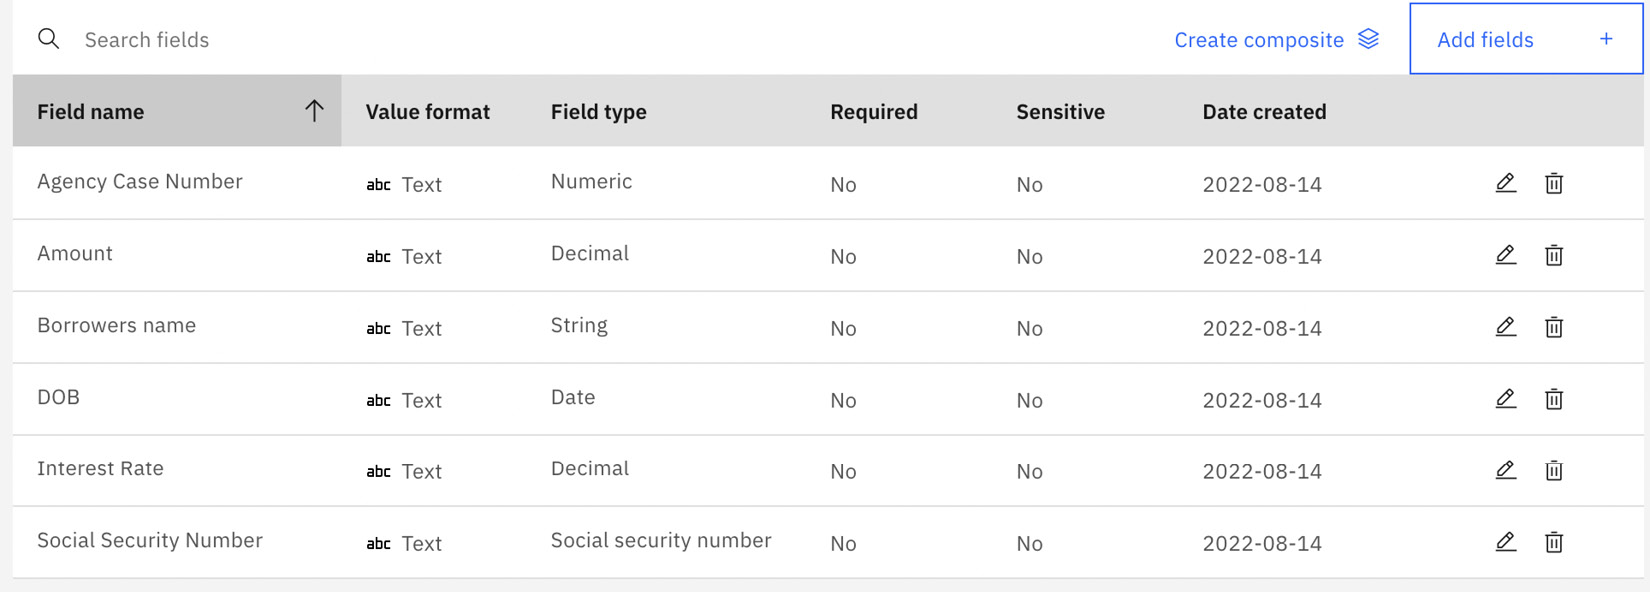
Figure 10.57 – Data fields for Loan application
Click on the Teach samples button:
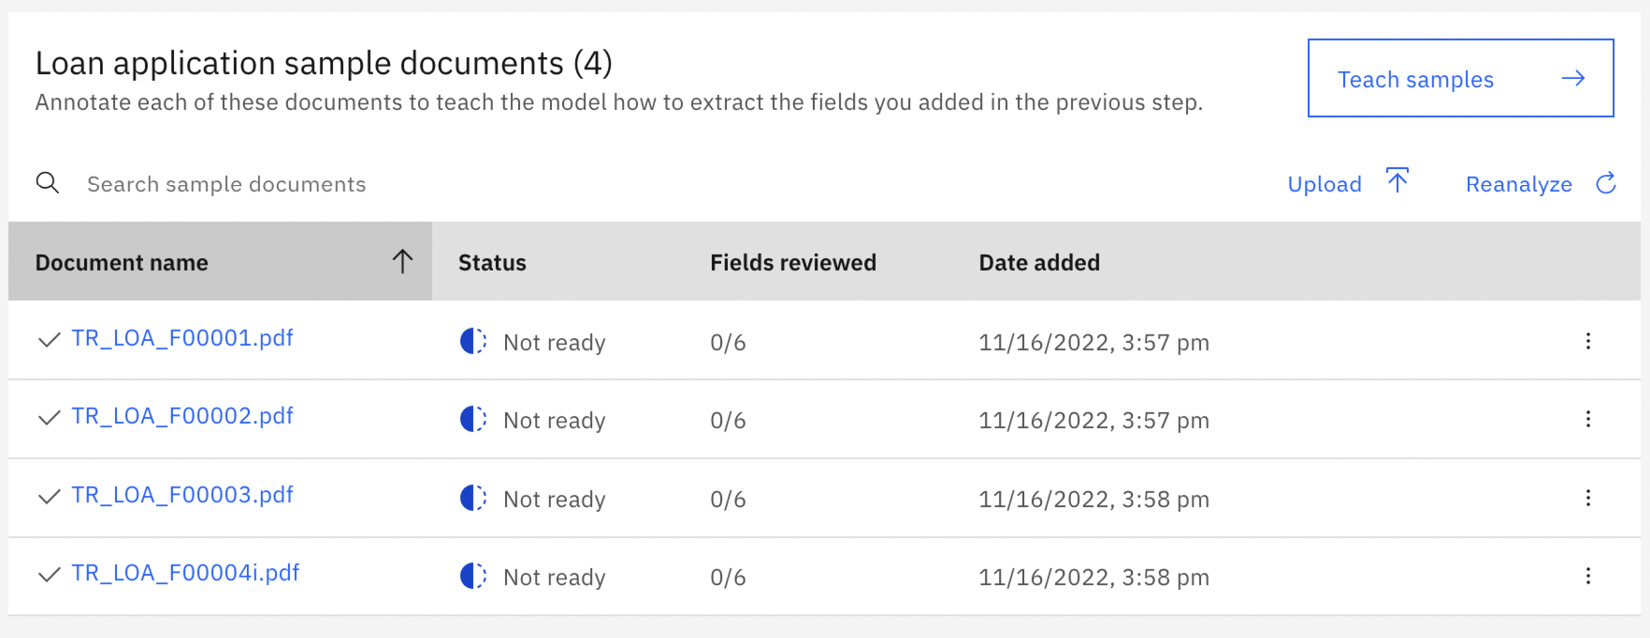
Figure 10.58 – Teach samples
Now we need to assign the fields in the sample document to the field data we defined. The first data field is Agency Case Number:
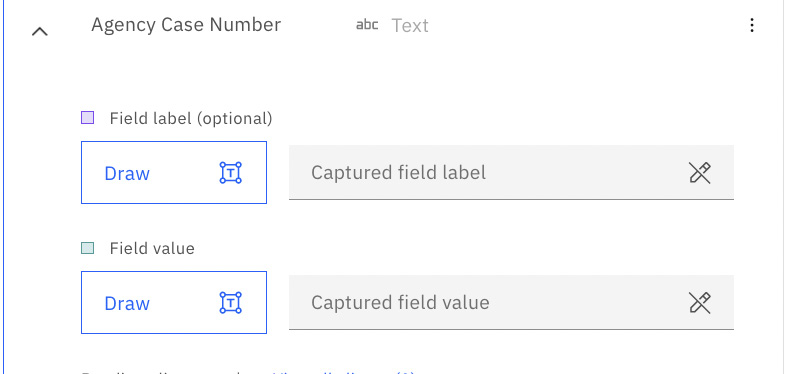
Figure 10.59 – Data field needing to be mapped
You will notice that the sample document has highlighted sections that ADP was able to distinguish as separate data elements within the document. We need to map the data fields to the data elements in the document by simply selecting the data elements:
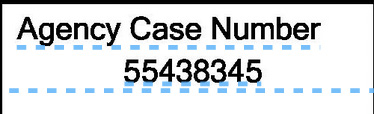
Figure 10.60 – Agency Case Number data element in the sample document
Once you’ve selected the data element in the document for the corresponding data field, click Save to save the changes:
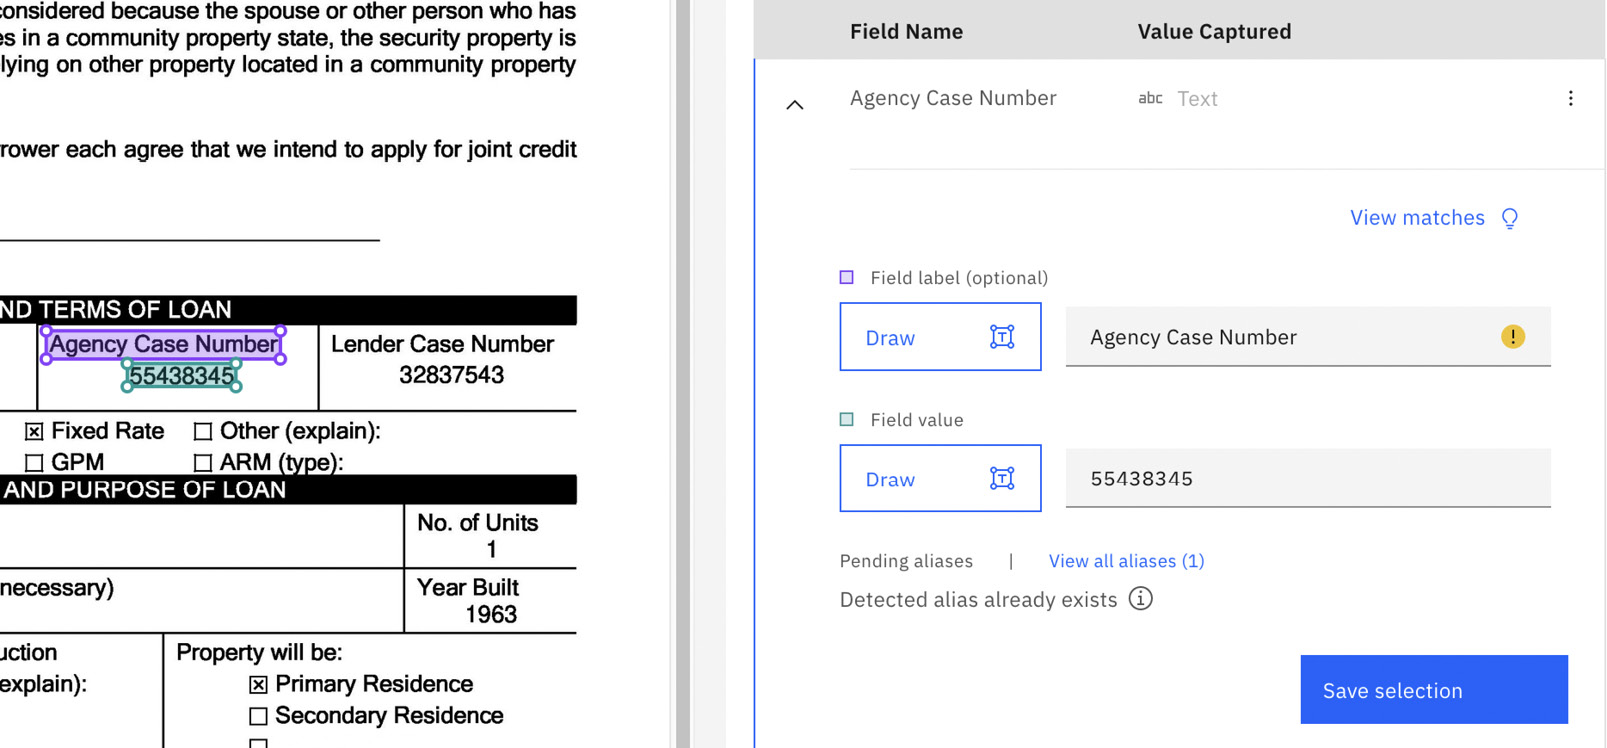
Figure 10.61 – Saved data field selected for Agency Case Number
If the data element is not automatically recognized, you can use the Draw option to highlight and map the data field. For example, if the Interest Rate data element was missed, you can simply draw the square around the Interest Rate text in the document to map to the Interest Rate data field. The same can be done for the actual Interest Rate value itself.
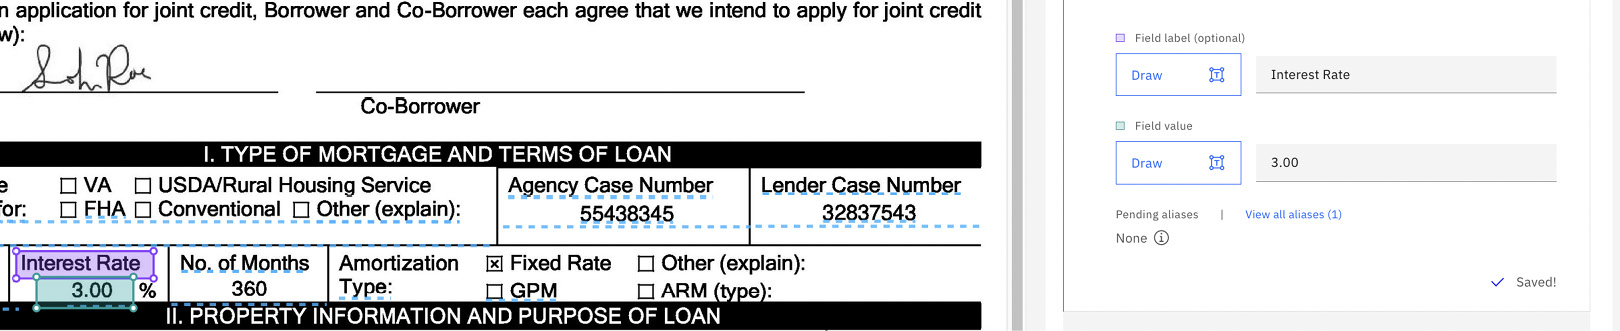
Figure 10.62 – Saved data field selected for Interest Rate using the Draw option
You can use either technique for the other data fields. Once done, click on the next sample at the top right. Repeat the data field mapping for all sample documents.
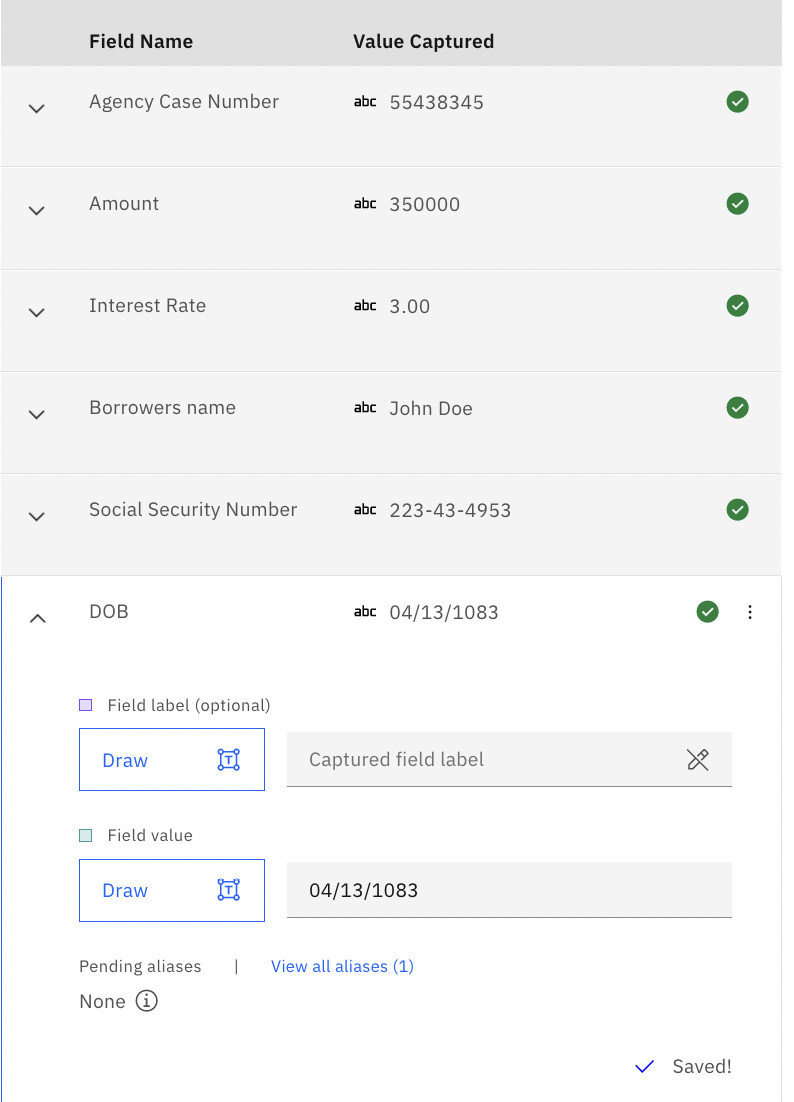
Figure 10.63 – Completed data field mapping
Once you are done with all the sample documents, click the Back button. We will select one of the documents to reanalyze it. You will need to confirm by clicking the Reanalyze button:

Figure 10.64 – Reanalyze a sample document
Now we are going to add more complex data elements, such as signatures and fields with checkboxes. Go back to the main Extraction model page for the Loan application document type and click the Add fields button:

Figure 10.65 – Add additional data fields
We will add a data field for the borrower’s signature:
- Field display name: Borrowers signature
- Value format: Signature
- Field type: sys.Boolean
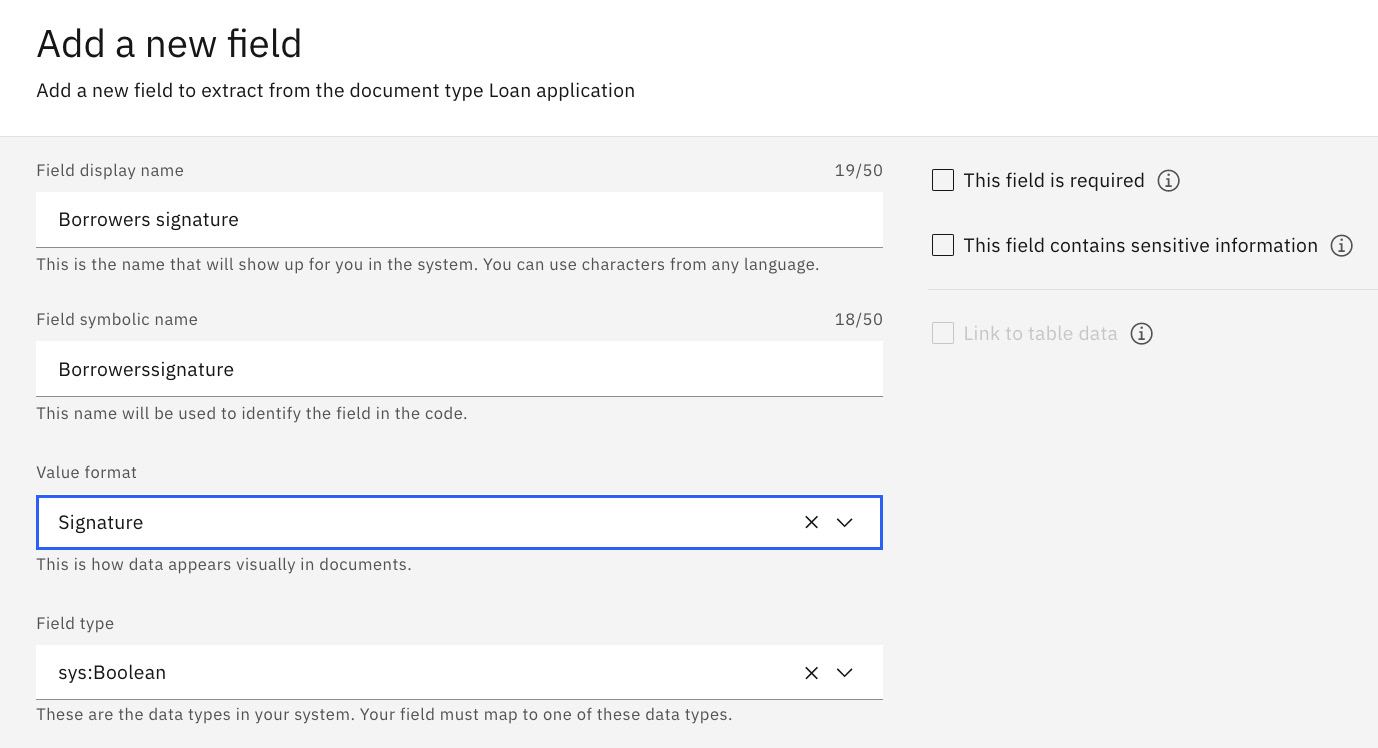
Figure 10.66 – Signature data field
We will add two checkbox data fields for the mortgage application type:
- Checkbox 1:
- Field display name: Mortgage for VA
- Value format: Checkbox
- Field type: sys.Boolean
- Checkbox 2:
- Field display name: Mortgage for USDA
- Value format: Checkbox
- Field type: sys.Boolean
Once again, we need to teach ADP the three new data fields using the sample documents:
- Teach ADP where to find the borrower’s signature:
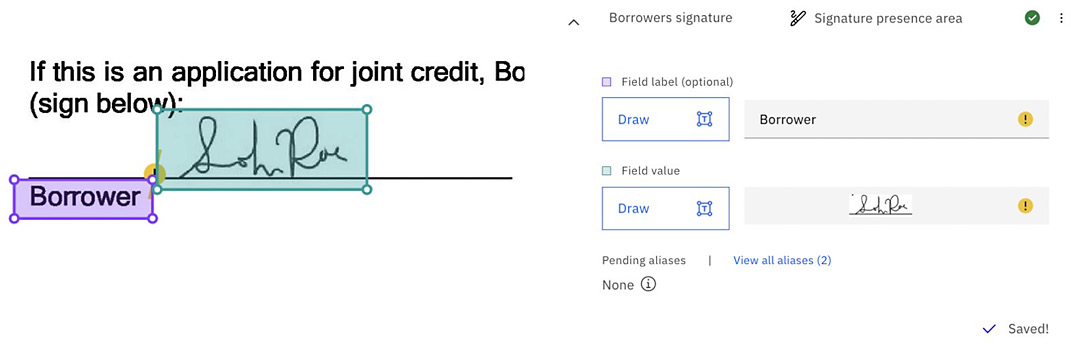
Figure 10.67 – Signature data field mapping
- Teach ADP where to find Mortgage Applicant Type applied for when it is VA:

Figure 10.68 – VA mortgage checkbox data field mapping
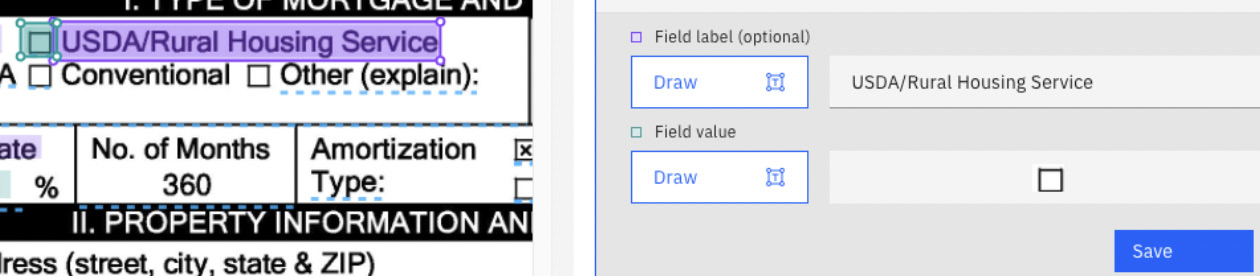
Figure 10.69 – USDA/Rural Housing Service mortgage checkbox data field mapping
Now we have the basis for our new document types. We just need to complete the retraining process for the rest of the document, as shown in the previous section.
Data enrichment
When it comes to data enrichment, ADP provides a wide range of capabilities to further improve and provide more accurate data extraction, such as composite fields, extractors, formatters, converters, and validators, or more complex ones, such as custom field types with custom text extractors. In this section, we will show validator and formatter capabilities.
Validation of fields
First, we need to open the Enrich menu option for the document type and select Document types:
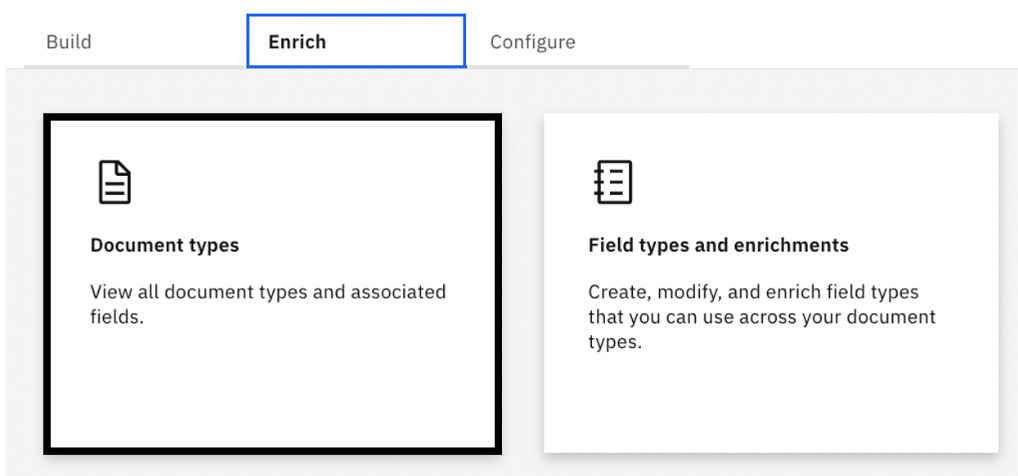
Figure 10.70 – The Enrich Document types option
Select the Loan application document type, select DOB, and then select Edit:

Figure 10.71 – Edit the DOB data field
Click on Value settings:

Figure 10.72 – Value settings for the DOB data field
Click on the Edit button:
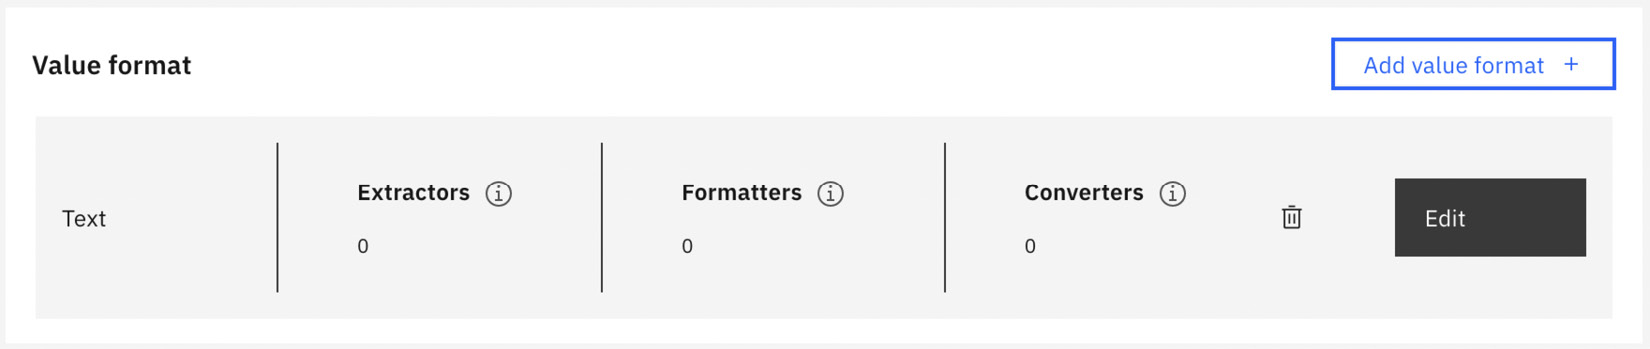
Figure 10.73 – Edit value settings for the DOB data field
Click on Converters, then click on Add converter:
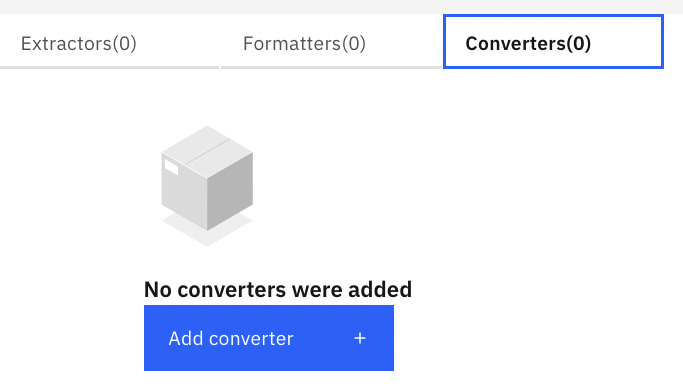
Figure 10.74 – Add converter for the DOB data field
We are going to select Select existing for this new converter and then click Add:

Figure 10.75 – Select the existing date converter
Test the converter by entering any date value and clicking Test. Once satisfied, click the Done button:
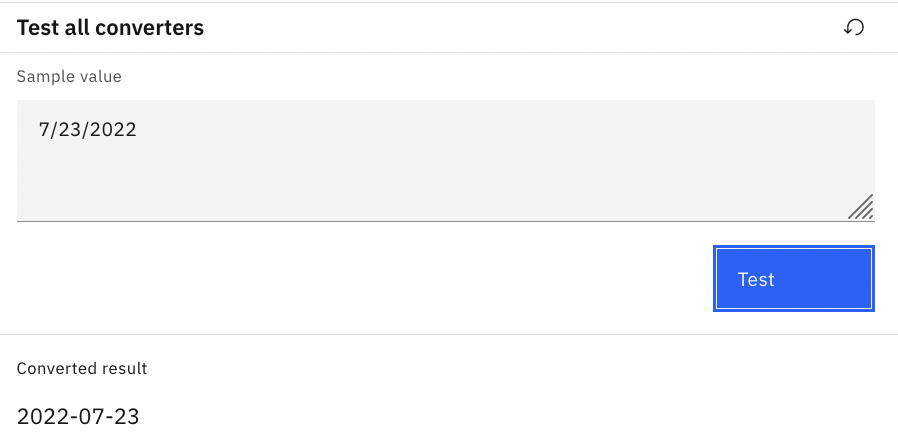
Figure 10.76 – Test date converter
Now we will add a date range for the date validator. The date range should be within 90 days of today’s date and not a date in the future. To add this, click the Add button in the Value validators section:

Figure 10.77 – Add custom value validator
Create the new validator by selecting the existing one. Leave everything as the default except setting Number of days to 90 and change Condition to <, then click Add:
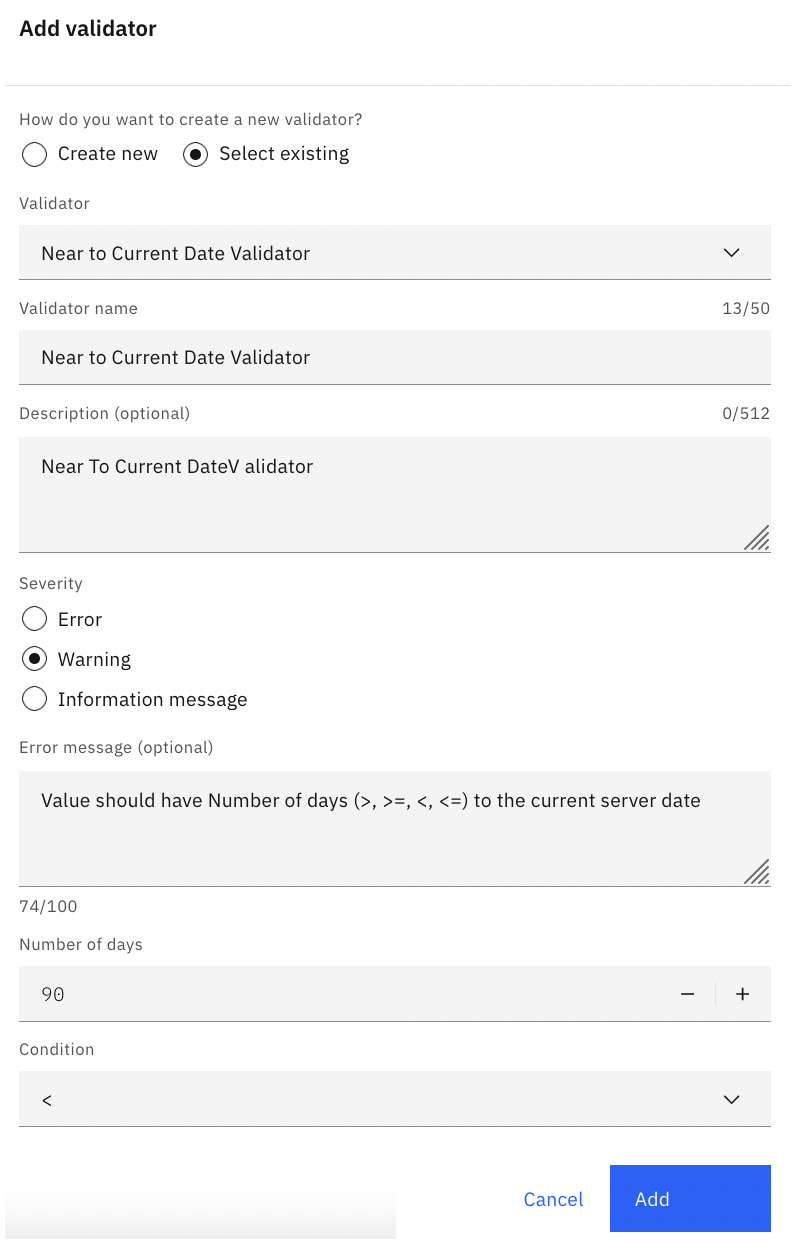
Figure 10.78 – Configure custom value validator
Test the date validator by entering a date and clicking the Test button. Click the Save button to save the new custom date validator:
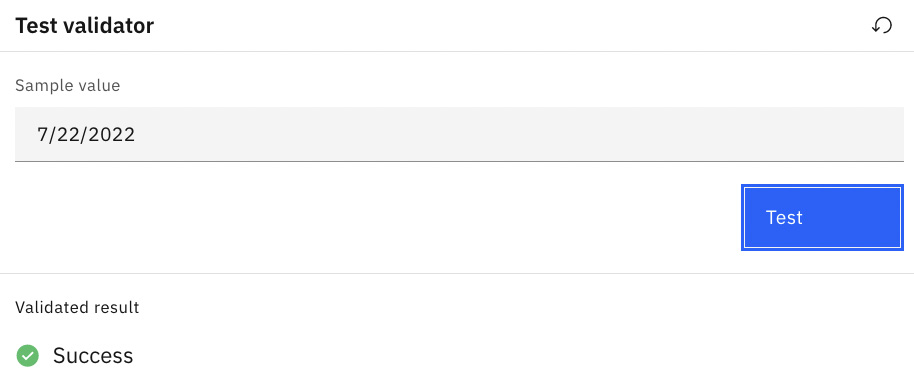
Figure 10.79 – Test custom value validator
Adding formatters to fields
Now we will look at adding formatters to help clean up the field values. In this example, we will look at the Interest Rate field. Currently, the Interest Rate field is configured for numeric values only. Some of the data values might contain a percentage symbol, which will cause the field validation to fail. Remember the issue we saw earlier when we were previewing the document processing application with the dollar Amount field value? What we are about to do here for the interest rate can also be applied to the dollar Amount field:
- To add this formatter to the Interest Rate data field, we will go back to the Enrich option for the Loan application document type and select the Document types option again. Edit the Interest Rate data field. Edit the existing Text value format and select Formatters to add a new formatter. This time, we will create a new formatter with the following configuration and click Add:
- Type: Remove text formatter
- Formatter name: Remove percentage symbol
- String to find: %
- Where: In place
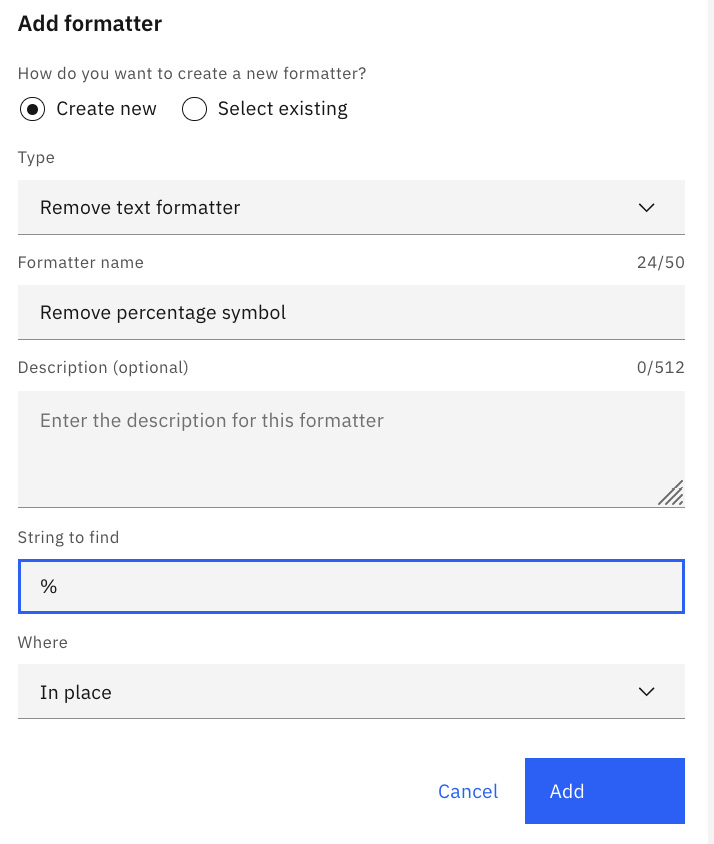
Figure 10.80 – Add a custom formatter for the Interest Rate data field
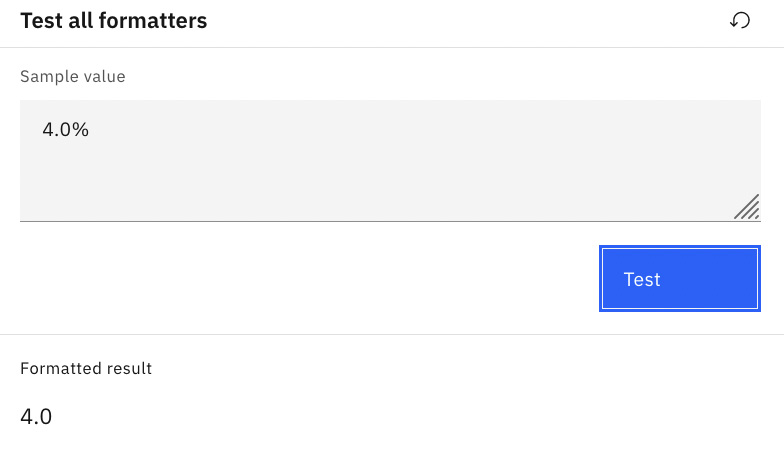
Figure 10.81 – Test the custom formatter for the Interest Rate data field
- Add another formatter to remove spaces from the Interest Rate value field and click Done, then Save:
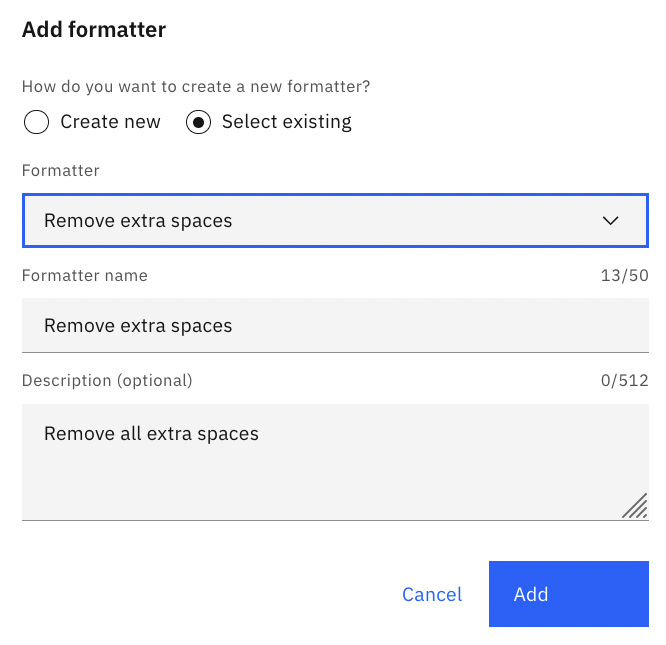
Figure 10.82 – Custom formatter for the Interest Rate data field to remove spaces
We have explored two types of data enrichment that will help improve the data extraction for document types. Others can be used depending on the data you are trying to enrich and can improve the data quality from the extraction process.
Data standardization
Data standardization is a process of defining attributes for the data field to be used in the FileNet content repository data model. These attributes are used to create document classes and properties to store the processed documents. Each document type equates to a document class in the FileNet object store. And each data field equates to a property on the document class. The data definition can be used across projects and applications within Cloud Pak for Business Automation.
There are two parts to the data standardization step:
- Deploying the document type
- Defining fields
Deploying the document type
To get started, we will need to return to the main project screen and click Start on the Data standardization step:

Figure 10.83 – Start data standardization process
Select the Loan application document type and enable Deploy. The Deploy option will make it available in the runtime environment:

Figure 10.84 – Deploy the Loan application document type
Defining fields
Click Start to begin defining the data field attribute definition:
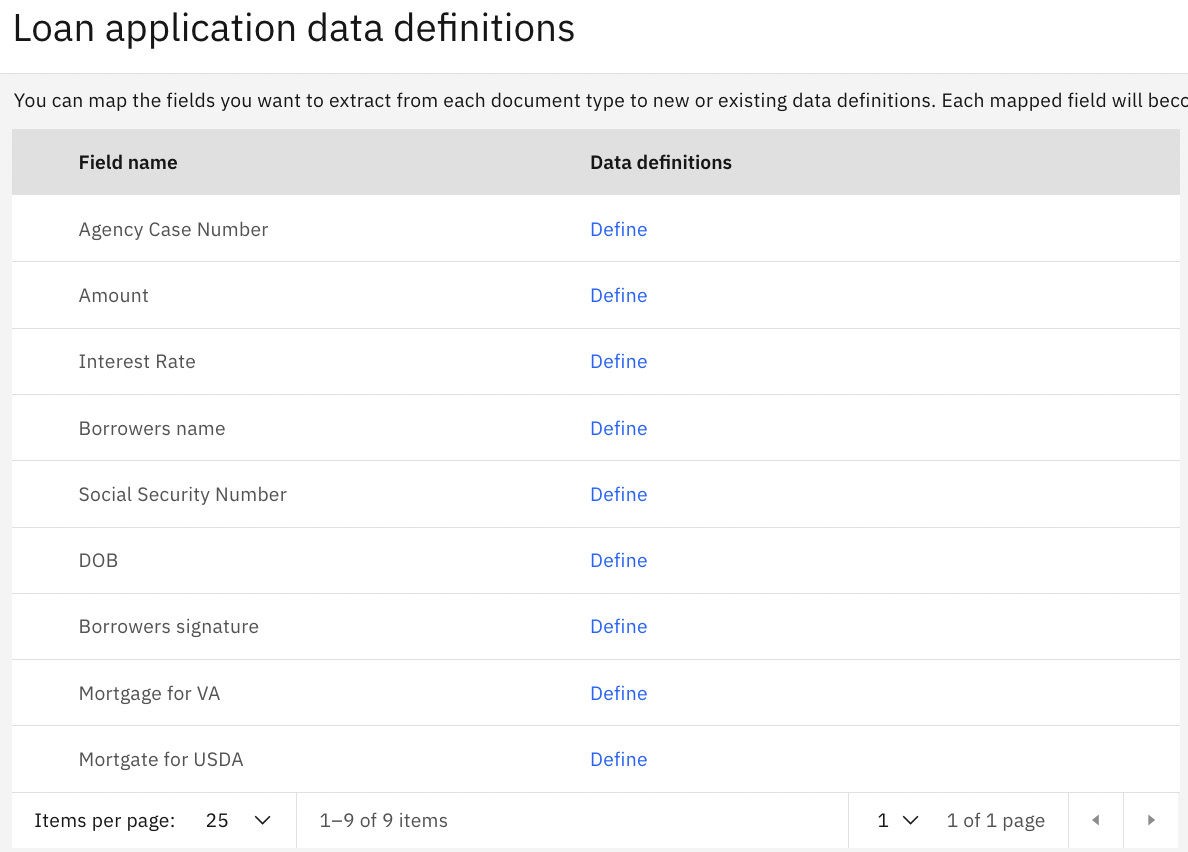
Figure 10.85 – Loan application data definitions
Click the Define button next to Agency Case Number. Select Create a new data definition and configure the following and then click Save:
- Data definition name: Agency Case Number
- Type: String
- Cardinality: Single value
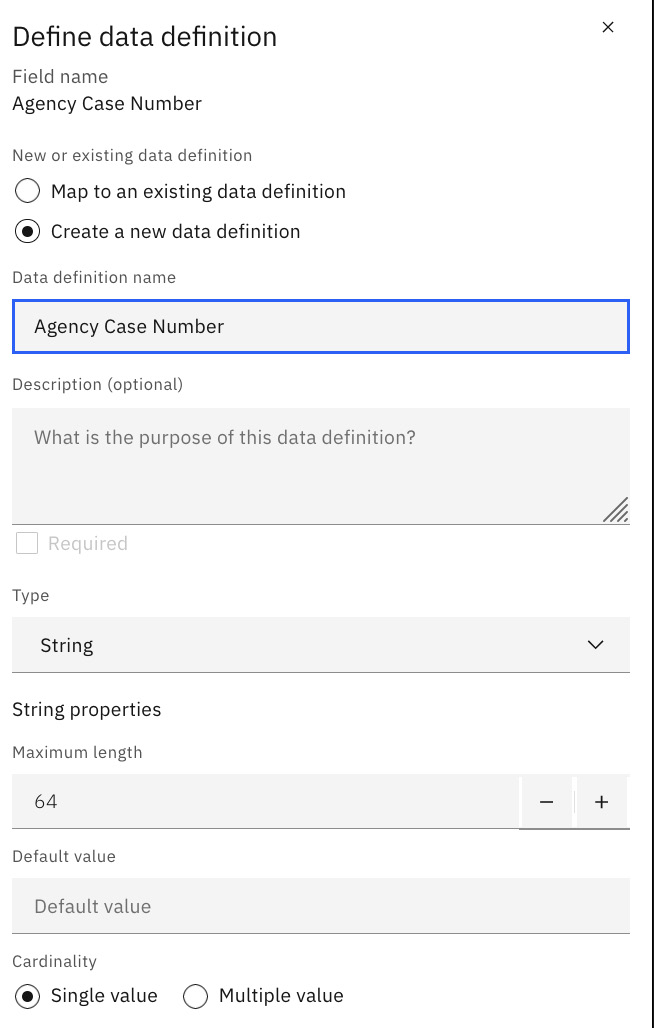
Figure 10.86 – Data definition for Agency Case Number
Complete defining the other data definitions based on the following table:
|
Data definition name |
Type |
Default value |
Length |
Cardinality |
|
Amount |
String |
64 |
Single | |
|
Interest rate |
String |
64 |
Single | |
|
Borrowers Name |
String |
64 |
Single | |
|
Social security number |
String |
64 |
Single | |
|
Borrowers signature |
Boolean |
False |
Single | |
|
Mortgage for VA |
Boolean |
False |
Single | |
|
Mortgage for USDA |
Boolean |
False |
Single | |
|
DOB |
String |
64 |
Single |
Table 10.2 – Data definitions and corresponding details
Once you have completed defining the data definition, click on Data standardization in the breadcrumb:
Figure 10.87 – Breadcrumb to get back to the Data standardization screen
You should now see the data.
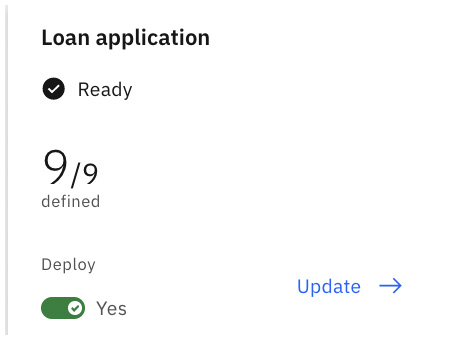
Figure 10.88 – Data definition defined for Loan application
Now that we have completed the last recommended step for document processing, we can deploy the project to be used for the business application runtime. Remember that if you don’t configure data standardization, the document types will not be classified.
Summary
In this chapter, we explored in detail the feature capabilities of ADP. We learned how easy it is to get started in creating an ADP project using the template and document types available OOTB. We were able to quickly train the system for our company-specific invoices and do minor updates to a small handful of data fields it was not able to find initially. We quickly increased the accuracy of the data extraction with minor corrections and, over time, the accuracy will continue to increase with ADP AI and machine learning capabilities. We also built a simple business application that allows our users to process documents with the help of AI.
We also looked at advanced capabilities to further enrich the data extraction, not only to get more out of the document but to consistently standardize the data we get. This is important as we start building more applications using capabilities in CP4BA.
In the next chapter, we will delve more deeply into how to build a business application that we can share with our business users so that they can automate their daily work.