Queries can be used in C/AL code or in Dynamics NAV charts. They can also be published as web services and thus consumed by external applications. In this section, we will see exactly where queries can be used.
Queries can be accessed from C/AL code. It is a good idea to use queries instead of writing C/AL code involving record variables when you want to read records from multiple tables at the same time.
Executing a query from C/AL code is as simple as defining a variable of type Query and typing the following sentences:
MyFirstQuery.OPEN;
WHILE MyFirstQuery.READ DO
  OutputData(MyFirstQuery.Item_No,
    MyFirstQuery.Month_Posting_Date,
    MyFirstQuery.Sum_Quantity,
    MyFirstQuery.Source_No,
    MyFirstQuery.Description,
    MyFirstQuery.Name,
    MyFirstQuery.Customer_Posting_Group);
In this example, we have defined a query variable called MyFirstQuery that points to the query created earlier on in this chapter.
We first have to open the query using OPEN and then read the results (READ) using a loop statement. On every READ, we will get a different result record.
We can access any of the columns defined in the query by typing the following:
<QueryVariableName>.<ColumnName>
In the example, we pass all the columns as parameters of a function called OutputData() that will handle the results.
Just a few sentences are needed to execute a query. Isn't that cool?
Designing the query has been easy. Executing the query has been even easier. How much effort do you think is needed to get the exact same result as in the query but using pure C/AL code? Examine the following code and evaluate it yourself:
ItemLedgEntry.SETRANGE("Entry Type",ItemLedgEntry."Entry Type"::Sale);
IF ItemLedgEntry.FINDSET THEN
REPEAT
  tmpItem.SETRANGE("No. 2",ItemLedgEntry."Item No.");
  tmpItem.SETRANGE(tmpItem."Vendor No.",ItemLedgEntry."Source No.");
  tmpItem.SETRANGE("Price Unit Conversion",DATE2DMY(ItemLedgEntry."Posting Date",2));
  IF tmpItem.FINDSET THEN
  BEGIN
    tmpItem."Unit Price" := tmpItem."Unit Price" + ItemLedgEntry.Quantity;
    tmpItem.MODIFY;
  END
  ELSE
  BEGIN
    IF Item.GET(ItemLedgEntry."Item No.") THEN;
    IF Customer.GET(ItemLedgEntry."Source No.") THEN;

    tmpItem.INIT;
    tmpItem."No." := FORMAT(tmpItemNo);
    tmpItemNo := tmpItemNo + 1;
    tmpItem."No. 2" := ItemLedgEntry."Item No.";
    tmpItem."Vendor No." := ItemLedgEntry."Source No.";
    tmpItem."Price Unit Conversion" := DATE2DMY(ItemLedgEntry."Posting Date",2);
    tmpItem.Description := Item.Description;
    tmpItem."Description 2" := Customer.Name;
    tmpItem."Inventory Posting Group" := Customer."Customer Posting Group";
    tmpItem."Unit Price" := ItemLedgEntry.Quantity;
    tmpItem.INSERT;
  END;
UNTIL ItemLedgEntry.NEXT = 0;

tmpItem.RESET;
IF tmpItem.FINDSET THEN
REPEAT
  OutputData(
    tmpItem."No. 2",
    tmpItem."Price Unit Conversion",
    tmpItem."Unit Price",
    tmpItem."Vendor No.",
    tmpItem.Description,
    tmpItem."Description 2",
    tmpItem."Inventory Posting Group");
UNTIL tmpItem.NEXT = 0;
We first have to define all the variables used in the code, namely, ItemLedgerEntry, Item, Customer as record variables, tmpItem as a temporary record variable, and tmpItemNo as an integer.
We filter ItemLedgerEntry to only retrieve sales entry types. We loop through all the ItemLedgerEntry records and, in every loop, we check whether a temporary record exists or not for the grouping fields. If it does not exist, we create the temporary record with the appropriate values. If it exists, we just sum up quantities in the existing temporary record. Finally, we loop through all the temporary records, which have the same results as the query we defined earlier.
The code is confusing. There are no sentences in C/AL to group. We have to use some tricks to actually get that behavior. In this case, we use temporary records. There is no table in Dynamics NAV with the exact fields we need, so we just picked one-Item. We've used the fields in that table that had the type and length we needed, without really looking at the name of the fields.
Believe me, when I say; it was much easier to develop the query than this C/AL code.
The Windows client can display a set of predefined charts that use Dynamics NAV data. With Microsoft Dynamics NAV 2013, queries can be used as data sources for those charts.
We will use the query defined earlier on in this chapter as the data source of a chart and we will display it on the home page of the Dynamics NAV Windows client.
To define a query as the data source of a chart, perform the following steps:
- Open the Windows client for Microsoft Dynamics NAV 2013.
- Navigate to Departments/Administration/Application Setup/RoleTailored Client.
- Select Generic Charts.
- Click on New on the ribbon bar to add a new chart.
- The New-Generic Chart setup page opens.
- Give the new chart an ID value and a Name value. For example, set ID to
50000and Name toMy Query Chart. - On the Data Source tab, select Query as Source Type and 50000 as Source ID.
- On the Measures (Y-Axis) tab, select Sum_Quantity as Data Column on the Required Measure row.
- On the Dimensions (X- and Z-Axes) tab, select Source_No as X-Axis Field.
- Click on OK to close the New-Generic Chart setup page.
To display the chart on the home page of the Windows client, perform the following steps:
- Go back to the home page of the Windows client for Dynamics NAV 2013.
- Click on the Dynamics NAV icon found on the upper-left corner of the page and select Customize and then Customize This Page.
- Select Chart Part from Available parts.
- Click on Add.
- A blank chart will appear on the Role Center layout section. Select the blank chart and click on Customize Part.
- Select chart 50000 My Query Chart and click on OK.
- Click on OK to close the Customize the Role Center page.
- Back at the home page of the Windows client, the chart should be displayed as follows:

In Microsoft Dynamics NAV 2009, it was possible to publish page and codeunit objects as web services to allow external applications to access Dynamics NAV data and business logic. In Microsoft Dynamics NAV 2013, it is also possible to publish query objects as web services.
Page and codeunit objects can be accessed through SOAP web services. Queries can only be accessed through the new web services protocol introduced in Microsoft Dynamics NAV 2013: OData web services .
To publish a query as a web service, perform the following steps:
- Open the Windows client for Microsoft Dynamics NAV 2013.
- Navigate to Departments/Administration/IT Administration/General.
- Select Web Services.
- Select New on the ribbon bar to publish a new web service.
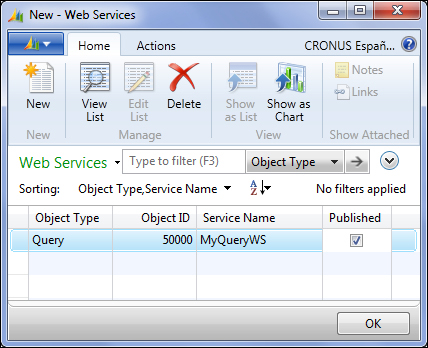
- The New-Web Services page opens.
- Select Query as Object Type.
- Enter
50000in the Object ID field. - Enter a name in the Service Name field. For example, let's use MyQueryWS as Service Name.
- Check the Published field, as shown in the following screenshot:
- Close the Windows client for Microsoft Dynamics NAV 2013.
At this point, the query is already published as a web service. You can check to see if it is accessible using your browser. To do so, perform the following steps:
- Open Internet Explorer (or any other browser).
- Type the following on the address bar:
http://<ServerName>:<ODataPort>/<ServerInstance>/OdataIn a typical installation,
<ODataPort>will be7048.<ServerName>will be the name of the server on which you have installed the server options of Microsoft Dynamics NAV 2013, and<ServerInstance>will be the name given to the Dynamics NAV service.If you are accessing the published web service on the server where Dynamics NAV is installed and you haven't changed the default port on which OData web services are published, you can use the following URL:
http://localhost:7048/DynamicsNAV70/Odata - The published OData web services should be displayed in an XML format, as shown in the following screenshot:

To access a concrete web service, enter its name at the end of the URL. In the case of the previous example, that would be http://localhost:7048/DynamicsNAV70/Odata/MyQueryWS.
Because Dynamics NAV 2013 queries can be published as web services, they can be accessed by absolutely any application that can consume OData web services. There is no limit. It can be an external application developed by you for the only purpose of reading Dynamics NAV data or it can be a commonly-used application that supports OData web services.
In this section, we will see how to use Dynamics NAV 2013 queries in Microsoft Office Excel.
Among all the applications that are out there, an extensively used one is probably Microsoft Office Excel. There is a free add-in for Excel called PowerPivot that can consume OData web services.
Great! How do we do that? Let's do it step by step:
- You can download PowerPivot by performing a quick search on the Internet which will lead you to the download page.
- Installing PowerPivot is an easy Next, Next, Finish install process.
- The installation of PowerPivot will create a new tab in the ribbon bar of Microsoft Office Excel.
- Publish a query as a web service. You can follow the instructions on the Web services section of this chapter to complete this action.
- Open Microsoft Excel.
- On the PowerPivot tab, select PowerPivot Window. A PowerPivot for Excel window will open.
- Select From Data Feeds.
- You will be asked to enter a friendly connection name and a data feed URL. Enter
NAV2013MyQueryWSas Friendly connection name andhttp://localhost:7048/DynamicsNAV70/Odata/MyQueryWSas the value for Data Feed URL, as shown in the following screenshot:
- Click on Test Connection to check if PowerPivot can access the published web service
- Click on Next and then click on Finish.
- An import process will start. Once it is finished, click on Close.
- The imported data will be displayed on the PowerPivot for Excel window.
- Close the PowerPivot for Excel window.
- On the PowerPivot tab, select PivotTable.
- A PivotTable that uses data from Microsoft Dynamics NAV 2013 will be created. Select the fields that you want to see on the PivotTable.
