


IBM System Storage DS Storage Manager installation
This chapter describes how to install the IBM System Storage DS Storage Manager on Microsoft Windows, Linux, and AIX. This chapter is organized in to the following sections:
The sections describe installing DS Storage Manager on a system that is used only for management purposes. Depending on the usage of the system, additional Storage Manager components might need to be installed. For more information about Storage Manager components and their usage, see 1.6, “IBM System Storage DS Storage Manager” on page 14.
|
Note: The file names that are shown in this chapter are only for a basic illustration of the steps to be followed, and they vary depending on the latest version of the Storage Manager that is available for download.
|
4.1 Installing DS Storage Manager on Microsoft Windows 2008
This section describes how to install DS Storage Manager on a Windows 2008 R2 system. Depending on the usage of the system, different components need to be installed, as described in 1.6, “IBM System Storage DS Storage Manager” on page 14.
4.1.1 Installation preparation
Before you perform the installation, complete the following steps:
1. Download the Storage Manager installation package from the IBM Support website. There are 32-bit (x86) and 64-bit (x86-64) versions. Make sure to download the package that corresponds to the Windows version of the host or management station. For more information about how to download DCS3700 fixes, code, and documentation, see Appendix A, “IBM Support Portal website” on page 583.
2. Extract the compressed archive into a local directory. The compressed archive contains the following items:
– A readme file with information about the package and the installation
– The installer file in the format SMIA-WS<32|64>-xx.xx.xx.xx.exe, where the Xs represent the version information
– A subdirectory with MIB files
– A scripts subdirectory that contains different scripts, such as Disable AVT
3. Decide on the installation type and proceed with the installation.
These steps are applicable for Manager and Client options.
4.1.2 Installing the Storage Manager Client on Microsoft Windows 2008
To install the Storage Manager client on a Microsoft Windows 2008 server, complete the following steps:
1. Run the installer file. Our version is SMIA-WS64-10.83.35.18.exe. The files extract themselves as shown in Figure 4-1.
|
Note: The file name that is shown above is for illustration purposes only and might vary depending on the latest version of the Storage Manager that is available for download.
|

Figure 4-1 IBM DS Storage Manager InstallAnywhere
|
Note: The installation program always uses English; the selected locale affects only the license agreement.
|

Figure 4-2 IBM DS Storage Manager Language Selection

Figure 4-3 IBM DS Storage Manager Introduction

Figure 4-4 IBM DS Storage Manager Copyright Statement

Figure 4-5 IBM DS Storage Manager License Agreement
6. Specify the directory where you want to install, as shown in Figure 4-6. The default is C:Program Files (x86)IBM_DS.

Figure 4-6 IBM DS Storage Manager Choose Install Folder
7. For Installation Type (Figure 4-7), select Custom and click Next. We recommend the Custom installation because you can see what components of Storage Manager will be installed in each Install Set (Typical, Management Station, or Host), and you can also modify them.
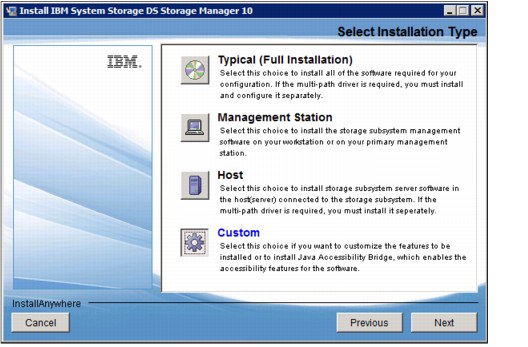
Figure 4-7 IBM DS Storage Manager Select Installation Type
8. In Figure 4-8 on page 137, select Install Set from the drop-down menu. The options in the drop-down menu are same as shown in Figure 4-7. When you select an Install Set, you can see what components will be installed and modify them if you want. For a description of each component, see 1.6, “IBM System Storage DS Storage Manager” on page 14. Our example shows the client selection because the system being installed is for management purposes and the other components are not required for it.

Figure 4-8 Select Product Features
9. If a version of Storage Manager is already installed, you see the warning that is shown in Figure 4-9. You can select to overwrite the existing installation or to cancel. Click OK to continue. If you do not have Storage Manager already installed, you do not see this warning.
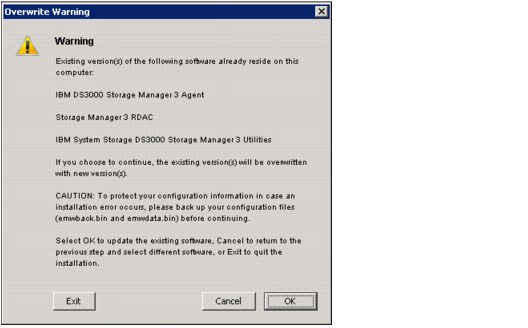
Figure 4-9 Overwrite Warning
10. In Figure 4-10, you can select whether to automatically start the Storage Manager Monitor. Click Next.

Figure 4-10 IBM DS Storage Manager Automatically Start Monitor
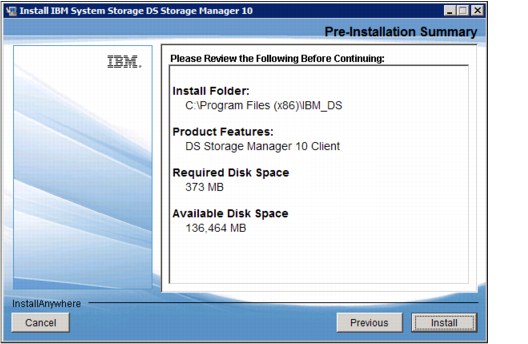
Figure 4-11 IBM DS Storage Manager Pre-Installation Summary
12. The installation status window opens during the installation, as shown in Figure 4-12.

Figure 4-12 IBM DS Storage Manager installation status window
After the installation finishes, verify that there are no errors and click Done (Figure 4-13).

Figure 4-13 IBM DS Storage Manager Install Complete
4.2 Installing DS Storage Manager on Linux
The procedure to install DS Storage Manager on Linux is similar to Windows, with one major difference: The multipath driver is not included in the Storage Manager installation package. It must be installed separately from the Storage Manager package. For more information about installing the multipath drivers, see 18.2.3, “Installing the Linux multipath driver” on page 542.
The IBM Systems Storage DS Storage Manager on Linux can be installed by using a GUI or a text-based interface. Both installation variants are described here. The first steps are common to all methods:
After you complete these steps, you can start IBM Storage Manager by running SMclient from a terminal window.
4.2.1 Preparing for the installation
To prepare for the installation, complete the following steps:
1. Download the latest version of the IBM Systems Storage DS Storage Manager Client to the management station or host that is connected to the DCS3700 for inband or outband connections from the IBM Support website. You can find more information about the IBM Support website in Appendix A, “IBM Support Portal website” on page 583.
2. Verify that there is enough space available in the /opt (450 MB for the complete installation) and /tmp (1 GB) directories to perform this installation. It is possible to set the IATEMPDIR environment variable to change the temporary directory to extract the files on a disk partition with enough free disk space instead of using /tmp.
|
Note: The setting of this variable changes only the temporary location where the IBM Storage Manager extracts the files for the installation.
|
To set the variable, run the following commands at the Linux command-line interface (CLI) before running this installer again:
– For Bourne shell (sh), ksh, bash, and zsh, run the following commands:
$ IATEMPDIR=/your/free/space/directory
$ export IATEMPDIR
– For C shell (csh) and tcsh, run the following commands:
$ setenv IATEMPDIR /your/free/space/directory
3. Extract the file to a local directory, as shown in Example 4-1.
Example 4-1 Extract the package archive
# tar -zxvf SM10.83_Linux_64bit_x86-64_SMIA-10.83.x5.18.tgz
Linux_x64_10p83/Linux_x86-64/
Linux_x64_10p83/Linux_x86-64/SMIA-LINUX64-10.83.A5.18.bin
Linux_x64_10p83/SM10R2MIB/
Linux_x64_10p83/SM10R2MIB/SM10_R2.MIB
Linux_x64_10p83/SM10R2MIB/README_First.txt
Linux_x64_10p83/scripts
The following files are unpacked:
– The installation package and executable
– The readme file that describes the package
– A subdirectory that is named SM10R2MIB that contains the MIB files
– A subdirectory that is named scripts that contains different scripts, such as
Disable AVT
Disable AVT
|
Note: This MIB file work only with the IBM System Storage DS3500, DCS3700, DS4000, and DS5000 Storage Manager.
|
4. The SMIA-LINUX-10.83.A5.18.bin file is the installer that contains the installation files. To be able to run this installer, you need to type sh before the file or change the file permissions to be able to execute.
5. By default, the installer requires a graphical console to start, but can be also installed on a text console or left unattended.
Run this file with the -? option to display information about the available options that can be used to install Storage Manager.
Here are the options:
– swing: A GUI installation that allows you to select the language of the license agreement. Only the license agreement is displayed in the selected language; the installation itself always uses English.
– console: Use a text-based console for the installation.
– silent: Perform an unattended installation.
6. Choose which method you want to use, and start the installation file, specifying your option with the -i parameter. For example:
$sh SMIA-LINUX-10.83.A5.18.bin -i console
4.2.2 Installing Storage Manager by using the GUI
|
Note: It is possible to run the GUI installation remotely, where you export the display by using X11 forwarding.
|
To install Storage Manager, complete the following steps:
1. Log on to the Linux server with administrative rights, that is, usually the root user, on a graphical console such as KDE, CDE, or Gnome.
2. Start the installer that was extracted in step 3 on page 140 in a terminal window by running the following command:
sh SMIA-LINUX-10.83.A5.18.bin
3. A window opens. Select the language to display the license agreement and click OK, as shown in Figure 4-14.
|
Note: The installation is performed in English always.
|

Figure 4-14 Select the language to display license agreement

Figure 4-15 Introduction

Figure 4-16 Copyright statement

Figure 4-17 License agreement
7. Select the Custom installation type and click Next, as shown in Figure 4-18. We recommend the Custom installation because you can see what components of Storage Manager will be installed in each Install Set (Typical, Management Station, or Host), and you can also modify them.

Figure 4-18 Installation type
8. Select the Install Set to be installed (DS Storage Manager 10 Client in our case). Click Next, as shown in Figure 4-19.

Figure 4-19 Select Product Features

Figure 4-20 Pre-Installation Summary
10. After a successful installation, a window similar to Figure 4-21 opens. If there are no errors, click Done to exit.

Figure 4-21 Install Complete
11. Optionally, verify the installation by running the rpm -qa |grep SM command and look for the following RPM packages in the installed package list:
– SMclient-10.83.G5.18-1
– SMesm-10.83.G5.02-1
– SMruntime-10.83.A5.00-1
4.2.3 Installing DS Storage Manager by using a text console
It is possible to install the IBM Systems Storage DS Storage Manager without any graphical interface by using the console mode installation. After installing the Storage Manager Agent, the system can be managed from any host that has the client installed and a network connection to this server.
To install the DS Storage Manager by using a text console, complete the following steps:
1. Start the installer with the -i console option. Select the locale (the default is English), and press Enter, as shown in Example 4-2.
Example 4-2 Text-based installation
# sh SMIA-LINUX-10.83.A5.18.bin -i console
Preparing to install...
Extracting the JRE from the installer archive...
Unpacking the JRE...
Extracting the installation resources from the installer archive...
Configuring the installer for this system's environment...
Launching installer...
Preparing CONSOLE Mode Installation...
===============================================================================
Choose Locale...
----------------
1- Bahasa Indonesia
2- Deutsch
->3- English
4- Español
5- Francais
6- Italiano
7- Português (Brasil)
CHOOSE LOCALE BY NUMBER:
2. Read the introduction and press Enter to proceed.
3. Read the copyright statement, press Enter to continue to the following page, and press Y to accept it.
4. Choose the type of installation to perform, as shown in Example 4-3. A full installation installs the Storage Manager Client, Utilities, and Agent. The option Management Station installs the Storage Manager Client and Utilities, and the option Host installs only the Storage Manager Agent. Press 4 for Custom and press Enter.
Example 4-3 Installation type
Select Installation Type
------------------------
Please choose the Install Set to be installed by this installer.
->1- Typical (Full Installation)
2- Management Station
3- Host
4- Customize...
ENTER THE NUMBER FOR THE INSTALL SET, OR PRESS <ENTER> TO ACCEPT THE DEFAULT
:
5. In this custom installation panel, you can select or clear individual components. By default, all components are selected and you can clear a component by entering the number that is associated with the component that you do not want to install. Here we choose only the DS Storage Manager 10 Client, as shown in Example 4-4.
Example 4-4 Choose Product Features
Choose Product Features
-----------------------
ENTER A COMMA_SEPARATED LIST OF NUMBERS REPRESENTING THE FEATURES YOU WOULD
LIKE TO SELECT, OR DESELECT. TO VIEW A FEATURE'S DESCRIPTION, ENTER
'?<NUMBER>'. PRESS <RETURN> WHEN YOU ARE DONE:
1- [X] DS Storage Manager 10 Client
2- [ ] DS Storage Manager 10 Utilities
3- [ ] DS Storage Manager 10 Agent
Choose the Features to be installed by this installer:
6. Confirm the pre-installation summary and press Enter, as shown in Example 4-5.
Example 4-5 Storage Manager - Pre-Installation Summary
Pre-Installation Summary
------------------------
Review the Following Before Continuing:
Install Folder:
/opt/IBM_DS
Product Components:
DS Storage Manager 10 Client,
DS Storage Manager 10 Utilities
Required Disk Space
714 MB
Available Disk Space
8,735 MB
PRESS <ENTER> TO CONTINUE:
7. The installation is now performed in the /opt/IBM_DS directory. After a successful installation, a message similar to Example 4-6 is displayed.
Example 4-6 Installation Complete
Installation Complete
---------------------
Congratulations. IBM System Storage DS Storage Manger 10 has been successfully installed to:
/opt/IBM_DS
PRESS <ENTER> TO EXIT THE INSTALLER:
#
4.2.4 Uninstalling DS Storage Manager on Linux
To uninstall DS Storage Manager on Linux, complete the following steps:
1. Run the following command at the command prompt:
# /opt/IBM_DS /UninstallIBM System Storage DS Storage Manager 10/
|
Note: Normally, the IBM Storage Manager directory by default is /opt/IBM_DS. It is possible to discover the current directory by running the following command:
rpm -qil SMclient-10.83.G5.18-1.noarch
At the time of writing, that is the name of the package. The current name of the RPM console package should display after you run the following command:
rpm -qa |grep SM
|
2. Read the introduction and press Enter to continue, as shown in Example 4-7.
Example 4-7 Press Enter to continue
Preparing CONSOLE Mode Uninstallation...
===============================================================
IBM System Storage DS Storage Manager 10 (created with InstallAnywhere)
-------------------------------------------------------------------------------
===============================================================
Uninstall IBM System Storage DS Storage Manager 10
--------------------------------------------------
About to uninstall...
IBM System Storage DS Storage Manager 10
This will remove features installed by InstallAnywhere. It will not remove
files and folders created after the installation.
PRESS <ENTER> TO CONTINUE:
3. Select the features to uninstall, as shown in Example 4-8.
Example 4-8 Features to uninstall
================================================
Uninstall Options
-----------------
ENTER THE NUMBER FOR YOUR CHOICE, OR PRESS <ENTER> TO ACCEPT THE DEFAULT:
->1- Completely remove all features and components.
2- Choose specific features that were installed by InstallAnywhere.
Please choose one of the following options: 1
Example 4-9 Complete uninstallation
============================================================================
Uninstall Complete
------------------
All items were successfully uninstalled.
linux:/opt/IBM_DS/Uninstall IBM System Storage DS Storage Manager 10 #
4.3 Installing DS Storage Manager on AIX
The procedure to install DS Storage Manager on AIX is similar to Linux, but with some differences. The size requirements for the installation and the package manager are different. As on Linux, the multipath drivers are not included in the installation package; it must be installed separately from the Storage Manager package. For more information about the AIX multipath drivers, see 19.2, “Configuring MPIO” on page 558.
As on Linux, the IBM Storage Manager can be installed by using a GUI or a text-based interface. Because we described the graphic and console mode in 4.2.2, “Installing Storage Manager by using the GUI” on page 141 and in 4.2.3, “Installing DS Storage Manager by using a text console” on page 146, we are going to include only the preparation for
this installation.
this installation.
After complete these steps, you will have installed the packages detailed below and be able to start IBM Storage Manager by running SMclient from a terminal window.
The following packages are shown by running the lslpp -al |grep SM command:
SMclient.aix.rte 10.83.G5.18.0 COMMITTED IBM DS Storage Manager 10
SMesm.aix.rte 10.83.G5.02.0 COMMITTED IBM DS Storage Manager ESM
SMruntime.aix.rte 10.83.65.00.0 COMMITTED IBM DS Storage Manager 10
SMutil.aix.rte 10.0.65.21.0 COMMITTED IBM DS Storage Manager 10
4.3.1 Preparing for the installation
To prepare for the installation, complete the following steps:
1. Download the latest version of the IBM Systems Storage DS Storage Manager Client to the management station or host that is connected to the DCS3700 for inband or outband connections from the IBM Support website. For more information about the IBM Support website, see Appendix A, “IBM Support Portal website” on page 583.
2. Verify that there is enough space available in the /usr (615 MB), /opt (450 MB), /var (31 MB) and /tmp (1 GB) directories to perform this installation. It is possible to set the IATEMPDIR environment variable to change the temporary directory to extract the files to a disk partition with enough free disk space instead of using /tmp.
|
Note: The setting of this variable changes only the temporary location where the IBM Storage Manager places the files for the installation.
|
To set the variable, enter one of the following commands at the UNIX CLI before running this installer again:
– For Bourne shell (sh), ksh, bash, and zsh, run the following commands:
$ IATEMPDIR=/your/free/space/directory
$ export IATEMPDIR
– For C shell (csh) and tcsh, run the following commands:
$ setenv IATEMPDIR /your/free/space/directory
3. Extract the file to a local directory, as shown in Example 4-10.
Example 4-10 Extract package archive
# gzip -d SM10.83_Aix_SMIA-10.83.x5.18.tgz
# tar -xvf SM10.83_Aix_SMIA-10.83.x5.18.tar
x Aix/Aix
x Aix/Aix/SMIA-AIX-10.83.65.18.bin, 707704559 bytes, 1382236 tape blocks
x Aix/SM10R2MIB
x Aix/SM10R2MIB/SM10_R2.MIB, 5298 bytes, 11 tape blocks
x Aix/SM10R2MIB/README_First.txt, 126 bytes, 1 tape blocks
The following files are unpacked:
– The installation package and executable
– The readme file that describes the package
– A subdirectory SM10R2MIB that contains the MIB files
– A subdirectory scripts that contains different scripts, such as Disable AVT
|
Note: This MIB file works only with the DS3500, DCS3700, DS4000, and DS5000 Storage Manager.
|
4. The SMIA-AIX-10.83.65.18.bin file is the installer that contains the installation files. To be able to run this installer, you need to type sh before the file or change the file permissions to be able to execute.
5. By default, the installer requires a graphical console to start, but it can also be run on a text console or left unattended.
Run this file with the option -? to display information about the available options to install Storage Manager.
Here are the options:
– swing: A GUI installation that allows you to select the language of the license agreement. Only the license agreement is displayed in the selected language; the installation itself always uses English.
– console: Use a text-based console for the installation.
– silent: Perform an unattended installation.
6. Choose which method you want to use, and start the installation file, specifying your option with the -i parameter. For example:
$sh SMIA-AIX-10.83.65.18.bin -i console
4.4 Completing the DS Storage Manager installation
This section contains procedures for using the Enterprise Management and Subsystem Management features of DS Storage Manager to complete the storage management installation tasks for all host operating systems.
To complete a Storage Manager installation, you must complete the following tasks:
•Initial automatic discovery of storage subsystems
•Initial manual discovery of storage subsystems
The Enterprise Management window opens when you start the DS Storage Manager. You can use the Enterprise Management window to perform the following tasks:
•Add and discover the storage subsystems.
•View all storage subsystems in your management domain.
The other options of the Enterprise Management window are described in Chapter 5, “Administration: Enterprise Management” on page 159.
4.4.1 Performing an automatic discovery of storage subsystems
To perform an initial automatic discovery of storage subsystems, complete the
following steps:
following steps:
1. From the Setup tab of the DS Storage Manager Enterprise Management window, click Add Storage Subsystem, as shown in Figure 4-22.

Figure 4-22 Add Storage Subsystem

Figure 4-23 Select Addition Method - Automatic
3. Click OK to begin an initial automatic discovery of hosts and storage subsystems that are attached to the local subnetwork, as shown in Figure 4-24.
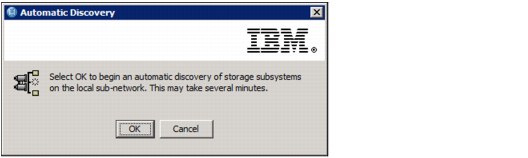
Figure 4-24 Automatic Discovery
After the initial automatic discovery is complete, the Devices tab of the Enterprise Management window displays all hosts and storage subsystems that are attached to the
local subnetwork.
local subnetwork.
|
Note: The Enterprise Management window can take up to a minute to refresh after an initial automatic discovery.
|
4.4.2 Performing a manual discovery of storage subsystems
You can manually add more hosts or storage subsystems. You can use this option to selectively manage a group of storage subsystems from an SMclient. You can also use this option to add additional devices to be managed that were not discovered during the SMclient
initial discovery.
initial discovery.
|
Note:
•When you add new storage subsystems to the existing storage subsystems in a SAN that are managed through the host-agent software, you must stop and restart the host-agent service. When the host-agent service restarts, the new storage subsystem is detected. Then, go to the Enterprise Management window and click Tools → Rescan to add the new storage subsystems to the management domain.
•When you add new storage subsystems to existing storage subsystems that are managed using the direct-management method, be sure to specify the IP addresses for
both controllers. |
To add the storage subsystem manually, complete the following steps:
1. From the Setup tab DS Storage Manager Enterprise Management window, click the Add Storage Subsystem link, as shown in Figure 4-25.

Figure 4-25 Add Storage Subsystem

Figure 4-26 Select Addition Method - Manual
3. Select a management method and add the storage subsystem:
– When using out-of-band management, select Out-of-band management and enter the IP addresses of both the controllers, as shown in Figure 4-27.

Figure 4-27 Out-of-band management
– For In-band management, select the In-band management option and enter the IP address of the attached host, as shown in Figure 4-28.

Figure 4-28 In-band management
4. Click Add to complete the process. After the storage subsystem is successfully added, you can add another storage subsystem, as shown in Figure 4-29, and you can repeat the process until all the storage subsystems that you want to add are added.

Figure 4-29 Storage Subsystem Added
4.4.3 Adding a Storage Subsystem verification
Verify that each host and storage subsystem displays in the Enterprise Management window. If a host or storage subsystem is not displayed, complete the following tasks:
•Check the hardware and hardware connections for possible problems.
•If you are using the network management method (commonly known as out-of-band management), verify that all hosts and storage subsystems are connected to the same subnet network. If you are using the host-agent method (commonly known as in-band management), ensure that the Fibre Channel connection between the host and storage subsystems is made.
•Make sure that all of the preparation steps for setting up the storage subsystem for a network managed system are completed. Use the Add Device option to add the IP addresses of the storage subsystem. Add both IP addresses of the controller. Otherwise, you get a “partially managed device” error message when you try to manage the
storage subsystem.
storage subsystem.
|
Note: To use the auto-discovery method, the storage subsystem and this host must be on the same subnet. Otherwise, use the manual method to add a system.
|
•If you are using the host-agent management method, complete the following steps:
a. Make sure that the SMagent is installed on the host.
b. Verify that you have a Fibre Channel connection from the storage subsystems to the host that has the SMagent installed.
c. Verify that all of the preparation steps are complete, and then complete the
following steps:
following steps:
i. Run the hot_add utility.
ii. Restart the SMagent.
iii. Right-click the host and click Tools → Rescan in the Enterprise
Management window.
Management window.
|
Note: In certain situations, a storage subsystem might be duplicated in the device tree after an automatic discovery. You can remove a duplicate storage management icon from the device tree by using the Remove Device option in the Enterprise Management window.
|
•Verify that the status of each storage subsystem is Optimal. If a device shows a status of Unresponsive, right-click the device and select Remove Device to delete it from the management domain. Then, use the Add Device option to add it to the management domain again.
You see an Enterprise Management window (Figure 4-30) when you add your
systems successfully.
systems successfully.

Figure 4-30 Enterprise Management window with discovered systems
..................Content has been hidden....................
You can't read the all page of ebook, please click here login for view all page.