


Administration: Subsystem Management
Chapter 5, “Administration: Enterprise Management” on page 159 describes how to manage a storage subsystem from the IBM System Storage DS Storage Manager (Enterprise Management) window.
When you choose to manage a specific storage subsystem, the IBM System Storage DS (Subsystem Management) window opens, along with the Initial Setup Task window in the background and a small window that prompts for the password.
|
Note: Starting with DS Storage Manager V10.70, all managed subsystems must have a password set. Setting the password and a description of the new strong password rules are described in 11.1.4, “Set a Storage Subsystem Password” on page 356.
|
After entering the correct password, all five tabs of Subsystem Manager are accessible. The last used tab from previous session is selected automatically and the size of window is also restored from previous session. For the Initial Setup Tasks for the first configuration steps on a new subsystem, see Chapter 11, “Administration: Setup tab” on page 353.
7.1 DS Storage Manager: Subsystem Management
The IBM System Storage DS Storage Manager Subsystem Management window has four main areas, as shown in Figure 7-1:
•Drop-down menu
•Toolbar
•Tabs
•Status bar

Figure 7-1 Subsystem Manager - Summary tab
7.2 Drop-down menu
The area at the top of Subsystem Management window is the drop-down menu bar. Although it is possible to do almost all configuration tasks from this menu, sometimes it is necessary to select the logical or physical components in tab area first before you can perform the task. Another option is to configure the storage subsystem directly in the tab area. This section describes configuration tasks that are the easiest to do from the drop-down menu in this section. Other configuration tasks are described in the chapters that are dedicated to a specific tab.
This section covers the Storage Subsystem drop-down menu.
7.2.1 Storage Subsystem menu
This menu is used to display or configure the general properties and features of the managed storage subsystem. It is used often and is independent of the tab that is selected in the
tab area.
tab area.
Many items can be seen in this menu:
•Premium Features
•Security
•Change
•Configuration
•Rename
•Preferences
•Exit
Click Storage Subsystem to open the associated menu items, as shown in Figure 7-2. If you select items with the small right arrow on the right side of the menu item, it opens another submenu. The other items (with three dot characters at the end of menu text) directly open a window with the requested task.

Figure 7-2 Storage Subsystem menu
The following sections describe the most common items of this drop-down menu.
Premium Features
This item is used for viewing or activating software licenses for the Premium Features. You might have some of them already activated because certain basic licenses are delivered with each IBM System Storage DCS3700 storage subsystem as standard, and you can buy more as needed. Types of licenses are described in 2.5, “Planning for Premium Features” on page 74.
Obtaining the license *.key file
You need a special license *.key file to activate more Premium Features in this step. This file must be downloaded from the IBM feature activation website (Figure 7-3), where each Premium Feature is registered based on the serial number of your DCS3700 enclosure and Feature Enable Identifier.
The IBM activation website is at the following URL:
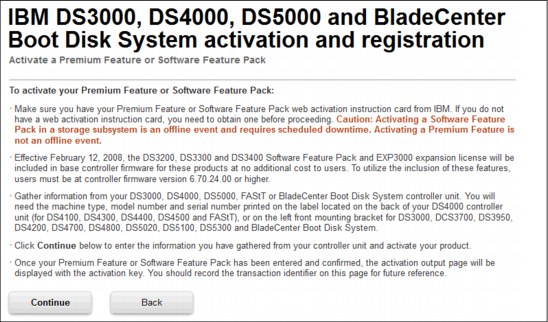
Figure 7-3 Premium Feature activation website
The following Premium Features can be delivered with your DCS3700 storage subsystem or you can buy these Premium Features as optional (additional charge) Premium Features:
•Enhanced Remote Mirroring (ERM)
•Enhanced FlashCopy
•Storage Partitioning
•FlashCopy Logical Drive
•VolumeCopy
|
Note: In firmware V7.83 IBM offers a Try and Buy feature, where the Premium Features such as ERM or FlashCopy can be tested first, allowing you to test the functionality for 90 days before you purchase the Premium Feature.
|
You can find instructions and the actual procedure to get the license *.key file in the Premium Feature Certificate, which is included in the license envelope and is part of your DCS3700 Premium Feature delivery. You can also find a unique access code for the IBM activation website where the *.key file must be registered, generated, and downloaded.
|
Warning: Store the paper document from the license envelope in safe place if you want to postpone your Premium Feature *.key file download. If you lose the access code for the IBM activation website, it is difficult to get it again from IBM in a short time frame. You need a proof of purchase when you contact an authorized IBM Support Representative.
Note: If you lose the downloaded *.key file, you can download it again (without the access code from the license envelope) from the same IBM activation website because it is already registered and generated. You need only the serial number and the Feature Key Identifier of the DCS3700.
|
View/Enable Premium Feature
Click Storage Subsystem → Premium Feature in drop-down menu to open a window where the list of possible features is displayed in the first pane, as shown in Figure 7-4. Some features are enabled at the plant, and some are disabled and can be enabled/activated by a *.key file that must be downloaded from the IBM website (Figure 7-3 on page 206). The Feature Enable Identifier that is displayed is necessary (together with DCS3700 enclosure serial number) during the *.key file generation at the IBM activation website.

Figure 7-4 Premium Feature window
Depending on the Premium Feature that is selected, you can enable a disabled feature, or disable an enabled feature. To enable a feature, click Enable and a window for selecting the *.key file on your management station opens. When the key file is accepted, a window with more information opens (Figure 7-5).

Figure 7-5 Enable Premium Feature - information
To disable a feature, select that feature and click Disable. A warning window opens (Figure 7-6).
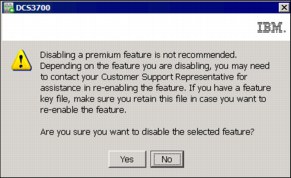
Figure 7-6 Disable Premium Feature
Feature Pack
The second pane in the Premium Feature window (Figure 7-4 on page 207) is the Feature Pack window. It is not possible to change the Feature Pack on any DCS3700
storage subsystem.
storage subsystem.
Security: Set Password
Starting with Storage Manager V10.70, new stronger password rules are in effect, so you must have passwords set for all DCS3700 storage subsystems. You must enter the password when Subsystem Manager is started for a storage subsystem, even if you just want to see the configuration. If you start Subsystem Manager for the first time, you must set a new password. In previous versions, the password was requested only in the case of configuration changes, such as deleting objects and creating a new array or logical volume.
A strong password must meet the following requirements:
•Must be 8 - 30 characters in length.
•Must contain at least one number (0 - 9).
•Must contain at least one lowercase letter (a - z).
•Must contain at least one uppercase letter (A - Z).
•Must contain at least one non-alphanumeric character (!, @, #, $, and so on).
•Must not contain any spaces, including trailing spaces.
Click Storage Subsystem → Security → Set Password to define a new password. You must set the current password and enter the new password twice.
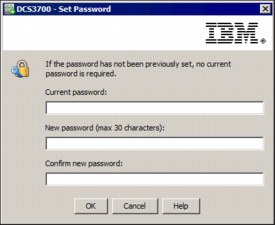
Figure 7-7 Set Password
If you have forgotten the current password, contact your IBM Customer Support Representative. If a password was not set previously (for example, you have a new subsystem), the current password is not required to establish a new password.
Change
The Change menu item in the Storage Subsystem menu is one of the most important menus for setting global parameters of the DCS3700 storage subsystem. Many changes that are done by this menu can also be done directly in tabs, but this section describes most of
these changes.
these changes.
Click Storage Subsystem → Change. The menu that opens (Figure 7-8) offers several options to configure:
•Cache Settings
•Failover Alert Delay

Figure 7-8 Change subsystem menu
Cache Settings
This menu item sets the global cache settings of the DCS3700 storage subsystem. It is possible to set other cache settings that are dedicated for each logical drive. The recommended cache settings depend on the required host load and type of load, and
can vary.
can vary.
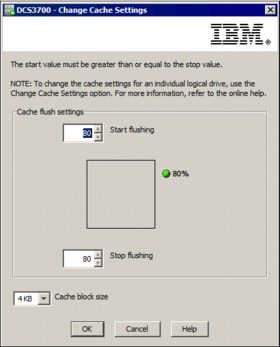
Figure 7-9 Cache Settings for a storage subsystem
The default value of the cache flushing is 80%/80%. You have a choice to set the Start and Stop level for cache flushing, and the Cache block size, as shown in Figure 7-9. For most installations, set 50%/50% for Start/Stop cache flushing and a 16 KB cache block size. But in certain cases, a different setting can achieve better performance results. All settings in this window are immediately accepted if you click OK; you do not need to reset the DCS3700 storage subsystem, so it is possible to test your settings during regular production on the storage subsystem.
Failover Alert Delay
A failover alert delay can be specified on a DCS3700 storage subsystem. The setting can delay the logging of a critical event if the multipath failover driver transfers the logical drive to the non-preferred controller of the storage subsystem. If the multipath driver transfers the logical drives back to the preferred controller within the specified delay period, no critical event is logged. If the transfer exceeds this delay period, then an alert is issued as a critical event.
Click Storage Subsystem → Change → Failover Alert Delay, and in the window that is shown in Figure 7-10 on page 211, you can set a range of 0 - 60 minutes. The default failover delay is 5 minutes.

Figure 7-10 Failover Alert Delay
|
Note: If the ownership transfers back to preferred controller within the delay period, the critical alert notification is not sent. However, a “Needs Attention” status is displayed immediately and the Recovery Guru shows details about it. For more information about alert sending, see 13.2, “View Health (Recovery Guru)” on page 387.
|
iSCSI
This option (Figure 7-11) in the Storage Subsystem drop-down menu is available and visible only if iSCSI daughter cards are installed in the DCS3700 storage subsystem.

Figure 7-11 iSCSI drop-down menu
For a detailed description about how to set an attachment to iSCSI hosts, see Chapter 12, “Administration: iSCSI” on page 363.
Automatic configuration of arrays
If the Automatic configuration option is selected, a new window with an introduction to automatic configuration opens that uses dedicated options to create tuned logical drives. Click Next and the window that is shown in Figure 7-12 opens.
|
Note: If your storage subsystem contains drives with different media types and different interface types, or has no unassigned drives available for configuration, the Automatic Configuration window does not open.
|

Figure 7-12 Fully automatic configuration of arrays
Do not use the Choose a suggested configuration option because it creates an impractical set of many arrays with a minimal number of disks in each array. Because you are setting only the RAID level, you have no control of the number and size of logical disks and number of arrays that are created by using this option.
Instead, select the option to create your own configuration and click Next. A new wizard window opens. This wizard offers more parameters for automatic configuration.
You can preset the following items, as shown in Figure 7-13 on page 213:
•RAID level
•Number of disk drives per array
•Number of Hot spare drives
•Number of logical drives per array
•Change I/O Type
If you select Change I/O Type, you can preset the following items:
•Dynamic cache pre-fetch
•Array segment size
Unfortunately, you still have no influence on the size of logical drives, which is set automatically. You also cannot select which disk drives are used for arrays and hot spares, and selecting disk drives from separate enclosures is impossible.

Figure 7-13 Automatic Configuration Parameters
A Summary window and a window with more information about the automatic configuration process (Figure 7-14) opens.

Figure 7-14 Automatic Configuration - Summary
Dynamic Pool Automatic Configuration
The storage management software can detect the unconfigured capacity in a storage subsystem. When the unconfigured capacity is detected, the storage management software prompts you to create one or more disk pools, add the unconfigured capacity to an existing disk pool, or both. By default, the Automatic Configuration dialog box opens when one of these conditions are true (Figure 7-15 on page 215):
•The Subsystem Management window (SMW) is opened to manage a storage subsystem, disk pools do not exist in the storage subsystem, and there are enough similar drives to create a disk pool.
•New drives are added to a storage subsystem that has at least one disk pool. If there are enough eligible drives available, you can create a disk pool of different drive types than the existing disk pool.
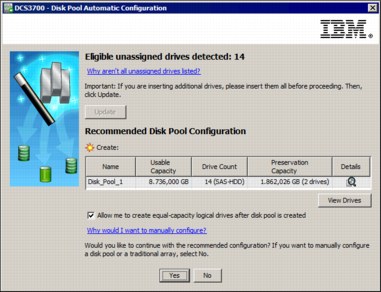
Figure 7-15 Automatic Configuration - Disk Pools
If you want to open the Automatic Configuration dialog box, click Storage Subsystem → Configuration → Automatic → Disk Pools (Figure 7-16).

Figure 7-16 Invoke Automatic Configuration - Disk Pools
You can preset the following items (shown in Figure 7-15):
•Name: The default name that is given to the disk pool.
•Usable Capacity: The capacity of the disk pool that can be used to create logical drives.
•Drive Count: The number of drives that comprise the disk pool and their drive type and media type.
•Preservation Capacity: The disk pool capacity that is reserved for reconstruction of data when one or more drives fail.
•Details: An icon is displayed in this column. When you hover the mouse pointer over this icon, you can view more information about the disk pool recommendation, such as drive speed, security capability, and T10 PI (Protection Information) capability.
As shown in Figure 7-17, you can define the following items:
•Name
•Usable Capacity
•Free Capacity (% of Usable)
•Equal Capacity Logical Drives

Figure 7-17 Logical Drive Automatic Configuration
Hot spare coverage
If you select the Configure hot spare drives option in the Select Configuration Task window, a new window opens for hot spare configuration. In this window (Figure 7-18 on page 217), you have two choices: Automatic or manual configuration of hot spares.

Figure 7-18 Hot Spare Coverage
The concept of a hot spare drive is explained in Chapter 9, “Administration: Hardware tab” on page 305. There you can also find a detailed description of the same Hot Spare Drive Option window, and how to set hot spare drives.
Save Configuration
Click the Save Configuration link to open a window (Figure 7-19) where you can save the logical configuration settings of a storage subsystem to a script file. You can then click Tools → Load Storage Subsystem Configuration in the Enterprise Management window to copy the configuration data back from the saved file to a storage subsystem with the exact hardware configuration. For more information about the Load Storage Subsystem Configuration option, see “Load Storage Subsystem Configuration option” on page 165.

Figure 7-19 Save Configuration
When your DCS3700 Storage Subsystem is fully configured, the Save Configuration option lets you save storage subsystem logical settings, logical drive configuration, topology, and mappings to a text file in the form of script file that also can be used by the SMcli command-line interface. If there are individual topology items or logical drives that you do not want to include in the saved configuration, you can edit the script file after it is saved. You can also use modified SMcli commands from this file to create a logical device in your storage subsystem. For more information about SMcli, see Chapter 15, “Command-line interface (CLI)” on page 463.
|
Save Configuration: It is a preferred practice to save the Configuration after every change you make to the system. IBM Support can re-create the system after a disaster only if it has a valid configuration file.
|
Clicking Configuration → Save does not save the following settings:
•The age of the battery
•The controller time of day
•The nonvolatile static random access memory (NVSRAM) settings
•Any Premium Features
•The storage subsystem password
•The operating status and states of the hardware components
•The operating status and states of the arrays and logical drives
Clearing a configuration
Clicking Configuration → Clear in the Subsystem Management window provides the submenu options that are listed in the following sections.
Clear Storage System Configuration
Click Clear Storage System Configuration to permanently delete the current logical drive configuration. Using this function cause these conditions to occur:
•All logical drives and arrays are deleted. This action destroys all data on these logical drives and arrays.
•The user-supplied DCS3700 storage subsystem name is deleted.
•If you have password-protected your storage subsystem for destructive operations, that password protection is lost.
|
Attention: When you use this option, all data that is stored on the storage subsystem is lost. Do not attempt this operation unless you have a verified current backup of all data on the storage subsystem.
|
To clear the storage subsystem configuration, complete the following steps:
1. In the DS Storage Manager (Subsystem Management) window, click Configuration → Clear → Storage Subsystem.
You are prompted to confirm that you want to proceed, as shown in Figure 7-20.

Figure 7-20 Clear Storage Subsystem Configuration
2. Type yes in the text box and click OK to clear the storage subsystem configuration.
Clear Array Configuration
You can use the Logical Drive option to permanently delete the Logical Drive configuration on the DCS3700 storage subsystem.
|
Attention: All data that is stored on the array is lost when you use this option. Do not attempt this operation unless you have a verified current backup of all data on the
logical drives. |
To clear the storage subsystem array configuration, complete the following steps:
1. In the DS Storage Manager (Subsystem Management) window, click Configuration → Clear → Logical Drive.
You are prompted to confirm that you want to clear the Logical Drive configuration, as shown in Figure 7-21.
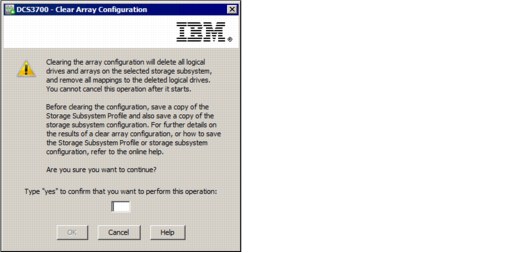
Figure 7-21 Clear Array Configuration
2. Type yes in the text box and click OK to clear the Logical Drive (array) configuration.
Rename Storage Subsystem
When you add a storage subsystem to your Storage Manager, it is identified as “Unnamed”. If you have several storage subsystems that are installed in your environment, you can give each subsystem a meaningful name.
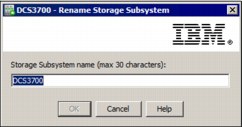
Figure 7-22 Rename Storage Subsystem
The subsystem name is immediately updated in Enterprise Manager.
|
Note: Renaming the storage subsystem can have an influence on services that are running outside the Storage Manager. For example, you can run some customized SMcli scripts where the storage subsystem is referenced by its name. Also, some types of multipath failover drivers on servers use the name of the attached storage subsystem. Rename a new storage subsystem as soon as possible before it is in production.
|
Preferences
To change the User Interface Settings or to Reset Conditional Dialogs, click Storage Subsystem → Preferences, as shown in Figure 7-23.

Figure 7-23 Preferences

Figure 7-24 Conditional Dialogs Reset confirmation
7.3 Toolbar
Several icons are in the toolbar area and shown in Figure 7-25. These icons can help you easily navigate to certain management tasks.
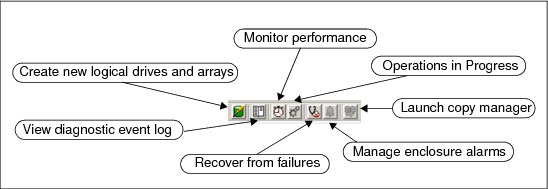
Figure 7-25 Toolbar icons
The seven icons in the toolbar are (from left to right):
•Create new logical drives and arrays
•View diagnostic event log
•Monitor Performance
•Operations in Progress
•Recover from failures
•Manage enclosure alarms
•Launch copy manager
7.4 Status bar
Several icons are displayed in the Status bar area, and they can easily show the types of license that are available on the managed subsystem. Some of them are shown activated. If the icon is crossed by red line, as shown in Figure 7-26, this Premium Feature is
not activated.
not activated.

Figure 7-26 Status bar icons
If you hover your cursor over one of the icons, a small text box (Figure 7-27) is shown after about one second. It shows the description of the selected Premium Feature and its enablement status.
Figure 7-27 Premium Feature icon - description text
To activate new licenses (Premium Features), click Storage Subsystem → Premium Features, as described in “View/Enable Premium Feature” on page 207.
7.5 Tabs
This is the main management area of the IBM System Storage DS (Subsystem Management). In this area (see Figure 7-28 on page 223), you can see the highlighted name of the managed storage subsystem in the upper part, and close to the name is an icon that shows the status of the whole storage subsystem. It changes from green to red if the subsystem has degraded components, or when something has failed. The description changes from Optimal to Needs Attention in this case.

Figure 7-28 Tab area
Each of these five tabs is described in the following chapters in this book:
•Summary tab in Chapter 6, “Administration: Summary tab” on page 187
•Storage & Copy Services tab in Chapter 8, “Administration: Storage & Copy Services tab” on page 225
•Host Mappings tab in Chapter 10, “Administration: Mappings tab” on page 327
•Hardware tab in Chapter 9, “Administration: Hardware tab” on page 305
•Setup tab in Chapter 11, “Administration: Setup tab” on page 353
..................Content has been hidden....................
You can't read the all page of ebook, please click here login for view all page.