
Chapter 9. Programming Raspberry Pi with Scratch—Next Steps
If you invested the necessary time to practice the Scratch programming skills you learned in Chapter 8, “Programming Raspberry Pi with Scratch—Beginnings,” you are ready to take the next step by developing and sharing a full-fledged Scratch application.
In this chapter, you learn how to create a pretty neat game, if I do say so myself. You’ve even got my blessing to remix the game and submit it to the Scratch Projects website (if you don’t know what remixing means, don’t worry—I cover that later on).
Note: Version Control, Revisited
As you learned in Chapter 8, the Scratch Team at the MIT Media Lab has upgraded their website, promotional materials, and the development environment itself to Scratch 2.0. Although Scratch 2.0 on its surface looks very different from Scratch 1.4, don’t be daunted. Everything you learned in the previous chapter and everything you learn in this chapter carries over root and branch from Scratch 1.4 to Scratch 2.0. Besides, this book is about the Raspi, and Raspi includes Scratch 1.4.
Begin with the End in Mind
Before you begin coding, I think the review of some programming best practices is in order. What questions do you need answers to before you open up your development tools and start to build an application?
What exactly is the purpose of the app? For the purposes of this exercise, you want to build a game in Scratch that tests the player’s reflexes and offers a minute or so of heart-racing fun.
Specifically, the game I designed for this chapter is called Dodgeball Challenge; Figure 9.1 displays the splash screen for the game.

FIGURE 9.1 Dodgeball Challenge splash screen. By the end of this chapter, you’ll know how to build this game!
From a meta perspective, I also intend for this case study Scratch game to serve as a showpiece for what Scratch is capable of as a multimedia development environment.
Who is the intended audience for the app? Speaking personally, I have two main audiences in mind: you, my readers and students, who want to learn how to program in Scratch and anybody with a love of simple, addictive video games.
I have actually added the Dodgeball Challenge game to the Scratch website. If you like, you can visit the game page (http://is.gd/RvvRsT) and check out the game for your reference (see Figure 9.2). Isn’t open source software wonderful?

FIGURE 9.2 You can check out the Dodgeball Challenge game (and associated source code) from the Scratch Projects website. Note that the game is automatically converted to Scratch 2.0 and can be opened directly from a (non-Raspberry Pi) web browser.
Before you proceed to the rest of the chapter in which you build the game from Scratch (pun intended), play the game a few times so that you’re familiar with the gameplay. Although I provide the game rules on the Scratch website page, let me summarize them for you here for the sake of completeness:
![]() The goal of Dodgeball Challenge is to survive for 60 seconds.
The goal of Dodgeball Challenge is to survive for 60 seconds.
![]() The game ends if the user’s avatar (specifically, the Scratch Cat as controlled by your computer mouse) touches a ball or (optionally) the edge of the playfield.
The game ends if the user’s avatar (specifically, the Scratch Cat as controlled by your computer mouse) touches a ball or (optionally) the edge of the playfield.
![]() Every 15 seconds a new ball is added to the game, ramping up the complexity and difficulty.
Every 15 seconds a new ball is added to the game, ramping up the complexity and difficulty.
Let’s Build the Game!
Fire up Scratch and save a new .sb project file. Because the Scratch Cat is the default sprite, let’s go ahead and use it. The first step in this process is to set up the game screens, but before you do that, let’s set the table with regard to what you’re about to take on.
We have a concrete idea for a fun game, and we’ll build it one piece at a time, starting with the screens. Iterative software development means that you’ll test the game after every change. This approach minimizes the possibility of introducing bugs (programming logic flaws) into the released version of the game.
Take a look at Figure 9.3 so that you can refamiliarize yourself with the Scratch 1.4 user interface.

1: Menu and toolbars
2: Stage
3: Blocks palette
4: Script area
5: Sprite area
Task: Setting Up the Game Screens
1. In the Sprites area, double-click the Stage to bring it into focus. In the Scripts area, navigate to the Backgrounds tab. Use the Paint button to create three additional playfield screens (four in total) as shown in Figure 9.4.
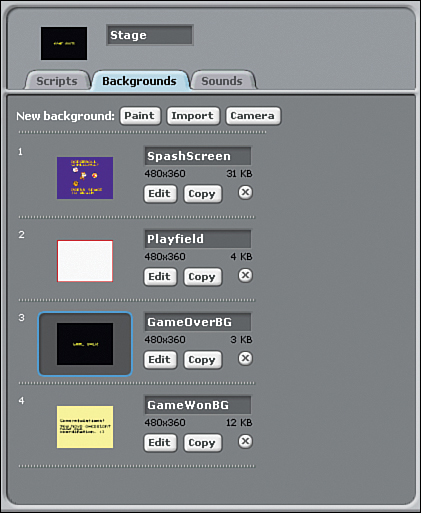
Here’s the breakdown of the purpose of each background:
![]() SplashScreen: This is the introductory screen that advertises the game to players and provides instructions on starting the game itself.
SplashScreen: This is the introductory screen that advertises the game to players and provides instructions on starting the game itself.
![]() Playfield: This is the screen that is used during actual gameplay.
Playfield: This is the screen that is used during actual gameplay.
![]() GameOverBG: This is the screen the player sees when he loses the game.
GameOverBG: This is the screen the player sees when he loses the game.
![]() GameWonBG: This is the success screen presented to the player who lasts the entire 60 seconds without losing.
GameWonBG: This is the success screen presented to the player who lasts the entire 60 seconds without losing.
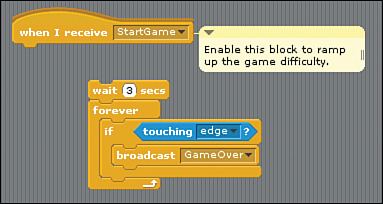
2. Navigate to the Scripts pane and add the two code blocks shown in Figure 9.5. Ignore the two “when I receive” stacks for now.

1. This block ensures that when the player clicks the Green Flag, the black splash screen is presented.
2. This block triggers the actual gameplay by switching the background to the white playfield background and kicking off the StartGame broadcast. Note that I chose the Spacebar as the method for starting the game, but you can select any key from the keyboard. Although you can also set up the game to respond to a mouse click, I advise against that for this broadcast so as not to introduce any potential confusion. For my part, I tend to use out of the way keystrokes in my games so if the user clicks their mouse or taps a common key (such as ENTER), the game does not blow up.
As I alluded to in the previous chapter, broadcasts provide a convenient method for communicating among sprites (or between the Stage and sprites) in a Scratch application. You can use the broadcast block from the Control palette to define a broadcast; make sure to give each broadcast a meaningful name.
You can then leverage the when I receive block (again from the Control palette) to receive, or catch, outbound broadcasts from the same sprite, another sprite, or even the Stage.
Let’s now turn our attention to initial setup of the ScratchCat sprite.
Task: Setting Up the Scratch Cat
1. Double-click the Cat to select the sprite and rename it ScratchCat in the Scripts area.
2. Click the Shrink Sprite button above the Stage and repeatedly click the Scratch Cat sprite until it reaches your desired size. My thought was to make the sprite large enough to see its detail, yet small enough to provide for challenging gameplay.
3. Go over the Scripts area and set up the block stacks as shown in Figure 9.6. Yes, I know you can simply examine my source code from the game copy you downloaded from the Scratch website. However, if you want to learn to program with Scratch, you need to test this stuff out yourself!

Let me explain the purpose of each block stack:
1: This stack hides both the Scratch Cat as well as the timer that you are about to build when the player clicks the Green Flag. You don’t need to see these elements until the player actually starts the gameplay itself (that is to say, when the player taps the Spacebar).
2: This event listener “unhides” the Scratch Cat and maps the player’s mouse movements to the Scratch Cat’s location. Note that these actions kick off in response to the StartGame broadcast that you initiated from the SplashScreen.
3: This block stack sets up the game timer, which is crucial in this game. Although the Sensing palette contains a couple Timer blocks, those blocks mark the elapsed time since you last opened the Scratch app. Of course, that’s not what you need here. Therefore, you can create a new variable named Timer (discussed in the Note, “Creating Variables”) and simply increment its value every second. Pretty straightforward stuff, wouldn’t you agree?
Variables are how you store temporary data in your app. To create the Timer variable, navigate to the Variables palette and click Create Variable. By default the new variable will be available to all sprites in the game; that is what we want in this case. For further details, look at the live source code at the Scratch website: http://is.gd/RvvRsT.
4: This is an optional block stack I put together to give you the ability to ramp up the game’s complexity. This block ends the game if the Scratch Cat touches the border of the screen. I disabled the stack by default because I felt that it made the game overly difficult. What do you think?
5: When the GameOver message is broadcast, I want the Scratch Cat sprite to disappear.
Setting Up the First Ball
I chose to add most of the gameplay logic in the Scripts area for the Basketball sprite, which is the first enemy sprite used in the Dodgeball Challenge game. Take a look at the code in Figure 9.7, and I’ll walk you through it.

1: Wow, this is one honkin’ block stack! Here’s the deal: When the user presses the Spacebar and kicks off the StartGame broadcast, you want to perform the following actions:
![]() Show the previously hidden basketball sprite (I prefer doing this to having the ball materialize out of thin air).
Show the previously hidden basketball sprite (I prefer doing this to having the ball materialize out of thin air).
![]() Wait an arbitrary second to give the player their bearings before the game starts.
Wait an arbitrary second to give the player their bearings before the game starts.
![]() Loop through “random” movement. If you look within each repeat block, you see that I have the ball move 15 steps, turn in a random direction between two degree markers, and bounce if the sprite hits the border of the Stage.
Loop through “random” movement. If you look within each repeat block, you see that I have the ball move 15 steps, turn in a random direction between two degree markers, and bounce if the sprite hits the border of the Stage.
![]() When the timer reaches 15, 30, and 45 seconds, I introduce additional balls. These invocations are handled, reasonably enough, through broadcasts.
When the timer reaches 15, 30, and 45 seconds, I introduce additional balls. These invocations are handled, reasonably enough, through broadcasts.
![]() When you reach 60 seconds without a game-ending action, Scratch broadcasts the GameWon message and congratulates the player on successfully completing the challenge.
When you reach 60 seconds without a game-ending action, Scratch broadcasts the GameWon message and congratulates the player on successfully completing the challenge.
![]() You’ll also note that I cranked up the speed and behavior of the basketball at the 15, 30, and 45 second marks by adjusting the step count as well as its directionality.
You’ll also note that I cranked up the speed and behavior of the basketball at the 15, 30, and 45 second marks by adjusting the step count as well as its directionality.
3: This code stack says that if the ScratchCat sprite makes contact with the basketball sprite, then the game ends by broadcasting the GameOver message.
2, 4, 5: These code blocks state that the basketball should be hidden when the player clicks the Green Flag or when the game ends, either successfully or unsuccessfully. The main point here is to let you know that a sprite can listen to and respond to its own broadcast messages.
Setting Up the Second and Third Balls
The setup for the Baseball and Beachball sprites is much easier than that of the basketball because we’ve already handled their introduction to the game. Look at the code in Figure 9.8 and see for yourself:

1: You want the ball to hide when the player initially runs the game.
2: When it’s time to add the second and third balls, this block performs the same show/wait 1 second/start to move actions. The difference here is that you aren’t linking any additional behavior to the second and third balls (but go ahead if so inclined; I just thought the game was difficult enough as it was).
3: I discussed this block already; you want the game to end if the ball and the ScratchCat touch.
4, 5: These blocks instruct the balls to disappear when the game ends.
Debugging and Troubleshooting
With almost any computer program, you need to be on the lookout for so-called bugs. Bugs can take the form of logic problems, syntax errors, missing references—unfortunately, the list of possible bug sources is almost limitless.
The good news is that software development industry has established best practice for identifying, trapping, and resolving software bugs. Even Scratch includes built-in debugging functionality.
To these points, following are some good best practices for writing Scratch games that are as close to “bug free” as possible.
![]() Run, re-run, and re-re-run your project. This is called iterative application development, and it is crucial for you to do to ward off any glitches that will anger and frustrate your users. The Scratch environment makes it really easy to start, stop, and restart your project. Thus, you should get into the habit of testing your changes as you make them.
Run, re-run, and re-re-run your project. This is called iterative application development, and it is crucial for you to do to ward off any glitches that will anger and frustrate your users. The Scratch environment makes it really easy to start, stop, and restart your project. Thus, you should get into the habit of testing your changes as you make them.
![]() You can run individual code stacks. Instead of using the Green Flag to run your project from start to finish, you can test the behavior of individual code stacks simply by clicking its Hat block. Try it out—it’s helpful from a troubleshooting and debugging standpoint.
You can run individual code stacks. Instead of using the Green Flag to run your project from start to finish, you can test the behavior of individual code stacks simply by clicking its Hat block. Try it out—it’s helpful from a troubleshooting and debugging standpoint.
Note: The Origin of the Software Bug
Why are problems with software applications (errors, flaws, or failures that cause unexpected results) called “bugs”? The term was first used in the context of hardware engineering by the inventor Thomas Edison, who wrote in an 1878 letter, “It has been just so in all of my inventions. The first step is an intuition, and comes with a burst, then difficulties arise—this thing gives out and [it is] then that ‘Bugs’—as such little faults and difficulties are called—show themselves and months of intense watching, study and labor are requisite before commercial success or failure is certainly reached.”
![]() You can enable Single Stepping mode. In Scratch, click Edit, Set Single Stepping. You’ll be presented with a list of speeds, from Turbo on one extreme to Flash blocks (slow) on the other.
You can enable Single Stepping mode. In Scratch, click Edit, Set Single Stepping. You’ll be presented with a list of speeds, from Turbo on one extreme to Flash blocks (slow) on the other.
Single Stepping gives you the ability to slow down the execution of your Scratch game so you can better see code stacks and individual blocks firing. This makes it easier to see if, when, where, and why your program does not behave the way you want it to.
After you choose your Single Stepping mode, click Edit > Start Single Stepping to begin your debugging session. Be sure to click Edit > Stop Single Stepping when you are finished to return Scratch to its “factory default” behavior.
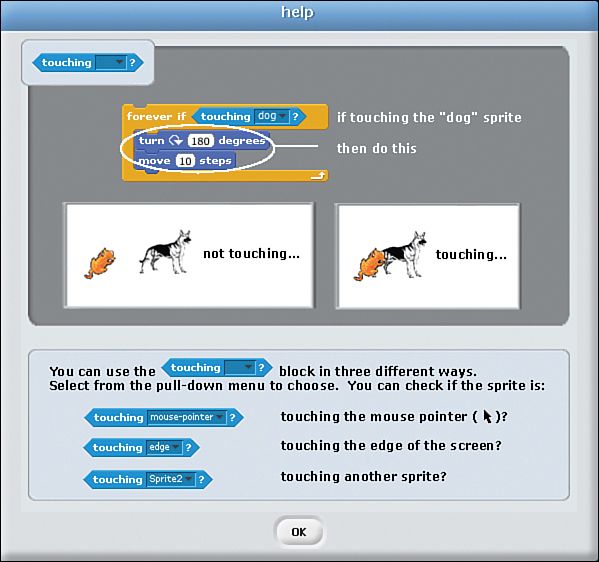
![]() Get block-level help. Try right-clicking a block that’s in your project and selecting Help from the shortcut menu. You will see a nifty Help window that graphically shows you how the selected block functions in the context of a practical example (see Figure 9.9). I personally find this flavor of online help to be invaluable because sometimes I discover the perfect block that I previously overlooked, which solves my current troubleshooting or debugging problem.
Get block-level help. Try right-clicking a block that’s in your project and selecting Help from the shortcut menu. You will see a nifty Help window that graphically shows you how the selected block functions in the context of a practical example (see Figure 9.9). I personally find this flavor of online help to be invaluable because sometimes I discover the perfect block that I previously overlooked, which solves my current troubleshooting or debugging problem.
![]() Consider documenting your code. Right-click near a block in your Scripts area and select Add Comment from the shortcut menu. Documentation is one of the most important best practices in all of computer programming.
Consider documenting your code. Right-click near a block in your Scripts area and select Add Comment from the shortcut menu. Documentation is one of the most important best practices in all of computer programming.
These comments can be intended simply to remind you to fix something a little bit down the road. You can also use comments to explain your rationale in doing something in your program (see Figure 9.10); this can be helpful in a year or so when you re-open the project and think to yourself, “What in the world was I thinking when I wrote that?!”
Finally, adding comments to your code helps make your code more understandable to fellow Scratchers who download and inspect your project. Note that you can link a comment to a block by dragging the comment in the proximity of said block. The little disclosure arrow enables you to shrink or expand any comment.
Uploading Your Project
Now that you’ve completed your project, it is time to share your work with the Scratch community. Why do this? Here are a few good reasons:
![]() You’re proud of your work. You just invested time and effort in creating your Scratch game. Thus, you want to get the application in front of as many sets of eyeballs as possible. This is a natural and honorable motive of any self-respecting software developer.
You’re proud of your work. You just invested time and effort in creating your Scratch game. Thus, you want to get the application in front of as many sets of eyeballs as possible. This is a natural and honorable motive of any self-respecting software developer.
![]() Share and share alike. The spirit of open source software is to share your work with other developers to solicit their feedback. By contrast, you are expected to offer constructive criticism of other peoples’ Scratch projects. That’s how we all learn!
Share and share alike. The spirit of open source software is to share your work with other developers to solicit their feedback. By contrast, you are expected to offer constructive criticism of other peoples’ Scratch projects. That’s how we all learn!
Task: Share Your Scratch Project
1. With your project open in Scratch, click Share, Share This Project Online or click the Share This Project button on the main toolbar. The interface is shown in Figure 9.11.
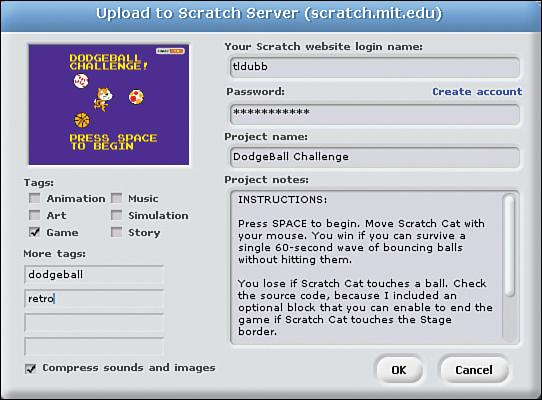
FIGURE 9.11 You can upload your Scratch project to the Projects website directly from within the Scratch application.
2. Fill in the fields in the Upload to Scratch Server (scratch.mit.edu) dialog box as completely as possible. Let me help you understand what’s involved:
![]() Your Scratch website login name and Password: As with most things Scratch-related, you must have a free Scratch account to upload a project. Click Create account to, well, create a new user account.
Your Scratch website login name and Password: As with most things Scratch-related, you must have a free Scratch account to upload a project. Click Create account to, well, create a new user account.
![]() Project name and Project notes: These fields are automatically populated based on the .sb project file name and any project notes you added. I highly recommend you add project notes (welcome message, instructions, and so on) to help people understand and use your Scratch app more efficiently and effectively. You can add your project notes either in this dialog box or by clicking File, Project Notes in Scratch.
Project name and Project notes: These fields are automatically populated based on the .sb project file name and any project notes you added. I highly recommend you add project notes (welcome message, instructions, and so on) to help people understand and use your Scratch app more efficiently and effectively. You can add your project notes either in this dialog box or by clicking File, Project Notes in Scratch.
![]() Tags; More tags: Tags are keywords that make it easier for Scratchers to find projects on the Scratch website. You can select any of the six prebuilt tags and/or define your own.
Tags; More tags: Tags are keywords that make it easier for Scratchers to find projects on the Scratch website. You can select any of the six prebuilt tags and/or define your own.
![]() Compress sounds and images: This option is a good idea because it makes your Scratch program smaller. A smaller .sb file means that the app runs faster in the web browser and takes less time for your users to download from the Scratch website.
Compress sounds and images: This option is a good idea because it makes your Scratch program smaller. A smaller .sb file means that the app runs faster in the web browser and takes less time for your users to download from the Scratch website.
As you saw in Figure 9.2, the MIT Media Lab developers give you a dedicated web page for each app you upload. Be sure to check out the page and perform the following actions on a regular basis:
![]() Read comments left by other Scratchers and take their criticism constructively.
Read comments left by other Scratchers and take their criticism constructively.
![]() Proofread and potentially edit your project notes. You can do this directly from within the web browser, provided you are logged into the site with your Scratch account.
Proofread and potentially edit your project notes. You can do this directly from within the web browser, provided you are logged into the site with your Scratch account.
![]() Consider adding additional tags as they occur to you. There is no upper limit on how many tags a Scratch project can have associated with it. To that point, other Scratchers can tag your project as well.
Consider adding additional tags as they occur to you. There is no upper limit on how many tags a Scratch project can have associated with it. To that point, other Scratchers can tag your project as well.
Remixing
Sometimes you’ll come across a Scratch project that is so good it leads you to think, “I’ll bet I can make this good app great!” This notion is perfectly legal as well as in keeping with the open source community spirit shared by Scratch and other public domain frameworks.
In Scratch nomenclature, a remix is a Scratch project that is based on somebody else’s Scratch project. When you publish a remix, a link to your remix is accessible on the original app’s home page. By contrast, viewers of your app can click a link that takes them back to the original app’s home page at scratch.mit.edu.
Remember that the name of this program, Scratch, derives from the disc jockey (DJ) term of moving vinyl records back and forth to create rhythmic sounds. Similarly the term remix refers to the method by which musical artists re-record their songs by using the same melody but changing the style.
Note: About Licenses...
Scratch apps fall under not the traditional GPL license like Raspberry Pi does, but instead under the related Creative Commons Attribution-ShareAlike 2.0 license. You can read the user-friendly license details at the Creative Commons website at http://is.gd/FAsiS7).