
Chapter 4. Installing and Configuring an Operating System
The operating system (also called the OS, pronounced oh-ess) is the most important software on your computer because it represents the interface between you, running software programs, and the machine’s underlying hardware.
To put this discussion in a more meaningful context, let’s say that you want to send an email message from your computer or mobile device. You compose and send your message by using a web browser or a dedicated email application. The computer’s operating system translates your keystrokes and mouse movements into instructions that are understood by your application.
When you click Send, the OS then conducts the message through a number of subsystems, including translating your message data into an intermediate format that your computer’s network interface card (NIC) device driver software can process.
The NIC driver and the networking protocol stack further segments the email message and ultimately transmits binary digital data in the form of 0s and 1s across the network communications media through the NIC hardware.
Figure 4.1 shows the conceptual relationship between the user, the application, the operating system, the device driver, and the device itself.
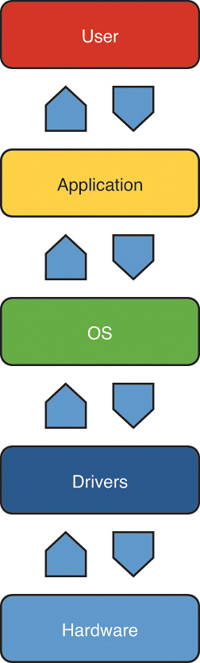
FIGURE 4.1 The operating system orchestrates data flow between the user, applications, device drivers, and the underlying computer hardware.
Let me briefly explain the layers shown in Figure 4.1:
![]() OS: The operating system orchestrates the communication among all the other layers.
OS: The operating system orchestrates the communication among all the other layers.
![]() User: The computer operator provides input to and received output from the computer.
User: The computer operator provides input to and received output from the computer.
![]() Application: The program or application enables the user, operating system, and hardware to get work done.
Application: The program or application enables the user, operating system, and hardware to get work done.
![]() Drivers: Each hardware device needs platform-specific software that enables the OS to interact with it. In Linux, the OS kernel often integrates device drivers into its code.
Drivers: Each hardware device needs platform-specific software that enables the OS to interact with it. In Linux, the OS kernel often integrates device drivers into its code.
![]() Hardware: Hardware can be either permanently part of the computer (like a motherboard) or an attached peripheral (like a mouse).
Hardware: Hardware can be either permanently part of the computer (like a motherboard) or an attached peripheral (like a mouse).
Like any other computer, the Raspberry Pi includes an operating system as well. Therefore, the OS skills that you’ll pick up in this chapter are abilities that you will apply every single day in your work with the Pi. In later chapters we’ll apply your Linux operating system skills as we undertake various Pi-related projects.
Common Operating Systems
Truly, operating systems are not at all voodoo magic, although their underlying structure can sometimes get complicated. The bottom line is that any end user of a computer system interacts with an operating system of one type or another.
For instance, a Mac user deals with the Apple OS X (pronounced oh ess TEN, not oh ess EX) operating system. A PC user generally uses a version of the Microsoft Windows operating system—for example, Windows 8 or Windows 7. Mobile device users might run one of the following operating systems, depending on the make and model of their mobile hardware:
![]() Apple iOS
Apple iOS
![]() BlackBerry
BlackBerry
![]() Google Android
Google Android
![]() Windows Phone
Windows Phone
![]() Windows RT
Windows RT
You might know already that the Raspberry Pi runs none of these. What’s going on here? Well, as it happens, the RasPi uses a particular distribution of Linux.
Understanding Linux
Linux (LIH-nix) is an open source operating system originally developed by the Finnish computer scientist Linus Torvalds (LEE-nus TUR-valds) in 1991. Linux was built from the ground up as a free operating system that any interested party could tinker with, improve upon, and re-release under the GPL license (discussed back in Chapter 1, “What Is the Raspberry Pi?”).
At some point you might have heard a nightmare story or two about how difficult it is to use. There was a time when the only people who would touch Linux were computer science nerds or grizzled government employees. Believe me, friends: Linux has gotten much more user-friendly over the past 10 years or so.
Thanks to Linux vendors like Red Hat and Canonical, Linux has become much more mainstream, often to the chagrin of the original Linux fanatics who prefer a less corporate, structured approach to OS development and distribution. In point of fact, Canonical’s Ubuntu Linux, in its 12.10 version, bears a striking resemblance to Apple OS X (see Figure 4.2).
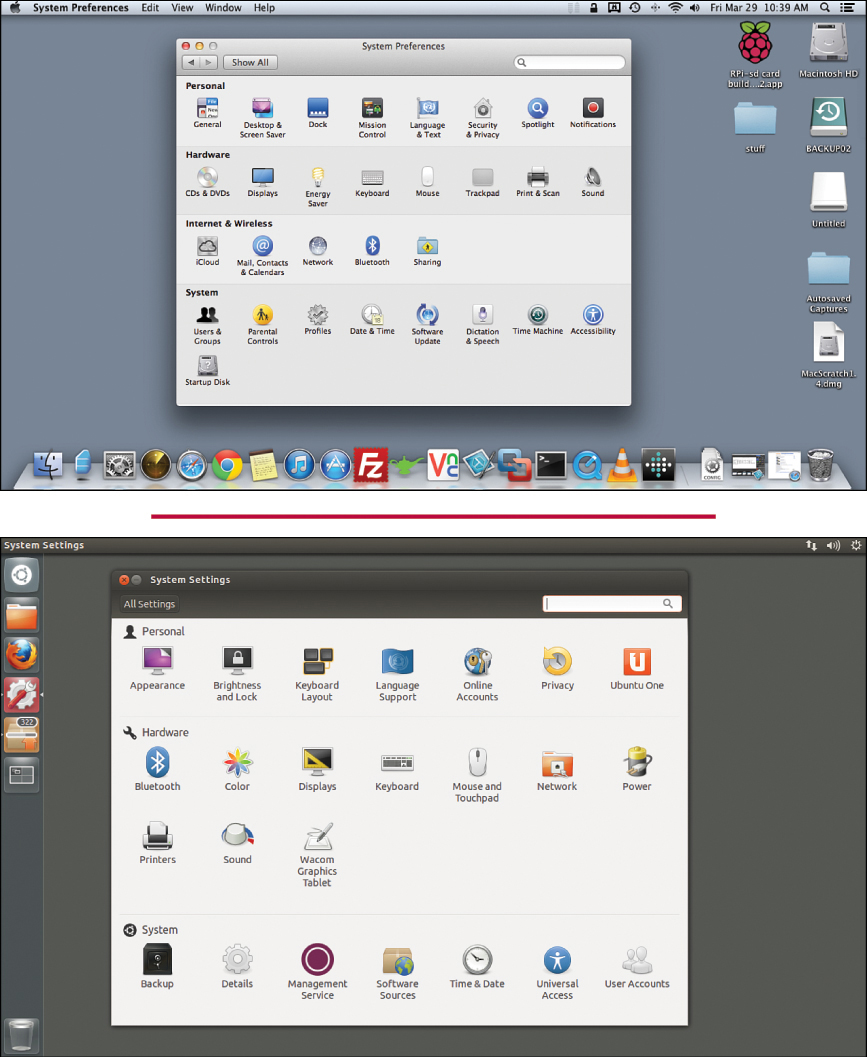
The OS X and Ubuntu Linux user interfaces are quite similar indeed. As you will learn pretty soon if you haven’t already, I’m a big believer in using (brief) unordered lists to teach concepts. Allow me to summarize what I see as the chief advantages of Linux:
![]() Generally more secure than proprietary OS software such as Windows and OS X because the community quickly squashes bugs and vulnerabilities.
Generally more secure than proprietary OS software such as Windows and OS X because the community quickly squashes bugs and vulnerabilities.
![]() Gives the operator control of every aspect of OS operation, right down to the bare kernel level.
Gives the operator control of every aspect of OS operation, right down to the bare kernel level.
![]() The OS and most available software are free.
The OS and most available software are free.
![]() You can do the vast majority of stuff in Linux that you are accustomed to doing in Windows or OS X.
You can do the vast majority of stuff in Linux that you are accustomed to doing in Windows or OS X.
In addition to these factors, it’s also true that people who write malicious software tend to target the most popular operating systems simply because there are more available targets. Consequently, the relatively “niche” status of Linux in the consumer/enthusiast environment gives the platform a security advantage over mainstream OSs.
Note: But What About Office?
Long-time Linux users typically gravitate toward OpenOffice (http://is.gd/AxqDKr) or LibreOffice (http://is.gd/ORAFcy) as open source (and therefore free) alternatives to the proprietary Microsoft Office productivity suite.
As Bret Michaels sang in the 1980s, “Every rose has its thorn....” Here are what I see as the essential disadvantages of Linux:
![]() To access the raw power of Linux, you must learn how to use the command line, which involves a number of highly cryptic command-line tools.
To access the raw power of Linux, you must learn how to use the command line, which involves a number of highly cryptic command-line tools.
![]() The graphical user interface in Linux is generally not as polished or intuitive as, say, Windows 7 or OS X.
The graphical user interface in Linux is generally not as polished or intuitive as, say, Windows 7 or OS X.
![]() Configuring driver support for new hardware is sometimes problematic to Linux beginners due to the common requirement of manual driver installation and configuration.
Configuring driver support for new hardware is sometimes problematic to Linux beginners due to the common requirement of manual driver installation and configuration.
![]() You can run Windows or OS X apps under Linux; however, doing so is not considered to be a beginner-level task. In general, the variety of software that is available to Linux is far less than what is available to, say, Windows or OS X.
You can run Windows or OS X apps under Linux; however, doing so is not considered to be a beginner-level task. In general, the variety of software that is available to Linux is far less than what is available to, say, Windows or OS X.
Despite the challenges that running Linux has for us, I submit that Linux is truly the ideal operating system platform for the Raspberry Pi. Remember that the Pi is intended as a learning environment—what better way to discover the relationship between an OS and hardware than in an open-source situation where the underlying source code and hardware schematics are freely available to you?
Also, as we’ll see momentarily, you have quite a bit of flexibility in terms of which Linux distribution you might prefer to run on our Pi.
Linux and Raspberry Pi
Remember when I said earlier that Linus Torvalds gave us Linux as a platform for community development? We call those Linux variations, those that come from the development community, remixed or forked distributions.
The Raspberry Pi Foundation put together an official Linux distribution that is optimized for Raspberry Pi; this distribution is called Raspbian (RASS-pian). The name Raspbian bears a bit of an explanation. Raspbian is a portmanteau, which is a mash up of two or more words derived from two separate technologies:
![]() Raspberry Pi: The $25/$35 computer upon which this book is based
Raspberry Pi: The $25/$35 computer upon which this book is based
![]() Debian: The Linux distribution used as a base for Raspbian (http://is.gd/lgF8Ft)
Debian: The Linux distribution used as a base for Raspbian (http://is.gd/lgF8Ft)
Personally, I’m overjoyed that the Foundation used Debian as a base Linux for the Pi. Number one, Debian includes one of the most powerful and flexible package managers in the industry (more on that in the next couple chapters). The Raspbian user interface is shown in Figure 4.3.
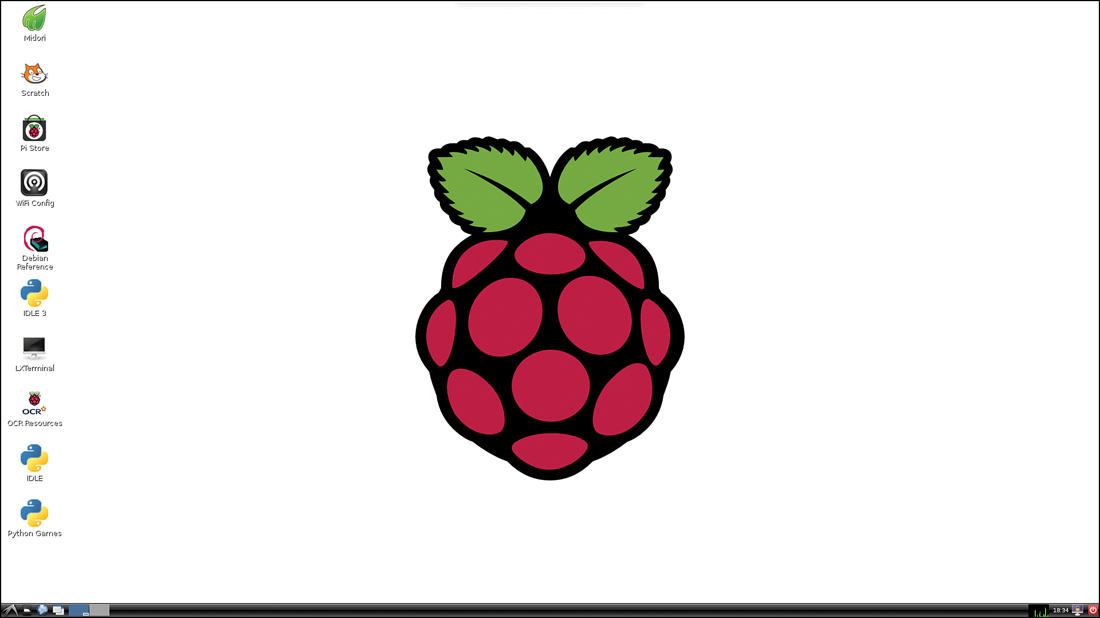
Number two, Debian is one of the more user-friendly Linux distros in existence. As a matter of fact, Ubuntu Linux is also based on Debian.
But can we go ahead and install the “real” Debian or Ubuntu on the Pi? Unfortunately, no—at least not without some major kernel hacking. Remember that the Pi board uses an ARM CPU. Most desktop computers today, at least in the retail space, use the Intel processor. As of this writing in spring 2013, neither Debian nor Ubuntu Linux supports the ARM processing architecture.
The Kernel and Firmware
If the operating system constitutes the software “body” of a computer system, then the kernel represents the brain. Specifically, the kernel is the OS subcomponent that functions most intimately with installed hardware devices.
What’s cool about Linux is that you can customize and recompile the kernel to suit different situations. For instance, the Raspberry Pi Foundation modified the Debian Linux kernel to accommodate the ARM processor and other components included on the Pi board.
The Linux kernel is called firmware because it is software that is semi-permanently written to the first partition of your Raspbian SD card. I say semi-permanently because the firmware data persists after you power down the computer. However, you can update the firmware to a more recent version if need be.
We can contrast data that is stored on the SD card with data that is stored in random access memory, or RAM. RAM-based data persists only as long as the Pi is powered up; unless you save RAM contents to the SD card, that data is permanently lost if the Pi is turned off or rebooted.
Raspberry Pi uses its own custom-built firmware that “blends” the proprietary Broadcom BCM2835 system on a chip (SoC) with the Raspbian operating system. In point of fact, the BCM2835 SoC actually has two sets of firmware flashed onto the SD card. The first is responsible for managing the hardware resources on the Pi, and the second is charged with controlling the behavior of the Pi’s graphical processing unit (GPU).
Note: I’m Floating!
The original Raspbian code was not optimized in the kernel to process floating-point (decimal) numbers in hardware. This “soft float ABI (application binary interface)” situation, which involves emulating math co-processing in software, bothered experienced Linux users who wanted to use the Pi to perform more complex math. Fortunately, the current versions of Raspbian now contain a “hard float” ABI, which means that instructions for processing floating-point numbers are performed in hardware using the math co-processor chip. Needless to say, hard float is orders of magnitude faster than soft float.
Updating the Raspberry Pi kernel firmware is covered in the next chapter.
Raspberry Pi’s Other Operating Systems
Keeping in spirit with the “do it yourself” philosophy of Linux, you can run a number of specially crafted Linux distros on the Pi. Raspbian is considered to be the reference operating system because it was built from the ground up for learning software and hardware programming with the Pi board. However, alternatives exist that are optimized for other uses. Let’s take a brief look at a few of them:
Arch Linux ARM (http://is.gd/6EJlou): This distro is an ARM-specific branch of the Arch Linux OS that is aimed at experienced Linux users. Its structure is lightweight and is intended to provide the user with as much control as possible.
Fedora Remix (http://is.gd/Nj0Iys): This distro is an ARM port of the highly successful Fedora Linux OS. In particular, check out the Pidora distribution (http://is.gd/2TfKjx). Many Linux users swear by Fedora, so its ability to run on the Raspberry Pi pleases many enthusiasts.
Occidentalis (http://is.gd/t79m03): This distro, pronounced ocks-ih-den-TAIL-is, was developed by Adafruit and includes lots of OS “extras” to make hardware hacking easier. Adafruit is one of the best Raspberry Pi education sites out there; they sell extension hardware and provide detailed instructions on how to use it with your Pi.
OpenELEC (http://is.gd/KpaeqS): This distro, pronounced open ee-LECK, has a single aim—to run the Xbox Media Center (XBMC) as efficiently as possible. OpenELEC and XBMC are discussed in great detail in Chapter 12, “Raspberry Pi Media Center.”
RaspBMC (http://is.gd/KyBKzy): This distro is like OpenELEC inasmuch as it is intended only to run Media Center software on the Pi.
RISC OS (http://is.gd/6EJlou): This distro, pronounced risk oh ess, was developed by Acorn, who you’ll remember is the manufacturer of the BBC Micro microcomputer, the Raspberry Pi’s inspiration.
Of these alternative Linux distros for the Raspberry Pi, I personally like Occidentalis the best because the environment is optimized for use with the Adafruit Learning System (http://is.gd/efFtD7). Be sure to visit and bookmark the Adafruit website; they offer almost every conceivable Raspberry Pi hardware add-on. Figure 4.4 shows the Occidentalis user interface.
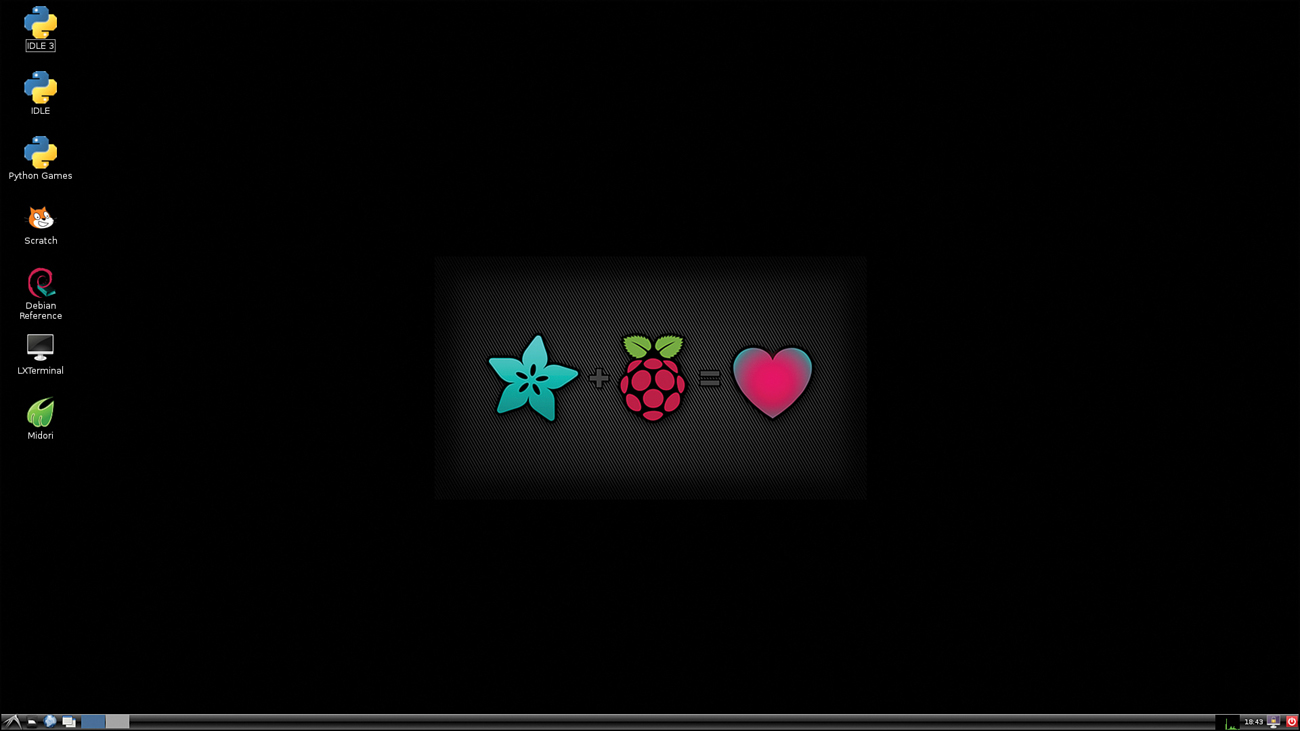
FIGURE 4.4 Adafruit’s Occidentalis Linux distribution, which includes plenty of hardware hacking tools.
Please note that the Raspberry Pi-compatible operating systems suggested here represent only part of what’s available. Check out the RPi Distributions page at the Embedded Linux Wiki (http://is.gd/3yHQZ2) for a more complete rundown.
Installing Raspbian on Your Raspberry Pi
My first computer, the Tandy TRS-80 Model III, and the Commodore 64 had no persistent, onboard storage. That is to say, anything you wanted to save permanently, such as a BASIC program that took 12 hours to type in, had to be saved to some external media to survive a system shutdown or restart.
It was a great day in the early 1990s when Intel-based personal computers began shipping with fixed internal hard drives! Suddenly you could boot an operating system, load programs, and save data to your heart’s content, free of the worry of losing all of your work when you turned off the computer!
Believe it or not, the Raspberry Pi board also does not contain an internal disk drive to boot the OS and save user data. Instead, the Foundation included an SD card slot.
If you read Chapter 3, “A Tour of Raspberry Pi Peripheral Devices,” you have all the information you need to purchase your SD card. I formally suggest you stay with the Standard SD card form factor (see Figure 4.5), but you can make use of the Mini or Micro cards with the appropriate adapters.
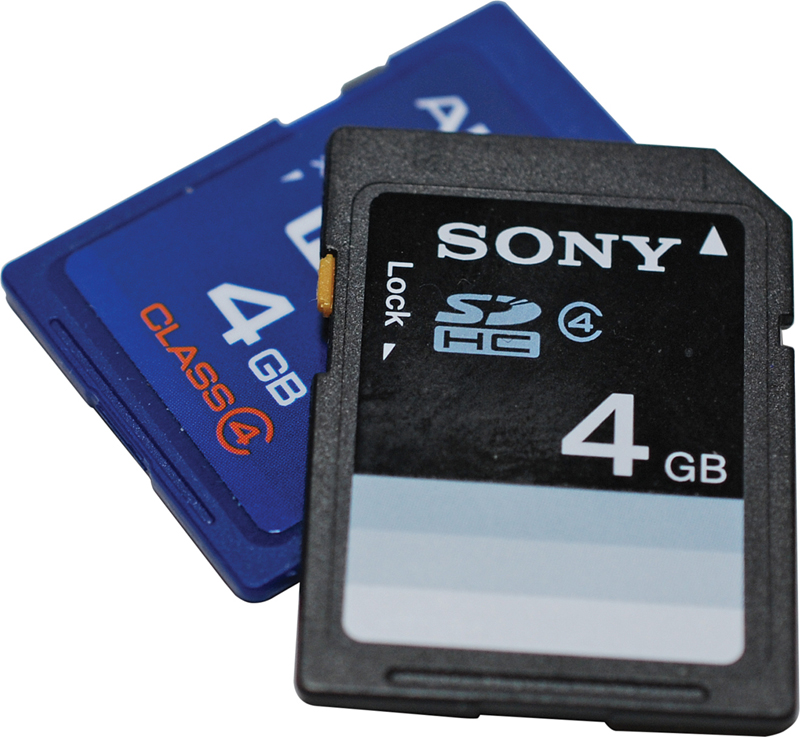
FIGURE 4.5 You can learn much about an SD card by studying its sticker label. Here we can see the brand, capacity, and speed rating in a single glance.
Building a Raspbian SD card is not as easy as copying a bunch of files from a folder on your PC or Mac to the SD card. Instead, you download a binary OS image file and flash that image onto your SD card in one pass.
Note: What Type of SD Card Should I Use?
I suggest you purchase a name-brand SD card of at least 4GB capacity. Moreover, I recommend that the SD card speed be rated at Class 4 or higher. You can visit the Embedded Linux website (http://is.gd/Ym6on0) to view a comprehensive compatibility index of Raspberry Pi-compatible SD cards.
You’ll need the following ingredients to create a Raspbian OS image SD card:
![]() PC or Mac computer
PC or Mac computer
![]() SD card reader (some computers include these in the case)
SD card reader (some computers include these in the case)
![]() SD image burning tool or command-line equivalent
SD image burning tool or command-line equivalent
![]() Official Raspbian OS image (http://is.gd/6EJlou)
Official Raspbian OS image (http://is.gd/6EJlou)
The following sections take you through the process of setting up an SD card with Raspbian.
Task: Creating a Raspbian SD Card in Windows
1. Plug your SD card into your Windows computer and make a note of which drive letter Windows assigns to the device. It does not matter if there is any data already stored on the card—it will be overwritten (be careful!).
2. Use Windows Explorer or a ZIP file management utility (I like the free 7Zip from http://is.gd/oOJvG8) to unpack both the Raspbian OS image and Win32 Disk Imager.
3. Fire up Win32 Disk Imager. You’ll note that all you have to do is unzip the package and run the executable program file—there is no installation.
4. Click the Browse button (marked 1 in Figure 4.6) and locate the Raspbian .img file that you downloaded from the Raspberry Pi Foundation website.

FIGURE 4.6 The open source Win32 Disk Imager is perhaps the best SD card flashing utility for the Windows OS.
5. Open the drop-down list (marked 2 in Figure 4.6) and specify the drive letter that is associated with your mounted SD card. Again, be careful to ensure that you have the correct drive letter selected.
6. Click Write (marked 3 in Figure 4.6) to flash the card.
7. Close Win32 Disk Imager and eject your SD card. You’re finished!
Task: Creating a Raspbian SD Card in OS X
GUI-based Install Tools
For those who are interested (and brave), here are a couple GUI tools that theoretically can be used to flash Raspberry Pi OS images to SD cards:
![]() RPi-sd card buider (http://is.gd/AJTQfM)
RPi-sd card buider (http://is.gd/AJTQfM)
![]() Pi Filler (http://is.gd/8WplZ7)
Pi Filler (http://is.gd/8WplZ7)
1. Download your Raspbian OS image to your Mac, and double-click the ZIP file to extract the underlying .img file.
2. Plug your SD card into your Mac computer and start Terminal. The easiest way to do this is to open Spotlight, type terminal, and press Enter (see Figure 4.7).

3. From the Terminal prompt, type diskutil list. This command shows you all of the fixed and removable disk drives you have available on your Mac. Make a note of the device path for your SD card. For instance, you can see in Figure 4.8 that my brand-new 4.0 GB SD card is addressed as disk2.

FIGURE 4.8 Flashing a Raspbian OS image to an SD card in OS X. The relevant commands are highlighted in yellow.
If your SD card has been used before, there may already be one or more partitions defined on the card; they should be addressed as disk2s1, disk2s2, and so forth. It’s important to note that we want to flash the entire contents of the card and not an individual partition.
4. Take the SD card offline by issuing the command diskutil unmountdisk /dev/diskN, where N is your SD card’s device ID. As shown by 1 in Figure 4.8, my SD card is called disk2.
5. Navigate to the folder that contains your Raspbian OS image. Because I stored my .img file in my Downloads folder, I used the command cd Downloads to switch from my home directory to the Downloads directory. You then can specify the input file path of the dd command by using only the file name instead of with a full path.
6. Use the dd command to flash the Raspbian OS image to the SD card. Here is the statement:
sudo dd if=image_file_name.img of=/dev/diskXsY bs=2M
And here’s a breakdown of each command in the statement:
![]() sudo: This command instructs the computer that you want to issue this command with administrator privileges. Your OS X user account has to be an administrator to complete this task.
sudo: This command instructs the computer that you want to issue this command with administrator privileges. Your OS X user account has to be an administrator to complete this task.
![]() dd: This command, which officially stands for “Data Description” and unofficially stands for “Data Destroyer,” is used to flash binary images to removable media.
dd: This command, which officially stands for “Data Description” and unofficially stands for “Data Destroyer,” is used to flash binary images to removable media.
![]() if: This command specifies the path to the input file. In this case, it is the Raspbian OS image.
if: This command specifies the path to the input file. In this case, it is the Raspbian OS image.
![]() of: This command specifies the path to the output, which in this case is the SD card’s target partition.
of: This command specifies the path to the output, which in this case is the SD card’s target partition.
![]() bs: This command stands for block size, and larger values write more data chunks to the SD card in less time, but you are more likely to have errors. Best practice states that two megabytes (2MB) is a good compromise between speed and accuracy.
bs: This command stands for block size, and larger values write more data chunks to the SD card in less time, but you are more likely to have errors. Best practice states that two megabytes (2MB) is a good compromise between speed and accuracy.
After the image flash completes, you’ll see a confirmation message and get your command prompt back. You’re finished!
Task: Creating a Raspbian SD Card in Linux
1. Download the latest Raspbian OS image from the Raspberry Pi Foundation website. You can double-click the ZIP file to extract the .img file inside. Make a note of the location of the file.
2. Open up Terminal; in Ubuntu this is accomplished by clicking the Dash icon, typing terminal, and pressing Enter (see Figure 4.9).

As you can probably tell, the Unity user interface in Ubuntu 12.10 takes some getting used to. When you click the Dash icon on the quick launch bar, a prompt window appears in which you can simply start typing for the program, document, or setting you want to find.
Almost immediately you’ll see local and Internet-based results for your search query. In Figure 4.9, you can see that typing terminal brings back the built-in Terminal application as the first result.
As with the OS X flashing procedure earlier, the full input and output for the Linux process in is shown in Figure 4.10. Again, the commands are highlighted for your easier reference.
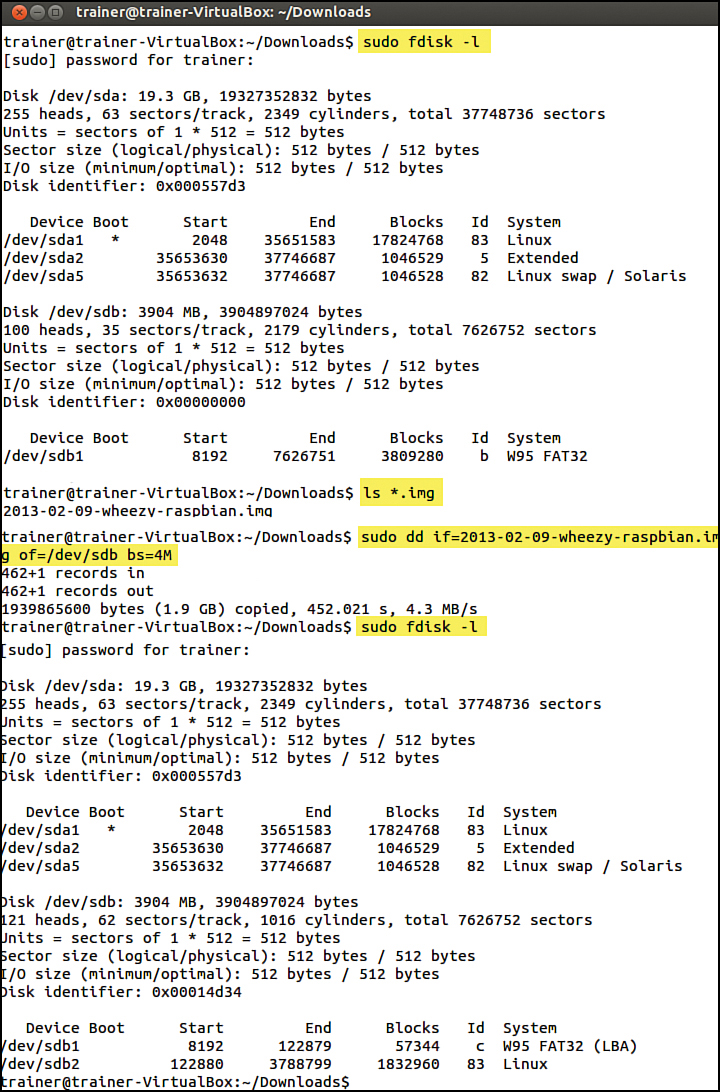
3. Plug in your SD card and wait a couple of minutes for Linux to detect your card. Next, run the command fdisk -l from a Terminal prompt. This step and the rest of the procedure is highlighted in Figure 4.10.
In the screenshot note the reference to the device path /dev/sdb1. In Linux, hard drives and removable media are mounted as file system paths.
Caution: Be Careful!
I can’t stress this enough: The dd command is extremely powerful, and if you don’t watch which drive path you point it at, you could easily erase your boot drive and your valuable data!
4. Run the following statement:
sudo dd if=image_file_name.img of=/dev/disksdX bs=2M
Here is a breakdown of the syntax:
![]() sudo: Run the dd command under administrative privilege.
sudo: Run the dd command under administrative privilege.
![]() dd: This command actually performs the OS flash.
dd: This command actually performs the OS flash.
![]() if: Here you specify the full or relative path to the OS image. In Figure 4.10, you see that the cd command is used to switch to the directory that contains the Wheezy OS image file.
if: Here you specify the full or relative path to the OS image. In Figure 4.10, you see that the cd command is used to switch to the directory that contains the Wheezy OS image file.
![]() of: This command specifies the path to the output. This is important: Note in Figure 4.10 that /dev/sdb is specified as the target, not /dev/sdb1. You don’t want to flash a specific partition on the disk—you want to flash the image onto the entire SD card.
of: This command specifies the path to the output. This is important: Note in Figure 4.10 that /dev/sdb is specified as the target, not /dev/sdb1. You don’t want to flash a specific partition on the disk—you want to flash the image onto the entire SD card.
![]() bs: This stands for block size, and larger values write more data “chunks” to the SD card in less time, but you are more likely to have errors. Two megabytes (2MB) is a good compromise between speed and accuracy. And yes, the syntax specifies M instead of MB for the block size value.
bs: This stands for block size, and larger values write more data “chunks” to the SD card in less time, but you are more likely to have errors. Two megabytes (2MB) is a good compromise between speed and accuracy. And yes, the syntax specifies M instead of MB for the block size value.
5. Run fdisk -l again and look at your /dev/sdb entries. You’ll see that Raspbian creates two partitions on the SD card. One partition is a File Allocation Table (FAT) Windows-compatible partition. The other is much bigger and is a Linux partition.
An All-in-One Solution
Because the process of installing an operating system to the Raspberry Pi can be so tedious and scary for computing newcomers, some developers have taken it upon themselves to build tools to lessen this learning curve.
Take the New Out Of Box Software (NOOBS) project (http://is.gd/0n2yZv), for example. This is a tiny boot loader that makes installing an OS on your Raspberry Pi a breeze.
As you can see in Figure 4.11, the NOOBS user interface presents a simple menu from which a user can install any of the following Pi-tailored operating systems:
![]() Arch Linux
Arch Linux
![]() OpenELEC
OpenELEC
![]() Pidora
Pidora
![]() RaspBMC
RaspBMC
![]() Raspbian
Raspbian
![]() RiscOS
RiscOS

After you’ve used NOOBS to install an OS on your Pi, the boot loader remains resident on your SD card such that you can reinvoke it at any time by holding down the Shift key during bootup.
If nothing else, NOOBS provides a quick, convenient, and easy way to test out a number of different OSs on the Pi to help you find your “comfort zone.”
Testing Your New Raspbian Image
The best way to verify that your newly created Raspbian image works correctly is to insert it (carefully) into the SD slot on your Pi’s circuit board and plug the Raspberry Pi into your power supply. You’ll also want to plug in a keyboard, mouse, and monitor/TV, as discussed in Chapter 2, “Hardware Components Quick Start.”
If all goes well, you’ll see the Raspi-Config interface as shown in Figure 4.12.
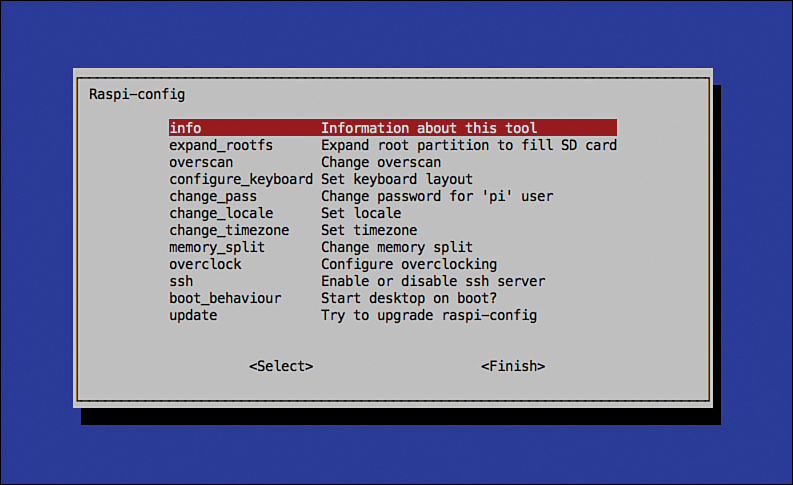
If for some reason the Raspberry Pi doesn’t boot directly into Raspi-Config, then simply issue the command sudo raspi-config from the Terminal prompt.
You learn the details of Raspberry Pi first-time configuration next in Chapter 5, “Debian Linux Fundamentals—Terminal.”