Chapter 12 Protecting Yourself from Google Hackers
Solutions in this chapter:
 A Good, Solid Security Policy
- Web Server Safeguards
- Hacking Your Own Site
- Getting Help from Google
- Links to Sites
Introduction
The purpose of this book is to help you understand the tactics a Google hacker might employ so that you can properly protect yourself and your customers from this seemingly innocuous threat. The best way to do this, in my opinion, is to show you exactly what an attacker armed with a search engine like Google is capable of. There is a point at which we must discuss in no uncertain terms exactly how to prevent this type of information exposure or how to remedy an existing exposure. This chapter is all about protecting your site (or your customer’s site) from this type of attack.
We’ll look at this topic from several perspectives. First, it’s important that you understand the value of strong policy with regard to posting data on the Internet. This is not a technical topic and could very easily put the techie in you fast asleep, but a sound security policy is absolutely necessary when it comes to properly securing any site. Second, we’ll look at slightly more technical topics that describe how to secure your Web site from Google’s (and other search engine’s) crawlers. We’ll then look at some tools that can be used to help check a Web site’s Google exposure, and we’ll spend some time talking about ways Google can help you shore up your defenses.
There are too many types of servers and configurations to show how to lock them all down. A discussion on Web server security could easily span an entire book series. We’ll look at server security at a high level here, focusing on strategies you can employ to specifically protect you from the Google hacker threat. For more details, please check the references in the “Links to Sites” section.
A Good, Solid Security Policy
The best hardware and software configuration money can buy can’t protect your resources if you don’t have an effective security policy. Before implementing any software assurances, take the time to review your security policy. A good security policy, properly enforced, outlines the assets you’re trying to protect, how the protection mechanisms are installed, the acceptable level of operational risk, and what to do in the event of a compromise or disaster. Without a solid, enforced security policy, you’re fighting a losing battle.
Web Server Safeguards
There are several ways to keep the prying eyes of a Web crawler from digging too deeply into your site. However, bear in mind that a Web server is designed to store data that is meant for public consumption. Despite all the best protections, information leaks happen. If you’re really concerned about keeping your sensitive information private, keep it away from your public Web server. Move that data to an intranet or onto a specialized server that is dedicated to serving that information in a safe, responsible, policy-enforced manner.
Don’t get in the habit of splitting a public Web server into distinct roles based on access levels. It’s too easy for a user to copy data from one file to another, which could render some directory-based protection mechanisms useless. Likewise, consider the implications of a public Web server system compromise. In a well thought out, properly constructed environment, the compromise of a public Web server only results in the compromise of public information. Proper access restrictions would prevent the attacker from bouncing from the Web server to any other machine, making further infiltration of more sensitive information all the more difficult for the attacker. If sensitive information were stored alongside public information on a public Web server, the compromise of that server could potentially compromise the more sensitive information as well.
We’ll begin by taking a look at some fairly simple measures that can be taken to lock down a Web server from within. These are general principles; they’re not meant to provide a complete solution but rather to highlight some of the common key areas of defense. We will not focus on any specific type of server but will look at suggestions that should be universal to any Web server. We will not delve into the specifics of protecting a Web application, but rather we’ll explore more common methods that have proven especially and specifically effective against Web crawlers.
Directory Listings and Missing Index Files
We’ve already seen the risks associated with directory listings. Although minor information leaks, directory listings allow the Web user to see most (if not all) of the files in a directory, as well as any lower-level subdirectories. As opposed to the “guided” experience of surfing through a series of prepared pages, directory listings provide much more unfettered access. Depending on many factors, such as the permissions of the files and directories as well as the server’s settings for allowed files, even a casual Web browser could get access to files that should not be public.
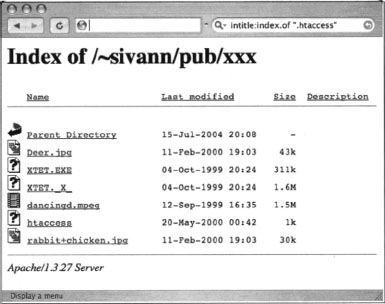
Figure 12.1 demonstrates an example of a directory listing that reveals the location of an htaccess file. Normally, this file (which should be called .htaccess, not htaccess) serves to protect the directory contents from unauthorized viewing. However, a server misconfiguration allows this file to be seen in a directory listing and even read.
Directory listings should be disabled unless you intend to allow visitors to peruse files in an FTP-style fashion. On some servers, a directory listing will appear if an index file (as defined by your server configuration) is missing. These files, such as index.html, index.htm, or default.asp, should appear in each and every directory that should present a page to the user. On an Apache Web server, you can disable directory listings by placing a dash or minus sign before the word Indexes in the httpd.conf file. The line might look something like this if directory listings (or “indexes,” as Apache calls them) are disabled:
Options -Indexes FollowSymLinks MultiViews
Robots.txt: Preventing Caching
The robots.txt file provides a list of instructions for automated Web crawlers, also called robots or bots. Standardized at www.robotstxt.org/wc/norobots.html, this file allows you to define, with a great deal of precision, which files and directories are off-limits to Web robots. The robots.txt file must be placed in the root of the Web server with permissions that allow the Web server to read the file. Lines in the file beginning with a # sign are considered comments and are ignored. Each line not beginning with a # should begin with either a User-agent or a disallow statement, followed by a colon and an optional space. These lines are written to disallow certain crawlers from accessing certain directories or files. Each Web crawler should send a user-agent field, which lists the name or type of the crawler. The value of Google’s user-agent field is Googlebot. To address a disallow to Google, the user-agent line should read:
According to the original specification, the wildcard character * can be used in the user-agent field to indicate all crawlers. The disallow line describes what, exactly; the crawler should not look at. The original specifications for this file were fairly inflexible, stating that a disallow line could only address a full or partial URL. According to that original specification, the crawler would ignore any URL starting with the specified string. For example, a line like Disallow: /foo would instruct the crawler to ignore not only /foo but /foo/index.html, whereas a line like Disallow: /foo/ would instruct the crawler to ignore /foo/index.html but not /foo, since the slash trailing foo must exist. For example, a valid robots.txt file is shown here:
#abandon hope all ye who enter
User-Agent: *
Disallow: /
This file indicates that no crawler is allowed on any part of the site—the ultimate exclude for Web crawlers. The robots.txt file is read from top to bottom as ordered rules. There is no allow line in a robots.txt file. To include a particular crawler, disallow it access to nothing. This, might seem like backward logic, but the following robots.txt file indicates that all crawlers are to be sent away except for the crawler named Palookaville:
#Bring on Palookaville
User-Agent: *
Disallow: /
User-Agent: Palookaville
Disallow:
Notice that there is no slash after Palookaville’s disallow. (Norman Cook fans will be delighted to notice the absence of both slashes and dots from anywhere near Palookaville.) Saying that there’s no disallow is like saying that user agent is allowed—sloppy and confusing, but that’s the way it is.
Google allows for extensions to the robots.txt standard. A disallow pattern may include * to match any number of characters. In addition, a $ indicates the end of a name. For example, to prevent the Googlebot from crawling all your PDF documents, you can use the following robots.txt file:
#Away from my PDF files, Google!
User-Agent: Googlebot
Disallow: /*.PDF$
Once you’ve gotten a robots.txt file in place, you can check its validity by visiting the Robots.txt Validator at www.sxw.org.uk/computing/robots/check.html.
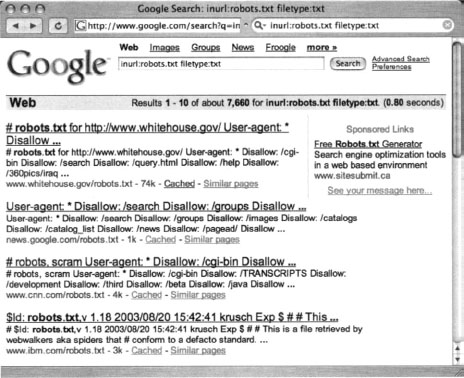
Hackers don’t have to obey your robots.txt file. In fart, Web crawlers really don’t have to, either, although most of the big-name Web crawlers will, if only for the “CYA” factor. One fairly common hacker trick is to view a site’s robots.txt file first to get an idea of how files and directories are mapped on the server. In fart, as shown in Figure 12.2, a quick Google query can reveal lots of sites that have had their robots.txt files crawled. This, of course, is a misconfiguration, because the robots.txt file is meant to stay behind the scenes.
NO ARCHIVE: The Cache “Killer”
The robots.txt file keeps Google away from certain areas of your site. However, there could be cases where you want Google to crawl a page, but you don’t want Google to cache a copy of the page or present a “cached” link in its search results. This is accomplished with a META tag. To prevent all (cooperating) crawlers from archiving or caching a document, place the following META tag in the HEAD section of the document:
<META NAME="ROBOTS” CONTENT="NOARCHIVE">
If you prefer to keep only Google from caching the document, use this META tag in the HEAD section of the document:
<META NAME="GOOGLEBOT” CONTENT="NOINDEX, NOFOLLOW">
Any cooperating crawler can be addressed in this way by inserting its name as the META NAME. Understand that this rule only addresses crawlers. Web visitors (and hackers) can still access these pages.
NOSNIPPET: Getting Rid of Snippets
A snippet is the text listed below the title of a document on the Google results page. Providing insight into the returned document, snippets are convenient when you’re blowing through piles of results. However, in some cases, snippets should be removed. Consider the case of a subscription-based news service. Although this type of site would like to have the kind of exposure that Google can offer, it needs to protect its content (including snippets of content) from nonpaying subscribers. Such a site can accomplish this goal by combining the NOSNIPPET META tag with IP-based filters that allow Google’s crawlers to browse content unmolested. To keep Google from displaying snippets, insert this code into the document:
<META NAME="GOOGLEBOT” CONTENT= “NOSNIPPET">
An interesting side effect of the NOSNIPPET tag is that Google will not cache the document. NOSNIPPET removes both the snippet and the cached page.
Password-Protection Mechanisms
Google does not fill in user authentication forms. When presented with a typical password form, Google seems to simply back away from that page, keeping nothing but the page’s URL in its database. Although it was once rumored that Google bypasses or somehow magically side-steps security checks, those rumors have never been substantiated. These incidents are more likely an issue of timing.
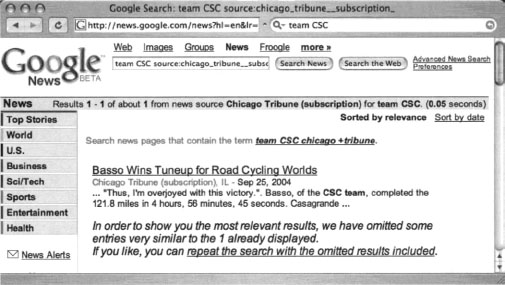
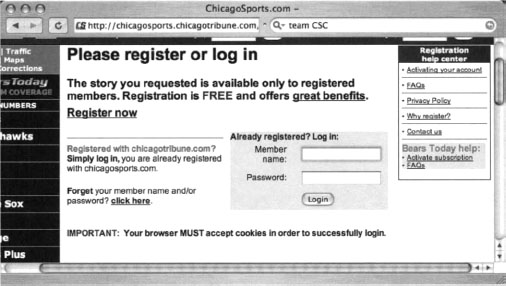
If Google crawls a password-protected page either before the page is protected or while the password protection is down, Google will cache an image of the protected page. Clicking the original page will show the password dialog, but the cached page does not—providing the illusion that Google has bypassed that page’s security. In other cases, a Google news search will provide a snippet of a news story from a subscription site (shown in Figure 12.3), but clicking the link to the story presents a registration screen, as shown in Figure 12.4. This also creates the illusion that Google somehow magically bypasses pesky password dialogs and registration screens.
If you’re really serious about keeping the general public (and crawlers like Google) away from your data, consider a password authentication mechanism. A basic password authentication mechanism, htaccess, exists for Apache. An htaccess file, combined with an htpasswd file, allows you to define a list of username/password combinations that can access specific directories. You’ll find an Apache htaccess tutorial at http://httpd.apache.org/docs/howto/htaccess.html, or try a Google search for htaccess howto.
Software Default Settings and Programs
As we’ve seen throughout this book, even the most basic Google hacker can home in on default pages, phrases, page titles, programs, and documentation with very little effort. Keep this in mind and remove these items from any Web software you install. It’s also good security practice to ensure that default accounts and passwords are removed as well as any installation scripts or programs that were supplied with the software. Since the topic of Web server security is so vast, we’ll take a look at some of the highlights you should consider for a few common servers.
First, for Microsoft IIS 6.0, consider the IIS 6.0 Security Best Practices document listed in the Links section at the end of this chapter.
For IIS 5, the Microsoft IIS 5.0 Security Checklist (see the “Links to Sites” section at the end of this chapter) lists quite a few tasks that can help lock down an IIS 5.0 server in this manner:
- Remove the \IISSamples directory (usually from c:inetpubiissamples).
- Remove the IISHelp directory (usually from c:winnthelpiishelp).
- Remove the \MSADC directory (usually from c:program filescommon filessystemmsadc).
- Remove the IISADMPWD virtual directory (found in c:winntsystem32inetsrviisadmpwd directory and the ISM.dll file).
- Remove unused script extensions:
- Web-based password change: .htr
- Internet database connector: .idc
- Server-side includes: .stm, .shtm and .shtml
- Internet printing: .printer
- Index server: .htw, .ida and .idq
The Apache 1.3 series comes with fewer default pages and directories, but keep an eye out for the following:
- The /manual directory from the Web root contains the default documentation.
- Several language files in the Web root beginning with index.html. These default language files can be removed if unused.
For more information about securing Apache, see the Security Tips document at http://httpd.apache.Org/docs/2.0/misc/security_tips.html.
It certainly sounds like a clich$eA in today’s security circles, but it can’t be stressed enough: If you choose to do only one thing to secure any of your systems, it should be to keep up with and install all the latest software security patches. Misconfigurations make for a close second, but without a firm foundation, your server doesn’t stand a chance.
Hacking Your Own Site
Hacking into your own site is a great way to get an idea of its potential security risks. Obviously, no single person can know everything there is to know about hacking, meaning that hacking your own site is no replacement for having a real penetration test performed by a professional. Even if you are a pen tester by trade, it never hurts to have another perspective on your security posture. In the realm of Google hacking, there are several automated tools and techniques you can use to give yourself another perspective on how Google sees your site. We’ll start by looking at some manual methods, and we’ll finish by discussing some automated alternatives.
As we’ll see in this chapter, there are several ways a Google search can be automated. Google frowns on any method that does not use its supplied Application Programming Interface (API) along with a Google license key. Assume that any program that does not ask you for your license key is running in violation of Google’s terms of service and could result in banishment from Google. Check out www.google.com/accounts/TOS for more information. Be nice to Google and Google will be nice to you!
Site Yourself
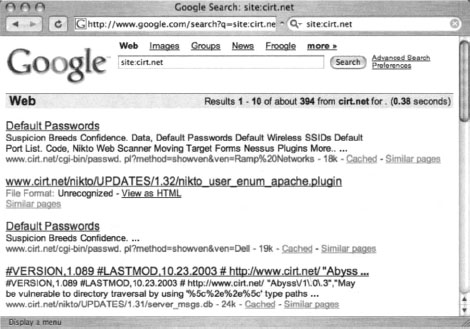
We’ve talked about the site operator throughout the book, but remember that site allows you to narrow a search to a particular domain or server. If you’re sullo, the author of the (most impressive) NIKTO tool and administrator ofcirt.net, a query like site:cirt.net will list all Google’s cached pages from your cirt.net server, as shown in Figure 12.5.
You could certainly click each and every one of these links or simply browse through the list of results to determine if those pages are indeed supposed to be public, but this exercise could be very time consuming, especially if the number of results is more than a few hundred. Obviously, you need to automate this process. Let’s take a look at some automation tools.
Gooscan
Gooscan, written by Johnny Long, is a Linux-based tool that enables bulk Google searches. The tool was not written with the Google API and therefore violates Google’s Terms of Service (TOS). It’s a judgment call as to whether or not you want to knowingly violate Google’s TOS to scan Google for information leaks originating from your site. If you decide to use a non-API-based tool, remember that Google can (though very rarely does) block certain IP ranges from using its search engine. Also keep in mind that this tool was designed for securing your site, not breaking into other people’s sites. Play nice with the other children, and unless you’re accustomed to living on the legal edge, use the Gooscan code as a learning tool and don’t actually run it!
Gooscan is available from http://johnny.ihackstuff.com. Don’t expect much in the way of a fancy interface or point-and-click functionality. This tool is command-line only and requires a smidge of technical knowledge to install and run. The benefit is that Gooscan is lean and mean and a good alternative to some Windows-only tools.
Installing Gooscan
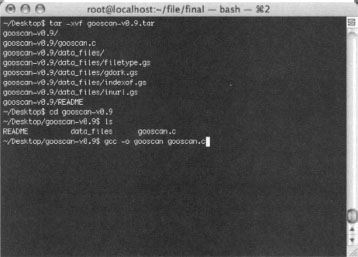
To install Gooscan, first download the tar file, decompressing it with the tar command. Gooscan comes with one C program, a README file, and a directory filled with data files, as shown in Figure 12.6.
Once the files have been extracted from the tar file, you must compile Gooscan with a compiler such as GCC. Mac users should first install the XCode package from the Apple Developers Connection Web site, http://connect.apple.com/. Windows users should consider a more “graphical” alternative such as Athena or SiteDigger, because Gooscan does not currently compile under environments like CYGWIN.
Gooscan’s Options
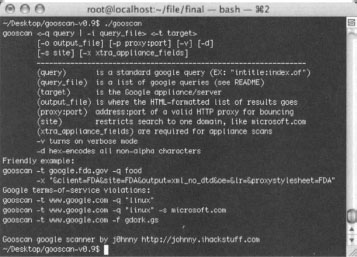
Gooscan’s usage can be listed by running the tool with no options (or a combination of bad options), as shown in Figure 12.7.
Gooscan’s most commonly used options are outlined in the included README file. Let’s take a look at how the various options work:
- <-t target>(required argument) This is the Google appliance or server to scan. An IP address or host name can be used here. Caution: Entering www.google.com here violates Google’s terms of service and is neither recommended nor condoned by the author.
-
<-q query | -i query_file> (required argument) The query or query file to send. Gooscan can be used to send an individual query or a series of queries read from a file. The -q option takes one argument, which can be any valid Google query. For example, these are valid options:
-q googledorks
-q “microsoft sucks”
-q “intitle: index. of secret”
- [ -i input_file] (optional argument) The -i option takes one argument—the name of a Gooscan data file. Using a data file allows you to perform multiple queries with Gooscan. See the following list for information about the included Gooscan data files.
- [-o output_file] (optional argument) Gooscan can create a nice HTML output file. This file includes links to the actual Google search results pages for each query.
- [-p proxy:port] (optional argument) This is the address and port of an HTML proxy server. Queries will be sent here and bounced off to the appliance indicated with the -t argument. The format can be similar to 10.1.1.150:80 or proxy.validcompany.com: 8080.
- [-v] (optional argument) Verbose mode. Every program needs a verbose mode, especially when the author sucks with a command-line debugger.
- [-s site] (optional argument) This filters only results from a certain site, adding the site operator to each query Gooscan submits. This argument has absolutely no meaning when used against Google appliances, since Google appliances are already site filtered. For example, consider the following Google queries:
site:microsoft.com linux
site:apple.com microsoft
site:linux.org microsoft
- With advanced express permission from Google (you do have advanced permission from Google, don’t you?) you could run the following with Gooscan to achieve the same results:
$ ./gooscan -t www.google.com -s microsoft.com linux
$ ./gooscan -t www.google.com -s apple.com microsoft
$ ./gooscan -t www.google.com -s linux.org microsoft
The [-x] and [-d] options are used with the Google appliance. We don’t talk too much about the Google appliance in this book. Suffice it to say that the vast majority of the techniques that work against Google.com will work against a Google appliance as well.
Gooscan’s Data Files
Used in multiple query mode, Gooscan reads queries from a data file. The format of the data files is as follows:
search_type | search_string | count | description
search_type can be one of the following:
-
intitle Finds search_string in the title of the page. If requested on the command line, Gooscan will append the site query Example:
intitle|error| |
This will find the word error in the title of a page.
-
inurl Finds search_string in the URL of the page. If requested on the command line, Gooscan will append the site query. Example:
inurl|admin||
This will find the word admin in the URL of a page.
- indexof Finds search_string in a directory listing. If requested on the command line, Gooscan will append the site query. Directory listings often will have the term index of in the title of the page. Gooscan will generate a Google query that looks something like this:
intitle:index.of search_string
When using the site switch, Gooscan automatically performs a generic search for directory listings. That query looks like this: intitle:index.of site:site_name. If this generic query returns no results, Gooscan will skip any subsequent indexof searches. It is a logical conclusion to skip specific indexof searches if the most generic of indexof searches returns nothing.
- filetype Finds search_string as a filename, inserting the site query if requested on the command line. For example:
filetype | cgi cgi | |
This search will find files that have an extension of .cgi.
- raw This search_type allows the user to build custom queries. The query is passed to Google unmodified, adding a site query if requested in the command line. For example:
raw|filetype:xls email username password| |
This example will find Excel spreadsheets with the words email, username, and password inside the document.
- search string The search_string is fairly straightforward. Any string is allowed here except chars
and |. This string is HTML-ized before sending to Google. The A character is converted to %65, and so on. There are some exceptions, such as the fact that spaces are converted to the + character.
- count This field records the approximate number of hits found when a similar query is run against all of Google. Site is not applied. This value is somewhat arbitrary in that it is based on the rounded numbers supplied by Google and that this number can vary widely based on when and how the search is performed. Still, this number can provide a valuable watermark for sorting data files and creating custom data files. For example, zero count records could safely be eliminated before running a large search. (This field is currently not used by Gooscan.)
- description This field describes the search type. Currently, only the filetype.gs data file populates this field. Keep reading for more information on the filetype.gs data file.
Several data files are included with Gooscan, each with a distinct purpose:
- gdork.gs This file includes excerpts from the Google Hacking Database (GHDB) hosted at http://johnny.ihackstuff.com. The GHDB is the Internet’s largest database of Google hacking queries maintained by thousands of members who make up the Search Engine Hacking Forums, also hosted at http://johnny.ihackstuff.com. Updated many times a week, the GHDB currently sits at around 1500 unique queries.
- filetype.gs This huge file contains every known filetype in existence, according to www.filext.com. By selecting interesting lines from this file, you can quickly determine the types of files that exist on a server that might warrant further investigation. We suggest creating a subset of this file (with a Linux command such as:
head -50 filetype.gs > short_filetype.gs
for use in the field. Do not run this file as is. It’s too big. With over 8,000 queries, this search would certainly take quite a while and burn precious resources on the target server. Instead, rely on the numbers in the count field to tell you how many (approximate) sites contain these files in Google, selecting only those that are the most common or relevant to your site. The filetypes.gs file lists the most commonly found extensions at the top.
- inurl.gs This very large data file contains strings from the most popular CGI scanners, which excel at locating programs on Web servers. Sorted by the approximate number of Google hits, this file lists the most common strings at the top, with very esoteric CGI vulnerability strings listed near the bottom. This data file locates the strings in the URL of a page. This is another file that shouldn’t be run in its entirety.
- indexof.gs Nearly identical to the inurl.gs file, this data file finds the strings in a directory listing. Run portions of this file, not all of it!
Using Gooscan
Gooscan can be used in two distinct ways: single-query mode or multiple-query mode. Single-query mode is little better than using Google’s Web search feature, with the exception that Gooscan will provide you with Google’s number of results in a more portable format. As shown in Figure 12.8, a search for the term daemon9 returns 2440 results from all of Google. To narrow this search to a specific site, such as phrack.org, add the [-s] option. For example:
gooscan -q “daemon9” -t www.google.com -s phrack.org.
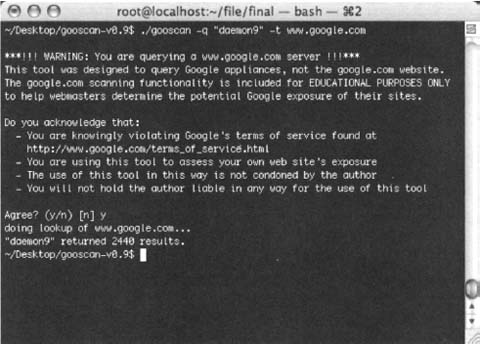
Notice that Gooscan presents a very lengthy disclaimer when you select www.google.com as the target server. This disclaimer is only presented when you submit a search that potentially violates Google TOS. The output from a standard Gooscan run is fairly paltry, listing only the number of hits from the Google search. You can apply the [-o] option to create a nicer HTML output format. To run the daemon9 query with nicer output, run:
gooscan -q “daemon9” -t www.google.com -o daemon9.html
As shown in Figure 12.9, the HTML output lists the options that were applied to the Gooscan run, the date the scan was performed, a list of the queries, a link to the actual Google search, and the number of results.
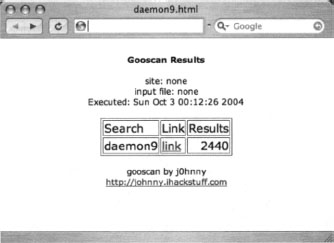
The link in the HTML output points to Google. Clicking the link will perform the Google search for you. Don’t be too surprised if the numbers on Google’s page differ from what is shown in the Gooscan output; Google’s search results are sometimes only approximations.
Running Google in multiple-query mode is a blatant violation of Google’s TOS but shouldn’t cause too much of a Google-stink if it’s done judiciously. One way to keep Google on your good side is to respect the spirit of its TOS by sending small batches of queries and not pounding the server with huge data files. As shown in Figure 12.10, you can create a small data file using the head command. A command such as:
head -5 data_files/gdork.gs > data_files/little_gdork.gs
will create a four-query data file, since the gdork.gs file has a commented header line.
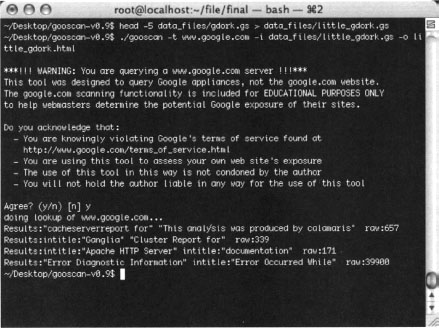
The output from the multiple-query run of Gooscan is still paltry, so let’s take a look at the HTML output shown in Figure 12.11.
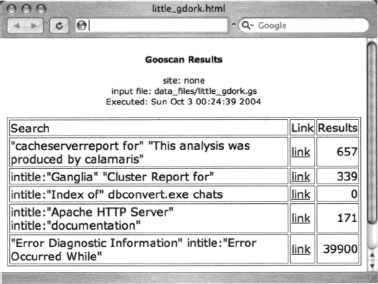
Using Gooscan with the [-s] switch we can narrow our results to one particular site, in this case http://johnny.ihackstuff.com, with a command such as:
Gooscan -t www.google.com -i data_files/little_gdork.gs -o ihackstuff.html -s johnny.ihackstuff.com
as shown in Figure 12.12. (Don’t worry, that Johnny guy won’t mind!)
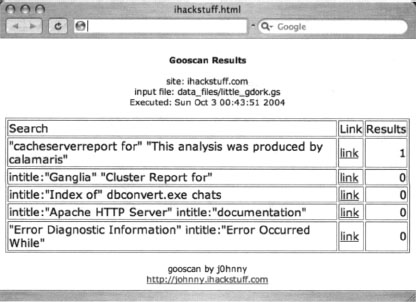
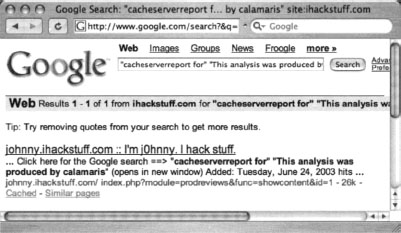
Most site-narrowed Gooscan runs should come back pretty clean, as this run did. If you see hits that look suspicious, click the link to see exactly what Google saw. Figure 12.13 shows the Google search in its entirety.
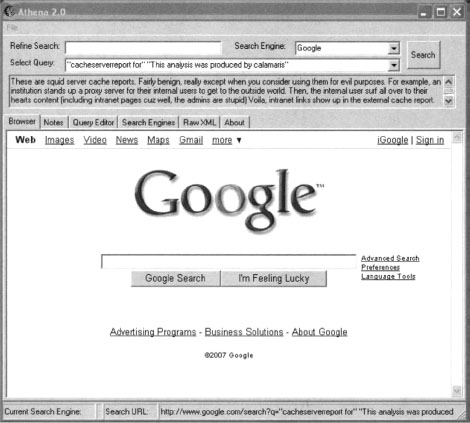
In this case, we managed to locate the Google Hacking Database itself, which included a reference that matched our Google query. The other searches didn’t return any results, because they were a tad more specific than the Calamaris query, which didn’t search titles, URLs, filetypes, and the like.
In summary, Gooscan is a great tool for checking your Web site’s exposure, but it should be used cautiously since it does not use the Google API. Break your scans into small batches, unless you (unwisely) like thumbing your nose at the Establishment.
Windows Tools and the .NET Framework
The Windows tools we’ll look at all require the Microsoft .NET framework, which can be located with a Google query of .NETframework download. The successful installation of the framework depends on a number of factors, but regardless of the version of Windows you’re running, assume that you must be current on all the latest service packs and updates. If Windows Update is available on your version of Windows, run it. The Internet Explorer upgrade, available from the Microsoft Web site (Google query: Internet Explorer upgrade) is the most common required update for successful installation of the .NET Framework. Before downloading and installing Athena or Wikto, make sure you’ve got the .NET Framework (versions 1.1 or 2.0 respectively) properly installed.
The only way Google will explicitly allow you to automate your queries is via the Google Application Programming Interface. Some of the API tools covered in this book rely on the SOAP API, which Google discontinued in favor of the AJAX API. If you have an old SOAP API key, you’re in luck. That key will still work with API-based tools. However, if you don’t have a SOAP key, you should consider using SensePost’s Aura program (www.sensepost.com/research/aura) as an alternative to the old SOAP API.
Athena
Athena by Steve Lord ([email protected]) is a Windows-based Google scanner that is not based on the Google API. As with Gooscan, the use of this tool is in violation of Google’s TOS and that as a result, Google can block your IP range from using its search engine. Athena is potentially less intrusive than Gooscan, since Athena only allows you to perform one search at a time, but Google’s TOS is clear: no automated scanning is allowed. Just as we discussed with Gooscan, use any non-API tool judiciously. History suggests that if you’re nice to Google, Google will be nice to you.
Athena can be downloaded from http://snakeoillabs.eom/. The download consists of a single MSI file. Assuming you’ve installed version 1.1 of the .NET Framework, the Athena installer is a simple wizard, much like most Windows-based software. Once installed and run, Athena presents the main screen, as shown in Figure 12.14.
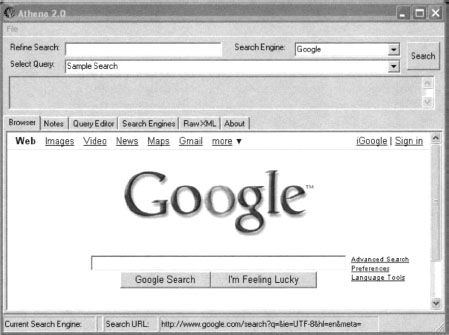
As shown, this screen resembles a simple Web browser. The Refine Search field allows you to enter or refine an existing query. The Search button is similar to Google’s Search button and executes a search, the results of which are shown in the browser window.
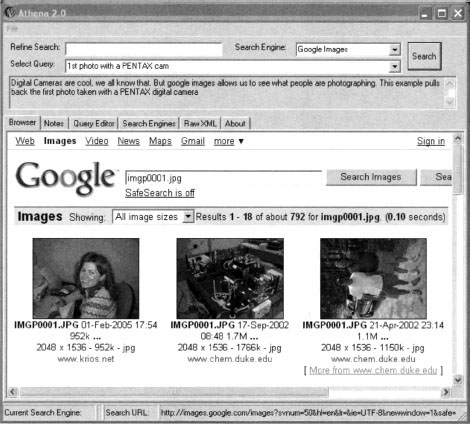
To perform basic searches with Athena, you need to load an XML file containing your desired search strings. Simply open the file from within Athena and all the searches will appear in the Select Query drop-down box. For example, loading the digicams XML file included with Athena will load a nice array of digital photo searches. Simply select a query from the list and click the Search button. For example, selecting 1st photo with a PENTAX cam and clicking Search will deliver the Google results for that search, as shown in Figure 12.15.
Athena also allows you to add modifiers to the query using the Refine Search box. Using the previous query, entering inurl:“buddylist.blt” into the Refine Search box and clicking the Search button provides a much cleaner search (see Figure 12.16).
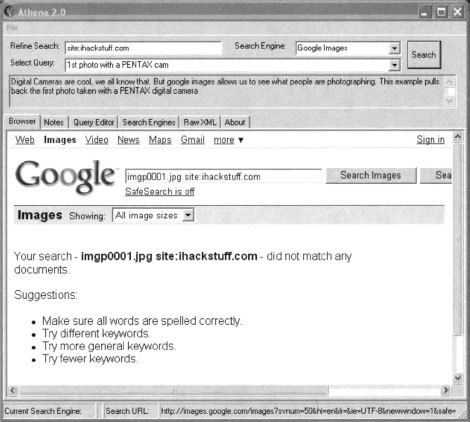
The results show that the image does not exist on the http://johnny.ihackstuff.com website. At this point, Athena might seem rather pointless. It functions just like a Web browser, submitting queries into Google and displaying the results. However, Athena’s most powerful functionality lies in its XML-based configuration files.
Using Athena’s Config Files
Two of these files are included with Athena: Athena.xml and digicams.xml. These files contain custom queries and descriptions of those queries. The digicams file contains sample queries for finding images and the Athena.xml file contains the queries found in the GHDB.
To load the GHDB, simply select File | Open Config and select the Athena.XML file.
Jut as with the digicams image search, queries found in the GHDB can be modified and resubmitted through the Refine Search field.
Constructing Athena Config Files
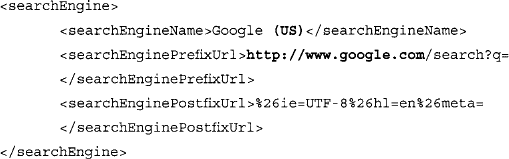
Athena’s XML-based config files, can be modified or even completely overhauled based on your needs. There are two main sections to the XML file: a searchEngine section and the signature section. The searchEngine section describes how a particular search engine’s queries are constructed. A typical searchEngine section is shown in the following code examples.
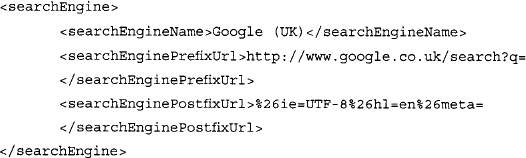
This section is responsible for describing how the various search engines handle search requests. The searchEngineName field is simply a text-based field that describes the name of the search engine. This name will appear in Athena’s drop-down box, allowing you to select from among different search engines. The searchEnginePrefixUrl field represents the first part of the search URL that is sent to the search engine. It is assumed that the query part of the search will be filled in after this prefix. The searchEnginePostfixURL field describes the part of the URL that will come after the prefix and the query. This usually describes various options such as output format (UTF-8). Note that Athena uses the <searchEngine> section, and SiteDigger does not. This section could be reworked to search the U.S.-based Google engine with the following searchEngine section:
The signature section describes the individual searches that are to be performed. A typical signature section is shown in the following code example:
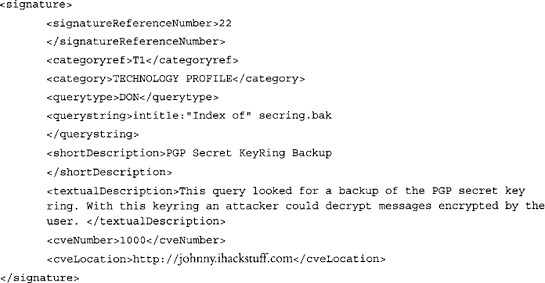
The signatureReferenceNumber is a unique number assigned to each signature. The categoryref is a unique number that describes the signature in the context of its category, which is described in full by category. The querystring is the Google query that is to be performed. It is made HTML-friendly and inserted between the searchEnginePrefixUrl and the searchEnginePostfixUrl in the URL sent to Google. shortDescription and textualDescription are short and long descriptions of the search, respectively. The cveNumber and cveLocation refer to the www.cve.mitre.org Common Vulnerabilities and Exposures list.
The header of the XML file should contain these lines:
<?xml version="1.0” encoding="utf-8"?>
<searchEngineSignature>
and the file should be closed out with a </searchEngineSignature> line as well.
Using this format, it’s fairly simple to create a file of custom queries. The file must conform to the UTF-8 character set and be strictly XML compliant. This means that HTML tags such as <A HREF> and <BR> must not only be matched with closing tags but that each HTML tag be case sensitive. Microsoft’s XML scanner will complain about an opening >BR< tag followed by a closing <br> tag, since the case of the tags is different. The less-than and greater-than symbols (< and >) can also cause problems when used improperly. If your data contains the Internet shorthand for “grin,” which is <G>, the MS XML scanner will complain.
The maintainers of the GHDB make available current config files for use with Athena. This file can be downloaded from http://johnny.ihackstuff.com.
Wikto
Wikto is an amazing web scanning tool written by Roloef Temmingh while he was with Sensepost (www.sensepost.com). Wikto does many different things, but since this book focuses on Google hacking, we’ll take a look at the Google scanning portions of the tool. By default, Wikto launches a wizard interface as shown in Figure 11.18.
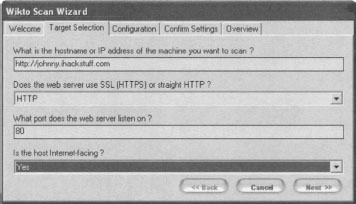
Wikto will first prompt for the target you wish to scan, as well as details about the target server. Clicking the Next button loads the Configuration panel as shown in Figure 11.19
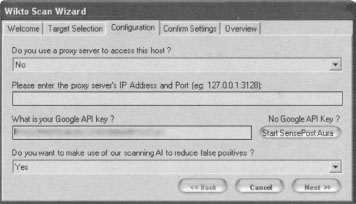
This panel prompts for proxy information and asks for your Google API key. The API issue is tricky, as Google is no longer giving out SOAP API keys. If you already have a SOAP API key (lucky you), enter it into the field and continue to the next panel. Otherwise, consider using Sensepost’s Aura (www.sensepost.com/research/aura) tool to simulate Google SOAP API calls. Download and install Aura from the SensePost website, then click Start SensePost Aura to point Wikto at the Aura proxy. After entering an API key (or bypassing it with Aura), click through the rest of the wizard’s confirmation screens. The main Wikto screen will be displayed. We will first concentrate on the Googler tab. Clicking Start will launch a Google scan against the target site, searching for the specific file types listed in the File Types field. Figure 12.20 shows the result of a scan against http://johnny.ihackstuff.com.
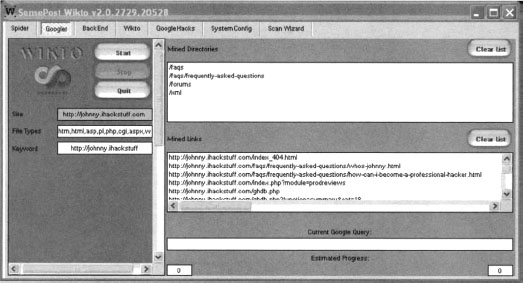
Notice that the output fields list files and directories that were located on the target site. All of this information was gathered through Google queries, meaning the transactions are transparent to the target. Wikto will use this directory and file information in later scanning stages.
Next, we’ll take a look at the GoogleHacks tab, shown in Figure 12.21.
This scanning phase relies on the Google Hacking Database from http://johnny.ihackstuff.com. Clicking the Load Google Hacks Database will load the most current version of the GHDB, providing Wikto with thousands of potentially malicious Google queries. Once the GHDB is loaded, pressing the Start button will begin the Google scan of the target site. What’s basically happening here is Wikto is firing off tons of Google queries, each with a site operator which points to the target website. The GHDB is shown in the upper panel, and any results are presented in the lower panel. Clicking on a result in the lower panel will show the detailed information about that query (from the GHDB) in the middle panel. In this case, many results are returned, since the target website (http://johnny.ihackstuff.com) mentions each of these queries in great detail.
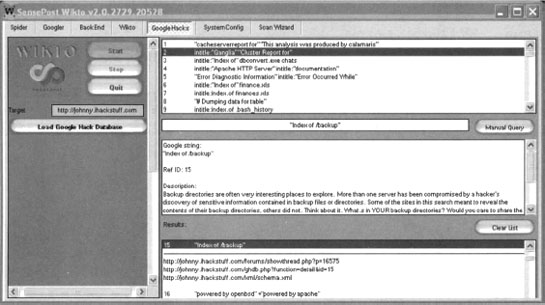
In addition to this automated scanning process, Wikto allows you to perform manual Google queries against the target through the use of the Manual Query button and the associated input field.
Wikto is an amazing tool with loads of features. Combined with GHDB compatibility, Wikto is definitely the best Google hacking tool currently available.
Google Rower
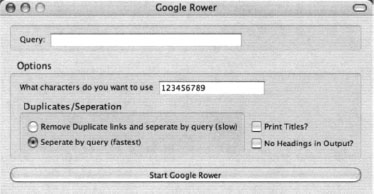
Google Rower is a Firefox extension (and also a stand-alone Windows program) that uses brute force lookup techniques to expand a search. Google Rower is a great tool to bypass the one thousand query lookup restriction. It accomplishes this by adding “padding digits” to a base query. It then harvests the results, removes duplicates, and displays the results. For example, Google Rower can obtain more results for the query JeffBall5 by searching for Jeffball55 a, Jeffball55 b, Jeffball55 c, etc.
Google Rower can be downloaded from http://www.tankedgenius.com. Installation is a simple straightforward Firefox .xpi file installation. After installing Google Rower, open Firefox, select Tools->Google Rower and enter a query as shown in Figure 12.22.
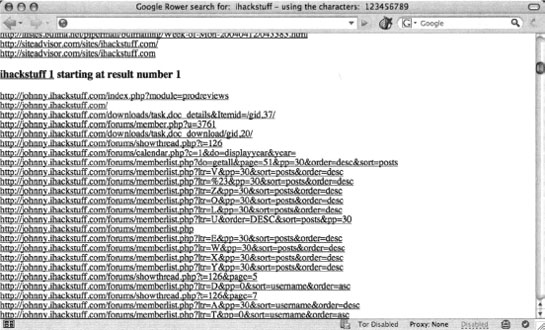
Entering a query of ihackstuff with the default options will query for the base term ihackstuff followed by a series of characters, in this case the numbers one through nine. The results are sorted and displayed, as shown in Figure 12.23.
Alternatively you can right-click within Firefox and select Google Rower. In this case, Google Rower will launch with the query filled in based on the selected text.
Google Rower has several options to select from, as shown in Table 12.1.
Table 12.1 Google Rower Options
| Google Rower Option | Description |
|---|---|
| Duplicates/Separation | Google Rower provides several different options for separating the links via query and removing the duplicate links. The different options affect speed and memory that the extension will use. |
| Print Titles | By default Google Rower outputs the links of the results returned by Google. Selecting this option allows the titles of the pages as reported by Google to be outputted. |
| No Headings in Output | By default Google Rower outputs some headings to show which links came from which query. Selecting this option turns off those Headings. This option is useful when the results will be piped into another program. |
Google Site Indexer
Google Site Indexer (GSI) was written by Jeffball55 (Jeff Stewart) and CP. GSI uses some of Google’s Advanced Operators, specifically site and inurl in order to create a file and directory map of a target web site. By sending Google queries such as site:tankedgenius.com, GSI can incrementally index all files Google has indexed. However, since Google only retrieves a maximum of a thousand results, GSI can mix the advanced operators (like site:tankedgenius.com inurl:cp) in order to get a better mix of unique results. GSI can be downloaded from www.tankedgenius.com.
Installation is a simple affair: clicking on the .xpi file from within Firefox will initiate the installation process. To run Google Site Indexer, open Firefox and select Tools -> GSI. The GSI interface will be displayed as shown in Figure 12.24.
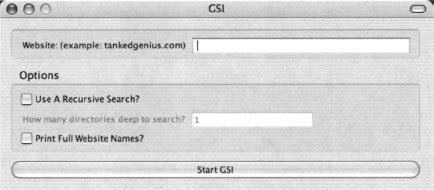
Execution is simple as well. Simply fill in the name of the target website, and click Start GSI. The results will be shown in a hierarchical format as shown in Figure 12.25.
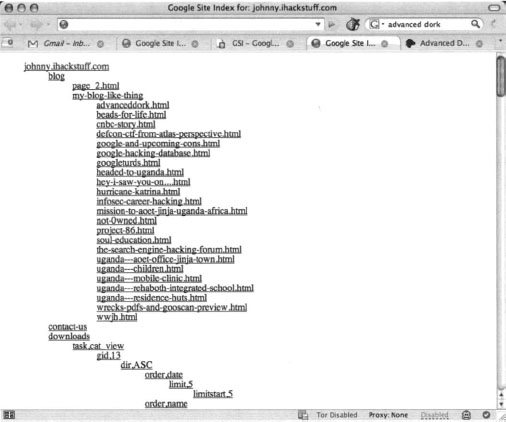
Notice that the results are presented in a hierarchical tree that represents the files and directories on the target site. Each link can be clicked on to browse to the appropriate page.
Alternatively you can right-click within Firefox and select GSI. In this case, GSI will launch with the query filled in based on the selected text, or if no text is selected, GSI will automatically fill in the name of the current website.
GSI has several options to select from, as shown in Table 12.2.
| GSI Option | Description |
|---|---|
| Recursive Search | If you choose to use a recursive search, GSI will use inurl searches. For example, if you choose to do a Google Site Index on tankedgenius.com. It would first send a query site:tankedgenius.com. The query would return a result of http://www.tankedgenius.com/blog/cp/index.html. If a recursive search is at level is at 1, then it would also send a query of site:tankedgenius.com inurl:blog. It would then add the results from that to the index. If the recursion level is set to 2, it would also send a query of site:tankedgenius.com inurl:cp and get the results. |
| Full website names | By default GSI displays an indented site index with only the directory name showing for each link. If you would prefer, you can set this option so that it shows the entire link |
Due to the nature of the Google queries that GSI sends, GSI may get 403 errors from Google. These errors are normal when sending queries with multiple operators.
Advanced Dork
Advanced Dork is an extension for Firefox and Mozilla browsers which provides Google Advanced Operators for use directly from the right-click context menu. Written by CP, the tool is available from https://addons.mozilla.org/en-US/firefox/addon/2144.
Like all Firefox extensions, installation is a snap: simply click the link to the .xpi file from within Firefox and the installation will launch.
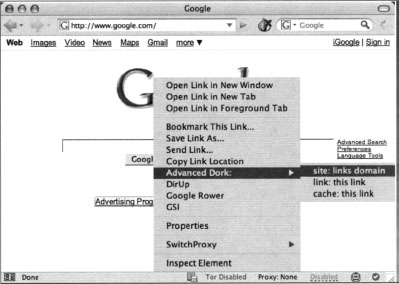
Advanced Dork is context sensitive—Right licking will invoke Advanced Dork based on where the right-click was performed. For example, right-clicking on a link will invoke link-specific options as shown in Figure 12.26.
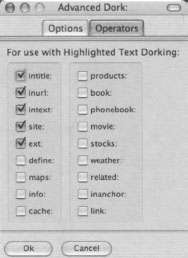
Right-clicking on a highlighted text will invoke the highlighted text search mode of Advanced Dork, as shown in Figure 12.27.
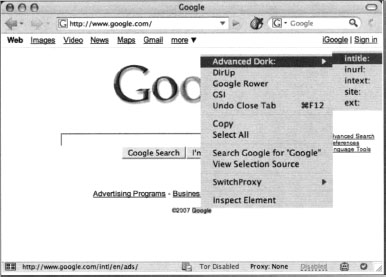
This mode will allow you to use the highlighted word in an intitle, inurl, intext, site or ext search. Several awesome options are available to Advanced Dork, as shown in Figures 12.28 and 12.29.
Some of these options are explained in Table 12.3.
Table 12.3 Advanced Dork Options
| Option | Descriptions |
|---|---|
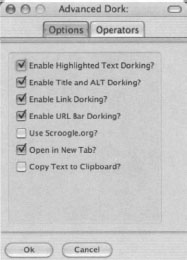
| Highlight Text Functions | Right click to choose from over 15 advanced Google operators. This function can be disabled in the options menu. |
| Right-Click HTML Page Info | Right click anywhere on a page with no text selected, and Advanced Dork will focus on the page’s HTML title and ALT tags for searching using the intitle and allintext operators, respectively. This function can be disabled in the options menu. |
| Right-Click Links | Right click on a link to choose from site: links domain, link: this link, and cache: this link. Site: links domain will only search the domain name, not the full url. |
| Right Click URL Bar | Right click the URL Bar (Address Bar) and choose from site, inurl, link, and cache. Inurl works with the highlighted portion of text only. Site will only search the domain name, not the full url. |
Advanced Dork is an amazing tool for any serious Google user. You should definitely add it to your arsenal.
Getting Help from Google
So far we’ve looked at various ways of checking your site for potential information leaks, but what can you do if you detect such leaks? First and foremost, you should remove the offending content from your site. This may be a fairly involved process, but to do it right, you should always figure out the source of the leak, to ensure that similar leaks don’t happen in the future. Information leaks don’t just happen; they are the result of some event that occurred. Figure out the event, resolve it, and you can begin to stem the source of the problem. Google makes a great Web page available that helps answer some of the most commonly asked questions from a Webmaster’s perspective. The “Google Information for Webmasters” page, located at www.google.com/webmasters, lists all sorts of answers to commonly asked questions.
Solving the local problem is only half the battle. In some cases, Google has a cached copy of your information leak just waiting to be picked up by a Google hacker. There are two ways you can delete a cached version of a page. The first method involves the automatic URL removal system at http://www.google.com/webmasters/tools/removals. This page, shown in Figure 12.30, requires that you first verify your e-mail address. Although this appears to be a login for a Google account, Google accounts don’t seem to provide you access. In most cases, you will have to reregister, even if you have a Google account. The exception seems to be Google Groups accounts, which appear to allow access to this page without a problem.
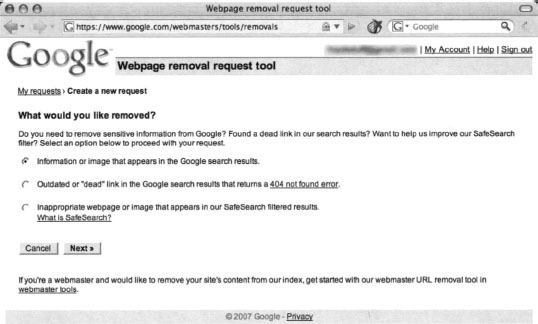
The URL removal tool will walk you through a series of questions that will verify your ownership of the content and determine what it is that you are trying to remove. Each of the options is fairly self-explanatory, but remember that the responsibility for content removal rests with you. You should ensure that your content is indeed removed from your site, and follow up the URL removal process with manual checks.
Summary
The subject of Web server security is too big for any one book. There are so many varied requirements combined with so many different types of Web server software, application software, and operating system software that no one book could do the topic justice. However, a few general principles can at least help you prevent the devastating effects a malicious Google hacker could inflict on a site you’re charged with protecting.
First, understand how the Web server software operates in the event of an unexpected condition. Directory listings, missing index files, and specific error messages can all open up avenues for offensive information gathering. Robots.txt files, simple password authentication, and effective use of META tags can help steer Web crawlers away from specific areas of your site. Although Web data is generally considered public, remember that Google hackers might take interest in your site if it appears as a result of a malicious Google search. Default pages, directories and programs can serve as an indicator that there is a low level of technical know-how behind a site. Servers with this type of default information serve as targets for hackers. Get a handle on what, exactly; a search engine needs to know about your site to draw visitors without attracting undue attention as a result of too much exposure. Use any of the available tools, such as Gooscan, Athena, Wikto, GSI, Google Rower and Advanced Dork, to help you search Google for your site’s information leaks. If you locate a page that shouldn’t be public, use Google’s removal tools to flush the page from Google’s database.
Solutions Fast Track
A Good, Solid Security Policy
- An enforceable, solid security policy should serve as the foundation of any security effort.
- Without a policy, your safeguards could be inefficient or unenforceable.
Web Server Safeguards
- Directory listings, error messages, and misconfigurations can provide too much information.
- Robots.txt files and specialized META tags can help direct search engine crawlers away from specific pages or directories.
- Password mechanisms, even basic ones, keep crawlers away from protected content.
- Default pages and settings indicate that a server is not well maintained and can make that server a target.
Hacking Your Own Site
- Use the site operator to browse the servers you’re charged with protecting. Keep an eye out for any pages that don’t belong.
- Use a tool like Gooscan, Athena, GSI, Google Rower or Advanced Dork to assess your exposure. These tools do not use the Google API, so be aware that any blatant abuse or excessive activity could get your IP range cut off from Google.
- Use a tool like Wikto, which uses the Google API and should free you from fear of getting shut down.
- Use the Google Hacking Database to monitor the latest Google hacking queries. Use the GHDB exports with tools like Gooscan, Athena, or Wikto.
Getting Help from Google
- Use Google’s Webmaster page for information specifically geared toward Webmasters.
- Use Google’s URL removal tools to get sensitive data out of Google’s databases.
Links to Sites
- http://johnny.ihackstufF.com The home of the Google Hacking Database (GHDB), the search engine hacking forums, the Gooscan tool, and the GHDB export files.
- www.snakeoillabs.com Home of Athena.
- http://www.seorank.com/robots-tutorial.htm A good tutorial on using the robots.txt file.
http://googleblog.blogspot.com/2007/02/robots-exclusion-protocol.html Information about Google’s Robots policy.
http://www.microsoft.com/technet/archive/security/chklist/iis5cl.mspx The IIS 5.0 Security Checklist
http://technet2.microsoft.com/windowsserver/en/library/ace052a0-a713–423e-8e8c-4bfl98f597b81033.mspx The IIS 6.0 Security Best Practices
http://httpd.apache.Org/docs/2.0/misc/security_tips.html Apache Security Tips document
www.sensepost.com/research/aura Sensepost’s AURA, which simulates Google SOAP API calls.
http://www.tankedgenius.com Home of JeffBall and Cp’s GSI and Google Rower tools.
https://addons.mozilla.org/en-US/firefox/addon/2144 Home of Cp’s Advanced Dork
Frequently Asked Questions
The following Frequently Asked Questions, answered by the authors of this book, are designed to both measure your understanding of the concepts presented in this chapter and to assist you with real-life implementation of these concepts. To have your questions about this chapter answered by the author, browse to www.syngress.com/solutions and click on the “Ask the Author” form.
If this is too tedious, you’ll need to consider an automation tool. A step above the site technique is Athena. Athena reads the full contents of the GHDB and allows you to step through each query, applying a site value to each search. This allows you to step through the comprehensive list of “bad searches” to see if your site is affected. Athena does not use the Google API but is not automated in the truest sense of the word. Gooscan is potentially the biggest Google automation offender when used improperly, since it is built on the GHDB and will crank through the entire GHDB in fairly short order. It does not use the Google API, and Google will most certainly notice you using it in its wide-open configuration. This type of usage is not recommended, since Google could make for a nasty enemy, but when Gooscan is used with discretion and respect for the spirit of Google’s no-automation rule, it is a most thorough automated tool.