
Chapter 3
Creating Your Own Mad-Scientist Lab
In This Chapter
![]() Finding a suitable place to build your laboratory
Finding a suitable place to build your laboratory
![]() Investing in good-quality tools
Investing in good-quality tools
![]() Picking out components to get you started
Picking out components to get you started
We love the Frankenstein films, especially the scenes in Dr Frankenstein’s laboratory that’s filled with the most amazing and exotic electrical gadgets. The mad doctor’s assistant, Igor, throws a giant knife switch at just the right moment and sparks fly, the music rises to a crescendo, the creature jerks to life and the crazy doctor yells ‘it’s alive!’.
Whichever of the Frankenstein movies is your favourite – the original 1931 Frankenstein starring Boris Karloff, Mel Brooks’s 1974 Young Frankenstein with Gene Wilder or Tim Burton’s recent Frankenweenie – they all have great laboratory scenes.
Fortunately, you don’t need a deserted castle or an elaborate mad-scientist laboratory to construct your own basic electronic circuits. You do, however, need to build yourself a modest workplace, equipped with a basic set of tools as well as some fundamental electronic components to work with.
In this chapter, we introduce you to the stuff you need to get before you can begin building electronic circuits. You don’t have to buy everything straightaway, of course. You can start with just a simple collection of tools and a small space to work in. As you become more advanced in your electronic skills, you can acquire additional tools and equipment as your needs develop.
Setting up Your Lab
To begin building your own electronic circuits, you need to create a good place to work. You can establish a fancy workbench in your garage or in a spare room (see Figure 3-1), but if you don’t have that much space, you can set up an ad-hoc mad-scientist lab just about anywhere. All you need is a place for a small workbench and a chair.
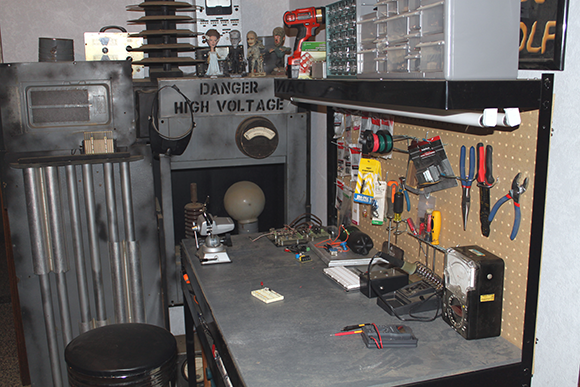
Figure 3-1: Some electronic work areas do end up looking quite mad!
Here are the essential ingredients of any effective work area for electronic tinkering:
![]() Adequate space: You need to have adequate space for your work. When you’re just getting started, your work area can be small – maybe just a square metre or two in the corner of the garage – but as your skills progress, you need more space.
Adequate space: You need to have adequate space for your work. When you’re just getting started, your work area can be small – maybe just a square metre or two in the corner of the garage – but as your skills progress, you need more space.
 The location you choose for your work area must be secure, especially if you have young children around. Your work area is going to be filled with dangers – things that can cause shocks, burns and cuts, as well as things that under no circumstances should be eaten. Little hands are incredibly curious, and children are prone to put anything they don’t recognise in their mouths. So be sure to keep everything safely out of reach, ideally behind a locked door. Check out Chapter 4 of this minibook for loads more on safety.
![]() Good lighting: The ideal lighting is directly overhead instead of from the side or behind you. If possible, purchase an inexpensive fluorescent shop light and hang it directly over your work area. If your chosen spot doesn’t allow you to hang lights overhead, the next best bet is a desk lamp that swings overhead, to bring light directly over your work.
Good lighting: The ideal lighting is directly overhead instead of from the side or behind you. If possible, purchase an inexpensive fluorescent shop light and hang it directly over your work area. If your chosen spot doesn’t allow you to hang lights overhead, the next best bet is a desk lamp that swings overhead, to bring light directly over your work.
![]() A solid workbench: Initially, you can get by with something as simple as a small folding table. Eventually, though, you’re going to want something more permanent and substantial. You can make yourself an excellent workbench from an inexpensive but sturdy office desk.
A solid workbench: Initially, you can get by with something as simple as a small folding table. Eventually, though, you’re going to want something more permanent and substantial. You can make yourself an excellent workbench from an inexpensive but sturdy office desk.
 If your only option for your workbench is your kitchen table, go to your local big box hardware store and buy up to a square metre of 1.5-cm-thick plywood. This area can serve as a good solid work surface until you acquire a real workbench.
![]() Comfortable seating: If your workbench is a folding table or desk, the best seating is a good office chair. Many workbenches stand a little taller than desk height, however, to allow you to work comfortably while standing. If your workbench is tall, you need a seat of the correct height. You can buy a bench stool from a home-improvement store or check out second-hand shops for a cheap bar stool.
Comfortable seating: If your workbench is a folding table or desk, the best seating is a good office chair. Many workbenches stand a little taller than desk height, however, to allow you to work comfortably while standing. If your workbench is tall, you need a seat of the correct height. You can buy a bench stool from a home-improvement store or check out second-hand shops for a cheap bar stool.
![]() Plenty of electricity: Obviously you need a source of electricity nearby as you build electronic projects. A standard 13-amp electrical outlet supplies enough current capacity, but it probably doesn’t provide enough electrical outlets for your needs. The easiest way to meet that need is to purchase several multi-outlet power strips and place them in convenient locations behind or on either side of your work area.
Plenty of electricity: Obviously you need a source of electricity nearby as you build electronic projects. A standard 13-amp electrical outlet supplies enough current capacity, but it probably doesn’t provide enough electrical outlets for your needs. The easiest way to meet that need is to purchase several multi-outlet power strips and place them in convenient locations behind or on either side of your work area.
![]() Plenty of storage: You need a place to store your tools, supplies and components. The ideal storage for hand tools is a small sheet of pegboard mounted on the wall right behind your workbench. Then, you can use hooks to hang your tools within easy reach. For larger tools, such as a drill or saw, built-in cabinets are best.
Plenty of storage: You need a place to store your tools, supplies and components. The ideal storage for hand tools is a small sheet of pegboard mounted on the wall right behind your workbench. Then, you can use hooks to hang your tools within easy reach. For larger tools, such as a drill or saw, built-in cabinets are best.
For small parts, multicompartment storage boxes such as the ones shown in Figure 3-2 are best. We suggest that you get one or two to store all the little components, such as resistors, diodes, capacitors, transistors and so on. If you buy two boxes, get one with a few larger compartments and another with a greater number of smaller compartments.
Keep a few small, shallow storage bins handy. They’re especially useful for storing parts for the project you’re working on, and a shallow bin is better than having them scattered loose all over your work area.

Figure 3-2: Multi-compart-ment storage boxes are ideal for storing small compo-nents.
Equipping Your Lab
Like any hobby, electronics has its own special tools and supplies. Fortunately, you don’t need to run out and buy everything at once. But the more involved you get with the hobby, the more you want to invest in a wide variety of quality tools and supplies. The following sections outline some of the essential stuff you need at your disposal.
Acquiring basic hand tools
For starters, you need a basic set of hand tools, similar to the assortment shown in Figure 3-3. Specifically, you require the following items:
![]() Pliers: Occasionally you need to use standard flat-nosed pliers, but for most electronic work you depend on needle-nose pliers instead, which are especially adept at working with wires – bending and twisting them, pushing them through holes and so on. Most needle-nose pliers also have a cutting edge that lets you use them as wire cutters.
Pliers: Occasionally you need to use standard flat-nosed pliers, but for most electronic work you depend on needle-nose pliers instead, which are especially adept at working with wires – bending and twisting them, pushing them through holes and so on. Most needle-nose pliers also have a cutting edge that lets you use them as wire cutters.
Get a small set of needle-nose pliers with thin jaws for working with small parts and a larger set for bigger jobs.
![]() Screwdrivers: Most electronic work is relatively small, and so you don’t need huge, heavy-duty screwdrivers. But do get yourself a good assortment of small- and medium-sized screwdrivers, flat-blade and Phillips head.
Screwdrivers: Most electronic work is relatively small, and so you don’t need huge, heavy-duty screwdrivers. But do get yourself a good assortment of small- and medium-sized screwdrivers, flat-blade and Phillips head.
A set of jeweller’s screwdrivers is sometimes very useful. The swivelling knob on the top of each one makes holding the screwdriver in a precise position easy while turning the blade.
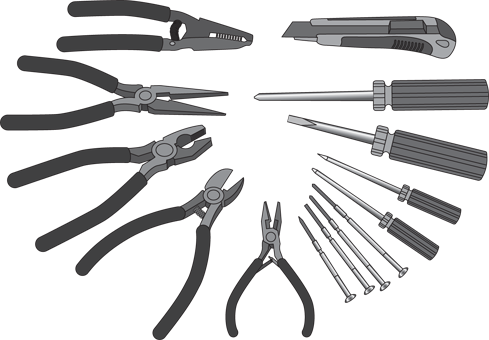
Figure 3-3: Basic hand tools you want to have.
![]() Wire cutters: Although you can use needle-nose pliers to cut wire, you also want a few different types of wire cutters at your disposal. Get something heavy-duty for cutting thick wire and something smaller for cutting small wire or component leads.
Wire cutters: Although you can use needle-nose pliers to cut wire, you also want a few different types of wire cutters at your disposal. Get something heavy-duty for cutting thick wire and something smaller for cutting small wire or component leads.
![]() Wire strippers: Figure 3-4 shows two pieces of wire that we stripped (removed the insulation from). We stripped the one on top with a set of wire cutters and the one on the bottom with a set of wire strippers. The crimping you can see in the one at the top, where the insulation ends, was caused by using just a bit too much pressure on the wire cutters. That crimp has created a weak spot in the wire that may eventually break.
Wire strippers: Figure 3-4 shows two pieces of wire that we stripped (removed the insulation from). We stripped the one on top with a set of wire cutters and the one on the bottom with a set of wire strippers. The crimping you can see in the one at the top, where the insulation ends, was caused by using just a bit too much pressure on the wire cutters. That crimp has created a weak spot in the wire that may eventually break.
Therefore, to avoid damaging your wires when you strip them, we suggest you purchase an inexpensive (under £10) wire-stripping tool. You’ll be glad you did later.

Figure 3-4: The wire on the top was stripped with wire cutters; the one on the bottom was stripped with a wire stripper.
Getting what you pay for
With tools, the old mantra ‘you get what you pay for’ is generally true. Good tools that are manufactured from the best materials and with the best quality fetch a premium price. Cheap tools are, well, cheap. The price range can be substantial. You can easily spend £20 or £25 on decent wire cutters, or you can buy cheap ones for £3 or £4.
Two main drawbacks apply to cheap tools:
![]() They don’t last. The business end of a cheap tool wears out very quickly. For example, each time you cut a wire with a pair of cheap wire cutters, you ding the cutting blade a bit. Pretty soon, the cutters can barely cut through the wire.
They don’t last. The business end of a cheap tool wears out very quickly. For example, each time you cut a wire with a pair of cheap wire cutters, you ding the cutting blade a bit. Pretty soon, the cutters can barely cut through the wire.
![]() When cheap tools wear out, they tend to damage the materials you use them on. For example, tightening a screw with a badly worn screwdriver can strip the screw. Likewise, attempting to loosen a tight nut with a worn-out wrench can strip the nut.
When cheap tools wear out, they tend to damage the materials you use them on. For example, tightening a screw with a badly worn screwdriver can strip the screw. Likewise, attempting to loosen a tight nut with a worn-out wrench can strip the nut.
We do, however, endorse spending money on cheap tools to help you get started in this fascinating hobby as inexpensively as possible. You can start with cheap tools and replace them one by one with more expensive tools as your experience, confidence, love of the hobby and, crucially, your budget increase.
Seeing clearly with magnifying glasses
One of the most helpful items you can have in your tool arsenal is a good magnifying glass. After all, most electronic stuff is small and resistors, diodes and transistors are downright tiny.
We suggest that you have at least three types of magnifying glasses on hand:
![]() A handheld magnifying glass: To inspect solder joints, read the labels on small components and so on.
A handheld magnifying glass: To inspect solder joints, read the labels on small components and so on.
![]() A magnifying glass mounted on a base: So that you can hold your work behind the glass. The best mounted glasses combine a light with the magnifying glass so that the object you’re magnifying is bright.
A magnifying glass mounted on a base: So that you can hold your work behind the glass. The best mounted glasses combine a light with the magnifying glass so that the object you’re magnifying is bright.
![]() Magnifying goggles: For completely hands-free magnifying for delicate work. The ideal goggles have lights mounted on them.
Magnifying goggles: For completely hands-free magnifying for delicate work. The ideal goggles have lights mounted on them.
Getting a firm grip on third hands and hobby vices
A third hand is a common tool with hobbyists. It’s a small stand that has a couple of clips that you use to hold your work, freeing up your hands to do delicate work. Most third-hand tools also include a magnifying glass. Figure 3-5 shows an inexpensive third-hand tool holding a circuit card.
The most common use for a third hand in electronics is soldering (a skill we describe in this minibook’s Chapter 7). You use the clips to hold the parts you want to solder, positioned behind the magnifying glass so you can get a good look.
Although the magnifying glass on the third hand is helpful, it does tend to get in the way of the work: manoeuvring your soldering iron and solder behind the magnifying glass can be awkward. For this reason, we often remove the magnifying glass from the third hand and use magnifying goggles instead (check out the preceding section).
The third hand is often helpful for assembling small projects, but it lacks the sturdiness required for larger projects. Eventually you're going to want to invest in a small hobby vice such as the one shown in Figure 3-6 (made by PanaVise; www.panavise.com).

Figure 3-5: A third hand can hold your stuff so both your hands are free to do the work.

Figure 3-6: A hobby vice.
Here are a few things to look for in a hobby vice:
![]() Mount: Get a vice that has a base with the proper type of workbench mount. Three common types of mounts are available:
Mount: Get a vice that has a base with the proper type of workbench mount. Three common types of mounts are available:
• Bolt mount: The base has holes through which you can pass bolts or screws to attach the vice to your workbench. This mount is the most stable, but it requires that you put holes in your workbench.
• Clamp mount: The base has a clamp that you can tighten to fix the base to the top and bottom of your workbench. Clamp mounts are pretty stable but can be placed only near the edge of your workbench.
• Vacuum mount: The base has a rubber seal and lever you pull to create a vacuum between the seal and the workbench top. Vacuum mounts are the most portable but work well only when the top of your workbench is smooth.
![]() Movement: Select a vice with plenty of movement so that you can swivel your work into a variety of different working positions. Make sure that when you lock the swivel mount into position, it stays put. You don’t want your work sliding around while you’re trying to solder on it.
Movement: Select a vice with plenty of movement so that you can swivel your work into a variety of different working positions. Make sure that when you lock the swivel mount into position, it stays put. You don’t want your work sliding around while you’re trying to solder on it.
![]() Protection: Make sure that the vice jaws have a rubber coating to protect your work.
Protection: Make sure that the vice jaws have a rubber coating to protect your work.
Making connections with a soldering iron
Soldering is one of the basic techniques you use to assemble electronic circuits. The purpose of soldering is to make a permanent connection between two conductors – usually between two wires or between a wire and a conducting surface on a printed circuit board.
The basic technique of soldering is to connect physically the two pieces to be soldered, and then heat them with a soldering iron until they’re hot enough to melt solder (a special metal that has a low melting point). You then apply the solder to the heated parts so that it melts and flows over the parts.
After the solder flows over the two conductors, you remove the soldering iron. As the solder cools, it hardens and bonds the two conductors together.
You can discover all about soldering in Chapter 7 of this minibook. For now, however, you need just three things for successful soldering:
![]() Soldering iron: A little hand-held tool that heats up enough to melt solder. An inexpensive soldering iron is just fine to get started with. As you become more involved with electronics, you can invest in a better soldering iron that has more precise temperature control and is internally grounded.
Soldering iron: A little hand-held tool that heats up enough to melt solder. An inexpensive soldering iron is just fine to get started with. As you become more involved with electronics, you can invest in a better soldering iron that has more precise temperature control and is internally grounded.
![]() Solder: The soft metal that melts to form a bond between the conductors.
Solder: The soft metal that melts to form a bond between the conductors.
![]() Soldering iron stand: To set your soldering iron on when you aren’t soldering. Some soldering irons come with stands, but the cheapest ones don’t. Figure 3-7 shows a soldering iron that has a stand.
Soldering iron stand: To set your soldering iron on when you aren’t soldering. Some soldering irons come with stands, but the cheapest ones don’t. Figure 3-7 shows a soldering iron that has a stand.

Figure 3-7: A soldering iron with a stand.
Measuring with a multimeter
In Chapter 2 of this minibook, we discuss measuring voltage with a voltmeter. You can also use meters to measure many other quantities that are important in electronics. Besides voltage, the two most common measurements you need to make are for current and resistance.
Instead of using three different meters to take these measurements, hobbyists commonly use a single instrument called a multimeter (like the one shown in Figure 3-8). We describe using multimeters in detail in this minibook’s Chapter 8.

Figure 3-8: An inexpensive multimeter.
Using a solderless breadboard
A solderless breadboard – usually just called a breadboard – is a must for experimenting with circuit layouts. A breadboard is a board that has holes in which you can insert wires or electronic components, such as resistors, capacitors, transistors and so on, to create a complete electronic circuit without any soldering. When you’re finished with the circuit, you can take it apart and then reuse the breadboard and the wires and components to create a completely different circuit.
 Breadboards are so useful because the holes in the board are solderless connectors that are internally connected to one another in a specific, well-understood pattern. When you get the hang of working with a breadboard, you soon have no trouble understanding how it works.
Throughout this book, we show you how to create dozens of different circuits on a breadboard. As a result, you need to invest in at least one. We suggest you get one similar to the one shown in Figure 3-9, plus one or two other, smaller breadboards. That way, you don’t always have to take one circuit apart to build another.

Figure 3-9: A solderless breadboard.
You can read more about working with solderless breadboards in Chapter 6 of this minibook.
Conducting electricity with wires
One of the most important items to have on hand in your lab is wire, which is simply a length of a conductor, usually made out of copper but sometimes made of aluminium or some other metal. The conductor is usually covered with an outer layer of insulation. In most wire, the insulation is made of polyethylene, which is the same stuff used to make plastic bags.
Wire comes in these two basic types:
![]() Solid wire: Made from a single piece of metal.
Solid wire: Made from a single piece of metal.
![]() Stranded wire: Made of a bunch of smaller wires twisted together.
Stranded wire: Made of a bunch of smaller wires twisted together.
Figure 3-10 shows both types of wire with the insulation stripped back so you can see the difference.

Figure 3-10: Solid and stranded wire.
For most purposes in this book, you want to work with solid wire, because inserting it into breadboard holes and other types of terminal connections is easier. Solid wire is also easier to solder. When you try to solder stranded wire, inevitably one of the tiny strands gets separated from the rest of the strands, which can create the potential for a short circuit.
Stranded wire, however, is more flexible than solid wire. If you bend a solid wire enough times, you eventually break it. For this reason, use stranded for wires that are frequently moved.
Wire comes in a variety of sizes, which are specified by the wire’s gauge, sometimes given in millimetres for diameter or cross-sectional surface area. You may also see gauge expressed as a two-digit number in which, strangely, the larger the gauge number, the smaller the wire. For most electronics projects, you need 20- or 22-AWG wire. (AWG stands for American Wire Gauge, but is used and understood in the UK.) Plus, circuits running off household electrical power use large wires (usually 14 or 16 AWG).
You may have noticed that the insulation around a wire comes in different colours. The colour doesn’t have any effect on how the wire performs, but often hobbyists use different colours to indicate the purpose of the wire. For example, in direct-current circuits red wire is commonly used for positive voltage connections and black wire for negative connections.
To get started, we suggest you purchase a variety of wires – at least four rolls: 20-AWG solid, 20-AWG stranded, 22-AWG solid and 22-AWG stranded. If you can find an assortment of colours, some much the better.
In addition to wires on rolls, you may also want to pick up jumper wires, which are precut, stripped and bent for use with solderless breadboards (see Figure 3-11).

Figure 3-11: Jumper wires for working with a solderless breadboard.
Supplying power with batteries
Don’t forget the batteries! Most of the circuits we cover in this book use AA or 9-volt batteries, and so you want to stock up.
You can use rechargeable batteries. They cost more initially, but you don’t have to replace them when they lose their charge. Of course, if you use rechargeables, you also need a battery charger.
To connect the batteries to the circuits, get hold of several AA battery holders: one that holds two batteries and another that holds four. You should also buy a couple of 9-volt battery clips. Figure 3-12 shows these holders and clips.

Figure 3-12: Battery holders help to deliver power to your circuits.
Stocking up on other useful items
Here are a few other items you may need to use from time to time:
![]() Cable ties: Also called zip ties, these little plastic ties are handy for temporarily (or permanently) holding wires and other things together.
Cable ties: Also called zip ties, these little plastic ties are handy for temporarily (or permanently) holding wires and other things together.
![]() Compressed air: A small can of compressed air comes in handy for blowing dust off an old circuit board or component.
Compressed air: A small can of compressed air comes in handy for blowing dust off an old circuit board or component.
![]() Electrical tape: Get a roll or two of plain black electrician’s tape for wrapping around temporary connections to hold them together and for keeping them from shorting out.
Electrical tape: Get a roll or two of plain black electrician’s tape for wrapping around temporary connections to hold them together and for keeping them from shorting out.
![]() Jumper clips: These short (typically 30 or 45 cm) wires have crocodile clips attached on both ends, as shown in Figure 3-13. You use them to make quick connections between components for testing purposes.
Jumper clips: These short (typically 30 or 45 cm) wires have crocodile clips attached on both ends, as shown in Figure 3-13. You use them to make quick connections between components for testing purposes.

Figure 3-13: Jumper clips are great for making quick connections.
Gathering Together the Basic Electronic Components
Besides the tools and supplies we describe in the preceding sections, you also need to have a collection of inexpensive electronic components to get you started with your circuits. You don’t have to buy everything immediately, but you do want to gather at least the basic parts before you go much farther in this book.
You can buy many of these components in person at a Maplin store. Alternatively, you can buy the parts online from RS Components (http://uk.rs-online.com), Farnell (uk.farnell.com), Digikey (www.digikey.co.uk), Mouser Electronics (uk.mouser.com), www.radioshack.com or other electronic parts distributor.
Curbing current with resistors
A resistor is a component that resists the flow of current. It’s one of the most basic components used in electronic circuits; in fact, every single circuit in this book contains at least one resistor. Figure 3-14 shows three resistors, next to a coin so that you get an idea of how small they are. Flip to Book II, Chapter 2, for all about resistors.

Figure 3-14: Resistors are one of the most commonly used circuit components.
Resistors come in a variety of resistance values (how much they resist current, measured in units called ohms and designated by the symbol Ω) and power ratings (how much power they can handle without burning up, measured in watts (W)).
All the circuits in this book can use resistors rated for 1.5 W. You need a wide variety of resistance values and we recommend buying at least ten each of the following 12 resistances:
470 Ω 4.7 kΩ 47 kΩ 470 kΩ
1 kΩ 10 kΩ 100 kΩ 1 MΩ
2.2 kΩ 22 kΩ 33 kΩ 220 kΩ
You can save money by purchasing a package that contains a large assortment of resistors. For example, Maplin sells several packs of hundreds of resistors for under £8.
Keeping charged with capacitors
Capacitors are probably the second most commonly used component in electronic circuits (after resistors). A capacitor is a device that can temporarily store an electric charge. We cover capacitors in Book II, Chapter 3 and Figure 3-15 shows a selection.

Figure 3-15: Capacitors come in many shapes and sizes.
You can buy capacitors in several different varieties, the two most common being ceramic disc and electrolytic. The amount of capacitance of a given capacitor is usually measured in microfarads (abbreviated μF).
As a starting assortment of capacitors, we suggest you get at least five each of the following capacitors:
![]() Ceramic disc: 0.01 μF and 0.1 μF.
Ceramic disc: 0.01 μF and 0.1 μF.
![]() Electrolytic: 1 μF, 10 μF, 100 μF, 220 μF and 470 μF.
Electrolytic: 1 μF, 10 μF, 100 μF, 220 μF and 470 μF.
The ceramic disc capacitors you buy should have a voltage rating of 50 V. The larger-value electrolytic parts will have lower voltage ratings.
Depending on diodes to block or allow current
A diode is a device that lets current flow in only one direction and has two terminals: the anode and the cathode. Current flows through the diode only when positive voltage is applied to the anode and negative voltage to the cathode. If these voltages are reversed, current doesn’t flow.
You discover diodes in Book II, Chapter 5. We suggest that you get at least five of the basic diodes known as the 1N4001.
Producing light with LEDs
A light-emitting diode (LED) is a special type of diode that emits light when current passes through it. You can read more on LEDs in Book II, Chapter 5.
Although many different types of LEDs are available, we suggest you start by purchasing five red diodes. Figure 3-16 shows typical LEDs.
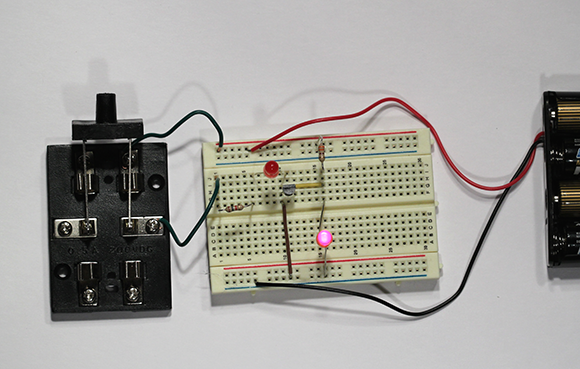
Figure 3-16: Light-emitting diodes.
Controlling current with transistors
A transistor is a three-terminal device in which a voltage applied to one of the terminals (called the base) can control current that flows across the other two terminals (called the collector and the emitter). The transistor is one of the most important devices in electronics, and we cover it in detail in Book II, Chapter 6. Get yourself a few simple 2N3904 NPN transistors, as shown in Figure 3-17, to have on hand.
 Don’t worry; Book II, Chapter 6, explains what the designation 2N3904 NPN means.

Figure 3-17: A look at a 2N3904 NPN transistor.
Chipping in with integrated circuits
An integrated circuit (also called a silicon chip) is a special component that contains an entire electronic circuit, complete with transistors, diodes and other elements, all photographically etched onto a tiny piece of silicon. Integrated circuits are the building blocks of modern electronic devices such as computers and mobile phones.
You discover how to work with some basic integrated circuits in Book III. To get started, you need to pick up a few each of two different types of integrated circuits: a 555 timer and an LM741 op-amp (see Figure 3-18).

Figure 3-18: Two popular integrated circuits: a 555 timer and an LM741 op-amp.