
Chapter 7
Uncovering the Secrets of Successful Soldering
In This Chapter
![]() Assembling your soldering toolkit
Assembling your soldering toolkit
![]() Soldering successfully
Soldering successfully
![]() Distinguishing a good solder joint from a not-so-good one
Distinguishing a good solder joint from a not-so-good one
![]() Repairing a bad solder joint
Repairing a bad solder joint
Soldering is one of the basic skills of building electronic projects. Although you can use solderless breadboards to build test versions of your circuits (check out Chapter 6 of this minibook), sooner or later you want to build permanent versions of your circuits. To do that, you need to know how to solder.
In this chapter, you discover the basics of soldering: how soldering works, what tools and equipment you need and how to create the perfect solder joint. You also find out how to correct your mistakes when (not if) you make them.
 Soldering is a skill that takes a bit of practice to master. Although not nearly as hard as playing the French horn, soldering does have a learning curve. When you’re first getting started, you may feel like you’re all thumbs, and your solder joints may look less than perfect. But stick with it – with a little practice, you get the hang of soldering in no time at all.
Understanding How Solder Works
Before we get into the nuts and bolts of making a solder joint, spend a few minutes thinking about what soldering is and what it isn’t.
Soldering refers to the process of joining two or more metal objects by heating them, and then applying solder to the joint. Solder is a soft metal traditionally made from a combination of tin and lead (it still is in America). European law now permits only lead-free solder, comprising tin and various other metals. When the solder melts, at several hundred degrees Celsius, it flows over the metals to be joined. When the solder cools, it locks the metals together in a connection.
 Several hundred degrees Celsius is pretty hot – certainly hot enough to burn your skin instantly on contact – and so soldering is an inherently dangerous task. It isn’t extremely dangerous, because the amount of solder you use and the tools you use are fairly small, and so any burns you do receive are likely to be small. But they can be painful, and so you need to take great care whenever you’re soldering. And take special care of your eyes.
Soldering is especially useful for electronics because it not only creates a strong physical connection between metals, but also creates an excellent conductive path for electric current to flow from one conductor to another: solder itself is an excellent conductor. For example, you can create a reasonably good connection between two wires simply by stripping the insulation off the ends of each wire and twisting them together. However, current can flow through only the areas that are physically touching. Even when twisted tightly together, most of the surface area of the two wires aren’t touching. But when you solder them, the solder flows through and around the twists, filling any gaps while connecting the entire surface area of both wires.
Soldering isn’t the same as braising or welding:
![]() Braising is similar to soldering, but instead of solder, metals with a higher melting point (usually 450°C or more) are used. Braising forms a stronger bond than soldering.
Braising is similar to soldering, but instead of solder, metals with a higher melting point (usually 450°C or more) are used. Braising forms a stronger bond than soldering.
![]() Welding is an entirely different process in which the metals to be joined are melted. In liquid form, the metals intermix and cool to form an extremely strong bond.
Welding is an entirely different process in which the metals to be joined are melted. In liquid form, the metals intermix and cool to form an extremely strong bond.
Procuring What You Need to Solder
To solder, you need to get together the equipment we describe in the following sections.
Buying a soldering iron
A soldering iron is the basic tool for soldering. Figure 7-1 shows a typical soldering iron.

Figure 7-1: A soldering iron.
Here are some things to look for when purchasing a soldering iron:
![]() The wattage rating needs to be between 20 and 50 watts. Note that the wattage doesn’t control how hot the soldering iron gets. Instead, it controls how fast it heats up and how fast it regains its normal operating temperature after completing each solder joint.
The wattage rating needs to be between 20 and 50 watts. Note that the wattage doesn’t control how hot the soldering iron gets. Instead, it controls how fast it heats up and how fast it regains its normal operating temperature after completing each solder joint.
 Each time you solder, the tip of the soldering iron cools a bit as it transfers its heat to the wires you’re joining and to the solder itself. A higher-wattage soldering iron can maintain a stable temperature longer while you’re soldering a connection and can reheat itself faster in between.
![]() The tip needs to be replaceable. When you purchase your soldering iron, buy a few extra tips so that you have replacements handy when you need them.
The tip needs to be replaceable. When you purchase your soldering iron, buy a few extra tips so that you have replacements handy when you need them.
![]() Although you can buy a soldering iron by itself for under £10, we suggest you spend more on a soldering station that includes an integrated stand for around £20. A secure place to rest your soldering iron when not in use is essential. Without a good stand, we guarantee that your workbench is soon covered with unsightly burn marks. (The soldering iron in the earlier Figure 7-1 includes a soldering station.)
Although you can buy a soldering iron by itself for under £10, we suggest you spend more on a soldering station that includes an integrated stand for around £20. A secure place to rest your soldering iron when not in use is essential. Without a good stand, we guarantee that your workbench is soon covered with unsightly burn marks. (The soldering iron in the earlier Figure 7-1 includes a soldering station.)
![]() More expensive soldering irons have built-in temperature control. Although not necessary, temperature control is a nice feature if you plan to do a lot of soldering.
More expensive soldering irons have built-in temperature control. Although not necessary, temperature control is a nice feature if you plan to do a lot of soldering.
Stocking up on solder
Although solder is wound on spools and looks like wire, in fact it’s a thin hollow tube with a thin core of rosin in the centre. This rosin, called the flux, plays a crucial role in the soldering process. It has a slightly lower melting point than the metal alloy, and so it melts just a few moments before the metal mixture melts. The flux prepares the metals by cleaning and lubricating the surfaces to be joined.
Getting together the other goodies you need
Besides a soldering iron and solder, you also require a few additional things on hand for successful soldering:
![]() A vice: You need at least three hands to solder: one to hold the items you’re soldering, one to hold the soldering iron and one to hold the solder. Unless you’re from the planet tri-mittia (where the inhabitants are helpful but pick-pocketing is a terrible problem!) and have three hands, you need to use a third-hand tool, a vice or some other resourceful device to hold the items you’re soldering, to allow you to wield the soldering iron and the solder. (Refer to Chapter 3 of this minibook for photographs of a third-hand tool and a hobby vice.)
A vice: You need at least three hands to solder: one to hold the items you’re soldering, one to hold the soldering iron and one to hold the solder. Unless you’re from the planet tri-mittia (where the inhabitants are helpful but pick-pocketing is a terrible problem!) and have three hands, you need to use a third-hand tool, a vice or some other resourceful device to hold the items you’re soldering, to allow you to wield the soldering iron and the solder. (Refer to Chapter 3 of this minibook for photographs of a third-hand tool and a hobby vice.)
![]() A sponge: To clean the tip of the soldering iron.
A sponge: To clean the tip of the soldering iron.
![]() Crocodile clips: These serve two purposes when soldering:
Crocodile clips: These serve two purposes when soldering:
• As a clamp to hold a component in place while you solder it.
• As a heat sink to avoid damaging a sensitive component when soldering the component’s leads. (A heat sink is simply a piece of metal attached to a heat-sensitive component that helps dissipate heat radiated by the component.)
![]() Eye protection: Always wear eye protection when soldering. Sometimes hot solder pops and flies through the air. Your eye and melted solder aren’t a good mix.
Eye protection: Always wear eye protection when soldering. Sometimes hot solder pops and flies through the air. Your eye and melted solder aren’t a good mix.
![]() Magnifying glass: Soldering is much easier if you do it through a magnifying glass so that you can get a better look at your work. You can use a table-top magnifying glass, a magnifying glass attached to a third-hand tool or special magnifying goggles.
Magnifying glass: Soldering is much easier if you do it through a magnifying glass so that you can get a better look at your work. You can use a table-top magnifying glass, a magnifying glass attached to a third-hand tool or special magnifying goggles.
![]() Desoldering braid and desoldering pump: These tools are used to undo soldered joints when necessary to correct mistakes. For more information, see the section ‘Undoing Your Work: Desoldering’ later in this chapter.
Desoldering braid and desoldering pump: These tools are used to undo soldered joints when necessary to correct mistakes. For more information, see the section ‘Undoing Your Work: Desoldering’ later in this chapter.
Preparing to Solder
Before you start soldering, follow these steps to prepare your soldering iron:
1. Turn on your soldering iron.
It takes about a minute to heat up.
2. Clean the tip when the iron is hot.
To clean your soldering iron, wipe its tip on a damp sponge. As you work, wipe the iron on the sponge frequently to keep the tip clean.
3. Tin the soldering iron.
Tinning refers to the process of applying a light coat of solder to the tip of the soldering iron. Tinning the tip of your soldering iron helps the solder flow more freely after it heats up. To tin your soldering iron, melt a small amount of solder on the end of the tip and then wipe the tip dry with your sponge.
Clean the tip of your soldering iron frequently as you work – ideally, immediately after every joint you solder. In addition, tin the soldering iron tip occasionally. Usually, tinning the iron once at the start of each project is sufficient. But if the solder disappears from the tip of the iron, you should tin it again.
Soldering a Solid Solder Joint
The most common form of soldering when creating electronic projects is soldering component leads to copper pads on the back of a printed circuit board (PCB), to which we introduce you in Chapter 6 of this minibook. If you can carry out that task, you’ll have no trouble with other types of soldering, such as soldering two wires together or soldering a wire to a switch terminal.
The following steps outline the procedure for soldering a component lead to a PCB:
1. Pass the component leads through the correct holes.
Check the circuit diagram carefully to be sure that you have installed the component in the correct location. If the component is polarised (such as a diode, electrolytic capacitor or integrated circuit) verify that the component is oriented correctly. You don’t want to solder it in backward.
2. Secure the component to the PCB.
If the component is near the edge of the board, the easiest way to secure it is with a crocodile clip. You can also secure the component with a bit of tape.
3. Clamp the PCB in place with your vice.
Turn the board so that the copper-plated side is up. If you’re using a magnifying glass, position the board under the glass.
4. Make sure that you have adequate light.
If you have a desktop lamp, adjust it now so that it shines directly on the connection to be soldered.
5. Touch the tip of the soldering iron to the pad and the lead at the same time.
You have to touch the tip of the soldering iron to the copper pad and the wire lead. The idea is to heat them both so that solder flows and adheres to both.
The easiest way to achieve the correct contact is to use the tip of the soldering iron to press the lead against the edge of the hole, as shown in Figure 7-2.
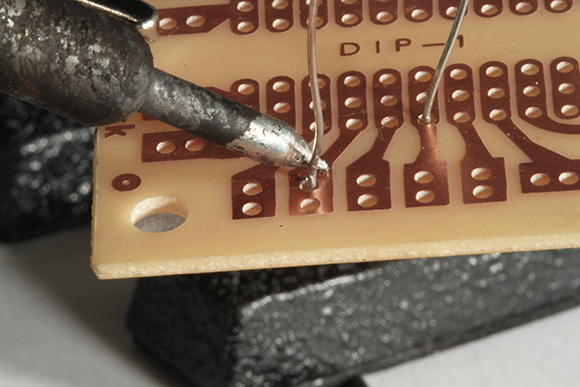
Figure 7-2: Position-ing the soldering iron.
6. Let the lead and the pad heat up for a moment.
They take only a few seconds to heat up sufficiently.
7. Apply the solder to the lead on the opposite side of the tip of the soldering iron, just above the copper pad.
The solder begins to melt almost immediately.
Figure 7-3 shows the correct way to apply the solder.
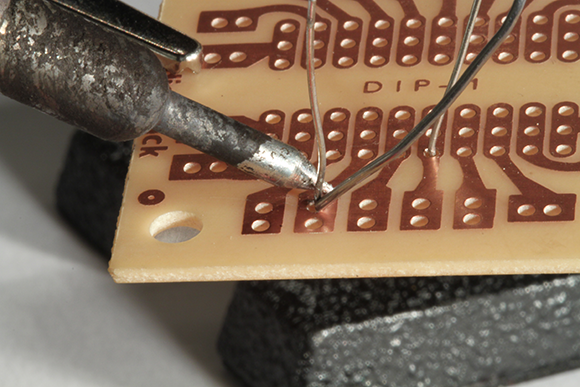
Figure 7-3: Applying the solder.
Don’t touch the solder directly to the soldering iron. If you do, the solder melts immediately, and you can end up with an unstable connection, often called a cold joint, where the solder doesn’t properly fuse itself to the copper pad or the wire lead.
8. Feed just enough solder to cover the pad when the solder begins to melt.
As the solder melts, it flows down the lead and then spreads out onto the pad. You want just enough solder to cover the pad completely, but not enough to create a big glob on top of the pad.
Be stingy when applying solder: too much solder is a more common problem than too little. Adding a little more solder later if you don’t get quite enough coverage is a lot easier than removing too much solder.
9. Remove the solder and soldering iron and let the solder cool.
Be patient – the solder takes a few seconds to cool. Don’t move anything while the joint is cooling. If you inadvertently move the lead, you create an unstable cold joint that you have to resolder.
10. Trim the excess lead by snipping it with wire cutters right above the top of the solder joint.
Use a small pair of wire cutters so that you can trim it close to the joint.
Checking Your Work
After you complete a solder joint, inspect it to make sure that the joint is good. Look at it under a magnifying glass, and gently wiggle the component to see if the joint is stable. A good solder joint should be shiny and fill but not overflow the pad, as shown in Figure 7-4.

Figure 7-4: A good solder joint.
Nearly all bad solder joints are caused by one of three things: not allowing the wire and pad to heat sufficiently, applying too much solder or melting the solder with the soldering iron instead of with the wire lead. Here are some indications of a bad solder joint:
![]() The pad and lead aren’t completely covered with solder, enabling you to see through one side of the hole the lead passes through. Either you didn’t apply quite enough solder, or the pad wasn’t quite hot enough to accept the solder.
The pad and lead aren’t completely covered with solder, enabling you to see through one side of the hole the lead passes through. Either you didn’t apply quite enough solder, or the pad wasn’t quite hot enough to accept the solder.
![]() The lead is loose in the hole or the solder isn’t firmly attached to the pad. One possible reason is that you moved the lead before the solder completely cooled.
The lead is loose in the hole or the solder isn’t firmly attached to the pad. One possible reason is that you moved the lead before the solder completely cooled.
![]() Solder overflows the pad and touches an adjacent pad. Sometimes this happens if you apply too much solder. It can also occur if the pad doesn’t get hot enough to accept the solder, which can cause the solder to flow off the pad and onto an adjacent pad. If solder spills over from one pad to an adjacent pad, your circuit may not work correctly.
Solder overflows the pad and touches an adjacent pad. Sometimes this happens if you apply too much solder. It can also occur if the pad doesn’t get hot enough to accept the solder, which can cause the solder to flow off the pad and onto an adjacent pad. If solder spills over from one pad to an adjacent pad, your circuit may not work correctly.
Undoing Your Work: Desoldering
Desoldering refers to the process of undoing a soldered joint. You may have to desolder if you discover that a solder joint is less than satisfactory, if a component fails or if you connect your circuit incorrectly.
To desolder a solder connection, you need a desoldering pump and a desoldering braid (see Figure 7-5).
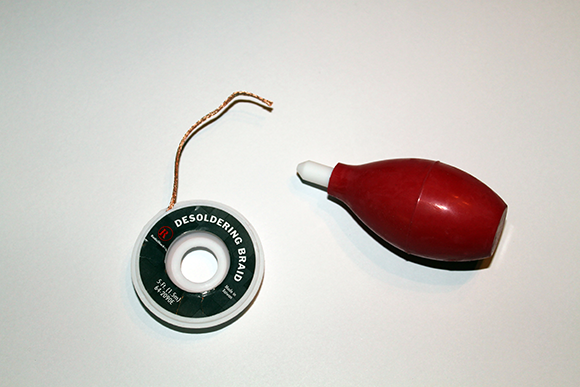
Figure 7-5: A desoldering pump and a desoldering braid.
Here are the steps for undoing a solder joint:
1. Apply the hot soldering iron to the joint you need to remove.
Wait a second for the solder to melt.
2. Squeeze the desoldering pump to expel the air it contains, and then touch the tip of the desoldering pump to the molten solder joint and release the pump.
As the pump expands, it sucks the solder off the joint and into the pump.
3. Apply heat again if the desoldering pump doesn’t completely free the lead, and touch the remaining molten solder with the desoldering braid.
The desoldering braid is specially designed to draw up solder, much like a candle wick draws up wax.
4. Use needle-nose pliers or tweezers to remove the lead.
Don’t try to remove the lead with your fingers after you desolder the connection. The lead remains hot for a while after you desolder it.