
Chapter 8. Enhancing Word Documents

Basic formatting, such as changing a font or text color, can certainly spruce up a document’s text. However, Word offers so much more to make your document appear polished and professional. You can add a variety of enhancements, such as page numbers, text boxes, headers and footers, and other page elements to give your document added pizzazz.
This chapter shows you how to use several of these key features to build better documents. You learn how to add pages, cover pages, and page numbers. When you work with longer documents, page numbers, headers and footers, and page breaks can help you organize your pages. You also learn how to enhance your document with special formatting features, such as text boxes, symbols, and drop caps.

Inserting a Cover Page
You can add a cover page to your document to display a title, author information, or other text of your choosing. Cover pages are templates with preset designs and placeholder text. Simply replace the template text with your own.

![]() Click the Insert tab on the Ribbon.
Click the Insert tab on the Ribbon.
![]() Click Pages.
Click Pages.
![]() Click Cover Page.
Click Cover Page.
![]() Scroll through and click a cover page template.
Scroll through and click a cover page template.
![]() Word adds the page; you can now fill it in as needed.
Word adds the page; you can now fill it in as needed.


 Note: Screen Resolution Differences
The layout of the Insert tab varies based on your screen resolution. For example, the Cover Page button displays directly on the Insert tab rather than on a menu below the Pages button with some resolutions. If your screen doesn’t match the figures in this chapter, look for the button you want elsewhere in the Ribbon tab group. ![]()
 Tip: Remove It
To remove a cover page you no longer want, click the page, click the Insert tab, click Pages, click Cover Page, and then click Remove Current Cover Page. ![]()
Inserting a Blank Page
Although Word creates a new page for you as you type when you reach the end of the current page, you might also need to insert a blank page from time to time. For example, you might need a new page in the middle of two existing pages to insert a chart or graphic. Inserting blank pages where you need them is easy.
![]() Click anywhere on the page that you want to appear after the newly inserted page.
Click anywhere on the page that you want to appear after the newly inserted page.
![]() Click the Insert tab.
Click the Insert tab.
![]() Click Pages.
Click Pages.
![]() Click Blank Page.
Click Blank Page.
![]() Word adds the page.
Word adds the page.

Note: Delete It!
To remove a blank page, click the bottom of the page that precedes it, and press Delete until the blank page is removed. ![]()
Tip: Type a Title
Did you know you can type text, such as a title, anywhere on a page? For example, if you just added a blank page to start a new section, you can double-click the center of the page and start typing there. ![]()
Inserting a Page Break
You can insert a page break anytime you need to manually start a new page. For example, you might want a longer paragraph at the end of a page to remain as a single block of text rather than be broken onto two pages. You can also insert a page break to start a new chapter or topic.
![]() Click where you want the page break to appear.
Click where you want the page break to appear.
![]() Click Insert.
Click Insert.
![]() Click Pages.
Click Pages.
![]() Click Page Break.
Click Page Break.
![]() Word inserts a page break.
Word inserts a page break.

Tip: Shortcut!
You can also insert a page quickly using the keyboard shortcut Ctrl+Enter. This command immediately starts a new page where the cursor currently sits. ![]()
Note: More Breaks
You can use several kinds of breaks in Word in addition to page breaks. You can insert column breaks to control how text flows from one column to the next or insert section breaks to help manage long documents. To find more break options, click the Layout tab, and click the Breaks drop-down menu. ![]()
Inserting Page Numbers
You can insert page numbers to appear in the header and footer areas of your documents. Page numbers are particularly helpful with longer documents, especially when you print them out and need to organize the pages.
![]() Click Insert.
Click Insert.
![]() Click Page Number.
Click Page Number.
![]() Click a page location for the numbers.
Click a page location for the numbers.
![]() Click a style.
Click a style.
![]() Word applies the numbers to your document pages and opens the Header & Footer Tools on the Ribbon.
Word applies the numbers to your document pages and opens the Header & Footer Tools on the Ribbon.
![]() Click Close Header and Footer to exit.
Click Close Header and Footer to exit.

Note: Format Them!
You can easily change the formatting for page numbers. To change font, size, or color, for example, select the page number in the header or footer area and apply any formatting from the Home tab, such as making the numbers bold or red. To change the number style, click the Page Number drop-down menu on the Header & Footer Tools–Design tab, and then click Format Page Number. This opens a dialog box where you can specify other styles, such as Roman numerals. Learn more about headers and footers in the next task. ![]()
Adding Headers and Footers
You can use headers and footers in your documents to add special information to every page, such as a title and date at the top of each page, or a company name and address at the bottom. Header and footer information appears outside the regular text margins at the top (headers) or bottom (footers) of the document.
![]() Click Insert.
Click Insert.

![]() Scroll through and click a header or footer style.
Scroll through and click a header or footer style.

![]() Word applies it to the document and displays the Design tab for Header & Footer Tools. In this example, a header is added.
Word applies it to the document and displays the Design tab for Header & Footer Tools. In this example, a header is added.
![]() Replace any placeholder header or footer text.
Replace any placeholder header or footer text.

Note: Working with Fields
Header and footer elements are built out of fields, which hold pieces of information that update, such as page numbers or dates. You can add and subtract specific fields from a header or footer to customize it. For example, you can insert a date and time field that updates every time you open the document. ![]()
![]() To insert a specific field, such as the document title or author name, click Document Info on the Header & Footer Tools–Design tab, and select a field.
To insert a specific field, such as the document title or author name, click Document Info on the Header & Footer Tools–Design tab, and select a field.

![]() Word inserts the specified field; in this example, an author name field is added to the header.
Word inserts the specified field; in this example, an author name field is added to the header.
![]() To navigate between headers and footers, click the Go to Header or Go to Footer button.
To navigate between headers and footers, click the Go to Header or Go to Footer button.
![]() To exit the header and footer area of a document, click the Close Header and Footer button.
To exit the header and footer area of a document, click the Close Header and Footer button.

Tip: Header and Footer Shortcuts
When you work with headers and footers, a dotted line separates the header or footer area from the rest of the document page. If you double-click outside the header or footer area, or press Esc, Word automatically closes the Header/Footer view for you. To reopen the view again, double-click inside the header or footer area at the top or bottom of the page. ![]()
Editing Headers and Footers
You can edit your headers and footers to make changes to the text or fields. You can add new fields, remove others, and adjust the formatting to suit your preferences. You can also delete headers and footers you no longer want.
![]() Double-click in the header or footer area you want to edit.
Double-click in the header or footer area you want to edit.

![]() Select and make any changes to the header or footer elements as needed, such as formatting, typing in different text, or adding more fields.
Select and make any changes to the header or footer elements as needed, such as formatting, typing in different text, or adding more fields.
![]() Use the Options tools to change how headers, footers, and documents appear while working in Header and Footer mode.
Use the Options tools to change how headers, footers, and documents appear while working in Header and Footer mode.
![]() Use the Position tools to change the position and alignment of header and footer elements.
Use the Position tools to change the position and alignment of header and footer elements.

Tip: Navigating Tools
You can use the tools in the Navigation group on the Design tab to navigate back and forth between header and footer areas in your document. For example, click the Go to Footer button to quickly view and make changes to the footer area. ![]()
![]() To remove a header or footer, click the Header or Footer button on the Header & Footer Tools–Design tab.
To remove a header or footer, click the Header or Footer button on the Header & Footer Tools–Design tab.
![]() Click Remove Header or Remove Footer.
Click Remove Header or Remove Footer.
![]() Word removes the header or footer.
Word removes the header or footer.
![]() To exit the header and footer area, click the Close Header and Footer button.
To exit the header and footer area, click the Close Header and Footer button.

Tip: Customize Headers and Footers
Headers and footers display on every page unless you specify otherwise. To control this, click the Layout tab, and then click the More button in the lower-right corner of the Page Setup group. On the Layout tab of the Page Setup dialog box you find options for placing different odd and even or first-page headers and footers. ![]()
Inserting a Text Box
You can use a text box to add text to a picture, such as a caption or title, or to hold a picture, quote, or other element you want to appear separate from the main document text. Text boxes act as containers that you can move around on the document page.
![]() Click Insert.
Click Insert.
![]() Click Text Box.
Click Text Box.
![]() Click a text box style.
Click a text box style.

![]() Word inserts a placeholder box and displays the Format tab on the Ribbon.
Word inserts a placeholder box and displays the Format tab on the Ribbon.

![]() Type the text you want to appear in the box.
Type the text you want to appear in the box.

Tip: Text Box Variety
Text boxes come in a variety of preset styles you can choose from, or you can insert a simple text box and add your own formatting later. To check online for more text box styles, click the More Text Boxes from Office.com command in the Text Box drop-down gallery. ![]()
![]() To move a text box, position the mouse pointer over an edge of the box and then drag it to a new location onscreen.
To move a text box, position the mouse pointer over an edge of the box and then drag it to a new location onscreen.

![]() To resize the box, click and drag a selection handle.
To resize the box, click and drag a selection handle.

![]() To add shading to a text box background, click the Shape Fill button and choose a shading color.
To add shading to a text box background, click the Shape Fill button and choose a shading color.

![]() To control additional layout options, click the Layout Options button and choose a text wrap selection.
To control additional layout options, click the Layout Options button and choose a text wrap selection.

Tip: Easy Formatting
You can format text within a text box using the same controls you use to format the rest of your document text. In addition, you can use the Drawing Tools–Format tab to make changes to the text box shape, color, background, and alignment. ![]()
Inserting a Drop Cap
A drop cap typically appears at the start of a paragraph, usually much larger in size than the rest of the text. Drop caps are commonly used in book publishing to mark the opening paragraph of a new chapter. You can use drop caps to add visual emphasis to your text.
![]() Select the text character you want to turn into a drop cap.
Select the text character you want to turn into a drop cap.
![]() Click the Insert tab.
Click the Insert tab.
![]() Click the Add a Drop Cap button.
Click the Add a Drop Cap button.
![]() Click Dropped.
Click Dropped.

![]() The drop cap is added and you can format it to suit your needs.
The drop cap is added and you can format it to suit your needs.

Tip: Remove It
To delete a drop cap, select it, click the Add a Drop Cap button, and choose None from the drop-down menu. ![]()

Inserting a Date
You can insert a date or time field into a document that automatically updates every time you open the file. You can also keep the date static (that is, unchanging) if you like.
![]() Click where you want to insert a date.
Click where you want to insert a date.
![]() Click the Insert tab.
Click the Insert tab.
![]() Click the Insert Date and Time button.
Click the Insert Date and Time button.

![]() Word opens the Date and Time dialog box; click a format for the date or time.
Word opens the Date and Time dialog box; click a format for the date or time.
![]() Click OK.
Click OK.

![]() The current date and time are added.
The current date and time are added.

Tip: Automatic Update
If you want the date or time to update automatically, make sure you click the Update Automatically check box in the Date and Time dialog box. ![]()
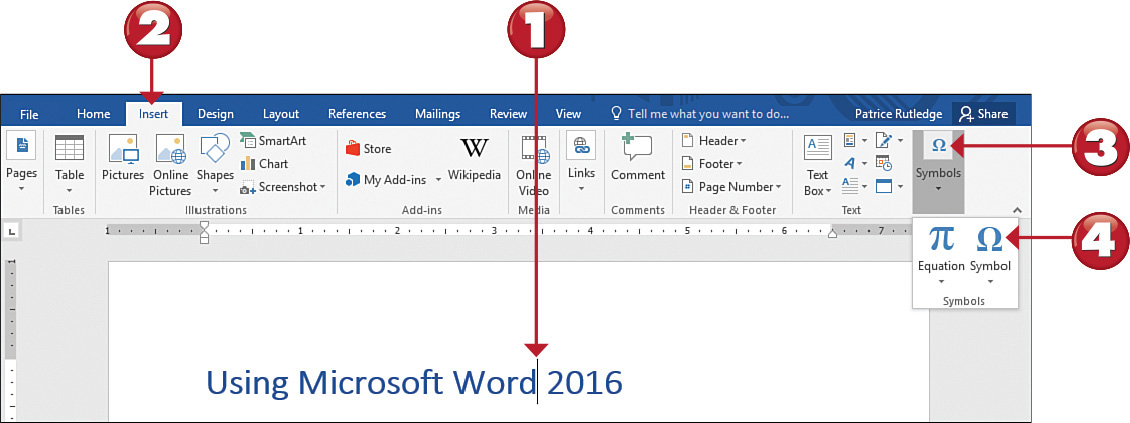
Inserting a Symbol
You might need to insert special symbols or characters from time to time, such as a copyright symbol or a registered trademark. Special symbols also include mathematical signs, special quotes, foreign language symbols, and more.
![]() Click where you want to insert a symbol.
Click where you want to insert a symbol.
![]() Click the Insert tab.
Click the Insert tab.
![]() Click Symbols.
Click Symbols.
![]() Click Symbol.
Click Symbol.
![]() Click a symbol from the list.
Click a symbol from the list.
![]() To view more symbols, click More Symbols.
To view more symbols, click More Symbols.

![]() Word opens the Symbol dialog box; click the Symbols tab to view symbols.
Word opens the Symbol dialog box; click the Symbols tab to view symbols.

Tip: More Symbols
If you don’t see the symbol or special character you’re looking for, you can switch to another font or symbol subset in the Symbol dialog box using the drop-down arrows. ![]()
![]() Click the Special Characters tab to view special characters.
Click the Special Characters tab to view special characters.

![]() Click the symbol or character you want to add.
Click the symbol or character you want to add.
![]() Click Insert.
Click Insert.

![]() The symbol appears in the document.
The symbol appears in the document.
![]() Click Close to exit the dialog box.
Click Close to exit the dialog box.

Tip: Symbol Shortcuts
Some symbols have their own shortcut keys you can press to quickly add the symbol to any spot in a document. For example, pressing Alt+Ctrl+C inserts the copyright (©) symbol, and pressing Alt+Ctrl+R inserts the registered symbol (®). Look for keyboard shortcut keys for common symbols on the Special Characters tab in the Symbol dialog box. ![]()
Inserting a Hyperlink
You can insert a hyperlink into a document that, when clicked, jumps you to another location in your existing document, another document, or a web page on the Internet.
![]() Select the text or graphic you want to turn into a hyperlink.
Select the text or graphic you want to turn into a hyperlink.
![]() Click the Insert tab.
Click the Insert tab.
![]() Click Links.
Click Links.
![]() Click Hyperlink.
Click Hyperlink.

![]() The Insert Hyperlink dialog box opens; click which type of link you want to create.
The Insert Hyperlink dialog box opens; click which type of link you want to create.
![]() Navigate to the item you want to link to; depending on the type of link you create, different options are available for selection.
Navigate to the item you want to link to; depending on the type of link you create, different options are available for selection.
![]() Click OK.
Click OK.

![]() Word formats the selected text as a hyperlink.
Word formats the selected text as a hyperlink.

Note: Add a ScreenTip
You can add text that displays whenever you hover the mouse pointer over the link. In the Insert Hyperlink dialog box, click the ScreenTip button, and type in your text. ![]()
Inserting a Bookmark
You can insert a hyperlink into a document that, when clicked, jumps you to another location in your existing document, another document, or a web page on the Internet.
![]() Select the text or graphic you want to turn into a hyperlink.
Select the text or graphic you want to turn into a hyperlink.
![]() Click the Insert tab.
Click the Insert tab.
![]() Click Links.
Click Links.
![]() Click Bookmark.
Click Bookmark.

![]() The Bookmark dialog box opens; type a name for the new bookmark.
The Bookmark dialog box opens; type a name for the new bookmark.
![]() Click Add and Word saves the bookmark.
Click Add and Word saves the bookmark.

Note: Navigate to a Bookmark
To navigate to a bookmark in your document, click the Home tab on the Ribbon, click Find, and click Go To. Word opens the Find dialog box. In the Go To tab, click Bookmark, and then select your bookmark from the drop-down list. ![]()