
Chapter 25. Working with maintenance plans
Just like a car or a house, you want to maintain your databases so that they run smoothly and safely over time. You probably have actions you want to perform that are specific to your application and data, but some actions are common to most databases, like backups and defragmentation. This is why Microsoft created maintenance plans that make the implementation of standard actions easy. We specify which of these standard actions we want to perform, for which databases, and at what intervals—no T-SQL coding required. Of course, some DBAs want more control over the actions than the maintenance plans allow for, but for those who are not full-time DBAs, maintenance plans are a good solution.
What is a maintenance plan, and how do I create one?
The implementation of maintenance plans (MPs) has changed over time. From SQL Server 6.5 to 2000, an MP was executed by sqlmaint.exe through a SQL Server Agent (Agent) job. As of SQL Server 2005, an MP is a SQL Server Integration Service (SSIS) package, executed by an Agent job.
You create a plan using SQL Server Management Studio (SSMS) and right-clicking the Maintenance Plans folder under the Management folder. You can use either a wizard or a trimmed-down version of the SSIS package Designer, available inside SSMS. For beginners, I recommend using the wizard, and, as you get more comfortable using MPs, you can dive into the Designer.
The SSIS package is saved directly to the msdb database (not out in the filesystem as a .dtsx file) along with some metadata in the msdb database, indicating that the plan exists. This metadata allows SSMS to list your plans in the Maintenance Plans folder, where you can right-click and edit them. If you choose to schedule the plan, which you typically will want to do, then one or more Agent jobs will be created.
Versions and service packs
If you are using SQL Server 2005, I strongly encourage you to be at least on Service Pack 2 (SP2) on both the server and the client (SSMS). SP2 added some functionality, like a separate schedule per task, and it also added the Maintenance Cleanup Task to the wizard. In fact, if you are using SQL Server 2005, you want to be at least slightly higher than the original SP2 release because of some bugs in that original release.
Tip
What build number you want to be using, and how to check it, is slightly complicated and depends on whether you have applied a hotfix or not. I suggest you check out http://blogs.msdn.com/psssql/archive/2007/04/06/post-sql-server-2005-service-pack-2-sp2-fixes-explained.aspx and verify that you aren’t using the original SP2.
I will assume SQL Server 2008 in this section. An MP in SQL Server 2005 with SP2 looks the same and has the same functionality as in 2008 (with the addition that for SQL Server 2008 you can compress a backup if you are using Enterprise Edition).
One or several schedules per plan?
You might not be familiar with some of the terms I use here; therefore, it’s time for some explanations. A maintenance plan (plan) is what is created by the Designer or wizard. It’s implemented as an SSIS package, which is saved directly to the msdb database. An SSIS package consists of several SSIS tasks, where each task is of a certain type (backup database, check integrity, and so on). You decide whether to schedule the plan (typically you will want to do this), which will create one or several Agent jobs, where each job has one Agent schedule.
As of SP2, you can decide whether you want to have one schedule per task or one schedule for the entire plan (the latter was the only option prior to SQL Server 2005 SP2). Having several schedules will result in several Agent jobs—one per schedule. There are advantages with both alternatives; therefore, think a few minutes about how you want to do this. As an example, say you want to perform these tasks:
- Weekly defragmentation and removal of backup history
- Daily database backup, removal of old backup files, and checking of database integrity
- Transaction log backup every 15 minutes
If you have one schedule per task, you can have only one plan, but you will end up with six Agent jobs (called subplans), each scheduled separately. This means you have to decide for each job when it is to be executed. If you don’t want the jobs to overlap each other, you’ll have to plan out the timing.
On the other hand, if you want only one schedule for the plan, you will end up with several plans—three plans in the preceding example. You would have one plan for the weekly tasks, another for the daily tasks, and yet another for the log backup task. For each plan, you can decide in what order the tasks are to be performed.
Regardless of how you do the scheduling, you need to specify what databases to operate on for each task (for the task types that operate at the database level). This differs from MPs in SQL Server 2000 and earlier, where you specified the databases at the plan level.
The dialog boxes will look slightly different depending on whether you are using the wizard or the Designer, on how you want to schedule the plan, and on what version and service pack you are using, but, in the end, the tasks you perform inside the plan are the same. The screenshots that follow in this chapter are from SQL Server 2008, and have one schedule for the whole plan, using the wizard. You will find that your dialog boxes will look very similar even if some of these attributes differ.
Wizard dialogs
If you create your plan using the wizard, you will be presented with a number of dialog boxes that are specific to the wizard. It is pretty obvious what they do, so I will only mention them briefly here:
- Select Plan Properties page— Here you specify the name of the plan, an optional description, and whether you want to have one schedule for the entire plan or one schedule per task. If you want one schedule for the entire plan, you can enter the scheduling page from here.
- Select Maintenance Tasks page— Here you select what tasks you want to include in the plan.
- Select Maintenance Task Order page— This page allows you to specify in what order each task is to be performed.
Task types
In the following sections, I will describe the task types that are available in an MP. You will see that I also mention which T-SQL command or stored procedure is executed for each task. Whenever you feel you want to dive deeper and learn about the options for each command, don’t hesitate to read about the command in the SQL Server Books Online. Each command is documented with all its options, and you will also learn about options that are not exposed in an MP, which can be valuable and help you decide whether or not to replace that task with your own T-SQL command.
Sometimes the most difficult thing is to decide what tasks to include, and in what order, so let’s start with some advice on that. I typically include the following tasks in my MPs:
- Database check integrity
- Reorganize index or rebuild index (not both)
- Update statistics
- History cleanup
- Backup database (often both full and transaction log and sometimes also differential)
- Maintenance cleanup task
The one thing I strongly discourage you from including is the shrink database task. See the following section, “Shrink database task,” for details.
As for the order in which tasks are performed, it doesn’t matter much as long as you follow best practices (for example, don’t shrink and don’t update index statistics if you also rebuild your indexes). One could argue that you want to check integrity before a backup (and don’t do a backup if the integrity check doesn’t pass), and you could argue that the other way around is better (check integrity after the backup so that you know the backup was clean). I don’t recommend spending too much time on this; the important thing is choosing which tasks to perform and following best practices.
Check database integrity task
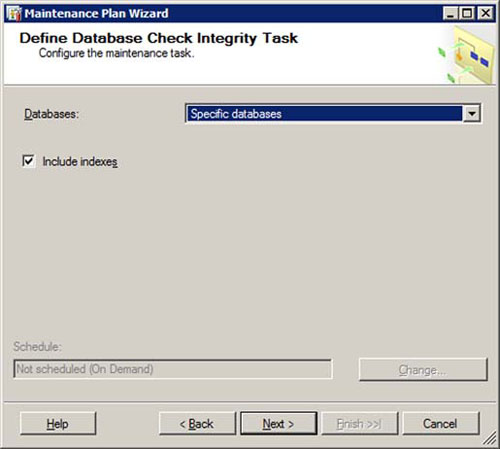
The check database integrity task executes the DBCC CHECKDB command, which searches for various types of corruption in the database. I prefer to execute this as often as I can (once a day if possible), because I want to know as soon as possible if I have a corruption problem in a database.
The DBCC CHECKDB command has a lot of options, but only Include Indexes (which toggles the NOINDEX option) is available through maintenance plans, as shown in figure 1.
Figure 1. Defining the check database integrity task
Shrink database task
Don’t ever be tempted to run the shrink database task, shown in figure 2. Regularly shrinking database files can have a huge negative performance impact, among other things.
Figure 2. Defining the shrink database task

For instance, shrinking fragments your indexes; therefore, it is useless to first defragment your indexes and then shrink your database. People often think that they can get around this by shrinking the files first, and then rebuilding the indexes, but the rebuild operation uses temporary space that then becomes “free” at the completion of the index rebuild. This often leads to confusion as to why there is free space, and to an incorrect assertion that the shrink operation failed to reclaim this space. In any case, it’s best practice to have a fair amount of free space in your database files.
Still, I frequently see shrinking being scheduled, and I have an article on my website describing why you want to avoid doing it. Check it out at http://www.karaszi.com/SQLServer/info_dont_shrink.asp if you need more convincing.
I recommend shrinking database files only in special circumstances. This task executes the DBCC SHRINKDATABASE command.
Reorganize index task
The reorganize index task, shown in figure 3, executes the ALTER INDEX command using the REORGANIZE option. This is something you might want to do in order to defragment your indexes, which in turn can improve performance. Note, though, that the task is pretty stupid—it will execute the command for every index in the database, regardless of whether the index is fragmented in the first place. You can be smarter than that, and you will even find T-SQL code in Books Online that checks the fragmentation level for each index and only defragments the fragmented indexes (see the Books Online topic for sys.dm_db_index_physical_stats).
Figure 3. Defining the reorganize index task

Rebuild index task
The rebuild index task, shown in figure 4, is pretty much the same as the reorganize index task, but it uses the REBUILD option of the ALTER INDEX command and can generate more problems (in terms of data and log file growth) if misused. This also operates on every index in the database, regardless of the fragmentation level.
Figure 4. Defining the rebuild index task

Let me again point out that you shouldn’t both rebuild and reorganize—that is a waste of time and resources. There’s a lot to say about index fragmentation and defragmenting indexes, such as why you might want to do it, whether you should reorganize or rebuild, how each operation is implemented, and so on. Such elaborations are outside the scope of this chapter, but Paul S. Randal has a section about index fragmentation in his great TechNet article about database maintenance, titled “Top Tips for Effective Database Maintenance.” I encourage you to read the article, which you’ll find at http://technet.microsoft.com/en-us/magazine/cc671165.aspx.
Update statistics task
The update statistics task uses the UPDATE STATISTICS command, which can improve performance for your queries by providing the optimizer with more accurate statistics for the data in your tables. A database option is available that will cause this to be performed automatically, but that does not kick in until you have modified about 20 percent of the data for a column. The more data you sample, the more accurate the statistics will be, but the longer the statistics collection will take. A full scan, which samples 100 percent of the rows, delivers the most accurate statistics, but it obviously takes the most time.
Note that if you rebuild your indexes, you will get updated statistics (based on a full scan) for free, but only for the index statistics of the indexes that are rebuilt, not for column statistics. What you don’t want to do is first rebuild indexes (which updates statistics for all indexes, based on all data) and then use this task to update index statistics. At best, this will waste time and resources to update the statistics twice. At worst, it will run this task after index rebuild, with less than a 100 percent sample rate, resulting in less precise statistics than after the index rebuild.
I recommend that you include this task in your plans. If you also rebuild indexes (in contrast to reorganizing, which does nothing for statistics), configure it to update Column Statistics Only. If you don’t rebuild indexes, configure it to update All Existing Statistics, as shown in figure 5. Use as high a Scan Type as you have time for—ideally a full scan.
Figure 5. Defining the update statistics task

History cleanup task
If you don’t delete old history information from your various history tables, you will find your msdb database growing over time. I’ve seen some pretty extreme cases with large msdb databases because of frequent transaction log backups or many databases in the SQL Server instance. This task, shown in figure 6, makes it a no-brainer to remove old history information.
Figure 6. Defining the history cleanup task
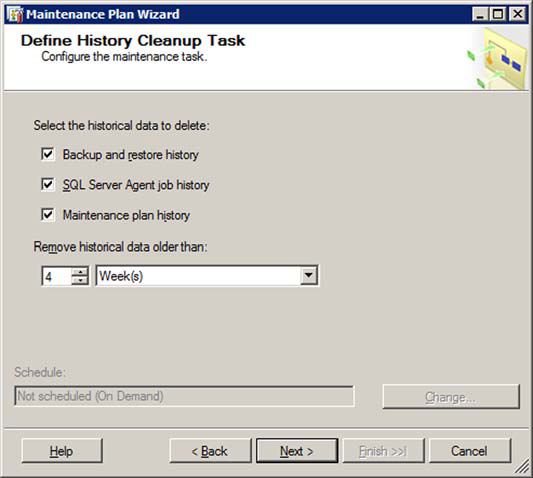
The following procedures are used by this task:
- sp_delete_backuphistory
- sp_purge_jobhistory
- sp_maintplan_delete_log
I typically keep three to six months of history. It can be useful to look at the history a few weeks back in time or even a couple of months, but I haven’t ever needed to check history for several months back in time.
Execute SQL Server Agent job task
There isn’t much to say about the execute SQL Server Agent job task, shown in figure 7. You can expand on the functionality of an MP by executing Agent jobs from within an MP. You might want to execute a batch file, executable file, or script from within the plan to create folders, move files, copy files, and so on. You can create an Agent job to do this and call the job from this task. The procedure used by this task is msdb.dbo.sp_start_job.
Figure 7. Defining the execute SQL Server Agent job task

Back up database task
The look of this dialog box will depend on whether you see it from the wizard or from the Designer. When used in the wizard (as in figure 8), you cannot change the backup type because it was selected in the initial dialog box where you selected what operations to perform. The topmost three choices specify what type of backup will be performed and for which databases.
Figure 8. Defining the back up database task

The expiration section is, in my opinion, pretty useless and even confusing. Many users believe that this will automatically remove or overwrite backups; for instance, those older than 14 days. That is not what these options (which set RETAINDAYS and EXPIREDATE behind the scenes) are for. All they do is cause an error if you try to overwrite that backup file earlier than the specified days or date. If it were up to me, these options would not be present in the MP backup task.
You can also specify whether to back up to a specific backup device or create a new backup device (file) for each backup. Most often, you want the latter, because this will allow for the removal of old backup files. Note, though, that the removal of old backup files is performed in a separate task, not in this task. I’ve been to several installations where the disks were approaching full because there was no function to remove old backup files.
You can also decide to verify the backup after it is produced, which uses the RESTORE VERIFYONLY command. An option to include the CHECKSUM option for the backup command in the MP backup task is not available, so the information the verification has to work with is somewhat limited. Performing backup using the CHECKSUM option is a best practice, but unfortunately MPs do not allow us to do that.
Finally, if you are on SQL Server 2008 and have Enterprise Edition, you can decide whether to compress the backup (which coincidently causes the backup to be done using CHECKSUM, regardless of whether CHECKSUM, NO_CHECKSUM, or none of those options are specified).
Maintenance cleanup task
If you are on SQL Server 2005 and haven’t installed SP2, then the maintenance cleanup task, shown in figure 9, is not in the wizard. That is a shame, because this is the task that will remove old backup files (or MP report files, depending on the setting). You can, of course, add it from the Designer, but I was happy to see that SP2 included this task in the wizard.
Figure 9. Defining the maintenance cleanup task
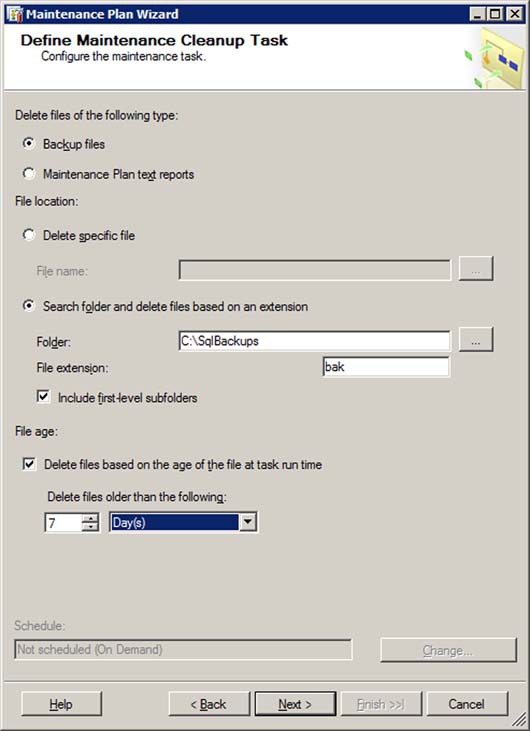
The options are pretty straightforward. Unfortunately the task uses an undocumented command, xp_delete_file; therefore, we are in unsupported land if we want to use this procedure from our own jobs.
Select reporting options
You should think about the reporting options. The dialog box shown in figure 10 is not from the wizard, it is from the Designer. The Designer dialog box is a superset of the wizard dialog box, so you’ll find all options in the wizard discussed here. The reason I decided to show this dialog box from the Designer is that it has some options that the wizard does not have.
Figure 10. Selecting the reporting options

If something goes wrong (like a backup fails or DBCC CHECKDB detects database corruption), you definitely want to know about it as soon as possible and with as much information as possible so that you can take appropriate action without any unnecessary delay. I find a report file good to have, even if there is history for each execution of the plan available (right-click an existing plan and select View History). For most cases, I like to enable email support within SQL Server and configure the jobs to email the operator. The exception is for jobs that execute frequently. In most cases, you will hopefully also have some monitoring solution for errors in the Windows Event Log, various error log files, high-severity errors (such as 823, 824), and the like.
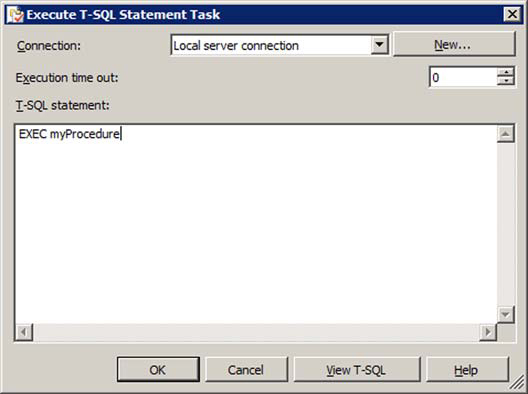
Execute T-SQL statement task
For some reason, this task, shown in figure 11, is not available from the wizard. If you want to add this task, finish the wizard and let it save the plan, and then right-click the plan and select Modify, which will open the Designer. I find this task useful, because it allows us to add whatever T-SQL commands we wish to an MP. Not only can we set the order in which tasks run in the plan, we can execute other Agent jobs as well as T-SQL commands from within our MPs.
Figure 11. Executing the T-SQL statement task
Executing and monitoring the plan
So now you have a maintenance plan. The Maintenance Plan Wizard or Designer, whichever you used, has created one or several Agent jobs for you. Make sure that the Agent is running and using an appropriate service account (the Windows account that is used for the SQL Server Agent service). The service account should exist as a Windows login in SQL Server, having sysadmin privileges. If you can start the Agent, you know you’ve fulfilled this, because the Agent refuses to start unless it can log in to SQL Server with sysadmin privileges. Also, the account needs access to the right folders and shares and other resources for whatever you perform in the MP.
When the plan has been executed, you might want to be notified. You can either set up notification of an Agent operator in the MP’s Select Report Options dialog box, or you can specify notification at the job level. I prefer the former, because this allows me to include the information from the MP report file in the email, which means I can immediately start troubleshooting possible problems when I receive the email. You can also right-click an existing MP in SSMS and select View History, which will show the history information from MP history tables in msdb, such as sysmaintplan_log and sysmaintplan_logdetail.
Summary
MPs are powerful tools. They allow you to easily and quickly define various types of maintenance operations for your SQL Server instance without needing any T-SQL programming. As you become more experienced and see a need for more tailored plans, you can refine your existing MPs. You can pick and choose between the options in the predefined tasks, and replace some of those with your own T-SQL or SQL Server Agent job tasks.
Some DBAs prefer to skip the MPs altogether, and do everything using some combination of T-SQL code, scripting language, and a job scheduler (like SQL Server Agent). I’ve done my share of that. What you should remember if you do this is that although it is extremely powerful and allows for ultimate flexibility (you write your own code, after all), the code you write needs to be written, debugged, tested, and maintained over time. I hesitate to leave home-grown maintenance jobs with customers who do not have the competency to maintain this code over time.
In many cases, MPs provide a good middle ground, and with the added flexibility introduced in SQL Server 2005, they become even more powerful and versatile.
About the author

Tibor Karaszi has been a SQL Server MVP since 1997, and he is an independent consultant and trainer, focusing on the relational database engine. His experience with SQL Server goes all the way back to the late 1980s and the first version of Microsoft SQL Server. Tibor lives in Stockholm, Sweden. His web site is at http://www.karaszi.com.