Open entries are transactions that haven't reached their final status yet, and are not included in the Open documents section. You can only post open entries when the corresponding master data is already imported. In a common scenario, the open entries include:
- Customer entries: It means all the money each customer owes on the day of the migration
- Vendor entries: It means all the money the company owes to each of their vendors on the day of the migration
- Bank entries: It means the money the company has in each bank account
- Item entries: It means the stock the company has in each location on the day of the migration
- Accounting Balances: It means the balance that each account has on the day of the migration
In a more advanced scenario, this may also include:
All these entries must be posted through their corresponding journal and must use a specific posting date. The posting date must be at least one day prior to the migration date. For instance, if you choose to go live on April 1, you should use March 31 as the posting date for all open entries. The easiest way to migrate open entries is to use the Configuration Worksheet described earlier in this chapter.
Customer entries are all the money that each customer owes on the day of the migration. We need to create at least one customer entry to summarize all of the money that the customer owes. If the company wants to control due dates from Dynamics NAV for the open entries, we need to create at least one summarized entry for each due date, or we can create one entry for each pending invoice.
The minimum information needed is as follows:
- Posting date: Use one day before migration day for all the entries.
- Account type: Use the Customer option for all the entries.
- Account number: Use the customer code given to the customer.
- Document number: You can use the invoice number extracted from the old system, or you can give it a document number such as
OPENING. - Description: Give the entry a description. You can use the invoice description extracted from the old system, or you can give a description such as
Opening Entriesto all the entries. - Currency: Leave it blank if the amounts are in local currency. Write the currency code otherwise. Keep in mind that if a currency code is filled, amounts must be in that currency.
- Amount: It's the money the customer owes. Write a negative amount if it's the company which owes money to the customer, either because of credit memos or advance payments.
Other information that can be provided are as follows:
- Document date: In case you are creating one entry for each pending invoice, the document date corresponds to the date of the original invoice
- Due date: In case you are creating one entry for each pending invoice, the due date corresponds to the date when the customer has to pay their debt
- Payment method: In case you are creating one entry for each pending invoice, the payment method corresponds to how the debt will be paid
Actually, you can provide information for any field included in the Gen. Journal Line table. But for migration purposes, the previously listed fields are enough.
Let's see, with an example, how to migrate customer entries. We'll just take the minimum information needed. The following steps are involved while migrating a customer entry:
- Provide an Excel template; we'll use the RapidStart Services. The data has to be imported into the General Journal, to create customer entries when posted.
- Create an Excel template for the table 81 and include the fields Account Type, Account No. , Posting Date, Document No., Description, Currency Code, and Amount. Refer to the Create the migration structure section in this chapter for more information on this step.
- Ask someone in the company to fill in the template, extracting data from the old system using the extraction tools available. You are a Dynamics NAV expert, and you may not know how data is stored in the old system, so don't try to do it yourself.
Tip
Remember that your job is to import data into Dynamics NAV the way Dynamics NAV expects it. It is the company's responsibility to assure that data is consistent and of good quality.
As a Dynamics NAV expert, you will be responsible for filling in the fields corresponding to the primary key of the table. In this case, these would be the Journal Template Name, Journal Batch Name, and Line No. fields.
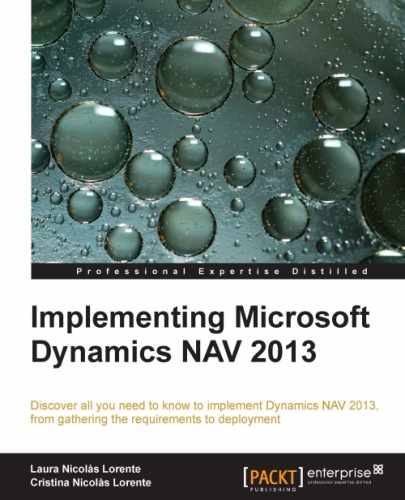
The final document will look similar to the following screenshot:

- Once the template is completely filled, it's time to import it to Dynamics NAV and apply it. Refer to the Migrate your data section in this chapter for more information on this step.
- Open the General Journal. The data is almost ready to be posted. Once posted, Dynamics NAV won't allow you to delete or modify the created entries, so take your time before posting. Check, check, and check your work. Once you are done, check it again. Also ask the user who provided you the information to check it. Use this checklist:
Question
Answer
Does the Total Balance shown in the Journal correspond with all the money customers owe?
Is the Posting Date set to one day before go-live?
Does each Customer owe the Amount shown in its Journal line?
Do not check it with the template you just imported; you will easily get a positive answer. Instead, ask someone in the company to check it with their old system. If you added extra fields to the template, add at least one question for each new field.
Once the lines are posted, new customer ledger entries will be created. G/L entries will also be created. When a new Gen. Journal Line table is created, Dynamics NAV copies the posting group from the customer card to the Gen. Journal Line table. The receivables account found in each posting group is used to determine which account must be used to post the amount each customer owes. Now, add another question to your checklist.
Question
Answer
Group all the lines by posting group. Get the receivables account for each posting group. Will each account receive the expected amount?
Since G/L entries will be created, the accounting rules must be followed. One rule says that any transaction must be balanced. The sum of the debit amounts in each line must equal the sum of the credit amounts.
In Dynamics NAV the Total Balance entry shown at the bottom of the General Journal field must be 0.
- In our example, the total available balance is 1.644,15. We need to perform an extra step to make it 0 and balance the whole transaction. There are a few options we can use to accomplish this. Let us explain two of those options which we are aware of:
- Fill in the Bal. Account Type field with G/L Account. Also fill in the Bal. Account No. field with the receivables account on the customer posting group assigned to each customer. In the example, both customers have the domestic customer posting group. The receivables account for them is 2310. If you try to use the
2310account in the Bal. Account No. field you will get the following error:
This is because Dynamics NAV has a mechanism to prevent accounts included in any posting group from receiving entries directly. You will have to skip this control in order to post the customer open entries. Go to the account card and uncheck the Direct Posting field. Don't forget to check it again when the migration process is over!
Your journal lines will now look like those in the following screenshot, and the transaction will be balanced and ready to post.

Of course, these two new fields could be added to the migration template to fill them at the outset.
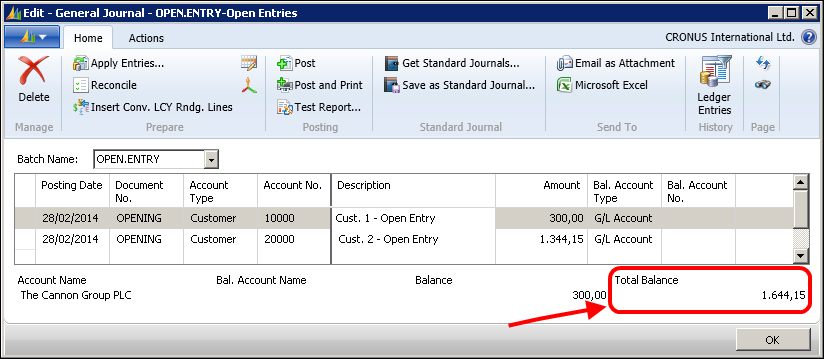
Let's see the general ledger entries that have been created after the posting process:
As you can see, the same account has been used. The balance of the account is 0,00 , even if it has four entries. If you run a balance report, you will see that no amount is shown in the Accounts Receivable line. It feels weird, doesn't it? Don't worry, this will be solved once the balance open entries are imported.
- Some countries include a temporary account in their chart of accounts to post transactions when the balance account is unknown at the moment of posting. The balance posted in that account can only be there for a short period of time and when known, must be transferred to the right balance account.
In the Spanish chart of accounts, for instance, we can find the
555group, namedMovements pending application. Ask the company accountant if such an account exists in your country and use it if it does. The amount posted on that account will be cleared later on while migrating the accounting balances. Since we will use the same posting date regarding accountancy, the amount will only be there for one day. Create a new posting account in that group. You can give it the number5551, and you can name itCustomer – Opening entries. Then writeBalance Sheetin the Income/Balance field and ensure that the Direct Posting field is checked.Now, go back to the General Journal page and manually insert a new line with the following information:
Field
Value
Posting date
March 31
Document number
OPENING
Account type
G/L account
Account number.
5551
Amount
-Total balance
Note that, after introducing this new line, the transaction becomes balanced, as shown in the following screenshot. Now it can be posted.

We like this way of balancing opening transactions because it follows accountancy rules. The accountant in the company will easily understand what we are doing. Plus, after the transaction is posted, if you run a balance report, the posted amount will be shown in the accounts receivable line. This looks much better.
- Fill in the Bal. Account Type field with G/L Account. Also fill in the Bal. Account No. field with the receivables account on the customer posting group assigned to each customer. In the example, both customers have the domestic customer posting group. The receivables account for them is 2310. If you try to use the
- We are done! You can repeat this process as many times as you want.
Vendor entries are pretty much the same as customer entries. Just follow the steps described in the previous section. There are a few differences explained as follows:
- When you fill in the data migration template, account type must have the vendor value.
- You have to reverse the sign of the amounts.
- The balancing account will be found in the Payables Account field in the Vendor Posting Group table.
- If you choose to use a temporary account to balance the transaction, create a new posting account. In the Spanish chart of accounts, you would create the
5552account. Give it a description such asVendor - Opening entries.
Bank entries are pretty much the same as customer entries. Just follow the steps described in the previous section. The few differences are explained as follows:
- When you fill in the data migration template, account type must have the bank account value.
- The balancing account will be found in the G/L Bank Account No. field in the Bank Account Posting Group table.
- If you choose to use a temporary account to balance the transaction, create a new posting account. In the Spanish chart of accounts, you would create the
5553account. Give it a description such asBank - Opening entries.
Item entries are a bit different from the entries described so far. First of all, another journal must be used, the item journal. Also, you can choose whether the posting of items entries creates general ledger entries or not.
The data migration tool has limitations here, so follow the recommendations to work around them.
The minimum information needed is:
- Posting date: Use 1 day before migration day for all the entries
- Entry type: Use Positive Adjmt. for all the entries
- Document number: You can use a generic document number, such as
OPENING - Item number: Use the item code given to the item
- Location code: Leave it blank if the company is not using locations; otherwise, write the location code
- Quantity: Fill in the quantity in terms of the base unit of measurement of the item
- Unit cost: Fill in the unit cost in the base unit of measurement of the item
Note
Note that the Item Journal Line table contains a field called Unit of Measure Code. So, you could use a different unit of measurement and therefore quantity and unit cost will refer to the new unit. When you import data using RapidStart Services, the OnValidate trigger of each field is run. By default, the fields are validated in the same order that they are declared in the table.
The Unit Cost field has the field number 17, whereas the Unit of Measure Code field has the field number, 5407. The Unit Cost field will be validated before the Unit of Measure Code field. If you fill in the Unit of Measure Code field in the template, code will be run. In this particular case, unit cost will be recalculated and you will not get the unit cost you filled in the template.
To avoid this situation, you will have to change the default validation order, as explained in the RapidStart Services section.
Usually, the automatic cost posting is disabled, since in most scenarios it is not recommended that this functionality should be used.
Even if, in your case, the automatic cost posting must be used, disable the functionality while posting the initial item open entries. The cost will be posted in the corresponding account later on, when accounting balances are imported.
Run the data migration tool to import the data into the item journal and post it. The item entries will be created.
Migrating fixed assets is a bit tricky. Here, we are not talking just about assets that have pending depreciation but all active assets in the company. Two types of entries have to be posted, cost entries and depreciation entries. Plus, there is more than one account involved with a singular asset. You could post fixed asset entries from two different journals:
- The general journal will post fixed asset entries as well as general ledger entries
- The fixed asset journal will only post fixed asset entries, general ledger entries will not be posted
We will now explain how to post fixed asset entries using the fixed asset journal. Accounting entries related to them will be posted while importing the accounting balances later on.
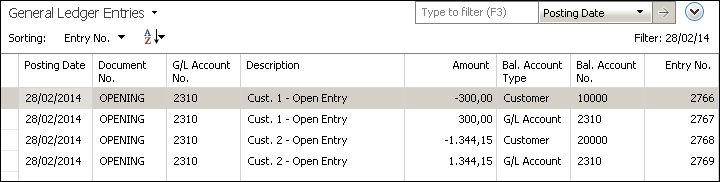
To use the fixed asset journal, you must uncheck the G/L integration for the acquisition cost and the depreciation. Go to Departments/Financial Management/Fixed Assets/Setup/Depreciation Book. Open the Depreciation Book Card page and uncheck the fields, as shown in the following screenshot:
From the fixed asset journal, the minimum information needed for the acquisition cost entries is:
- FA posting date: Use 1 day before migration day for all the entries
- Document number: You can use a generic document number, such as
OPENING - FA number: Use the fixed asset code given to the asset
- FA posting type: Use the Acquisition Cost value
- Amount: Fill in this field with the amount of the original invoice
Import this information using the data migration tool and post it.
From the fixed asset journal, the minimum information needed for the depreciation entries:
- FA posting date: Use 1 day before migration day for all the entries
- Document number: You can use a generic document number, such as
OPENING - FA number: Use the fixed asset code given to the asset
- FA posting type: Use the depreciation value
- Amount: Fill in this field with the total amount already depreciated for each asset
- Number of depreciation days: Count 30 days for each month depreciated
Import this information using the data migration tool, and post it. Do not forget to check the G/L integration again in the depreciation book card. If you have been using a temporary account in the past sections, we recommend that you post general ledger entries for the fixed assets entries that you just posted.
In the Spanish chart of accounts, you would create the 5554 and 5555 accounts. Give them descriptions such as FA - Opening Cost entries and FA - Opening Depreciation entries, respectively.
Summarize all asset acquisition cost entries, grouped by posting group. In the general journal, create one line for each posting group. Use the acquisition cost account found in the FA posting group. Use the FA - Opening Cost entries account to balance the whole transaction.
Do the same with the depreciation entries and use the FA - Opening Depreciation entries account to balance the transaction.
Accounting balances are the backbone of all open entries. When accounting balances are posted, everything else must match. It is like putting in the last piece of a puzzle. The sad part is that sometimes you find that your last piece does not fit. Don't worry about this right now; at the end of this section, we will explain how to check whether everything is ok and how to solve problems.
While other open entries could be imported and posted in many iterations, accounting balances must be posted all at once because the whole transaction must be self-balanced. Follow the steps described in the Customer Entries section of this chapter, but keep in mind these few differences:
- When you fill in the data migration template, Account Type must have the G/L account value
- If an account has a debit amount, the amount for that account must be positive
- If an account has a credit amount, the amount for that account must be negative
If you have been using a temporary account in the past sections, all 555 accounts must be 0 after posting the balance. To achieve this, you have to replace some accounts with the temporary accounts. The accounts needed to be replaced are as follows:
- Customer accounts must be replaced by the
5551account - Vendor accounts must be replaced by the
5552account - Bank accounts must be replaced by the
5553account - Fixed asset accounts must be replaced by the
5554account - Accumulated depreciation accounts must be replaced by the
5555account
If no temporary accounts were used, you have to be sure that the amount you are about to post is the same as the sum of all the corresponding entries. You can run the following reconciliation reports:
- Reconcile Cust: This report and the Vend. Accs. report can be found at Departments/Financial Management/General Ledger/Reports/Miscellaneous
- Inventory – G/L Reconciliation: This report can be found at Departments/Financial Management/Inventory/Analysis & Reporting
No standard reconciliation report for bank accounts or fixed assets exists exist, so you will have to check it yourself.
Since accounting must always be balanced, if 555 accounts are not 0 or the reconcile reports show any difference, it will mean that some other account does not have the correct balance. Find this other account and you will find the solution to your problem.