Microsoft Dynamics NAV 2013 is now completely configured and tuned. A range of brand new functionalities have been programmed and everything is ready for us to go live. But, data is needed for it to start working!
Companies may now start working with Dynamics NAV, but they are not new companies; they have been working for a while, and they already have all kinds of data: their customers, vendors, items, accounting information, and so on.
In this chapter we will see which tools can be used in Dynamics NAV to migrate data into the system and how to convert data to meet NAV requirements. We will look at tools such as:
- RapidStart Services
- XMLport
- User defined tools
We will also see what kind of data is commonly migrated to Dynamics NAV and which strategies can be used to migrate it. The kind of data and strategies are listed as follows:
- Master data
- Open entries
- Historical data
- Open documents
There are several ways to migrate data into Microsoft Dynamics NAV 2013. You will choose the method depending on what is to be migrated and whether any additional processes need to be carried out on the provided data to meet Dynamics NAV requirements.
We'll go through the different tools available in Dynamics NAV to migrate data. We'll also explain how to write our own tools if the ones provided out of the box do not meet our requirement or expectation.
RapidStart Services is a new feature of Microsoft Dynamics NAV 2013. It allows you to configure your company using out of the box configurations. Microsoft Dynamics NAV 2013 also allows streamlined importing of opening balances into journals and active documents with dimensions.
Typically, a Dynamics NAV implementation project can go on for a great length of time. With RapidStart Services, Dynamics NAV 2013 delivers a new way for partners and customers to speed up implementations. RapidStart Services is a tool designed not only to shorten deployment time but also to improve quality, to introduce a repeatable approach to implementations, and to automate and simplify recurring tasks.
With RapidStart Services, you can set up the tables often involved in the configuration process of new companies. You can create a questionnaire to guide your customers through the collection of setup information. Your customers have the option of using the questionnaire to set up application areas, or they can open the setup page directly and complete the setup there. Most importantly, RapidStart Services helps you, as a customer, prepare the company with default setup data that you can fine-tune and customize. Lastly, when you use RapidStart Services, you can configure and migrate existing customer data, such as a list of customers or items, into the new company.
The RapidStart Services tools can be found under the Department menu, Departments/Administration/Application Setup/RapidStart Services for Microsoft Dynamics NAV.

The following components can be used to set up a new company:
- Configuration wizard
- Configuration packages
- Configuration worksheet
- Configuration templates
- Configuration questionnaire
We will explain how these components work by following a step-by-step example of each of them. Before starting with the example, you need to create a new company, and we also recommend that you change your role to that of the RapidStart Services implementer. Follow these steps to do both these things:
- Open Microsoft Dynamics NAV Development Environment.
- Click on File | Company | New. A window opens; in it, you can enter the name of the new company.
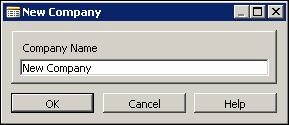
- Click on the OK button and wait for a few seconds until the system finishes creating the company.
- Open the Windows client. Click on the the Dynamics icon found on the upper-right corner of the page. Then, click on the Select Company option. On the Select Company page, choose the company called New Company. Then click on the OK button.

You have now entered in the New Company section. Follow the ensuing steps to change your role.
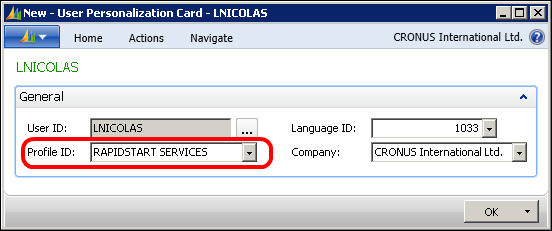
- Open the User Personalization page, found via Departments/Administration/Application Setup/RoleTailored Client/User personalization.
- Select your user ID and click on the Edit option.
- In the Profile ID field, select RAPIDSTART SERVICES.
- Close the Windows client and open it again. Your Role Center now looks like the following screenshot:
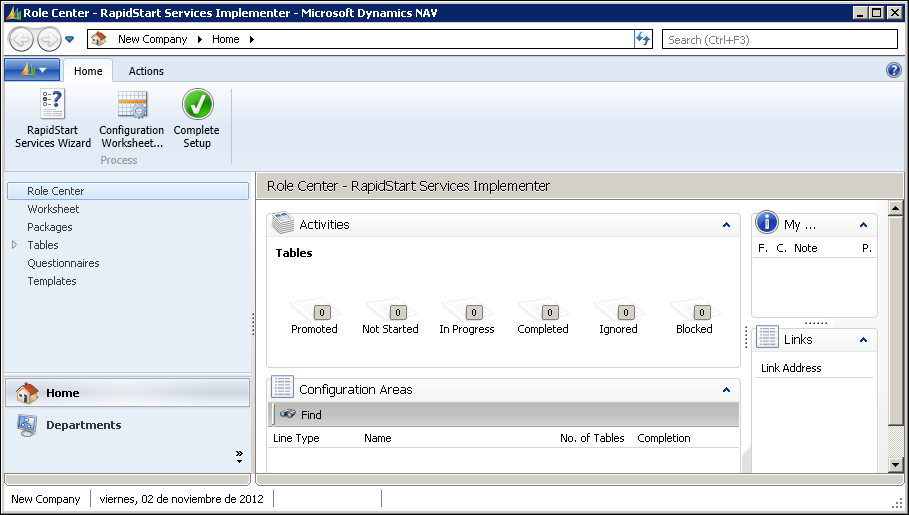
Now that we have a new company and we have selected the RapidStart Services implementer role, we are ready to use all the components of the RapidStart Services tool to set up our company.
The configuration wizard is used to quickly configure a new company. Click on the RapidStart Services Wizard option found on the ribbon bar.
A new page will open where you will be able to enter basic information about the new company.
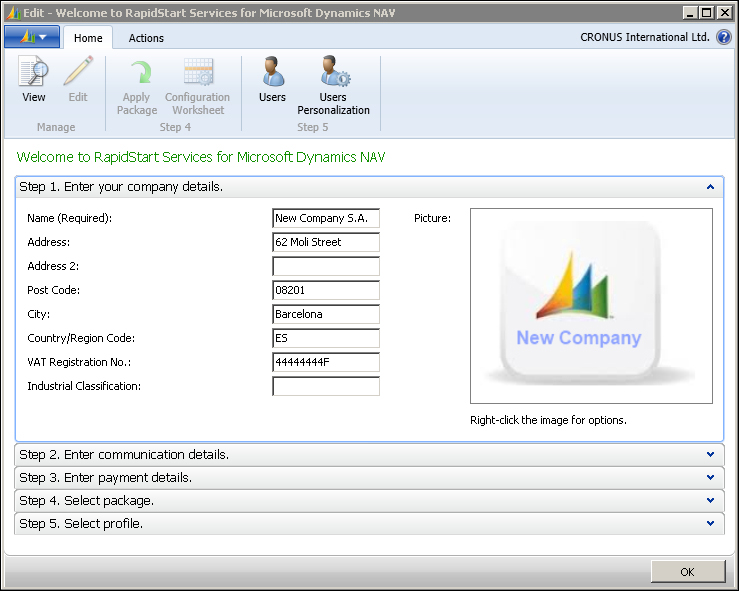
You can go through all the tabs of the page entering the required information. The Select Package tab will be explained in the Configuration packages section, next.
There are more than 200 tables that could be considered configuration tables. You will need to fill them in when you create a new company.
First of all, you will find almost 50 tables with the word setup as their description, but there are many other tables that could also be considered as setup tables. Here you can see a list of some setup tables:
- Posting groups: There are 10 tables located here
- Journal batch tables and journal template tables: More than 20 tables are located here
- G/L accounts, account schedules and VAT statements: Almost 10 tables are present here.
- Payment terms, payment methods, currencies, languages, countries and regions, post codes, series, and so on are the other setup tables without the word setup in their description.
Having to edit all those tables manually on each implementation could take forever. Many companies can use Dynamics NAV with the same data or almost the same data on those configuration tables.
The best approach will be to create a configuration package for the data on the configuration tables and then apply it on each new implementation, like a template.
You can create one configuration package per functional area, for example, you can create one package for the manufacturing functionality. Another approach would be to create one package for each type of data, for example, you could create one package with data related to all the posting groups found in the application.
In this section we will see how to create a configuration package and also how to apply it to a new company.
In this section we are going to create a new configuration package with all posting groups tables found on the application. Since posting groups refer to general ledger accounts, we are also going to include the chart of accounts in our package.
Follow these steps to create the new configuration package:
- Select a company containing the data that you want to include in your configuration package, for example, we have selected the demonstration company
CRONUS International Ltd. - From the RapidStart Services implementer Role Center, click on the Packages option.
- Click on the New button on the ribbon bar. The Config. Package Card page opens. Fill in the fields in the General tab, as shown in the following screenshot:

- Add tables to the packages by creating new lines on the Tables tab, as shown in the following screenshot. You will only have to fill in the
Table IDcolumn.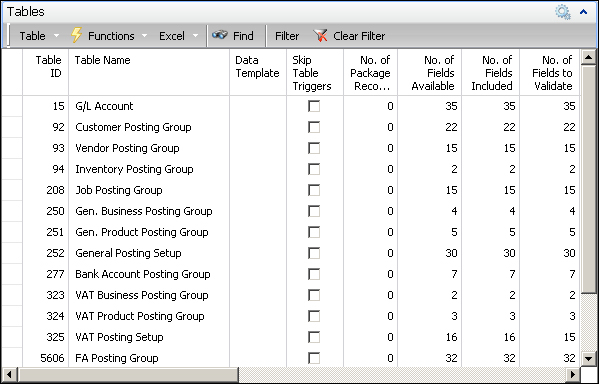
- When you insert a table on the package, all table fields are included by default. In some cases, you may want to exclude certain fields from the package. Select the
G/L Accounttable and click on Table | Fields. On the Config. Package Fields page, uncheck theInclude Fieldcolumn for theGlobal Dimension 1 Codefield and theGlobal Dimension 2 Codefield.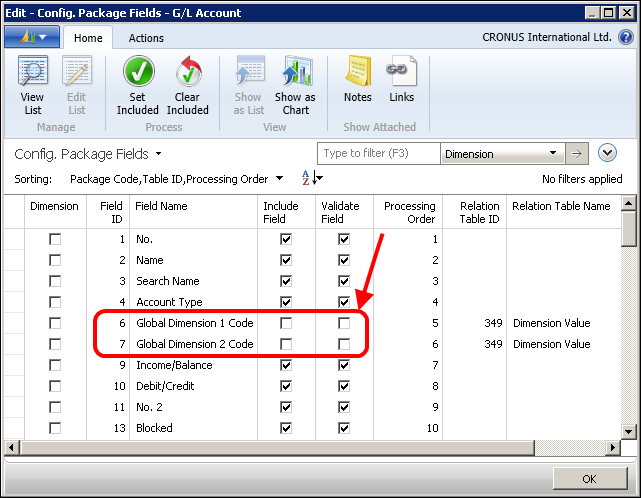
- Click on the Export Package option on the ribbon bar. This will create a
RAPIDSTARTfile that you can save.
In the previous section we created a new configuration package. In this section we are going to apply this package to the company New Company, that we created earlier in this chapter.
Follow these steps to apply the configuration package:
- On the Windows client, open the company
New Company. - From the RapidStart Services implementer's role center, click on the RapidStart Services Wizard option.
- On the Select package tab, select the configuration package that you created in the previous section.
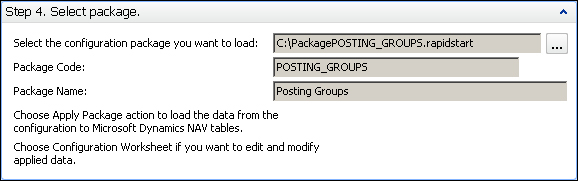
- Click on the Apply Package option found on the ribbon bar.
- Click on the Configuration Worksheet option if you want to edit the applied data check errors found during the importation. The configuration worksheet is explained in the next section.
The data contained in the configuration data has been imported to the new company. You can also import packages from the packages page we saw while creating the configuration package.
The configuration worksheet is the central location in which you can plan, track, and perform your configuration work. For those of you that have used previous versions of Dynamics NAV, the configuration worksheet is the old migration tool with some new features.
You use the configuration worksheet to create the structure of tables that need to be imported with the company data. You will be able to export this structure to Microsoft Office Excel, fill in the data, and then import it back to Dynamics NAV. This makes it easy for companies to copy and paste information from another ERP system.
We'll explain how the configuration worksheet works by creating a migration structure for the sales area and then importing some demo data into the customer's table.
To create a migration structure, you need to use a company that is already configured. We will use the demo company CRONUS International Ltd.
Follow the steps described in this section:
- Open the configuration worksheet.
- Create a line for table
18,Customer. You only need to fill in theLine Typefield and theTable IDfield.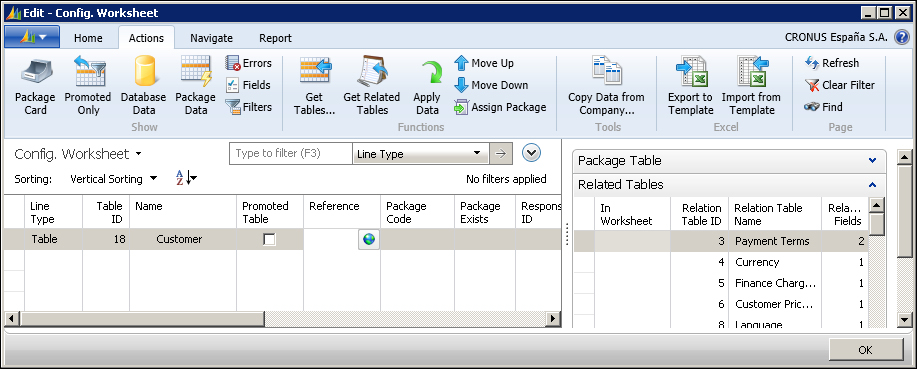
- Now, we have to put the tables into a configuration package. Click on the Assign Package option from the ribbon bar.
- The Config. Packages page opens. Create a new package and call it Customer. Then, click on the OK button.
- Now we have to define which fields will be included in the migration process. Click on the Fields option on the Actions tab of the ribbon bar.
- The Config. Package Fields page will open, showing all fields available in the table. In this list, we will have to place checkmarks on the Include Field column for all the fields we want to be part of the migration process. By default, all fields are checked. Click on the Clear Included option to uncheck all the fields.
- Select the following fields to be included. Then, click on the OK button.

When importing the data into the table, fields will be validated according to their processing order. You can use the Move Up and Move Down options to change the default validation order.
You can also uncheck the Validate Field column for a field if you don't want to run the
OnValidatetrigger of the field. If you do so, you will have to validate the data consistency on your own. - We will now add a filter to determinate which records will be included in the template we are going to create later on. Click on the Filters option on the Actions tab of the ribbon bar. We will add a filter to the
No.field to only include customers with a blankNo.field. Since this is the primary key of the table, all customers should have filled up this field. No records will match the filter, so no records will be included while exporting the template. Add the filter as shown in the following screenshot:
- Back at the configuration worksheet; the Related Tables FactBox shows the tables that are related to the
Customertable.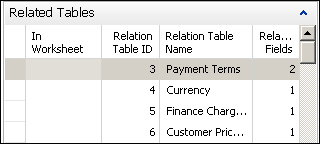
The first related table is
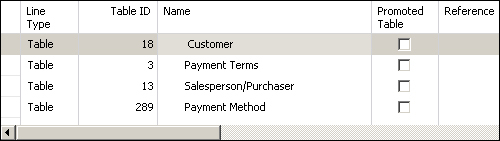
Payment Terms. We will not be able to fill in the payment terms code for a customer unless it exists on thePayment Termstable. Therefore, we need to include related tables in the configuration worksheet. Use the Get Related Tables option found on the Actions tab of the ribbon bar to add new tables to the worksheet. - The system has included all the related tables. However for this example, delete all tables, except the ones shown in the following screenshot:
- We are now going to group the tables by adding areas and groups. Create a new line and select the Area option on the
Line Typefield. WriteSales Areain theNamefield. Use the Move Up option from the Actions tab of the ribbon bar to move the new line to the first position. - Create three new lines for the
Master Data,Secondary Data, andGeneral Settingsgroups. Use the Move Up and Move Down options to rearrange the tables as shown in the following screenshot:
- Now, we have to put the tables into a configuration package. Click on the Assign Package option from the ribbon bar.
- The Config. Packages page opens. Create a new package and call it
Customer. Then, click on the OK button. - Back at the configuration worksheet page; you can see that the Package Code field is now filled for all the rows.
- Click on Package Card, and then click on the Export Package option to save the package file for the migration structure we have defined.
Now that you, as a partner, have defined the migration structure, it's time for the users to complete the migration by providing their data.
The partners are responsible for creating the migration structure according to company's needs. We have done that in the previous section. Then, the rest of the work can be done by the end users. Therefore, you will need to train the end users on the steps explained in this section.
To provide data for the new company, you can follow the ensuing steps:
- Open the company named
New Companythat we created earlier in this chapter. - Open the package page and click on the Import Package option. Select the file created in the previous section. The data included in the package is stored in special tables. It will not be applied to the database yet.
- Open the Configuration Worksheet page. The system has created the configuration structure of the new company while importing the package file.
- Select the line for the table with the table-ID
3,Payment Terms. The Package Table FactBox shows us some information, as shown in the following screenshot: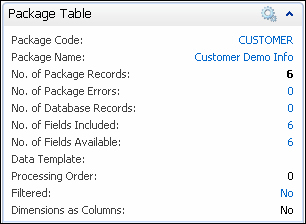
For instance, we can see that 6 records were included in the package.
- Click on the Package Data option on the ribbon bar. A page opens showing all the data included in the package.
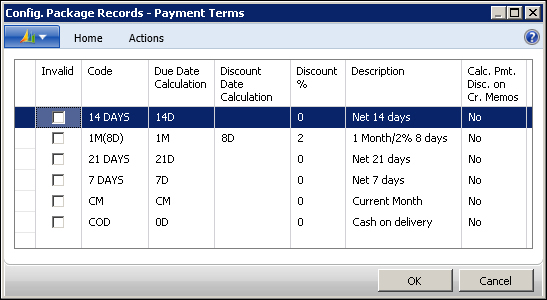
Before applying it to the database, you can delete or insert lines or modify the existing ones.
- Go back to the Config. Worksheet page and click on the Apply Data option. Now the payment terms are created on the database. You can repeat this action for the
Payment Methodtable. - Change the
Statuscolumn for both tables and select the option Completed. - On your Role Center page, you will be able to see the level of completion of the migration tasks.

- To migrate data for the
Customertable, open the Config. Worksheet page and select the line for theCustomertable. Click on the Export to Template option on the ribbon bar. The system will export the template, and will open the Excel file.
- We will use the information extracted from the old system to fill in our Excel template. We are going to import the customers shown in the following screenshot:
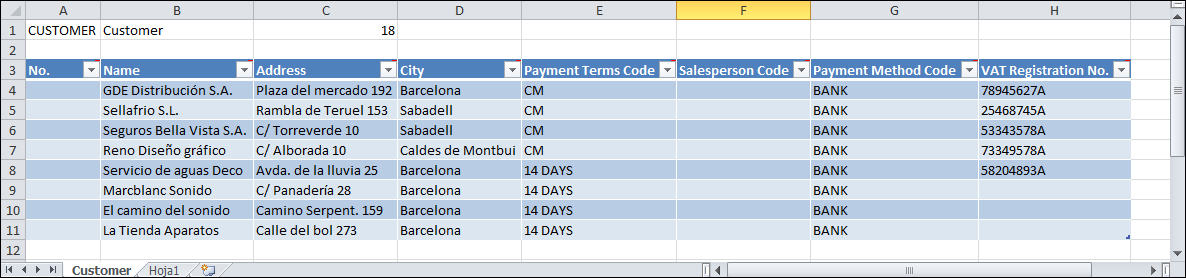
Do not change the columns in the worksheets. If they are moved, changed, or deleted, the worksheet cannot be imported into Microsoft Dynamics NAV.
- In the configuration worksheet, click on the Import from Template option and import your customers' file. Use the Package Data option to check the data and then click on the Apply Data option.
- Click on the Database Data option to see the records that have been created in the
Customertable.
Templates are used to fill in preconfigured data. When you import data such as items into Dynamics NAV, you only enter general information, such as item number, description, and price, and then collect the rest of the mandatory field data from a template.
You usually create templates for the master data, such as customers, vendors, and items master data.
In this section, we are going to see how to create a configuration template and how to use it while importing data into Dynamics NAV.
Each template consists of a header and lines. On the header, you specify the table related to the template. On the lines, you specify which fields are included in the template and their default values.

Follow the ensuing steps to create the configuration template shown in the preceding screenshot:
- Open the Templates page and click on the New button.
- In the
Codefield, enter a unique ID for the template. On theDescriptionfield, enter a description. - In the
Table IDfield, enter the table to which this template has been applied. - Create a new line, select the Field Name field. The Field List window displays the list of fields in the table. Select a field and then click on the OK button.
- In the Default Value field, enter an appropriate value.
Using configuration templates with RapidStart Services is as simple as selecting the template we want to use on a line of a configuration package. The following steps will demonstrate this:
- Open the Packages page.
- From the list of packages, open the CUSTOMER package we created earlier in this chapter.
- Find the Customer table included in the package. In the Data Template field, select the template that we created in the previous section.

And we are done! When importing new customers using the package, the template will be applied:
Configuration questionnaire is used to collect data from users to help configure a new company. You can create a list of questions and provide it to the users as an Excel or an XML file. When the user completes the questionnaire, you import the file into the new Microsoft Dynamics NAV company and then apply it to the database. Follow the steps described in the following section to create and complete configuration questionnaires.
Follow the steps listed in this section to create a configuration questionnaire:
- Open the Questionnaire page and click on the New option.
- Provide a code and a description.
- Click on the Questions Areas option found on the ribbon bar.
- In the Code field, enter a code for the question area.
- In the Table ID field, choose the ID of the table for which you want to collect information.
- Click on the Update Questions option found on the ribbon bar. Each field in the table is added to the questionnaire with a question mark following its label. You can rephrase the label to make it clear how the question should be answered. For example, if a field is called Name, you could edit it to state
What is the name of <data being collected>. As needed, you can also delete questions that you do not want to include in the questionnaire. - Repeat these steps to add additional question areas.
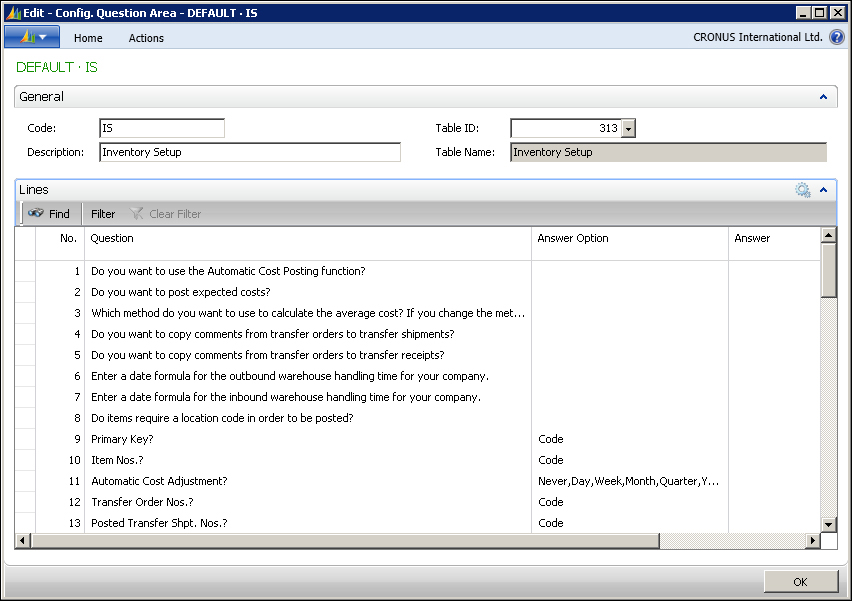
In the following screenshot, you can see an example of a questionnaire for the inventory setup area.
- Open the Questionnaire page, click on the Export to Excel option found on the ribbon bar, and save the file.
- Complete the configuration questionnaire by entering the answers in the Excel workbook. There are worksheets for each of the question areas that have been created for the questionnaire. Save the file.
- Back in the questionnaire, click on the Import from Excel option. Select the
XLSXfile that you have saved. - Click on the Question Areas option, and select one question area to begin the process of validating and applying the answers to the setup questionnaire.
- To apply the process of validating and applying the answers to the whole questionnaire, click on the Apply Answers option of the Questionnaire page.
- To apply answers for a specific question area, click on the Apply Answers option from the Question Areas page.
We have already covered the RapidStart Services. Before moving to another tool to migrate, there are a few things you should know about RapidStart Services:
- RapidStart Services can be used both for importing and exporting data. It is not a tool reserved just to import data when you first start working with Microsoft Dynamics NAV.
- RapidStart Services does not only insert new data into the database, it can actually be used to modify data as well. To modify data, first export it to an Excel template, modify whatever needs to be modified, and import the data again. The tool will perform the following actions:
- Create a new record in the corresponding table if no record exists with the same values on primary key fields as the imported record.
- Update a record in the corresponding table if the record imported already exists in the table. The record will be updated with all the information coming from the imported record.
- RapidStart Services consume a lot of time while importing and exporting data. It took us 1 minute to import 5,000 customers and almost 5 minutes to apply them. Importing that exact same data using an XMLport (the next tool we will explain) took us just a couple of seconds.
An XMLport is a Microsoft Dynamics NAV object type used to import and export data encapsulated in XML format. Fixed text and variable text formats are also available on an XMLport to import and export data from a plain text file, just as we used to do with dataports (a Dynamics NAV object type that has been discontinued in the previous release of the application). XMLports have their own designer, XMLport Designer , which can be found in Object Designer .

Using XMLport Designer, we will specify all the XML tag names and their type (element or attribute). We will also map those tag names to data structures (tables, records, or fields) in the Dynamics NAV database.
We will create an XMLport to import customers, just as we did on the Configuration Worksheet section. By performing the same example with both the tools, we will be able to compare them and have some elements to decide which one we will use in our migrations.
We will be importing the following data into the Customers table:
- Name
- Address
- City
- Salesperson code
- Payment method code
- Payment terms code
- VAT registration number
To understand the XMLport structure, we will create a new XMLport as an example, using the following steps:
- Open the Dynamics NAV Development Environment.
- Navigate to Tools | Object Designer (or press Shift + F12).
- Select XMLport.
- Click on the New button (or press Alt + N).
- The XMLport Designer will open with an empty XMLport.
- Create the structure shown in the following screenshot:

- Save the XMLport by clicking on File | Save (or press Ctrl + S).
- Give your XMLport an ID, 50001 and a name, Import Customer Data.
- Click on the OK button.
The following are the elements of our XMLport:
- The Node Name column indicates the tag names that will be used in the XML document.
- The Node Type column, where we will indicate which type of tag it will be, whether element or attribute.
- The Source Type column, from which we can select whether the mapping of the element or attribute is with a text source, a table source, or a field source.
- The Data Source column, where we will indicate the text for text sources, the Dynamics NAV table for table source types, and the Dynamics NAV field for field source types.
Tip
For both table and field source types, we can click on the up arrow that appears in the column to select the appropriate Dynamics NAV data structure. When a table source type has been selected, a list of Dynamics NAV tables will be shown. When a field source type is selected, a lookup field will appear for us to select a field in any of the tables selected as table source type on the XMLport. When using a text source type, the information imported from the XML document will be put in a text variable with the name specified in the Data Source column. This variable can be used as a global C/AL variable.
Child nodes have to be indented under their parent elements using one indentation per level. To indent elements, use the left and right arrows that can be found in the lower right corner of the XMLport Designer window. Nodes have to be entered in the exact same order that they appear in the XML document.
If you check the XMLport properties by placing the cursor on the first empty line of the XMLport and clicking on View | Properties (or pressing the Shift + F4 key combination), you will see a property called format, which is set to xml. Other options for this property are variable text and fixed text. By selecting either variable text or fixed text, you will be able to import/export data in a plain text format rather than in an XML format.
We will be importing a file called Customer.xml that has the following structure and data:
<?xml version="1.0" encoding="UTF-16" standalone="no"?>
<CustomerList>
  <Customer>
    <Name>GDE Distribución S.A.</Name>
    <Address>Plaza del mercado 192</Address>
    <City>Barcelona</City>
    <SalespersonCode />
    <PaymentMethodCode />
    <PaymentTermsCode>CM</PaymentTermsCode>
  </Customer>
  <Customer>
    <Name>Sellafrio S.L.</Name>
    <Address>Rambla de Teruel 153</Address>
    <City>Sabadell</City>
    <SalespersonCode />
    <PaymentMethodCode>BANK</PaymentMethodCode>
    <PaymentTermsCode>CM</PaymentTermsCode>
  </Customer>
</CustomerList>
To import the file, follow these steps:
- Open the Dynamics NAV Development Environment.
- Click on Tools | Object Designer (or press Shift + F12).
- Select the XMLport option.
- Click on the Run tab (or press Alt + R).
- The Windows client will open, and the Edit – Import Customer Data page will also open.
- Select the Import tag in the Direction field.
- Click on the OK button.
- Navigate to the XML file you want to import and click on the Open tab.
- The file will be imported.
Check the customer list to see the records that have been created by the XMLport. You will notice that the OnInsert and OnValidate triggers for each of the fields, have been run (each customer has a number, so the OnInsert trigger has been run, and the field Search Name has been filled in, which means that at least the OnValidate trigger for the Name field has been run as well).
With an XMLport, you can write your own code to handle multiple situations. You can either write data on multiple Dynamics NAV tables or create secondary records while importing master data.
In our example, you can write code to create new payment methods if the payment method code filled for one customer does not exist on the database.
XMLports do also offer the capability of importing data into different Dynamics NAV tables that have a link relation between them, such as in a Sales Order table. In a Sales Order table, data has to be imported into the Sales Header and Sales Line table, which have a header/line relation through the Document Type and Document No. fields.
Imagine we have an XML document, like the one shown in the following screenshot, which we want to import into Dynamics NAV.
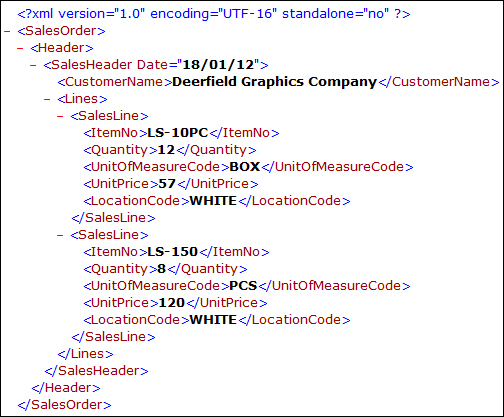
We analyze the XML document tag structure and decide that we will have to import the data into the Sales Header and Sales Line tables, and we design an XMLport with the following structure:

In this XMLport structure, we have used all XML tags detected on the XML document and we have mapped them to Dynamics NAV tables (the SalesHeader element is mapped to the Sales Header table and the SalesLine element is mapped to the Sales Line table) and Dynamics NAV fields in the corresponding tables.
Note that the Date tag, which has been mapped to the Order Date field of table Sales Header has a node type of attribute. We have designed it that way because, while analyzing the XML document, we have seen the Date tag as an attribute of the preceding tag, SalesHeader.
In the properties of the SalesLine tag, which is mapped to the Sales Line table, we have indicated that this tag has a link relation with table Sales Header, we have specified which fields offer the link in the LinkFields property, and we have set the LinkTableForceInsert property to Yes. This means that we force the record on the link table (Sales Header) to be inserted before we start writing anything into the linked table (Sales Line).

All of this won't be enough. We will need to write some code to fill in some fields that do not appear in the XML document but are needed in Microsoft Dynamics NAV to create a Sales Order table.
For example, we will have to fill-in the Document Type field in both the Sales Header and Sales Line tables. We will have to fill-in the Type field in the Sales Line table. We will also need to find the customer number as only the name of the customer appears in the XML document, but in Dynamics NAV we will have to inform the Sell-to Customer No. field as well. Now, declare the global variables as shown in the following screenshot:

Write the code as stated in the following screenshot:

When initializing the Sales Header record, assign Order as the Document Type field and assign an initial value of 10000 to the global variable LineNo.

Assign the Document Date field the same value as the Order Date field.

Find the customer number by setting a filter on its Name field and assign it to the Sell-to Customer No. field, as shown in the following screenshot:

When initializing the Sales Line record, assign Order as the Document Type field, Item as the Type field, and the value of global variable LineNo as the Line No field. Then increment variable LineNo to be used in the next line.
Save and compile the XMLport with the number 50003 and the name Import Sales Order.
Run the XMLport and take a look at the Sales Order that has been created:
Everything seems to be fine, except the order and document dates, which were set to 18/01/12 in the XML document but have the value 26/01/2012 in the Sales Order table.
To find out what happened, you can run the import codeunit for XMLport 50003 Import Sales Order again, with the debugger option turned on. If you follow the code in the debug mode, you will see that the order and document dates are first set to 18/01/2012, but, when the OnInsert trigger for the Sales Header table is run, they are set to the date, Workdate, which in the example is 26/01/2012.
We will have to change something in our XMLport to prevent this behavior. What we will do is save the Order Date field in a global variable and validate it against the table field after the OnInsert trigger is run.
Create a global variable named OrderDate as the Date field. Modify the code in the XMLport to insert the highlighted code lines in the Date – Import::OnAfterAssignField() trigger.

Also add the highlighted code line in the SalesLine – Import::OnAfterInitRecord() trigger.

When the Date tag is assigned to the Order Date field, we can also do assign it to a variable called OrderDate.
When the sales line record is being initialized (it means the OnInsert trigger for table Sales Header has already been run), we once again assign the saved date to the Order Date, Document Date, and Posting Date fields and we modify the Sales Header record.
Back in Microsoft Dynamics NAV, if we take a look at the Sales Order table that has been created, we will see that, finally, all data is correct.
The tools provided by Microsoft Dynamics NAV to import data only allow you to import data in a very specific Microsoft Office Excel format, in an XML format, or in plain text.
What if we have the data in a completely different format? In that case, you probably have two options:
- Manually manipulate the document you may have, to give it the format expected. This may be a good option for a one-time import process. Manual manipulation of data and formats may lead to errors, but if you just have to do it once, do it carefully, take your time, and check everything afterwards. The time consumed in doing all this work will probably not be as much as developing a tool to import the data, so yes, it is probably a good option.
- Write your own tool to import data. Make your tool meet the exact format as it appears in the original document, so no manual manipulation of data is needed.
Note
You can use a codeunit , a report, or even a page to write your own code. You will find several examples in the Dynamics NAV code on how to read from files or how to use the
Excel Buffertable to read from an Excel file. Use variables of typerecordfor as many tables as you have to import data to.
We will not be giving any examples on how to develop a tool to import data as it is not within the scope of this book. We just wanted to point out that this is always an option, although if possible, it is better to use the tools provided by Dynamics NAV. That will probably save you a lot of time.