Knowing the Dynamics NAV philosophy of how things are done is important for everyone.
It is important for users and people working in a company that uses or will use Dynamics NAV as their ERP. They have to know how to do things and, especially, be aware of the consequences of what they do.
It is also important for consultants, analysts, developers, people working in a company that implements Dynamics NAV, and for partners. They have to fully understand the way NAV works, not only because they are the people responsible for transmitting that knowledge to users, but also because they will probably be designing and developing new functionalities or modifying existing ones. For this, it is important to use the same structures, way to present data, way to make information flow, and, in the end, the same philosophy Dynamics NAV uses in all its standard functionalities. Completely different behaviors may confuse your end users.
In this chapter we will cover:
- The structure of Microsoft Dynamics NAV 2013 in the section The data model
- The way information flows in Microsoft Dynamics NAV 2013 in the sections The posting routines, Navigating through your data, and Real-time data gathering – The SIFT technology
- Other general considerations in the sections No save button, Posted data cannot be modified (nor deleted), and Everything leads to accounting
If you have never worked with Microsoft Dynamics NAV and start playing around with it, there are a few words you will see over and over, including setup, journal, posting group, post, document, entry, dimension, and so on. You may not have a clue of what all of this means or what it is used for. But don't worry, we will explain it all!
Dynamics NAV is structured into different functional areas, namely Financial Management, Sales & Marketing, Purchase, Warehouse, Manufacturing, Jobs, Resource Planning, Service, and Human Resources.
Each of the functional areas has its own setup, where the behavior of each of the areas is defined. A general setup also exists on the Administration menu.
Each of the functional areas has a master data table. The Customer table is the master data table for the Sales & Marketing area. The G/L account table is the master data table for the Financial Management area. There are also other master tables, secondary master tables, that relate to the main master table in a functional area. For instance, the Customer table has quite a few secondary master data tables, such as Contacts, Bank Accounts, Ship-to Addresses, or Cross-References. They are defined in this way because a single customer may have multiple contacts, bank accounts, ship-to addresses, or cross-references.
The secondary master data of a main master data register can be found in the Navigate tab (although not all items in the Navigate tab are secondary master data):

So far we've seen what we could call core master data tables, which hold the basic information in a functional area, and we've seen that those tables may have some secondary master data tables associated.
A different kind of master data also exists in Dynamics NAV. We could call it information helper master data tables. Examples of this kind of information are locations, currencies, payment terms, payment methods, units of measure, item-tracking codes, and so on.
Some helper master data may have its own secondary master data. Locations have zones and bins, and currencies have exchange rates.
Several documents exist in Dynamics NAV, such as sales documents (quotes, orders, invoices, return orders, and credit memos), purchase documents (quotes, orders, invoices, return orders, and credit memos), warehouse documents (transfer orders, receipts, put-aways, shipments, and picks), and manufacturing documents (production orders).
A document combines information from different master data tables and is one of the entry points to a transaction.
For example, a Sales Order document combines information from the Customer table (the customer that buys), the Item table (the items that are being sold), the Resources table (the resources that will provide the services the company offers), and so on.
When the sales order is processed, it will lead to one or more transactions, such as Item transactions (the stock of the item will be reduced with the quantity being sold) and General Ledger transactions (accounting entries will be created when the sales invoice is posted).
A document always has a header-lines structure presented in a single screen. In the header section, we will find general information that applies to the whole document, such as Sell-to Customer No. In a Sales Order document, the status of the document, or the shipment date. In the lines section, we will find detailed information about the document, such as the list of all items being sold in a sales order or the list of all items being produced in a production order.
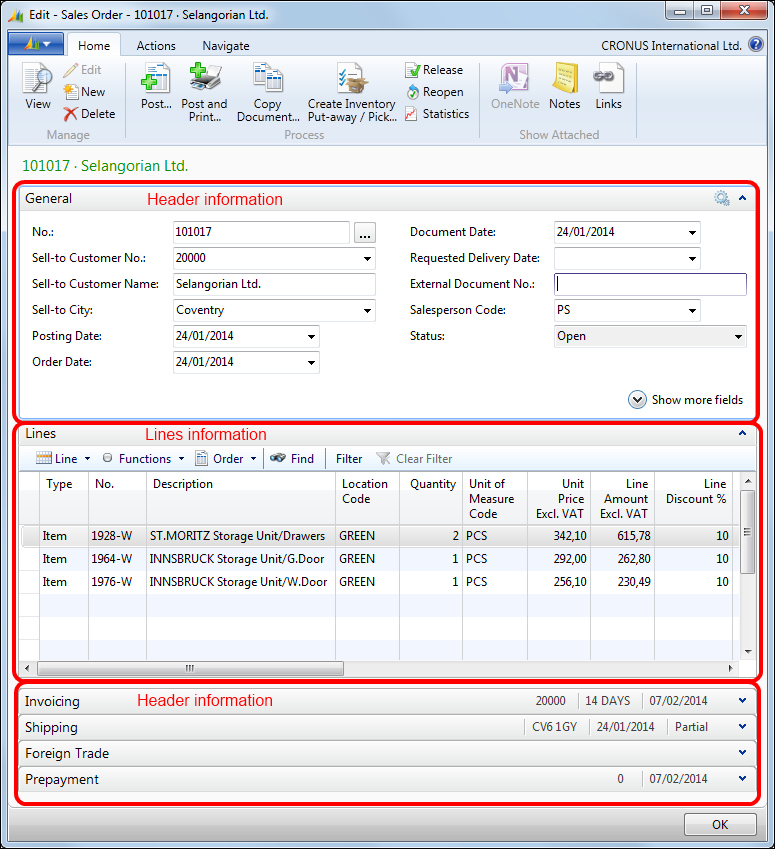
Under the Actions tab, you will always find one or more printing options to print the currently selected document. A printed document in Dynamics NAV looks somewhat like the following screenshot:
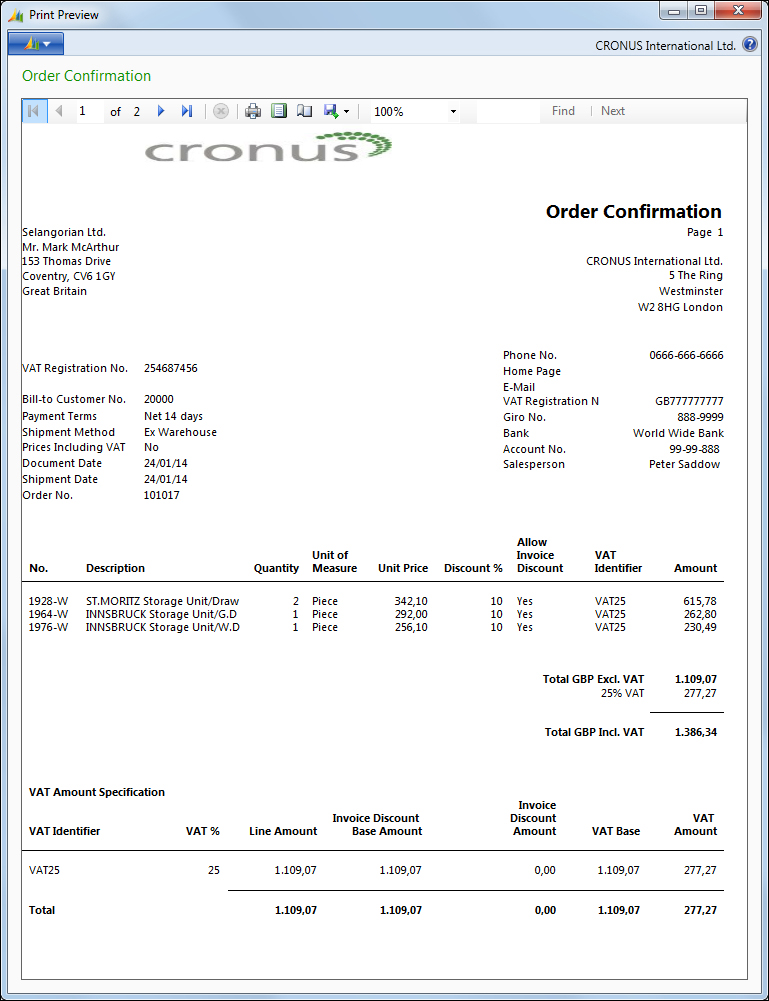
Printed documents in Dynamics NAV have all the common information that is needed. Most companies that implement Dynamics NAV ask their partners to modify the layout of the printed documents, at least those that are sent (either as a PDF file or as a printed paper copy) to their customers or vendors.
Besides the Print option, you will also find the Post action in a document, both in the Home tab (where the most common posting actions are found) and in the Actions tab (where all posting actions can be found).

Posting options in the Home tab
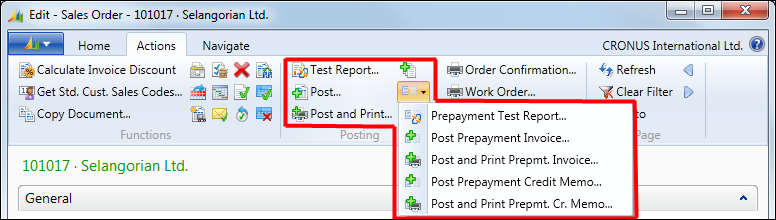
Posting options in the Actions tab
Posting is the most important action in Dynamics NAV.
Before a document has been posted, it is a document for which the action that is supposed to be done is still undone. That is, a non-posted Sales Order table is an order for which the items that were ordered have not yet been shipped or the services that had to be provided have still not been provided. You could see non-posted documents as a work area in which the user can enter the required information and post it when it is ready. When you post a document, you are telling Dynamics NAV that the action that had to be completed for the document has been completed (a sales order has been shipped, the items of a production order have been produced, a purchase order has been received, a sales invoice has been accounted for, and so on).
The posting action modifies the original document (to state that it has been posted) and creates new documents, that is, posted documents. For example, when a Sales Order is posted with the Ship option selected, Posted Sales Shipment is created, and when a sales invoice is posted, Posted Sales Invoice is created.
You will find posted documents from a Dynamics NAV functional area under the History category of the corresponding area.

In Dynamics NAV, you will see journals all over the place, in every single functional area. Just to name a few, if you move around on the Departments menu, you will find:
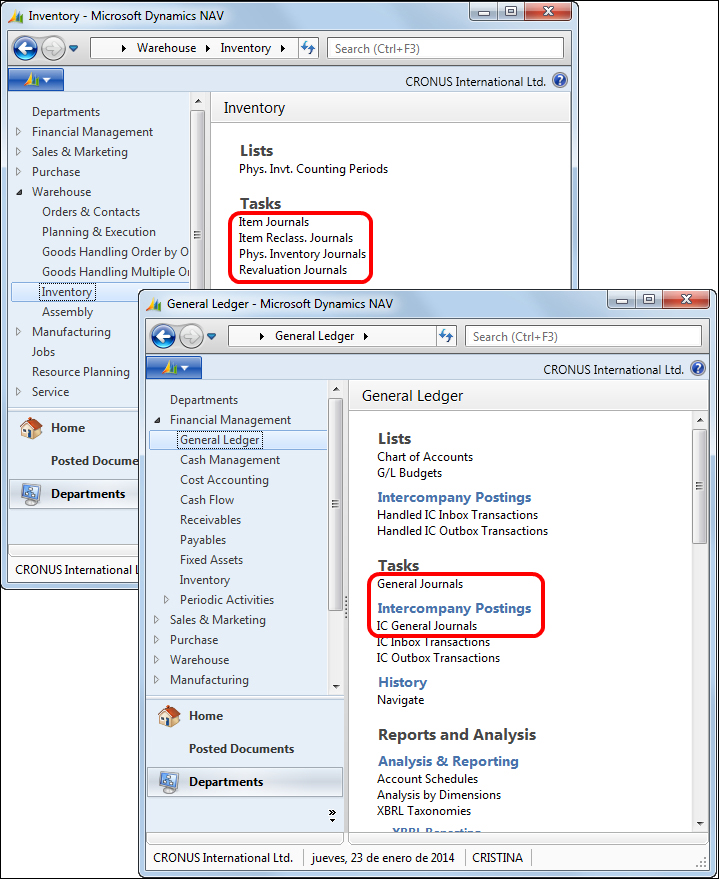
We may have skipped some journals, but we counted 27 different journals. That's quite a lot. Such a large amount of journals can make you think that this is something important. And yes, you are right, journals are very important in Dynamics NAV. They are just as important as the posting actions on documents because, when posting, Dynamics NAV internally uses journals to do the job.
Journals are where all kinds of transactions in Dynamics NAV, such as accounting transactions, sales transactions, item transactions, and so on, take place.
You could actually write down all the company transactions in journals and post them there (journals also have a posting action) without using any kind of document. In fact, some companies follow this method, although we would not recommend it.
Imagine you want to post a sales invoice in which you have sold an item, a resource, and a fixed asset. Using the appropriate G/L accounts, you could post all transactions by going to Item Journal and posting the necessary movements to reduce the stock there, then going to Resource Journal and posting the necessary movements associated with the resource there, then going to FA Journal and posting the movements associated with the fixed asset there, and finally going to General Journal and posting the accounting transaction of a sales invoice there, without using a Sales Invoice document.
It's a lot of work. It is actually what Dynamics NAV does when posting a document. It goes to the appropriate journals, depending on the document and on the concepts used in the document, creates the necessary journal lines, and posts the different journals.
You may be wondering why journals are available to users if they are something Dynamics NAV uses internally and users should not care about. They are actually there because even if a high percentage of the company transactions can be done using a document, there are some other transactions that do not have a document, so a journal will have to be used.
Among the journals, the one that is the most used in Dynamics NAV is probably General Journal. General Journal is mainly used to post accounting transactions. There are many accounting transactions, such as salary payment to employees and many others, that a company has to make, and the company does not have a document to make them (not in Dynamics NAV at least).

Another journal that is commonly used is Item Journal, where stock increases and decreases not associated with a document can be registered. What happens if an item is broken and thrown away? There is no document in Dynamics NAV to enter such a transaction. Well, the place to actually do that is Item Journal, where the user can post a stock decrease for the item that broke.
Did we say 27 journals? Actually just a few journals exist in Dynamics NAV, namely General Journal, Item Journal, BOM Journal, Resource Journal, Job Journal, FA Journal, and Warehouse Journal. There are a few more, but these are the most important ones.
Many journals we've seen on the Dynamics NAV menu are actually the same journals, but they show and let the user enter different information and have preselected options and built-in functionality depending on what the journal is meant for. For example, Item Journal, Phys. Inventory journal, and Output Journal actually rely on the same real journal, that is, Item Journal.
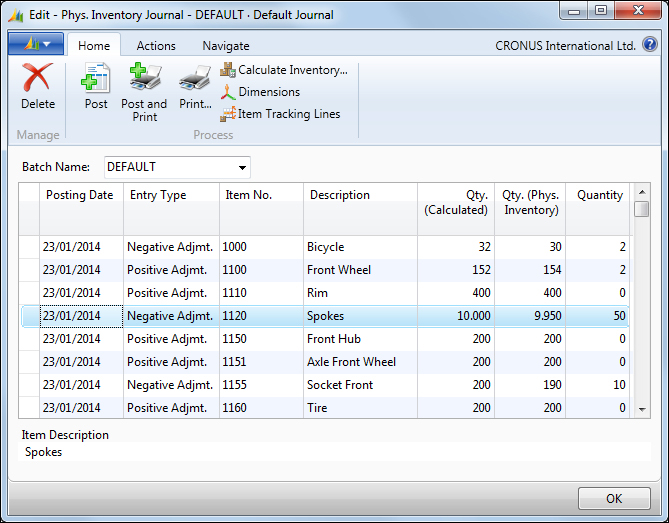
Phys. Inventory Journal
is meant to register the system inventory differences when a physical inventory is completed. It is an item transaction; that's why it's built on top of Item Journal but has some peculiarities. In a physical inventory, we count how many units we have in the inventory. We know how many units we've counted, but we do not know how many units are registered in Dynamics NAV; so when coming to Phys. Inventory Journal, we do not know whether the transaction will have to be a positive or a negative adjustment, nor do we know the amount of times the transaction will have to be posted. That's why in the Phys. Inventory Journal, we inform the real quantity we've counted (field Qty. (Phys. Inventory)), and the functionality of the journal decides the rest, comparing the real stock that was counted with the stock registered in the system.
Output Journal
is meant to register the stock increase of a manufactured item in the system, when a production order is finished. It is again an item transaction and that's why it is built on top of Item Journal. However, the user will have to provide some extra information that is not usually entered in other kinds of item transactions, such as the Production Order that is being posted, the Operation in the Production Order, or the Scrap Quantity. The Output Journal line shows the user the fields that he/she has to fill in to post this transaction. These fields are not shown in other item journals.

Once a journal is filled in with all the needed transactions, it has to be posted. Once it is posted, entries will be created and the journal lines will disappear (except for those that belong to Recurring Journal).
Entries are the result of a posted transaction and they are always related to a master record.
In the following table, you will find the most important entries in Dynamics NAV. You will also see the master tables they are related to.
|
Entry table |
Related master table |
|---|---|
|
|
|
|
|
|
|
|
|
|
|
|
|
|
|
|
|
|
|
|
|
|
|
|
Entries are created by a journal. G/L Entries are created by General Journal, which can also create Cust. Ledger Entries, Vendor Ledger Entries, Bank Account Ledger Entries, or VAT Entries. Item Ledger Entries are created by Item Journal.
In the following diagram you can see which journal is responsible for creating which entry:

The image also shows that some journals, if needed, may call some other journals. So, the final result of the transaction will not only be the corresponding ledger entries for the journal that is being posted but also ledger entries corresponding to a different journal.
For example, when posting an Item Journal transaction, if Dynamics NAV has been configured to automatically post costs to the Inventory account, the Adjustment account, and the COGS account, a General Journal line will be created and its posting route will be called from Item Journal.
Entries in Dynamics NAV are the result of a transaction. They are the final stage of the transaction. Once an entry has been created, it cannot be modified.
You are probably thinking, Hey! There is some information that must change on an entry! For instance, after you post a sales invoice, at some point the invoice will be paid. Therefore, Cust. Ledger Entry will have to be updated to reflect the new remaining amount for the invoice. Definitely, you are right. This is managed in Dynamics NAV using detailed ledger entries. Most entry tables in Dynamics NAV have a related detailed entry. Some information in the entry table is actually a calculation of the related detailed entries. So, there is no need to modify the original entry or even the related detailed entry. Changes are resolved adding new detailed ledger entries.
You will find only two exceptions to the norm:
- Fields used for the system's internal purposes (such as the open field found on some entry tables).
- Some specific fields that the user can modify manually, such as the
Due Datefield in customer and vendor entries or theShipment Agent Codefield in the shipments' header. Changes in these fields are handled in special codeunits.
Let's see how this actually works step by step:
- Using the
CRONUS International Ltd.demonstration company, create a newSales Invoicefor customer number10000,The Cannon Group PLC. Create a line on the invoice forItem,1000, andBicycle. The quantity of the line will be1PCS. You will find it in the following path:Departments/Sales & Marketing/Order Processing/Sales Invoices

- Post
Sales Invoice. - Open
Customer Cardfor customer number10000,The Cannon Group PLC. - Click on the Navigate tab and then on Ledger Entries (or press Ctrl + F7).

- Locate the
Cust. Ledger Entryvalue that corresponds to the invoice that has been posted. In this example, it isEntry No.2768.Original Amountfor this entry is5.000,00, same as the actualRemaining Amount.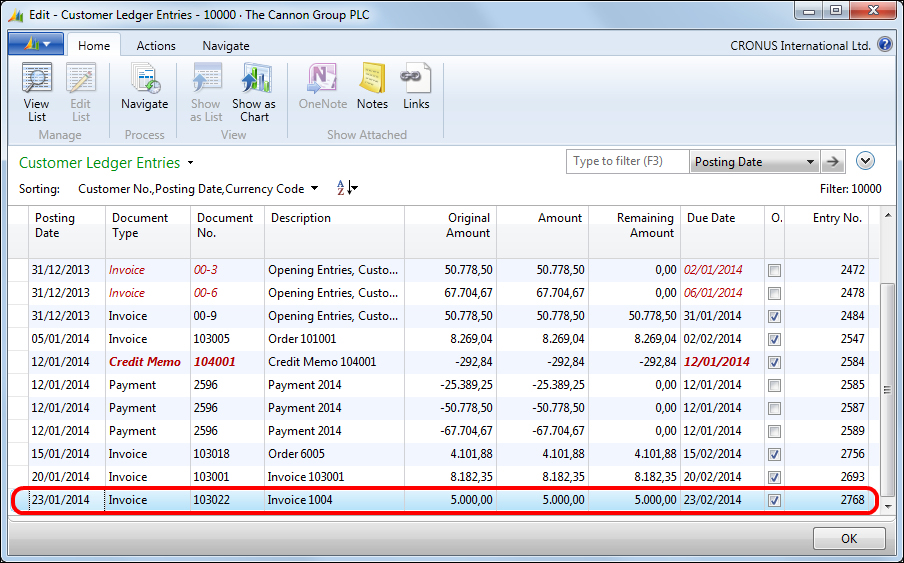
- Open
Cash Receipt Journal. You will find it in the following path:Departments/Financial Management/Cash Management/Cash Receipt Journals
Create a line in the invoice to indicate the partial payment of 2000 that was on the date of February 16, 2014, using the following steps:.
- Select Payment as Document Type
- Select Customer as Account Type
- Select customer number 10000 as Account No
- Select Invoice as Applies-to Doc. Type
- Select the invoice that has been posted on field Applies-to Doc. No.
In this example, it is invoice 103022.
Note that since the amount of the original invoice is
5.000, the system has automatically set up the Amount field of the payment to-5.000. Change it to-2.000to partially pay the invoice. The Amount value in the Cash Receipt Journal field is negative because the payment of a sales invoice is, in accounting language, a credit amount and is translated in Dynamics NAV as a negative amount.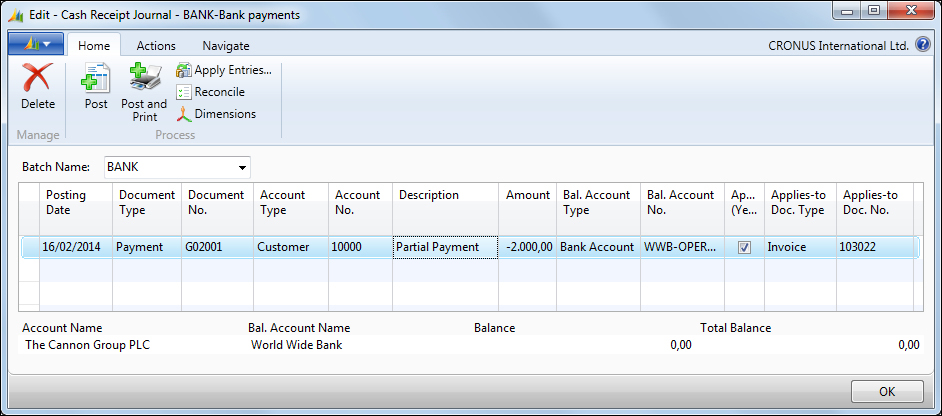
- Post
Cash Receipt Journal. - Again, open
Customer Cardfor customer number10000,The Cannon Group PLC. - Click on the Navigate tab and then on Ledger Entries (or press Ctrl + F7).
Locate the
Cust. Ledger Entryvalue that corresponds to the invoice that has been posted in the previous steps. You will also seeCust. Ledger Entrythat corresponds toPaymentwe have just posted.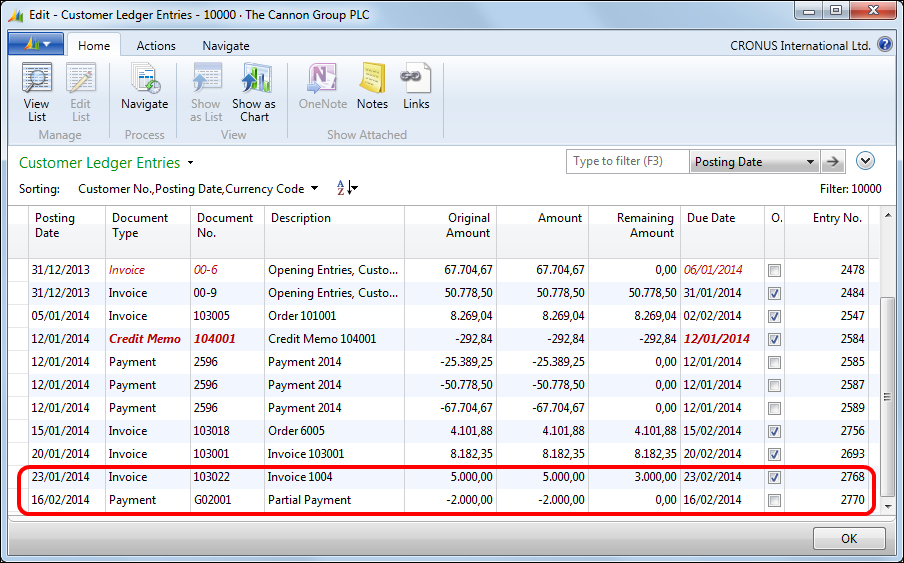
Note that
Remaining AmountforEntry No.2768(Invoice) has been updated after we posted the partial payment.Remaining Amountfor the invoice is now3.000,00. - Click on the field Remaining Amount for
Entry No.2768. - The View – Detailed Cust. Ledger Entries page is opened.
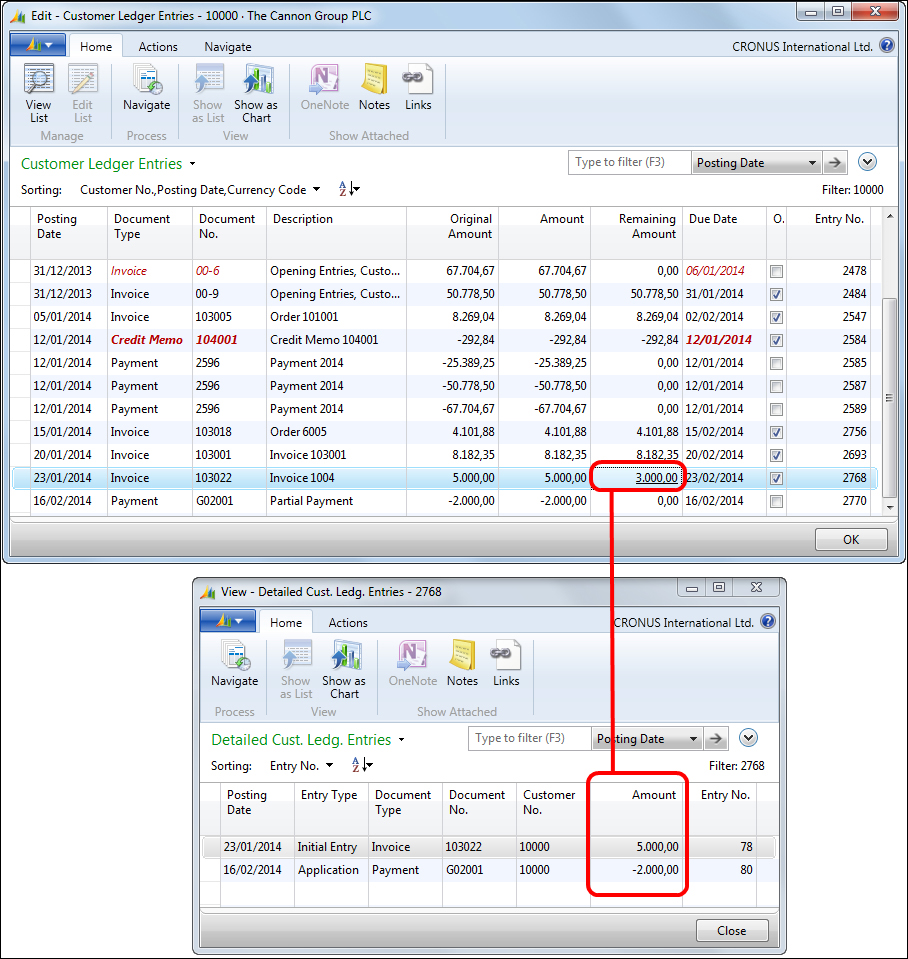
There are two detailed entries for
Entry No.2768:- The first one is the initial entry that corresponds to the
Invoiceentry withDocument No.103022 - The second one is the entry that corresponds to the
Paymententry which hasDocument No.G02001, which has been applied to the invoice
Remaining AmountforEntry No.2768is the sum of these two detailed entries:5.000+ (-2.000) =3.000. - The first one is the initial entry that corresponds to the
- Close the View – Detailed Cust. Ledger Entries page.
- Close the Edit – Customer Ledger Entries page.
- Close the Edit – Customer Card page.
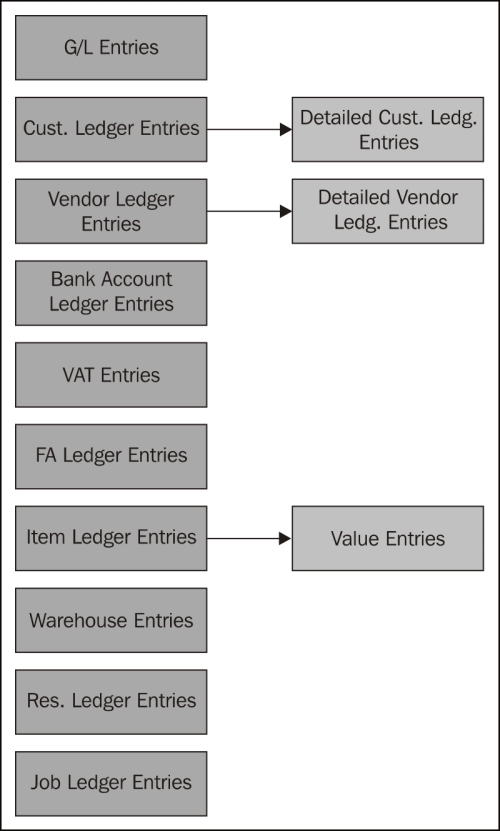
Not all Ledger Entries tables have a Detailed Ledger Entry table. In the following image, you can see which Ledger Entry tables have a Detailed Ledger Entry table and the name of that Detailed Ledger Entry table:
We've talked about master data, documents, journals, and entries. As we talked about each of these concepts, we explained a little bit how they were connected to each other. Now we will see the general model combining all four concepts.
The general data model looks somewhat like the following diagram:

Master Data and Helper master data are combined in Document. When Document is posted, its corresponding Posted Document is created. Also, journal lines are created and posted. The journal lines will end up in different Entries.
Master Data and Helper master data can also be combined directly on Journal without using any document. These journal lines will also end up in different Entries.