
In this chapter, we will cover the following topics:
- Loading models and actors
- Loading terrain
- Loading and attaching sounds to objects
- Creating a scene using C++
- Adding an additional camera
- Inspecting and modifying the scene
- Modifying the scene graph
- Moving objects based on time
- Controlling actions using intervals
- Making animations fit to intervals
- Making objects follow a predefined path
- Making the camera smoothly follow an object
- Generating geometry at runtime
- Loading data asynchronously
One thing that is great about games is their ability to present immersive and exciting worlds which players are able to explore over the course of their progress in the game. Be it dungeons filled with dragons and monsters or futuristic space stations, these worlds do have one thing in common they need to be built by hand by someone prior to their inclusion in a game.
In this chapter we will see how Panda3D allows us to build interesting scenes by placing and arranging static and animated objects to fill the initial void of an empty scene. Additionally, we will see how to place cameras and make our game worlds even more exciting by dynamically moving and animating objects.
Panda3D makes it very easy to quickly load some static non-animated models as well as actors that can be animated and placed to your liking to create a scene. This is one of the powerful features of the engine and, for example, makes it a very strong prototyping tool. In this recipe you will learn how to get Panda3D to load models and actors and display them on the screen.
Note
This book follows the naming convention used by Panda3D. Therefore the term model refers to a static mesh without animation data and actor is used for meshes that include animation data.
The following steps will use the application skeleton presented in the recipe Setting up the game structure found in Chapter 1, Setting Up Panda3D and Configuring Development Tools. If you're unsure about setting up a project and need a little refresher on that topic, feel free to take a step back to this topic.
Loading models and actors is easy. Just follow these steps:
- Add the highlighted code to your
Application.pyfile:from direct.showbase.ShowBase import ShowBase from direct.actor.Actor import Actor from panda3d.core import Vec3 class Application(ShowBase): def __init__(self): ShowBase.__init__(self) self.teapot = loader.loadModel("teapot") self.teapot.reparentTo(render) self.teapot.setPos(-5, 0, 0) self.pandaActor = Actor("panda", {"walk": "panda-walk"}) self.pandaActor.reparentTo(render) self.pandaActor.setPos(Vec3(5, 0, 0)) self.pandaActor.loop("walk") self.cam.setPos(0, -30, 6)
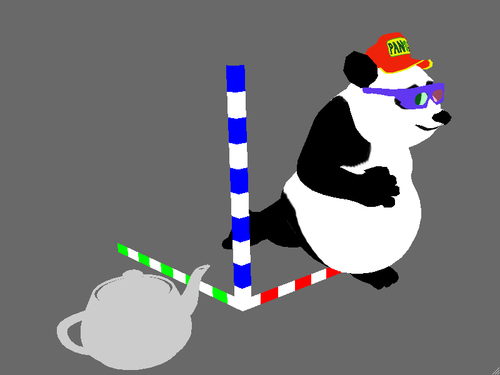
Click Run | Run Project in the main menu or press F6 to start the application. If you followed all of the steps correctly, your scene will look like the following screenshot:

After setting up our new project, we add new import statements for the Actor and Vec3 classes we are going to use in the following code. Then the teapot model, which is included in the standard installation of Panda3D, is loaded—note that you do not need to provide a file extension!
The next line is very important. The reparentTo() method is used to make the calling object a child of the object given as the parameter to reparentTo(), which is the render object in this case. This allows you to build hierarchies of scene objects so that when you move a parent node, all child nodes are influenced too. For example, in a racing game you could make the wheel models child nodes of the car body model to ensure their proper position relative to the chassis. In our sample code, the teapot is a child of render, which is the root of the scene graph. Models and actors that are not added to the scene graph will not be drawn!
Finally, the teapot is set five units to the left of the coordinate system origin to leave some space for the big panda that is going to be loaded by the next block of code.
Note
It is important to understand Panda3D's coordinate system, which is visualized in the following screenshot. By default, positive x (in red) points to the right, positive y (in green) points into the screen and positive z (in blue) points up.
Loading actors works a little bit different than loading models. We create a new instance of the Actor class and provide the name of the actor to load. The second parameter is a dictionary that maps animation names to a file containing the animation data. This parameter is optional and only necessary if animation and mesh data are stored in separate files.
After adding the panda to the scene graph and setting its position, the walk animation is set to play in a loop and finally, the camera is set to a position that allows it to capture our first scene.