
If you plan to create a game set in a non-flat outdoor environment, you will need a way to create a natural looking terrain consisting of mountains, hills, and slopes. Luckily, Panda3D comes with the GeoMipTerrain class that allows you to generate such an environment from a simple grayscale image called a height map.
Create a new project as described in Setting up the game structure and add a directory called textures on the same level as the models, nbproject, sounds, and src directories. Also copy the height map and terrain texture you are going to use for rendering the landscape to the textures directory.
Height maps can be created with specialized tools like Terragen or by rendering the height information of a mesh created by hand to a texture using a modeling package like Maya. A very quick solution is to generate a random landscape using a difference cloud filter found in many professional image editing programs.
The size of your height map should be 2n + 1 pixels so the engine is able to handle it efficiently. This means your height map images should be of sizes 257x257 (28 + 1) or 1025x1025 (210 + 1), for example. This image size rule is mandated by the algorithm that turns the pixels of the height map into the vertices of the terrain. If the texture image provided fails to comply with this rule, the engine will resize it, which may lead to longer loading times and undesired resulting terrains. The code we are going to write will use a texture size of 513x513 pixels.
Fulfill these tasks to make Panda3D load and render terrain:
- Make sure all needed resources are in place and add the marked code to
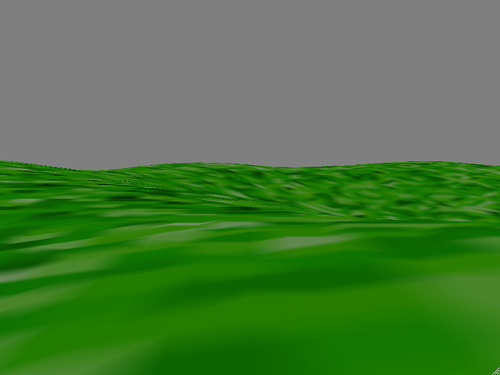
Application.py. The height map and color map images are assumed to be calledheight.pngandgrass.png.from direct.showbase.ShowBase import ShowBase from panda3d.core import GeoMipTerrain class Application(ShowBase): def __init__(self): ShowBase.__init__(self) self.terrain = GeoMipTerrain("terrain") self.terrain.setHeightfield("../textures/height.png") self.terrain.setColorMap("../textures/grass.png") self.terrain.getRoot().setSz(35) self.terrain.getRoot().reparentTo(render) self.terrain.generate() z = self.terrain.getElevation(256, 256) * 40 self.cam.setPos(256, 256, z) self.terrain.setFocalPoint(self.cam) self.taskMgr.add(self.updateTerrain, "update terrain") def updateTerrain(self, task): self.terrain.update() return task.cont - Start your program. You should be able to see a scene similar to the following screenshot:
After the obligatory import statement, we create a new instance of GeoMipTerrain and load the height map and texture. In version 1.7.0 of Panda3D, GeoMipTerrain seems to ignore the search paths set in the configuration. Therefore we provide the full relative paths and filenames. Additionally, we set the maximum elevation of the terrain by scaling the geometry about the z-axis with the setSz() method. By default, the terrain's elevation ranges between 0 and 1. Feel free to play with this value until the results suit your needs!
Next we add the terrain to the scene graph and call generate() to create the geometry for our landscape. We also set the camera to a position that is somewhere within the boundaries of the terrain and use getElevation() to sample the height map at the given position to set the camera height to be above the hills.
GeoMipTerrain uses LOD (level of detail) mapping, where items closer to the focal point are rendered in higher quality than those further away. We can also turn this off (and always get the highest quality) by calling setBruteforce(True) on a GeoMipTerrain object. To wrap things up, we add a small task to keep the terrain updated according to the focal point's position.
GeoMipTerrain objects can be configured further with the following methods, which you most likely need to use as they have a great influence on rendering performance.
Geometrical mipmapping, the level of detail technique used by the terrain renderer, divides the terrain into groups of quads, which then are set to an elevation according to the information found in the height map. The method setBlockSize() allows you to define the number of quads to use. Clearly, a higher amount will result in increased quality and decreased performance and vice versa.
With the setNear() and setFar() methods of GeoMipTerrain you are able to define two important thresholds that are used for choosing the level of rendering fidelity of the terrain. The near distance defines to which point from the focal point the highest level of detail will be used. The far distance, on the other hand, sets from which distance on the lowest detail level will be chosen.