
5
Managing Networking
This chapter covers the following recipes:
- Configuring IP Addressing
- Testing Network Connectivity
- Installing DHCP
- Using DHCP
- Configuring DHCP Scopes and Options
- Implementing DHCP Fail Over/Load Balancing
- Configuring a DHCP Reservation
- Implementing DNS in the Enterprise
- Configuring DNS Forwarding
- Managing DNS Zones and Resource Records
Introduction
Every organization’s heart is its network—the infrastructure that enables your client and server systems to interoperate. Windows has included networking features since the early days of Windows for Workgroups 3.1 (and earlier with Microsoft LAN Manager).
One thing worth noting is that even in the cloud age, “the network” isn’t going anywhere. The cloud is really just resources in someone else’s network, and you still need the network to communicate. The role of enabling a client to connect to a server does not really change when you have servers (and clients) now in the cloud.
Every server or workstation in your environment must have a correct IP configuration. While IPv6 is gaining in popularity, most organizations rely on IPv4. In the Configuring IP Addressing recipe, we look at setting a network interface’s IPv4 configuration, including DNS settings.
Many organizations assign a static IPv4 address to most server systems. The servers used throughout this book, for example, use static IP addresses. For client hosts and some servers, an alternative to assigning a static IP address is to use Dynamic Host Configuration Protocol (DHCP). DHCP is a network protocol that enables a workstation to lease an IP address (and release it when the lease expires). You set up a DHCP server to issue IP address configuration to clients using the Installing DHCP recipe.
Once you have installed your DHCP server, you can use the Configuring DHCP Scopes and Options recipe to set up the details that your DHCP server is to hand out to clients. In the Configuring DHCP failover and load balancing recipe, we deploy a second DHCP server and configure it to act as a failover/load balancing DHCP service.
You can create a DHCP reservation as an alternative to manually configuring a host’s IP details. The reservation means the DHCP server delivers a specific IP address to a particular host. In “Creating a DHCP Reservation,” you configure SRV2 to get its IP configuration from the DHCP server.
Another key service in all organizations is DNS, the Domain Name System. In Deploying DNS in the Enterprise, you install and configure DNS within the Reskit network. In Configuring DNS forwarding, you see how to set up DNS forwarders, which can be useful in larger enterprises.
In this chapter’s final recipe, Managing DNS Zones and Resource Records, you configure the DNS server on DC1 with zones and additional resource records.
The systems used in the chapter
This chapter is about networking in an enterprise. The recipes in this chapter make use of numerous hosts as follows:

Figure 5.1: Hosts in use for this chapter
Configuring IP Addressing
By default, Windows uses DHCP to configure all NICs that the Windows installation process discovers when installing Windows. Once you complete the installation of Windows, you can use the control panel applet (ncpa.cpl), the network shell console application (netsh.exe), or PowerShell to set IP configuration manually. In this recipe, you set the IP address details for SRV2 and ensure the host registers DNS names in the Reskit.Org DNS domain (on the DNS service running on DC1).
Setting up any host requires setting an IP address, a subnet mask, and a default gateway, which you do in the first part of this recipe. Then you configure SRV2 (a workgroup host) to register with the DNS server on DC1.Reskit.Org as SRV2.Reskit.Org (despite it not being a member of the domain yet!).
This approach raises some challenges. When you default create DC1.Reskit.Org as a DC, the domain promotion process sets the domain’s DNS zone to allow only secure updates that domain members can make. That means a workgroup host cannot register. You can overcome this by setting the zone to allow all updates. But this could be dangerous as it enables ANY host to, potentially, register their address. A second challenge is that since SRV2 is not a domain member, remoting to DC1 fails by default. A solution to that issue is to set the WinRM service to trust all hosts. Configuring WinRM to disregard server authentication has security implications you should consider before using this approach in production.
Getting ready
You run this recipe on SRV2 after you have installed PowerShell 7. The recipe starts with SRV2 being a workgroup host, not a domain member. In this recipe, after configuring an IP address, the recipe also adds SRV2 to the Reskit domain.
How to do it...
- Discovering the adapter, adapter interface, and adapter interface index
$IPType = 'IPv4' $Adapter = Get-NetAdapter -Name Ethernet | Where-Object Status -eq 'Up' $Interface = $Adapter | Select-Object -First 1 Get-NetIPInterface -AddressFamily $IPType $Index = $Interface.IfIndex Get-NetIPAddress -InterfaceIndex $Index -AddressFamily $IPType | Format-Table -Property Interface*, IPAddress, PrefixLength - Setting a new IP address for the NIC
$IPConfigHT = @{ InterfaceIndex = $Index PrefixLength = 24 IPAddress = '10.10.10.51' DefaultGateway = '10.10.10.254' AddressFamily = $IPType } New-NetIPAddress @IPConfigHT - Verifying the new IP address
Get-NetIPAddress -InterfaceIndex $Index -AddressFamily $IPType | Format-Table IPAddress, InterfaceIndex, PrefixLength - Setting the DNS server IP address
$CAHT = @{ InterfaceIndex = $Index ServerAddresses = '10.10.10.10' } Set-DnsClientServerAddress @CAHT - Verifying the new IP configuration
Get-NetIPAddress -InterfaceIndex $Index -AddressFamily $IPType | Format-Table - Testing that
SRV2can see the domain controllerTest-NetConnection -ComputerName DC1.Reskit.Org | Format-Table - Creating a credential for
DC1$U = 'ReskitAdministrator' $PPT = 'Pa$$w0rd' $PSS = ConvertTo-SecureString -String $ppt -AsPlainText -Force $Cred = [pscredential]::new($U,$PSS) - Setting WinRM on
SRV2to trustDC1$TPPATH = 'WSMan:localhostClientTrustedHosts' Set-Item -Path $TPPATH -Value 'DC1' -Force Restart-Service -Name WinRM -Force - Enabling non-secure updates to
Reskit.OrgDNS domain$DNSSSB = { $SBHT = @{ Name = 'Reskit.Org' DynamicUpdate = 'NonsecureAndSecure' } Set-DnsServerPrimaryZone @SBHT } Invoke-Command -ComputerName DC1 -ScriptBlock $DNSSSB -Credential $Cred - Ensuring the host registers within the
Reskit.OrgDNS zone$DNSCHT = @{ InterfaceIndex = $Index ConnectionSpecificSuffix = 'Reskit.Org' RegisterThisConnectionsAddress = $true UseSuffixWhenRegistering = $true } Set-DnsClient @DNSCHT - Registering the host IP address at
DC1Register-DnsClient - Pre-staging
SRV2in AD$SB = {New-ADComputer -Name SRV2} Invoke-Command -ComputerName DC1 -ScriptBlock $SB - Testing that the DNS server on
DC1.Reskit.Orgcorrectly resolvesSRV2Resolve-DnsName -Name SRV2.Reskit.Org -Type 'A' -Server DC1.Reskit.Org - Checking the computer account in the AD
Invoke-Command -ComputerName DC1 -ScriptBlock { Get-ADComputer -Identity SRV2} - Adding
SRV2to the domain and restartingAdd-Computer -DomainName Reskit.Org -Credential $Cred Restart-Computer
How it works...
In step 1, you use the Get-NetAdapter, Get-NetIPInterface, and Get-NETIPaddress cmdlets to retrieve the IP configuration of the NIC in SRV2. By default, Hyper-V VMs have a single NIC, and, again, by default, Windows sets this NIC to get its configuration from DHCP.
The output of this step looks like this:
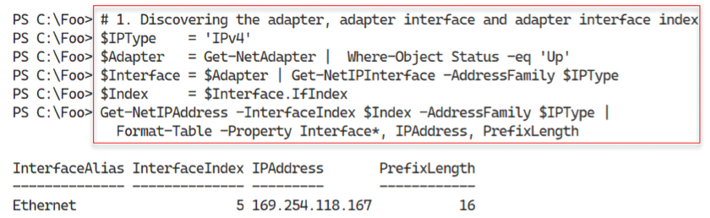
Figure 5.2: Discovering IP address information
In step 2, you use the New-NetIPAddress cmdlet to set the host’s NIC to have a static IP address (10.10.10.51). The output looks like this:

Figure 5.3: Discovering IP address information
In step 3, you verify the IP address by using Get-NetIPAddress, with output like this:

Figure 5.4: Confirming the NIC IP address
Next, in step 4, you set the NIC to use the DNS server at 10.10.10.10 – DC1.Reskit.Net. The step produces no console output. In step 5, you verify the IP configuration with output like this:

Figure 5.5: Confirming IP address configuration
Now that you have a working IP address for the NIC, you can use Test-NetConnection to check the connection to DC1. The output of this step looks like this:

Figure 5.6: Confirming IP address configuration
In step 7, you create a credential object for the ReskitAdministrator user. In step 8, you set the WinRM service on SRV2 to trust DC1, and then you restart the service. In step 9, you configure the DNS server on DC1 to accept both secure and non-secure updates for the Reskit.Org domain. In step 10, you configure the DNS client on SRV2 to register its IP address using the suffix Reskit.Org. With step 11, you force the registration on DC1's DNS server. In step 12, you create an account for SRV2 in the Reskit domain. These six steps produce no console output.
In step 13, you test the DNS server to check it resolves SRV2.Reskit.Org, with the following output:

Figure 5.7: Confirming resolution of SRV2.Reskit.Org
With step 14, you invoke the Get-ADComputer command on DC1 to verify the AD account details for SRV2. The output of this step looks like this:

Figure 5.8: Confirming AD account for SRV2
In the final step in this recipe, you add SRV2 to the Reskit.Org domain and then restart the computer. Since the restart-computer command follows directly after you add the computer to the domain, you may not see any message as SRV2 restarts. If you are very quick, you might see the output here:

Figure 5.9: Joining SRV2 to the domain and rebooting
There’s more...
In step 1, you discover the IP address of the host NIC. As you can see in the figure, the address is in the 169.254.0.0/16 subnet. This IP address is an Automatic Private IP Addressing or APIPA address. That is normal in a network with no DHCP server and a newly installed host. To understand more about APIPA, you can view this document: https://docs.microsoft.com/windows-server/troubleshoot/how-to-use-automatic-tcpip-addressing-without-a-dh.
In steps 2 through 4, you reconfigure the NIC in SRV2 to have a specific IP address and DNS server address. Step 6 ensures that SRV2 can connect to the DC (DC1).
In step 7, you create a credential object that you later use when invoking commands on the domain controller. In step 8, you set the WinRM service to trust DC1. By default, WinRM connections use domain membership or SSL for server authentication – the Trusted Hosts setting tells Windows not to carry out server authentication. Configuring this setting is necessary for the following steps in the recipe. But once you have completed these steps (and joined SRV2 to the domain), you should revert this setting.
Testing Network Connectivity
In today’s connected world, network connectivity is vital. When you add a new server to your infrastructure, it is useful to ensure that the server can connect to and use the network.
In this recipe, you perform necessary network connectivity tests on the newly installed SRV2 host. You should ensure that full connectivity exists before adding a server to the domain.
Getting ready
This recipe uses SRV2, a domain-joined host. You gave this host a static IP address in “Configuring IP Addressing.”
How to do it...
- Verifying
SRV2itself is up, and that loopback is workingTest-Connection -ComputerName SRV2 -Count 1 -IPv4 - Testing connection to local host’s WinRM port
Test-NetConnection -ComputerName SRV2 -CommonTCPPort WinRM - Testing basic connectivity to
DC1Test-Connection -ComputerName DC1.Reskit.Org -Count 1 - Checking connectivity to SMB port on
DC1Test-NetConnection -ComputerName DC1.Reskit.Org -CommonTCPPort SMB - Checking connectivity to the LDAP port on
DC1Test-NetConnection -ComputerName DC1.Reskit.Org -Port 389 - Examining the path to a remote server on the internet
$NetConnectionHT = @{
  ComputerName     = 'WWW.Packt.Com'
  TraceRoute       = $true
  InformationLevel = 'Detailed'
}
Test-NetConnection @NetConnectionHT    # Check our wonderful publisher
How it works...
In step 1, you verify that SRV2's loopback adapter works and that the basic TCP/IP stack is up and working. The output looks like this:

Figure 5.10: Verifying SRV2 itself is up and that loopback is working
In step 2, you check to ensure that the WinRM port is open and working, with output like this:

Figure 5.11: Checking the WinRM port
In the Reskit.Org network, DC1 is a domain controller and a DNS server. In step 3, you test the connectivity to this critical enterprise server, with output like this:

Figure 5.12: Testing basic connectivity to DC1
All domain-joined hosts need to access the SYSVOL share on a DC in any domain environment to download the group policy .POL files. In step 4, you test that SRV2 can access the SMB port, port 445, on the DC, with output like this:

Figure 5.13: Checking connectivity to SMB port on DC1
In step 5, you test that SRV2 can access DC1 on the LDAP port, port 389, with the following output:

Figure 5.14: Checking connectivity to the LDAP port on DC1
In step 6, you check connectivity with the internet and test the network path to the publisher’s website at www.packt.com.
The output is:

Figure 5.15: Examining the path to a remote server on the internet
There’s more...
This recipe’s steps confirm the host can accept connections over WinRM and can contact the DC for core activities. You could add several additional tests, such as testing that you can access the DNS server and resolve DNS queries.
This recipe uses two cmdlets to test the connection with another host: Test-NetConnection and Test-Connection. These two cmdlets have different parameters and perform similar but not identical functions. For example, Test-NetConnection tests the ability to connect to a specific TCP port on the remote host. And the Test-Connection cmdlet allows you to specify testing of the connection over IPv4 vs. IPv6. The Test-NetConnection command, as you can see in step 2, uses IPv6 and IPv4, although, in practice, IPv6 seems to be a bit faster. Mileage may vary, of course.
In step 6, you test the internet connectivity to our publisher’s website (www.packt.com). Since we are just testing the connectivity to this site, you only need to specify the actual computer name and do not need the HTTP or HTTPS prefix.
Installing DHCP
Each server needs a unique IP address and other configuration options to configure on a server-by-server basis. You configured SRV2 with a static IP address in a previous recipe and tested its connectivity to the rest of the Reskit network. You can configure client computers running Windows 10 or other OSs manually, although this can be a huge and challenging task in large organizations.
DHCP enables a DHCP client to automate its IP configuration and other networking details from a DHCP server. DHCP automates IP configuration, avoids all the manual configuration work, and avoids the inevitable issues arising from manual IP configuration.
Windows and most other client operating systems, including Linux and Apple Macs, have a built-in DHCP client. Windows Server also includes a DHCP Server service you can install to provide DHCP services to the clients. You can install DHCP using Server Manager and configure the service using the DHCP GUI application. Alternatively, you can automate the installation of DHCP, as you can see in this recipe. In the next recipe, Configuring DHCP Scopes and Options, you configure the DHCP service to issue IP addresses in a specific range. You also configure DHCP to provide DHCP clients with other IP address configuration options, such as the subnet mask, default gateway, and the DNS server IP address or addresses.
Getting ready
This recipe uses DC1, a domain controller in the Reskit.Org domain. You should have installed AD on this host and configured it as per earlier recipes.
How to do it...
- Installing the DHCP feature on
DC1and adding the management toolsImport-Module -Name ServerManager -WarningAction SilentlyContinue Install-WindowsFeature -Name DHCP -IncludeManagementTools - Adding
DC1to trusted DHCP servers and adding the DHCP security groupImport-Module -Name DHCPServer -WarningAction SilentlyContinue Add-DhcpServerInDC Add-DHCPServerSecurityGroup - Letting DHCP know it’s all configured
$DHCPHT = @{ Path = 'HKLM:SOFTWAREMicrosoftServerManagerRoles12' Name = 'ConfigurationState' Value = 2 } Set-ItemProperty @DHCPHT - Restarting the DHCP server
Restart-Service -Name DHCPServer -Force - Testing service availability
Get-Service -Name DHCPServer |
  Format-List -Property *
How it works...
In step 1, you import the ServerManager module. PowerShell 7 recognizes this is an older Windows PowerShell module and imports the module via the Windows PowerShell compatibility mechanism introduced in the Utilizing Windows PowerShell compatibility recipe in Chapter 2. This step also uses Install-WindowsFeature to add the DHCP Server service to DC1. The output from this step looks like this:

Figure 5.16: Installing the DHCP Server service on DC1
In step 2, you add DC1 to the set of authorized DHCP servers in the domain and add the DHCP security groups to the DHCP server, which produces no output to the console. The groups that this command adds are the DHCP Users and DHCP Administrators security groups. For more details on these groups, see https://secureidentity.se/delegate-dhcp-admins-in-the-domain/.
In step 3, you set a registry entry to tell Windows that all post-deployment DHCP configuration activities are complete. The GUI installation process takes you through this automatically. When installing DHCP via PowerShell, you need to set the registry entry to complete the configuration, which produces no output.
Once you have completed the configuration activities, restart the DHCP service, as shown in step 4. Once restarted, the DHCP service can issue IP configuration to DHCP clients. For this to happen, you must also have specified the configuration information in the Configuring DHCP Scopes and Options recipe. Depending on the speed of your CPU and storage system and how you have configured the VM, you may see the following output from this step:

Figure 5.17: Restarting the DHCP Server service on DC1
In step 5, you complete this recipe by ensuring that the DHCP service has started. The output of this step looks like this:

Figure 5.18: Testing DHCP service availability
There’s more...
When the Windows DHCP service starts, it checks to ensure the server is on the DHCP server list authorized in the domain. This server list ensures that the DHCP service does not start on any non-authorized DHCP server. Adding DC1 to the list of authorized servers can help guard against rogue DHCP servers.
In step 5, you check the DHCP service. Get-Service output includes a description of the service and the path name to the actual service executable. As you can see, the DHCP service does not run in its own process. Instead, it runs inside svchost.exe, which is why you cannot explicitly view the service’s process when using Get-Process.
Configuring DHCP Scopes and Options
Installing DHCP is straightforward, as you saw in the “Installing DHCP” recipe – you add the Windows feature and then carry out two small configuration steps. The extra steps enable you to use the relevant security groups and avoid the Server Manager GUI message that there are configuration steps not yet performed. You probably do not need to take these extra steps in most cases.
Before your DHCP server can provide IP address configuration information to clients, you must create a DHCP scope and options. A DHCP scope is a range of DHCP addresses your DHCP server can give out for a given IP subnet. DHCP options are specific configuration options your DHCP server provides, such as the DNS server’s IP address and the IPv4 default gateway.
Depending on your organization’s needs, you can set DHCP options at a scope level or server level. For example, you would most likely specify a default gateway in the scope options, with DNS server address(es) set at the server level. But as ever, mileage varies!
You create a new scope for the 10.10.10.0/24 subnet in this recipe and specify options at both the scope and server level.
Getting ready
You run this recipe on SRV1 after you have installed PowerShell 7.
How to do it...
- Importing the DHCP Server module
Import-Module DHCPServer -WarningAction SilentlyContinue - Creating an IPv4 scope
$SCOPEHT = @{ Name = 'ReskitOrg' StartRange = '10.10.10.150' EndRange = '10.10.10.199' SubnetMask = '255.255.255.0' ComputerName = 'DC1.Reskit.Org' } Add-DhcpServerV4Scope @SCOPEHT - Getting IPv4 scopes from the server
Get-DhcpServerv4Scope -ComputerName DC1.Reskit.Org - Setting server-wide option values
$OPTION1HT = @{ ComputerName = 'DC1.Reskit.Org' # DHCP Server to Configure DnsDomain = 'Reskit.Org' # Client DNS Domain DnsServer = '10.10.10.10' # Client DNS Server } Set-DhcpServerV4OptionValue @OPTION1HT - Setting a scope-specific option
$OPTION2HT = @{ ComputerName = 'DC1.Reskit.Org' # DHCP Server to Configure Router = '10.10.10.254' ScopeID = '10.10.10.0' } Set-DhcpServerV4OptionValue @OPTION2HT - Viewing server options
Get-DhcpServerv4OptionValue | Format-Table -AutoSize - Viewing scope-specific options
Get-DhcpServerv4OptionValue -ScopeId '10.10.10.0' | Format-Table -AutoSize - Viewing DHCPv4 option definitions
Get-DhcpServerv4OptionDefinition | Format-Table -AutoSize
How it works...
In step 1, you import the DHCPServer module. This step, which produces no output, loads the module using the Windows PowerShell compatibility solution. When you installed DHCP (in Installing DHCP), you added the management tools, including this module. However, the DHCP team has not yet made this module compatible with PowerShell 7. You read about the Windows PowerShell compatibility solution in Chapter 2. This step produces no console output.
In step 2, you create a new DHCP scope for IPv4 addresses. The scope enables the DHCP server to issue IP addresses in the range of 10.10.10.150 – 10.10.10.199. This step produces no output.
In step 3, you use Get-DHCPServerIPV4Scope to retrieve details of all the DHCP scopes you have defined on DC1. The output of this step looks like this:

Figure 5.19: Viewing IPv4 scopes on DC1’s DHCP Server
In step 4, you set two server-wide DHCP options, creating no output. These are options and values offered to all clients of any DHCP scope defined on this server. In step 5, you specify a scope option. These two steps also produce no output.
In step 6, you view the DHCP server-wide options with output that looks like this:

Figure 5.20: Viewing DHCP server-wide options
With step 7, you view the DHCP options you have set on the 10.10.10.10 scope, which looks like this:

Figure 5.21: Viewing DHCP server-wide options
In Windows Server 2022, Microsoft includes 66 pre-defined DHCP option definitions. You can use these options to provide option values to DHCP clients. Most of these options are of little use and are, in many cases, purely historical and not used widely. That said, these options help you to provide support for niche and uncommon scenarios.
To view the set of options Windows defines by default, in step 8, you use the geGet-DhcpServerv4OptionDefinition command.
The output from this command looks like this:

Figure 5.22: Viewing DHCPv4 option definitions
There’s more...
In step 2, you create a new scope and give it a scope name. However, as you can see in step 5 and elsewhere, the DHCP cmdlets do not provide a -DHCPScopeName parameter. Instead, you specify a ScopeID. In general, this is the subnet for the IP addresses in the scope, 10.10.10.0/24. But even then, as you can see in step 7, the cmdlet accepts any IP address in the 10.10.10.0/24 subnet as the subnet ID, including 10.10.10.10 as shown.
In step 6, you view the pre-defined DHCP options available to your DHCP server. The IETF defined these options in RFC 2132 (https://www.rfc-editor.org/rfc/rfc2132.html). It is worth pointing out that just because a DHCP option exists, there is no way to make software use the DHCP options. For example, you could configure a scope (or the server) to issue option 72, WWW servers. But at present, no browser makes use of this option. Additionally, Windows does not appear to use or request that option.
Using DHCP
After installing the DHCP service and configuring scope(s) and option values, your DHCP service can issue IP configuration data to any client on the network. Any IP client you attach to the physical subnet can ask for and receive IP confirmation details. Since the DHCP protocol acts at the IP level, the protocol performs no authentication when any DHCP client uses the protocol to request IP configuration details.
In Configuring IP Addressing, you set a static IP address for SRV2. In this recipe, you reconfigure this server to obtain a DHCP-based IP address (and options you specify in Configuring DHCP Scopes and Options).
Getting ready
You run this recipe on SRV2 after installing PowerShell 7 and after you have installed and configured DHCP (and have defined a new DHCP scope and associated options).
How to do it...
- Adding DHCP RSAT tools
Import-Module -Name ServerManager -WarningAction SilentlyContinue Install-WindowsFeature -Name RSAT-DHCP - Importing the DHCP module
Import-Module -Name DHCPServer -WarningAction SilentlyContinue - Viewing the scopes on
DC1Get-DhcpServerv4Scope -ComputerName DC1 - Getting V4 scope statistics from
DC1Get-DhcpServerv4ScopeStatistics -ComputerName DC1 - Discovering a free IP address
Get-DhcpServerv4FreeIPAddress -ComputerName dc1 -ScopeId 10.10.10.42 - Getting
SRV2NIC configuration$NIC = Get-NetIPConfiguration -InterfaceAlias 'Ethernet' - Getting the IP interface
$NIC | Get-NetIPInterface | Where-Object AddressFamily -eq 'IPv4' - Enabling DHCP on the NIC
$NIC | Get-NetIPInterface | Where-Object AddressFamily -eq 'IPv4' | Set-NetIPInterface -Dhcp Enabled - Checking the IP address assigned
Get-NetIPAddress -InterfaceAlias "Ethernet" | Where-Object AddressFamily -eq 'IPv4' - Viewing updated V4 scope statistics from
DC1Get-DhcpServerv4ScopeStatistics -ComputerName DC1 - Discovering the next free IP address
Get-DhcpServerv4FreeIPAddress -ComputerName dc1 -ScopeId 10.10.10.42 - Checking IPv4 DNS name resolution
Resolve-DnsName -Name SRV2.Reskit.Org -Type A
How it works...
In step 1, you install the RSAT-DHCP feature to add the DHCP server’s PowerShell module on SRV2, with output like this:

Figure 5.23: Installing DHCP tools on SRV2
Like many Windows Server 2022 native PowerShell modules, the DHCP server module is incompatible with .NET, and you cannot import it directly into PowerShell 7. You can use this module via the compatibility mechanism noted in Chapter 2. In step 2, you explicitly load this module using Import-Module, which creates no output.
In step 3, you look at the scopes available on DC1 (the DHCP server you installed in Installing DHCP). The output looks like this:

Figure 5.24: Installing DHCP tools on SRV2
In step 4, you examine the scope statistics for the DHCP scope you created in Configuring DHCP Scopes and Options, which produces output like this:

Figure 5.25: Viewing scope statistics
In step 5, you use the Get-DhcpServerv4FreeIPAddress cmdlet to find the first available free IP address in the scope. The output resembles this:

Figure 5.26: Getting the next free IPv4 address in the DHCP scope
In step 6, you get the NIC details and store them in the $NIC variable, producing no output. Note that you specify the InterfaceIndex of 6, which should be your VM’s NIC.
In step 7, you use that variable to get details of the NIC, with output like this:

Figure 5.27: Getting IP interface details
In step 8, you change the NIC to get configuration details via DHCP. This step creates no output.
In step 9, you view the NIC’s updated IPv4 address, assigned by DHCP. The output looks like this:

Figure 5.28: Checking the IP address assigned
In step 10, you re-examine the scope statistics with output like this:

Figure 5.29: Getting updated V4 scope statistics from DC1
With step 11, you re-check to discover the next free IP address in the DHCP scope, with output like this:

Figure 5.30: Discovering the next free IP address
In the final step, step 12, you check to ensure that SRV2 has registered its new IP address in the DNS server on DC1. The output looks like this:

Figure 5.31: Checking IPv4 DNS name resolution
There’s more...
In this recipe, you use the DHCP server cmdlets to get information from the DHCP server on DC1. These cmdlets retrieve information about the IP address scopes hosted on your DHCP server, including the next free IP address. You can also get statistics on the DHCP scope on the server, including free and used addresses.
In step 7, you get the IP interface details to allow you, in step 8, to convert the NIC from a static IP address to a dynamic address configuration based on DHCP.
In step 9, you view the DHCP-supplied IP address information for SRV2. If you perform step 8 and immediately run step 9, you may find that the NIC shows an APIPA IP address in the 169.254.0.0/24 subnet. This address is transient as Windows configures the DHCP-supplied address. When you change to DHCP (as in step 8), Windows first removes any static address and gives the NIC an APIPA address.
Windows then contacts the DHCP server and negotiates an address, which can take a few seconds. So be patient.
Configuring a DHCP Reservation
DHCP enables you to create an IP address reservation which means you can create an IP configuration for a specific host. If you need to change a host’s IP address later, you can just change the DHCP reservation (and refresh the DHCP lease on the host). You might have, for example, a printer that gets its IP configuration via DHCP.
For more information on DHCP reservations, see: https://learn.microsoft.com/en-us/powershell/module/dhcpserver/add-dhcpserverv4reservation?view=windowsserver2022-ps
Getting ready
You run this recipe on SRV2. This host is a domain-joined server on which you have loaded both PowerShell 7 and VS Code. In Configuring IP Addressing, you configured the NIC in this host to have a static IP address. Later, in Using DHCP, you gave SRV2 a DHCP address.
How to do it...
- Importing the DHCP Server module explicitly
Import-Module -Name DHCPServer - Getting NIC’s MAC address for NIC in
SRV2$SB = {Get-NetAdapter -Name 'Ethernet'} $Nic = Invoke-command -ComputerName SRV2 -ScriptBlock $SB $MAC = $Nic.MacAddress - Creating a DHCP reservation for
SRV2$NewResHT = @{ ScopeId = '10.10.10.0' IPAddress = '10.10.10.199' ClientId = $Mac ComputerName = 'DC1' } Add-DhcpServerv4Reservation @NewResHT - Renewing the IP address in
SRV2Invoke-Command -ComputerName SRV2 -ScriptBlock { ipconfig /renew } - Testing the net connection to
SRV2Clear-DnsClientCache Resolve-DnsName -Name SRV2.Reskit.Org -Type A Test-Connection -TargetName SRV2.Reskit.Org
How it works...
In step 1, you import the DHCP Server PowerShell module explicitly. There is some console output like this:

Figure 5.32: Importing the DHCP Server module
In step 2, you get the MAC address for the NIC. In step 3, you use this MAC address to create a DHCP reservation. These two steps produce no console output.
In step 4, which you run from DC1, you remotely invoke ipconfig.exe to release and then renew the DHCP-supplied address for SRV2. You are using PowerShell remoting to invoke this command on SRV2 – but once SRV2 changes its IP address, the remoting channel breaks. So you see no actual output other than PowerShell attempting to recreate the remoting channel.
In step 5, you check to see whether you can resolve SRV2 to its new address and connect to it with output like this:

Figure 5.33: Testing network connection to SRV2
There’s more...
In step 1, you explicitly import the DHCP Server module. Importing the module also generates a warning message about PowerShell loading the module using the compatibility mechanism. You read about the Windows PowerShell compatibility mechanism in Chapter 2. Also, in the output from this step, you see the suggestion to use the parameter -SkipEditionCheck. This advice is usually unhelpful as it does not tend to work in practice. The DHCP Server module works fine using the compatibility mechanism.
A DHCP reservation reserves a specific IP address for a host with a particular MAC address. So in step 2, you get the MAC address for the host’s NIC, and then in step 3, you reserve a specific address for this MAC address.
In step 4, you run ipconfig.exe on SRV2 and renew the IP address from DHCP. The DHCP server then sends SRV2 the IP address you configured in the reservation. The network stack on SRV2 then changes the IP address accordingly, which immediately breaks the remoting channel. The result is that this step works fine – SRV2 gets the reserved IP address – but you see some error messages. Although the ipconfig command worked fine (SRV2 has an updated IP address), you see an error on DC1. If you wanted a more controllable method, you could use the Restart-Computer command and specify both the -Wait and -For parameters to restart SRV2 and, from the script, wait until there is PowerShell connectivity.
Implementing DHCP Fail Over/Load Balancing
As shown in previous recipes, installing and configuring a single on-premises DHCP server is straightforward. However, a single DHCP server represents a single point of failure, which is never a good thing. The solution is always to have a second DHCP server with as much independence as possible from the first server. That would include running the second DHCP service on a separate host (physical or virtual) on different subnets and using independent power and networking components.
In earlier versions of Windows, one approach to fault tolerance was to stand up two DHCP servers and define the necessary scopes on each DHCP host. You split the full set of IP addresses and allowed each server to have part of that set. The traditional “wisdom” was to do an 80/20 split (have 80% of the scope supplied by your primary DHCP server and 20% on the backup server).
Independent DHCP servers are an error-prone approach and were never ideal since these separate servers did not coordinate scope details. That 80/20 “rule” was a recommendation for one specific customer scenario (a large firm in the Pacific Northwest) and possibly was not meant to become a best practice.
In Windows Server 2012, Microsoft added a DHCP failover and load balancing mechanism that simplified deploying DHCP in an organization. You can now set up two DHCP servers, define a DHCP scope, and allow both servers to work in tandem.
In this recipe, you install DHCP on a second server, DC2, and then configure and use the failover and load balancing capabilities of Windows Server.
This recipe uses the two DCs you have installed, DC1 and DC2. You should also have installed DHCP on DNS (“Installing DHCP”) and configured a DNS zone (Configuring DHCP Scopes and Options).
Getting ready
You run this recipe on DC2 after you have installed PowerShell 7. You should have created a DHCP server on DC1, created a scope, and created a reservation in that scope for the SRV2.
How to do it...
- Installing the DHCP server feature on
DC2Import-Module -Name ServerManager -WarningAction SilentlyContinue $FEATUREHT = @{ Name = 'DHCP' IncludeManagementTools = $True } Install-WindowsFeature @FEATUREHT - Letting DHCP know it is fully configured
$IPHT = @{ Path = 'HKLM:SOFTWAREMicrosoftServerManagerRoles12' Name = 'ConfigurationState' Value = 2 } Set-ItemProperty @IPHT - Authorizing the DHCP server in AD
Import-Module -Name DHCPServer -WarningAction 'SilentlyContinue' Add-DhcpServerInDC -DnsName DC2.Reskit.Org - Viewing authorized DHCP servers in the Reskit domain
Get-DhcpServerInDC - Configuring failover and load balancing
$FAILOVERHT = @{ ComputerName = 'DC1.Reskit.Org' PartnerServer = 'DC2.Reskit.Org' Name = 'DC1-DC2' ScopeID = '10.10.10.0' LoadBalancePercent = 60 SharedSecret = 'j3RryIsTheB3est!' Force = $true Verbose = $True } Invoke-Command -ComputerName DC1.Reskit.Org -ScriptBlock { Add-DhcpServerv4Failover @Using:FAILOVERHT } - Getting active scopes (from both servers!)
$DHCPServers = 'DC1.Reskit.Org', 'DC2.Reskit.Org' $DHCPServers | ForEach-Object { "Server: $_" | Format-Table Get-DhcpServerv4Scope -ComputerName $_ | Format-Table } - Viewing DHCP server statistics from both DHCP Servers
$DHCPServers | ForEach-Object { "Server: $_" | Format-Table Get-DhcpServerv4ScopeStatistics -ComputerName $_ | Format-Table } - Viewing DHCP reservations from both DHCP Servers
$DHCPServers |
  ForEach-Object {
    "Server: $_" | Format-Table
    Get-DhcpServerv4Reservation -scope 10.10.10.42 -ComputerName $_  |
      Format-Table
  }
How it works...
Before configuring a DHCP failover relationship, you first install and configure DHCP on DC2. In step 1, you install the DHCP Server feature on DC2 with the following output:

Figure 5.34: Adding the DHCP Server feature to DC2
In step 2, you let DHCP know it is now fully configured. In step 3, you authorize DC2 to be a DHCP server in AD. These two steps create no output.
In step 4, you view the authorized DHCP servers in the domain with the following output:

Figure 5.35: Adding the DHCP Server feature to DC2
In step 5, you create a failover/load balancing relationship between DC1 and DC2. The verbose output is as follows:

Figure 5.36: Creating a DHCP failover relationship
In step 6, you retrieve and view the active scopes on both DHCP servers with the following output:

Figure 5.37: Viewing active scopes on both DHCP servers
In step 7, you use the Get-DhcpServerV4ScopeStatistics command to retrieve details about the scopes on both servers, with output like this:

Figure 5.38: Viewing scope statistics on both DHCP servers
In step 8, you view the DHCP reservations on each server with the following output:

Figure 5.39: Viewing DHCP reservations from both DHCP servers
There’s more...
Unlike in Installing DHCP, in this recipe, you do not add the DHCP-related local security groups on DC2. If you plan to delegate administrative privileges, you may wish to add those groups as you did in the earlier recipe.
In step 5, you establish a load balancing and failover relationship between the two DHCP servers. By using the -Verbose switch for the Add-DhcpServerV4Failover cmdlet, you can see what the command does, step by step. As you can see in the output, this command copies full details of all the scopes on DC1 to DC2. You should note you create DHCP failover relationships on a scope-by-scope basis.
Depending on your needs, you can configure different relationships between DHCP servers using the -ServerRole parameter. For more details on this parameter and others that you can use to fine-tune the relationship between the two partners, see https://learn.microsoft.com/powershell/module/dhcpserver/add-dhcpserverv4failover.
The DHCP failover feature provides several additional settings to control precisely when to fail over and for how long (and when to failback). These settings allow you to manage, for example, what might happen during a planned reboot of your DHCP server.
Implementing DNS in the Enterprise
When you installed Active Directory in Chapter 4, you created a single DNS server on DC1. When you added a replica DC, DC2, and the child domain with UKDC1, you did not set up any additional DNS server in your forest. You always want to configure your clients and servers to use at least two DNS servers. In an enterprise organization, this is a best practice. For servers with a static DNS setting, you should also update the DHCP DNS server option settings to ensure that your DHCP servers provide two DNS server entries to DHCP clients.
In most organizations, there are several DNS service configuration options you may wish to set. These include whether to allow DNS server recursion on the server, the maximum size of the DNS cache, and whether to use Extended DNS (EDNS).
EDNS (also referred to as EDNS0 or, more recently, EDNS(0)) is an extension mechanism that enables more recent DNS servers to interact with older servers that may not be capable of specific actions. For more details on EDNS(0), see https://en.wikipedia.org/wiki/Extension_mechanisms_for_DNS#:~:text=Extension%20mechanisms%20for%20DNS%20(EDNS,increasing%20functionality%20of%20the%20protocol.
This recipe is a starting point. There are other DNS server options you may wish to consider updating, such as DNS Security. Additionally, you may need to reconfigure other servers and update the static IP address settings (to point to both DNS servers). And finally, in the Reskit.Org forest, you should also be updating the child domain UK.Reskit.Org.
In this recipe, you update the domain-wide DNS settings in the Reskit.Org domain. These settings configure DC2's DNS service in the same way as DC1, update DNS server configuration settings, and configure both DC1 and DC2 to use both DNS servers. You also update the DHCP zone to supply both DNS server addresses.
In Configuring IP Addressing, you configured SRV2, a workgroup host, to update DNS. You configured the Reskit.Org zone on DC1 to allow non-domain members to update their DNS registrations using dynamic DNS. This configuration is not a best-practice configuration. In the final steps in this recipe, you update the DNS zones for Reskit.Org to allow only secure updates.
Getting ready
You run this recipe on DC2, with DC1 and SRV2 also operational. You run this recipe after setting up DNS on both DC1 and DC2 and implementing DHCP.
How to do it...
- Installing the DNS feature on
DC2Import-Module -Name ServerManager -WarningAction SilentlyContinue Install-WindowsFeature -Name DNS -IncludeManagementTools - Creating a script block to set DNS Server Options
$SB1 = { # Enable recursion on this server Set-DnsServerRecursion -Enable $true # Configure DNS Server cache maximum size Set-DnsServerCache -MaxKBSize 20480 # 28 MB # Enable EDNS $EDNSHT = @{ EnableProbes = $true EnableReception = $true } Set-DnsServerEDns @EDNSHT # Enable Global Name Zone Set-DnsServerGlobalNameZone -Enable $true } - Reconfiguring DNS on
DC2andDC1Invoke-Command -ScriptBlock $SB1 Invoke-Command -ScriptBlock $SB1 -ComputerName DC1 - Creating a script block to configure
DC2to have two DNS servers$SB2 = { $NIC = Get-NetIPInterface -InterfaceAlias "Ethernet" -AddressFamily IPv4 $DNSSERVERS = ('127.0.0.1','10.10.10.10') $DNSHT = @{ InterfaceIndex = $NIC.InterfaceIndex ServerAddresses = $DNSSERVERS } Set-DnsClientServerAddress @DNSHT Start-Service -Name DNS } - Configuring
DC2to have two DNS serversInvoke-Command -ScriptBlock $SB2 - Creating a script block to configure
DC1to have two DNS servers$SB3 = { $NIC = Get-NetIPInterface -InterfaceAlias "Ethernet" -AddressFamily IPv4 $DNSSERVERS = ('127.0.0.1','10.10.10.11') $DNSHT = @{ InterfaceIndex = $NIC.InterfaceIndex ServerAddresses = $DNSSERVERS } Set-DnsClientServerAddress @DNSHT Start-Service -Name DNS } - Configuring
DC1to have two DNS serversInvoke-Command -ScriptBlock $SB3 -ComputerName DC1 - Updating DHCP scope to add 2 DNS entries
$DNSOPTIONHT = @{ DnsServer = '10.10.10.11', '10.10.10.10' # Client DNS Servers DnsDomain = 'Reskit.Org' Force = $true } Set-DhcpServerV4OptionValue @DNSOPTIONHT -ComputerName DC1 Set-DhcpServerV4OptionValue @DNSOPTIONHT -ComputerName DC2 - Getting DNS service details
$DNSRV = Get-DNSServer -ComputerName DC2.Reskit.Org - Viewing recursion settings
$DNSRV | Select-Object -ExpandProperty ServerRecursion - Viewing server cache settings
$DNSRV | Select-Object -ExpandProperty ServerCache - Viewing EDNS settings
$DNSRV | Select-Object -ExpandProperty ServerEdns - Setting the
Reskit.Orgzone to be secure only$DNSSSB = { $SBHT = @{ Name = 'Reskit.Org' DynamicUpdate = 'Secure' } Set-DnsServerPrimaryZone @SBHT } Invoke-Command -ComputerName DC1 -ScriptBlock $DNSSSB Invoke-Command -ComputerName DC2 -ScriptBlock $DNSSSB - Resolving
SRV2onDC2Resolve-DnsName -Name SRV2 -Type A -Server DC2
How it works...
In step 1, you install the DNS feature on DC2, with output like this:

Figure 5.40: Installing DNS feature on DC2
In step 2, you create a script block that contains commands to configure DNS server options. In step 3, you run this script block on both DC1 and DC2, creating no output.
In step 4, you create another script block that sets the IP configuration for the host NIC to have two DNS servers. In step 5, you run this script block to reconfigure DC2, which creates no output.
In steps 6 and step 7, you reconfigure the static IP setting on DC1 to have two DNS servers. This step also creates no output.
In step 8, you update the defined scope (10.10.10.0) on both DHCP servers to supply two DNS server IP addresses to clients of your DHCP server. This step produces no output.
Now that you have reconfigured DNS, in step 9, you get and view the DNS server details from DC2. This step produces no output. In step 10, you view the DNS server recursion settings with output like this:

Figure 5.41: Viewing DNS Server recursion settings
In step 11, you examine the DNS server cache settings, with output like this:
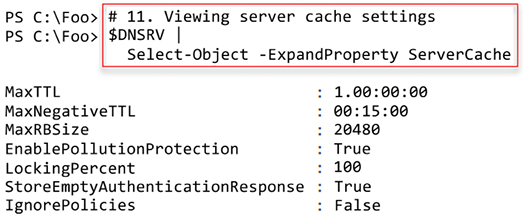
Figure 5.42: Viewing DNS Server cache settings
In step 12, you view the EDNS settings on DC2, with output like this:

Figure 5.43: Viewing DNS Server EDNS settings
In step 13, you change the DNS zone for Reskit.Org on both DC1 and DC2 to only accept secure dynamic updates, creating no output.
As a final DNS check, you use Resolve-DnsName to return any A records for SRV2.Reskit.Org, which produces output like this:

Figure 5.44: Resolving SRV2.Reskit.Org’s A record
There’s more...
In this recipe, you begin by installing and configuring DNS on DC2. Then you set DNS server options on both DNS servers (DC1 and DC2). You configure your domain controllers to point to themselves first and then to the other DNS servers second. Configuring DNS in this manner is a best practice.
In the earlier DHCP-related recipes, you configured your DHCP servers to provide a single DNS server IP address to DHCP clients as part of an IP lease. In step 8, you update the DHCP scope provided by DC1 and DC2 to provide two DNS server IP addresses when offering an IP configuration to a DHCP client.
At the end of this recipe, you obtain and view the DNS server recursion, server cache, and EDNS settings on DC2. You could extend these steps by examining the settings on DC1 and comparing them to ensure consistent configuration on both DNS servers.
In Configuring IP Addressing, you used a workgroup computer, SRV2, and enabled it to register with DNS by setting the DNS zone domain to accept insecure updates. Using non-secure DNS updates is not a best practice as it could allow a rogue computer to “steal” a real DNS name.
In a later recipe, you added SRV2 to the Reskit.Org domain. Therefore, you can now configure the DNS AD-integrated zones to accept only secure updates (i.e., only from domain-joined computers). In step 13, you ensure that the Reskit.Org DNS domain only allows secure updates.
Finally, in step 14, you resolve SRV2.Reskit.Org from DC2. You originally created, via dynamic DNS update, the DNS A record for SRV2 on the DNS server on DC1. Now that you have created a new DNS service on DC2, and since the Reskit.Org zone is AD-integrated, DNS can resolve all records from the DNS zone from either DNS server. You can see in the figure that SRV2 has the DHCP-provided IP address (10.10.10.199).
In this recipe, you set up DNS for use in the Reskit.Org domain and for DHCP clients in that domain. But, you did not make any DNS-related changes to the UK.Reskit.Org sub-domain. This means that the DC in that domain, UKDC1.UK.Reskit.Org, still uses just DC1 for its DNS. In production, you would want at least a second DC for this sub-domain and update DNS server address settings for servers in the UK domain (and ensure any DHCP leases include two DNS server IP addresses). This additional work is similar to what you did in this recipe.
Another production aspect regards the replication of AD-integrated DNS zones. In this chapter, you created a DNS zone for Reskit.Org. The recipes you used in this chapter set that zone to be AD integrated and replicated to every DC in the Reskit.Org forest. If you change the zone content (for example, adding a new static host A record), the updates are stored within AD. AD then replicates the changes to DC1 and DC2, as well as to UKDC1. By default, Windows replicates all AD-integrated zone data to every DC in the forest, but you can change that. Depending on your usage scenario, you may wish to adjust the zone replication scope for AD-integrated zones. For more details on AD-integrated DNS zones, see https://learn.microsoft.com/windows-server/identity/ad-ds/plan/active-directory-integrated-dns-zones.
Managing DNS Zones and Resource Records
The DNS service enables you to resolve names to other information. The most common use of DNS is to resolve a hostname to its IP (IPv4 or IPv6) addresses. But different name resolutions, such as determining email servers or anti-spam, also rely on DNS.
DNS servers hold zones. A DNS zone is a container for a set of Resource Records (RRs) related to a specific DNS domain. If you use an email client to send mail, for example, to [email protected], the email client uses DNS to discover an email server to which to send the mail. When you enter www.packt.com, your browser uses DNS to resolve that website name into an IP address and contacts the server at that IP address.
Before using DNS to hold a RR, you must create a DNS forward lookup zone. A zone is integral to a global (or internal) DNS namespace. You can configure different zones to hold other parts of your namespace. You could, for example, have one zone containing RRs for the Reskit.Org on DC1 and DC2 while delegating to a new sub-zone, uk.reskit.org, on UKDC1. In Chapter 4, you added a child domain to the Reskit.Org forest, UK.Reskit.Net.
A reverse lookup zone does the reverse – you use it to obtain a hostname from its IP address. You may find reverse lookup zones useful, but you do not need them for most domain usage. The old NSlookup nslookup.exe command is one tool that uses the reverse lookup zone, for example. For more details on DNS in Windows, see https://learn.microsoft.com/windows-server/networking/dns/dns-top.
Traditionally, DNS stores and obtains zone details from files on the DNS server. When the DNS service starts up, it reads these zone files and updates the files as needed when it receives updates. If you have multiple DNS servers, you must configure your service to perform replication to ensure all DNS servers are in sync.
With Windows 2000, Microsoft added AD-integrated zones. DNS stores the DNS data for these zone types within AD. These zones replicate their zone data via AD replication, which simplifies the setup. This also means that when you created the AD service on DC1, DNS created a zone in the DNS server on DC1 and replicated the zone data to all DCs in a forest. For more information on AD-integrated zones, see https://learn.microsoft.com/windows-server/identity/ad-ds/plan/active-directory-integrated-dns-zones.
In this recipe, you create a forward and reverse look up zone on DC1. Then you add RRs in those zones. Once added, you test DNS resolution.
Getting ready
You run this recipe on DC1 after installing and configuring DNS.
How to do it...
- Creating a new primary forward DNS zone for
Cookham.Net$ZHT1 = @{ Name = 'Cookham.Net' ResponsiblePerson = 'dnsadmin.cookham.net.' ReplicationScope = 'Domain' ComputerName = 'DC1.Reskit.Org' } Add-DnsServerPrimaryZone @ZHT1 -Verbose - Creating a reverse lookup zone
$ZHT2 = @{ NetworkID = '10.10.10.0/24' ResponsiblePerson = 'dnsadmin.reskit.org.' ReplicationScope = 'Forest' ComputerName = 'DC1.Reskit.Org' } Add-DnsServerPrimaryZone @ZHT2 - Registering DNS for
DC1andDC2Register-DnsClient Invoke-Command -ComputerName DC2 -ScriptBlock {Register-DnsClient} - Checking the DNS zones on
DC1Get-DNSServerZone -ComputerName DC1 | ft -AutoSize - Adding Resource Records to the
Cookham.Netzone# Adding an A record $RRHT1 = @{ ZoneName = 'Cookham.Net' A = $true Name = 'Home' AllowUpdateAny = $true IPv4Address = '10.42.42.42' } Add-DnsServerResourceRecord @RRHT1 # Adding a Cname record $RRHT2 = @{ ZoneName = 'Cookham.Net' Name = 'MAIL' HostNameAlias = 'Home.Cookham.Net' } Add-DnsServerResourceRecordCName @RRHT2 # Adding an MX record $MXHT = @{ Preference = 10 Name = '.' TimeToLive = '4:00:00' MailExchange = 'Mail.Cookham.Net' ZoneName = 'Cookham.Net' } Add-DnsServerResourceRecordMX @MXHT - Restarting the DNS service to ensure replication
Restart-Service -Name DNS $SB = {Restart-Service -Name DNS} Invoke-Command -ComputerName DC2 -ScriptBlock $SB - Checking results of RRs in the
Cookham.NetzoneGet-DnsServerResourceRecord -ZoneName 'Cookham.Net' | ft -auto - Testing DNS resolution on
DC2andDC1# Testing The CNAME from DC1 Resolve-DnsName -Server DC1.Reskit.Org -Name 'Mail.Cookham.Net' # Testing the MX on DC2 Resolve-DnsName -Server DC2.Reskit.Org -Name 'Cookham.Net' - Testing the reverse lookup zone
Resolve-DnsName -Name '10.10.10.10'
How it works...
In step 1, which you run on DC1, you create a new primary forward lookup DNS zone for the DNS domain Cookham.Net. Using the -Verbose switch creates output from this step, like this:

Figure 5.45: Creating a new DNS zone
In step 2, you create a primary reverse lookup zone for 10.10.10.0/24. In step 3, you run the Register-DNSClient on both DC1 and DC2. This ensures that both DCs have updated their DNS details. These two steps produce no console output.
In step 4, you check on the DNS zones held by the DNS service on DC1. The output looks like this:

Figure 5.46: Checking DNS zones on DC1
In step 5, you add three RRs to Cookham.net: an A record, a CNAME record, and an MX record. In step 6, you restart the DNS service on both DC1 and DC2 to ensure replication has ensured both DNS servers are up to date. These two steps generate no console output.
In step 7, you get all the DNS resource records for Cookham.Net, which look like this:

Figure 5.47: Checking DNS RRs for Cookham.Net
In step 8, you test DNS name resolution from DC1 and DC2. You first resolve the Mail.Cookham.Net CNAME RR from DC1, then check the MX record from DC2.
The output from these two commands is as follows:

Figure 5.48: Checking DNS name resolution from DC1 and DC2
In step 9, you test the reverse lookup zone and resolve 10.10.10.10 into a domain name like this:

Figure 5.49: Testing the reverse lookup zone on DC2
There’s more...
In step 5, you create some new RRs for the Cookham.Net zone, which you test in later steps. To ensure that AD and DNS replicate the new RRs from, in this case, DC1 to DC2, in step 6, you restart the DNS service on both DCs. This ensures that Windows replicates the zone information stored in AD if AD has not already replicated that information.
Configuring DNS Forwarding
When a DNS server gets a query for a resource record (RR) not held by the server, it can use recursion to discover a DNS server that can resolve the RR. If, for example, you use Resolve-DNSName to resolve www.packt.com, the configured DNS server may not hold a zone that would help. Your DNS service then looks to the DNS root servers to discover a DNS server that can via the recursion process. Eventually, the process finds a DNS server that can resolve the RR. Your DNS server then caches these details locally in the DNS server cache.
If you are resolving publicly available names, this process works great. But you might have internally supplied DNS names that DNS can’t resolve via the mechanism. An example might be when two companies merge. There may be internal hostnames (e.g., intranet.kapoho.com and intranet.reskit.org) that your organization’s internal DNS servers can resolve but are not available from publicly-facing DNS servers. In that scenario, you can set up conditional forwarding. Conditional forwarding enables one DNS server to forward a query to a DNS server or set of servers and not use recursion. You can learn a bit more about conditional forwarding here: https://medium.com/tech-jobs-academy/dns-forwarding-and-conditional-forwarding-f3118bc93984.
An alternative to using conditional forwarding is to use stub zones. You can learn more about the differences between conditional forwarding and stub zones here: https://blogs.msmvps.com/acefekay/2018/03/20/what-should-i-use-a-stub-conditional-forwader-forwarder-or-secondary-zone/.
Getting ready
In this recipe, you use DC1, a domain controller and DNS server for Reskit.Org. You have previously promoted DC1 to be a DC and installed/configured DNS using recipes earlier in this chapter and book.
How to do it...
- Obtaining the IP addresses of DNS servers for Packt.com
$NameServers = Resolve-DnsName -Name Packt.Com -Type NS | Where-Object Name -eq 'Packt.com' $NameServers - Obtaining the IPv4 addresses for these hosts
$NameServerIPs = foreach ($Server in $NS) { (Resolve-DnsName -Name $Server.NameHost -Type A).IPAddress } $NameServerIPs - Adding a conditional forwarder on
DC1$CFHT = @{ Name = 'Packt.Com' MasterServers = $NSIPS } Add-DnsServerConditionalForwarderZone @CFHT - Checking zone on
DC1Get-DnsServerZone -Name Packt.Com - Testing conditional forwarding
Resolve-DNSName -Name WWW.Packt.Com -Server DC1 |
 Format-Table
How it works...
In step 1, you resolve the name servers serving the Packt.com domain on the internet, and then you display the results like this:

Figure 5.50: Obtaining IP addresses of DNS servers for Packt.Com
In step 2, you use the DNS servers you just retrieved and resolved their IPv4 addresses from the hostnames (which you got in step 1). This step produces the following output:

Figure 5.51: Obtaining IPv4 addresses of DNS servers for Packt.Com
In step 3, which generates no output, you create a DNS forwarding zone for Packt.com, which you populate with the IP addresses returned in step 2.
In step 4, you view the conditional forwarder domain defined on DC1, with output like this:

Figure 5.52: Checking zone on DC1
With the final step, step 5, you resolve www.packt.com like this:

Figure 5.53: Testing conditional forwarding
There’s more...
In step 1, you discover the name server names for the DNS servers that serve Packt.com. In this case, these servers are part of Cloudflare’s distributed DNS service. For more information on how this service works, see https://www.cloudflare.com/dns/.
In step 2, you resolve those DNS server names into IP addresses. In step 3, you create a conditional forwarding domain that forwards queries for packt.com (such as www.packt.com) to one of the six IP addresses you saw in step 2.
In step 4, you view the conditional forwarding zone on DC1. Since the zone is not DS integrated, DNS does not replicate it to DC2. In production, you should repeat step 3 on DC2.
In step 5, you resolve www.packt.com via conditional forwarding.
Join our community on Discord
Join our community’s Discord space for discussions with the author and other readers:
