
14
Managing Windows Update Services
This chapter covers the following recipes:
- Installing Windows Server Update Services
- Configuring WSUS Update Synchronization
- Configuring the Windows Update Client
- Creating Computer Target Groups
- Configuring WSUS Automatic Approvals
- Managing WSUS Updates
Introduction
Keeping your client and server systems updated with patches and updates is an important task undertaken by Windows administrators. Windows Server Update Services (WSUS) is a feature of Windows Server 2019 that enables you to manage the download and distribution of updates to your organization’s computers.
In addition to updating Windows, WSUS enables you to manage patches and updates for various Microsoft software products. Thus, an update you download from Microsoft and distribute via WSUS may apply to Windows, Microsoft Office, and many other Microsoft software products.
This chapter shows how to install and configure the WSUS server and WSUS client computers. The recipes examine the management, approval, and installation of updates and how you can report on the status of update installation.
Note: Windows Update is one of the few Windows services you can not administer using PowerShell 7 directly. The design of the WSUS module means you can not use the cmdlets directly using PowerShell 7 or the Windows PowerShell compatibility mechanism. WSUS cmdlets use .NET Framework classes that the .NET team has not migrated to work with the open-source .NET implementation used by PowerShell 7. Additionally, the WSUS team designed the cmdlets, so you use object instance methods rather than cmdlets. Thus, if you load the module using the compatibility mechanism, the methods are lost, and you cannot use them directly within PowerShell 7. You can, however, create a remoting session using a Windows PowerShell endpoint and run these otherwise incompatible cmdlets within that remoting session.
This chapter demonstrates that you can manage WSUS using PowerShell 7 and Windows PowerShell remoting. This method is a lot more work, and it is more work to debug scripts – but it does work.
The systems used in the chapter
This chapter uses two primary hosts: SRV1 and WSUS1. You run recipes remotely from SRV1 against the WSUS host. You also need the domain’s domain controller, DC1, as well. The hosts used in this chapter are as shown here:

Figure 14.1: Hosts in use for this chapter
Installing Windows Server Update Services
WSUS is an installable feature within Windows Server 2022 that Windows setup does not install by default. To use Windows Update Services, you first install the WSUS Windows feature and do basic configuration and setup. Once installed, you can use the Windows PowerShell cmdlets to deploy WSUS in your environment.
In this recipe, you install WSUS and review the results of that installation. In subsequent recipes, you manage and use the WSUS service.
Note that this recipe uses remoting from SRV1 to WSUS1. The steps demonstrate the complexity of installing WSUS and configuring it for initial use in general and within PowerShell 7.
Getting ready
You run this recipe on SRV1, a domain-joined Windows Server 2022 host. The recipe also uses the WSUS1 server, another member server in the Reskit.Org domain. At the start of this recipe, WSUS1 has no additional features or software loaded.
How to do it...
- Creating a remoting session for
WSUS1$SessionHT = @{ ConfigurationName = 'microsoft.powershell' ComputerName = 'WSUS1' Name = 'WSUS' } $Session = New-PSSession @SessionHT - Installing
WSUSonWSUS1$ScriptBlock1 = { $InstallHT = @{ Name = 'UpdateServices' IncludeManagementTools = $true } Install-WindowsFeature @InstallHT | Format-Table -AutoSize -Wrap } Invoke-Command -Session $Session -ScriptBlock $ScriptBlock1 - Determining features installed on
WSUS1Invoke-Command -Session $Session -ScriptBlock { Get-WindowsFeature | Where-Object Installed | Format-Table } - Creating a folder for
WSUSupdate content onWSUS1$ScriptBlock2 = { $WSUSDir = 'C:WSUS' If (-Not (Test-Path -Path $WSUSDir -ErrorAction SilentlyContinue)) {New-Item -Path $WSUSDir -ItemType Directory | Out-Null} } Invoke-Command -Session $Session -ScriptBlock $ScriptBlock2 - Performing the post-installation configuration using
wsusutil.exe$ScriptBlock3 = { $WSUSDir = 'C:WSUS' $Child = 'Update ServicesToolswsusutil.exe' $CMD = Join-Path -Path "$env:ProgramFiles" -ChildPath $Child & $CMD Postinstall CONTENT_DIR="$WSUSDir" } Invoke-Command -ComputerName WSUS1 -ScriptBlock $ScriptBlock3 - Viewing the
WSUSwebsite onWSUS1Invoke-Command -ComputerName WSUS1 -ScriptBlock { Get-Website -Name ws* | Format-Table -AutoSize } - View the cmdlets in the
UpdateServicesmoduleInvoke-Command -ComputerName WSUS1 -ScriptBlock { Get-Command -Module UpdateServices | Format-Table -AutoSize } - Inspecting properties of the object created with
Get-WsusServerInvoke-Command -Session $Session -ScriptBlock { $WSUSServer = Get-WsusServer $WSUSServer.GetType().Fullname $WSUSServer | Select-Object -Property * } - Viewing details of the
WSUSserver objectInvoke-Command -Session $Session -ScriptBlock { ($WSUSServer | Get-Member -MemberType Method).count $WSUSServer | Get-Member -MemberType Method } - Viewing
WSUSserver configurationInvoke-Command -Session $Session -ScriptBlock { $WSUSServer.GetConfiguration() | Select-Object -Property SyncFromMicrosoftUpdate, LogFilePath } - Viewing product categories after initial install
Invoke-Command -Session $Session -ScriptBlock { $WSUSProducts = Get-WsusProduct -UpdateServer $WSUSServer "{0} WSUS Products discovered" -f $WSUSProducts.Count $WSUSProducts | Select-Object -ExpandProperty Product | Format-Table -Property Title, Description } - Displaying subscription information
Invoke-Command -Session $Session -ScriptBlock { $WSUSSubscription = $WSUSServer.GetSubscription() $WSUSSubscription | Select-Object -Property * | Format-List } - Getting latest categories of products available from Microsoft Update
Invoke-Command -Session $Session -ScriptBlock { $WSUSSubscription.StartSynchronization() Do { Write-Output $WSUSSubscription.GetSynchronizationProgress() Start-Sleep -Seconds 30 } While ($WSUSSubscription.GetSynchronizationStatus() -ne 'NotProcessing') } - Checking the results of the synchronization
Invoke-Command -Session $Session -ScriptBlock { $WSUSSubscription.GetLastSynchronizationInfo() } - Reviewing the categories of the products available after synchronization
Invoke-Command -Session $Session -ScriptBlock {
  $WSUSProducts = Get-WsusProduct -UpdateServer $WSUSServer
  "{0} Product found on WSUS1" -f $WSUSProducts.Count
  $WSUSProducts |
    Select-Object -ExpandProperty Product -First 25 |
      Format-Table -Property Title,
                              Description
}
How it works...
In step 1, you create a remoting session from SRV1 to WUS1. This step produces no console output. Next, in step 2, you install the Windows Update Services feature and the associated tools via the remoting session. The output looks like this:
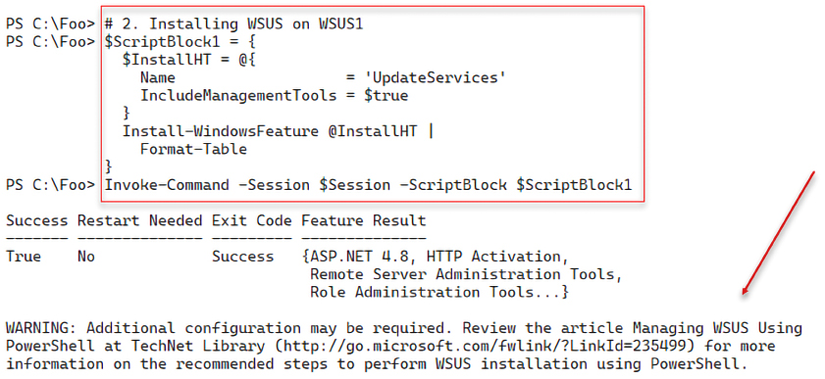
Figure 14.2: Installing WSUS on WSUS1 via remoting
When you install the Windows Update Services, the installation process adds several additional related services, as you can see in step 3, which looks like this:

Figure 14.3: Viewing the installed features on WSUS1
In step 4, you create a folder that you use to hold WSUS content on WSUS1. This step produces no console output.
In step 5, you perform the post-installation task using the wsusutil.exe console command, which produces some limited output like this:

Figure 14.4: Viewing Installed features on WSUS1
When you execute step 5, the wsusutil.exe utility creates an IIS website on WSUS1 to communicate with WSUS clients. In step 6, you view the site, as you can see here:

Figure 14.5: Viewing the WSUS website
In step 7, you examine the commands contained in the UpdateServices module you installed earlier (in step 1). The output of this step looks like this:
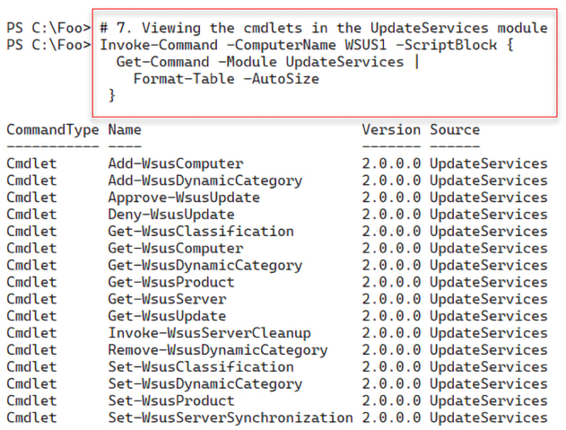
Figure 14.6: Viewing the WSUS cmdlets
You examine the key properties of your WSUS server, in step 8, by using the Get-WsusServer cmdlet. The cmdlet returns a UpdateServer object, which looks like this:

Figure 14.7: Viewing the WSUS server properties
The $WSUSServer object you instantiated in step 8 also contains many methods you can call to manage aspects of the WSUS server. There are a large number of methods, as you can see from the output of step 9:

Figure 14.8: Viewing the WSUS server object’s methods
A key troubleshooting feature of WSUS is the SoftwareDistribution.log. In step 10, you view the WSUS configuration to discover the filename, which looks like this:

Figure 14.9: Viewing the WSUS configuration
Following the initial installation and configuration in step 11, you can see that the WSUS1 server gets updates for a very small set of products (17 in all), as shown here:

Figure 14.10: Viewing the WSUS configuration
You can configure the WSUS server to subscribe to and automatically retrieve new updates. In step 12, you retrieve and view the WSUS server’s subscription details, which look like this:
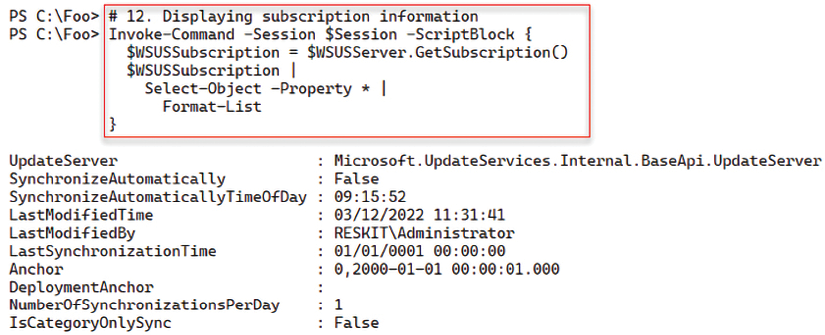
Figure 14.11: Viewing the WSUS subscription information
In step 13, you perform a full synchronization by invoking the StartSynchronization() method of the WSUS server object. This method invokes an asynchronous operation – after calling this method, WSUS carries out the server update process in the background. You can call the GetSynchronizizationStatus() method to view the status, as you can see in step 13.
The synchronization process is not overly fast and can take several hours to complete. Truncated for brevity, the output of this step looks something like this:

Figure 14.12: Synchronizing WSUS
After WSUS has completed the synchronization, in step 14, you review a summary of the results, showing the successful result. The output looks like this:
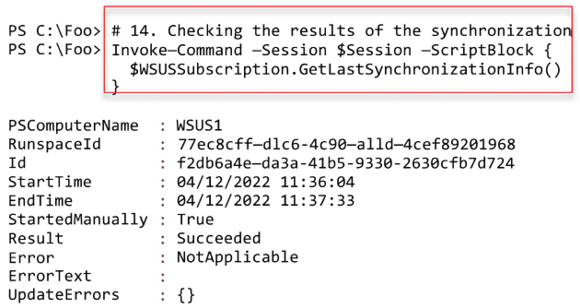
Figure 14.13: Reviewing results of the most recent synchronization
Now that this first full synchronization has taken place, WSUS can support a larger number of Microsoft products, as you can see in the output from step 15, which looks like this:

Figure 14.14: Reviewing product categories now available to WSUS
There’s more...
In step 2, you use the Install-WindowsFeature command to install WSUS. As you can see in the output, you must perform additional configuration before using WSUS, which you do in later recipe steps, particularly in step 5. Also, note that the URL shown in the output is invalid at the time of writing. Microsoft has removed the mentioned TechNet Library article; sadly, the associated content also appears lost.
In step 3, you create a folder to hold downloaded updates you intend to review and then deploy to your organization. This folder can get large, especially when you implement multilingual updates. You should hold your updates on a volume that is likely to have adequate space in the future. Making the volume fault-tolerant is also important as you plan and deploy WSUS.
In step 5, you run the wsusutil.exe command remotely on WSUS1 to complete the service installation. This executable comes with the WSUS installation. This command is useful and valuable because the WSUS team did not support certain operations via Windows PowerShell cmdlets. In this step, you run the command to perform the initial configuration of your WSUS server, including creating the WSUS database. If the command does not complete successfully, recovery is not particularly straightforward. If you use a VM to run WSUS1 (both in your testing and production scenario), taking VM snapshots after each step makes it much easier to recover.
In step 13, you perform a full sync with the Windows Update servers. The initial synchronization can take several hours. You may wish to change the value used in the Start-Sleep command to a larger value (otherwise, you could end up with thousands of lines of output!).
In this recipe, you installed WSUS on a single server. You can use WSUS on multiple servers, which is appropriate for supporting larger networks. You can set up a WSUS server to synchronize from other WSUS servers on the network, use web proxies, and work with SQL Server instead of the Windows Internal Database.
The objects created by WSUS are complex. In most cases, you can use standard PowerShell discovery techniques to discover more about these objects. There is more detailed information about the WSUS objects at https://learn.microsoft.com/previous-versions/windows/desktop/mt748187(v=vs.85). Microsoft last updated this documentation in 2016 and does not update it regularly. That said, the information is accurate for WSUS in Windows Server 2022.
Configuring WSUS Update Synchronization
As you can see, WSUS can update hundreds of products, although many may not be useful in your organization. After you install WSUS and do the initial synchronization, you can configure WSUS to identify the specific products for which your organization requires product updates. You can also define the classifications of updates WSUS should download.
Once you define the updates to be obtained (and later provided to WSUS clients), you can configure WSUS to synchronize subsequent updates manually. You can also build an update schedule and have WSUS update automatically. In this way, you can have WSUS download only the updates for the product categories and the classifications you have selected at your chosen time. The first initial synchronization can take hours, depending on your selections. Subsequent synchronizations pull only the newest updates since the last synchronization.
Getting ready
You run this recipe on SRV1, a domain-joined Windows Server 2022 host. The recipe also uses the WSUS1 server, another member server in the Reskit.Org domain. At the start of this recipe, WSUS1 has no additional features or software loaded.
How to do it...
- Creating a remote session on
WSUS1$Session = New-PSSession -ComputerName WSUS1 - Locating versions of Windows Server supported by Windows Update
Invoke-Command -Session $Session -ScriptBlock { Get-WsusProduct | Where-Object -FilterScript {$_.product.title -match '^Windows Server'} | Select-Object -ExpandProperty Product | Format-Table Title, UpdateSource } - Discovering updates for Windows 11
Invoke-Command -Session $Session -ScriptBlock { Get-WsusProduct -TitleIncludes 'Windows 11' | Select-Object -ExpandProperty Product | Format-Table -Property Title } - Create and view a list of software product titles to include
Invoke-Command -Session $Session -ScriptBlock {$Products = (Get-WsusProduct | Where-Object -FilterScript {$_.product.title -match '^Windows Server'}).Product.Title $Products += @('Microsoft SQL Server 2016','Windows 11') $Products } } - Assigning the desired products to include in Windows Update
Invoke-Command -Session $Session -ScriptBlock { Get-WsusProduct | Where-Object {$PSItem.Product.Title -in $Products} | Set-WsusProduct } - Getting
WSUSclassificationInvoke-Command -Session $Session -ScriptBlock { Get-WsusClassification | Select-Object -ExpandProperty Classification | Format-Table -Property Title, Description -Wrap } - Building a list of desired update classifications
Invoke-Command -Session $Session -ScriptBlock { $UpdateList = @('Critical Updates', 'Definition Updates', 'Security Updates', 'Service Packs', 'Update Rollups', 'Updates') } - Setting the list of desired update classifications in
WSUSInvoke-Command -Session $Session -ScriptBlock { Get-WsusClassification | Where-Object {$_.Classification.Title -in $UpdateList} | Set-WsusClassification } - Getting synchronization details
Invoke-Command -Session $Session -ScriptBlock { $WSUSServer = Get-WsusServer $WSUSSubscription = $WSUSServer.GetSubscription() } - Starting synchronizing available updates
Invoke-Command -Session $Session -ScriptBlock { $WSUSSubscription.StartSynchronization() } - Looping and waiting for synchronization to complete
Invoke-Command -Session $Session -ScriptBlock { $IntervalSeconds = 15 $NP = 'NotProcessing' Do { $WSUSSubscription.GetSynchronizationProgress() Start-Sleep -Seconds $IntervalSeconds } While ($WSUSSubscription.GetSynchronizationStatus() -eq $NP) } - Synchronizing the updates which can take a long while to complete
Invoke-Command -Session $Session -ScriptBlock { $IntervalSeconds = 15 $NP = 'NotProessing' # Wait for synchronizing to start Do { Write-Output $WSUSSubscription.GetSynchronizationProgress() Start-Sleep -Seconds $IntervalSeconds } While ($WSUSSubscription.GetSynchronizationStatus() -eq $NP) # Wait for all phases of process to end Do { Write-Output $WSUSSubscription.GetSynchronizationProgress() Start-Sleep -Seconds $IntervalSeconds } Until ($WSUSSubscription.GetSynchronizationStatus() -eq $NP) } - Checking the results of the synchronization
Invoke-Command -Session $Session -ScriptBlock { $WSUSSubscription.GetLastSynchronizationInfo() } - Configure automatic synchronization to run once per day
Invoke-Command -Session $Session -ScriptBlock {
  $WSUSSubscription = $WSUSServer.GetSubscription()
  $WSUSSubscription.SynchronizeAutomatically = $true
  $WSUSSubscription.NumberOfSynchronizationsPerDay = 1
  $WSUSSubscription.Save()
}
How it works...
In step 1, you create a remoting session from SRV1 to WUS1. This step produces no console output. Next, in step 2, you determine the different versions of Windows Server supported by WSUS, with output that looks like this:

Figure 14.15: Reviewing product categories now available to WSUS
In step 3, you view the version(s) of Windows 11 that you can update using WSUS and Windows Update, like this:

Figure 14.16: Versions of Windows 11 supported by WSUS
In most cases, you probably do not want or need to support all Microsoft products. Rather, you most likely want to get updates for a subset of products that exist in your environment. To achieve that, you begin, in step 4, by creating a list of the products you DO want to support. In this step, you include all versions of Windows Server, SQL Server 2016, and all versions of Windows 11, which looks like this:

Figure 14.17: Creating a list of products for WSUS to support
In step 5, you specify that your WSUS server should get updates for the products in the $Products array you created in the previous step. There is no output from this step.
For any given product supported, Windows Update can provide many different kinds, or classifications, of updates. In step 6, you get the classifications of update types available, which look like this:
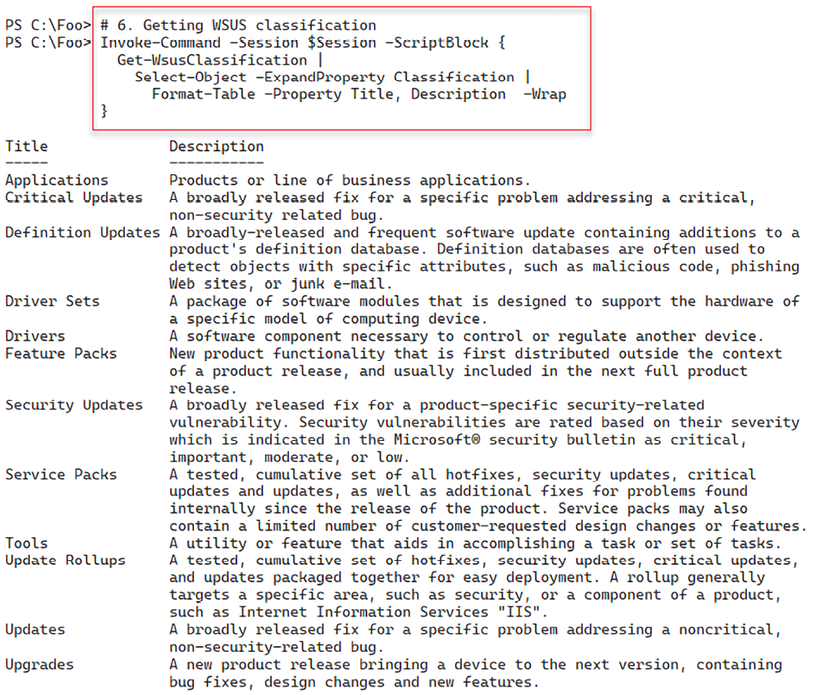
Figure 14.18: Reviewing WSUS update classifications
You may not want all these kinds of updates. For example, you may wish not to download driver updates, perhaps preferring manual updates for drivers if/when needed. To achieve this, in step 7, you build a list of the update classifications you wish WSUS to support. In step 8, you configure your WSUS server with this list. In step 9, you obtain the synchronization status of WSUS1, and in step 10, you initiate synchronization of update categories of WSUS1 from Windows Update. Then in step 11, you wait for the synchronization to complete. These four steps produce no console output.
In step 12, you initiate a loop that gets the category synchronization status. If category updating is still processing, wait a bit longer. This synchronization should not take too long, but be patient. The console output looks like this:

Figure 14.19: Synchronizing update categories
With the update categories synchronized, you can now synchronize the updates available to your WSUS server – updates for specified properties with a specific update category. You do this in step 13. This step can take a long time. The (trimmed) output from this step looks like this:

Figure 14.20: Synchronizing updates
Once this synchronization is complete, in step 14, you view the WSUS synchronization status, which now looks like this:

Figure 14.21: Viewing synchronization status
In step 14, you configure WSUS1 to download new updates every day for those products and classifications you previously specified. This step produces no output.
There’s more...
In step 2, you examined the updates available for all versions of Windows Server. As you can see, this even includes very old versions of Windows Server, such as Windows Server 2003, which is now out of support and, hopefully, you no longer use within your organization.
Inevitably, some organizations are still running Windows Server 2003, hopefully for good business reasons. It’s comforting to know that you can still get updates even if you should have updated or replaced them years ago. That said, it would be highly unusual for Microsoft to issue further updates for such old and out-of-support versions of Windows.
WSUS supports a range of products and different classifications of updates. Consider carefully what products you wish to get updates for and what update types to support. You could err on the side of caution, but that can involve many updates you may never need.
In step 13, you see the synchronization status every 15 seconds. At each check, you can see how many updates have been downloaded. The initial update downloads can take a long time.
Configuring the Windows Update Client
By default, Windows computers, both the server and client version, download updates from Microsoft’s Windows Update servers on the internet. To configure Windows hosts to take updates from an internal WSUS server, you need to update the configuration of the built-in Windows Update Client in Windows.
Using Group Policy is the easiest method of configuring the Windows Update Client. You create a Group Policy Object (GPO), configure the policy with server names, and so on, and then assign the policy.
You can apply a single GPO to the domain as a whole (configuring Windows Update Client on every domain-joined host) or apply policies at the site or OU level, depending on the complexity of your WSUS implementation. A small company located on a single site might use just one policy at the domain or site level. Large multinational organizations may have multiple WSUS servers around the globe and need multiple Windows Update policies applied throughout a large multi-forest network.
In this recipe, you configure SRV1 to get updates from the WSUS server WSUS1.
Getting ready
You run this recipe on SRV1 after you have installed and configured WSUS on the WSUS1 server.
How to do it...
- Ensuring the
GPmanagement tools are available onSRV1Install-WindowsFeature -Name GPMC -IncludeManagementTools | Out-Null - Creating a new policy and linking it to the domain
$PolicyName = 'Reskit WSUS Policy' New-GPO -Name $PolicyName - Configuring
SRV1to useWSUSfor updates$WSUSKEY = 'HKLMSoftwarePoliciesMicrosoftWindowsWindowsUpdateAU' $RVHT1 = @{ Name = $PolicyName Key = $WSUSKEY ValueName = 'UseWUServer' Type = 'DWORD' Value = 1 } Set-GPRegistryValue @RVHT1 | Out-Null - Setting
AUoptions$KEY2 = 'HKLMSoftwarePoliciesMicrosoftWindowsWindowsUpdateAU' $RVHT2 = @{ Name = $PolicyName Key = $KEY2 ValueName = 'AUOptions' Type = 'DWORD' Value = 2 } Set-GPRegistryValue @RVHT2 | Out-Null - Setting the
WSUSserver URL$Session = New-PSSession -ComputerName WSUS1 $WSUSServer = Invoke-Command -Session $Session -ScriptBlock { Get-WSUSServer } $FS = "http{2}://{0}:{1}" $N = $WSUSServer.Name $P = 8530 # default WSUS port $WSUSURL = $FS -f $n, $p, ('','s')[$WSUSServer.UseSecureConnection] $KEY3 = 'HKLMSoftwarePoliciesMicrosoftWindowsWindowsUpdate' $RVHT3 = @{ Name = $PolicyName Key = $KEY3 ValueName = 'WUServer' Type = 'String' Value = $WSUSURL } Set-GPRegistryValue @RVHT3 | Out-Null - Setting the
WUstatus server URL$KEY4 = 'HKLMSoftwarePoliciesMicrosoftWindowsWindowsUpdate' $RVHT4 = @{ Name = $PolicyName Key = $KEY4 ValueName = 'WUStatusServer' Type = 'String' Value = $WSUSURL } Set-GPRegistryValue @RVHT4 | Out-Null - Viewing a report on the
GPO$RHT = @{ Name = $PolicyName ReportType = 'Html' Path = 'C:fooout.html' } Get-GPOReport @RHT Invoke-Item -Path $RHT.Path
How it works...
In step 1, you install the Group Policy Management Console and related tools (in case you have not previously installed the feature on this host in previous recipes). This step creates no console output.
In step 2, you create a new GPO in the Reskit.Org domain, generating output like this:

Figure 14.22: Creating a new GPO
In step 3, you configure SRV1 to accept updates from WSUS (versus Microsoft Update). In step 4, you set the options for Windows Update to download and install any approved updates. In step 5, you create and configure Windows Update with the URL to use to get WSUS-approved updates. In step 6, you specify the status server (the server to which Windows Update sends status reports on updates). These four steps create no output.
In the final step, step 7, you generate and view a management report showing the policy details. There is no console output, but this step opens a browser window with the report like this:

Figure 14.23: Viewing the GPO
There’s more...
In step 2, you created the WSUS policy and linked it to the domain. For large organizations, separate policies may be appropriate, each connected to separate OUs or sites in your AD. This can facilitate distributed administration where different AD OUs or AD sites might need different settings, and for very large organizations, multiple independent WSUS implementations worldwide.
In this recipe, you configured the GPO object with four registry-based settings. The recipe used Out-Null to limit the amount of output. If you experiment with this recipe, consider removing the pipe to Null to see the output generated.
In step 7, you view the GPO report. This report shows what settings are included in the GPO.
Creating Computer Target Groups
With the recipes so far in this chapter, you have set up a WSUS server and created a GPO to configure the Windows Update Client on your computers. The next step is to create target groups—the computers you plan to use when targeting WSUS updates.
In any organization, different groups of hosts can have other update requirements. Your Windows client hosts run software such as Microsoft Office that you do not normally see on a server.
Your mission-critical servers might require a separate testing and sign-off process for updates that you then approve for use. For efficient management of updates, you define target groups (for example, domain controllers (DCs), SQL servers, and so on) and then determine the computers in the target group.
In this recipe, you create a target group for domain servers, including SRV1 and SRV2.
Getting ready
You run this recipe on SRV1, with SRV1 and WSU1 online. You should have installed and configured WSUS on WSUS1. Additionally, you need at least one of the domain controllers in the Reskit.org domain up and running.
How to do it...
- Creating a remoting session to
WSUS1$SessionHT = @{ ConfigurationName = 'microsoft.powershell' ComputerName = 'WSUS1' Name = 'WSUS' } $Session = New-PSSession @SessionHT - Creating a
WSUScomputer target group for serversInvoke-Command -Session $Session -ScriptBlock { $WSUSServer = Get-WsusServer -Name WSUS1 -port 8530 $WSUSServer.CreateComputerTargetGroup('Domain Servers') } - Viewing all computer target groups on
WSUS1Invoke-Command -Session $Session -ScriptBlock { $WSUSServer.GetComputerTargetGroups() | Format-Table -Property Name } - Finding the servers whose name includes
SRVInvoke-Command -Session $Session -ScriptBlock { Get-WsusComputer -NameIncludes SRV | Format-Table -Property FullDomainName, OSDescription } - Adding
SRV1,SRV2to theDomain Serverstarget groupInvoke-Command -Session $Session -ScriptBlock { Get-WsusComputer -NameIncludes SRV | Where-Object FullDomainName -match '^SRV' | Add-WsusComputer -TargetGroupName 'Domain Servers' } - Getting the
Domain Serverscomputer target groupInvoke-Command -Session $Session -ScriptBlock { $SRVGroup = $WSUSServer.GetComputerTargetGroups() | Where-Object Name -eq 'Domain Servers' } - Finding the computers in the group
Invoke-Command -Session $Session -ScriptBlock {
  Get-WsusComputer |
    Where-Object ComputerTargetGroupIDs -Contains $SRvGroup.id |
      Sort-Object -Property FullDomainName |
          Format-Table -Property FullDomainName, ClientVersion,
                                 LastSyncTime
}
How it works...
In step 1, you create a remoting session to WSUS1, using a Windows PowerShell 5.1 endpoint. This step creates no console output.
In step 2, you create a new computer target group called Domain Servers, which looks like this:

Figure 14.24: Creating a computer target group
In step 3, you use the $WSUSServer object to get and then display the current target groups, including the one you just created, which looks like this:

Figure 14.25: Viewing computer target groups on WSUS1
In step 4, you retrieve the computers whose name contains SRV and that have registered with the WSUS server, which looks like this:

Figure 14.26: Viewing computer target groups on WSUS1
In step 5, which creates no output, you add just the two servers (SRV1 and SRV2) into the Domain Servers computer target group. In step 6, which also creates no console output, you instantiate the Domain Servers target group and store it in the SRVGroup variable.
In the final step, you view the servers in the Domain Servers target group with output like this:

Figure 14.27: Viewing members of the Domain Servers computer target group
There’s more...
In step 2, you create a target group. In WSUS, a target group is a collection of computer systems that an administrator defines and uses to specify the computers that should receive updates from the WSUS server. You can use the target groups that organize computers based on various criteria, such as their location, role, or hardware configuration. This allows you to configure which specific updates are needed by each target group.
In step 7, you display the computers in the Domain Servers computer target group. Once you create the GPO object (as in step 2), it can take 24 hours or longer to have all the computers in your domain begin working with WSUS for the computers in the Domain Servers target group. Since it can take a lot of time to set up a WSUS server and create and populate computer target groups, it may be a task you leave for a long weekend.
Configuring WSUS Automatic Approvals
Microsoft’s Windows Update can produce many updates for you to manage (inspect, accept/decline, and deploy). Some update types, for example, critical updates, may be ones you want to automatically approve, so as soon as you receive one of these, you can start deploying it.
Configuring automatic approvals can be a good thing in that you ask WSUS to push more urgent updates automatically. At the same time, automatically pushing an update can be problematic if, for some reason, the update has issues.
Getting ready
You run this recipe on SRV1 after installing and configuring WSUS on WSUS1.
How to do it...
- Creating a remoting session to
WSUS1$SessionHT = @{ ConfigurationName = 'microsoft.powershell' ComputerName = 'WSUS1' Name = 'WSUS' } $Session = New-PSSession @SessionHT - Creating the auto-approval rule
Invoke-Command -Session $Session -ScriptBlock { $WSUSServer = Get-WsusServer $ApprovalRule = $WSUSServer.CreateInstallApprovalRule('Critical Updates') } - Defining a deadline for the rule
Invoke-Command -Session $Session -ScriptBlock { $Type = 'Microsoft.UpdateServices.Administration.' + 'AutomaticUpdateApprovalDeadline' $RuleDeadLine = New-Object -Typename $Type $RuleDeadLine.DayOffset = 3 $RuleDeadLine.MinutesAfterMidnight = 180 $ApprovalRule.Deadline = $RuleDeadLine } - Adding update classifications to the rule
Invoke-Command -Session $Session -ScriptBlock { $UpdateClassifications = $ApprovalRule.GetUpdateClassifications() $CriticalUpdates = $WSUSServer.GetUpdateClassifications() | Where-Object -Property Title -eq 'Critical Updates' $UpdateClassifications.Add($CriticalUpdates) | Out-Null $Defs = $WSUSServer.GetUpdateClassifications() | Where-Object -Property Title -eq 'Definition Updates' $UpdateClassifications.Add($Defs) | Out-Null $ApprovalRule.SetUpdateClassifications($UpdateClassifications) } - Assigning the rule to a computer target group
Invoke-Command -Session $Session -ScriptBlock { $Type = 'Microsoft.UpdateServices.Administration.'+ 'ComputerTargetGroupCollection' $TargetGroups = New-Object $Type $TargetGroups.Add(($WSUSServer.GetComputerTargetGroups() | Where-Object -Property Name -eq 'Domain Servers')) $ApprovalRule.SetComputerTargetGroups($TargetGroups) | Out-Null } - Enabling the rule
Invoke-Command -Session $Session -ScriptBlock { $ApprovalRule.Enabled = $true $ApprovalRule.Save() } - Getting a list of approval rules
Invoke-Command -Session $Session -ScriptBlock{
  $WSUSServer.GetInstallApprovalRules()   |
    Format-Table -Property Name, Enabled, Action
}
How it works...
In this recipe, you configure automatic approval for certain updates. This rule automatically approves updates that are either critical updates or definition updates. Updates of these two types you approve for use by clients.
In step 1, you create a PowerShell remoting session on the WSUS1 server using a Windows PowerShell remoting endpoint. In step 2, you create an in-memory object for an approval rule. Next, in step 3, you define a deadline for the rule. In step 4, you add some update classifications to the rule. Then, in step 5, you assign the rule to a computer target group. In step 5, you enable this new approval rule and save it. These six steps produce no output.
In step 7, you get a list of the current approval rules on WSUS1, with output like this:

Figure 14.28: Viewing a list of approval rules
There’s more...
For many operations, the WSUS team did not provide cmdlets and also did not provide GUI support. Instead, you need to rely on the properties and particularly the methods of many WSUS objects. A key object is the WSUS server object. This object, which you instantiate using the Get-WSUSServer cmdlet, contains methods such as GetInstallApprovalRules(), which gets the installed approval rules. The WSUS team chose not to create a Get-InstallApprovalRule cmdlet.
How you write scripts to manage WSUS is similar to how you might have developed older-style Windows applications using the Component Object Model (COM). PowerShell’s built-in help system does not provide much assistance in discovering details about the methods or how to use them. There is little current, up-to-date documentation on the methods and objects either. This approach makes it harder to access all of the richness of WSUS simply through cmdlets.
Managing WSUS Updates
Microsoft produces a large number of updates and has ever since Microsoft first introduced WSUS. You can manage these updates via the GUI or PowerShell. As with other aspects of managing WSUS, managing updates via PowerShell means using the WSUS server object and its associated methods.
Getting ready
You run this recipe on SRV1 after installing and configuring WSUS on WSUS1.
How to do it...
- Creating a remoting session to
WSUS1$SessionHT = @{ ConfigurationName = 'microsoft.powershell' ComputerName = 'WSUS1' Name = 'WSUS' } $Session = New-PSSession @SessionHT - Viewing the status of
WSUS1Invoke-Command -Session $Session -ScriptBlock { $WSUSServer = Get-WsusServer $WSUSServer.GetStatus() } - Viewing computer targets
Invoke-Command -Session $Session -ScriptBlock { $WSUSServer.GetComputerTargets() | Sort-Object -Property FullDomainName | Format-Table -Property FullDomainName, IPAddress, Last* } - Searching for updates with titles containing
Windows Server 2022Invoke-Command -Session $Session -ScriptBlock { $Title = 'Windows Server 2022' $Updates = 'Security Updates' $SecurityUpdates = $WSUSServer.SearchUpdates($Title) } - Viewing the matching updates (first 10)
Invoke-Command -Session $Session -ScriptBlock { $SecurityUpdates | Sort-Object -Property Title | Select-Object -First 10 | Format-Table -Property Title, Description } - Selecting one of the updates to approve based on the Knowledge Based (KB) article ID
Invoke-Command -Session $Session -ScriptBlock { $SelectedUpdate = $SecurityUpdates | Where-Object KnowledgebaseArticles -eq 5019080 } - Defining the computer target group
Invoke-Command -Session $Session -ScriptBlock { $SRVTargetGroup = $WSUSServer.GetComputerTargetGroups() | Where-Object -Property Name -eq 'Domain Servers' } - Approving the update for installation in the target group
Invoke-Command -Session $Session -ScriptBlock { $SelectedUpdate.Approve('Install',$SRVTargetGroup) } - Selecting one of the updates to decline based on a KB article ID
Invoke-Command -Session $Session -ScriptBlock { $DeclinedUpdate = $SecurityUpdates | Where-Object -Property KnowledgebaseArticles -eq 5019080 } - Declining the update
Invoke-Command -Session $Session -ScriptBlock {
  $DeclinedUpdate.Decline($DCTargetGroup)
}
How it works...
In step 1, you create a PowerShell remoting session on the WSUS1 server using a Windows PowerShell remoting endpoint. In step 2, you use the Get-WsusServer cmdlet to instantiate a UpdateServer object inside the persistent remoting session to WSUS1. This object and its methods are at the core of automating WSUS. You then use the GetStatus() method to return the status of your WSUS server, which looks like this:

Figure 14.29: Viewing status of WSUS1
In step 3, you use the GetComputerTargets() method to retrieve the names of the host computers served by your WSUS server, which looks like this:

Figure 14.30: Viewing WSUS computers
In step 4, you use the SearchUpdates() method to get the security updates for hosts running Windows Server 2022. This step produces no output. In step 5, you review the first 10 security updates for Windows Server 2022, which looks like this:

Figure 14.31: Viewing available updates
In step 6, you select a specific update based on a KB article number. In step 7, you define a target group to which to apply the selected update. These two steps produce no output.
In step 8, you approve this selected patch for installation for all members of the Domain Servers computer target groups. The output of this step looks like this:

Figure 14.32: Approving an update explicitly
In step 9, select an update you don’t wish to install. This step produces no output. In step 10, you decline that update for the Domain Servers computer target group, which also creates no console output.
There’s more...
In step 4, you examined the security updates for Windows Server 2022. You could also have looked for any updates or critical updates. You can also update this step to search for different targets, such as Windows 10 or Office.
In step 6, you selected a specific update based on a KB article ID that you want to approve explicitly. Suppose you are an IT pro responsible for Windows Update Services inside your organization. In that case, you must keep up to date on critical updates and deploy urgent patches as quickly as possible.
In step 9, you declined a specific update for one computer target group, also based on the KB article number. As you administer WSUS, you may discover certain updates that you can decline, since they do not impact certain target groups, or experience says they are not good to deploy in your organization. Keeping on top of which patches to approve or decline can be a lot of work, but it is vital to ensure that your systems are updated promptly.
Join our community on Discord
Join our community’s Discord space for discussions with the author and other readers:
