
4
Importing and Tagging Your Character
With our PSD file streamlined and ready, we can now step over to Character Animator and begin the tagging process. Tagging is the process where we identify layers and points so Character Animator knows what to do with them. Some of the work we did in the previous chapter will help us here, as Character Animator will automatically tag some layers because of the way they’re named.
In this chapter, we will learn about the following:
- Adjusting the rig in Character Animator
- Tagging the mouth and head
- Tagging body parts
Technical requirements
We will use both Character Animator and Photoshop in this chapter, so have both apps ready and let’s get going!
Adjusting the rig in Character Animator
In the previous chapter, we went into Photoshop and made adjustments to a rig to make it more friendly for Character Animator. While this is the preferred way, you can make minor layer adjustments in Character Animator as well. This can be nice for quick fixes but lacks granular control. You can also change the PSD in Photoshop and the file will update in real time in Character Animator.
To see all this in action, let’s import our character first.
Importing Chaz into Character Animator
We imported a .svg file in Chapter 2, so we have some knowledge of how to import a character. Here is a refresher:
- Create a new project by going to File > New Project (or by pressing Ctrl + Alt + N or ⌘ + ⌥ + N). This will allow us to start with a clean slate.
- Save the project in a safe place and name it Chat_with_Chaz.
- Import Chaz_Host_v2.psd or the file you worked on in the previous chapter by double-clicking on the Project panel or using Ctrl + I, or ⌘ + I.
- Rename the imported PSD file to CHAZ by right-clicking and choosing Rename.
- If not already displayed, double-click on CHAZ in the Project panel to reveal its layers and design.
Once complete, we see the following interface:
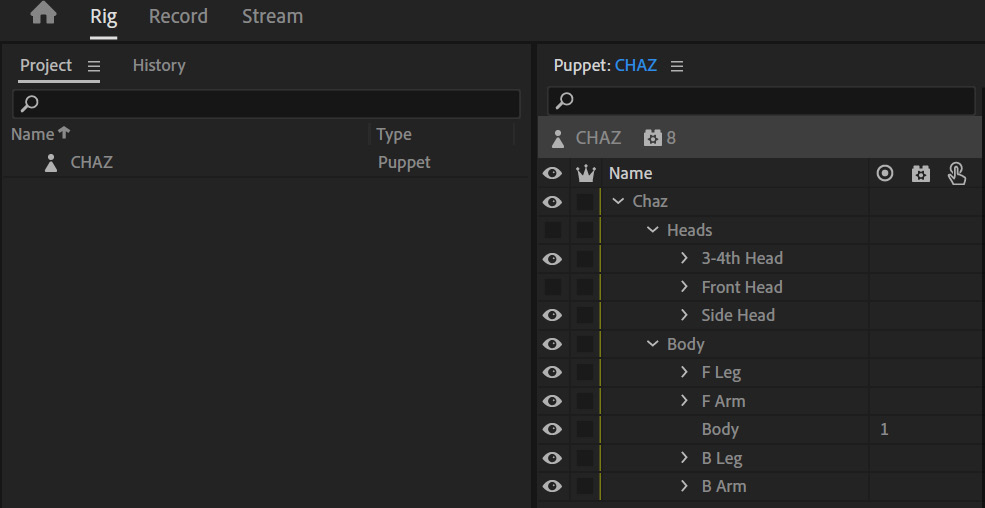
Figure 4.1: Chaz rig’s layers revealed in the Rig tab
You will also see the character appear in the Rig tab. The character should look the same as they did in Photoshop.

Figure 4.2: Chaz inside of the Rig tab
With the character imported into Character Animator, we can make some modifications.
Making layer changes in Character Animator
With the CHAZ file, we can see the layers. The order and name of these layers should seem familiar, as it’s the same list from Photoshop.
You may recall that we created independent groups in the rig using a + sign in the name. These layers act differently and allow them to work without interference from other layers. It’s important to know how to identify and change independence in Character Animator. Here’s how we can do that:
- Expand the Heads group to reveal the three head subgroups.
- Expand the 3-4th Head group. This will reveal Right Eyebrow.
- To the left of Right Eyebrow, there should be a crown icon, which shows independence. To toggle independence, just click the crown.

Figure 4.3: When the crown is white (or yellow when selected), the layer is independent
When we toggle independence, it will not reflect this change in the original .psd file. We’re essentially overlaying new rules on top of the original.
However, if we go back to the .psd file in Photoshop and make a change, once we hit Save, it will instantly reflect the change in Character Animator. To see an example of this, follow these steps:
- Open Chaz_Host_v2.psd in Photoshop. To do this from Character Animator, right-click on CHAZ in the Project panel and choose Edit Original (or press Ctrl + E or ⌘ + E):

Figure 4.4: Right-clicking on the puppet reveals four useful options
- Click the eye icon next to the Front Head phase to ensure it is visible
- Now open Glasses 1.png in Photoshop as well (the image is also in the book files):

Figure 4.5: A stylish pair of glasses
- Select Layer 1 for Glasses 1.png and press Ctrl + C or ⌘ + C to copy the layer.
- Go over to Chaz_Host_v2.psd:
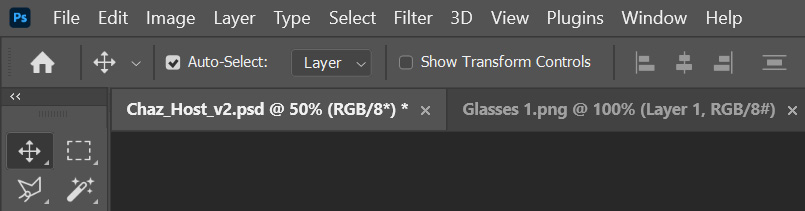
Figure 4.6: It’s easy to work between two projects in Photoshop with the tabs
- Paste with Ctrl + V, or ⌘ + V.
- Rename Layer 1 to Glasses:

Figure 4.7: Our layer structure will transfer from Photoshop to Character Animator seamlessly
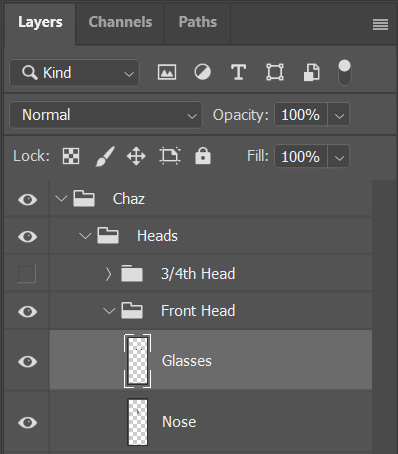
Figure 4.8: Glasses will sit on top of the list under Front Head
- From here, using the Free Transform tool, resize and move the glasses onto Chaz’s face in the front view:

Figure 4.9: Glasses placed on the Front Head face
- Save the file with Ctrl + S, or ⌘ + S.
- Go back to Character Animator. You should see the rig refresh, with the new layer present:

Figure 4.10: Character Animator will refresh the file when changes are made to the .psd file
Not only will the layers update to reflect the current .psd version, but the character’s appearance will reflect the change, as well.

Figure 4.11: What Chaz looks like in Character Animator. The yellow outline indicates his boundaries when all layers are accounted for
This can be of great use if you need to make additions or minor changes. Just note that if you move ahead with rigging and later decide to make big changes, such as character proportions, you may have to go back to your rig to redo it to accommodate those changes. That’s why it’s always best to lock down the key components of your design before proceeding to animation.
Creating PSD versions
Let’s say when you change your rig, you don’t want to override the original. This may be useful if you’re unsure of your changes and want to keep the original design as a backup. Here’s something we can do:
- Ensure Chaz_Host_v2.psd is open in Photoshop.
- Use Ctrl + Shift + S or ⌘ + Shift + S to save a copy of the file.
- Name the new file Chaz_Host_v2_with_glasses.psd:

Figure 4.12: Saving a copy of a .psd file
- When asked about compatibility, just press OK.
- Still in Photoshop, press Ctrl + O, or ⌘ + O to prompt the Open File window.
- Open Chaz_Host_v2.psd again:

Figure 4.13: Versions of .psd files follow a similar naming style to the versions in Character Animator
- Click on the Glasses layer and press the Delete key on the keyboard.
- Save the new file with Ctrl + S, or ⌘ + S.

Figure 4.14: You can change the .psd path at anytime by clicking on the file link.
What we’ve done here is create a new rig with glasses while retaining the original without. We can swap between these puppets if needed. To do this, follow these steps:
- Go back to Character Animator. It may take a moment for your rig to refresh and remove the Glasses layer.
- Click once on CHAZ in the Project panel.
- In the upper-right, under Properties, find the subcategory titled Puppet:

Figure 4.15: This links to your source .psd
- Underneath the Puppet subcategory is a file path, for the .psd file that Character Animator is currently reading. Click on that link and choose Chaz_Host_v2_with_glasses.psd from the file browser:

Figure 4.16: We will want to bring the rig with glasses in
The puppet will refresh and the glasses should be back in the layer list.
Again, this is useful if you change a rig but don’t want to alter the original, as you never know when you may need to reference it again.
We may end up making minor adjustments in Photoshop as we continue to work. That’s why it’s important to create a breadcrumb trail of files in case you need to step back. Remember, we can create versions of the project in Character Animator as well.
Next, we will prepare the head and mouth of our rig using tags.
Tagging the head and mouth
While some of the naming conventions we used for our layers will help Character Animator identify and implement features, some areas still need a little work from us. Tagging is the practice of adding identifiers to existing layers so that Character Animator can automate more of the animation process. To practice this, we’re going to tag the head phases and the mouth.
Switching the tag view
You have two ways of working with tags in Character Animator. We will be taking a look at both of these methods. To tag the head, do the following:
- Make sure the Rig tab is open and the CHAZ puppet is visible.
- Then click on the Heads group.
A diagram will appear on the side labeled Tags, representing a character:
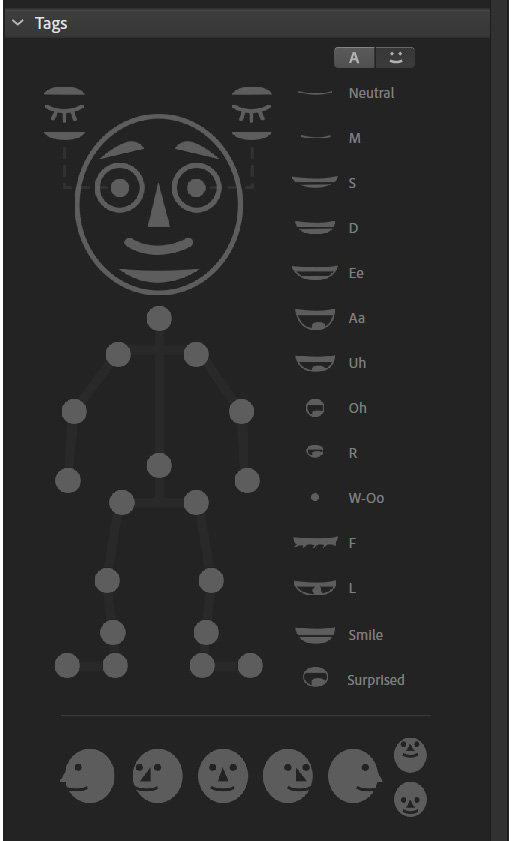
Figure 4.17: The Show Tags as Pictures view
- At the top right of this panel are two buttons. The Smile button is the current view we’re on:
- The Smile button represents the Show Tags as Pictures option
- The A button represents the Show Tags as Text option
Smile is the current view we’re on, so click on the A to change the tag view:

Figure 4.18: The Show Tags as Text option
The list view is harder to decipher, especially for newcomers. We will use Show Tags as Pictures moving forward, but you can use Show Tags as Text if you wish.
Understanding left and right tags
With Character Animator, when we tag something as left or right, we are referring to the character’s left or right, which means that what’s left on our screen is actually right for the character.
As an example, under 3-4th Head, click on Right Eye.

Figure 4.19: The screen’s left is the character’s right
You’ll see that the selected eye is on the left of the screen (be assured, this isn’t an error in the naming convention; this is correct):

Figure 4.20: Note how the character’s right eye, outlined in yellow, sits on our left
What about Side Head? We will dig into this more when creating a head turn, but Side Head has the character looking to the right. That means the eye and eyebrow visible are on his left:
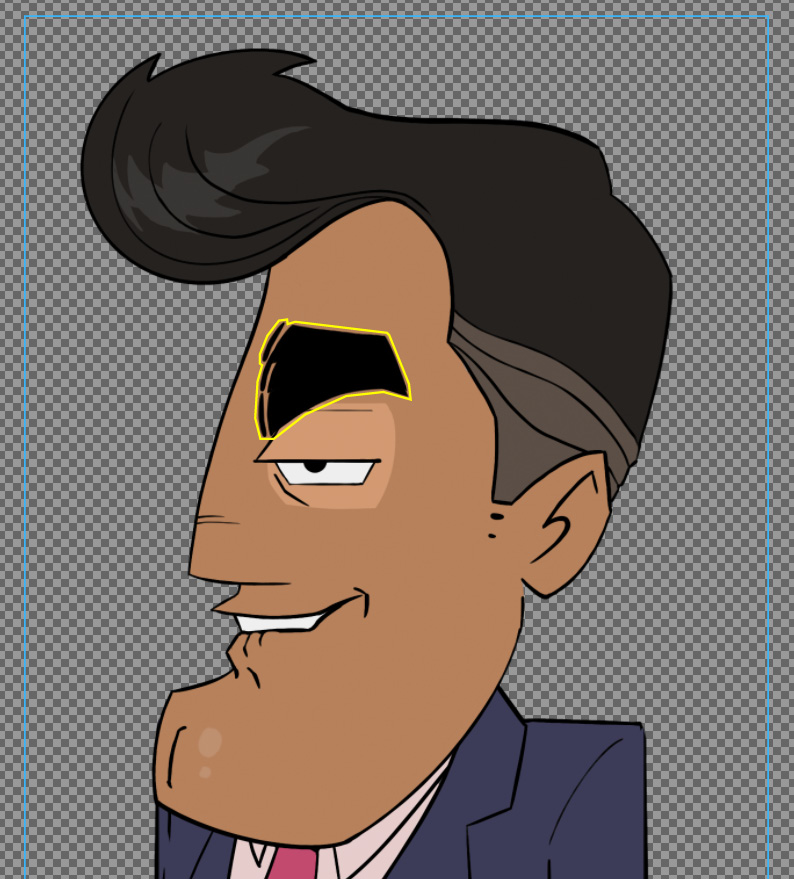
Figure 4.20: Luckily, we only need to deal with one eye and brow with the side view
So, when the time comes to tag that view, we know what direction we need to account for.
Tagging head layers
Next, we will tag the main Heads group and the three phases:
- Under the Puppet’s layers, click on the Heads group:

Figure 4.22: Simply click on the Heads group

Figure 4.23: Click the head outline to properly tag the head
- Then click on 3-4th Head and click on the head outline in the Tags panel again.
Now, we’re going to focus on the layers that make up 3-4th Head.
- You should ensure that the Left Eyebrow and Right Eyebrow are situated properly. You can double-check this by clicking on the eyebrow groups and seeing whether the correct eyebrow highlights in the Tags diagram. If not, click the unassigned layers for each eyebrow to tag them properly.
- To set the Nose layer, click on the nose in the Tags diagram.
- The Right Eye and Left Eye, like the eyebrows, should automatically be tagged. If not, click on an eye and choose the correct position in the diagram:
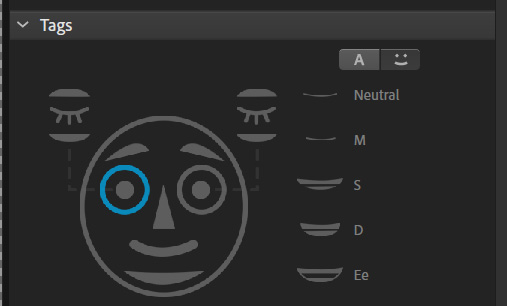
Figure 4.24: Clicking the eye outlines to tag each eye
- Under the Eye groups, Blinks, Eyes, and Pupils should all tag automatically. If not, go through each layer and click on the appropriate icon in the Tags panel:

Figure 4.25: Blinks and eyelids appear above the head in the diagram
However, you will need to click on Top Lid as it may not automatically tag:

Figure 4.26: We only have the top lid to work with. You don’t need to include every layer the diagram shows
- The Mouths group will need to be tagged. Click on it, then click on the mouth in the diagram. We will need to also tag the individual mouth poses, but we will cover that in the next subsection.
- The Background layer will not be tagged. So, we can leave it alone.
- At this point, you will want to go back through all groups under Side Head and Front Head to ensure that the following are tagged in each group, just like the 3-4th Head:
- That each head group is tagged to the head
- That the Front Head eyes and eyebrows are properly tagged for left and right
- That for Side Head, the Eye and Eyebrow are assigned as Left
We now need to tell Character Animator how to work with the pupils:
- To ensure the pupils mask properly, click on the Eye layer under Left Eye.
- In the Tags panel, click on the A icon to go into the list view for your behaviors:

Figure 4.27: Clicking on the A button will reveal more tags than shown in the diagram
- New behaviors will now be visible, one of which is labeled Left Pupil Range. Click on it to enable it as a tag.
- Now, tag the right eye with Right Pupil Range to ensure proper tracking for both eyes.
If you test the eye gaze now, the eyeball acts as a mask or boundary, but also moves based on the position of your pupils:

Figure 4.28: The pupils should now be using the eyeballs as a border and mask
You can adjust the strength of the behavior, as well as other behavior attributes, when recording, but for now, we should be okay with the default choices.
With that, you now have an idea of what to look out for if rig issues crop up in the future. While it’s best to correct these issues early on, sometimes things are missed or changes are made that affect the outcome. But, if you take a moment and backtrack, the issue can be corrected. Hopefully, this gives some idea of how such a process could play out.
Tagging mouth layers
To tag the mouth poses, follow these steps:
- With the 3-4th Head layer, locate and expand the Mouths layer.
- With the eight mouth poses revealed, click on Fv:
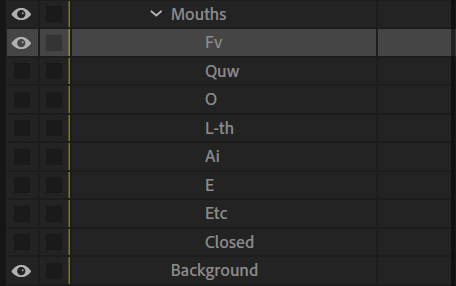
Figure 4.29: The eight phonemes, or mouth poses, we will be tagging

Figure 4.30: Selected items in the diagram will always highlight in blue
- Now, whenever our character makes an F or V sound, Character Animator will switch the mouth to this pose.
- Next, you’re going to tag the following seven poses like so:
- Quw tagged with W-Oo
- O tagged with Oh
- L-th tagged with L
- Ai tagged with Aa and Uh
- E tagged with Ee
- Etc tagged with S, D, and Smile
- Closed tagged with Neutral and M
- Once you complete tagging the 3-4th Head mouth, move down the list and make sure to tag the phonemes for Front Head and Profile Head in the same way.
Now, with the head and mouth layers tagged, we can move on to the body layers.
Tagging the body layers
Like the head and mouth, we need to tag the body properly. Tagging the body parts works a little differently – we will need to add puppet handles and then tag them so the software knows how to react.
A puppet handle is essentially a control point we put on the rig, which can behave in various ways. Right now, we need to decide which parts of the rig need handles. Luckily, the Tags diagram makes it easy to keep track of which points go where on a character. Let’s get going:
- Collapse the main Heads group.
- Expand the Body group so we can see all the body layers:

Figure 4.31: The body layers
- Start by clicking on the F Leg group.
- Click on the Handle tool located at the bottom of the screen (L on the keyboard):

Figure 4.32: The circle with the dot in the middle is the Handle tool
- Add two handles to the leg: one for the knee and one for the ankle. These handles will tell Character Animator how each point of the leg should bend and react.
- A tag labeled F Leg will appear near the middle of the rig. Click and drag this toward the top of the leg:

Figure 4.33: The three tags will represent the left hip, knee, and ankle
- With the top handle still selected, click on the Left Hip handle in the figure to tag the handle as the left hip. You can also click on the plus icon next to the tag and choose the Left Hip tag through that menu:

Figure 4.34: Click on the handle on your rig then select the point on the diagram
- Click on the middle handle and choose Left Knee in the Tags panel.
- Tag the bottom handle as Left Ankle:
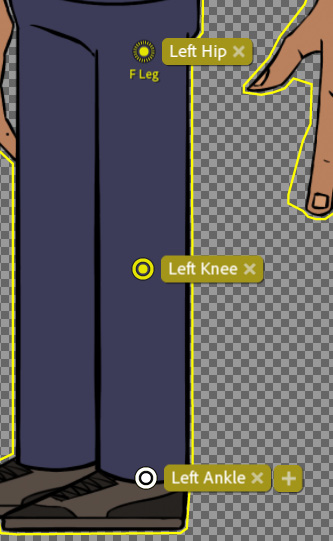
Figure 4.35: Tags will also be visible so you can identify them at a glance
- Now, add two points to the left foot: one for the heel and the other for the toes.
- Using the Tags diagram, assign the appropriate tags for the foot:

Figure 4.36: Two tags for the feet – toes and heels
- Move over to B Leg and add handles in the same spots as the left. This time though, you’re going to tag them as Right Hip, Right Knee, Right Ankle, Right Heel, and Right Toe:

Figure 4.37: The back leg will be considered the right leg
- For the arms, you will follow a similar pattern to the legs, except you will use Shoulder, Elbow, and Wrist for the tags:

Figure 4.38: Tagging the front arm
Tagging the back or right arm will follow a similar process. Just be sure to use the Right tags:

Figure 4.39: Tagging the back arm
- Finally, for the Body layer, you will need to tag Neck and Waist. Try to match the positions to the following figure:

Figure 4.40: Tagging the body
With the body tagged, everything should be laid out for us to start testing and refining the rig. We may come back and make some minor modifications if certain things don’t line up. But for now, this is looking good!
Summary
As you can see, setting up a rig in Character Animator can be a bit time-consuming. However, it’s important that we take the time to get it right. That way, when we animate, we can focus on the production and not have to work around defects of the rig. The good thing is you can retag, rename, and rearrange your layers as you see fit, and you can choose whether you want to make select modifications in Character Animator or Photoshop.
You can find the completed product of our work in this chapter by accessing Version 1 of the rig inside the book’s project file history.
Up next, we’re going to go further with the rig, test out some animation, and add even more functionality to the handles with various behaviors.