8
Managing Events
The event module is one of the features that sets Dynamics 365 Marketing apart from all other marketing automation applications out there. You can run big events with thousands of people for several days, or you can run your breakfast meeting with 10 people attending for 2 hours. The event module is highly flexible and helps you to run any type of event you desire.
Throughout this chapter, we are going to look at how you can manage your events, and we are going to see how Scottish Summit event used the event module to run their previous two events. Because we are using a live, configured system, there might be some customizations you will not find in your system. These customizations might give you some ideas as to how you can customize your Dynamics 365 Marketing application to suit your needs best.
We are going to go through the basic setup of an event. Then, we are going to look at the in-person-specific setup before moving on to the webinar-specific setup. We will also go through how to use journeys to make sure our event participants get the information they need. Finally, we’re going to look at the out-of-the-box event website that’s based on Power Pages.
In this chapter, we will cover the following:
- Event management settings
- Creating and managing events
- Creating and managing in-person events
- Creating and managing webinars
- Event communication
Event management settings
Before we start working with events, we will go through our settings. We need to make sure all our settings are up to date and working as intended for our events. You can find the Event management settings in the Settings area as shown in Figure 8.1:

Figure 8.1 – Event management in Settings
Let’s go through the settings and see what each of them does. We’ll start with Web applications.
Web applications
Some companies have their own website from which they want to get all their event registrations. To connect external applications with Dynamics 365 Marketing, you must register a web application. Once you’ve registered the web application, you get a token and an endpoint, as shown in Figure 8.2, that your developers can use to connect to the event API:

Figure 8.2 – Web application
Once your web application is registered, it is time for your developer to do their magic. Looking at how to use the event APIs is out of the scope of this book. You can read more about using external websites here: https://learn.microsoft.com/en-us/dynamics365/marketing/developer/event-management-web-application.
Webinar providers
In the Webinar providers area, you can connect to a third-party company that hosts webinars. As of the wave 2 2022 release, the only vendor provider available out of the box in Dynamics 365 Marketing is On24. You can read more about On24 here: https://www.on24.com/. If want to use another provider, you need the help of a developer. The setup of On24 is configured as shown in Figure 8.3:

Figure 8.3 – On24 webinar provider setup
The actual connection with On24 isn’t handled in the Webinar providers area but in the Webinar configurations area.
Webinar configurations
The Webinar configurations area is where you connect to your webinar providers. To create a new configuration, you must add a new configuration and register the client ID, access token key, and access token secret, as shown in Figure 8.4:

Figure 8.4 – Webinar configuration
Once the webinar configuration is set up and activated, you can use the provider chosen when you are running your event webinars.
Event administration
In the Event administration area, you can create settings for all your events. You can only have one event administration record active at a time, but you can have none active if you like. In Figure 8.5, you can see that you can give a record a name and set how to match the contact based on which fields, and enable demo payment confirmation if you want to:

Figure 8.5 – Event administration record
If you choose to match contacts based on email, first name, and last name, then all those fields have to match. If you set your matching strategy to be based only on email, then every event registration connected to the email given will be automatically connected to the contact.
Enable demo payment confirmation should never be used in a production environment. This is only used to simulate payment on the event website for demo purposes. If you want to charge for your events and have your customers pay online, you need to partner with a third-party provider and develop a payment gateway.
Website table configurations
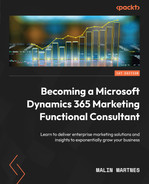
Most companies will require their own unique columns for their events. These custom columns are not exposed by the event API out of the box. To expose these fields in the event API, you create a website table configuration as shown in Figure 8.6:
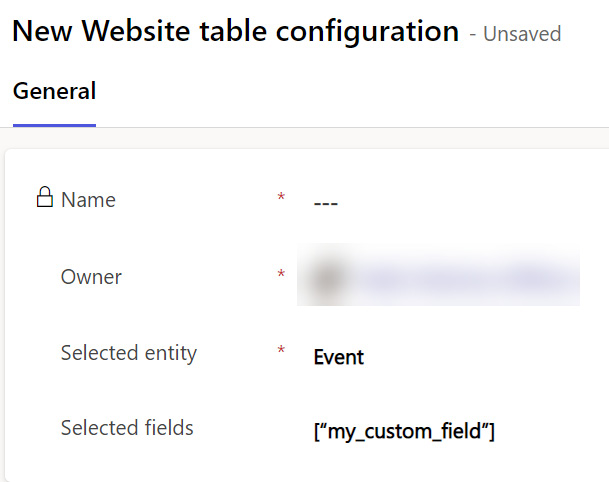
Figure 8.6 – Website table configuration
Now that we have gone through Event management in the Settings area and familiarized ourselves with the UI, we can start to set up our events.
Creating and managing events
Dynamics 365 Marketing has its own area for event planning. Here, you can administer every event and everything surrounding an event.
You can create an event from scratch or from a template. On the main event page, you can also create your event template. The + New, + New from template, and + Create template options are shown in Figure 8.7:

Figure 8.7 – Active events and event creation options
When you create a new event, a blank record is opened. The mandatory columns are Event name, Event time zone, Event start date, and Event end date, as shown in Figure 8.8:

Figure 8.8 – Creating an event
If you don’t fill out these columns, you cannot save your event. We will circle back to webinars and locations in later sections of this chapter.
If your event has a maximum capacity (whether it’s an in-person event or a webinar), you can set Maximum event capacity. You can also turn on a waitlist for the event. When Waitlist this event is set to Yes, another section where you can add information about the waitlist appears. You can set the number of invitations per slot, which determines how many people should get the opportunity to register for each person that cancels. You can also set whether you want the contacts on the waiting list to be automatically registered. If you don’t want the contacts to be automatically registered, you can set Contacts can choose to be registered automatically to No. This section is shown in Figure 8.9:

Figure 8.9 – Venue constraints and waitlist
At the top of the event form, you can see the business process flow (BPF) for your events. This BPF should be configured to suit the needs that you have for your events. This is where you can add reminders or other necessary information for all your events at certain stages.

Figure 8.10 – BPF for events
Now, let’s go through the information you can find in the different tabs of an event record.
Tabs of an event record
We’re going to go through the tabs of an event record that are relevant for every kind of event: Agenda, Website and form, Registration and attendance, and Additional information. We’ll start by going through the Agenda tab.
Agenda
Using the Agenda tab, you can build your event’s agenda. You can register the sessions, session tracks, speaker engagements, and sponsors, as you can see in Figure 8.11:

Figure 8.11 – The Agenda tab of an event record
Allow registrants to create their own agenda is a very important part of the tab. Out of the box, it is set to No. This means that attendees register for the full event rather than specific sessions or tracks. This column is automatically set to No and hidden if you create session passes because in that case, attendees sign up for the different sessions with the passes.
If this setting is set to Yes, then your attendees can sign up for one, some, or all of the sessions you have in your event. We’ll go through the rest of these sections in more detail later in this chapter.
Website and form
On the Website and form tab, you connect your event to an event URL and set the registration information for the event. As you can see in Figure 8.12, Scottish Summit used a custom URL for their event:

Figure 8.12 – The Website and form tab for Scottish Summit 2022
They are not using the out-of-the-box marketing form but a developed solution to register attendees. They have chosen Enable CAPTCHA, enabled Create leads for event registrations so that multiple attendees can register in one registration, and chosen Enable anonymous registration, meaning that people can join without letting them know who they are.
I highly recommend that you always set a registration end date; this makes sure that your attendees will get the information they need before the event starts.
Registration and attendance
In the Registration and attendance tab, as shown in Figure 8.13, you can do the following:
- See everyone that has registered or bought a ticket for your event
- Register new attendees
- See who has checked in
- See who is on the waiting list
- See contacts who have canceled

Figure 8.13 – The Registration and attendance tab
Attendees can cancel their tickets from the event website, or users can do it manually from the marketing application.
Additional information
In the Additional information tab, you can find a section for financial information. This is where you can do some budgeting for your event. Remember that Dynamics 365 Marketing is not an ERP system; all finances need to be handled somewhere else.

Figure 8.14 – Additional information – Financials
In the Event team members section, you can register everyone that is involved in your event. As you can see in Figure 8.15, Scottish Summit 2022 had four team members (in addition to the two main organizers). Each of these team members had a specific role. The clear roles made it easier for everyone involved in the event to have an overview of who was responsible for each task.
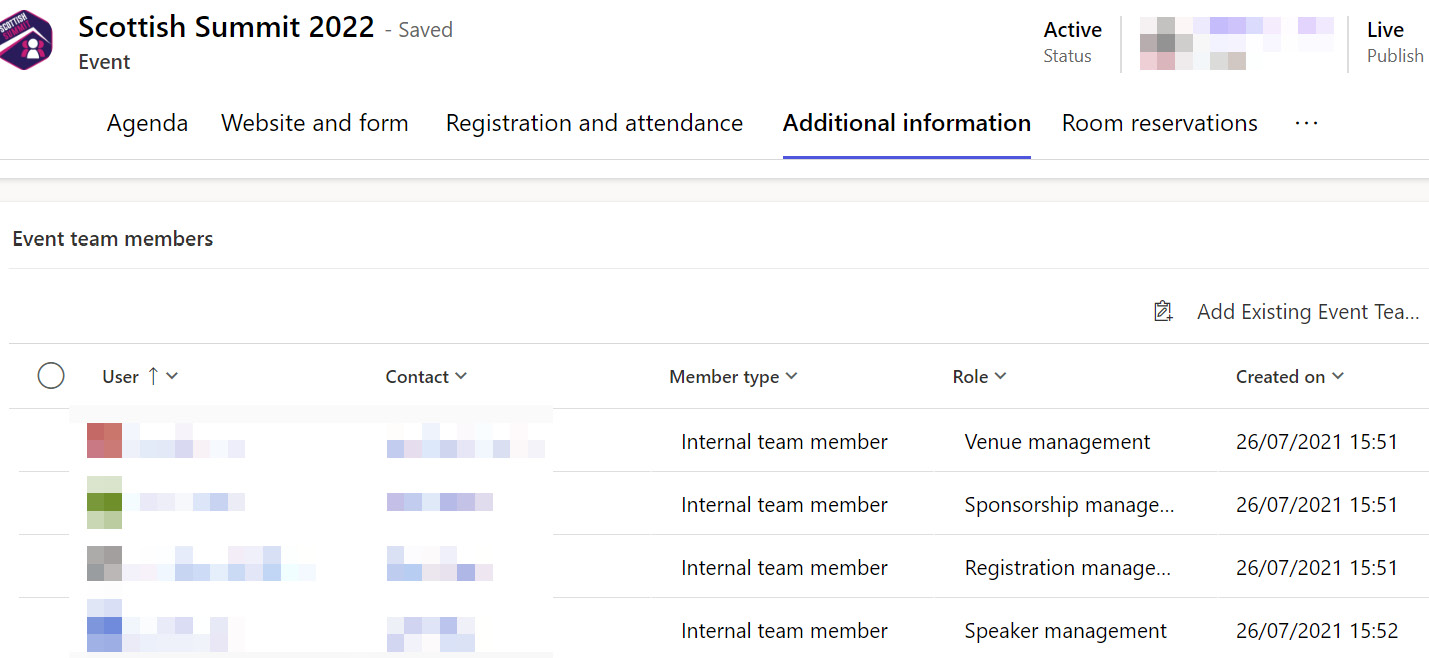
Figure 8.15 – Additional information – Event team members
Now, we’ve gone through the most important tabs for any event record, but there are some connected records that are extremely important for every event. Let’s go through these connected records.
Speakers
At most events, you will have speakers. These are the people that are making presentations or delivering training. As you can see in Figure 8.16, you can register a lot of information about your speakers:
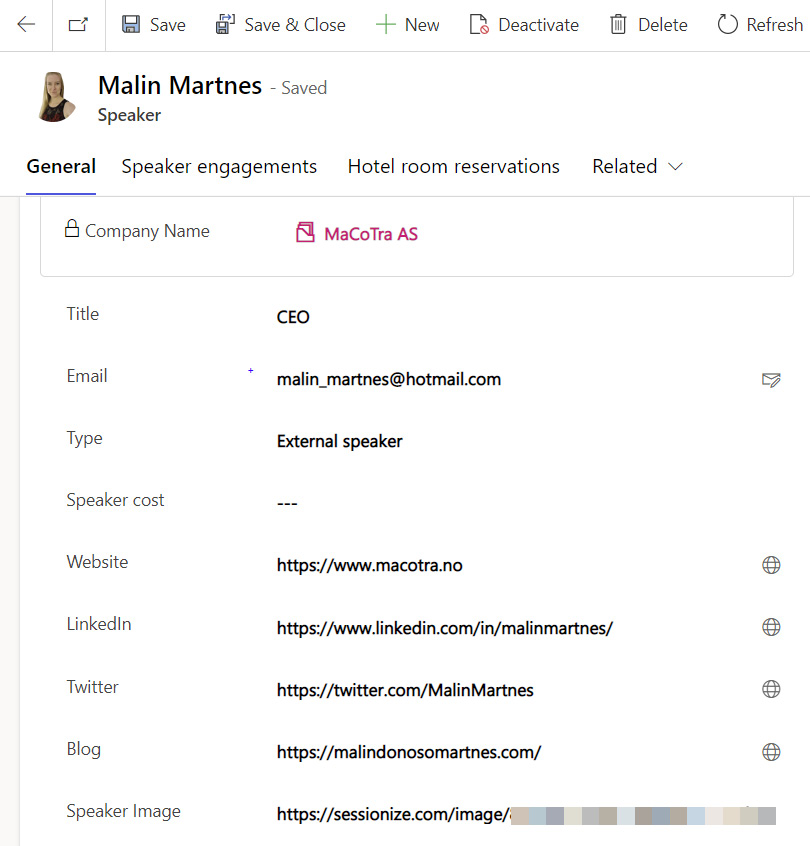
Figure 8.16 – Speaker record
This is a speaker record from Scottish Summit’s Dynamics 365 Marketing solution. They integrated their system with other solutions, such as Sessionize, which updates this information. The speaker record is connected to the contact, and some of the information, such as the company name, is copied from the contact record.
In the Speaker engagements tab, you can see all the sessions this speaker is connected to, as shown in Figure 8.17:

Figure 8.17 – Speaker engagements
Now, let’s move on to the sessions that the speakers are connected to and see how they work.
Sessions
Sessions are the content of your event. They could include any presentations, training, or panel discussions you have at your event. Scottish Summit had all their sessions in Dynamics 365 Marketing from their 2020 to 2022 events. As you can see in Figure 8.18, they customized their marketing app to show all the sessions in one view:

Figure 8.18 – Sessions for Scottish Summit
Every speaker is connected to their sessions through the speaker engagement record. This record connects the speaker to the session.
As you can see from Figure 8.19, you are given a calendar of the agenda of your event once you’ve connected all the sessions to your event:
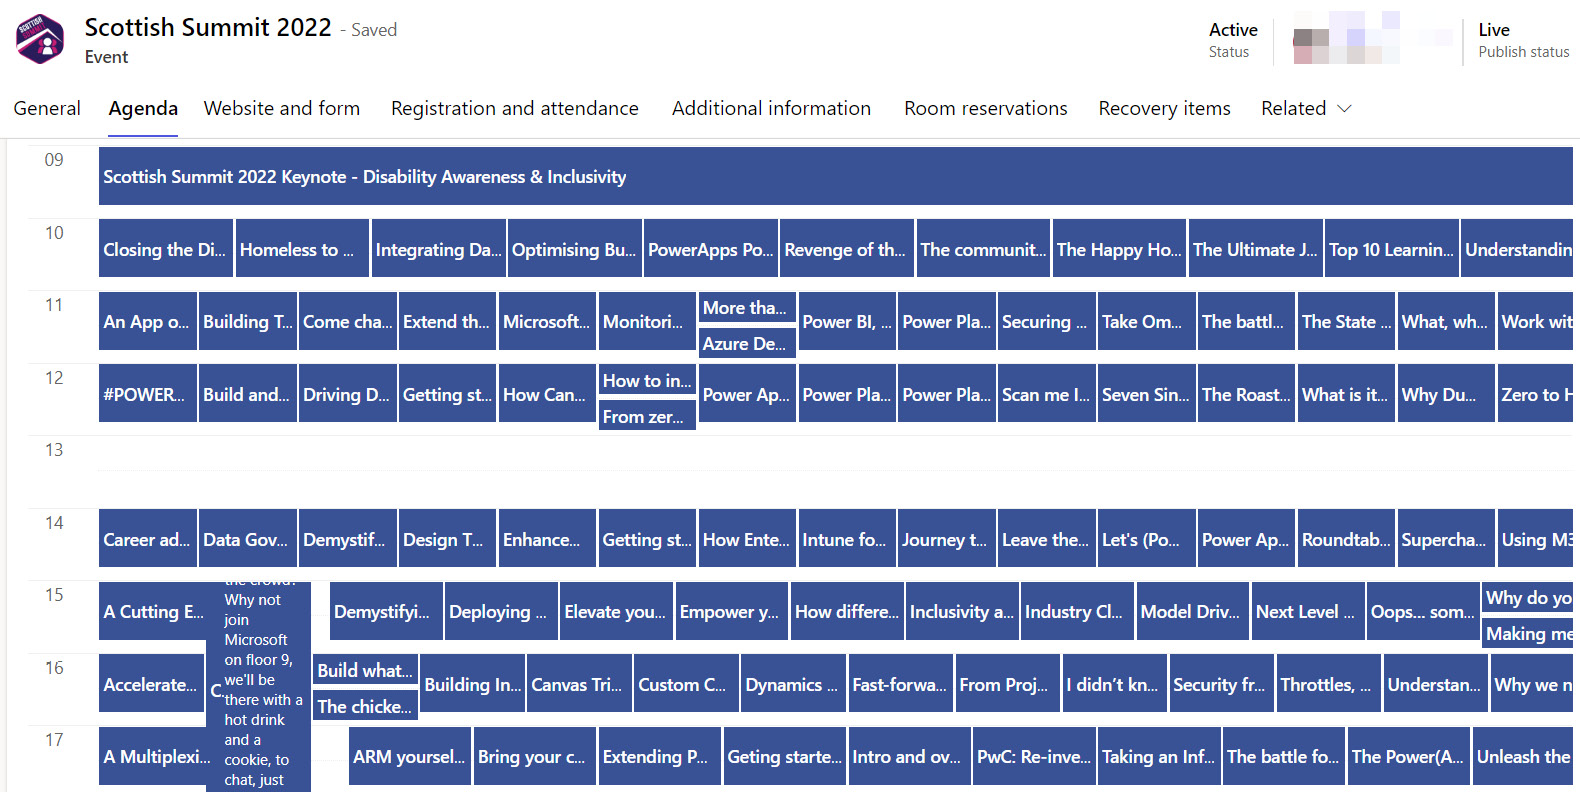
Figure 8.19 – Sessions of an event
To create a new session, go to the Agenda tab of your event and click on + New Session as shown in Figure 8.20:

Figure 8.20 – Creating a new session
A new pane on the right side opens and you can register your new session as shown in Figure 8.21:

Figure 8.21 – Creating a new session (continued)
Once you’ve clicked Save and Close, you can open the new record and register more information as shown in Figure 8.22:

Figure 8.22 – New session to edit
The session is automatically created as a draft and must be published along with the event when it’s time to go live.
Session tracks
Session tracks are a way of grouping your sessions. This can make it easier for attendees to know which sessions are relevant to them. You can create your session tracks by going to the Agenda tab of an event, finding Session tracks, and clicking on + New Session Track, as shown in Figure 8.23:

Figure 8.23 – Creating a new session track
A new pane on the right side will open and you can register information about your session track, as shown in Figure 8.24:

Figure 8.24 – New session track
Once this is done, you can connect all your sessions to your session tracks. I highly recommend starting with creating your session tracks before you create your sessions. This way, you can add your sessions to the track as you create the sessions and don’t have to change this when all the sessions have been created.
Check-ins
You can manually check in attendees on the event record. When you send the registration email to your attendees, you can embed a QR code for check-ins. Dynamics 365 Marketing does not have any way of checking in registrations through QR codes. You can use the mobile version of Dynamics 365 Marketing to create a new event registration and use the camera on the phone to register the QR code. This means you must manually create it one at a time and then scan the QR code. The better solution is to develop a custom solution to automatically check in the attendees by scanning the QR code..
Sponsorships management
For free community events such as Scottish Summit, it is imperative to have sponsors. You also need to have an overview of what you are giving your sponsors and any monetary offerings they are giving you.
Scottish Summit had several sponsors and several sponsorable articles. Sponsorable articles are specific items that the sponsors can cover. In Figure 8.25, you can see the sponsorship record for one sponsor of Scottish Summit 2022. All the amounts from the sponsors are automatically connected to the event, and you can find the sum of the amounts in the Financials section of the Additional information tab for the event:

Figure 8.25 – Sponsorship record
We have gone through the parts of event management that are the same for both in-person events and webinars. Now, let’s look at what in-person-event-specific options you have in Dynamics 365 Marketing.
Creating and managing in-person events
Managing an in-person event is quite different from managing an online event. You need to have control over all the buildings, rooms, event vendors, hotels, and even hotel room reservations. Let’s go through the in-person event-specific things for an event record.
Room reservations
On an event record, the tab named Room reservations is where you can see the different rooms that you’ve reserved for the different sessions you have in your event. As you can see in Figure 8.26, Scottish Summit had several concurrent sessions held in different rooms. The calendar shows the different sessions that have been assigned rooms. This calendar is read-only and intended for informational purposes only:

Figure 8.26 – Event room reservations
The next in-person-specific section you find in the event module is on the Registration and attendance tab, the section for event passes.
Event passes
Event passes are your attendees’ tickets. You can choose not to use passes, or you can have multiple types of passes. If you want to use passes, you must create each of the passes you want to use before you can sell them to your attendees, as shown in Figure 8.27:

Figure 8.27 – Creating an event pass
Different passes can have different costs: they may be different types of attendees, different days of your conference, or early bird passes, for instance. You can use different prices and have different amounts of passes available. You can also see how many passes have been sold and how many passes are left. All this is shown in Figure 8.28:

Figure 8.28 – Different passes
Payment for passes is something you must develop yourself and is not included in Dynamics 365 Marketing.
Now, we’ve seen the tabs and sections that are relevant for in-person events. Let’s dig deeper into the things that are specific only to in-person events.
Venue management
It doesn’t matter whether you are hosting a big event with thousands of attendees or a small event for 20 people in your office: you need to have an overview of your venue. Let’s go through Venue management, which consists of Buildings, Rooms, and Layouts, as shown in Figure 8.29:

Figure 8.29 – Venue management
You can see from Figure 8.30 that buildings, rooms, and layouts are all connected. One building can have several rooms, and each room can have different layouts and requirements:

Figure 8.30 – Venue setup
Let’s see how Scottish Summit configured its buildings, rooms, and layouts.
Buildings
Scottish Summit used the same building to host their event for 2020 and 2022. You can see the information registered for the building in Figure 8.31:

Figure 8.31 – Building information for Scottish Summit
As you can see, you can register a lot of information about the building, such as the following:
- Estimated capacity
- Number of rooms
- Cost
- Address
- Facilities (such as Wi-Fi and accessible facilities)
- Contact information
You also have all the rooms in a building registered. Let’s look at how Scottish Summit administrated its rooms.
Rooms
As you can see in Figure 8.31, there were 16 rooms in the building for Scottish Summit. We can also see this in the Rooms view shown in Figure 8.32:

Figure 8.32 – View of all active rooms
If we click on one of the rooms, the room record opens and we can see more information and edit it, as shown in Figure 8.33:

Figure 8.33 – Room record
As you can see in Figure 8.33, the room is connected to a building, and the building information is shown on the right-hand side of the form. If we click on the room reservations, we get the same calendar as we do for an event record, but we see all the sessions in the room.
We can also add the possible layouts of the rooms. Let’s see how we can manage layouts.
Layouts
Each room can have several different layouts. Every layout is always connected to one room. One room can have different capacities using different layouts. A boardroom often has a big table and chairs around it, while a classroom needs desks and chairs and will have more space, while a theater just needs chairs and will have room for even more people. In Figure 8.34, you can see that Conference Room 1 at Scottish Summit had five different layouts with different capacities.

Figure 8.34 – Layouts of Conference Room 1
Now, let’s take a look at some of the things that surround the events: the logistics.
Logistics
To run in-person events, you often have a lot of logistics to consider. You might have different event vendors helping you with different things, as shown in Figure 8.35:

Figure 8.35 – Logistics of an event
You might have agreements with different food caterers, one or several hotels, and any other custom vendors that your event is using. Let’s go through how Scottish Summit manages event vendors with Dynamics 365 Marketing.
Event vendors
Scottish Summit had several companies involved in running the event, as you can see from Figure 8.36. They had 10 different vendors registered and control over what they used the different vendors for. All vendors are connected to an account, and there you will find all the contact information:

Figure 8.36 – Scottish Summit event vendors
You can see in Figure 8.36 that Scottish Summit had the hotel group registered as vendors. In the next section, you’ll see that the hotels are connected to a vendor hotel group.
Hotels
In the list of hotels in Figure 8.37, you can see that Scottish Summit has an agreement with three different hotels in two different hotel groups:

Figure 8.37 – List of hotels used by Scottish Summit
In each of these records, we can see more information, such as the address, facilities, and primary contact. We can also see the hotel room allocations.
Hotel room allocations
Scottish Summit 2022 arranged for hotel rooms for all speakers that needed a room. To do that, they needed an agreement with each hotel and an agreement on how many hotel rooms would be available for them. As you can see in Figure 8.38, they had 81 rooms allocated in one hotel and 29 allocated in another hotel:

Figure 8.38 – Hotel room allocations
Out of these rooms, some were reserved, and you can see how many of the rooms were left. The hotel room allocations are tightly connected with the hotel room reservations.
Hotel room reservations
Scottish Summit had a complete overview of all the hotel room reservations for their speakers through Dynamics 365 Marketing. As you can see in Figure 8.39, all the speakers and their special requests, including the day they came and the day they left, were registered in the system:

Figure 8.39 – Hotel room reservations
With all these reservations connected to the hotel room allocations, Scottish Summit had a complete overview of how many hotel rooms they needed to order and how many hotel rooms were left from their agreement with the hotels.
Now that we have been through what is unique to in-person events, let us go through how we can use Dynamics 365 Marketing to host webinars.
Creating and managing webinars
Webinars were never before as popular as they were during the COVID pandemic. To stream an event online, you need to set Do you want to stream this event? to Yes in the main event record, as shown in Figure 8.40:

Figure 8.40 – Streaming an event using the main event record
A set of new columns will appear, and you can edit your online event. The Streaming provider option you choose should be one of the webinar providers you set in the Settings area, or you can choose Microsoft Teams. In this book, we’re focusing on the out-of-the-box functionality with the use of Teams Webinars.
Teams
When you use Microsoft Teams for your webinars, you get different options depending on which Microsoft Teams license you have. You can create a Teams webinar, Teams meeting, or Teams Live event. Teams Live events do not allow attendees to share video, audio, or chat, apart from a Q&A feature. Teams Live events are best suited for a large audience with few presenters. After you save a record, when you’ve set it as a streaming event, Dynamics 365 Marketing will automatically create a Teams URL and the Teams meeting owner will automatically be whoever saved the event after it was set to stream; this can be someone other than the owner of the event record.
You can see this in Figure 8.41:

Figure 8.41 – Teams meeting options
If you set Change meeting options to No, the webinar or meeting will follow the policies that are set in your organization. If you set it to Yes, you can change the settings as shown in Figure 8.42:
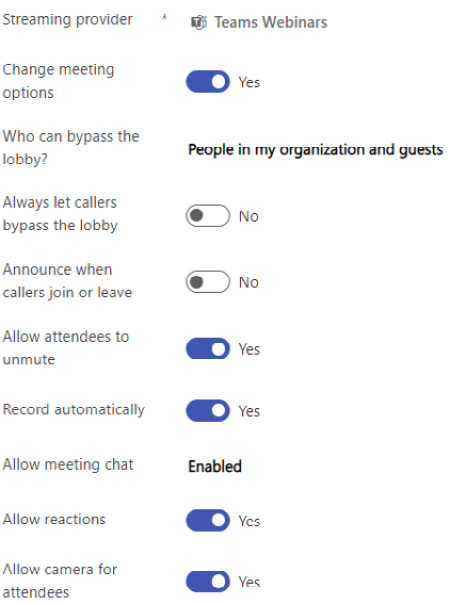
Figure 8.42 – Change meeting options
It’s important to know what each of these settings does:
- Who can bypass the lobby?
This is for if you want certain people to be able to go right into the meeting and not have to be admitted in by the meeting organizer.
- Always let callers bypass the lobby
This setting is used so that you don’t have to admit attendees to the meeting; everyone comes straight into the meeting.
- Announce when callers join or leave
Using this setting, you can set whether in the Teams chat for the meeting, there will be an announcement every time someone joins or leaves the meeting. This can be a disturbance otherwise; if there are many attendees, it can take focus away from the presenter.
- Allow attendees to unmute
If you want your attendees to ask questions or take part in discussions, this must be set to Yes. If it is set to No, then no attendees can unmute.
- Record automatically
I’m sure you’ve been in a meeting that was meant to be recorded but someone forgot to do so. With this setting, you don’t have to remember to press the record button; the system does it for you. The attendees can watch the recording from the attendee URL given in the registration email.
- Allow meeting chat
This can be enabled to activate the chat feature and disabled to remove it. It can also be set to an in-meeting-only setting, where chat is only available for the time you’re attending the meeting and will be locked if you leave the meeting.
- Allow reactions
If someone says something smart, we might want to send them a thumbs up – or send them a laughing emoji if they’re being funny. This can be turned on or off in the settings.
- Allow camera for attendees
For a lot of meetings, it’s very nice to see other people in the audience so that it doesn’t feel like we’re talking to a black box. Other times, webcam images can take away focus. If there are many attendees, then the use of cameras can also use a lot of compute power and WiFi bandwidth.
In an event’s record, on the Additional information tab, you can see Calendar content at the bottom of the form, as shown in Figure 8.43:

Figure 8.43 – Calendar content
The Join on Microsoft Teams button you see in Figure 8.43 can be used to create an email to send to attendees. You can see the button and the Link to section in Figure 8.44:

Figure 8.44 – Link to – Teams check-in
When your attendees join the meeting 30 minutes or less before the start, they will be created as a check-in record automatically. If they join more than 30 minutes before, a check-in record isn’t created; this is to make sure that attendees testing the links won’t be registered as checked-in. Be aware that every Teams check-in button is unique to each attendee; anyone attending through this button will be registered as a new check-in record attached to the original attendee.
Event communication
To communicate with attendees, you need to use journeys, either in Outbound marketing or Real-time marketing journeys, depending on your preferences. We went through how to create journeys in Chapter 6, Outbound Customer Journeys, and Chapter 7, Real-Time Marketing Journeys.
The attendees need to have somewhere to register, so you need to either create a custom form from your website or use the event registration marketing forms.
Once your attendees have registered, they also need to get emails throughout the journey. You need to create all the emails you’re going to use in your journey, from registering for the event and canceling to reminders the day before the event and the thank-you and evaluation after the event.
Event website
Some companies running events have their own website for each event. Others put their registration forms on their regular website or in emails. Others still use Power Pages with the out-of-the-box template that is fully integrated with Dynamics 365 Marketing. Scottish Summit had its own event website and developed an integration with Eventbrite where all the attendees registered.
Power Pages
The Power Pages event template is a preconfigured website that gets all the information and graphics from your published event in Dynamics 365 Marketing. Your attendees can register, as well as see information about your events, speakers, sessions, sponsors, and any other information about your event. In Figure 8.45, you can see an event page that showcases the out-of-the-box features of this Power Pages template:

Figure 8.45 – Event website
On this page, you can create a payment gateway and use third-party payment providers to charge for your events. All the information for your events that has gone live is shown on the event portal automatically. We are going to go through how to create and manage Power Pages and other surrounding systems in Chapter 10, Power Platform.
Summary
In this chapter, we have gone through many features and functionalities of the event module in Dynamics 365 Marketing. The chapter has hopefully shown you why the event module is one of the things that separates Dynamics 365 Marketing from other marketing automation systems. You should have an idea of how you can utilize the event module to run your events. The event module can handle big events with many sessions and thousands of attendees. The module can also help you if you are just running a webinar for 10 people.
We’ve gone through the basic setup of events, including in-person-event-specific setup and webinar-specific setup. We’ve seen how we can organize and have full control over hotels, hotel allocation, hotel reservations, and other types of vendors. We’ve gone through how we can use Microsoft Teams as our webinar provider and the different settings you can configure for your webinars. With all that, we’ve learned about everything we need to know to be able to create and manage all our events.
We’ve seen how Scottish Summit used Dynamics 365 Marketing to run their events and the features they’ve used, as well as exploring some of the components they developed and configured.
A very big part of your work after each event is getting evaluations and feedback from your attendees. In the next chapter, we are going to go through the preferred solution for evaluation: Dynamics 365 Customer Voice.
Questions
The following are some questions that will help you gauge your understanding of the topics discussed in this chapter. The answers are provided in the Assessments section at the end of the book.
- You can only use Microsoft Teams as your webinar provider.
- Yes
- No
- In which marketing form can you register attendees?
- Landing page
- Forward to a friend
- Event registration
- Event attendees
- How is the speaker connected to your event and session?
- Directly to the event
- Directly to the session
- Directly to the session track
- Through speaker engagements
- If you use Microsoft Teams as your webinar provider, you can’t change any options – it uses the organization’s settings.
- True
- False