
6
Outbound Customer Journeys
Customer journeys write the story of how your customers interact with your company. It is how you wish to guide them and give them information. A customer journey could be signing up for a newsletter and receiving that newsletter by email. A customer journey could also be a complete route for an event participant, such as registering, getting a reminder email with the event QR code, and evaluating the event through Customer Voice. As of August 2022, there are two areas where you can create and manage customer journeys: Outbound marketing and Real-time marketing. In this chapter, we are going to go through outbound customer journeys. We’re going to see how they work and what options you have.
We’re going to go through the following topics:
- Outbound customer journeys
- Analytics
- Checking your knowledge
We will begin with how you create and understand outbound customer journeys.
Creating and understanding outbound customer journeys
Outbound customer journeys were the first customer journey to come to Dynamics 365 Marketing. Outbound customer journeys are connected to the marketing emails that you can find in the Outbound marketing area. This means that if you create a marketing email in Real-time marketing, you cannot use it in an outbound customer journey. If you want to use an email you have created in Real-time marketing, you need to use a Real-time marketing journey. In outbound customer journeys, you set up the route the customer should take when interacting with your company. This could be when they register for an event and what emails you want to send to them. A new potential customer that downloads a whitepaper should be contacted by the sales department. In other words, every way of communicating with your customer or potential customer is via a customer journey.
Now, let’s go through how we create an outbound customer journey.
Creating an outbound customer journey
To create an outbound customer journey, you must first make sure you are in the Outbound marketing area:
- You can find the Customer journeys option in the Marketing execution section, as shown in Figure 6.1:

Figure 6.1 – Customer journeys under Marketing execution in Outbound marketing
- Once you’ve clicked on Customer journeys, you will see a list of all the active customer journeys. In this area, you can click on the + New button to create a new customer journey, as shown in Figure 6.2:

Figure 6.2 – New customer journey
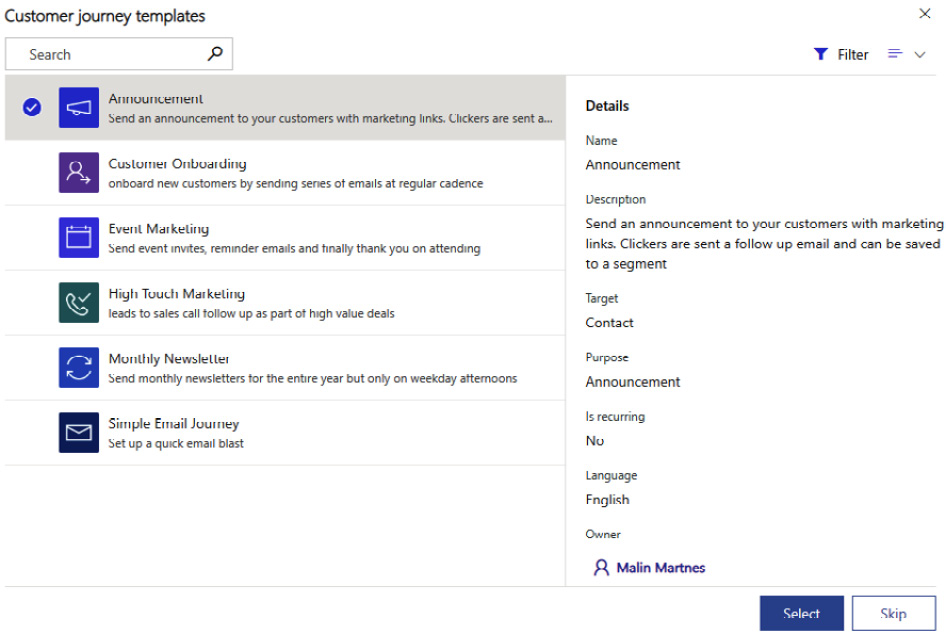
Figure 6.3 – Choosing a customer journey template
- If you repeat the same customer journey often or use the same steps in a lot of your customer journeys, you should create them as customer journey templates.
If you do not select a template, a blank customer journey is created for you, as shown in Figure 6.4:
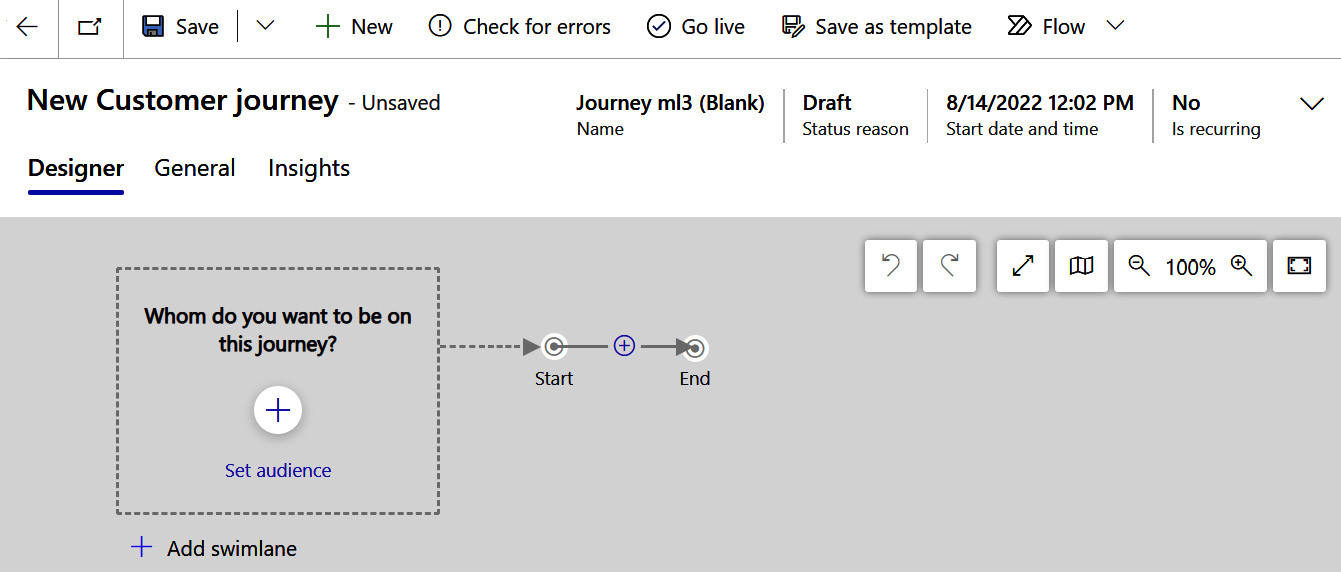
Figure 6.4 – Blank customer journey
- You can now start filling it with information to guide your customers through the best customer journey possible.
Now that you know how to create a journey, it’s time to fill the journey with what you want your customers to do. You can do this in the Designer tab.
Using the designer
The designer is where you create the customer magic. This is where you specify who your customers are and how they’re going to interact with your company. You have two important areas in the designer: choosing the audience and adding tiles. Let’s start by looking at the audience (who you want to communicate with) before moving on to adding tiles (what you want to do with the audience).
Audience
The audience is the start of your customer journey. These are the people that enter your customer journey. Click + Set audience and select which audience you’re targeting, as shown in Figure 6.5:

Figure 6.5 – Selecting a source type for your audience
Your audience can come from the following places:
- A segment
- Contacts updating their contact information
- Contacts that have submitted a form
Let’s go through each of the audience options.
Segment
In Chapter 3, What Are Segments and Lists?, we went through what a segment is and how to create one. Now, you can use these segments as a starting point for a customer journey. These are the customers you want to talk to. For example, in a dynamic segment, when a new contact meets the criteria of the segment and is added to the segment, they will also start the customer journey. You can say the segment is either a regular Segment or a Subscription List option, as shown in Figure 6.6:

Figure 6.6 – Segment or Subscription List
You can select one segment, add conditions, create segments from the journey, add customers from several segments, or exclude customers from certain segments, as you can see in Figure 6.7:

Figure 6.7 – Adding a condition to a segment – exclusion or inclusion
If you cannot find a segment, make sure the segment is published.
When the condition uses or, which you can see on the left-hand side in Figure 6.7, you are saying “this segment OR this segment.” When you click on or, it changes to and, as shown in Figure 6.8:

Figure 6.8 – Condition with and instead of or
When you have and in your condition, you can select whether you want to include or exclude the segment. Maybe you want to start the journey for all customers in this segment, but not those that already have bought the product and are in another segment as well. Then, you can use the Exclusion element, as shown in Figure 6.8.
Be aware that if you choose Subscription List as the audience and the contact is removed from that list or unsubscribes, they will continue all active journeys until completion.
Updated contact info
To be able to use updated contact information, you will have to go through several selections. First, you must find the entity name of the table you want to use. In Figure 6.9, I’ve selected Contact because I want to use a change of contact information to trigger this customer journey:

Figure 6.9 – Selecting an entity
Then, you need to select the contact field name. This is the unique identifier of the table you chose. As you can see in Figure 6.10, I’ve selected Master ID (masterid):

Figure 6.10 – Selecting the contact field name
Trigger Event is the next field. Here, I can select whether the record should trigger when it’s created, deleted, or updated, as shown in Figure 6.11:

Figure 6.11 – Selecting the trigger event
Now, we select the column or field that we want to trigger the customer journey. As you can see in Figure 6.12, this is the trigger name, and I’ve selected the email column:
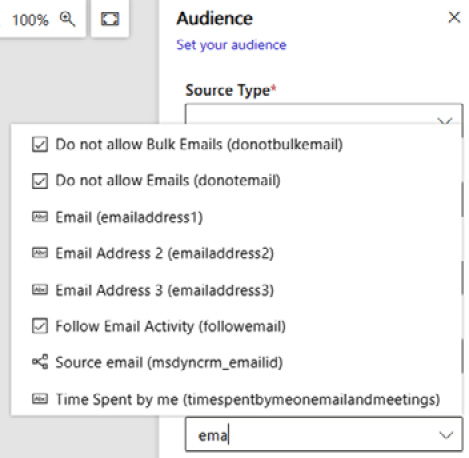
Figure 6.12 – Trigger name
Now, every time a contact updates their email address, it will trigger this customer journey. You can choose to trigger the customer journey from any column from any table related to the contact.
Let’s see how a submitted form is going to trigger a customer journey:
- Submitted a form
When Submitted a form is selected as the source type, you need to select the form, as shown in Figure 6.13:
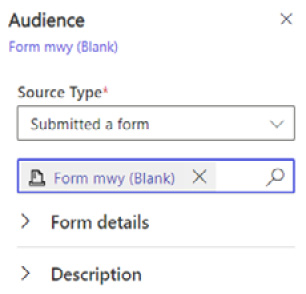
Figure 6.13 – Submitted a form as the source type
- Add tiles
Now that you’ve gone through who your audience is, you need to define what you want your audience to do. You can add tiles by clicking +, as shown in Figure 6.14:

Figure 6.14 – Clicking + in the customer journey
When you click to add a tile, you get a lot of options regarding the type of tile you want to add. You can add these tiles:
- Messages
- If/then branches
- Wait/Delay
- Actions
- Sales activities
- Custom tiles
- Legacy tiles
Let’s go through all the different types of tiles you can add:
- Messages: Messages is probably the most commonly used tile in a customer journey, as these are our emails. Click on Send an email and then choose the email you want to send to your customers, as shown in Figure 6.15:
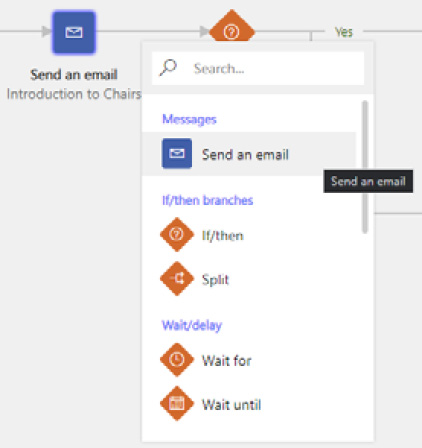
Figure 6.15 – Selecting the send an email tile
If you cannot find an email in the list, to add the email, make sure the email has gone live. If you’re adding an email with links to an event, page form, or Customer Voice survey, you also must add the elements under email elements to make sure the recipients get the correct information in the email.
- If/then branches: In the If/then branches, a tile can either use If/then or Split.
The other option is to create an If/then tile, as shown in Figure 6.16:
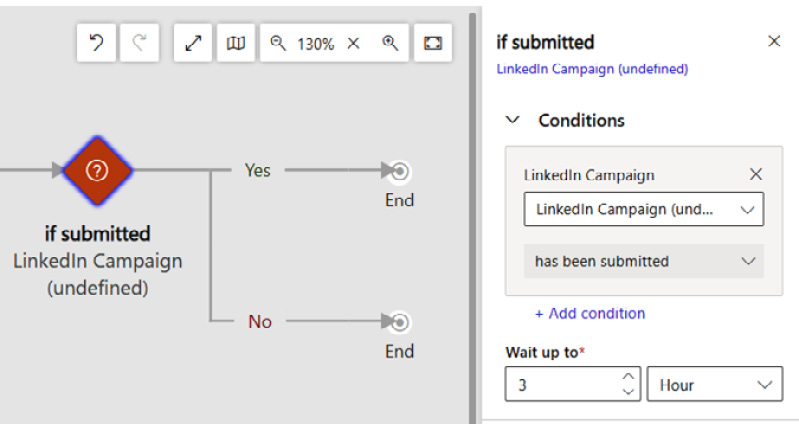
Figure 6.16 – If/then condition
In this tile, you will have to set some conditions. Based on your previous tiles, you can add your conditions. You can also have multiple conditions. You then select the waiting time, which can be hours or days. After the selected waiting time, your audience will go down the path for the condition they want to fulfill.
When using Split, you divide your audience into two or more paths. By default, it is split by percentage, and the two paths receive 50% each, as you can see in Figure 6.17:
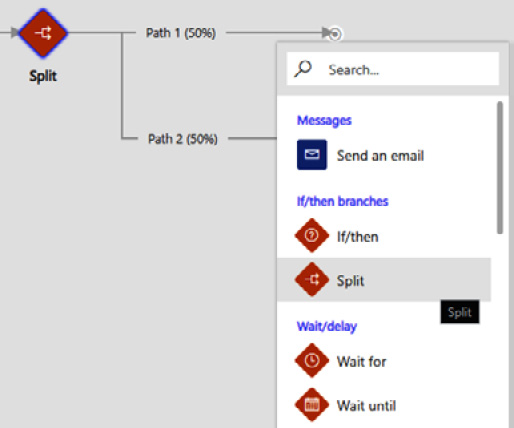
Figure 6.17 – Split
You can also add as many paths as you want and select the percentage you want to send down each path. You can even use the Distribute evenly option, as you can see in Figure 6.18:

Figure 6.18 – Splitting into multiple paths and distributing evenly
After you have defined your splits, you will also need to add tiles to each path.
- Wait/Delay: In Wait for tiles, you can specify the amount of time you should wait for. You can set that duration to a number of hours, days, weeks, or months. Your audience will move on to the next title after that amount of time, as shown in Figure 6.19:
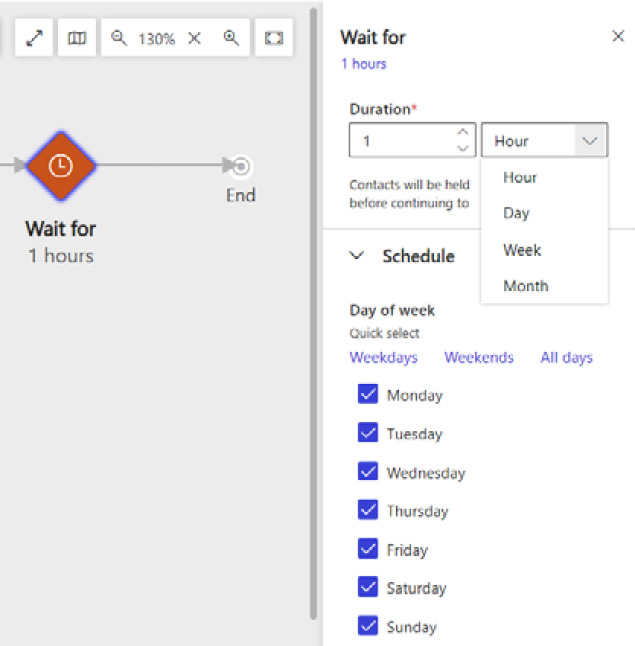
Figure 6.19 – Wait for
The other waiting tile is a Wait until tile. Here, you will need to specify a date and time, as shown in Figure 6.20:
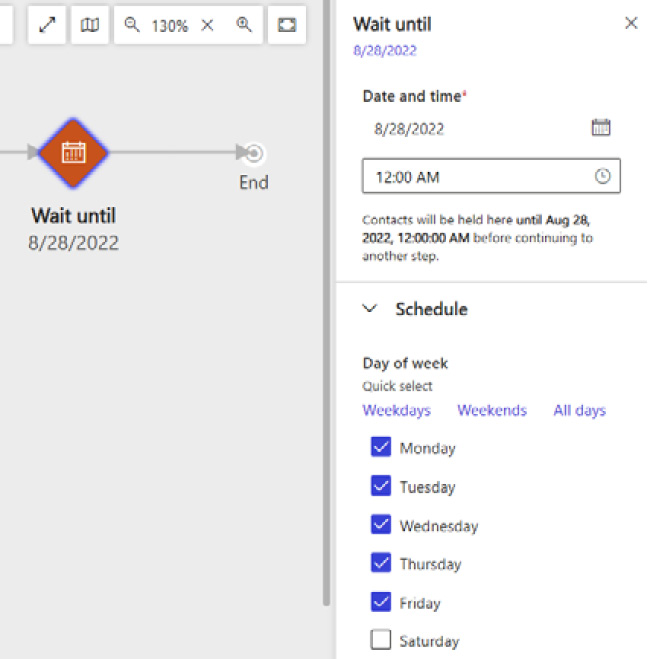
Figure 6.20 – Wait until
In both waiting tiles, you can set up a schedule, where you can specify whether the email should be sent on a specific date of the week or at a specific time of day, as shown in Figure 6.21:

Figure 6.21 – Schedule in a waiting tile
- Actions: You have three different action tiles:
- Create lead: This will create a lead based on the information from the contact doing the previous steps
- Choose a campaign: This tile links the contact to a specific LinkedIn campaign
- Choose a workflow: A classic workflow allows you to make certain actions within Dataverse

Figure 6.22 – Action tiles
- Sales activities: In sales activities, you can create an appointment, phone call, or task tile, as shown in Figure 6.23:

Figure 6.23 – Sales activities
To be able to create any of these activities, you will first need to create them as marketing templates, and then you can choose them in the tile. The next step is to decide who to assign the activity to, as shown in Figure 6.23.
- Custom tiles: In custom tiles, you can add a custom channel, as shown in Figure 6.24:

Figure 6.24 – Adding a Custom Channel tile
To add a custom channel, you will first have to create it and then connect the customer journey to it. A custom channel could be SMS, social media, or another channel that you wish to use in your customer journey. Custom channels contain custom tables, workflows, or plug-ins with your developer’s logic.
- Legacy tiles: The Event tile is the only legacy tile. Here, you can connect your outbound customer journey to an event and use that information in another tile. In Figure 6.25, I’ve selected an event for that tile:

Figure 6.25 – Event tile
Now, you’re familiar with all the tiles and can build your outbound customer journey. Before you start using it, let’s go through some general settings first.
General settings
In the General tab of the customer journey, as you can see in Figure 6.26, you can find important information, such as the Name, Owner, and Status details of the customer journey:

Figure 6.26 – The General tab in a customer journey
Let’s go through some of the most important information in the General tab.
Minimum consent
In the Minimum consent field, you can set which consent level your contacts need to be part of this customer journey. As you can see in Figure 6.27, a drop-down menu appears, from which you can select five different consent levels:

Figure 6.27 – Minimum consent
There are different rules and legislation you need to follow depending on where you and your customers live. If your customer journey sends marketing information, then you need to be allowed to send your contacts marketing information and should select (4) Marketing. If your customer journey is to send a receipt to your customer, then the (2) Transactional option is what you want to use. When you send out your newsletters, you can select the (3) Subscriptions option.
Target
The Target field is where you select your target audience for this customer journey. As you can see in Figure 6.28, you can select either contact or an account:

Figure 6.28 – Target audience
Your customer journey will always be sent to contacts, no matter what you choose in this column. If you choose contacts in this column, then every contact is treated as an individual with no consideration of the account they are connected to in Dataverse. If your target audience is Account, the journey can group all your contacts by account, and show your contacts’ movement through the tiles on the account timeline.
Recurring
By default, your customer journey will only process each contact once. If you want a contact to go through the same customer journey more than once, you must add it as a recurring customer journey. To set a customer journey as recurring, you set the Is recurring field to Yes. You then get two new fields, as shown in Figure 6.29:
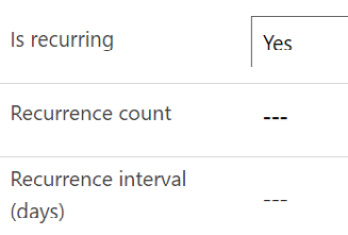
Figure 6.29 – Recurring customer journey
The Recurrence count setting is how many times a contact can go through the customer journey. The Recurrence interval (days) setting is how many days each recurrence interval should be – that is, how long it should be before a contact can go through the same customer journey again.
Suppression segment
If you have some customers to whom you should never send any messages, you can add them to a suppression segment. Some of you might be wondering about the difference between a suppression segment and specifying an exclusion segment in the audience style. They both do the same thing but work slightly differently. In the exclusion segment of the audience, you exclude contacts from starting the customer journey. If a contact is added to the exclusion segment after they have started the journey, they will still continue the journey until the end. If you use a suppression segment, these contacts will be blocked from continuing the customer journey. You can use a suppression segment by going to the General tab and finding the segment you want to exclude, as shown in Figure 6.30:

Figure 6.30 – Suppression segment
Last but not least, let’s take a look at how we can use content settings.
Content settings
As shown in Figure 6.31, you can connect your content settings to your customer journey. This way, all your content will be linked to the correct content settings, and we’ll fill out some information from the content settings:
Figure 6.31 – Content settings
Now, we’ve gone through how you create and what you can do with an outbound customer journey, but we also want to get better at what we do, so let’s look at analytics and how they work.
Analytics
Scottish Summit (https://scottishsummit.com/) is one of the biggest community events in the Microsoft world. Scottish Summit uses Dynamics 365 Marketing to keep track of its events and communication with contacts. The analytics we can see in Figure 6.32 are an email blast that was sent to previous attendees of Scottish Summit:
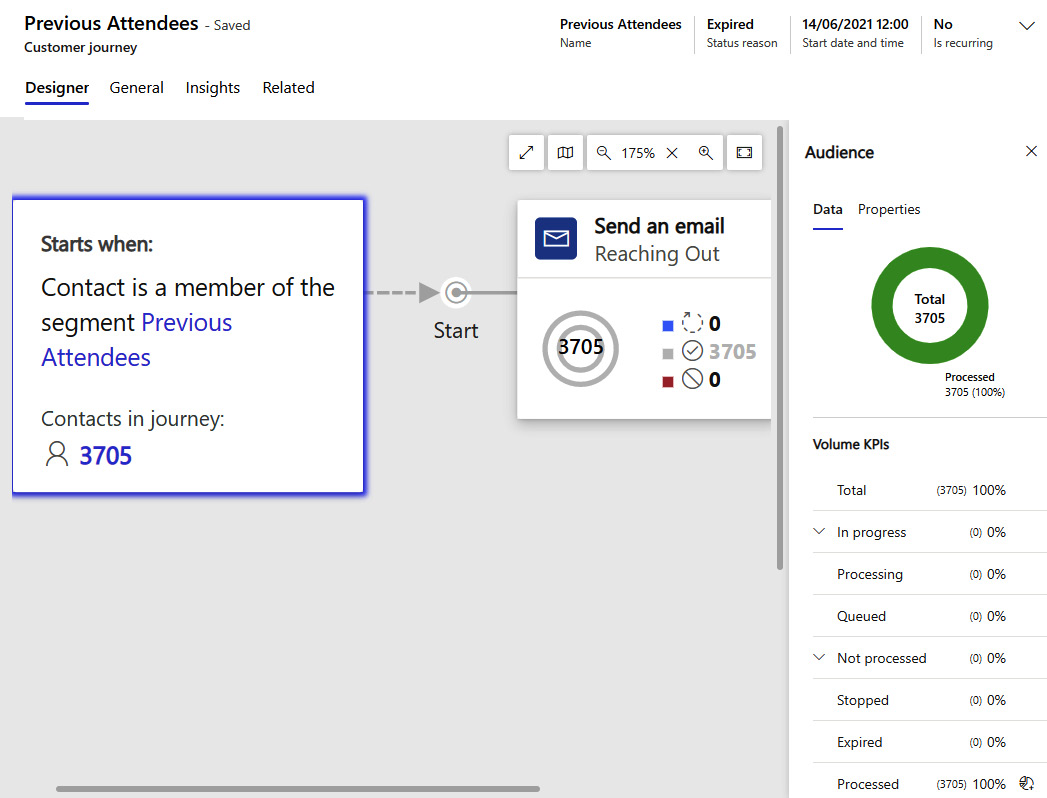
Figure 6.32 – Customer journey to previous attendees
If I click on the Audience tile in a customer journey that has run, I will see some data end statistics about the audience.
If I click on the Send an email tile, I will get a different set of statistics, as shown in Figure 6.33:

Figure 6.33 – Statistics from an email tile
All the different tiles you are using will show you different statistics based on how your contact has interacted with that specific tile.
When you’ve selected an email tile and see the delivery KPIs, you can click on View details, as shown in Figure 6.34, to get more information about email statistics:
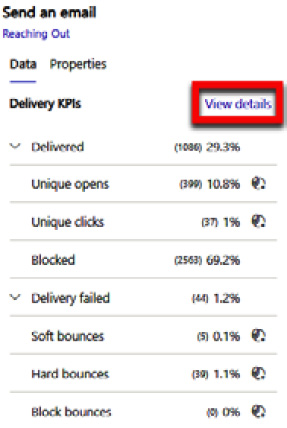
Figure 6.34 – Viewing the details of delivery KPIs
You can then get more statistics about the email connected to the customer journey and can see how people have interacted with the email as shown in Figure 6.35:

Figure 6.35 – Email statistics of a customer journey
In the Insights area, you can see some statistics as shown in Figure 6.36:
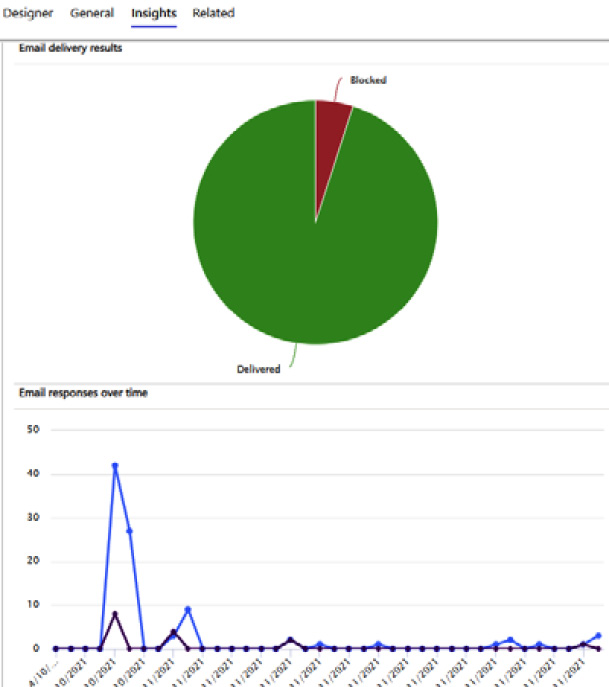
Figure 6.36 – Insights statistics
You can see a pie chart of the email delivery results. The green is Delivered and the red is Blocked. You can also see the email responses over time, showing who has clicked on the links and who has opened the email.
You can also see incomplete journeys, as shown in Figure 6.37:

Figure 6.37 – Incomplete journeys
Here, you can go through all the stopped contacts. Maybe they have joined a suppression segment, or they don’t have the correct consent.
You can also see the ones that have blocked emails for any number of reasons. This list should be looked after by your users and cleaned up so that you have good data quality.
Summary
In this chapter, we have gone through most of the things you need to know about creating an outbound customer journey. We’ve seen how you can create an outbound customer journey. We’ve gone through all the tiles you can use when creating one and how they can help you. We’ve gone through the important settings and how they can affect your contacts and your customer journeys. We finished by looking at the analytics to find out how they can help us get even better and create more amazing outbound customer journeys for our contacts.
In the next chapter, we are going to see how we create our customer journeys in Real-time marketing. There are several similarities between outbound customer journeys and Real-time marketing journeys. Which one is most suited for your company’s needs will become clearer when we go through Chapter 7, Real-Time Marketing Journeys.
Questions
The following are some questions that will help you gauge your understanding of the topics discussed in this chapter. The answers are available in the Assessments section at the end of the book.
- How can you use outbound customer journeys?
(a) To send emails to customers
(b) To reply to your customers
(c) To say how you interact with customers
- How many times will a contact go through a customer journey by default?
(a) 1
(b) 10
(c) Unlimited
- You can use either a suppression segment or an excluding segment audience; they both do the same thing.
(a) True
(b) False
- In the Send an email tile, you can make changes to what?
(a) The design of the email
(b) The send time of the email
(c) The content settings of the email
(d) The expiration of the email
- What always needs to be done before you can start using the customer journey?
(a) Saving
(b) Publishing
(c) Going live