
7
Real-Time Marketing Journeys
In the previous chapter, we went through what customer journeys are – how you interact with your audience. Outbound customer journeys was the first way of doing this. Real-time marketing journeys are the new preferred way of doing this. Microsoft is focusing on developing real-time marketing journeys, so this is where all the new and helpful tools will be.
In this chapter, we are going to go through real-time marketing triggers and journeys, how you can create them, and what you can do with them.
We’re going to cover the following topics:
- Real-time marketing triggers
- Creating and understanding real-time marketing journeys
- Analytics
We’re going to start by looking at how you create and understand real-time marketing journeys. We’re going to see how you can use them and how you can utilize the real-time marketing triggers to create marketing journeys for your customers in real time. By the end of the chapter, you will be able to create and use triggers and real-time marketing journeys.
Real-time marketing triggers
One of the biggest differences between outbound marketing and real-time marketing in Dynamics 365 marketing is the triggers. There are several triggers set up out of the box, but you can also set up your own triggers. Let’s say you want to send an email to everyone that has abandoned their cart on your website; this can be done with triggers. You can find and create triggers from the Real-time marketing area, under Engagement and Triggers, as shown in Figure 7.1:

Figure 7.1 – Out-of-the-box Real-time marketing triggers
As you can see in Figure 7.1, there are several triggers ready for you to use, such as when a contact updated their email address or responded to a Customer Voice Survey. Let’s go through some of the out-of-the-box triggers.
Out-of-the-box triggers
There are several out-of-the-box triggers already set up in Dynamics 365 Marketing. If you want to start a journey if the contact address is updated, or if there are any issues with the email, SMS, or push notification, all these triggers are already set up in the system:
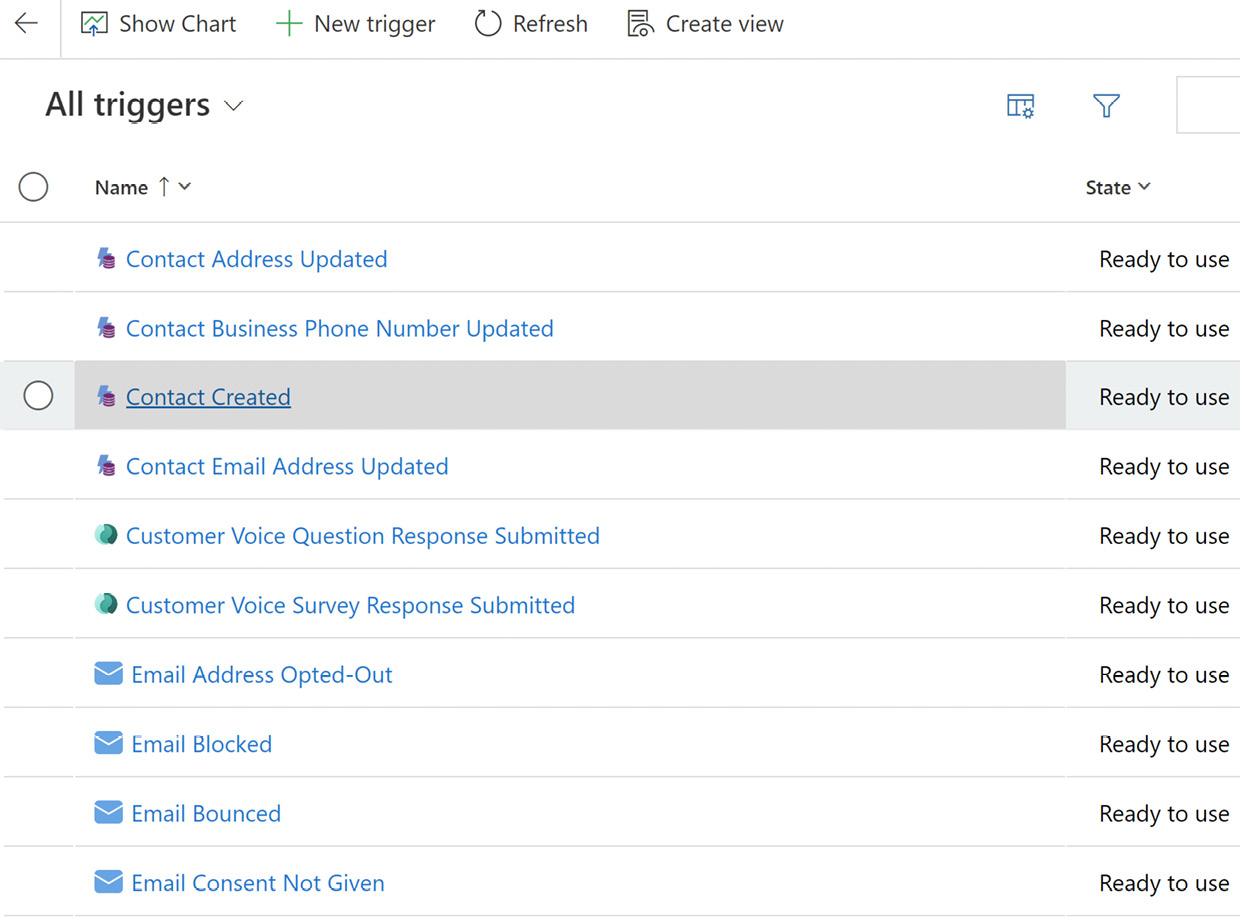
Figure 7.2 – Out-of-the-box triggers
Now that we’ve looked at the out-of-the-box triggers, let’s take a look at how we can create our own custom triggers.
Creating custom triggers
At times, it’s not enough to use the out-of-the-box triggers – you want to create your own triggers. Let’s see how we can create custom triggers. When you click on + New trigger, you can create a new custom trigger, as shown in Figure 7.3:
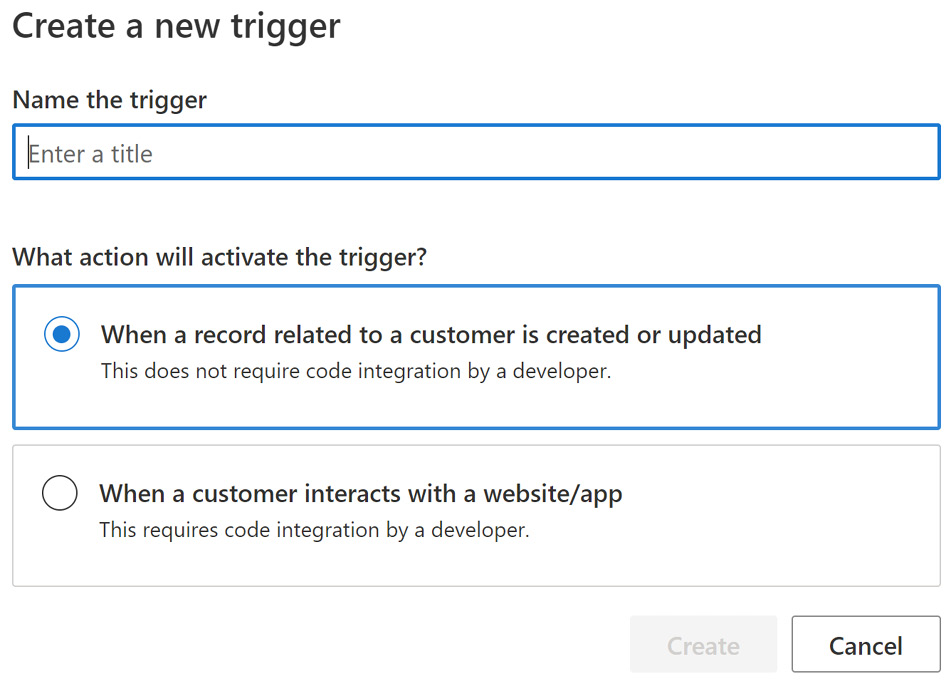
Figure 7.3 – Creating a custom trigger
First, you need to give the trigger a name. You then select the action that will activate this trigger. You can select When a record related to a customer is created or updated, where you don’t need to integrate the code with anything, or you can select When a customer interacts with a website/app, where you need to integrate the code to a website or an app. Let’s start with going through how you can activate the trigger when a record related to a customer is created or updated.
When a record related to a customer is created or updated
When you select When a record related to a customer is created or updated, there are several choices you need to make to create the trigger. Let’s go through all of them and see what they all mean:
- In which table is the record created or updated? is the first dropdown you get. This is where you choose the table that the contact created or updated, as shown in Figure 7.4:
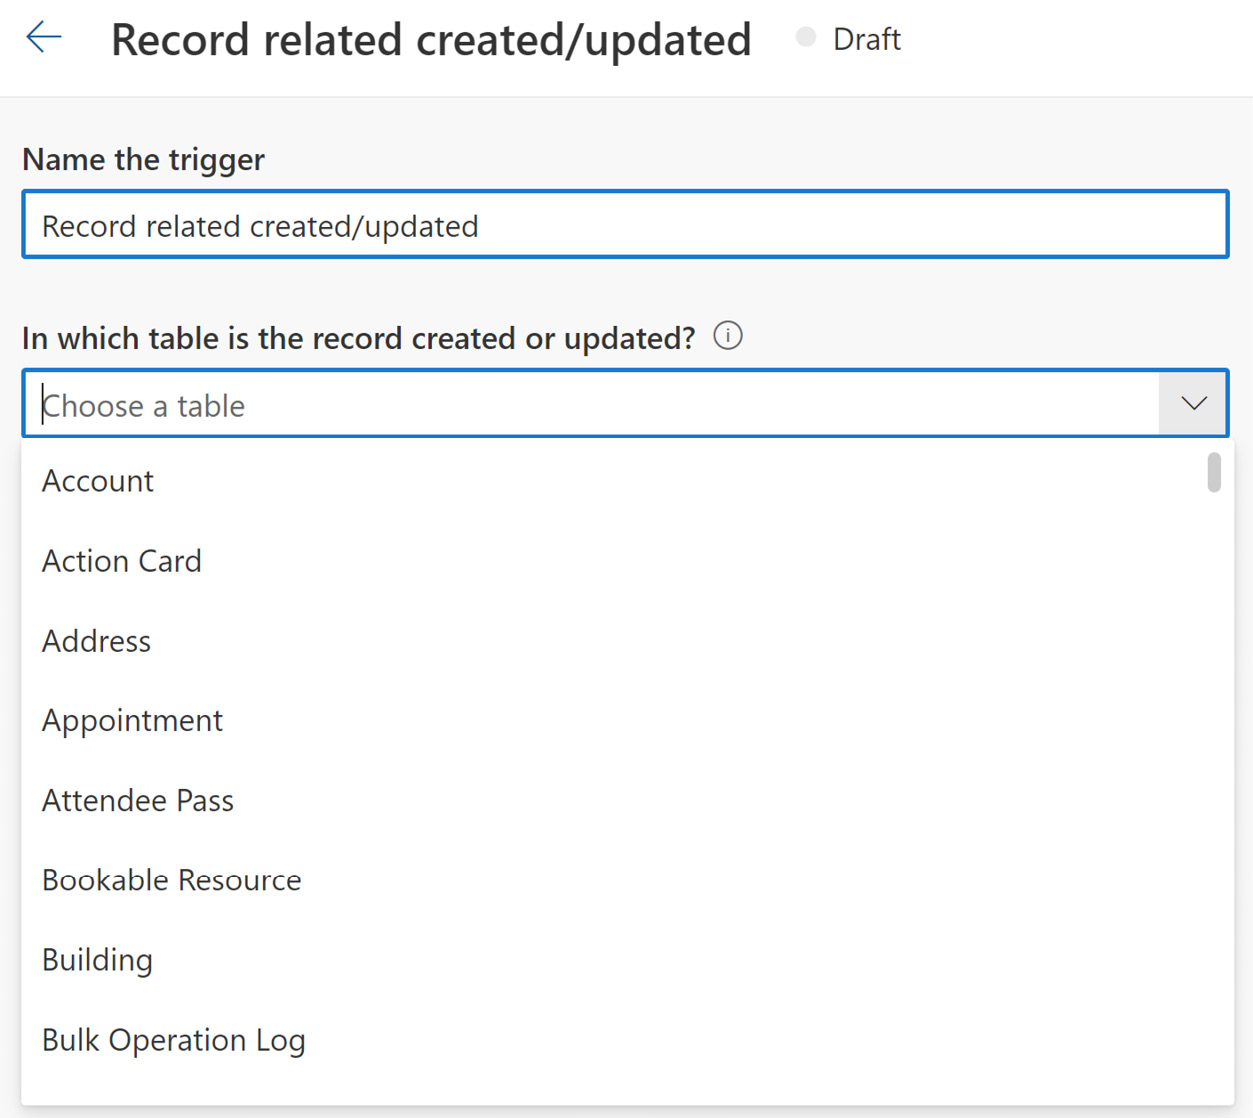
Figure 7.4 – Selecting the related table
- The next step is Who is the audience for this trigger?. Here, you can select Contact (via attribute Primary Contact) or Lead (via attribute Originating Lead), as shown in Figure 7.5:

Figure 7.5 – Selecting the audience
When you select the audience, these are the rows that will trigger the journey. It will only trigger for the one person who is the primary contact for the account, or for the originating lead that created the account.
- You can then select an option for When is the trigger activated?. Here, you can decide whether it should trigger when a new record is created, when an existing record is updated, or when any of the two happen, as shown in Figure 7.6:

Figure 7.6 – Deciding when the trigger is activated
- The last step is to select which attribute updates should activate the trigger. In this step, you can select any of the columns that are on the related record that should activate the trigger, as shown in Figure 7.7:
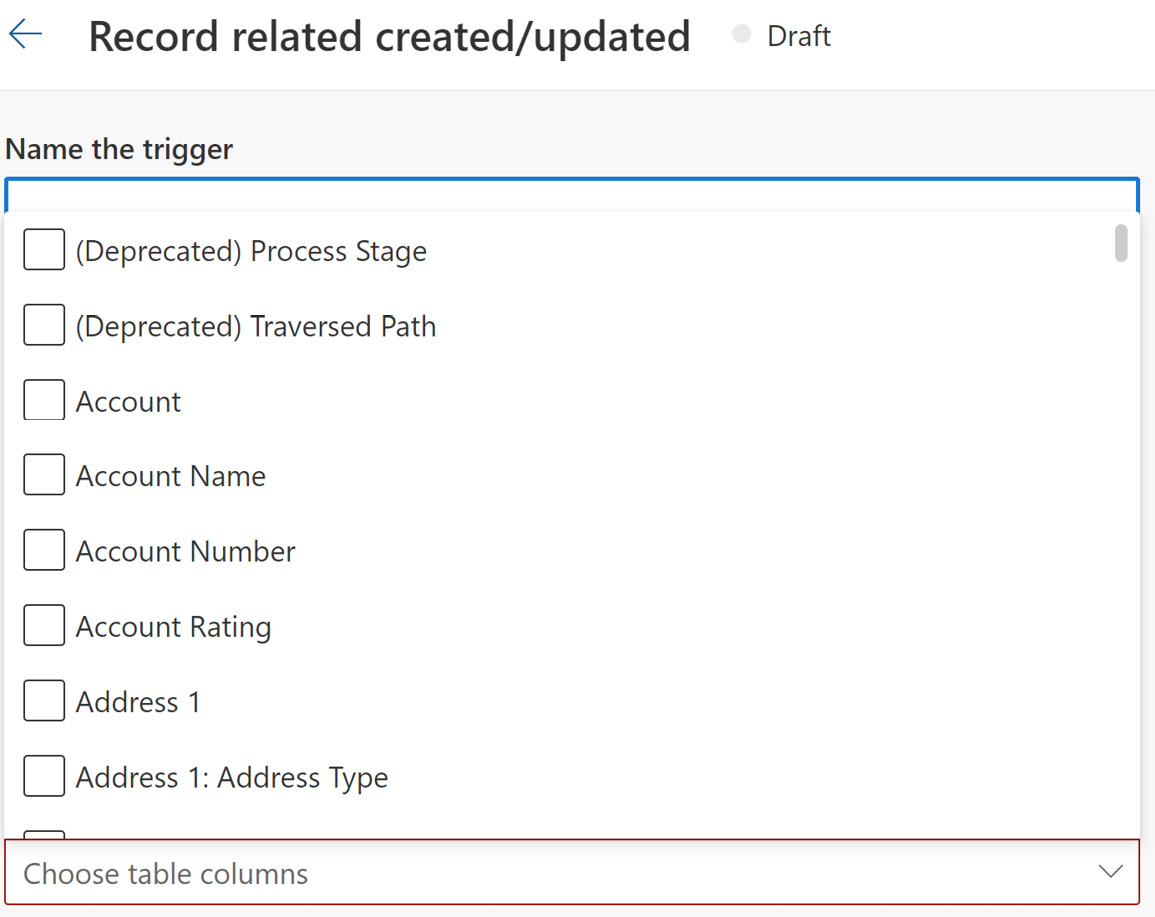
Figure 7.7 – Attribute updates that should activate the trigger
For example, if you select Email, then this trigger will activate for the contact or lead every time the Email column is changed on the related table.
- When all these steps are completed, you can use the trigger in a journey after you’ve set it as ready to use. The Ready to use button will appear when you’ve completed all the previous steps, as shown in Figure 7.8:

Figure 7.8 – Ready to use
Now, your new custom trigger that activates when a related record is created or updated is ready to use.
If you want to activate the trigger based on contact information changing, you do the following steps:
- Select Contact as the table.
- Select Contact (via self) as the audience.
- Select when the trigger is activated.
- Select the attributes that should activate the trigger.
When you do this, you get the setup shown in Figure 7.9:
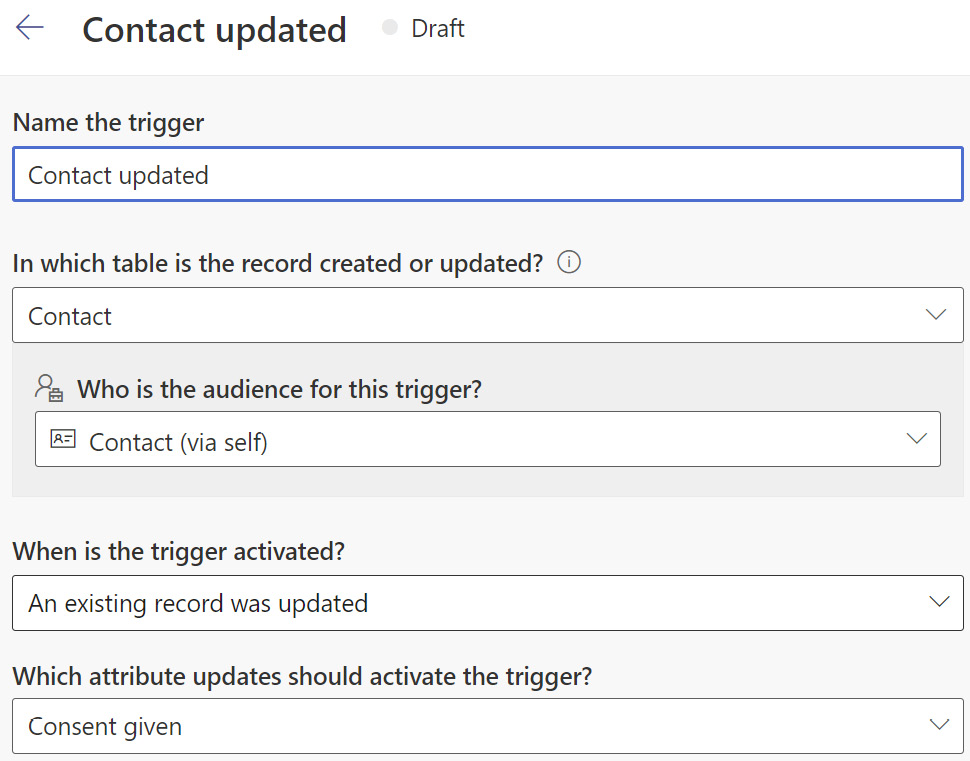
Figure 7.9 – Contact updated
Creating a trigger as we have done in these examples is a no-code version of setting up triggers. Let’s see how you can create a trigger and integrate it with some help from a developer.
When a customer interacts with a website/app
The other way of creating a custom trigger is to select When a customer interacts with a website/app. This has different steps and will most often require help from a developer to use:
- The first step is the actual setup of the trigger. As shown in Figure 7.10, the first action is to select the data type – do you want this trigger to contain information about the lead or the contact?
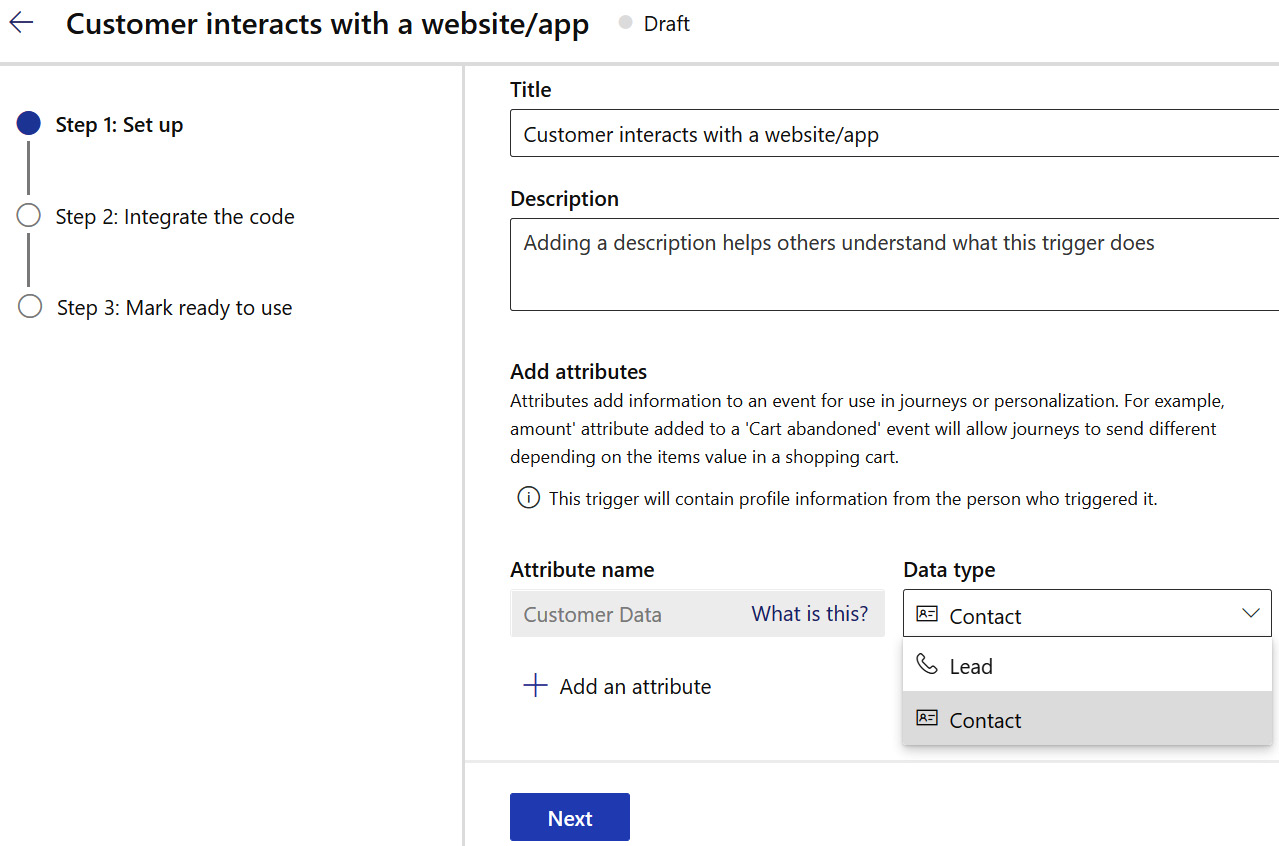
Figure 7.10 – Selecting the data type
- The next step is to add the attributes; these are the pieces of information you want to use further in your journey. In my example, I’ve added First name, which is a Text data type, and Is working in IT, which is a True or false data type, as shown in Figure 7.11:

Figure 7.11 – Selecting attributes and data types
You can add as many attributes as you want to in this step; you’ll map them when you add them to a journey.
- After you click Next, it’s time to integrate the code where you want to use it. You can either download the file or copy the code snippet link, as shown in Figure 7.12:
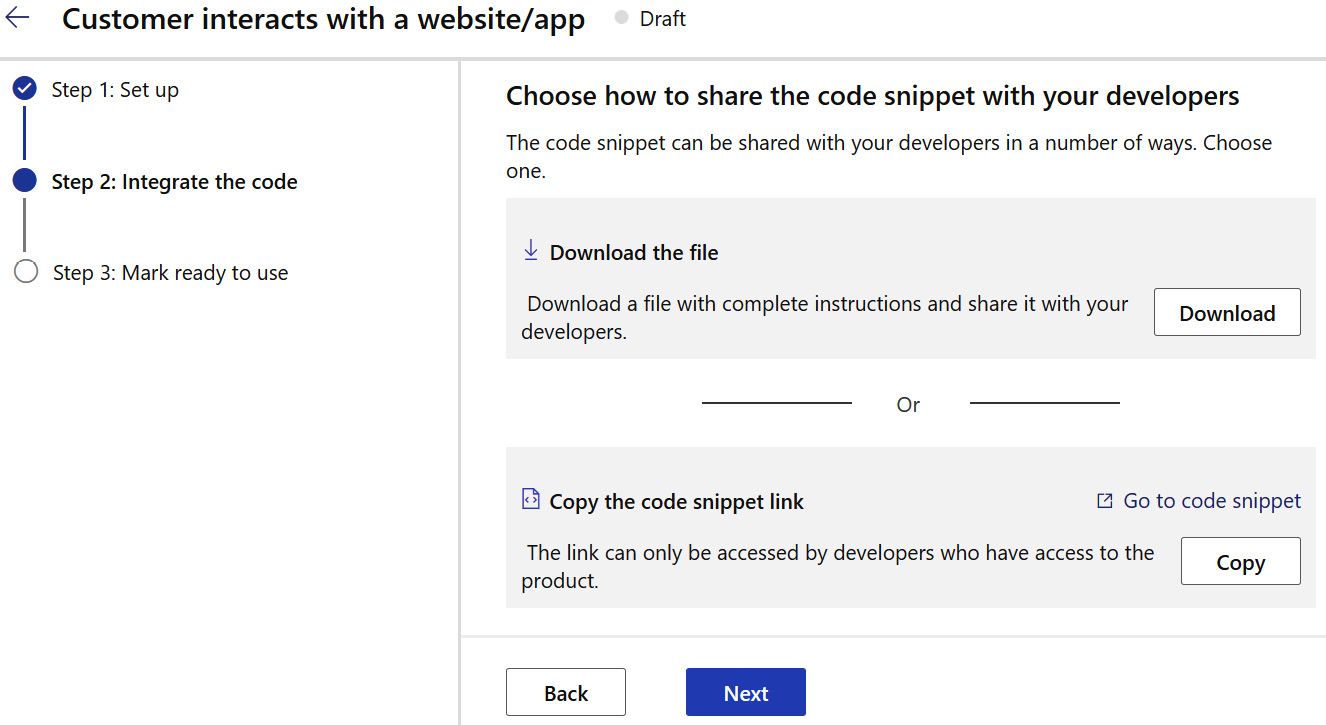
Figure 7.12 – Integrating the code
- If you click on Go to code snippet, you can select which code language you want to copy the code in:
- JavaScript
- C#
- iOS/macOS (Objective-C)
- Python
- Android
Your developer will be able to tell you which language they want the code in. Once you’ve copied the code, you can move on to the next stage.
- The last stage is Mark it ready to use. You can use the trigger once it’s been set as ready to use, but it will not do anything until it’s integrated where you are getting the information – for example, your website or Power Automate. You can see from Figure 7.13 that it can be used to build customer journeys, but it can’t be triggered until it’s integrated:
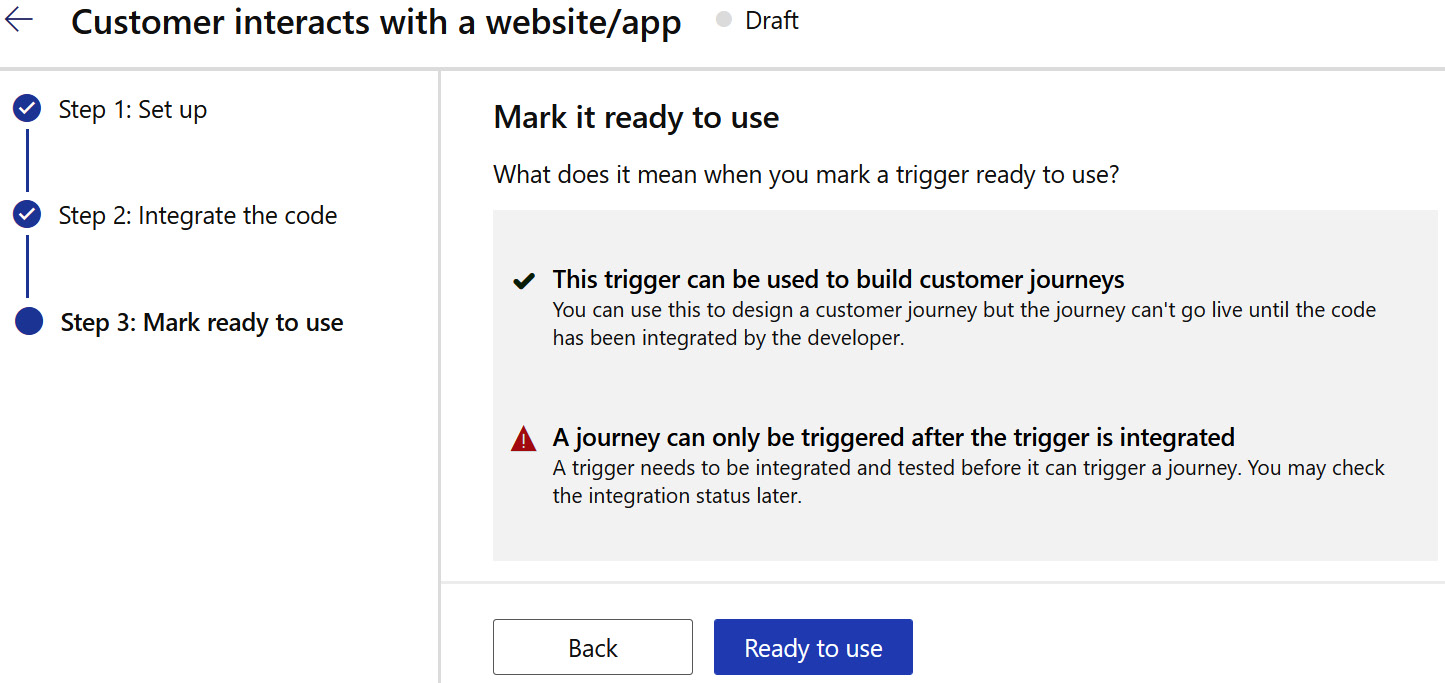
Figure 7.13 – Marking the trigger ready to use
When you click Ready to use, you will see a message saying the trigger is getting ready to use. It will start working as soon as you’ve integrated the trigger code, as you can see in Figure 7.14:
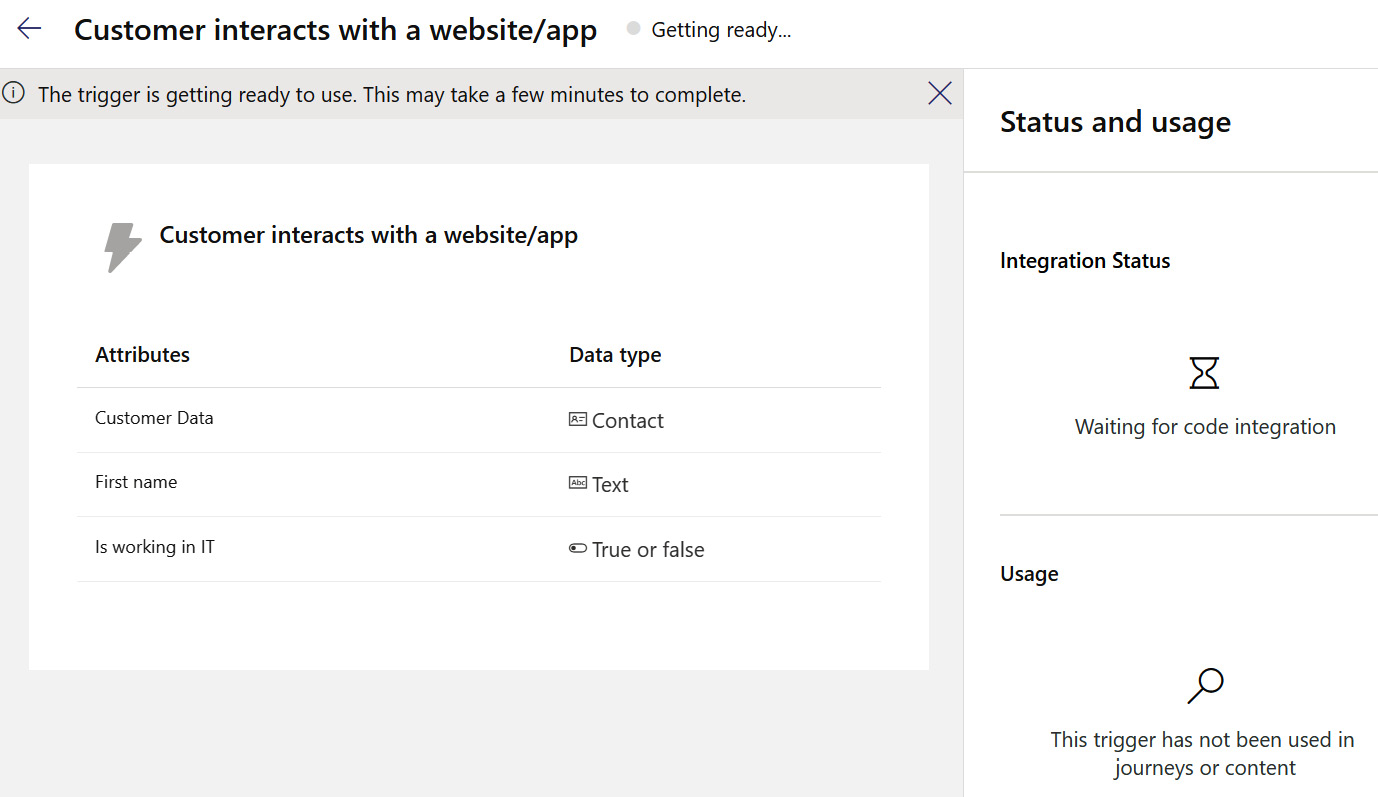
Figure 7.14 – Setting the custom trigger as active
Now, it’s time to start using the triggers in a real-time marketing journey. Let’s look at how you create and understand real-time marketing journeys.
Creating and understanding real-time marketing journeys
Real-time marketing journeys are how you will interact with your customers. They are the interactions your customers will have with you. This is where you define what kind of information the different people should get. Let’s see how we can create and use real-time marketing journeys.
Creating a real-time marketing journey
The first thing you need to do when creating a real-time marketing journey is to give the journey a name. You should give the journey a name that describes what this journey does so that it is easy to find that journey later.
The next thing to do is choose the type of journey: should this journey be trigger-based or segment-based? To determine that, let us dig deeper into these two different types of journeys.
Trigger-based journey
To start a journey that is trigger-based, you select the Trigger-based tile. You can then choose the trigger; this trigger must already be in the system and set to ready to use. Once you’ve created your trigger, you can also add conditions. Perhaps you don’t want to run this journey on everyone it triggers for; maybe you just want to run this for your Gold customers. You specify the trigger you want to use to define your audience, as shown in Figure 7.15:

Figure 7.15 – Trigger-based creation
After you’ve chosen the trigger, you can choose an attribute from that trigger to activate the journey. In Figure 7.16, you can see that I’ve chosen the custom trigger that we created earlier in the chapter and decided that it should trigger every time the customer is working in IT. This makes sure that none of the people that don’t work in IT activate this trigger and start this journey:

Figure 7.16 – Selecting an attribute from the trigger
Now, we’ve gone through how you start a journey by using a trigger. This can be any of the out-of-the-box triggers, or you can use custom triggers to get the journey to trigger based on anything you want.
We can now look at how we create the other type of journey: segment-based.
Segment-based journey
As you do in outbound customer journeys, you can select to start a journey by choosing a segment. There are some steps you must complete before you can create your journey:
- Click on Segment-based and select a segment, as shown in Figure 7.17:
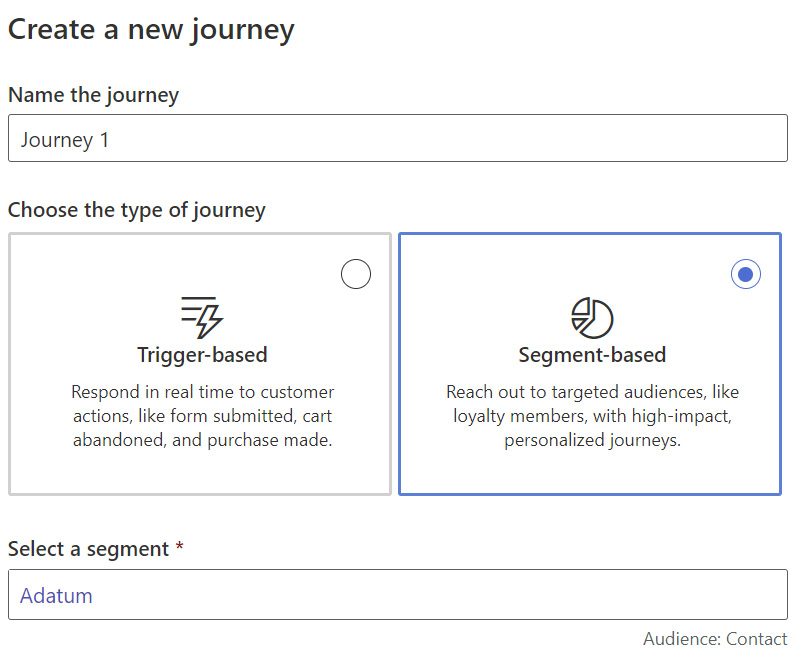
Figure 7.17 – Selecting a segment
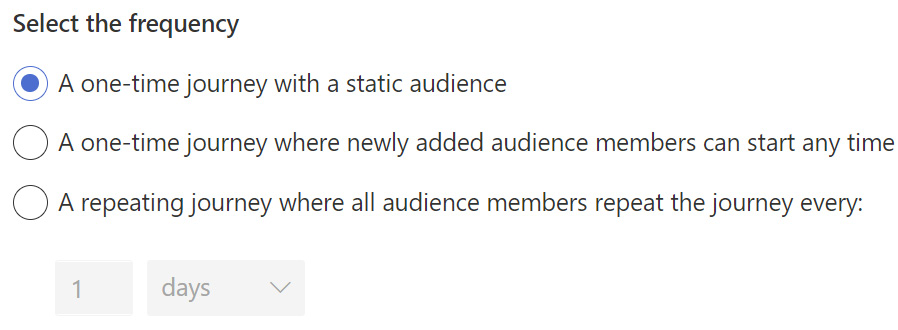
Figure 7.18 – Selecting the frequency
Let’s look at the frequency options:
- A one-time journey with a static audience: This will only trigger the journey once with the audience you set and will not be triggered again, even if contacts are added to the segment.
- A one-time journey where newly added audience members can start anytime: This will allow contacts to go through the journey one time and never again. New contacts will also be added to the journey.
- A repeating journey is where all audience members repeat the journey every X days, weeks, or months: With this option, the contacts can go through the same journey several times – how often is defined by the time restriction you set.
- The time zone that is set in your system is automatically set as default, but this can be changed, as shown in Figure 7.19:
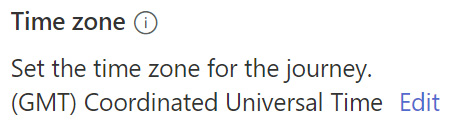
Figure 7.19 – Time zone
- Select a start date and time, as shown in Figure 7.20:

Figure 7.20 – Start date
- Now, you can click Create, and a new canvas will open where you can create your customer journey, as shown in Figure 7.21:
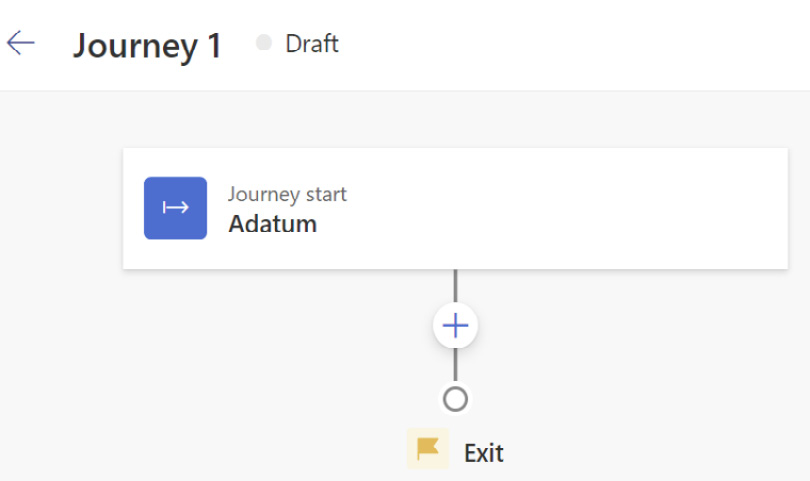
Figure 7.21 – A blank canvas for the journey
Now we have the canvas where we can create our journey, but first, let’s go through the journey settings.
Journey settings
When you first set up your journey, you will see Journey settings on the right-hand side, as shown in Figure 7.22:
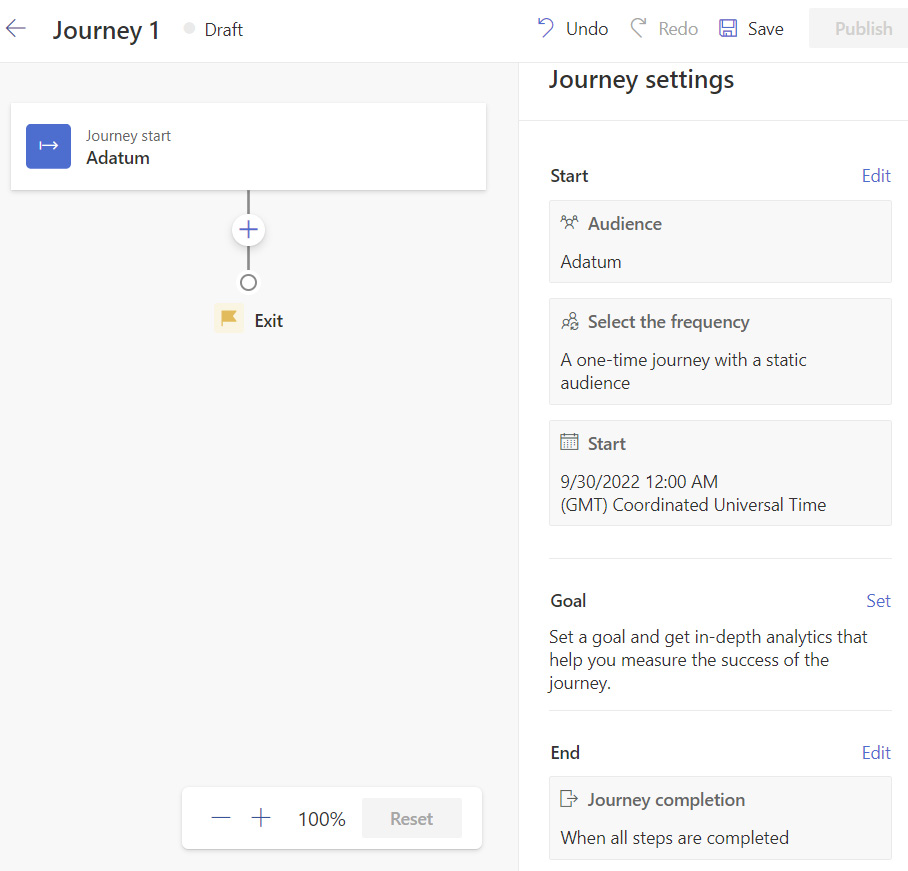
Figure 7.22 – Start, goal, and end of a new journey
Here, you can make some changes to the setup that you used when creating this journey. You can change the start date/time, set a goal, and set an end for when the journey is completed. Let’s take a closer look at the changes you can make in the settings area.
Start
In the Start section, you can change the very same things that you selected when you set up the journey. If you chose a trigger-based journey, you can now change the trigger, add or change conditions, exclude contacts from certain segments, and decide whether the contact should repeat the journey, as shown in Figure 7.23:
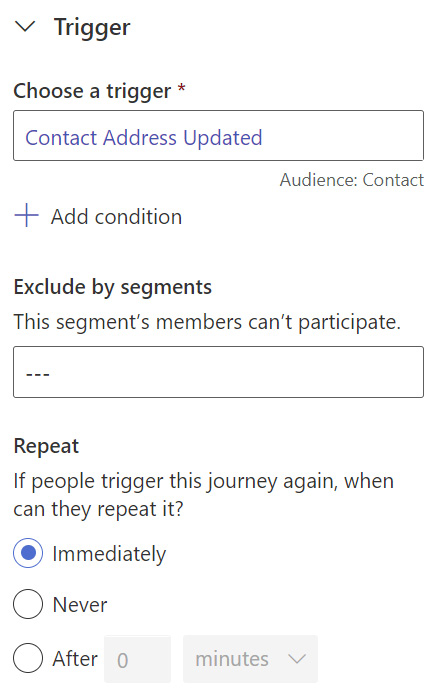
Figure 7.23 – Changing the trigger
If you chose a segment-based journey, you can set the segment that triggers the journey, select the frequency (who the journey should trigger for and how often), and exclude people in certain segments, as shown in Figure 7.24:
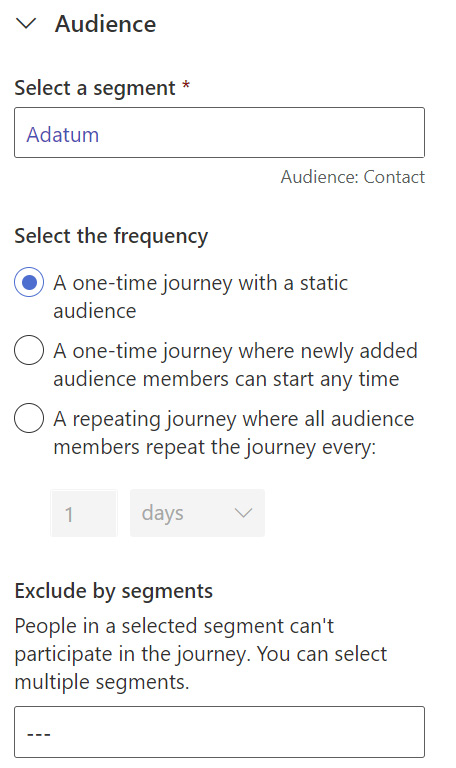
Figure 7.24 – Changing the segment, selecting the frequency, and excluding by segment
Goal
In the Goal section, you can set what the goal of the journey is, when the goal is met, and how many people are needed to achieve this goal. As you can see in Figure 7.25, you have a standard set of goals, but you can also create your custom goal. You can define that a goal is met when it has triggered one of your marketing event triggers:
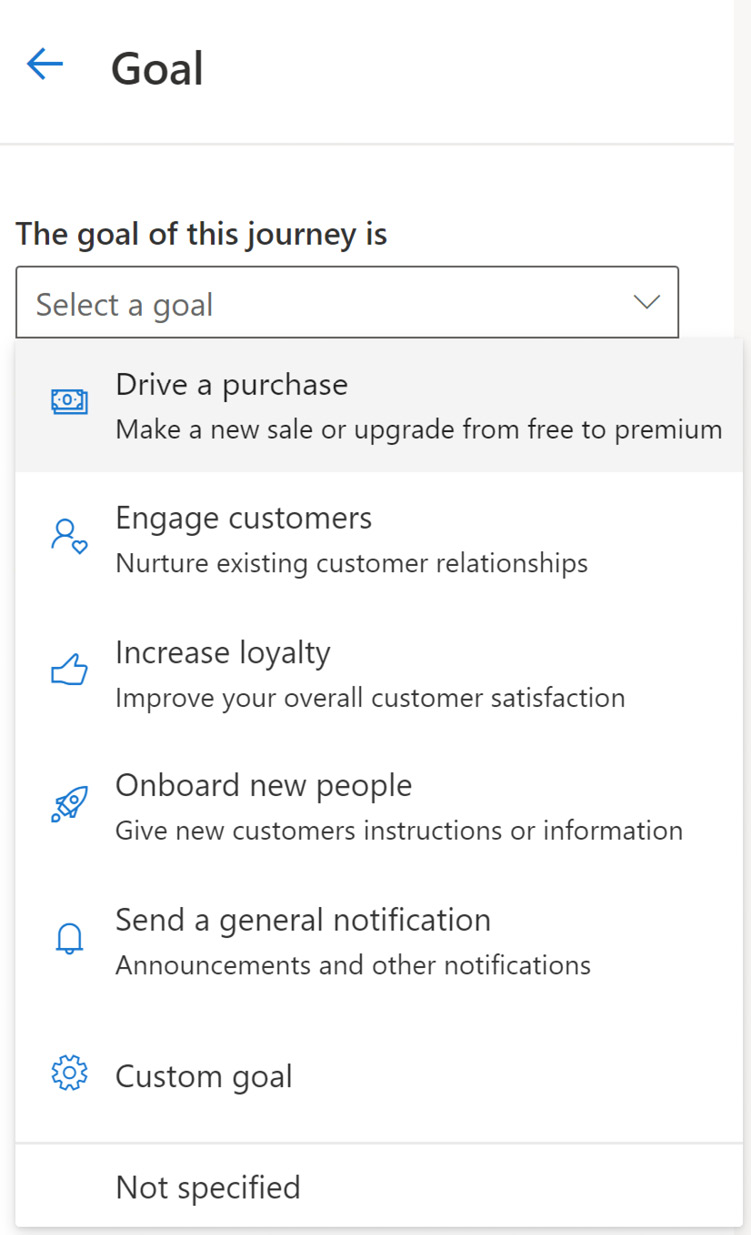
Figure 7.25 – Configuring the goals of the journey
Now, let’s go through how we can set an end to the journey.
End
In the End section, you can set when a journey is completed. By default, when a contact has completed all the steps in the path, then the journey is set as Completed. You can also set up other exit routes, such as when a trigger occurs or when a contact is put in a segment. Maybe you’ve put up a sales journey to get customers to buy your new solution; if they do buy this solution, then you don’t want them to continue to get notifications and emails about that solution. Even though they still haven’t completed all the steps in your journey, you want them to exit this part because they are now in the segment of customers who have bought this solution.
Now that we’ve seen how we can set our goals and make changes to the settings, let’s start going through how we can make changes to the journey.
Adding actions or other elements
The first step in creating a journey for the customer is to create actions and other elements. These are all the steps that your journey will go through. Let’s go through what you can create with actions and other elements.
Action
Adding an action to a journey is what you will do most in any journey. This is where you can add the ability to send an email, text message, or push notification. To select an action, you click on the blue + button in your canvas, as shown in Figure 7.26:

Figure 7.26 – Adding an action to the journey
When you click on the blue + button, a new window will open where you can select Send an email, Send a text message, or Send a push notification, as shown in Figure 7.27:

Figure 7.27 – Adding actions
Send an email
To send an email through the real-time customer journey, select the Send an email tile. A panel on the right-hand side will appear where you can select the email and select where you want to send that email, as shown in Figure 7.28:
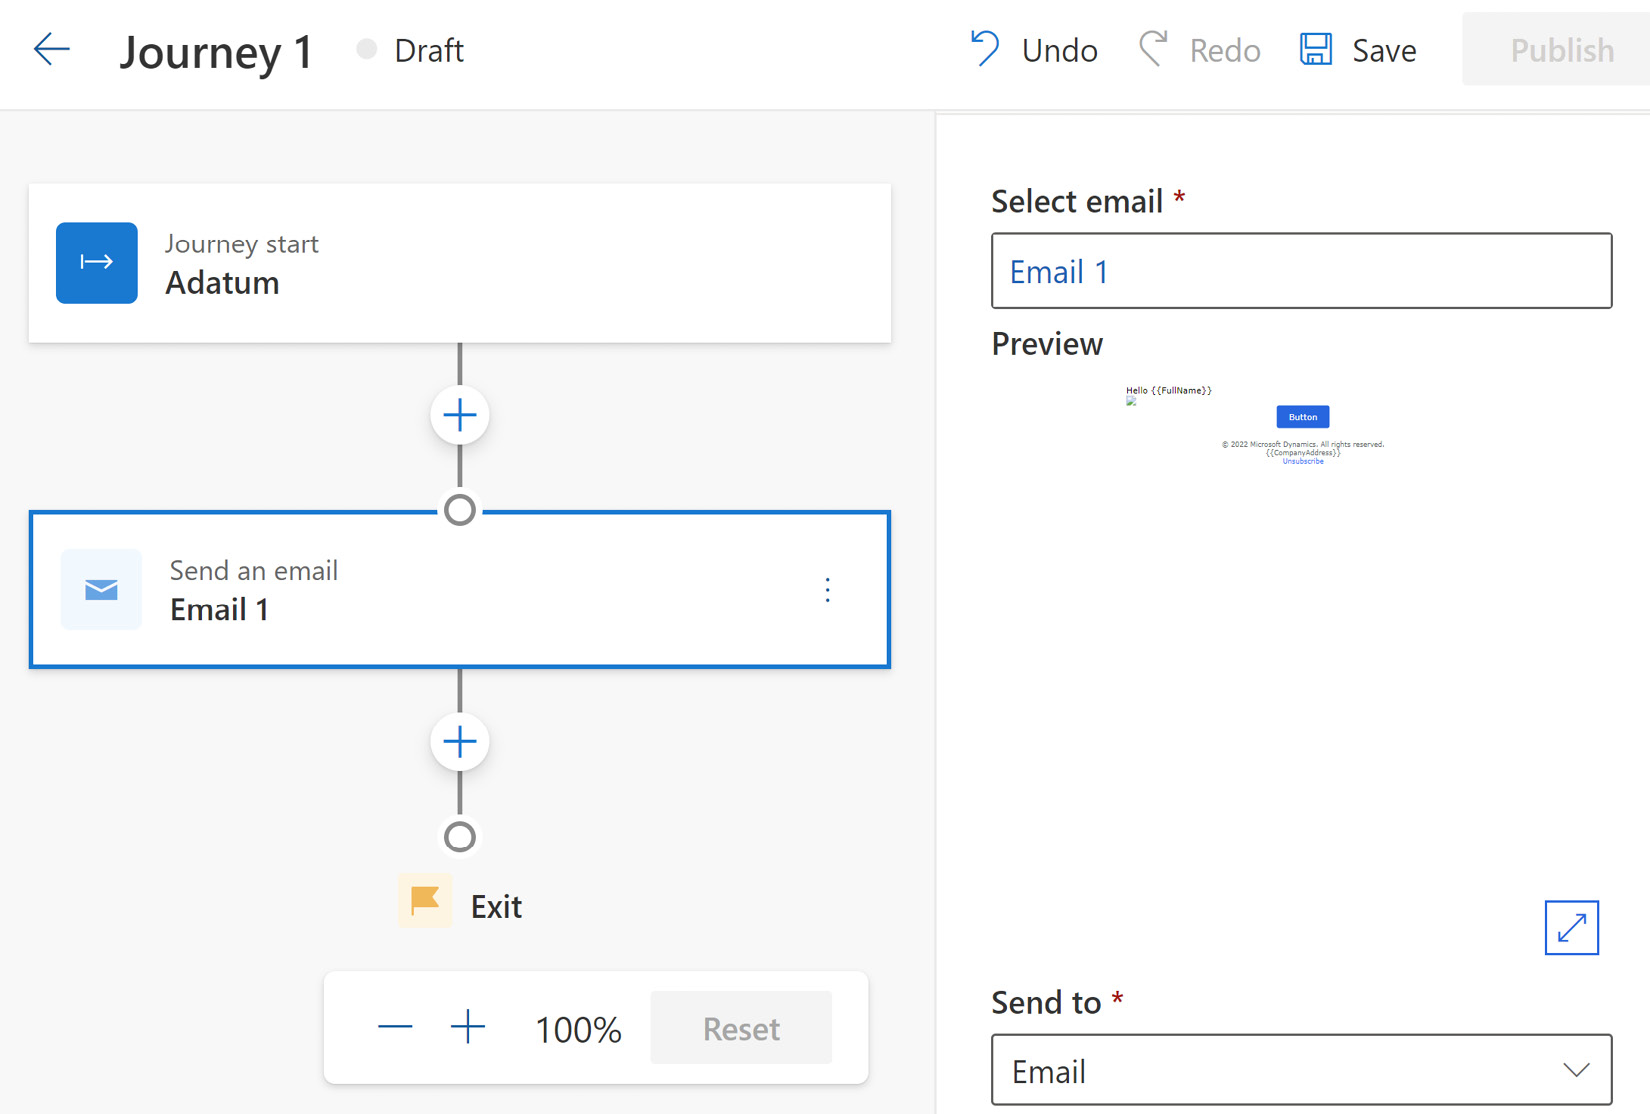
Figure 7.28 – Send an email
To connect your journey to an email, you must have created the email previously. You can also create an email from the journey window; this will automatically add the email. Let’s see how we can send a text message.
Send a text message
To send a text message, select the Send a text message tile. As you can see in Figure 7.29, this opens a panel on the right in which you have to choose the text message you want to send, choose a text message sender, and choose to whom you want to send the text message:
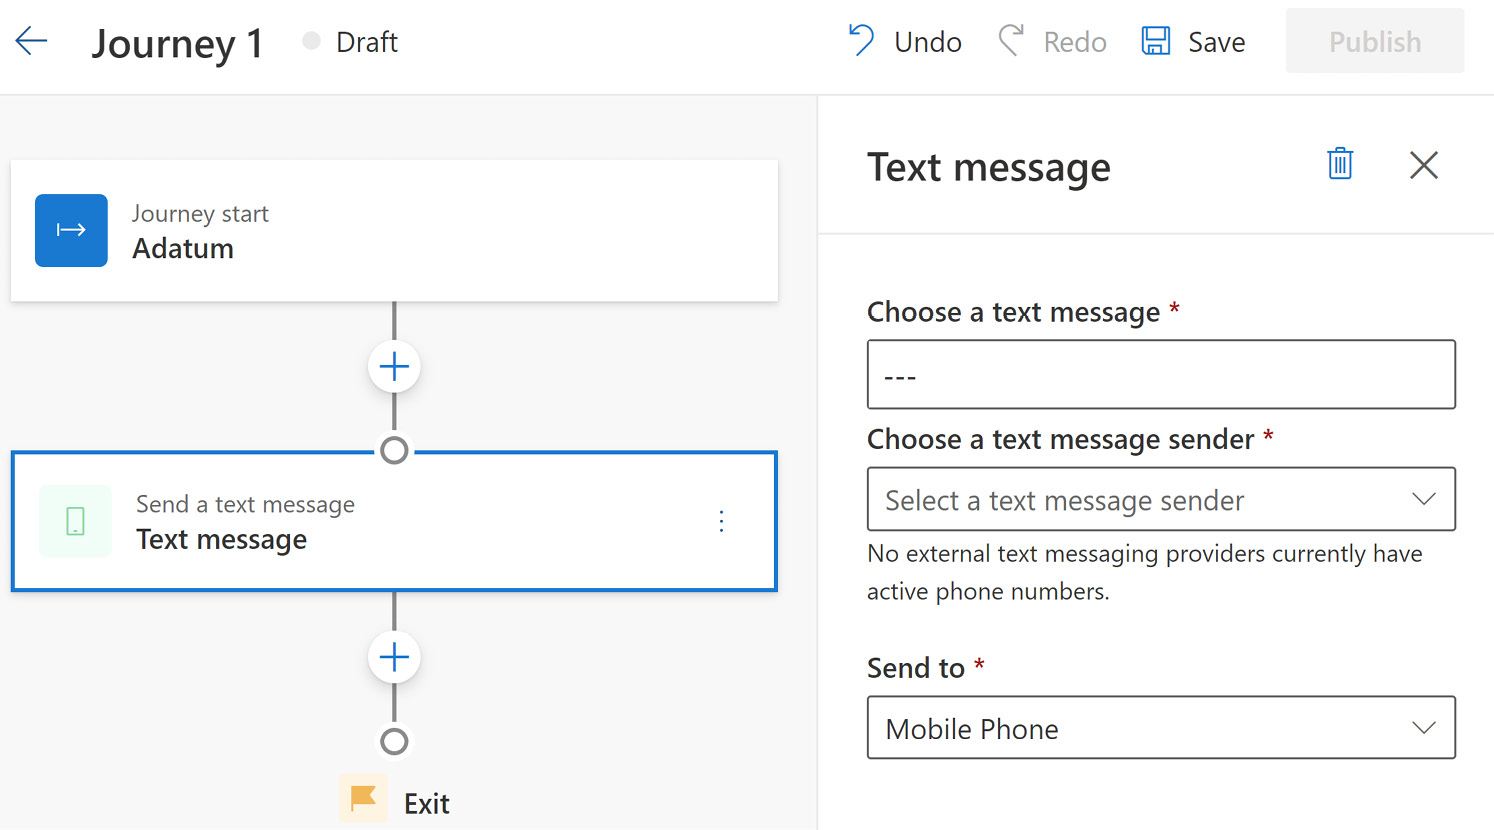
Figure 7.29 – Send a text message
As with sending an email, you must have created the text message and the text message sender before you can send the text message. As with the email, you can create the text message from this window and have it connected with the journey. Let’s look at the last action tile, sending a push notification.
Send a push notification
To send a push notification, you select the Send a push notification tile. This will open the same type of panel as you saw with email and text. Here, you need to select a mobile application and the actual push notification you want to push, as shown in Figure 7.30:
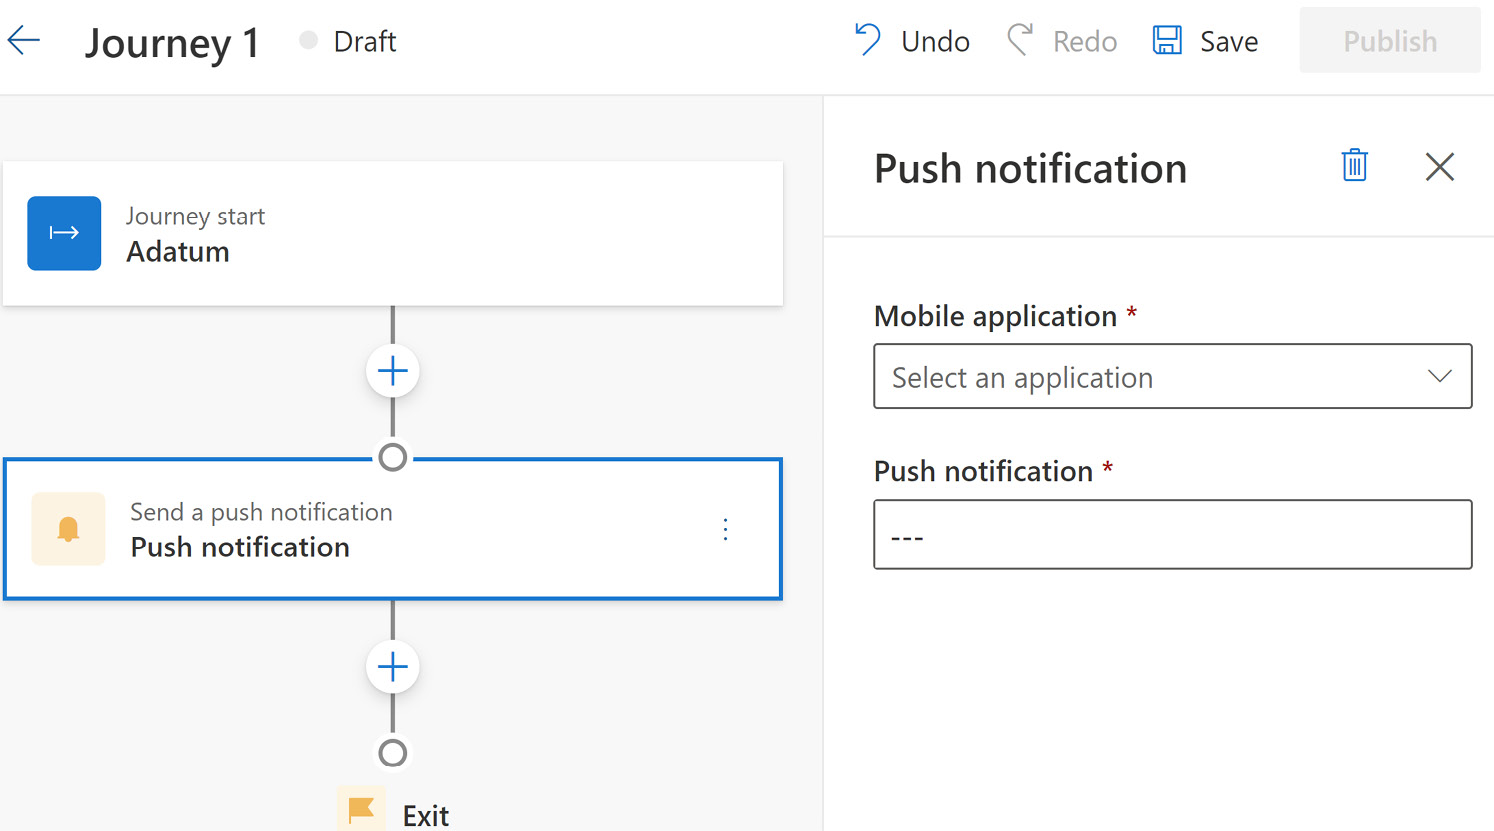
Figure 7.30 – Push notification
The push notification and mobile application must be set up before you can do this. As with emails and text messages, you can set up the push notification from this window.
These are the action tiles, and they are the ones you will use the most. Other elements will help you create a better journey for your audience. Let’s get to know the other elements better.
Other elements
As well as sending emails, text messages, and push notifications on the journey, you can also act on how the customer reacts. Other elements that you can add are shown in Figure 7.31:

Figure 7.31 – Adding other elements
Let’s go through these elements and see how they can help you create a better journey for your customers.
Respond to an action
When you select Respond to an action, you get an If/then branch option. You can send the customer down a positive or negative branch, as shown in Figure 7.32:

Figure 7.32 – If/then branch
You first choose the branch condition type. This is where you can choose the email, text, or push notification we sent to the customer in a previous step, as shown in Figure 7.33:

Figure 7.33 – Choosing the interaction point for the if/then branch
You should also define the time limit, where you can specify when the customer has to have performed the trigger to go down the positive (Yes) branch. If they do not perform the trigger within the set time, then they’ll go down the negative (No) branch.
After you’ve set what interaction element your branches are based on, you can set what type of interaction trigger you want to use, as shown in Figure 7.34:

Figure 7.34 – Choosing an interaction point
When you’re using email, you can either select when the email link is clicked or when the email is opened as the interaction point. You want to see whether a customer has opened the first email you sent before you send another email. You don’t want to send the email to the customer if they haven’t opened the first email, or you might want to send a follow-up email if they haven’t clicked on a link to sign up for something.
The next thing you do is select the actions you want in both branches, as shown in Figure 7.35. If you want one of the paths not to do anything, then you can leave it blank:

Figure 7.35 – Adding a step to the negative branch
Now, you can continue to build your customers’ paths until they have completed the steps. This type of branching is never combined again, so if you want to combine the branches or have a need to branch based on a specific value, then you shouldn’t use this trigger, but use another element instead. Let’s go through how you set up this element.
Branch based on a specific value
This element is a bit different from the previous element. When you add it, you get two branches as a start, but you can add multiple other branches. You must always have conditions in Branch 1, and customers that don’t meet the conditions in Branch 1 will move to the Other branch. These branches merge back together again, and you can continue the path as one journey. You can see this behavior in Figure 7.36:
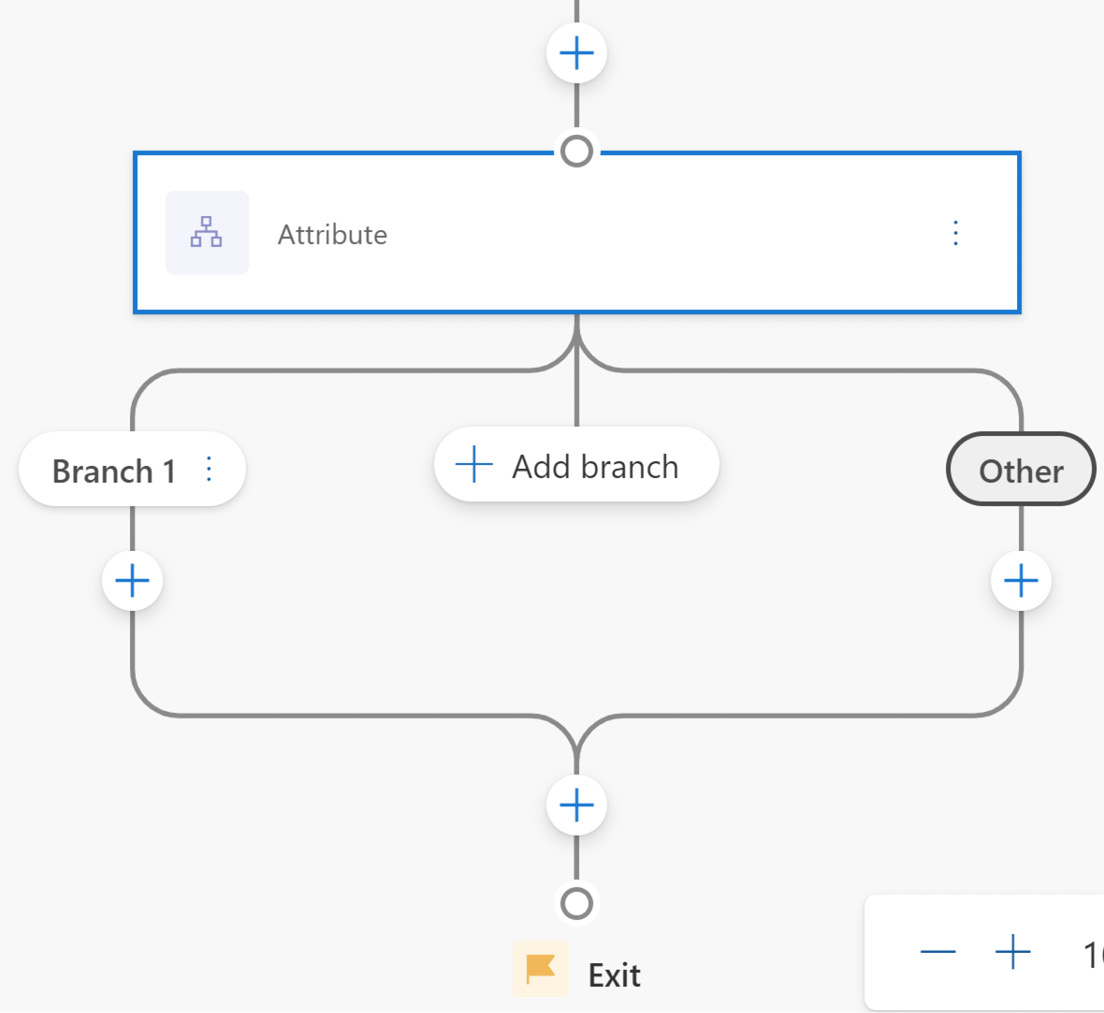
Figure 7.36 – Branch based on a specific value
To select who goes down the different branches, you can add conditions to each branch, as shown in Figure 7.37:
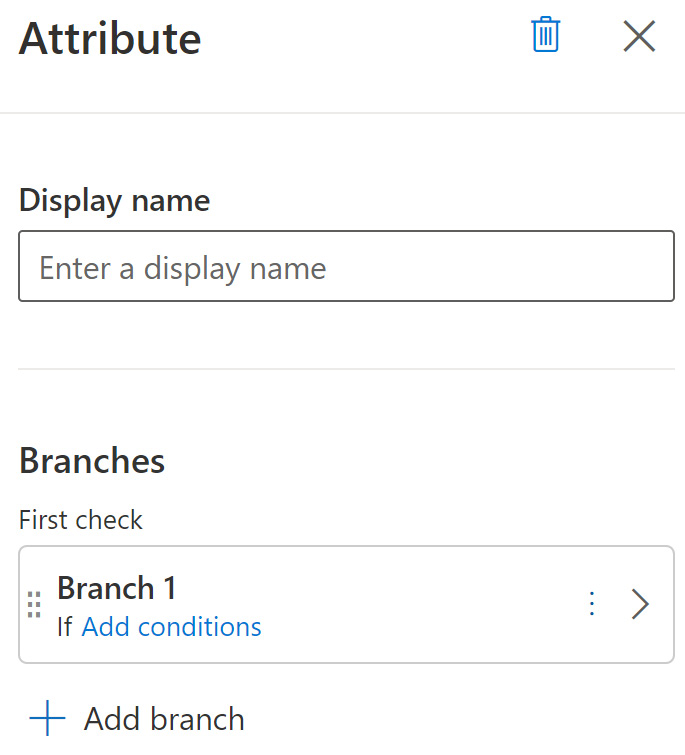
Figure 7.37 – Adding conditions to a branch
When you click on Add conditions, you can choose to make the condition on an attribute or a segment membership, as shown in Figure 7.38:
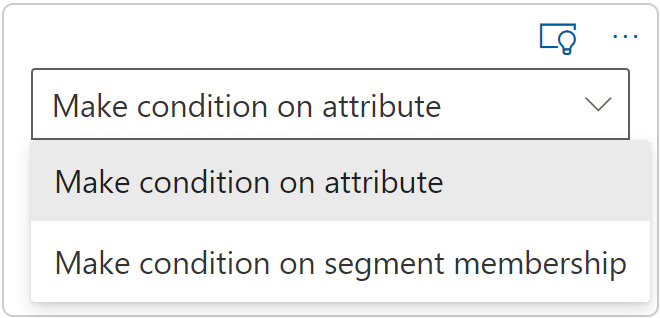
Figure 7.38 – Make condition on attribute or segment membership
When you select Make condition on attribute, you can choose columns from the Contact table, as shown in Figure 7.39:

Figure 7.39 – Choosing an attribute
When you select Make condition by segment membership, you can choose the segment that you want to include or exclude contacts from going down a specific branch, as shown in Figure 7.40:

Figure 7.40 – Condition in a branch
Everyone else (not included in this branch) will go down the other path. After the contacts have progressed through the branch, they consolidate and continue the path forward as one group again.
Now, let’s look at how we can do A/B testing in a journey.
Test which variation performs better
The Test which variation performs better tile is for A/B testing. You’re testing whether Version A or Version B performs best, as you can see in Figure 7.41:

Figure 7.41 – Adding an A/B test
You can select an email, text message, or push notification for versions A and B; this means that you can compare an email against another email or test any of the different channels against each other to see which performs best.
After you’ve selected what you’re going to send, an option set will appear on the right where you select the email, push notification, or text message that you want to send to your customers. You also decide what proportion of the total audience should receive each test version, as shown in Figure 7.42:

Figure 7.42 – Selecting versions and audience
The next step is Test completion. Here, you set the winning metric (which defines which version is the winner). You can select from the following options:
- Clickthrough rate
- Open rate
- Based on the journey goal
The test will also end on either a specific date and time or automatically on statistical significance. Statistical significance is when one of the journeys are the clear winner over the other.
The last thing is to set the default version; if there is no clear winner, then this is the version that will be sent to new people. All of this is shown in Figure 7.43:
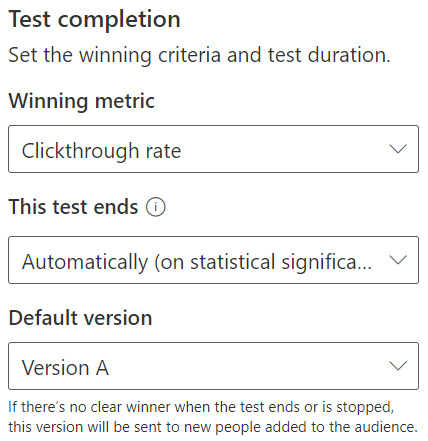
Figure 7.43 – Test completion
You can create up to five tests per journey in real-time marketing. This way, you can create multiple different tests and check which performs best. Now, let’s go through another element: a smarter way of selecting the right channel.
Send messages through the right channel
In the Send messages through the right channel tile, you use AI to send the message to each person via the right channel based on their previous behavior. If you prefer emails, then that’s what you’ll get, but if you prefer text messages, then that’s the channel through which you’ll receive the information. You need to select at least two channels to start with, as shown in Figure 7.44:
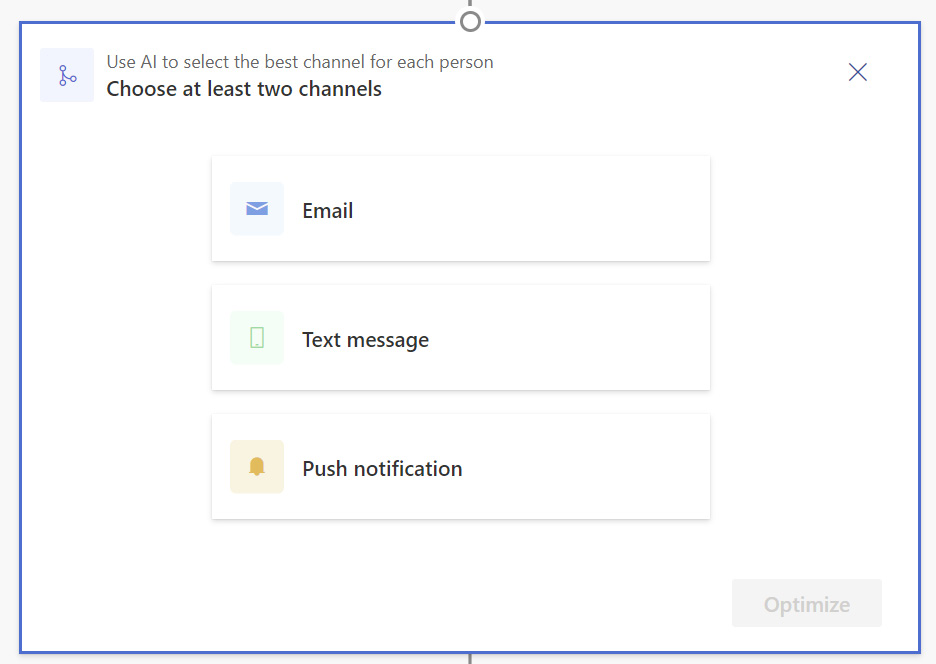
Figure 7.44 – Use AI to select the best channel for each person
You can select the content for at least two channels and set the default channel, as shown in Figure 7.45:

Figure 7.45 – Selecting the content and default channel
Once this is done, then based on the preference of each person, the best channel will be sent to the right people. Remember that you need to have used the channels before setting this up; otherwise, you won’t have any statistics on what your customer prefers.
Even though we would like to think otherwise, most of our customers aren’t waiting for emails from us and clicking on our content the second they get it. Because our customers aren’t waiting for the email, let’s see how we can add waiting criteria to our journey.
Hold an action for a specific time
The Hold an action for a specific time tile allows you to wait for your customers. You can wait for a set amount of time, until a specific date and time, or until a time specified by a trigger. This way, you can send an email and not continue down a path until the customer has had the chance to read the email. You should wait for longer than an hour before moving on to the next tile in your journey, as the data from the Microsoft servers needs to update and send the data back to your system, and this can sometimes take over an hour.
Activate a custom trigger
The final tile is Activate a custom trigger. Here, we can use the custom trigger we created earlier. We can also trigger a Power Automate flow, as shown in Figure 7.46:
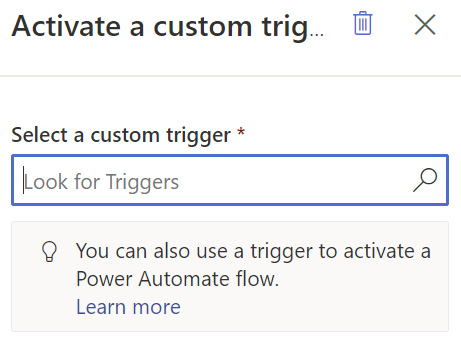
Figure 7.46 – Select a custom trigger
If you select the trigger we previously created, you must map the attributes we created in the trigger to the audience or another trigger, as shown in Figure 7.47:
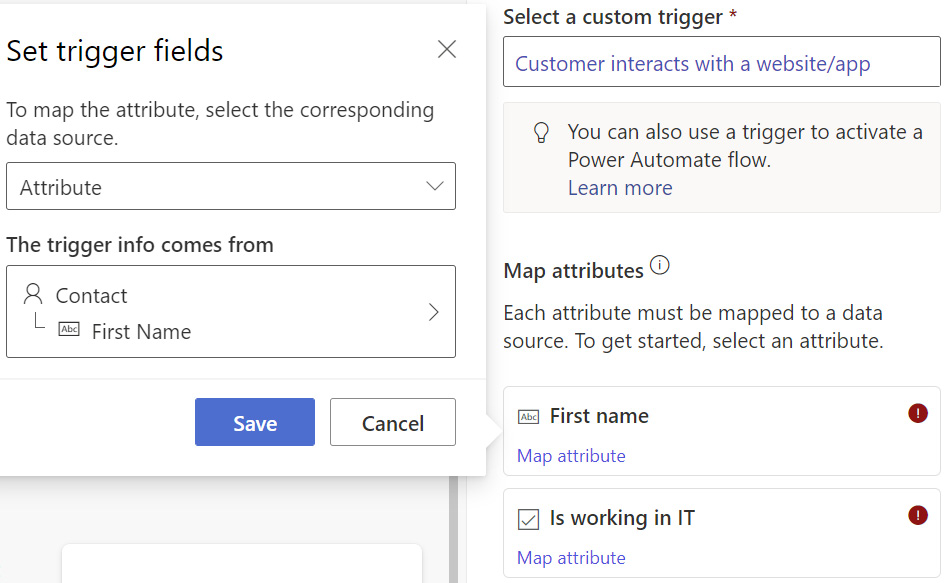
Figure 7.47 – Map attributes
Now, we’ve gone through all the different tiles we can create in a real-time marketing journey. Remember that Microsoft comes out with new features every month, so make sure you’re up to date on what is coming.
After we’ve created our journeys, it’s time to start using them and, hopefully, improve the journey. How do we best improve the journeys? We look at the analytics and see how the journey has performed and how we can make it even better.
Analytics
We all know analytics is how we can get better. Let’s go through how we can look at analytics in a real-time marketing journey.
Once the journey is activated and the audience has gone through all the steps, the journey is set to Read-only and Completed, as shown in Figure 7.48:

Figure 7.48 – The completed journey
You can see that four contacts have gone through this process and that all four have been processed. If you click on any of the tiles, a new tab on the right-hand side will open with tile-specific analytics. In Figure 7.49, you can see the analytics for the Send an email tile:
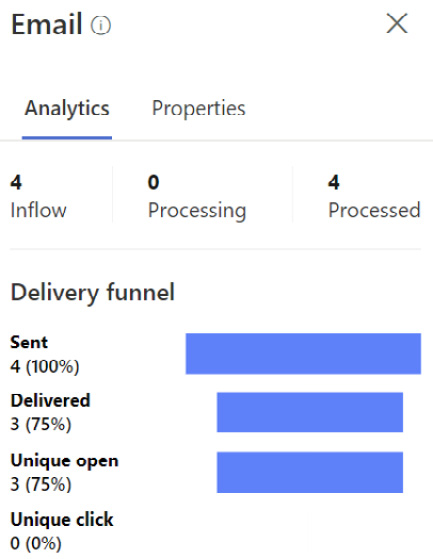
Figure 7.49 – Analytics for email
If you click on the link at the bottom of the right-hand tab (Delivery and interaction details), you can see more details, such as whether the email was delivered, blocked, or failed. In Figure 7.50, you can see that three out of the four emails were delivered, while one hard-bounced and wasn’t delivered to the contact. If you have a lot of hard bounces, it can affect your spam score.
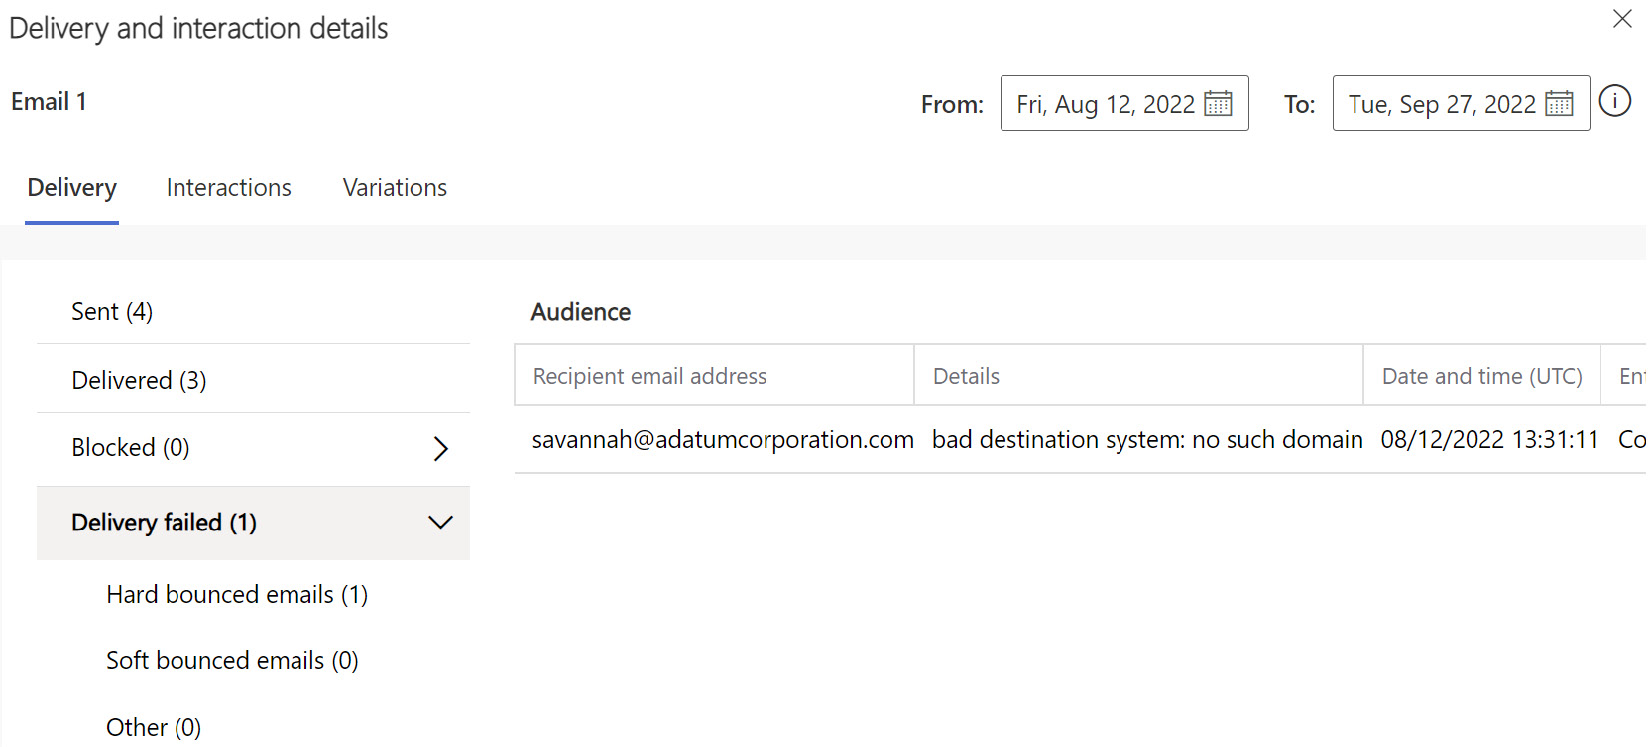
Figure 7.50 – Delivery and interaction details
In the Interactions tab, you can see the following:
- Unique opens
- Unique clicks
- Marked as spam
- Unsubscribed
With this, you have a good overview of how the steps in your journey have performed and how you can make your journey better.
In addition to having statistics for each journey, you also have a dashboard based on Power BI with full information on your journeys and channels. This dashboard, which you can see in Figure 7.51, shows a lot of information that will be important when you want to analyze and create better journeys:

Figure 7.51 – Analytics dashboard
In the analytics dashboard, we can see information about our journeys, including how long they’ve been active, how the emails, text messages, or push notifications have been engaged with, whether the journeys have reached the set goals, and why contacts have left the journeys.
We’ve now gone through the analytics and taken a quick view of some of the things you get in analytics. Remember, if you don’t look at the analytics, you’ll never create better journeys. It’s time to wrap up this chapter with a summary.
Summary
In this chapter, we’ve gone through how you can use the out-of-the-box triggers and how you can create your own triggers. This way, you can trigger a journey any way you want to trigger it. We’ve seen how you can use these triggers to start a journey, but also how you can use the triggers in the middle of a journey. We’ve gone through the other option of starting a journey with the help of segments. With both of these options, you can use conditions to filter the audience of the journey to ensure that only the audience you want to target goes through the journey.
We’ve seen how you create and manage the journeys, and all the actions and elements you can use to create great journeys for your audience.
We concluded the chapter by discussing analytics, where we can discover how we can create better journeys through company communication with our audiences.
In the next chapter, we are going to learn about one of the features that sets Dynamics 365 Marketing apart from its competitors: the event module.
Questions
The following are some questions that will help you gauge your understanding of the topics discussed in this chapter. The answers are provided in the Assessments section at the end of the book.
- When creating a custom trigger, it must be embedded as code on a website?
- Yes
- No
- What two options are there to activating a journey?
- Audience
- Trigger
- Custom trigger
- Manually
- Segment
- A goal for the journey is set out-of-the-box
- Yes
- No
- You can always use AI to use the right channel to the audience?
- Yes
- No