
8
Automating Decisions to Speed Up Your Processes
This chapter will describe how decision management can be used to automate your business rules and how you can embed those rules within your applications. We will detail the decision modeling approach, and how we can use a low-code experience to create decisions that will run millions of times per day with responses in milliseconds.
The main topics for this chapter are the following:
- Business problem
- Modeling your decision flow with Decision Model and Notation (DMN)
- Writing simple and complex decisions with decision tables
- Governing changes in decision logic
- Packaging and deploying decision
- Combining rules with AI prediction and high-speed decision making
But let’s start by describing the business problem that decision automation solves.
Business problem
Automating decisions is a lot about speed: changing market conditions, new competitors, mergers and acquisitions, emerging trends, and changing policies. In such a context, to adapt and take the edge, it is very important to build automated capabilities to make the right decisions quickly, either to serve the needs of a specific application or from within a process, of which the decision is a part. If a system pauses and waits for a human to intervene and decide, then the process is slowed and customer satisfaction decreases. On the other hand, if the system is able to make decisions—or at least, a majority of the decisions—all by itself in an automated fashion, then it’s more reactive to customer demand and the overall need for speed.
Automating decisions is also about taking the right decision. This decision can be exposed to and understood by the customer and can be explained for auditing purposes. A decision that changes over time can be traced. And thus, it is important that the people who understand the policies of the business and manage them on a daily basis are the ones empowered with the ability to maintain the rules that drive automated decision-making so that they can ensure the system runs exactly as intended.
IBM Cloud Pak for Business Automation includes ADS—short for Automation Decision Services—to cater to those needs. In the rest of this chapter, we will present how to automate decisions for usage within an enterprise context, either as a standalone service or as part of workflows and applications as mentioned in previous chapters.
Modeling – decision models and task models
As mentioned previously, it’s important that the business can own the decisions—that is, the people in charge of defining enterprise policies should also be the ones in charge of using the tooling to model the decisions, by using a format that both the human and the machine can understand unambiguously.
Examples of decisions that can (and should!) be automated are listed here:
- In the insurance space, claim processing includes a lot of automated (or automatable) decisions, such as fraud detection, automatic claim payment when common conditions are met, automatic rejection of incomplete cases, routing to the proper adjuster based on the claim topic, and so on
- In the banking sector, we can think about all automation of online banking, which requires decisions related to accounting management, money transfer validation, account opening and closing verifications, compliance with international transactions with specific country laws, and more
- In the lending industry, decisions are also heavily used, as was illustrated by the example described in previous chapters related to the eligibility and compliance of loan applications
- Other industries also require decision automation—for example, in maritime transportation, to validate compliance of cargo loads with regard to safety regulations; or, as illustrated by the famous Mayflower Autonomous Ship (MAS) (https://mas400.com/) project, to let the AI Captain take the right navigation decision according to the maritime laws and abide by the collision regulations
As you can see, those types of decisions are usually expressed as a rather large corpus of knowledge, typically in policy documents and expert know-how acquired over time. Consequently, one important aspect of the automation strategy consists in structuring all the information and data needed to decide what is called a decision model.
Another important point is that, as illustrated by the large variety of examples shown previously, the vocabulary that is used to describe those decisions varies largely from one industry to another. In fact, it is rarely standard: each company has developed over time its own terminology, acronyms, and preferred approaches to doing business. Consequently, it is critically important that the tooling in which decisions are defined provides for the ability to customize the vocabulary for each use case. We will see how IBM Cloud Pak for Business Automation enables this.
The decision model
Since the goal of decision-making is to help with enterprise automation, decisions represent the knowledge that business experts have acquired and improved over time. Consequently, in order to render their definition easier to comprehend, they can be decomposed into smaller sub-decisions and the data elements they depend on. This is one of the goals of a decision model. Structuring a decision from its constituents adds clarity and helps with common understanding and management of the decision over time.
As an example, let’s consider a mortgage loan validation decision. In order to decide on the eligibility of an applicant for a loan, we may consider the administrative eligibility of the applicant (for example, active account holder, of legal age, not in debt, acceptable credit score, and so on); as well as the risks of the envisioned loan: total cash amount, loan amount compared to the value of collateral, whether the house considered is located in a risk area (for example, flood), and so on.
In this example, we can see that the main decision (Loan Eligibility) can be decomposed into two sub-decisions (Applicant Eligibility and Loan Risk), which themselves depend upon base data elements (such as Applicant income, Loan Amount, Loan to Value ratio, and so on).
This can be depicted by the following diagram, in which square boxes represent decision elements, rounded boxes represent data elements, and arrows represent functional dependencies:

Figure 8.1 – Decision model
Such a diagram adds tremendous value by offering a common representation that can be shared across stakeholders and used for discussion when changes are warranted. It is also a very practical way to verify that the right data needed to take the decision is indeed available from the system that will make use of that decision, or to validate that such data can be obtained from the system user (in this case, the loan applicant through an online form or a bank branch agent).
The data model
As we mentioned previously, each project requires a dedicated vocabulary. In our previous example, we talked about a loan, credit score, applicant income, and so on. Each of these elements refers to a specific definition in a corporate policy; for example, credit score may mean the sum of all sources of income over a year, pre-tax. These data elements are needed for the definition of a decision, but also usually exist in other enterprise systems that will make use of the decision service. Consequently, IBM Cloud Pak for Business Automation offers a data model editor, within Decision Designer, which can be used to define data model elements, how they are structured, and how they are verbalized.
Structuration refers to the ability to define complex elements and lists. For example, an applicant can be defined as a structure containing the following typed individual elements:
- first name: This is a string type
- last name: This is a string type
- income: This is a number type
- mailing address: This is an address type (itself a complex type)
- saving accounts: This is a list of accounts type (a list of other data elements defined themselves as complex types)
This data model is represented in the data model editor of the tool, as shown here:

Figure 8.2 – Data model
The definition of the data model is often performed in collaboration with the rule writer (who knows the vocabulary they intend to use) and with a developer (who will be responsible for mapping fields from existing systems into a call to a decision service).
A data model can also contain enumerations, which are lists of predefined values. For example, in the context of frequent flyer programs, the category of a customer can be set to None, Bronze, Silver, or Gold. Defining them this way will guide the input of the decision logic to those values only, and will avoid any typo that could otherwise creep in if using strings (such as sliver customer instead of silver).
Important note
Here, we’re showing how to define a data model within the Designer. However, it is also possible to import a predefined data model built by developers, with even more advanced features, into the Designer. These are referred to as external libraries.
Verbalization refers to the capability that the tooling has to define vocabulary elements (words) in the language of your choice (English, French, Chinese, and more) irrespective of the actual technical name of elements from existing systems. At the time of writing, the current version of IBM Cloud Pak for Business Automation supports English, French, Spanish, German, Italian, and Chinese; more languages are being added over time. So, the rule-writing (covered in the next section) becomes more natural, as can be seen in the previous screenshot.
One of the strengths of a decision designer is that a data model and a decision model can be defined at the same time. This way, as the decision is being discovered and modeled, data elements and their verbalization can be added on the fly, thus offering an uninterrupted modeling experience.
The task model
Decision Designer offers another way to structure decisions using a task model (formerly known as a rule flow in Operational Decision Manager, or ODM for short). A task model doesn’t depict dependencies between decisions, sub-decisions, and input data, but rather organizes the decision logic artifacts (more information on this in the next chapter) into tasks that are executed sequentially, or upon some specific conditions. Instead of describing the decision, it offers a procedural approach for computing it. This can be well suited for higher complexity decisions when decisions are authored by more technical users, or also for a smooth transition from ODM. However, this is beyond the scope of this book, and you can refer to this documentation for further details: https://www.ibm.com/docs/en/cloud-paks/cp-biz-automation/21.0.x?topic=decisions-modeling.
Once you’ve defined a task model and/or decision model, you may need a way to compose them to handle the growing complexity.
Composition of models
Decision models can be viewed as a function. They take inputs—the various data elements needed for the decision—and compute an output: the decision itself. However, when the decision model grows in size, it may become unmanageable. To address this, Decision Designer offers the possibility to compose decision models (and in fact, also task models) so that a complex decision can be broken down into several models calling each other. This also helps define models that can be reused within several other models.
The mechanism to perform composition is also used for using AI-driven predictive models in decision models, a topic covered in the Combining decisions with AI prediction section.
Once you’ve defined task and decision models, maybe with the composition, you’ll have a functional description of the decision, but you’ll still need to describe the logic that will drive the decision. The next section will show how to do this.
Writing simple and complex decision logic
Each decision node in the decision model mentioned previously defines a partial decision. The name and type of the node determine what the decision is about and what the node returns to another node higher in the diagram, while the arrows indicate which inputs (provided data elements and other sub-decisions) are available for this node to compute its decision (output).
Now comes the time to actually implement the logic that represents the decision that a specific node takes. Within the decision node, in the logic panel, we can use the two following decision artifacts to define the logic: business rules and decision tables.
Business rules
Business rules are declarative statements in the form of if conditions then outcome. Here is an example of a very simple business rule that could be added to the administrative eligibility decision node of our previous example:
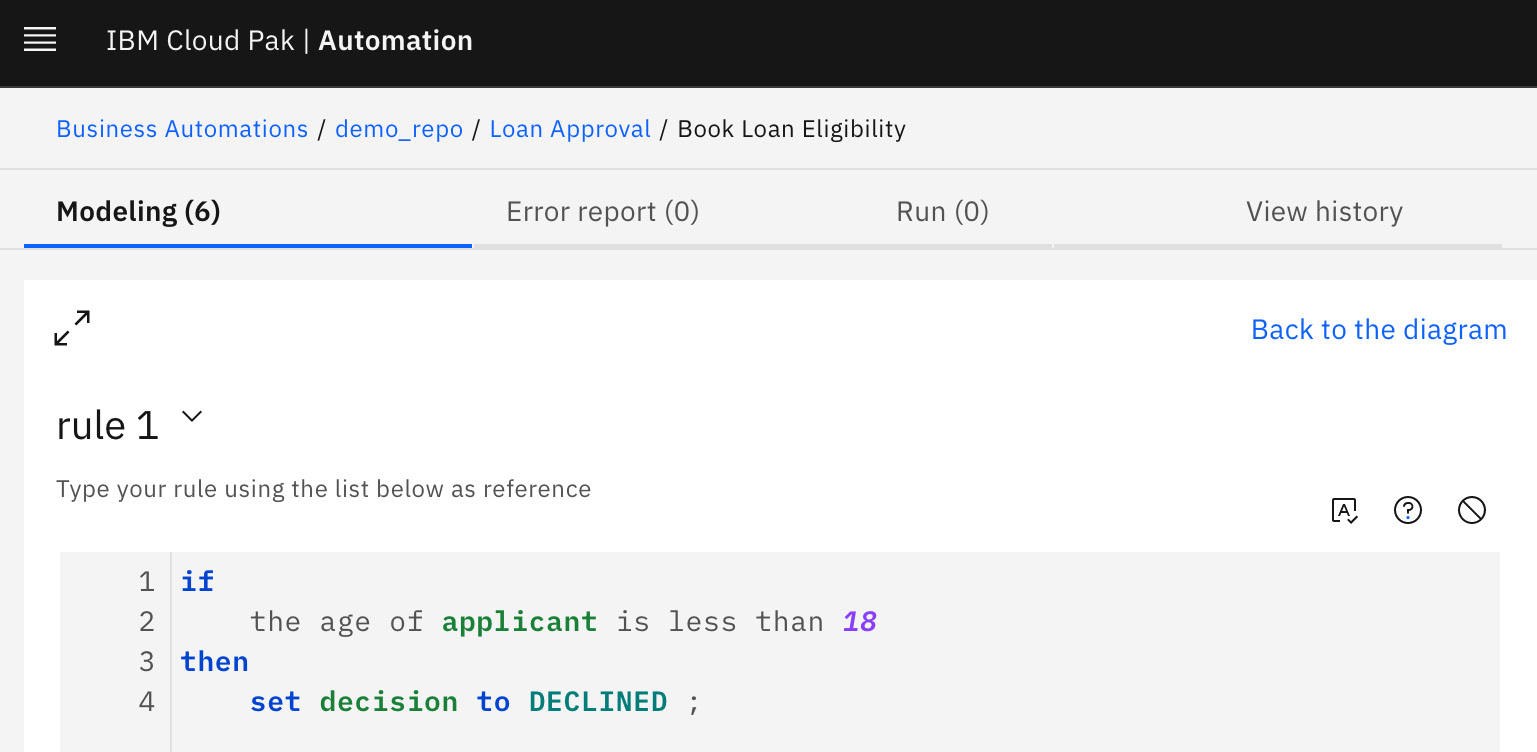
Figure 8.3 – Business rule
Of course, we can write more complex rules, especially combining conditions, such as the one shown in this example:

Figure 8.4 – More complex business rule
Pro tip
It is best to write several short rules, each of them with a dedicated purpose. This makes maintenance easier over time, and also improves execution efficiency. For example, if you find yourself writing a rule that contains an OR operator, consider splitting the rule into two smaller, separate rules.
Decision tables
Decision tables are a compact and efficient way to represent several rules that are similar in structure, with a very readable format. Each row can be viewed as a rule, while columns are used for the condition and outcome (action) part, as can be seen in the next screenshot:
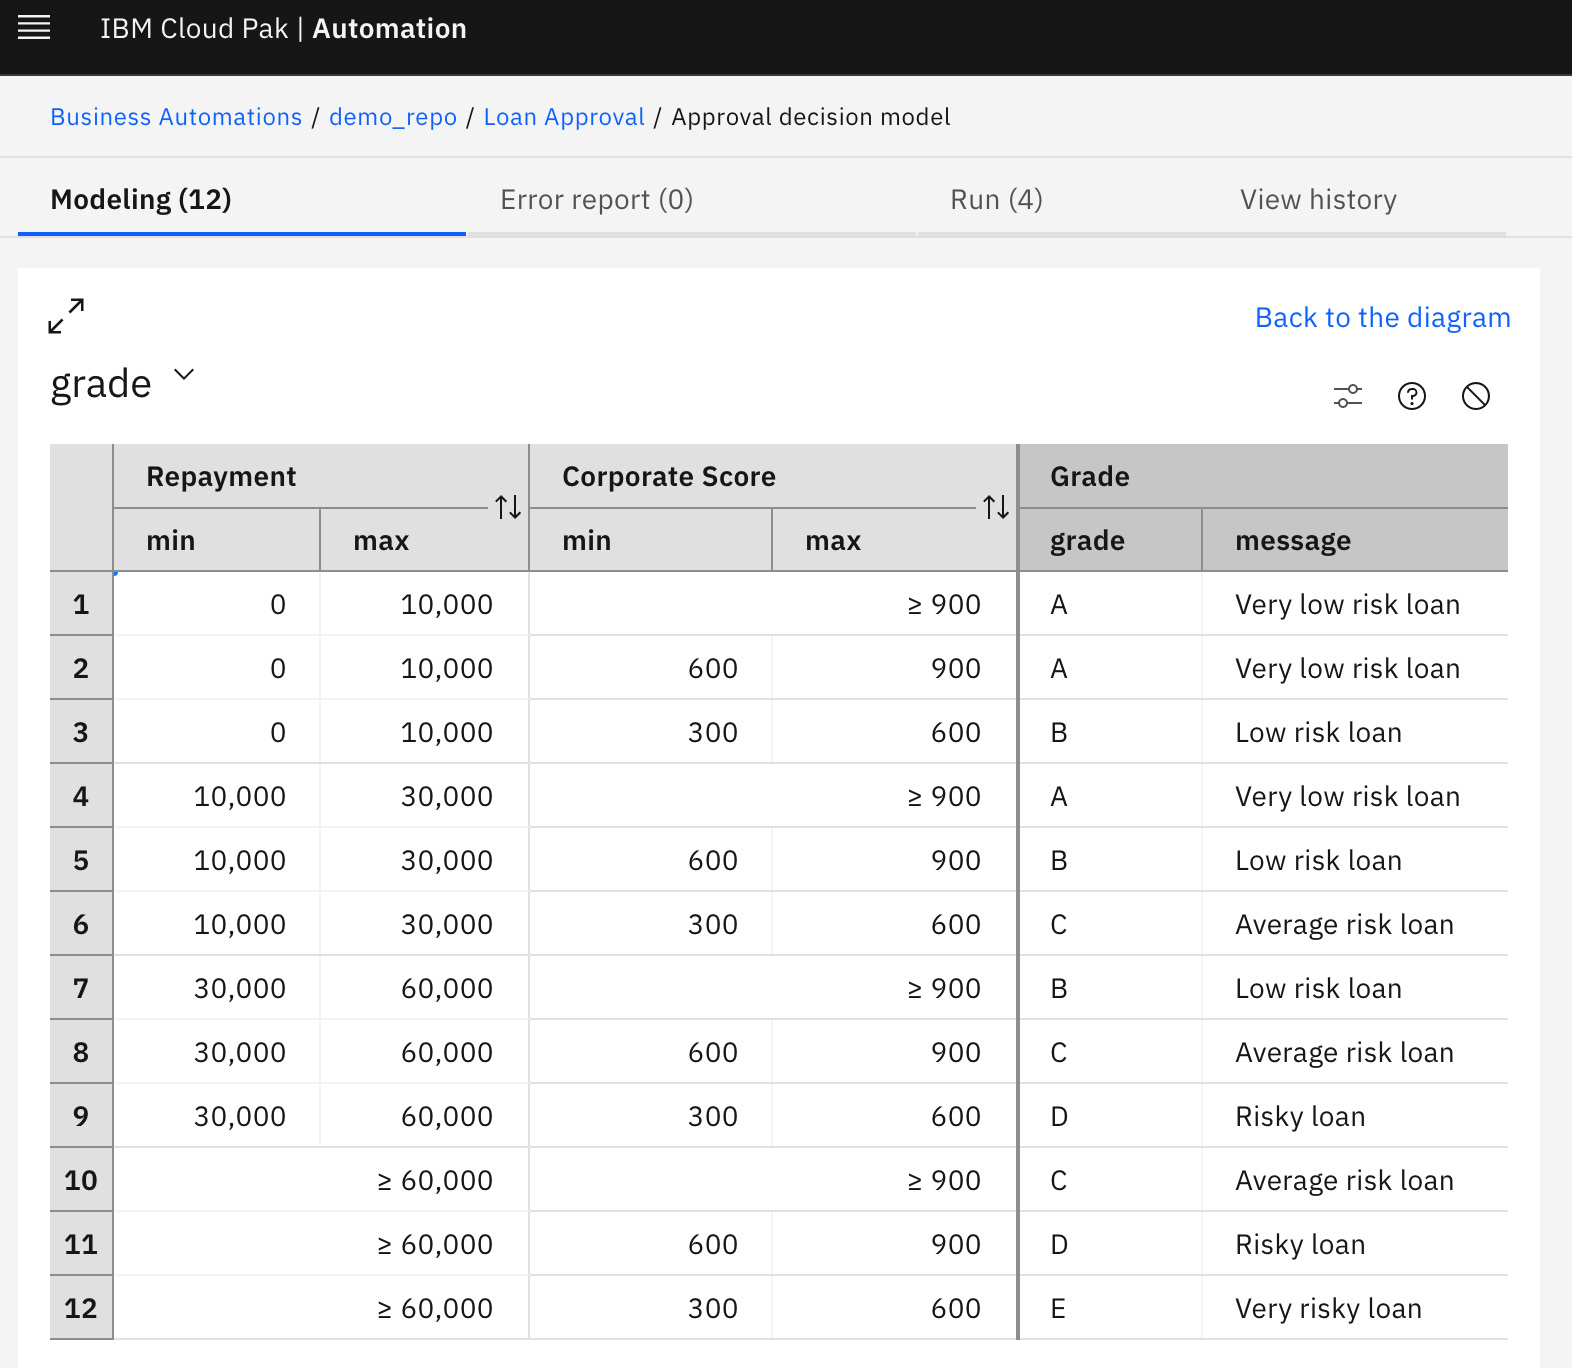
Figure 8.5 – Decision table
In this example, we can see two condition columns on the left, called Repayment and Corporate Score, and one outcome column to the right, stating what the decision is in each case: the grade of the considered loan.
Each row is a rule; for example, row 5 can be read as if the repayment of the loan is between 10,000 and 30,000 and the corporate score of the borrower is between 600 and 900, then set the grade of the loan to B.
In addition to the clear and compact representation, decision tables also offer additional value. Decision Designer can check for gaps in value ranges, or overlap across rows, and display warnings that help make sure that all possible cases are covered, as can be seen in this example:

Figure 8.6 – Decision table warning
Business rules and decision tables are combined together to define the logic; here is how to combine them.
Defining the logic
We can define the decision logic of each node using business rules, decision tables, or a combination of both. In the case where several rules and tables would be applicable to a specific set of inputs, the interaction policy (https://www.ibm.com/docs/en/cloud-paks/cp-biz-automation/21.0.x?topic=logic-interaction-policies) of the decision node determines how the precedence is established. For example, the first rule that matches is selected or the rule that gives the highest number is selected (think about allocating a discount, for example).
Pro tip
A decision node should contain a few to a few dozen rules (or tables). If you find yourself needing more, consider splitting the decision nodes into several smaller decisions. Typically, a node should be dedicated to deriving the value of the same data elements, as much as possible.
Business rules and decision tables feel natural as they rely on domain vocabulary. The next section shows how to define this.
Rule vocabulary
The structure of a rule contains a few predefined words (for example, if, then, set decision to, and more), but the majority of the vocabulary actually comes from the verbalization established when defining a data model.
For example, in this rule, these words are outlined:

Figure 8.7 – Example of vocabulary usage
These words come from verbalization defined in the data model. The Data Model Editor, shown in the following screenshot, lets you define and change those verbalizations:

Figure 8.8 – Example of vocabulary definition
Thus, it is important to define carefully the data model verbalization to match the corporate terminology and make the rule-writing easier to understand by all stakeholders. This also applies to decision tables.
The next section will cover what will happen as changes occur in the decision logic.
Governing changes in decision logic
Decisions can change at any time. They reflect policies, market conditions, laws and regulations, business knowledge and experience, seasonal discounts, promotions, and so on. In fact, an important value-add of using decision automation is the ability to change a decision taken at a fast pace, without any impact on the apps calling into the decision, and with little reliance on further developments.
However, changes need to be tracked. Who made the change, for what reason, with which other changes does this one need to be deployed to production, and which tests have been performed to validate the correctness of the change: those are the areas that the governance of decision models addresses.
Collaboration
Decision Designer is a web-based tool, part of IBM Cloud Pak for Business Automation, designed for collaboration. This means that, as one user starts a new project (a container holding the various decision artifacts needed for developing the decision service is mandated to address a specific business need), other users from the same team—according to established permissions—can also access the project content and perform edits as well.
A decision, whether it’s taken manually or automatically, is usually defined by a team of people in charge of a specific business area. Especially when a decision is taken every day by several people from a team, we will find that the knowledge on how the decision is taken is often spread within the team. Even when official policy documentation exists, personal interpretation often comes into play, and human beings make up for gaps that may exist in documentation over time. Thus, when implementing the decision into an automated system, a definition of the decision must be performed by a team of experts, who will iteratively refine the definition and converge until they reach a point where the definition is complete and can be deployed into an automated system. In order to reach that stage, it is thus important to use tooling that lends itself naturally to collaboration, which is precisely what Decision Designer has been built for.
Important note
Since the Designer is intended to be used by multiple people within an organization, it also features a permission management mechanism, which allows assigning of roles to various team members, such as read-only or read-write access, or defining which individuals are part of which team and can thus access a specific project.
Changes and commits
In Decision Designer, when a user wants to perform a change, they simply locate an artifact (decision model, rule, data element, and so on), open the editor, and perform the change as appropriate. However, a single edit of a single artifact is rarely a self-contained representation of a business change. It is best to group together edits that pertain to the same business need, and only those.
For example, if a new policy requires declining loans over a million dollars for a single applicant of retirement age unless they are in a specific high tax bracket, then most likely the edits required to implement this policy will affect several rules and decision tables. The business rule writer thus needs to perform all of the related edits, and then, clicking on the Share button, they select them all and attach a justification message (for example, implementation of new policy xyz), and Decision Designer will create what developers call a commit, which is a group of related changes. This becomes the smallest increment between a definition of the logic before this new policy and after, and thus when other users will accept incoming changes into their workspace, they are sure to get all of the edits together (or none, should they roll back the change).
Rule writers should pay attention to how they ensure that each commit corresponds to a single business requirement. This makes it easier to trace changes and choose which one to deploy or roll back and helps guarantee consistency by building a decision that either implements the new policy or doesn’t, but doesn’t implement it halfway.
Branches and merges
There may be business situations where a series of commits (changes) are needed for a specific release of the automation system, a certain time period, or certain geography, but not another. Those variations from the main decision can be captured in a branch. This is the same concept as is usually known in the development world.
As an example, let’s assume that a company has put in place an automated decision system for validating loans as mentioned in previous chapters. It has developed a corpus of decision logic governing the eligibility rules of the loans applied for. Now, let’s assume that the team has a brilliant idea to improve the quality of loan eligibility criteria for students, and the team wants to try out this idea in a specific state to start with.
The team can create a branch, innovative idea, off of the main branch, and within this branch, it collaborates to perform the changes and additions—as a series of commits—that implement the idea. Upon deployment (see the next chapter), the main branch is deployed to the systems of all 49 states, and this branch is deployed to the system of the state in which the experiment is conducted. While the experiment is running, the logic with this branch can be updated as the team sees fit, and redeployed.
Once the experiment is over, the team can decide that it had a positive outcome—in which case, it would merge the changes back into the main branch so that they can be deployed to all other states—or that the outcome wasn’t good, in which case the branch is simply abandoned.
As we can see, the concepts are exactly the same as code branches and merge into the development world, and in fact, they do rely on the same mechanism. Decision Designer provides a branch switcher (top-right corner, next to the connect button):

Figure 8.9 – Selecting a branch
This allows us to easily see the same decision logic in various branches, as well as a merging capability.
Connection with Git
Projects in Decision Designer are persisted into a standard Git repository, as a set of folders and files. The operations performed in the web user interface end up being translated to a series of basic Git commands, even though the user is not exposed to them and is offered a simple interface. The following screenshot shows you how to connect to a remote Git repository:
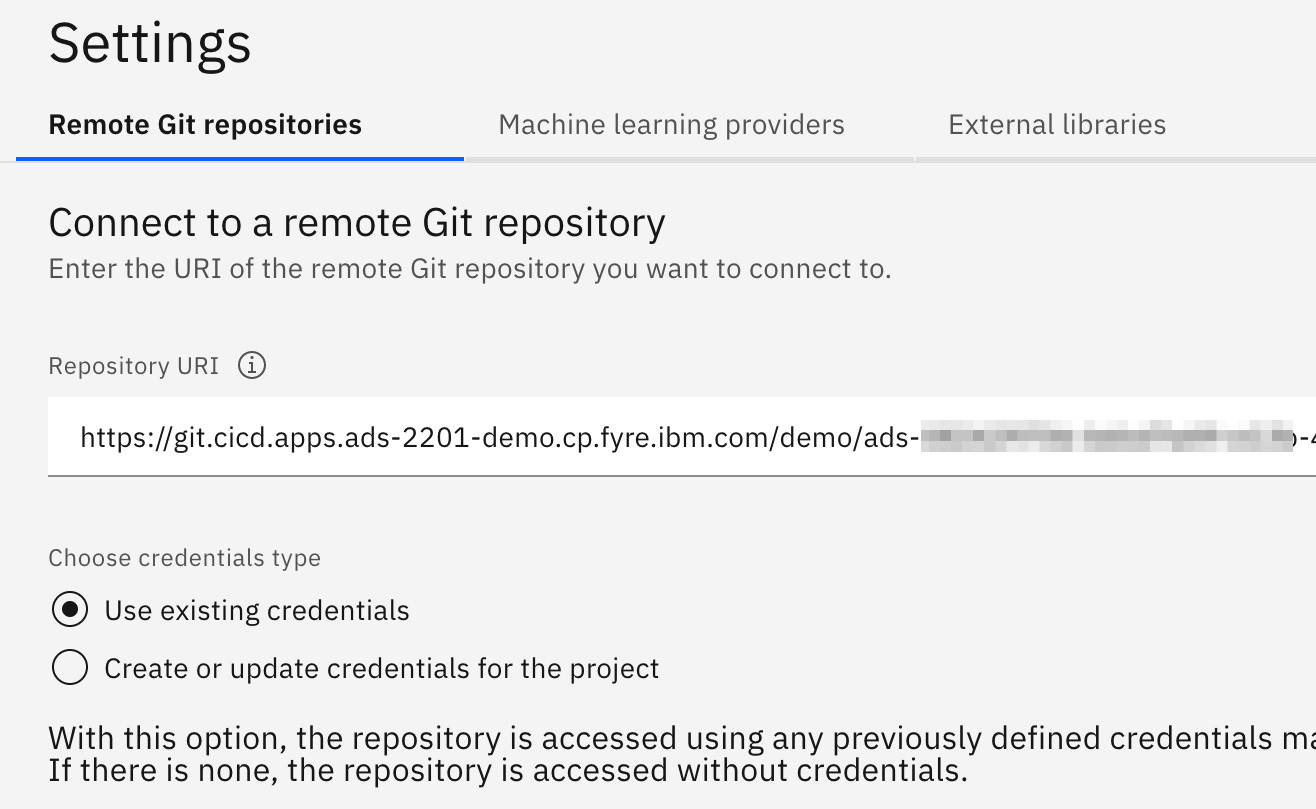
Figure 8.10 – Connecting to a Git repository
But the fact that the tool implements operations this way enables collaboration with developers and easier integration with the rest of the application development stack. An in-depth look at this powerful concept of operation will be described as part of Chapter 13, On-Premises and On-Cloud Deployments.
Testing decisions
Decision Designer offers capabilities to test decisions as they are modeled. This allows writers to deliver a validated set of changes. In fact, related to the concept of commits explained earlier in this chapter, it is quite important to make sure that a single commit includes both the changes made to the decision artifacts as well as the matching test cases; this allows delivering a self-contained, proven change to the rest of the team.
There are two features that help with this objective:
- The first one is the in-place validation, a sort of try-me feature. When authoring a decision model, moving over to the Validate tab shows a form that allows typing a set of inputs, immediately running the current state of the decision model, and visualizing the outcome (as well as intermediate computation steps and values). This helps tremendously in tuning the decision logic, with a very rapid feedback loop. The input datasets can be saved and retrieved later.
The rule author can take advantage of this feature while authoring the decision logic, to validate that the change they’re performing actually fulfills their current objective. They get immediate feedback on changes as they are performing them. In the following screenshot, you can see the result of such a validation:

Figure 8.11 – Decision validation, input data, and results
- The second feature offers the possibility to add a series of test cases, grouped in a test suite. Each test case is defined by its input data as well as the expected outcome. This information is saved within the project, and when the project gets packaged and deployed to the runtime (see the next chapter), those tests are executed and must pass for the deployment to succeed. The added value is that the business user, who knows the decision logic, can define tests that the deployment pipeline will validate at each deployment to detect regressions early.
In this case, such a feature is useful not only for the moment when the rule author performs changes but also for collaboration with other rule authors, since the test suites embody the expected behavior. This way, if other authors perform other changes, now or later in the future, that inadvertently have side effects affecting this behavior, execution of the test suites will flag the changes and force the authors to actually examine them and make sure the impacts are controlled. They can either make sure no unintended side-effect is present or else amend the existing test suites to account for the new expected behaviors.
Once a decision has been defined and validated comes the time to package it and deploy it over to the runtime environment.
Packaging and deploying decisions
Decisions are packaged as an archive containing all of the information and decision logic that the runtime environment needs. This section shows how to prepare and deploy such an archive on the runtime.
Single-click deployment
When Decision Designer is installed, as part of the Cloud Pak installation procedure, a development runtime is also installed and configured in an OpenShift cluster. Decision Designer is preconfigured so that it can connect to this runtime and interact with it. This enables a simple experience by which any decision artifact can be deployed right away to this runtime environment for execution. This runtime is exactly the same as would be running in other environments, such as performance testing, pre-production, or even production. This gives confidence to authors that if their decision artifacts are behaving as expected in this runtime, they would behave the same way in higher environments.
Moreover, this also allows us to integrate automation services together, as will be detailed in the next paragraph. In the following screenshot, you can see the single-click button in the Deploy tab:

Figure 8.12 – Deploy tab
In order to perform such a deployment, head over to the Deploy tab, select your decision service, and hit the Deploy button. Behind the scenes, Decision Designer compiles your decision into a deployable binary artifact, deploys it to the development runtime, and displays the matching URL on the Deployment page so that you can verify that the deployment was effective and successful. All of this process is fully automated, and the rule author doesn’t have to be aware of its details to know that the decision service has been made available for consumption by an external application.
Automation services
In addition to the deployment mentioned previously, the author of the decision logic can also click the Publish button. As the name implies, this publishes the service—named automation service—into the catalog of Business Automation Studio. As a consequence, it becomes available and visible to other automation service consumers within the Cloud Pak. For example, an automation application will now be able to discover the service and make use of it.
This is a very powerful feature that allows combining and integrating together different aspects of the Cloud Pak to build up an automation solution addressing the business problem at hand. This way—for example—the logic of a decision can be implemented with a decision automation service, and thus reused in various places (workflows and applications) that require it, thus ensuring consistency of the decision taken, proper decoupling of the various concerns, and easier maintenance of the decision logic at a single point.
Packaging and advanced deployment options
When using single-click deployment, Decision Designer decides on a packaging structure to contain your decision services. However, it also supports more advanced packaging options, as well as advanced deployment patterns that integrate nicely into corporate pipelines. These options will be covered in Chapter 15, Automating Your Operations and Other Considerations.
Combining decisions with AI prediction
Statistical learning, especially in its latest deep learning (DL) form, has been trending more and more recently and offers advances in the general field of AI, which is very complementary to symbolic AI.
Machine learning (ML) is very good at perceiving—for example—image recognition or speech recognition, as well as at classifying unstructured data. ML models are also valuable for building predictors. With the assumption that the future is likely to behave like the past, we can build models to predict customer churn, borrower propensity to default on their loan payments, and other indicators derived from analysis of past data.
On the other hand, symbolic AI—such as the type of decision logic that can be expressed with rules or decision tables in Cloud Pak for Business Automation—is the preferred way to decide on and take explainable actions that can be verified for compliance with regulations or company policies.
IBM decision models can now also be augmented with indicators coming from ML models—for example, predictive scores. This is a very powerful feature that allows building decisions leveraging the strength of the two main approaches of AI by combining them together to take advantage of what each of them is good at.
With this, it becomes possible to write decision logic such as the following excerpt:

Figure 8.13 – Decision logic with AI call
Estimated income and long-distance calls are usual attributes from the business object model, and churn is an attribute whose value is coming from the invocation of an external predictive score. As can be seen here, the integration is seamless, and the rule writer can easily manipulate data elements computed from ML models.
In order to enable the rule writer to access predictive scores this way, you would need to define a predictive model within Decision Designer. A predictive model achieves three purposes:
- First, it defines which is the external ML model that needs to be invoked to compute the score. This is done with the concept of an ML provider, which is a technical object describing the URL and credentials to be used to access the ML model. Decision Designer provides native integration with Watson ML, but can also be connected to other ML models from other vendors (ML models hosted on Amazon, Google, Microsoft, and more can be connected using the Open Prediction Service hub, available at https://github.com/IBM/open-prediction-service-hub).
- Second, the predictive model allows for defining a mapping between the data models used on the rule side and the ML side. Quite often, data values used for training ML models are not as friendly as the vocabulary used in rules. For example, the category of a customer can be represented as the numbers 0, 1, 2 in an ML model (as used by the data scientist), but a rule writer would rather use the Bronze, Silver, and Gold categories.
The predictive model contains pre- and post-invocation steps in which this mapping can be performed. This way, a developer can build a predictive model, and a rule writer can use it across several decision models without having to manipulate low-level elements, but instead, being able to express the decision logic using a familiar, business-friendly vocabulary. Here is an example of such a mapping, expressed through a decision table:

Figure 8.14 – A very simple decision table
- Finally, the predictive model defines a verbalization that will be used within the decision logic to refer to the result of its invocation. The name of the predictive model defines the output, while the input nodes of the model define the input parameters. Based on those, Decision Designer generates a default vocabulary element that rule writers can mix within rules (or decision tables) to trigger invocation of the model and retrieve the computed value.
This integration is very powerful and enables defining decisions leveraging pre-established data from traditional applications as well as predictive models built by data scientists, and taking actions derived from those. This brings a simple and reliable mechanism to infuse AI into automation solutions.
Summary
This chapter gave a brief overview of how to use the decision part of IBM Cloud Pak for business automation to model decisions, using a simple top-down approach that will appeal to the business analyst, especially as they’re discovering and crafting decisions. These can be augmented with ML models easily, to build AI-infused automated decisions that can be used either from an existing (or new) standalone application or as part of the Cloud Pak, invoked as an automation service from a workflow or automation application.
This tooling is designed to foster collaboration between business analysts and developers, to guide the analyst as they’re defining decision logic as business rules and decision tables, and to offer an easy way to try to validate the decision model before deploying it to the high-performance runtime for execution.
Now, as was presented in the overall view of automation at the beginning of this book, quite often, decisions are part of business processes. They capture the logic that humans go through to decide what to do with certain information during some process tasks. This information is often captured within documents, either automatically generated or manually created, following specific templates pertaining to the process. The next chapter of our automation journey will explore the management and automation of those documents.