
Image capturing is no fun without the ability to share images; for example, on Facebook. We will be using the Facebook SDK for that.
Challenge! If you are building an app running on a Parse backend, as we did in Chapter 2, Applications with a Cloud-based Backend, there is no need for that, as the Facebook SDK is already in there. If you want, you can combine the recipes from Chapter 2, Applications with a Cloud-based Backend with this one, and create a real cool app real quick!
For this recipe, you need to have the previous recipe completed successfully and you need to have a real Android device (or a virtual one, but this will require some additional steps).
You also need to have a Facebook account, or you can create one just for testing purposes.
Let's take a look at how we can share our sepia captured image on Facebook:
- Get the code from the previous recipe. Open the
build.gradlefile in theappfolder. Add a new dependency to thedependenciessection, and click on the Sync now link that will appear after you have added this line:compile 'com.facebook.android:facebook-android-sdk:4.1.0' - To obtain a Facebook app ID, browse to https://developers.facebook.com (yeah, this requires a Facebook account). From the MyApps menu, choose Add a new app, select Android as your platform, enter a name for your app, and click on Create new Facebook App ID. Choose a category- for example, Entertainment- and click on Create App ID.
- Your app will be created, and a QuickStart page will be shown. Scroll down all the way to the Tell us about your Android project section. Enter details in the package name and default activity class name fields, and click on the Next button.
- A pop-up warning will be shown. You can safely ignore the warning and click on the Use this package name button. Facebook will start thinking, and after a while the section Add your development and release key hashes will appear.
- To obtain development key hashes, open the Terminal app (in Windows, start Command Prompt) and type the following:
keytool -exportcert -alias androiddebugkey -keystore ~/.android/debug.keystore | openssl sha1 -binary | openssl base64
- Hit Enter, copy the value that is shown, and paste it into the Facebook web page at Development Key Hashes. Click on the Next button to proceed.
- In the section Next Steps, click on the Skip to developer dashboard button. It will bring you straight to the information you need, the app ID. Copy the value in the App ID field:

- Next, initialize the Facebook SDK. Open the
CameraActivityclass, and within theonCreatemethod, add the following line just after thesuper.OnCreateline. Use the Alt + Enter shortcut to import the required packagecom.facebook.FacebookSdk:FacebookSdk.sdkInitialize(getApplicationContext());
- Now we need to tell the app about the Facebook app ID. Open the
strings.xmlfile from theres/valuesfolder. Add a new string that will contain your Facebook app id:<string name="facebook_app_id">Your facebook app id</string>
- Open the
AndroidManifest.xmlfile. - Add a metadata element to the
applicationelement:<meta-data android:name="com.facebook.sdk.ApplicationId" android:value="@string/facebook_app_id"/>
- Add a
FacebookActivitydeclaration to themanifestfile:<activity android:name="com.facebook.FacebookActivity"android:configChanges="keyboard|keyboardHidden|screenLayout| screenSize|orientation" android:theme="@android:style/Theme.Translucent. NoTitleBar" android:label="@string/app_name" />
- In the
Camera2BasicFragmentclass, locate thecaptureStillPicturemethod. Add a new call to the end of theonCaptureCompletedcallback implementation, just after theunlockFocusclass:sharePictureOnFacebook();
- Finally, add a provider to the
manifestfile (within theapplicationsection), which will allow you to share images on Facebook. The next chapter will discuss content providers. For now just append your app ID to the end ofFaceBookContentProvideratauthorities, replacing the zeros in the example shown here:<provider android:authorities="com.facebook.app. FacebookContentProvider000000000000"android:name="com.facebook.FacebookContentProvider"android:exported="true" />
- Implement the
sharePictureOnFacebookmethod. We will load the bitmap from the file. In a real app, we would have to calculate the required value forinSampleSize, but for the sake of simplicity, we will just use a fixedinSampleSizesetting of4here. On most devices, this will be sufficient to avoid anyOutOfMemoryexceptions that may occur otherwise. Also, we will add the photo to thesharedialog that will be displayed after taking a picture:private void sharePictureOnFacebook(){ final BitmapFactory.Options options = new BitmapFactory.Options(); options.inJustDecodeBounds = false; options.inSampleSize = 4; Bitmap bitmap = BitmapFactory.decodeFile(mFile.getPath(), options); SharePhoto photo = new SharePhoto.Builder().setBitmap(bitmap).build(); SharePhotoContent content = new SharePhotoContent.Builder().addPhoto(photo).build(); ShareDialog.show(getActivity(), content); } - To be on the safe side, we want to create a unique file name for each picture. Modify the
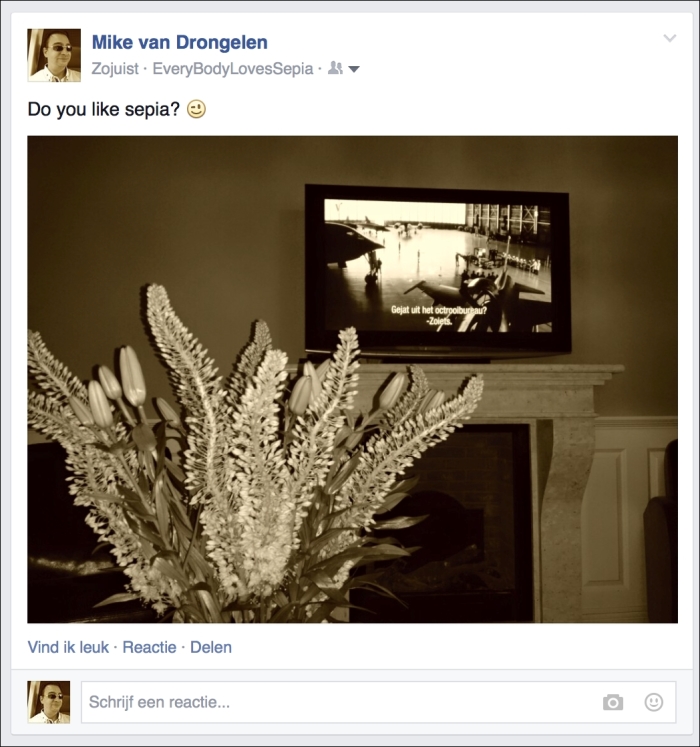
onActivityCreatedmethod to do so:@Override public void onActivityCreated(Bundle savedInstanceState) { super.onActivityCreated(savedInstanceState); mFile = new File(getActivity().getExternalFilesDir(null), "pic"+ new Date().getTime()+".jpg"); } - The page will look like this on your Facebook timeline. Here it is shown in the Dutch language:
- Run the app and share some sepia images on your own Facebook timeline!
Our app is fully functional already, although it may require a few tweaks. On my Samsung device, all images that I have captured in portrait mode are rotated 90 degrees. That is just a little bit too artistic. Let's fix it in the next recipe!