
Quality is a serious business so we will combine it with some fun. We will be creating a quiz app in the upcoming recipe. We will use Google Play services for this, and we will have a look at patterns that we can apply to our app, in particular the MVC and Model View Presenter (MVP) approach.
So what actually is a design pattern? A design pattern is a solution for a common problem. We can reuse such a pattern anywhere. There is no need to reinvent the wheel (unless you can think of a better one of course) and there is no need to repeat ourselves.
Patterns are best practices that we can trust on. They can help us to speed up the development process, including testing.
Some of the patterns are:
- MVC
- MVP
- Observable
- Factory
- Singleton
- Support annotations
- Google Play services
MVC is most suitable for larger projects. The benefit of this pattern is the separation of concerns. We can separate our UI code from the business logic. A controller will be responsible for which view is being displayed. It will get data from another layer, a repository-a-like class that will get its data from somewhere, and pass that data through a model (or list of models) to the UI. The controller has no clue where the data is coming from and how it is being displayed. These are tasks of the repository class and the UI, respectively.
MVP is a more suitable pattern to use with Android app development in most cases because of the nature of activities and fragments. With MVP patterns, a presenter contains the UI logic for a view. All invocations from the view are delegated directly to it. The presenter will communicate with the view through an interface, allowing us to create unit tests with mocked data later.
We saw this pattern in Chapter 7, Content Providers and Observers, already. An observer observes changes in another object.
This pattern helps to create an object. The bitmap factory that we have been using for previous recipes (and that we will use again in this recipe) is a great example of the factory pattern.
The singleton pattern will prevent us from having multiple instances of an object. Typically, it is a (class) method that returns an instance. It will be created if it does not exist or else it will just return the previously created instance. The application class is an example of the singleton pattern.
Support annotations can help us to provide hints to code inspection tools, such as lint. They can help you detect problems such as null pointer exceptions and resource type conflicts just by adding metadata tags and running code inspections. The support library itself has been annotated with these annotations. Yes, they eat their own dog food, which proves that using annotations is the way to go.
There are basically three types of annotations that we can use: Nullness annotations, resource type annotations, and IntDef StringDef annotations. For example, we can use the @NonNull annotation to indicate that a given parameter cannot be null, or we can use the @Nullable annotation to indicate that a return value can be null.
The Play Games SDK provides cross-platform Google Play game services that let you easily integrate popular gaming features, such as achievements, leader boards, saved games, and real-time multiplayer (on Android) options in your tablet and mobile games.
That is enough theory for now! Let's create our Quiz app and apply some of the theory that we have discussed here.
For this recipe, you need to have the latest version of Android Studio and a real device on which Google Play services have been installed, which will be the case for most devices. Alternatively, you can install them on a virtual Genymotion device, but that will require some additional preparations.
Also, you need to have (or to create) a Google developer account.
And off we go. Start Android Studio and perform the following steps as we are going to build something great:
- Create a new project in Android Studio. Name it
GetItRightand click on the Next button. - Choose the Phone and tablet option and click on the Next button.
- In the Add an activity to mobile view, choose Google Play Service and click on the Next button.
- Accept the activity name and title fields and click on the Finish button.
- Point your web browser at the Google Developer console and log in or register if you do not have an account yet. You can find it at: https://console.developers.google.com.
- In the developer console, click on the game tab (game icon on the left-hand side of the webpage).
- Accept the terms of service if asked to do so.
- Click on the Setup up Google Play Services button.
- Enter the name of the app
Get It Right Sample, and pick a category: Trivia, and click on the Continue button. - In the game details view, enter a description and click on the Save button.
- Next, you need to generate an Oauth2 client ID. To do so, click on the Linked app link.
- Pick Android as your OS, enter
packt.com.getitrightas the package name, leave the other settings unchanged, and click on the Save and continue button. - Click on the Authorize your app now button in step 2. In the Branding information popup dialog, click on the Continue button.
- The Client ID dialog appears. Enter
packt.com.getitrightas the package name. To get the signing certificate fingerprint, open Terminal app (for Windows: Command Prompt) and type:keytool -exportcert -alias androiddebugkey -keystore ~/.android/debug.keystore -list –v - If asked for the
keystorepassword, the default password for the debug keystore isandroid. - Copy and paste the fingerprint (SHA1) and click on the Create Client button.
- Click on the Back to the list button, and after that click on the Continue to next step button.
- In the Android app details view, you will see the Application ID (if you scroll down a little) that we are going to need later. Copy its value.
Follow the given steps for adding leader boards to your app:
- On the left-hand side of the webpage, choose LEADERBOARDS and click on the Add new leaderboard button. Name your new leaderboard
GetItRight Leaderboardand click on the Save button. Note the leader board ID. We will be using it later: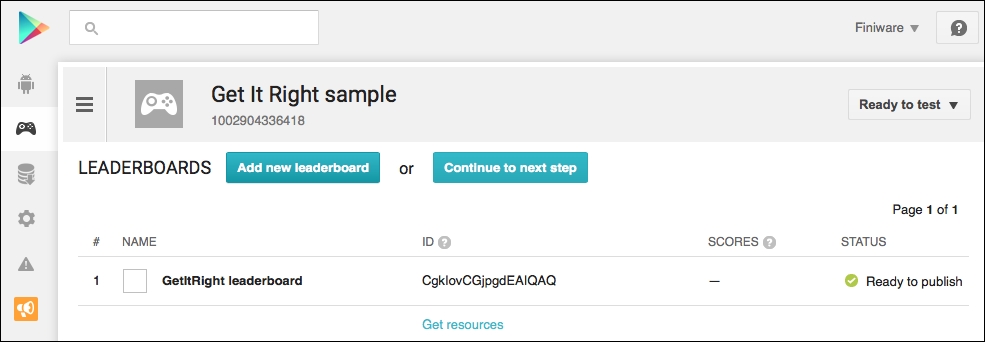
- Open the
build.gradlefile inside theappdirectory of your project and add a dependency for Google Play services:compile 'com.google.android.gms:play-services:7.5.0'
- Sync your project. In case it fails to resolve Google Play services, an error will be generated including a link that reads Install Repository and sync project. Click on this link to do so.
- Open the
AndroidManifest.xmlfile and add a metadata tag to the application tag:<meta-data android:name="com.google.android.gms.games.APP_ID"android:value="@string/app_id" />
- Also, add
app_idto thestrings.xmlfile:<resources><string name="app_name">GetItRight</string><string name="app_id">your app id</string>
- Add a breakpoint on the first line of the
onConnectedmethod of theGooglePlayServicesActivityclass. Do the same thing for the first line of theonConnectionFailedmethod. Using the Google Play service template and the provided app ID, you should be able to connect to Google Play Services already. Run the app (in debug mode) to find out if it does. - Create a new Android Resource directory and choose layout as the Resource type; create a new layout resource file within that directory and name it
activity_google_play_services.xml. - Add some new strings to the
strings.xmlresource file:<string name="incorrect_answer">That is incorrect</string><string name="correct_answer">That is the correct answer!</string><string name="leader_board">LEADER BOARD</string>
- Create a layout for the
activity_google_play_serviceresource file:<?xml version="1.0" encoding="utf-8"?> <LinearLayout xmlns:android= "http://schemas.android.com/apk/res/android"android:orientation="vertical" android:layout_width="match_parent"android:padding="16dp" android:background="@android:color/holo_blue_dark" android:layout_height="match_parent"> <ScrollView android:layout_width="match_parent" android:layout_height="wrap_content"><LinearLayout android:orientation="vertical"android:layout_width="match_parent"android:layout_height="wrap_content"> <ImageView android:id="@+id/image"android:src= "@android:drawable/ic_popup_sync"android:layout_width="match_parent"android:layout_height="300px" /> <TextView android:id="@+id/text"android:textColor="@android:color/white"android:text="Question"android:textSize="24sp"android:layout_width="match_parent"android:layout_height="wrap_content" /> <LinearLayout android:orientation="vertical"android:layout_width="match_parent"android:layout_height="wrap_content"> <Button android:id="@+id/button_1" android:layout_width="match_parent"android:layout_height="wrap_content"android:gravity="center_vertical|left" /> <Button android:id="@+id/button_2"android:layout_width="match_parent"android:layout_height="wrap_content" android:gravity="center_vertical|left" /> <Button android:id="@+id/button_3"android:layout_width="match_parent"android:layout_height="wrap_content"android:gravity="center_vertical|left" /> <Button android:id="@+id/button_4" android:layout_width="match_parent"android:layout_height="wrap_content"android:gravity="center_vertical|left" /> <Button android:id="@+id/button_test"android:text="@string/leader_board"android:layout_width="match_parent"android:layout_height="wrap_content"android:gravity="center_vertical|left" /> </LinearLayout> </LinearLayout> </ScrollView> </LinearLayout> - Open the
GooglePlayServicesActivityfile. In theonCreatemethod, load the layout and set the on click listeners for all buttons:setContentView(R.layout.activity_google_play_services); findViewById(R.id.button_1).setOnClickListener(this); findViewById(R.id.button_2).setOnClickListener(this); findViewById(R.id.button_3).setOnClickListener(this); findViewById(R.id.button_4).setOnClickListener(this); findViewById(R.id.button_test).setOnClickListener(this);
- Implement the
onClickListenermethod for theGooglePlayServicesActivityfile. Android Studio will suggest an implementation and you can accept this suggestion or add the implementation yourself:public class GooglePlayServicesActivity extends Activity implements GoogleApiClient.ConnectionCallbacks,GoogleApiClient.OnConnectionFailedListener, View.OnClickListener { @Override public void onClick(View v) { } - Add two private members, one for our leaderboard request and one that will hold your leaderboard ID:
private int REQUEST_LEADERBOARD = 1;
private String LEADERBOARD_ID = "<your leaderboard id>";
- Create the implementation for the
onClickmethod. We are preparing the situation where the user clicks on any of the multiple choice options. For the leaderboard (test) button, we can add the implementation right away:@Override public void onClick(View v) { switch (v.getId()){ case R.id.button_1: case R.id.button_2: case R.id.button_3: case R.id.button_4: break; case R.id.button_test: startActivityForResult( Games.Leaderboards.getLeaderboardIntent( mGoogleApiClient, LEADERBOARD_ID), REQUEST_LEADERBOARD); break; } } - Create a new package and name it
models. Create theAnswer,Question, andQuizclasses:To add the
Answerclass, you need the following code:public class Answer { private String mId; private String mText; public String getId() { return mId; } public String getText() { return mText; } public Answer (String id, String text) { mId = id; mText = text; } }To add the
Questionclass, use the given code:public class Question { private String mText; private String mUri; private String mCorrectAnswer; private String mAnswer; private ArrayList<Answer> mPossibleAnswers; public String getText(){ return mText; } public String getUri(){ return mUri;} public String getCorrectAnswer(){ return mCorrectAnswer; } public String getAnswer(){ return mAnswer; } public Question (String text, String uri, String correctAnswer){ mText = text; mUri = uri; mCorrectAnswer = correctAnswer; } public Answer addAnswer(String id, String text){ if (mPossibleAnswers==null){ mPossibleAnswers = new ArrayList<Answer>(); } Answer answer = new Answer(id,text); mPossibleAnswers.add(answer); return answer; } public ArrayList<Answer> getPossibleAnswers(){ return mPossibleAnswers; } }To add the
Quizclass, use the following code:public class Quiz { private ArrayList<Question> mQuestions; public ArrayList<Question> getQuestions(){ return mQuestions; } public Question addQuestion(String text, String uri, String correctAnswer){ if (mQuestions==null){ mQuestions = new ArrayList<Question>(); } Question question = new Question( text,uri,correctAnswer); mQuestions.add(question); return question; } } - Create a new package and name it
repositories. Create a new class and name itQuizRepository. Add some questions to the quiz. You can use the questions from the following example, but you can create some questions yourself as well if you would like to do so. In a real app, the questions and answers, of course, would not be hardcoded but retrieved from a database or from a backend (note that we can always change this behavior later without the need to modify anything but this class):public class QuizRepository { public Quiz getQuiz(){ Quiz quiz = new Quiz(); Question q1 = quiz.addQuestion( "1. What is the largest city in the world?", "http://cdn.acidcow.com/pics/20100923/ skylines_of_large_cities_05.jpg" , "tokyo"); q1.addAnswer("delhi" , "Delhi, India"); q1.addAnswer("tokyo" , "Tokyo, Japan"); q1.addAnswer("saopaulo" , "Sao Paulo, Brazil"); q1.addAnswer("nyc" , "New York, USA"); Question q2 = quiz.addQuestion("2. What is the largest animal in the world?","http://www.onekind.org/uploads/a-z/az_aardvark.jpg" , "blue_whale"); q2.addAnswer("african_elephant" , "African Elephant"); q2.addAnswer("brown_bear" , "Brown Bear"); q2.addAnswer("giraffe" , "Giraffe"); q2.addAnswer("blue_whale" , "Blue whale"); Question q3 = quiz.addQuestion("3. What is the highest mountain in the world?","http://images.summitpost.org/medium/ 815426.jpg", "mount_everest"); q3.addAnswer("mont_blanc" , "Mont Blanc"); q3.addAnswer("pico_bolivar" , "Pico Bolívar"); q3.addAnswer("mount_everest" , "Mount Everest"); q3.addAnswer("kilimanjaro" , "Mount Kilimanjaro"); return quiz; } } - In the
GamePlayServicesActivityclass, add these three private members:private Quiz mQuiz; private int mScore; private int mQuestionIndex=0;
- Add the implementation for the
newGamemethod. We will get theQuizobject by asking the repository for it. After resetting the score and the question index, we call thedisplayQuestionmethod, which implements the UI logic by actually displaying the question, the possible answers, and a nice image:private void newGame(){ mQuiz = new QuizRepository().getQuiz(); mScore = 0; mQuestionIndex = 0; displayQuestion(mQuiz.getQuestions().get(mQuestionIndex)); private void displayQuestion(Question question){ TextView questionText = (TextView)findViewById(R.id.text); displayImage(question); questionText.setText(question.getText()); ArrayList<Answer> answers = question.getPossibleAnswers(); setPossibleAnswer(findViewById(R.id.button_1), answers.get(0)); setPossibleAnswer(findViewById(R.id.button_2), answers.get(1)); setPossibleAnswer(findViewById(R.id.button_3), answers.get(2)); setPossibleAnswer(findViewById(R.id.button_4), answers.get(3)); } private void setPossibleAnswer(View v, Answer answer){ if (v instanceof Button) { ((Button) v).setText(answer.getText()); v.setTag(answer); } } private void displayImage(final Question question){ new Thread(new Runnable() { public void run(){ try { URL url = new URL(question.getUri()); final Bitmap image = BitmapFactory.decodeStream(url.openConnection().getInputStream()); runOnUiThread(new Runnable() { @Override public void run() { ImageView imageView = (ImageView) findViewById(R.id.image); imageView.setImageBitmap(image); } }); } catch (Exception ex){ Log.d(getClass().toString(), ex.getMessage()); } } }).start(); }
The following steps can be used to add methods to a new game:
- At the end of the
onCreatemethod, we will call thenewGamemethod:newGame();
- Modify the
onClickmethod, so we can respond when a user clicks on any of the buttons. If any of the multiple choice buttons are being clicked on, we will call thecheckAnswermethod. Is it the correct answer we have chosen? How exciting:@Override public void onClick(View v) { switch (v.getId()){ case R.id.button_1: case R.id.button_2: case R.id.button_3: case R.id.button_4: checkAnswer(v); break; case R.id.button_test: startActivityForResult( Games.Leaderboards.getLeaderboardIntent( mGoogleApiClient, LEADERBOARD_ID), REQUEST_LEADERBOARD); break; } } - Add the
checkAnswermethod. We will compare the given answer against the correct answer for the question, and depending on the result, we will call theonGoodAnsweroronWrongAnswermethods. Depending on the answer, your progress gets decided: if the answer is wrong, the game is over and we display the leader board. - If there are no more questions, we will submit the users score and display the leader board as well. The leader board itself will take care of all the logic for it. Was the submitted score high enough to make your name appear on top of the list? Check it with the help of the following snippet:
private void checkAnswer(View v){ if (v instanceof Button){ Answer answer = (Answer)((Button)v).getTag(); if (mQuiz.getQuestions().get(mQuestionIndex). getCorrectAnswer().equalsIgnoreCase( answer.getId())){ onGoodAnswer(); } else{ onWrongAnswer(); } } } private void onWrongAnswer(){ Toast.makeText(this, getString( R.string.incorrect_answer), Toast.LENGTH_SHORT).show(); startActivityForResult( Games.Leaderboards.getLeaderboardIntent( mGoogleApiClient, LEADERBOARD_ID), REQUEST_LEADERBOARD); } private void onGoodAnswer(){ mScore+= 1000; Games.Leaderboards.submitScore(mGoogleApiClient, LEADERBOARD_ID, mScore); Toast.makeText(this, getString(R.string.correct_answer), Toast.LENGTH_SHORT).show(); mQuestionIndex++; if (mQuestionIndex < mQuiz.getQuestions().size()){ displayQuestion(mQuiz.getQuestions().get( mQuestionIndex)); } else{ startActivityForResult( Games.Leaderboards.getLeaderboardIntent( mGoogleApiClient, LEADERBOARD_ID), REQUEST_LEADERBOARD); } } - To be prepared for unit testing and code inspection let's add annotation support. Open the
build.gradlefile in theappfolder and add the dependency. Click on the Sync now link that appears after modifying the file:compile 'com.android.support:support-annotations:22.2.0'
- If an error appears that reads
Failed to resolve support-annotations, then click on the Install Repository and Sync Project link that appears. - If all goes well, then we can add annotations, for example, to the parameter of the
CheckAnswermethod:private void checkAnswer(@NonNull View v){ - In the
Questionclass, we could add a@Nullableannotation to thegetPossibleAnswersmethod, which could be the case if we did not provide any multiple choice option for a question:@Nullable public ArrayList<Answer> getPossibleAnswers(){ return mPossibleAnswers; } - Later, if we do some analysis, this will result in a warning for
GooglePlayServiceActivity, where we will be calling this method. We will have a closer look at that in the code analysis recipe:Method invocation 'answers.get(0)' may produce 'java.lang.NullPointerException'
You can play the game if you like and add some more annotations. Just don't play too long with them. Let's play the game instead!
Run your app and become number one on the leader board. Since currently you are the only test player, that cannot be too hard I guess.
You have just created your own quiz app, which you can extend with some other challenging questions if you like, as shown in the following screenshot:

We have investigated Google Play services and we have been using a MVC approach for our app. Also, we had a look at how to use annotations, which could help us to improve code after doing some code analysis.
We had only a sneak peek at patterns and how to apply them. Check out the Internet or get some great books to learn more about patterns. Also, refer to https://www.google.com/design/spec/patterns/app-structure.html.
Make sure you read the docs about support annotations as well. There are so many more possibilities using them. Check the docs out at http://tools.android.com/tech-docs/support-annotations.
Also, we have been using Google Play services for only a fraction. We just know how to sign in and how to use a leader board. If you want, you can check out the other options. For that, refer to https://developers.google.com/games/services/android/quickstart.
- Refer to Chapter 7, Content Providers and Observers.